LG 48CX

At least with the Xbox Series X, John from Digital Foundry says that firmware 04.30.10 on his CX allowed him to enable VRR and black frame insertion at the same time and, better yet, it worked.

However, he was only able to do so when Dolby Vision was enabled (not even HDR10), so he thinks this VRR + BFI may not necessarily be an intentional feature. Furthermore he did mention that you really need to keep the frame rate up, like maybe 90fps and above, or else the flicker gets bad (though obviously different people have different tolerances to flicker).

So now the question is if we could enable this VRR + BFI but on a PC? Perhaps making a custom EDID via CRU could help in this endeavor? I only have access to a 2019 OLED, so I can't test any of this out myself.

EDIT: The real question is if, possibly through EDID trickery, we could get VRR + BFI working withOUT HDR.

Digital Foundry video in question @ 42:31:
 
Last edited:
I don't mess with BFI but I can tell you that BFI lowers the peak brightness. The rule of thumb traditionally has been the same % it reduces the blur = around the same % it lowers the brightness. So if you did 50% blur reduction via BFI you'd have a 50% peak brightness reduction. That is pretty much incompatible with HDR to start with, imo even if you did 25% - 30% .. let alone the technical hurdles.

It could be very difficult to maintain a constant brightness level as the scene brightness changes were you using both VRR + BFI. Also, the peak brightness of OLEDs leaves no overhead for HDR 800/1000 to be cut down from on HDR material. There was one monitor that tried to do BFI + VRR it but the implementation was very bad in the end. That doesn't mean it's impossible but afaik no one has made a good implementation of BFI+VRR. Also, like I said, it doesn't address the higher color volume ranges for HDR issue besides.

We already have some great HDR games , probably more on console but there are some great ones on pc. Going forward we are going to have autoHDR on a lot more titles too, even if the highlights and light sources in autoHDR are more in the 450 - 600 nit range instead of up to 800 (to 1000 on hdr 1000 screens) like native HDR has. In my opinion, HDR is as much as.. probably more of an improvement than 4k resolution is on a highly capable HDR screen like a modern OLED tv.

he did mention that you really need to keep the frame rate up, like maybe 90fps and above, or else the flicker gets bad (obviously though different people have different tolerances to flicker)

Even if you can't consciously "see" flicker - it can still be eye-fatiguing and even headache inducing after a time. PWM monitors are generally avoided like the plague. As far as I'm aware it's only if you keep your frame rate at a solid -minimum-, without VRR, that BFI will it be invariable in regard to the frequency.

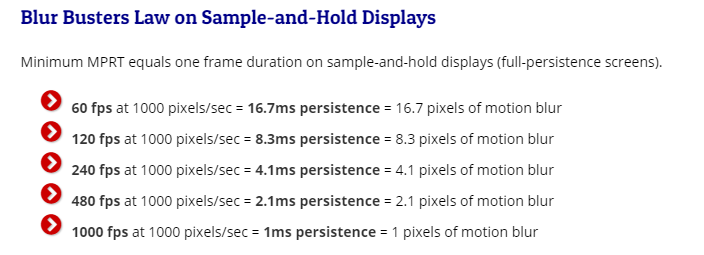
Part of the reason BFI looks better at 120fps solid instead of varying fpsHz rates it due to the variance but also because at 120fpsHZ you are already cutting the sample-and-hold blur by 50% compared to a 60fpsHz solid baseline just by nature of the 120fpsHz rate *without* BFI/strobing. I'd rather just run 100 to 110fps average where possible settings wise and get something like (70) 85fpsHZ <<<<< 100fpsHz avg >>>> 115fpsHz (117capped). At 4k or 3840x1600 that can be asking a lot. On easy to render old games or simpler games like cs:go and mobas, you could maintain 117fpsHz minimum (solid) though.

Theoretically we could get much higher Hz screens, especially with OLED response times but without using some kind of frame duplication (e.g. 100fps solid x4 for 400fpsHz, or 100fps solid basline x 10 for 1000fpsHz) - that higher hz won't come into play much. If we did get to those points it would cut the blur near to and equal to BFI.

From blurbusters.com

okw997S.png
 
Wow!
Did you know, that all current OLED's can do 2000Hz (pixel response time under 0.5ms)?
However, there is signalling interface that do support data bandwidth required to deliver that kind of image update speeds @2160p or even 1080p (not even DP2.1).
And there are currently no TCONs / display processors that do support that kind of display update frequences (refresh is not a correct word, as it is related to refreshing CRT phosphors, and is no longer valid for LCD/OLED panels).
https://tftcentral.co.uk/reviews/lg_cx_oled
View attachment 404196
And I will really heartily welcome any 2160p or better MicroLED display that is smaller than 100", costs under 50K$/k€ and is available during the current decade.
I was meaning for VR use. For lithographic processes the microLED will not be beaten by OLED. Sure OLED can be as fast (actually it's much slower, LEDs can have 10ns rise time) but the real advantage is massive heatsinking and power density possibilities (e.g. crazy HDR/contrast levels) via silicon. Microled is already available and viable and proven, I work with it all the time. But only if you want a 10m wide screen ;)

For now I'll stick with OLED for a darker room as it's the best overall tech for PC display panels (for most scenarios anyway), hands down. In my books ;D

....

=================================================================================================================


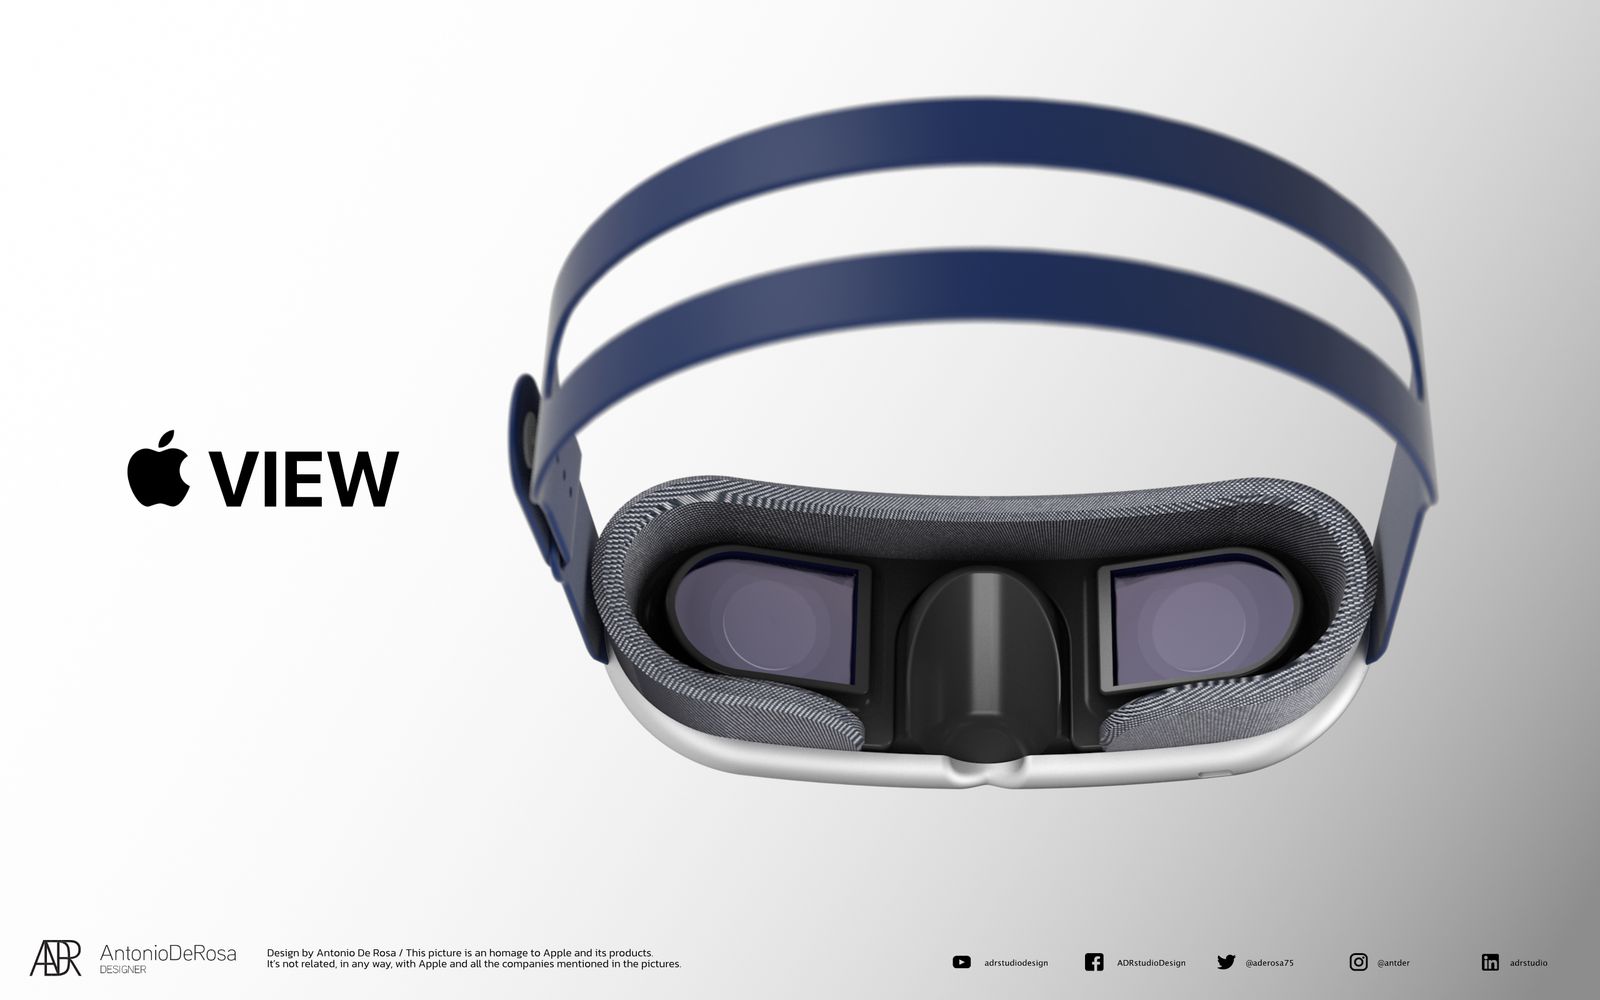
https://www.macrumors.com/roundup/apple-glasses/


516752_apple-view-concept-right-corner.jpg


516753_apple-view-concept-back.jpg


Micro OLED for both the headset and the glasses supposedly:


bad rez on the lightweight AR glasses so they seem like they are mostly for HUD type things and simple graphics compared to the actual "dual 8k" 8k resolution headset.

==============================

https://uploadvr.com/ps5-vr-headset-hdr-oled-aaa/


===================================

Valve and Facebook are also working on next gen headsets. Valves is probably going to microOLED and they are also probably going to use varifocal optic lenses (thin clear Liquid crystal lenses stacked with polarizers that change your focal point). This would make VR more realistic compared to how our normal vision works, and could work better with foveated rendering, using lower resolution outside of what you are focused on. Facebook is prob also going to use Varifocal Lenses but idk if their headest will be microOLED (probably though gauging by what everyone else is doing and what optical/display tech companies are being tapped).

So as you can see, OLED display tech isn't going away any time soon. Quite the opposite for the near future.
 
I don't mess with BFI but I can tell you that BFI lowers the peak brightness.

Whoops I'm a derp and forgot to mention that I was mainly thinking that, possibly through EDID trickery, we could get VRR + BFI working withOUT HDR.

But even with having to rely on HDR being enabled, to completely write-off the idea of VRR+BFI just because of the reduction in brightness seems incredibly narrow-focused on nothing but the HDR experience since we all know that the "darkroom experience" is one of OLED's key strengths as was just mentioned by N4CR in the post right after yours. Heck the "darkroom experience" is even one of the biggest reasons I still use a CRT in an LCD+CRT dual-monitor setup while the other reason is CRT's motion resolution, and OLED + BFI is the only display tech that isn't a CRT I know of that can properly handle both attributes at the same time.

(also I've never actually played a game that supported HDR, and yes I know that both Xbox Series S/X and Windows 11 support auto-HDR for non-HDR software, but I have none of those and have no interest in those consoles or that OS; heck I've never even owned an Xbox, not to mention my internet is only 10mbps down, and I also have gone the Windows 7 --to-> Linux Mint route OS-wise and never even had Win8/8.1/10/etc.)


EDIT: And regarding flicker = fatigue, viewing bright images (e.g. HDR) in a dark environment also cause fatigue, and ideally you would turn the brightness down below standard SDR levels anyway in a darkroom environment (which is what I do with the aforementioned CRT).

This tells me that you either only use your OLED display in a well-lit room even at night (which to me feels like a waste) or you simply never view HDR content at night, which farther makes me question why you focused half of your post on HDR anyway. Maybe you live in a latitude that has lots of daylight all year round? (I live in a northerly latitude that ends up seeing sunset at like 5pm, and I'm naturally a night owl to boot)
 
Last edited:
Whoops I'm a derp and forgot to mention that I was mainly thinking that, possibly through EDID trickery, we could get VRR + BFI working withOUT HDR.

But even with having to rely on HDR being enabled, to completely write-off the idea of VRR+BFI just because of the reduction in brightness seems incredibly narrow-focused on nothing but the HDR experience since we all know that the "darkroom experience" is one of OLED's key strengths (and is my primary interest in OLED) as was just mentioned by N4CR in the post right after yours.

(also I've never actually played a game that supported HDR, and yes I know that both Xbox Series S/X and Windows 11 support auto-HDR for non-HDR software, but I have none of those and have no interest in those consoles or that OS; heck I've never even owned an Xbox, not to mention my internet is only 10mbps down, and I also have gone the Windows 7 --to-> Linux Mint route OS-wise and never even had Win8/8.1/10/etc)

This is interesting. Any dolby vision games on PC that can be used to test this out? I don't have an XSX. Would be fantastic if LG made this an official feature to give us the choice between peak brightness or motion clarity. Let the user decide how they want to play their games.
 
My CX says it's 120V 50/60hz, so should be usable with a relatively cheap transformer.

Since at least as far back as the B6, they've all worked fine on 220v. I'm only had one LG that didn't and it was 2012 model, step down transformer worked fine with it though, no issues with 50 hz.
 
Whoops I'm a derp and forgot to mention that I was mainly thinking that, possibly through EDID trickery, we could get VRR + BFI working withOUT HDR.

But even with having to rely on HDR being enabled, to completely write-off the idea of VRR+BFI just because of the reduction in brightness seems incredibly narrow-focused on nothing but the HDR experience since we all know that the "darkroom experience" is one of OLED's key strengths as was just mentioned by N4CR in the post right after yours. Heck the "darkroom experience" is even one of the biggest reasons I still use a CRT in an LCD+CRT dual-monitor setup while the other reason is CRT's motion resolution, and OLED + BFI is the only display tech that isn't a CRT I know of that can properly handle both attributes at the same time.

(also I've never actually played a game that supported HDR, and yes I know that both Xbox Series S/X and Windows 11 support auto-HDR for non-HDR software, but I have none of those and have no interest in those consoles or that OS; heck I've never even owned an Xbox, not to mention my internet is only 10mbps down, and I also have gone the Windows 7 --to-> Linux Mint route OS-wise and never even had Win8/8.1/10/etc.)


EDIT: And regarding flicker = fatigue, viewing bright images (e.g. HDR) in a dark environment also cause fatigue, and ideally you would turn the brightness down below standard SDR levels anyway in a darkroom environment (which is what I do with the aforementioned CRT).

This tells me that you either only use your OLED display in a well-lit room even at night (which to me feels like a waste) or you simply never view HDR content at night, which farther makes me question why you focused half of your post on HDR anyway. Maybe you live in a latitude that has lots of daylight all year round? (I live in a northerly latitude that ends up seeing sunset at like 5pm, and I'm naturally a night owl to boot)


Constant high frequency flickering induced eye fatigue (especially if you allow the rate to vary like PWM) is really not comparable to displaying realistic highlight and light source color volumes in HDR throughout varying scenes, camera panning and FoV movement. That's really being insincere imo.

PWM / flickering is like taking a high frequency strobe light shutter to your eyes on the full frame of the screen the entire time you are staring at the screen. It's like a constant full-screen stutter to your eyes/brain when it's in a near margin of consciously seeing it or not.

also I've never actually played a game that supported HDR,

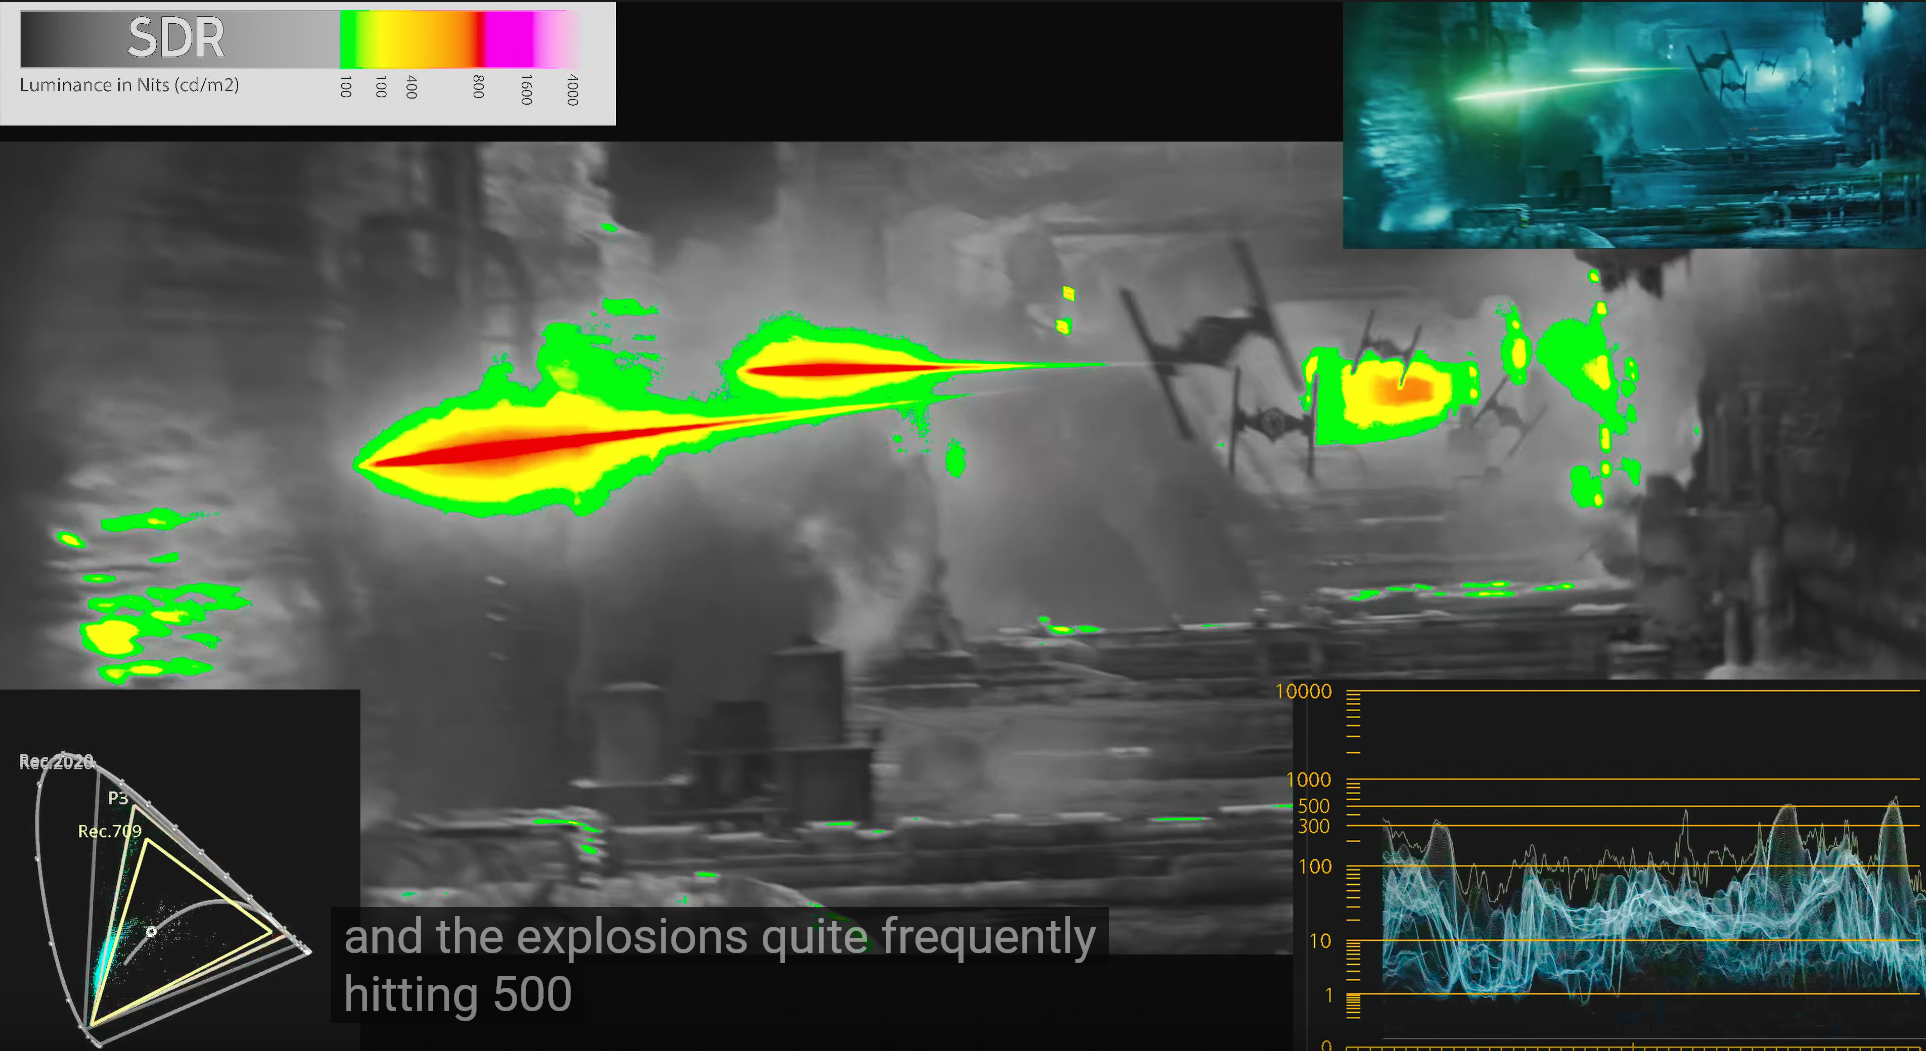
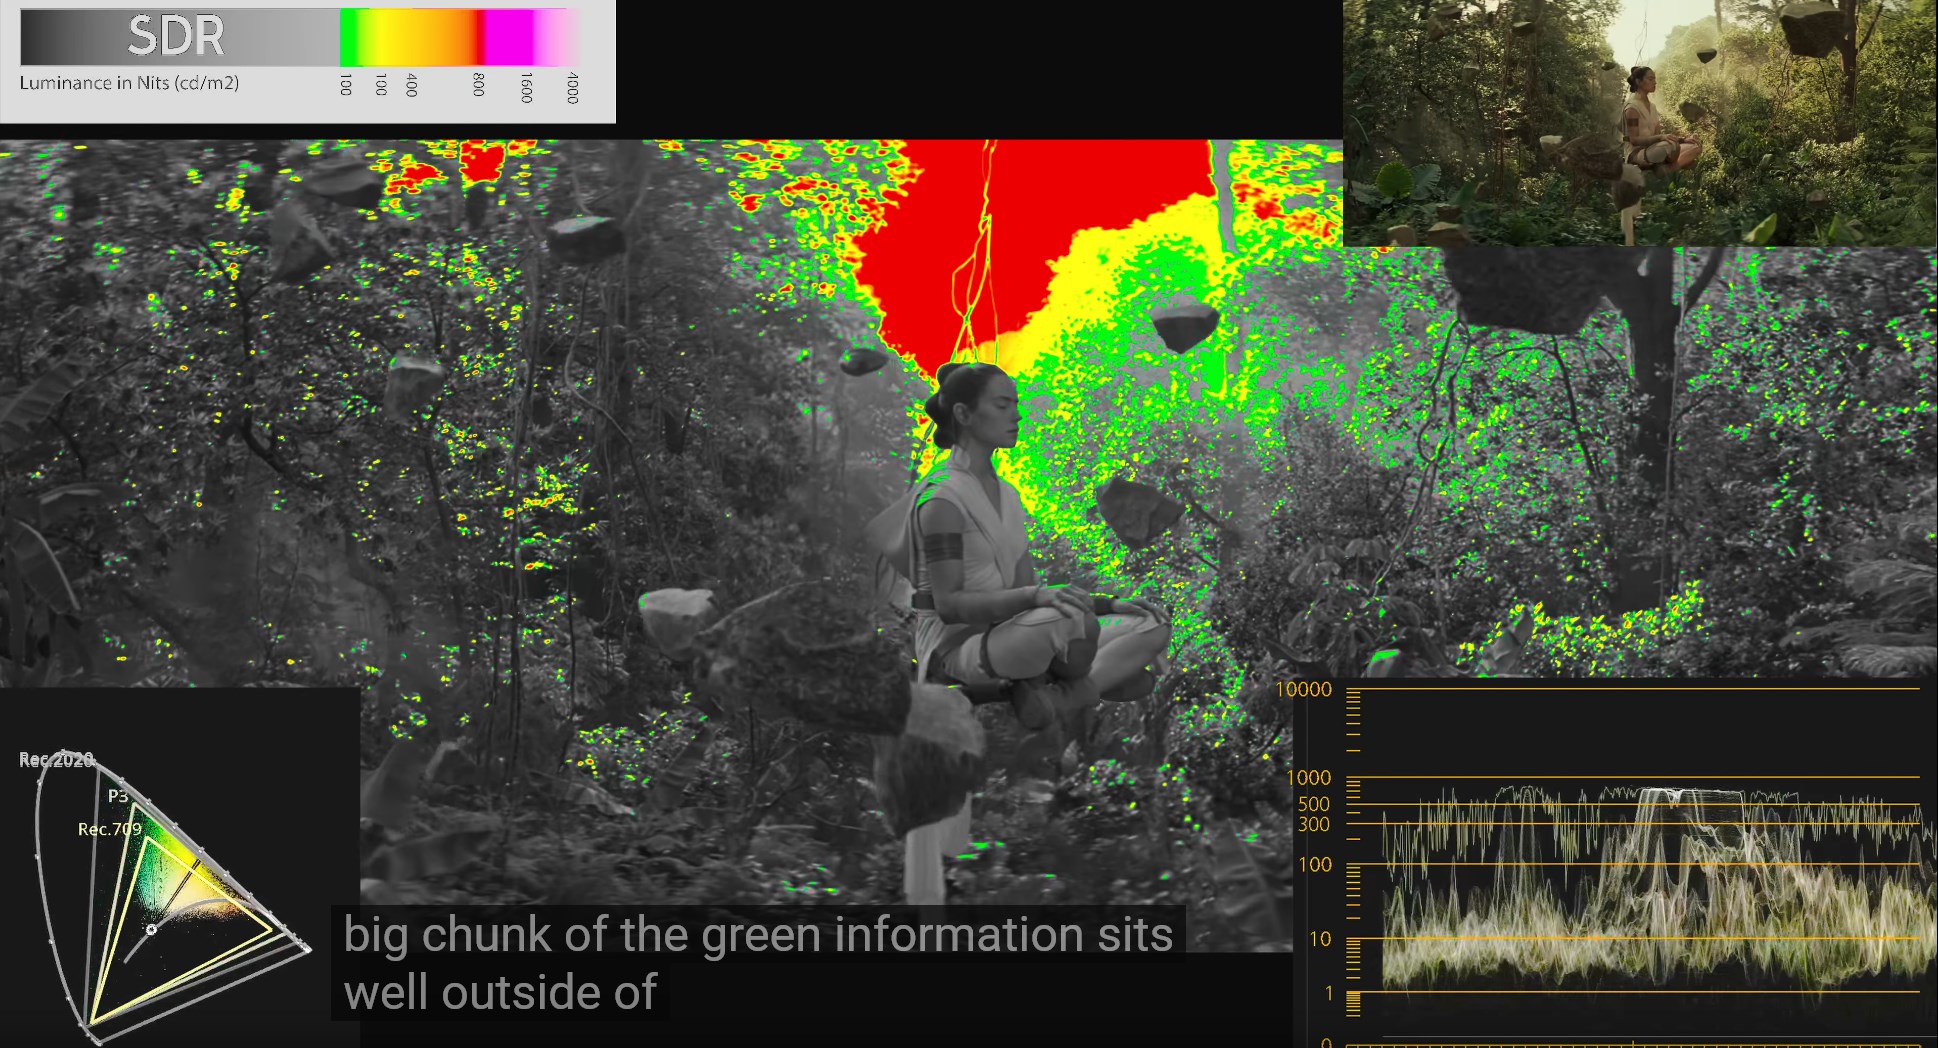
HDR is NOT taking a SDR screen's relative values and turning the screen brightness up 10x. The bulk of a scene is still in SDR ranges. HDR's higher, more realistic color volumes (the "brightness" aspect of HDR) is typically highlights and point light sources, much of that is in the 200 - 600 nit range of small areas in dynamic moving scenes and switching cinematography.


Heck the "darkroom experience" is even one of the biggest reasons I still use a CRT in an LCD+CRT dual-monitor setup while the other reason is CRT's motion resolution

Yes CRTs have a relatively low peak brightness and look more contrasted and saturated in dimmer viewing environments. I used a FW900 next to different LCDs for years. They eventually go dimmer and/or bloom as they slowly die with age too. People are sometimes using 80nit peak on a fw900 but a brand new one that hasn't suffered dimming with age is capable of going to like 115nit peak.

--------------------------------------------------------------------
Reference standard is 100nit white. Some people use 120 or 200 on modern screens based on how bright their room is. With an oled, or any real theater media viewing, you shouldn't be in a powerfully bright lighting environment though imo.

The SDR reference is 100nit white , Peak luma range 100 to 250 nits . A brand new non-aged crt can do 115nit peak or so. Those reference values would appear dim and washed out in brighter than reference viewing environments

https://www.lightillusion.com/viewing_environment.html
If you were to calibrate a home TV within a Home Viewing Environment to the above Reference Standards for SDR displays the on-screen image would be far too dull and washed-out with the imagery nothing like that intended by the program maker. To arrive at a viewing image that is as similar as possible to look & feel of the graded intent means increasing the peak brightness, as well as reducing the EOTF value, so the on-screen imagery can better counter the bright viewing environment.


Obviously, if you are serious about watching accurate imagery at home you will control your viewing environment. But even then, there may be compromises that have to be accepted, and understanding that will enable the best alternative calibration to be defined.


The issue is that there are no standard approaches as to how to adjust TV display calibration to accurately counter the variable environmental settings within a standard home viewing environment. This is an area in desperate need of research, and is something the BBC have attempted to look at with their HLG HDR standard's System Gamma value, as HDR viewing environments are far more critical than SDR.

https://www.lightspace.lightillusion.com/uhdtv.html

UHDTV - HDR and WCG
more detail can be seen in the brighter areas of the image, where existing SDR images simply clip, or at least roll-off, the image detail.

----------------------------------------------------------

brightness seems incredibly narrow-focused on nothing but the HDR experience since we all know that the "darkroom experience" is one of OLED's key strengths

Oled is of course better viewed in dim to dark viewing environments but HDR itself is designed for dim to dark room viewing environments.

https://www.lightillusion.com/viewing_environment.html
Specifications for a HDR colour critical Reference Viewing Environment are also defined by various standards bodies, including SMPTE and the ITU-R. Specifications for a Home Viewing Environment do not presently exist, due in part to issues with the absolute nature of the PQ HDR specification.


The following defines the basic standards for a HDR Reference Viewing Environment, and match those for HDTV.


  • Monitor surround luminance to be 5 nits*
  • Colour of monitor surround to be D65
  • Surround extent to be 90° horizontal, 60° vertical
  • Remaining surfaces to be dark matte to prevent stray light
  • Average room Illumination ≤ 5 nits
  • Viewing distance 1.5 screen height**
  • Viewing angle to define < 0.001 Δuv

5 nits*: A 5 nits surround is defined due to the potentially low luma of shadow detail, based on the specified EOTF for both PQ and HLG based HDR. This is part of the issue with home viewing environments, where the surround illumination is often difficult to control, especially down to the specification levels.


1.5 screen height**: This relates to the UHD TV screen resolution, rather than HDR (High Dynamic Range).

Its format is ultimately designed for absolute values (though you can break that rule with higher brightness settings that distort the scale of it's absolute curve for higher brightness viewing environments). You aren't supposed to be looking at your world. The screen is supposed to be your world/theater/light source/viewing environment almost like VR in a way. All screens also have limits of the % of screen vs the highest brightness ranges. 50%, 25% screen area, 10%, etc. in graduated amounts. The brightest amounts can only be shown on small %'s of the screen at any given time.

Examples showing that the bulk of the scene is in SDR range. The highlights and light sources make it look amazing though:

7X2ncu9.png


kaag2Cm.jpg


These highlights and brighter areas add realism but they are nowhere near the nits you could experience in real life highlights, reflections, and light sources. However I'd still much rather view something that looks more realistic rather than have a shutter going off in front of my eyeballs constantly. To me there is no comparison between the two.
also I've never actually played a game that supported HDR,
Whether you care about HDR or not (after apparently not even experiencing it in a game :confused: ) - more native HDR games and ~60% HDR via autoHDR gaming content will be available and it does look incredibly better than SDR content on a proper HDR screen.

So we'll have a growing library of native HDR titles (and atmos surround titles) plus what could be a large library of autoHDR titles with windows 11. Whether true or not remains to be seen but It has also been rumored that autoHDR will eventually be brought to windows10.
For the console crowd, xbox x has autoHDR. The PS5 also is getting auto HDR but incredibly/infuriatingly -- sony is locking it to their newer sony bravia tvs alone - even though it could theoretically work with any dolby vision capable display (and probably even with any HDR 10 display just like win11 and xbox if they wanted to engineer the firmware to).

Some of the improvements of HDR: https://en.wikipedia.org/wiki/High-dynamic-range_video
  • Highlights (i.e. the brightest parts of an image) can be brighter, more colorful, and more detailed.[2]
  • Shadows/lowlights (i.e. the darkest parts of an image) can be darker and more detailed.[2]
  • More realistic luminance variation between scenes (such as sunlit, indoor, and night scenes).[2]
  • Better surface material identification.[2]
  • Better in-depth perception, even with 2D imagery.[2]

the Windows 7 --to-> Linux Mint route OS-wise and never even had Win8/8.1/10/etc
For the majority of gamers experiencing the highest gaming performance, the most streamlined pc gaming performance, and the most immediate availability of full gaming features and fixes across the board - they will be on windows 10 and most likely eventually windows 11.

narrow-focused on nothing but the HDR experience

HDR on a quality HDR screen is arguably a bigger improvement than 4k.
It's not turning a SDR screen's brightness knob up, it's opening it's range taller (both higher and lower) for colors, detail-in-colors and dark-detail. It's a more colorful and detailed screen on a much taller and deeper range, and on a quality screen that is side by side at the same time and dynamically throughout the content. On an oled, that side by side is down to the emissive pixel.
SDR is a narrow band that clips or crushes, rolls off of detail-in-color and lowlights/detail-in-darks on both ends, even in the same scenes. So you completely lose that detail on both ends.
HDR has way more color and way more detail shown throughout the whole light and dark range.. also better surface material ID and better in-depth perception (even in 2D) due to the high side-by-side contrast and increased color and shadow detail.

051617_av_vet_color_vol.jpg


Other than a few TV shows and some anime stuff - I prioritize all of my movie watching to HDR (dolby vision where possible) and I also prioritize HDR games now. HDR is that good. AutoHDR is great too. I hope it opens up a lot of games to 50% - 60% HDR volume. To me (for games currently, there are a lot of HDR movies) it's like when there was a limited library of content that was 1080p or 4k before they each became ubiquitous.. except imo it's even more impactful (provided you have a really high quality HDR display).
 
Last edited:
Other than a few TV shows and some anime stuff - I prioritize all of my movie watching to HDR (dolby vision where possible) and I also prioritize HDR games now. HDR is that good. AutoHDR is great too. I hope it opens up a lot of games to 50% - 60% HDR volume. To me (for games currently, there are a lot of HDR movies) it's like when there was a limited library of content that was 1080p or 4k before they each became ubiquitous.. except imo it's even more impactful (provided you have a really high quality HDR display).

AutoHDR is not as great as you might think it is. I have Windows 11 and have extensively tested a bunch of SDR games with the AutoHDR function and it only works "OK" at best. I guess one should not expect it to perform like a real HDR game but honestly I was more disappointed than pleased with the results. I have tested Witcher 3, Greedfall, Rise of the Tomb Raider, and many more. I would say it does indeed do something but it isn't a massive game changer. If I had the choice of using a fully implemented HDR experience and foregoing BFI, I would absolutely forego BFI. But if it was an "Auto HDR" game, I would rather just stick to the SDR image and use BFI + VRR for the absolute best motion clarity because AutoHDR really just isn't a big difference over SDR. If I was playing Far Cry 6 which looks absolutely incredible in HDR, I would just turn BFI off and enjoy the full native HDR experience the game has to offer. But if I'm going back and playing something like Rise of the Tomb Raider where the AutoHDR doesn't really impress me, I would happily take a BFI + VRR experience instead. Of course Microsoft can always continue to refine and improve the AutoHDR itself over the years so my preference may also change depending on that.
 
  • Like
Reactions: elvn
like this
Haven't tried autoHDR yet so I'll just take your opinion as it is for now on that non-native HDR ~ sdr upscaling to partial HDR color volumes. I appreciate your opinion on it having actually used it. It could be a matter of preference when talking about "quasi" or "1/2 HDR" like you said though.

From the heat maps like the image I linked below it appeared to increase the highlights up to 50% comparing it between SDR and native HDR. If that was the case I'd take it.
The increased color and highlights and also the detail shown. I am wondering if autoHDR also increases the detail in blacks just as much as it does the color volume, dropping the bottom out with a lot more "lowlights" detail like native HDR does. Because combined and side by side the expanded ranges of highlights and "lowlights" create a ton of detail in native HDR. Even a gain of near half as much would be considerable to me compared to a narrow SDR range.

From the examples it looked up to halfway to native nits/color temp and highlight area. Of course that could be marketing. I'll have to see how it looks whenever I decide to upgrade to win11 (or if they someday update win10 to support autoHDR).

heatmap.jpg


In regard to BFI:

..are you maintaining 120fps (117fps capped) minimum/solid?
or
.. are you capping your Hz to a lower ceiling and maintaining a matching fpsHz minimum solidly in your game and graphics settings?
.. are you getting VRR+BFI like someone claimed and at a consistent brightness without exacerbating flicker or other artifacts?

...Are you instead using BFI without VRR and without exceeding the Hz with your frame rate - allowing your frame rate to fluctuate wildly, or are you only using BFI playing a game/settings that allow the bottom of your frame rate graph to be high enough to avoid fluctuation?
.... Which BFI setting are you using low/med/high ?

-----------------------------------

As I remembered it BFI works best, exhibiting the lowest flicker or eye fatigue and the least blur, when you already run your fpsHz at 120(117capped) so that:
.... you are already getting 50% sample and hold blur reduction (compared to 60fpsHz baseline)by nature of the 120fpsHz rate before the BFI is considered and added.
....you aren't causing stroboscopic effects or PWM like temporal variance by combining changing the frame rate with BFI.

NM64 mentioned that the video he linked said you needed to keep 90fps+ to avoid the worst flicker (probably more).

If that's true then optimally you'd need an easy to render game or considerably lower graphics setting on modern demanding games, especially at 4k resolution. That also doesn't touch on raytracing as a potential issue dropping the frame rate again.

I'm definitely for dialing settings in to get 100fps average or better wherever possible, even without BFI. The motion definition/pathing/articulation is much higher and smoother (more unique pages in an animated flip book) and it cuts the blur down some even w/o BFI.

When articles like the tft central review mention 60Hz and 120Hz they usually mean AT 60fps solid (minimum) and AT 120fps solid (minimum), because they are testing with a simple ufo bitmap graphic and a pursuit camera:
tftcentral review of the LG CX, BFI section:
At 60Hz the BFI behaves a bit differently. In the low and medium modes it is unfortunately not in sync with the refresh rate and you get two “strobes” per refresh rate cycle. It inserts a black frame every 8.33ms which has the negative impact of causing a doubled ghost image to moving content and doesn’t look very good. You can see this clearly from the pursuit camera photos above. If you switch up to the high mode then the “strobing” is brought in sync with the refresh rate at 60Hz and you get a much clearer picture with great motion clarity again. It makes a huge difference relative to normal mode (BFI turned off) at 60Hz making the moving image much sharper, clearer and easier to track. The issue though here is that the BFI is then every 16.67ms which introduces a noticeable flicker to the screen (at 60Hz frequency). For motion and gaming this is harder to spot, but could still cause you issues with eye strain and discomfort. It’s certainly very noticeable for static images when you first turn it on. Some people may like it still and at least at 60Hz it’s a usable option that really helps with motion clarity. We would not recommend using the low or medium


----------------

https://forums.blurbusters.com/posting.php?mode=quote&f=2&p=61438

How To Reduce Discomfort With Strobing

1. Use framerate = refreshrate = stroberate with high quality strobing such as Blur Busters Approved
2. Use a VSYNC ON technology (unless you can run VSYNC OFF frame rates far beyond refresh rate).
3. If you hate lag, use Low-Lag VSYNC HOWTO, or RTSS Scanline Sync, since VSYNC OFF can make strobing sometimes bad/uncomfortable especially when you're not able to do overkill VSYNC OFF frame rates far beyond refresh rate.
4. Lower your refresh rate below your minimum frame rate, 120Hz strobing looks better.
5. Use refresh rate headroom (120Hz strobing on 240Hz panels look better than 120Hz strobing on 144Hz panels)
6. Strobing amplifies jitters/stuttering. Control your stutters if you want to use strobing!
7. Strobing is bad for frame rates far below refresh rates. Raise your frame rate or lower your refresh rate until framerate=Hz. 120Hz can be superior to 240Hz sometimes, if motion blur reduction is your priority.
8. Put mouse into high-DPI operation (1600dpi or 3200dpi if your game supports low-sensitivity well) to smooth-out your slow mouseturns.

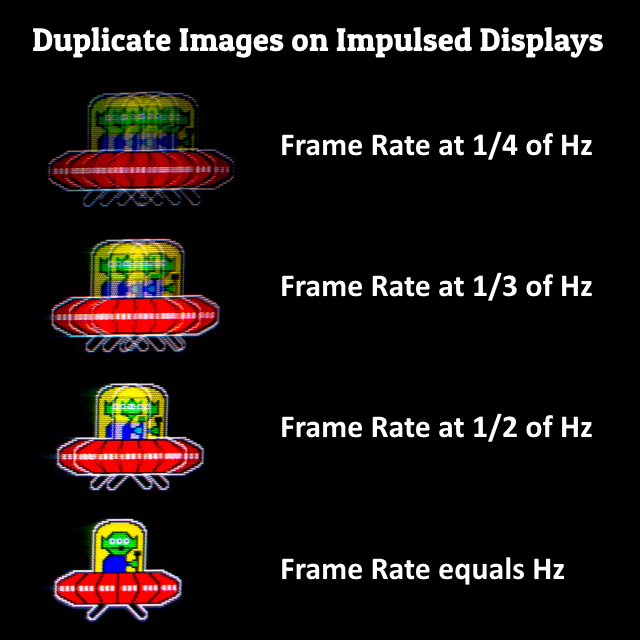
If you strobe at too high a refresh rate, you can get strobe crosstalk -- www.blurbusters.com/crosstalk -- which looks awful and can be just as bad as PWM dimming, especially for frame rates far below Hz!

You get duplicate images if your frame rate is far below refresh rate during strobing. This produces duplicate images, like PWM dimming can also do (multi-strobing per refresh cycle).

Some people get more discomfort/nausea from motion blur, so that the "single-pulse-per-Hz-PWM" of strobing can be more eye-pleasing than the alternatives.

How To Avoid discomfort/nausea from duplicate images:
- Stutters will generate random duplicate images, and feel jittery, fix your stutters as much as you can!
- Make sure you guarantee framerate=Hz so don't let framerate go below Hz often. Lower refresh rate can make picture better!
- Easiest is to use VSYNC ON at a refresh rate at or below your game's 0.1%-0.5% worst frametimes. This avoids stutters.
- If you must, must use VSYNC OFF, try to run framerates well beyond refresh rate. Preferably at over 2x margin, but do your best.
- Slow turns on a 400dpi or 800dpi mouse will often strobe duplicate-image at slow mouseturn speeds, use 1600dpi or 3200dpi + low sensitivity with a newer mouse, if you want TestUFO-smooth slowturns. Be noted, older engines such as CS:GO has wonky effects on high DPI + low sensitivity operation, while some newer engines such as Valorant is 3200dpi-friendly + low-sensitivity.


strobed-display-image-duplicates.png
 
Last edited:
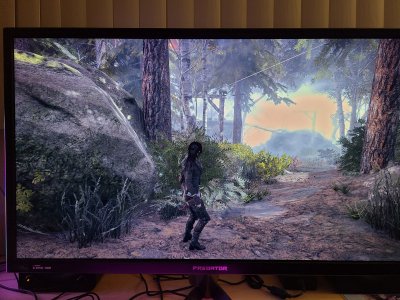
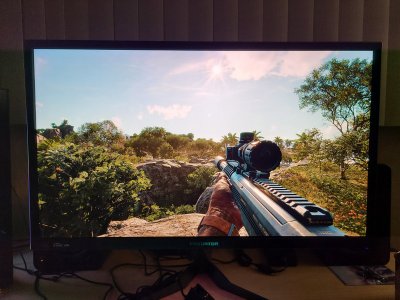
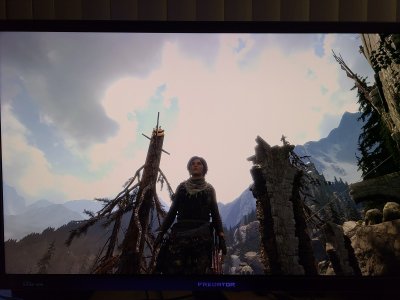
Oh I would not use BFI unless I could actually maintain over 100fps at all times, so really it's just older titles that either lack AutoHDR support or just has a lackluster implementation AND are super easy to run at >100 FPS on the latest gen of GPUs. I guess I should also clarify on why exactly I think that AutoHDR isn't so great. Basically from my testing, AutoHDR has either not given specular highlight detail enough brightness (i.e flames in a campfire have no impact at all and look barely any brighter than SDR), or it simply blows out highlight detail entirely. Here's an example picture from Rise of the Tomb Raider, and no that isn't just my camera doing weird things, that is how the image actually looks. I guess it's suppose to be fog/mist? But basically AutoHDR completely blows out all the detail to pure white and just blasts that area with brightness. Looking at the sun in the Witcher 3 also has the same effect where you can't even make out the sun anymore because that area of the screen has just been completely blown out. I tested on both my CX and X27 and the results were the same. Meanwhile in Far Cry 6 notice how all bright highlight detail is properly maintained, HDR set to 1100 nits on my X27. AutoHDR also seems to do absolutely nothing for the color gamut, only brightness levels. So it seems like they are just taking an SDR color space, and then trying to give specular highlight detail some extra brightness, but so far as either not given it enough brightness, or has completely blown out the detail entirely. The library of AutoHDR titles needs to be expanded as well to older titles, as it seems like the 2013 Tomb Raider reboot and Left 4 Dead completely lack any AutoHDR support. AutoHDR also has NO brightness sliders, what you get is what you get. This could also be the reason why it's not performing as great because who knows just what peak brightness level the AutoHDR is shooting for here and then our displays just have to try and tone map it as best as it can. HDTV test has demonstrated what happens when a game has a peak brightness that is too far too high with Microsoft Flight Simulator targeting a whopping 10,000 nits which might be the case with AutoHDR.
 

Attachments

  • 20211101_004058.jpg
    20211101_004058.jpg
    743.5 KB · Views: 1
  • 20211008_195651.jpg
    20211008_195651.jpg
    539 KB · Views: 1
Last edited:
  • Like
Reactions: elvn
like this
Oh I would not use BFI unless I could actually maintain over 100fps at all times, so really it's just older titles that either lack AutoHDR support or just has a lackluster implementation AND are super easy to run at >100 FPS on the latest gen of GPUs. I guess I should also clarify on why exactly I think that AutoHDR isn't so great. Basically from my testing, AutoHDR has either not given specular highlight detail enough brightness (i.e flames in a campfire have no impact at all and look barely any brighter than SDR), or it simply blows out highlight detail entirely. Here's an example picture from Rise of the Tomb Raider, and no that isn't just my camera doing weird things, that is how the image actually looks. I guess it's suppose to be fog/mist? But basically AutoHDR completely blows out all the detail to pure white and just blasts that area with brightness. Looking at the sun in the Witcher 3 also has the same effect where you can't even make out the sun anymore because that area of the screen has just been completely blown out. I tested on both my CX and X27 and the results were the same. Meanwhile in Far Cry 6 notice how all bright highlight detail is properly maintained, HDR set to 1100 nits on my X27. AutoHDR also seems to do absolutely nothing for the color gamut, only brightness levels. So it seems like they are just taking an SDR color space, and then trying to give specular highlight detail some extra brightness, but so far as either not given it enough brightness, or has completely blown out the detail entirely. The library of AutoHDR titles needs to be expanded as well to older titles, as it seems like the 2013 Tomb Raider reboot and Left 4 Dead completely lack any AutoHDR support. AutoHDR also has NO brightness sliders, what you get is what you get. This could also be the reason why it's not performing as great because who knows just what peak brightness level the AutoHDR is shooting for here and then our displays just have to try and tone map it as best as it can. HDTV test has demonstrated what happens when a game has a peak brightness that is too far too high with Microsoft Flight Simulator targeting a whopping 10,000 nits which might be the case with AutoHDR.


Ah thanks for the clarification and the examples. That sounds like bad dynamic tone mapping that would clip details similar to the examples in this thread:

https://discuss.pixls.us/t/luminance-hdr-how-to-prevent-highlights-from-blowing/724

If you recall, when trying to play hdr on windows desktop in mpc it won't read the metadata so defaults to a HDR4000 curve unless you manually set it with madVR to 800 or 1000 for example so you might be on the right track as to what it's doing. Hopefully it is autoHDR growing pains and the wrinkles will be ironed out more as time goes on.
 
Last edited:
Ah thanks for the clarification and the examples. That sounds like bad dynamic tone mapping that would clip details similar to the examples in this thread:

https://discuss.pixls.us/t/luminance-hdr-how-to-prevent-highlights-from-blowing/724

If you recall, when trying to play hdr on windows desktop in mpc it won't read the metadata so defaults to a HDR4000 curve unless you manually set it with madVR to 800 or 1000 for example so you might be on the right track as to what it's doing. Hopefully it is autoHDR growing pains and the wrinkles will be ironed out more as time goes on.

Possibly. My X27 can't tone map, at least I don't think so? I'm assuming the way it works is that anything above 1100 nits it will just hard clip because it doesn't have the brightness level required to display the detail, so in that case just how much brightness is the game calling for on that spot? 4,000 nits? 10,000 nits? Seems pretty crazy brightness for what is suppose to just be some fog/mist from the waterfall lol. Meanwhile the campfires are extremely dull looking as if it's SDR.
 
Possibly. My X27 can't tone map, at least I don't think so? I'm assuming the way it works is that anything above 1100 nits it will just hard clip because it doesn't have the brightness level required to display the detail, so in that case just how much brightness is the game calling for on that spot? 4,000 nits? 10,000 nits? Seems pretty crazy brightness for what is suppose to just be some fog/mist from the waterfall lol. Meanwhile the campfires are extremely dull looking as if it's SDR.

When I was newer to window's HDR Monstieur thankfully explained it to me much earlier in the thread, in regard to the LG CX at least:


The curves are arbitrarily decided by LG and don't follow a standard roll-off. There does exist the BT.2390 standard for tone mapping which madVR supports (when using HGIG mode).

LG's 1000-nit curve is accurate up to 560 nits, and squeezes 560 - 1000 nits into 560 - 800 nits.
LG's 4000-nit curve is accurate up to 480 nits, and squeezes 480 - 4000 nits into 480 - 800 nits.
LG's 10000-nit curve is accurate up to 400 nits, and squeezes 400 - 10000 nits into 400 - 800 nits.

I would use only the 1000-nit curve or HGIG for all movies, even if the content is mastered at 4000+ nits. All moves are previewed on a reference monitor and are designed to look good at even 1000 nits. It's fine to clip 1000+ nit highlights. HGIG would clip 800+ nit highlights.

LG defaults to the 4000-nit curve when there is no HDR metadata, which a PC never sends.


But he also said:
The 4000-nit curve results in reduced clipping, not more clipping, by reducing peak brightness and rolling off above 480 nits.
..
So the 4000nit curve compresses the high end inaccurately.

So I'm not sure what kind of curve windows autoHDR is working with.

I also saw this comment on a reddit thread which might explain that (lacking tools/sliders in windows autoHDR settings to do it more easily as you said).

https://www.reddit.com/r/OLED_Gaming/comments/ptw8z4/answering_questions_on_auto_hdr_windows/

https://www.reddit.com/user/PartyLocoo/
PartyLocoo · 7d

LG C1
Have you tried changing the default Windows tone mapping by using CRU? It is under extension block, HDR static metadata. From what I've understood it should change Max luminance from 1499 to the input value.
 
Last edited:
A reply from the OP of that reddit thread:

they are prob running HGIG or nothing at all. So far, AutoHDR has never really went as far as going very far in the nits and I tried adjusting the slider and it still shows a difference at the highest level. I highly recommend trying to use DTM with black level set to low. For some reason, black level Auto doesn't actually use the proper black levels...in fact, it's washed out af. I'm using low and everything is fine now. I don't recall having tried to change max luminance, but I wouldn't recommend it as we don't know what's actually happening in the background, in auto hdr and as I said, it still shows a difference in luminance, when the slider is adjusted to the maximum.

Also, in reading that thread, it appears there is an HDR intensity slider in autoHDR.

From the thread starter again in a reply to someone else:

u/TeeHiHi avatarTeeHiHi 39d

Unfortunately windows still applies the "1499,99 nits capable" value for HDR displays... No matter how popular. Which is weird, because they can read but capabilities on laptops with hdr screens...

All you get is "hdr intensity" which is basically just max brightness. That's why I use it with DTM :/ it still does an amazing job, but yes, hgig would be great and I don't see a technical reason why it wouldn't work, since it does work on some internal displays and on external ones on the Xbox.
 
Apparently there is a HDR brightness slider so you could experiment with turning the HDR brightness down , using a dim viewing environment in your room, and seeing if Dynamic Tone Mapping looks better than HGiG or not. Also try putting black level on low instead of auto.

From:
https://www.rockpapershotgun.com/how-to-enable-auto-hdr-in-windows-11

How to enable Auto HDR using Xbox Game Bar​


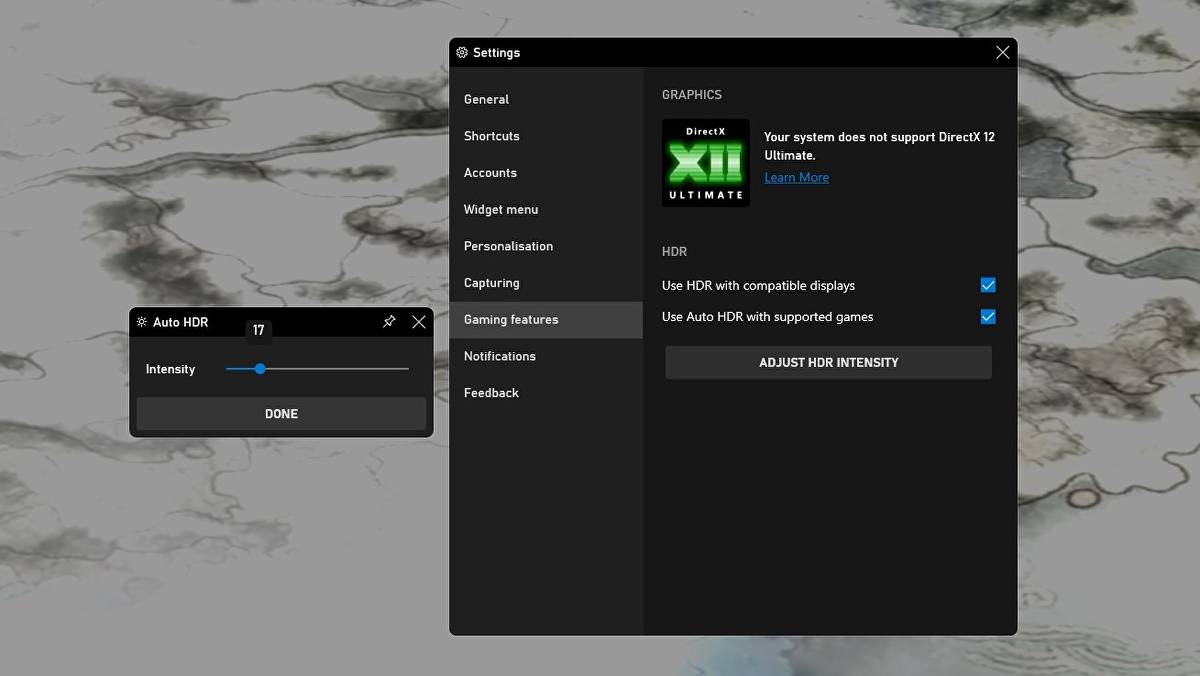
Step 1: Press the Windows key + G at the same time to open the Game Bar. You can do this anywhere, any time, including if you’re not actually playing a game. Presumably “Xbox Game and Everyone Else Bar” didn’t focus test as well. Anyhow, click on the cog icon in the central bar to open Settings.

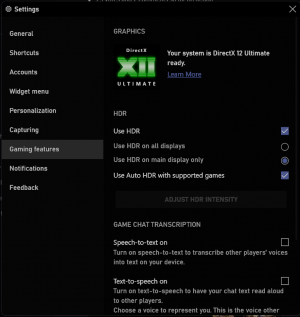
Step 2: Click the Gaming features tab on the left, and make sure both the “Use HDR with compatible displays” box and the “Use Auto HDR with supported games” box are checked.

Step 3: Optionally, you can click Adjust HDR Intensity and use the slider to make the image brighter or darker. I found the degree to which this makes a difference varies from game to game, but you can see any changes in real time as you move the slider, so just find your desired level of intensity and click Done to apply.

how-to-enable-auto-hdr-using-xbox-game-bar-step-3.jpg
 
Last edited:
Apparently there is a HDR brightness slider so you could experiment with turning the HDR brightness down , using a dim viewing environment in your room, and seeing if Dynamic Tone Mapping looks better than HGiG or not. Also try putting black level on low instead of auto.

From:
https://www.rockpapershotgun.com/how-to-enable-auto-hdr-in-windows-11


View attachment 408834

Thanks. Will give these options a shot. I only tested out what the default AutoHDR option provides so far. Also is there a table that shows that absolute values the HDR intensity corresponds to? Say for example 100/100 = 4,000 nits, 50/100 = 2,000 nits and so on.
 
Last edited:
Op of the reddit thread in response to your tomb raider picture which I forwarded to the replies there via imgur:

I've never seen anything close to that. That just looks washed out, not overblown necessarily, since all of it looks like shit. My recommendation is still going to be, dtm on, auto hdr on and black level low (if you're going for nice HDR pop. Do not recommend it for competitive, like rainbow, because it slightly crushes shadows).


Also, I use -4,-5 fine tune black level, as I don't trust devs to do proper black levels and so far, I've been right for most games.

..

I'll also add, after messing with all of those settings:
If HGiG looks too dull compared to dynamic tone mapping's over the top saturation - you can try sticking with HGiG and just turn the color slider up in the LG TV's OSD on the named game setting to start with. After turning up the color in the OSD, you can then optionally use reshade to fine tune a game using the lightroom filter (and maybe even the fakeHDR filter) until it looks a lot better than either extreme.
 
Last edited:
Thanks. Will give these options a shot. I only tested out what the default AutoHDR option provides so far. Also is there a table that shows that absolute values the HDR intensity corresponds to? Say for example 100/100 = 4,000 nits, 50/100 = 2,000 nits and so on.

Yeah that's the main complaint about that slider .. :love:
Don't know what it's doing exactly.

If you send the wrong curve with whatever settings or sliders you are using - rather than clipping the LG TV would probably compress farther down than it needs to. That is, going below the 560nit accurate range and compressing a larger range at the top (thus losing more color and detail than necessary at the top end).

LG's 1000-nit curve is accurate up to 560 nits, and squeezes 560 - 1000 nits into 560 - 800 nits.
LG's 4000-nit curve is accurate up to 480 nits, and squeezes 480 - 4000 nits into 480 - 800 nits.
LG's 10000-nit curve is accurate up to 400 nits, and squeezes 400 - 10000 nits into 400 - 800 nits.

So potentially, while maxing the slider might not clip the peak color brigthnesses/detail, you could still be losing detail depending just how bright of a signal it's sending due to a higher LG curve compressing more than you'd really have to. But like I said, I don't know what any % of that slider corresponds to.

I also don't know if altering window's default Dynamic Tone Mapping peak from 1500 using cru would help when using DTM instead of HGiG or if lowering that to 800 or 1000 would lower the peak nits autoHDR was capable of by the same proportion (e.g. lose 1/3 of autoHDR's typical ~ 600 to 800nits when you cut the peak from 1500 to 1000 ??).
 
Last edited:
Well so much for that. The adjust autohdr intensity button is completely greyed out for me. Not sure why.
 

Attachments

  • Screenshot 2021-11-02 205638.png
    Screenshot 2021-11-02 205638.png
    150.5 KB · Views: 1
I can confirm that Max luminance in CRU limits the peak brightness when Auto HDR Intensity is set to 100%.
I used values of 130 / 56 / Blank for Max luminance / Max frame-avg / Min luminance to get 798 & 160 nits for peak & frame average brightness.
Blank for Min luminance resulted in a PQ value of 5, which was lower than 1 for Min luminancewhich resulted in a PQ value of 6.

Auto HDR Intensity is also affected by the SDR content brightness slider.
On Windows 11, an Auto HDR Intensity of 0% starts at the SDR content brightness value.
On Windows 10, low values of Auto HDR Intensity would invert the brightness and make the image dimmer than SDR if the SDR content brightness slider was too high.

In my testing, Auto HDR Intensity appears to increase both the colour gamut and brightness. In some games, just cranking up SDR content brightness looks better than Auto HDR which produces searing white text sure to result in burn-in unless I restrict Intensity to 25%.
 
Last edited:
Well so much for that. The adjust autohdr intensity button is completely greyed out for me. Not sure why.


This worked for someone but not everyone:
You need to close and reopen the settings in the game bar app for the slider to show up...
Took me forever to figure that out.

In that case it looks like they needed to close the settings panel to get the activation checkbox states to "save". Then when they re-opened that panel the adjust button was no longer greyed out.

It could be that simple for some people apparently. Other than that I'm not sure what it could be but you can try enabling and disabling and re-enabling autoHDR and/or Windows HDR and closing the game bar and reopening it one or more times to see if it pops up. Are you keeping windows desktop in HDR mode the whole time normally?

I can confirm that Max luminance in CRU limits the peak brightness when Auto HDR Intensity is set to 100%.
I used values of 130 / 56 / Blank for Max luminance / Max frame-avg / Min luminance to get 798 & 160 nits for peak & frame average brightness.
Blank for Min luminance resulted in a PQ value of 5, which was lower than 1 for Min luminancewhich resulted in a PQ value of 6.

Auto HDR Intensity is also affected by the SDR content brightness slider.
On Windows 11, an Auto HDR Intensity of 0% starts at the SDR content brightness value.
On Windows 10, low values of Auto HDR Intensity would invert the brightness and make the image dimmer than SDR if the SDR content brightness slider was too high.

In my testing, Auto HDR Intensity appears to increase both the colour gamut and brightness. In some games, just cranking up SDR content brightness looks better than Auto HDR which produces searing white text sure to result in burn-in unless I restrict Intensity to 25%.


Good news and good information. Thanks.

If I can bother you with a few more questions, if you find the time:

- Are you using HGiG mode or DynamicToneMapping (DTM) on the TV after you edited the peak brightness, etc. with CRU ? Are autoHDR's settings and the CRU edits being made in relation to windows 11's own dynamic tone mapping and if so, how does that relate to the TV in HGiG or the TV's DTM?

- Are you saying the autoHDR brightness slider affects both color gamut and brightness and the SDR brightness slider affects only brightness so is preferable? If so can you do the same thing with the windows desktopHDR brightness slider?

- That is, what is the difference between:

.... your "just cranking up the SDR content brightness" (the regular windows brightness slider I'm assuming?) instead of using the autoHDR slider's color gamut+brightness increases
.... Keeping HDR mode active on the desktop all of the time and setting that windows 11 HDR brightness slider at a SDR level, then boosting it from there a bit using the autoHDR brightness slider in the xbox gaming panel slider alone
.... Keeping HDR mode active on the desktop and setting that windows 11 HDR brightness slider at a SDR level, then manually adjusting that same slider higher when using autoHDR

I'm also curious if HGiG on the TV works well with autoHDR and if I can still boost the color slider in the LG TV OSD and then use reshade with lightroom filter to adjust everything from there but I can search google to see if anyone is having luck with reshade + autoHDR.
 
Last edited:
This just tells me that AutoHDR is indeed a crapshoot and needs more work if we are having to rely on CRU to fix things up. I also managed to get the INTENSITY slider working by restarting the game, but it didn't seem to change anything besides making the overall entire picture brighter/dimmer. I don't gain or lose detail it's all the same, just the picture as a whole gets brighter or dimmer by adjusting the intensity slider. Also can confirm that the reddit post suggesting DTM to ON, black level to LOW, and FINE TUNE DARK AREAS being tweaked gives a better looking picture.
 
  • Like
Reactions: elvn
like this
This just tells me that AutoHDR is indeed a crapshoot and needs more work if we are having to rely on CRU to fix things up. I also managed to get the INTENSITY slider working by restarting the game, but it didn't seem to change anything besides making the overall entire picture brighter/dimmer. I don't gain or lose detail it's all the same, just the picture as a whole gets brighter or dimmer by adjusting the intensity slider. Also can confirm that the reddit post suggesting DTM to ON, black level to LOW, and FINE TUNE DARK AREAS being tweaked gives a better looking picture.

Thanks for all the feedback.
 
In looking around I came across this. At first glance it might sound outdated since windows has autoHDR now but the specialK mod seems to have a lot more control over settings, more like reshade filters. I'm going to read up on it.


https://discourse.differentk.fyi/t/download-special-k/1461

https://wiki.special-k.info/en/FAQ

In 2018 the framework innovated a general-purpose method of “retrofitting” HDR support for existing Direct3D 11-based SDR games in Windows, a feature that has since continued to evolve and in 2020 was updated to support most D3D11 and D3D12 based games compatible with flip model presentation, including some emulators such as Dolphin and PCSX2.

Special K has a varied and diverse featureset with these being some of its major features:
  • Custom frame limiter that can improve the frame pacing and alleviate stutters in many games.
  • HDR retrofit support in Direct3D 11 and Direct3D 12 games.
  • Enhanced borderless window mode in DirectX 11 games through the use of flip model presentation.
  • Texture cache for DirectX 11 games to minimize the impact to rendering by the act of streaming textures.
  • Texture modding in DirectX 11 games.
  • Game-specific features, tweaks, or bug fixes in a few select games (e.g. NieR: Automata).
  • Various Steam enhancements such as custom achievement popups or screenshot capture on achievement unlocks.
  • Force a custom display mode (borderless/exclusive fullscreen etc) in games.

Special K can also manipulate games in many various minor ways such as locking the cursor to the game window, disabling gamepad input, disabling specific shaders (DX11 only), and much more.

...
vqxewdX.png


sfRuldn.png


dqUEC1E.png


YbOyXPS.png
\

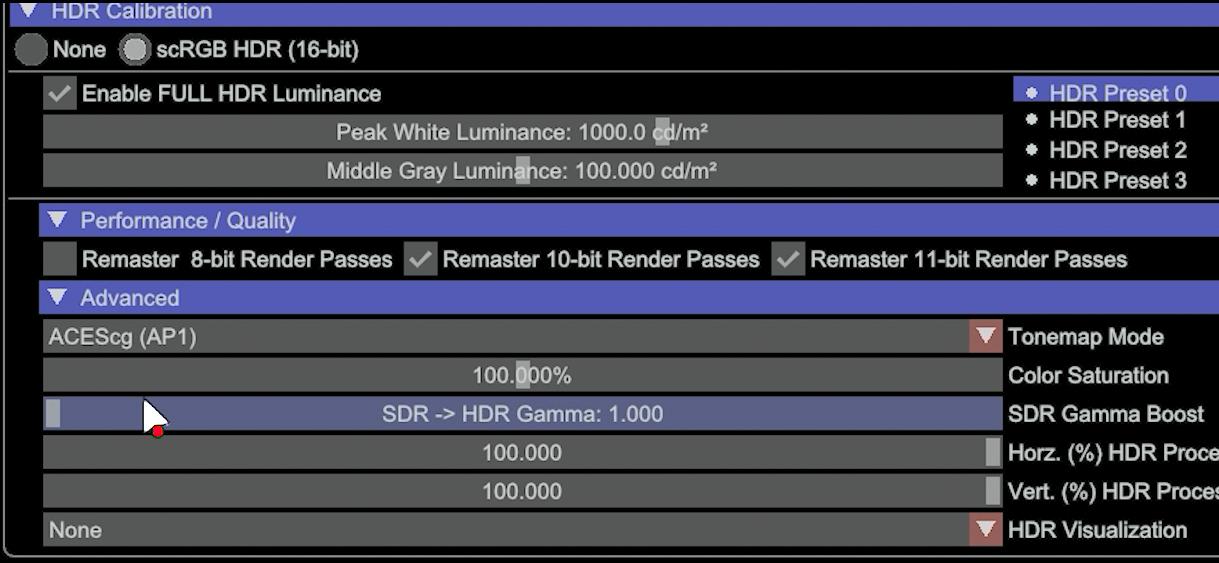
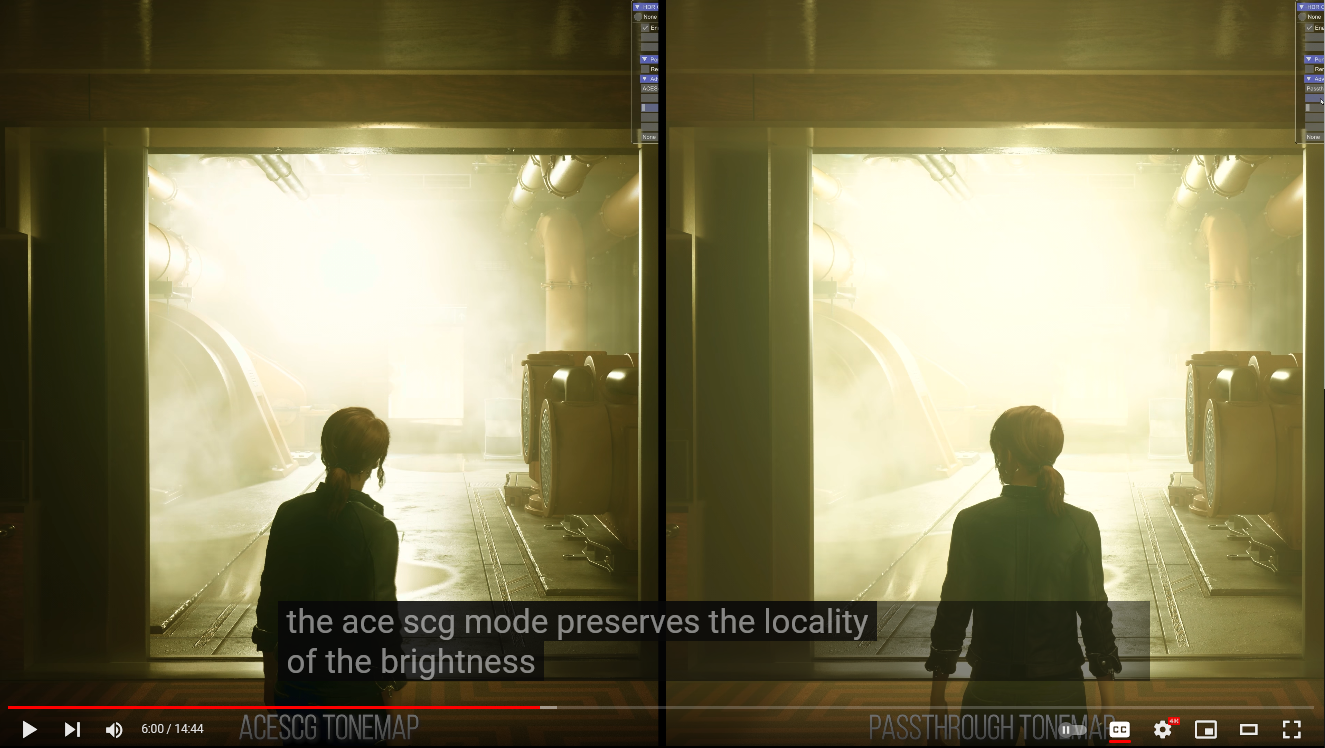
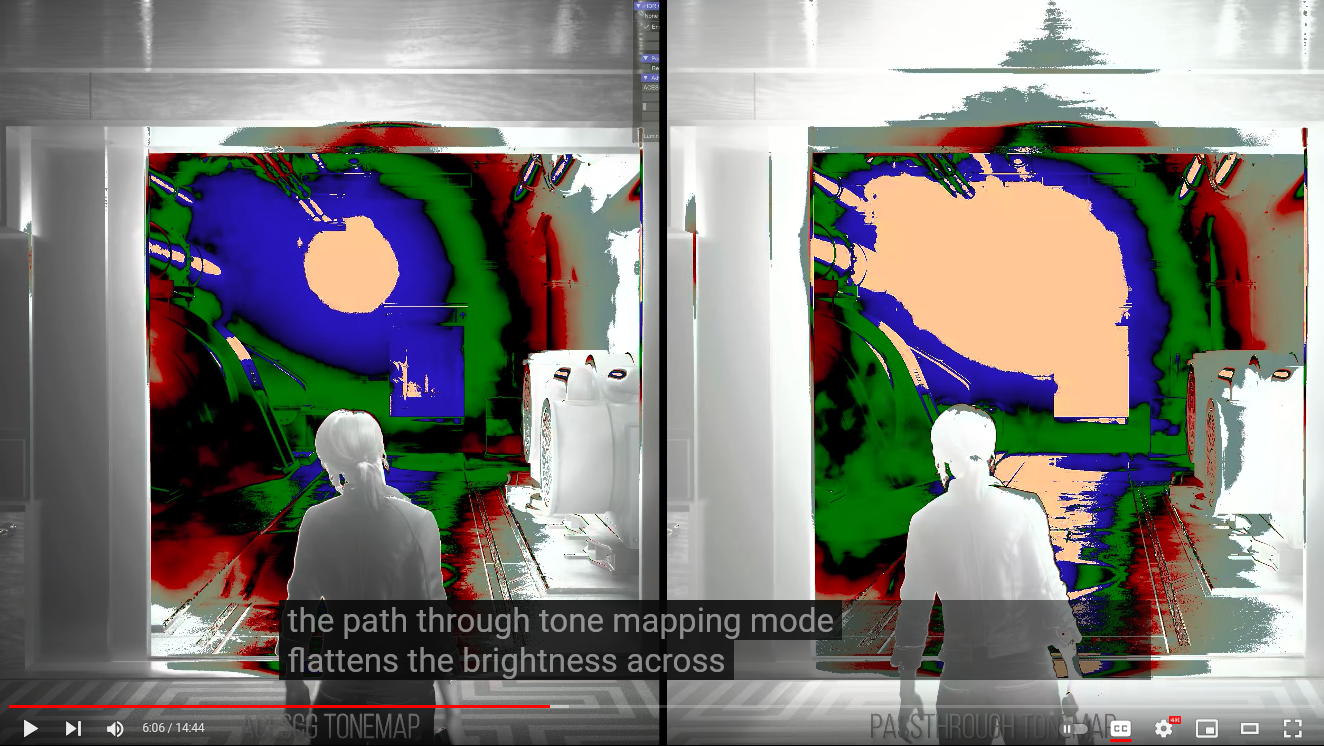
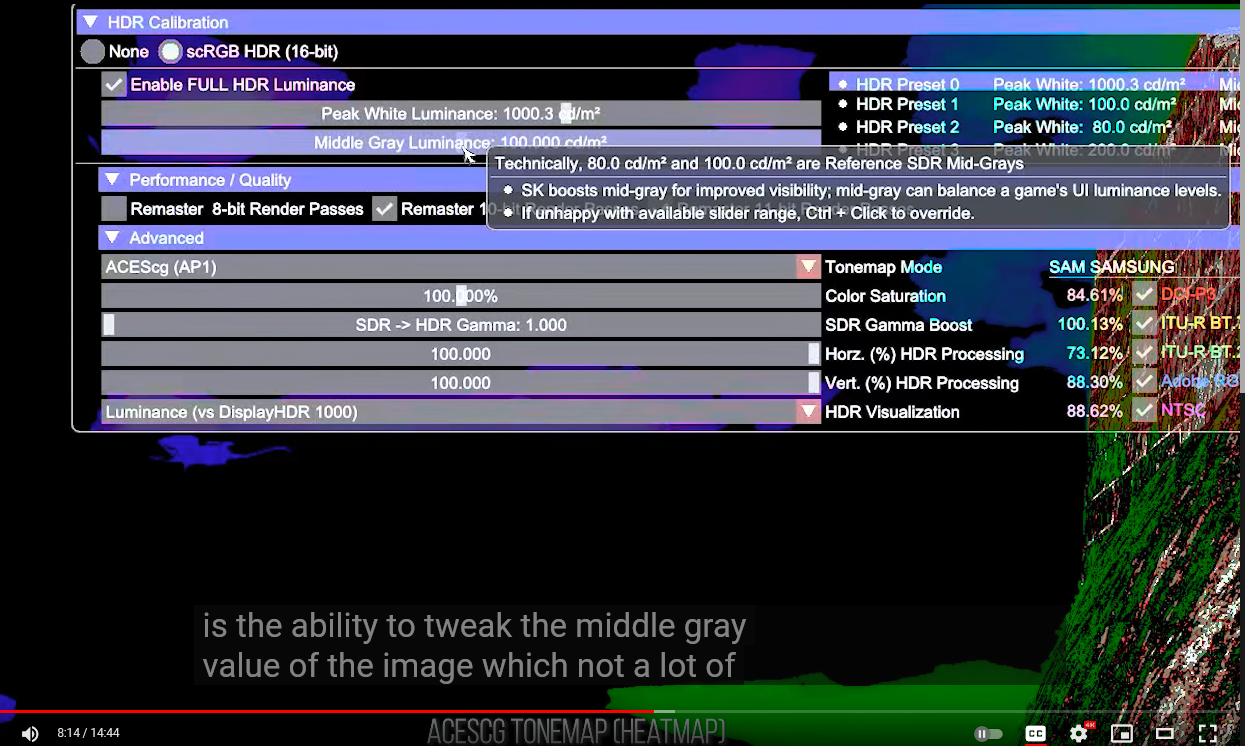
Along with the brightness being uncomfortable, that amount of light crushes the detail in the sky itself so you cannot see the more subtle artwork making up the sky box. Switching over to the default ACESCG tone mapping mode really helped out in dark souls2 as it localizes the brightness more and offers greater image contrast which I found pleasing so the sky was no longer so crushingly bright across the entire surface and detail was more visible in it which you can see well when I show the heat map visualization of the two modes here – where there’s a greater gradation to the brightness in that mode. On top of that you can actually tweak the image even more should you want.

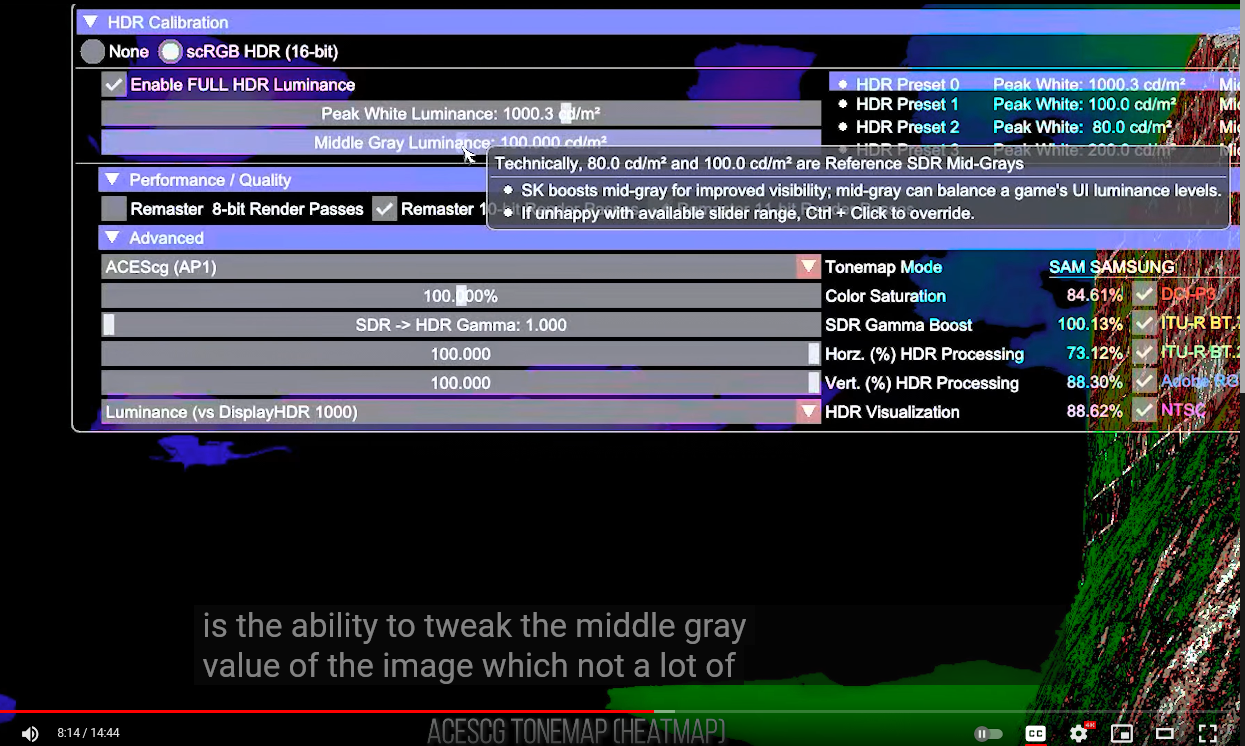
Another feature in the special K tools is the ability to tweak the middle grey value of the image which not a lot of hdr games actually allow you to do. The middle grey value is linked to your max luminance value and can be used to effectively compress or elongate the range of HDR highlights when in ACE SG mode. If you push down this middle grey value in dark souls 2 while looking at the sky with the heat map on you can see how it lowers the overall brightness in doing so and localizes the brightest areas to more specific parts of the image. By pushing down this middle grey variable you can also tweak the brightness of certain UI elements which was another issue tom mentioned in his look at autoHDR on xbox series.

So just with some small adjustments like adjusting the grey point you can produce a very pleasing game with HDR. This specialK HDR can require some tweaking but there’s flexibility in the options here to get an image you might like.
 
Last edited:
I'm at a point in life where I don't want to deal with injecting crap or 20 .ini files/tweaks on a per game basis. I just want to plug and play for the most part and auto HDR does that decently as is currently.

Half the fun before was tweaking stuff until you realize you're tweaking more than playing and enjoying the game. For that reason I've stepped back from it.
 
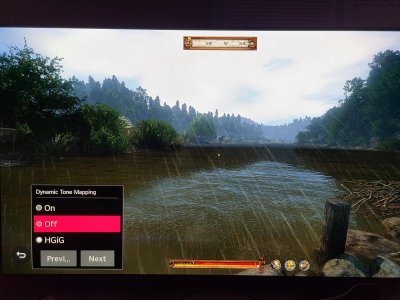
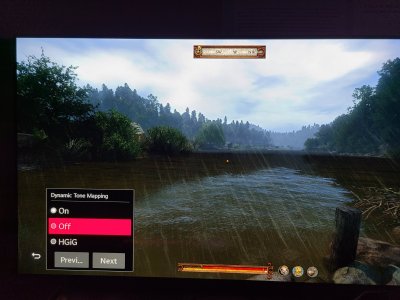
Yeah after using the settings from Reddit, AutoHDR looks much much better now. Big thanks to elvn for digging around and finding the info. Dynamic tone mapping definitely helps to restore some that detail that is otherwise lost if you stick to HGiG. Example with Kingdom Come Deliverance shown, notice how the detail in the sky is restored with DTM set to ON. Not sure how I can get a good looking picture on my X27 though since I don't think it has any sort of dynamic tone mapping function which is a bummer because all games with RT/DLSS are played on that display as that's my 3080 Ti rig.
 

Attachments

  • 20211103_214421.jpg
    20211103_214421.jpg
    589.8 KB · Views: 0
  • 20211103_214415.jpg
    20211103_214415.jpg
    483.6 KB · Views: 0
Good news and good information. Thanks.

If I can bother you with a few more questions, if you find the time:

- Are you using HGiG mode or DynamicToneMapping (DTM) on the TV after you edited the peak brightness, etc. with CRU ? Are autoHDR's settings and the CRU edits being made in relation to windows 11's own dynamic tone mapping and if so, how does that relate to the TV in HGiG or the TV's DTM?

- Are you saying the autoHDR brightness slider affects both color gamut and brightness and the SDR brightness slider affects only brightness so is preferable? If so can you do the same thing with the windows desktopHDR brightness slider?

- That is, what is the difference between:

.... your "just cranking up the SDR content brightness" (the regular windows brightness slider I'm assuming?) instead of using the autoHDR slider's color gamut+brightness increases
.... Keeping HDR mode active on the desktop all of the time and setting that windows 11 HDR brightness slider at a SDR level, then boosting it from there a bit using the autoHDR brightness slider in the xbox gaming panel slider alone
.... Keeping HDR mode active on the desktop and setting that windows 11 HDR brightness slider at a SDR level, then manually adjusting that same slider higher when using autoHDR

I'm also curious if HGiG on the TV works well with autoHDR and if I can still boost the color slider in the LG TV OSD and then use reshade with lightroom filter to adjust everything from there but I can search google to see if anyone is having luck with reshade + autoHDR.
By DTM I assume you mean DTM Off versus HGIG. DTM On is incorrect in all situations. I use HGIG mode for everything unless I know the content is hardcoded to 1000 / 4000 / 10000 nits, in which case I use DTM Off and override the HDMI Mastering Peak on the TV. If you set the Max Luminance to 800 nits with CRU, you should use HGIG mode with Auto HDR. For native HDR titles that don't have peak luminance calibration, you'll have to check on a case-by-case basis whether they respect Max Luminance in CRU. If they do, use HGIG, otherwise use DTM Off with the appropriate HDMI Mastering Peak override.

The searing white text is caused by the brightness component of Auto HDR, not gamut. Because of the way pure white in SDR (255,255,255) gets mapped to the brightest PQ value by Auto HDR, you may be able to achieve a brighter overall image without searing whites using just the SDR content brightness slider without Auto HDR. You won't get the benefit of wide gamut though. Auto HDR seems to map white in 2D overlays to the maximum brightness, but not so in 3D. It depends on the individual game.

Technically you'd get the most accurate Auto HDR image by setting the SDR content brightness slider to 0 and tweaking Auto HDR Intensity to your preference, especially in games that Auto HDR has specifically been tested and optimized for. This gives Auto HDR the full PQ curve to work with. If SDR content brightness is greater than 0, you're scaling the luminance linearly before it reaches Auto HDR instead of giving it the original colour values to work with. For convenience reasons I leave the SDR content brightness slider at 10 as the difference is not noticeable if you crank Auto HDR Intensity to a high value. Ideally Microsoft should issue an update to override the SDR content brightness slider to 0 when using Auto HDR.
 
Last edited:
Yeah after using the settings from Reddit, AutoHDR looks much much better now. Big thanks to elvn for digging around and finding the info. Dynamic tone mapping definitely helps to restore some that detail that is otherwise lost if you stick to HGiG. Example with Kingdom Come Deliverance shown, notice how the detail in the sky is restored with DTM set to ON. Not sure how I can get a good looking picture on my X27 though since I don't think it has any sort of dynamic tone mapping function which is a bummer because all games with RT/DLSS are played on that display as that's my 3080 Ti rig.
You're losing detail in the highlights because the Max Luminance is too high - the game thinks your display can hit 1500 nits when it's actually hard clipping below that. Reduce it to 1200 nits for the X27 or 800 nits for an OLED and use HGIG.

DTM On compresses and expands different parts of the luminance range to fit the input (however large) into 800 nits. It's better to let the game engine or Auto HDR do this by setting Max Luminance correctly in the first place.

This is AutoHDR. I CAN'T reduce the max luminance as there is no slider for that (Intensity function in Xbox game bar does not adjust the max luminance). Although I suppose I can check out how to do that with CRU but at this point I don't wanna mess around any further as I'm happy enough with the image as is. I'll look into it for the X27 though.

EDIT: I tested out a different area and the Intensity function does seem to lower the max luminance as some detail is restored when going from 100 to 0. Still looks blown out even at 0 though so CRU is probably needed to really dial it in.


Attachments

  • 20211103_232701.jpg
    20211103_232701.jpg
    365.6 KB · Views: 1
Last edited:
This is AutoHDR. I CAN'T reduce the max luminance as there is no slider for that (Intensity function in Xbox game bar does not adjust the max luminance). Although I suppose I can check out how to do that with CRU but at this point I don't wanna mess around any further as I'm happy enough with the image as is. I'll look into it for the X27 though.

EDIT: I tested out a different area and the Intensity function does seem to lower the max luminance as some detail is restored when going from 100 to 0. Still looks blown out even at 0 though so CRU is probably needed to really dial it in.


..

Im not set up to at the moment but I'd try that special K app from my last comment. It appears to allow a lot more control yet in an easy interface with a handful of sliders. Similar to setting the curve/peak in madVR for mpc + allowing several other fine tuning adjustments almost like a reshade filter. Notably the middle grey slider. It has several presets you can save so you can switch between for testing and adjusting them. Then once you have some presets dialed in you could switch between presets if you prefer one set of settings or another for different games.

529999_YbOyXPS.png
 
Last edited:
..

Im not set up to at the moment but I'd try that special K app from my last comment. It appears to allow a lot more control yet in an easy interface with a handful of sliders. Similar to setting the curve/peak in madVR for mpc + allowing several other fine tuning adjustments almost like a reshade filter. Notably the middle grey slider. It has several presets you can save so you can switch between for testing and adjusting them. Then once you have some presets dialed in you could switch between presets if you prefer one set of settings or another for different games.

View attachment 409454

I've only ever used Special K once for fixing the trash PC port that was Nier Automata. Does it need to be installed into every single game that you plan to use AutoHDR on? Or can you have it work as a global setting for all games, heck can CRU do that? I never actually used CRU before as I never had any need to.
 
I've only ever used Special K once for fixing the trash PC port that was Nier Automata. Does it need to be installed into every single game that you plan to use AutoHDR on? Or can you have it work as a global setting for all games, heck can CRU do that? I never actually used CRU before as I never had any need to.

Depends how you want to do it I think. There is a local per game method or global method which has a whitelist/blacklist for individual games.

I think the global method sounds best since you can just disallow different games individually using the front end. The caveat about specialK is that some particular online games cheat busting tech can mistake it for a cheat, particularly if you use the local/game-specific mode.. so your mileage may vary with those. Most of the games I play are souls-like, adventure games, and rpgs though I do play some co-op games like vermintide2/L4D2 genre games and once in awhile a co-op mmo or rpg online world.

https://discourse.differentk.fyi/t/download-special-k/1461

(latest version update appears to have been january 2021)


------------------------
https://www.pcgamingwiki.com/wiki/Special_K
-------------------------
Special K Injection Front-end (SKIF)
is used to manage the local Special K install. Features includes toggling global injection, disable individual games, or change the whitelist or blacklist for non-Steam games. As the tool is still under constant development in 2020 it often sees new features or functionality arrive monthly. As of August 2020 following the delisting of Special K on Steam the focus for the tool changed to become a cross-platform solution and is now provided through the Special K forums.

Local (game-specific)
When you simply don't need SK in all games

A local install (also known as a ‘game-specific’ install) refers to an install where the DLL files of Special K are added to the folder of the game executable and renamed to the DLL filename (the <DLL-name> mentioned further down) that Special K should use as an injection method.

This method allows the use of a specific version of Special K for a game without having the global injector running in the background, and means the install is mostly separate from the global injector with only a few common configuration files (for widgets, hotkeys, UI, etc) being shared between the two types of install.

Compatibility with some games might also be improved by using a specific version of Special K known to work best for the game, although with the caveat of not having features or fixes introduced in newer versions of Special K.

This method of using a local DLL file in the game folder is also used by software such as ReShade, dgVoodoo 2, and various mods.

..
GLOBAL VERSION
Install the global injector of Special K:
  1. Start by downloading the latest version available of either of the two:
  2. Extract the archive you downloaded at a location of your choice.
  3. Run the Special K Injection Frontend (SKIF) using SKIF.exe located within the extracted files.
  4. Click on Start Service.
  5. Launch the desired game.
    • Non-Steam games needs to be manually whitelisted, see the fixbox right below.
  6. Use Ctrl+⇧ Shift+← Backspace to access the control panel while in-game.
  7. Use the Special K Injection Frontend (aka SKIF) to start/stop the global injector.
..
Enable for non-Steam games:
  1. Start the global injection.
  2. Navigate to <path-to-game> and the appropriate subfolder containing the game executable.
  3. Look up what API the game uses. Refer to game-specific articles for details.
  4. Create a new empty file based on what API the game uses out of these:
    • OpenGL: SpecialK.OpenGL32
    • DirectX 11.x: SpecialK.dxgi or SpecialK.d3d11
    • DirectX 9: SpecialK.d3d9
    • DirectX 8: SpecialK.d3d8 - Requires the dgVoodoo plugin installed for Special K.
    • DirectDraw: SpecialK.ddraw - Requires the dgVoodoo plugin installed for Special K.
    • DirectInput 8: SpecialK.DInput8 - Alternative injection-method for titles that support DirectInput 8.
  5. Launch the game. Special K should now detect and hook it.
  6. Use Ctrl+⇧ Shift+← Backspace to access the control panel while in-game.
.
===============================================

Local (game-specific) Link

Use at own risk in multiplayer games where Special K might have an adverse effect.
A local (game-specific) install refers to an install where the DLL files of Special K is locally added to the folder of the game executable and renamed accordingly to the API Special K should use to inject itself into the game, in a manner identical to that of ReShade, dgVoodoo 2, and other DLL-based mods or tools. This method allows the use of Special K for one or more games without having the global injection running, as well as using static versions of Special K that is not updated alongside the global injection. This can enhance compatibility with games where newer versions of Special K does not work as well for games as an older version of Special K might do.
================================================

So I'd just use the global version and it's whitelist/blacklist and steam game enable/disable.
That way you can use it on the games you like with your handful of presets on the fly after a little initial tweaking of the presets. You can always blacklist games from specialK if you ever needed to on a certain ones and try windows autoHDR on those instead.


https://discourse.differentk.fyi/t/new-hdr-calibration-procedure-sk-0-11-1-hgig/970

Tonemap Modes​


These control luminance response when processing HDR
  1. Passthrough​

  • No tonemap is applied, only luminance gets scaled from SDR source to your target luminance
  • No control over saturation or middle-gray contrast is possible in passthrough
  • Passthrough tends to over-saturate and over-brighten, but … some people really like that
  1. ACES Filmic​

  • Applies a modified ACES Filmic tonemap
    • Very slightly dims the scene
    • Also applies a small desaturation
  • To counter-act the dimming and desaturation: tweak middle-gray and saturation
  1. HDR10 Passthrough​

  • Use only in games that are native HDR to begin with
  • Intended to analyze HDR quality in games, but has some potential for image adjustment
You may apply a small tweak to a (Native HDR) game’s Paper White level using this
 
Last edited:
This is AutoHDR. I CAN'T reduce the max luminance as there is no slider for that (Intensity function in Xbox game bar does not adjust the max luminance). Although I suppose I can check out how to do that with CRU but at this point I don't wanna mess around any further as I'm happy enough with the image as is. I'll look into it for the X27 though.

EDIT: I tested out a different area and the Intensity function does seem to lower the max luminance as some detail is restored when going from 100 to 0. Still looks blown out even at 0 though so CRU is probably needed to really dial it in.


The SDR content brightness slider has an effect on how Auto HDR looks with Intensity at 0. You may want to try switching off the Auto HDR checkbox completely and increasing SDR content brightness to 30 (200 nits) or above. If you use Auto HDR, zero or low values on the SDR content brightness slider are ideal.

Windows already selects the correct luminance values for the X27 IIRC, so you don't need CRU. You can verify them with the VESA DisplayHDR Test app on the Microsoft Store.
https://images.idgesg.net/images/article/2018/08/predator-x27-gamut-vesa-100768751-orig.jpg
 
Last edited:
What software do you use to manage desktop windows in Win10? Is DisplayFusion still the go to or are there other worthwhile alternatives?

for example-
I use a 4k desk monitor for most non-multimedia stuff. When I turn on the C1, I have it set as the primary display since most games only appear on the primary monitor afaik. Then I have to drag all my windows (Firefox, music player, chat, etc) back to the desk monitor.
Also the taskbar icons (near clock) only show on the primary display which is inconvenient.
I have to go into Settings>Display and set 'multiple displays' every time I turn the C1 on or off. If I accidentally turn the TV off then open Windows settings, it will appear in the C1 desktop space, so I can't see it unless I turn the TV back on.
Use Win + P to disable the C1 and move all windows to the other display. The problem is the C1 doesn't disconnect its HDMI input after powering off - it takes a few minutes.
 
Last edited:
What software do you use to manage desktop windows in Win10? Is DisplayFusion still the go to or are there other worthwhile alternatives?

for example-
I use a 4k desk monitor for most non-multimedia stuff. When I turn on the C1, I have it set as the primary display since most games only appear on the primary monitor afaik. Then I have to drag all my windows (Firefox, music player, chat, etc) back to the desk monitor.
Also the taskbar icons (near clock) only show on the primary display which is inconvenient.
I have to go into Settings>Display and set 'multiple displays' every time I turn the C1 on or off. If I accidentally turn the TV off then open Windows settings, it will appear in the C1 desktop space, so I can't see it unless I turn the TV back on.


-------------------------------------------------------------

I use the "turn off the screen" trick with the LG magic remote's mic or I have it set up on the quick menu so can activate it with 2 clicks. This turns off the oled emitters but doesn't drop the LG OLED out of the monitor array and it leaves whatever is running on it untouched (including audio of apps still running and earc hdmi audio functionality). One click of anything on the remote wakes up the emitters instantly. I only turn the screen off when leaving home, doing something else for hours, or going to sleep for the night.


I also found this in case anyone wasn't aware. I have been using the "turn off the screen" trick , holding the mic button and saying that to turn off the emitters without powering down the screen to standby. I do that any time I leave my keyboard or page off a paused game for awhile. If I hit the windows key while in game I get my mouse cursor back when windowed+fullscreen without minimizing windows like alt-tab tends to do.


There is a a way to "turn of the screen" (emitters) drilling down in the menus of the tv but this way I looked up is a lot faster:


https://www.reddit.com/r/OLED/comments/j0mia1/quick_tip_for_a_fast_way_to_turn_off_the_screen/

Quick Tip for a fast way to turn off the screen without voice commands or deep menu selection. Discussion


This option seems to only be for the LG CX, BX and GX unfortunately.. Would be nice for LG to add this to previous models with enough requests.

I notice many people have been going all the way through the settings or using voice commands to turn the screen off. Screen off comes in handy for many things like Spotify and podcasts with a static image while still hearing sound (the tv isn't actually off). There is a very quick and convenient way to simply add a screen off button to your quick settings when you press the settings button once (not holding as that will take you to main settings)

So you want to press the settings cog button once and then scroll to the bottom pencil button aka edit. You may have to delete a less used button to make room and then press the + button and find 'screen off'. This will add it to your quick menu which is really fast and doesn't require you to find it deep in settings or talk into your remote and wait for the countdown (it's instant). You can add a bunch of other stuff to quick menu via + but screen off was the big one for me.

I hope this helps! I've noticed many users didn't know this when I've commented so I figured it may help some of you worried about static images.

--------------------------------------------------------


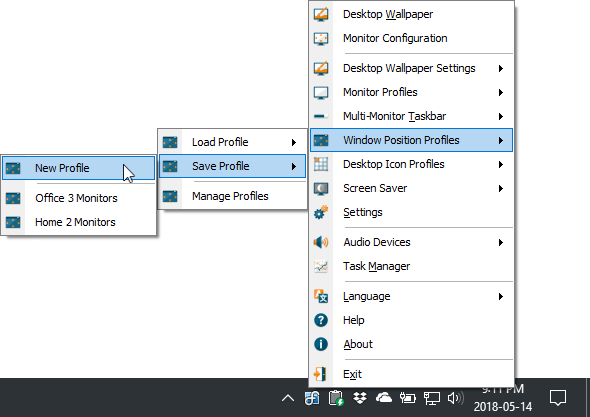
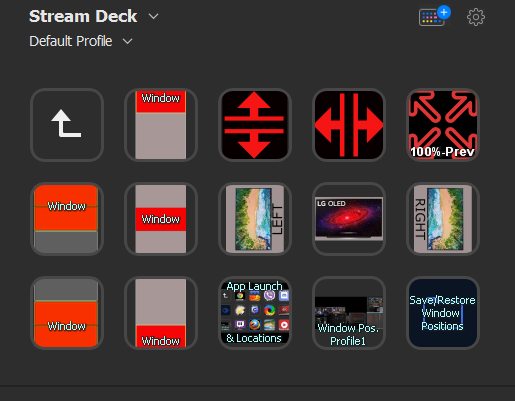
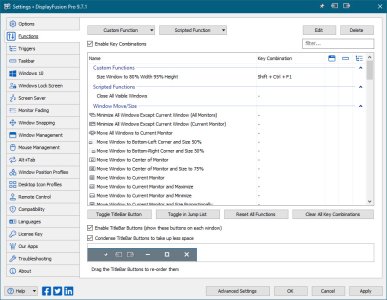
I use displayfusion for window management. To start with you can just easily set up several named "saved window positions" profiles that will shuffle all of your windows to where they were when you took that "snapshot" of window placements. You can hotkey these and if you have a stream deck it makes it even easier to press a streamdeck button mapped to that named saved window position hotkey. You can also set up an instant on the fly save and restore button for temporary or on the fly window arrangements almost like copy/paste.

https://www.displayfusion.com/Discu...iles/?ID=a9e84956-db3d-4f2c-b7e2-e3499f7570e4

Window Position Profiles
Easily save and load your window size and positions using DisplayFusion's Window Position Profile feature. Loading a previously saved Window Position Profile is an easy way to quickly organize your windows into preset arrangements.

The Window Position Profiles feature is a great choice for people who like an organized desktop. Arrange your desktop windows how you like them, save the layout as a Window Position Profile, then load this profile any time you're using these windows. Quickly load a Window Position Profile using a key combination, TitleBar Button, the DisplayFusion system tray menu, or from the command line using DFCommand. You can even assign a Window Position Profile to a Monitor Profile so that when your monitor layout changes, DisplayFusion will automatically arrange your desktop windows to a preset layout.

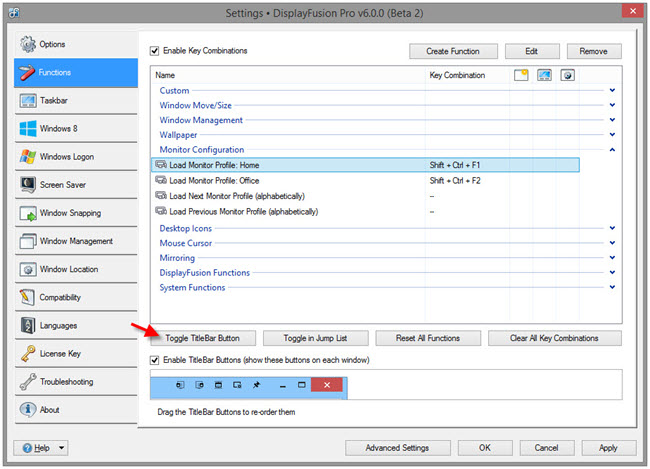
?ID=99dc651f-e605-4cfd-85fe-3eab982912b2.png


There is a hokey interface like this that has headings for "saved windows position profile <name>" in several rows. You can put the key combos in next to any function.

KB-MonitorProfiles-04.jpg


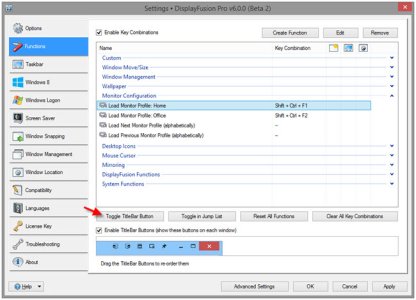
There are also custom monitor profiles that can switch different screen configs around like you are doing manually but I don't use those because dropping a screen from my array screws up a lot of my custom window placement script's placements. It's easier to just use the "turn off the screen" functionality of the LG TV using the remote for my purposes. Incidentally this is also why the "Ghost monitor" trick to use hdmi sound to a receiver without arc/earc was never a good solution for me either (any time I'd turn the receiver off, my window placements/saved positions would all be off).


-----------------------------------------------------

I use taskbarhider to lock the taskbar away via a hotkey and translucent taskbar to make it transparent - but I drag the actual windows taskbar to the top of one of my side portrait mode monitors. My oled only does media/gaming. Displayfusion's own windows taskbar is enabled on my other portrait mode monitor and it does in fact show the system tray duplicated on it. Other than the system tray I really don't use the taskbars. I can use win+S and type two letters + enter to launch practically anything. Win key to open the start menu if ever needed, win-tab or alt-tab to switch between apps, etc. However I use my streamdeck to launch and manage most apps and common windows/system items and settings panels.


I set up my streamdeck + displayfusion to launch/min/restore a bunch of my most used desktop apps individually and to defined home locations as a multi press toggle type action on a single key for each app by using some simple scripts - but I enjoy micromanaging things a little like that. I also have buttons that let me move whatever is the active window to each 1/3 height of the portrait mode screens (totem pole style), or 2/3 portrait mode height from bottom or top leaving whatever else as the last 1/3.

EOKDETC.png
 

Attachments

  • settings-functions.jpg
    settings-functions.jpg
    216.3 KB · Views: 4
  • KB-MonitorProfiles-04.jpg
    KB-MonitorProfiles-04.jpg
    84.6 KB · Views: 4
Last edited:
To further answer your question about a windows system panel being left behind (e.g. on the "turn off the screen" mode OLED's screen as primary monitor, where you can't see it) --

You can run a script to move all the windows to a different monitor, and then set that script to a hotkey (and a streamdeck button in my case). You could easily modify the script to different monitor #'s.

Swap All Windows Between Monitors 1 and 2​

DescriptionThis script will swap all open windows between monitors 1 and 2.
https://www.displayfusion.com/ScriptedFunctions/View/?ID=6b5dea6c-94b1-4820-8c3a-54fa8110e7d7

using System;
using System.Drawing;
using System.Windows.Forms;

public static class DisplayFusionFunction
{
public static void Run(IntPtr windowHandle)
{
// set the monitor IDs of the monitors you want to swap here
uint monitorA = 1;
uint monitorB = 2;

//if the passed window handle doesn't exist, exit the function
if (windowHandle == IntPtr.Zero)
return;

//get the open windows for each monitor
IntPtr[] srcWindowsMonitor2 = BFS.Window.GetVisibleWindowHandlesByMonitor(monitorB);
IntPtr[] srcWindowsMonitor1 = BFS.Window.GetVisibleWindowHandlesByMonitor(monitorA);

//move all of the windows in the destination monitor to the source monitor
foreach (IntPtr window in srcWindowsMonitor2)
{
if (BFS.Window.GetText(window).Contains("Chrome"))
{
BFS.Window.Restore(window);
BFS.Window.MoveToMonitor(monitorA, window);
BFS.Window.Maximize(window);
}
BFS.Window.MoveToMonitor(monitorA, window);
}

BFS.General.ThreadWait(1000);

//move all of the windows in the source monitor to the destination monitor
foreach (IntPtr window in srcWindowsMonitor1)
{
if (BFS.Window.GetText(window).Contains("Chrome"))
{
BFS.Window.Restore(window);
BFS.Window.MoveToMonitor(monitorB, window);
BFS.Window.Maximize(window);
}
BFS.Window.MoveToMonitor(monitorB, window);
}
}
}

You can search here for a lot of scripted functions but you can also search this from displayfusion's own interface and automatically import the ones you want (then if necessary edit them as you see fit and rename them):
https://www.displayfusion.com/ScriptedFunctions/
hw3lF3f.png


Or you can do it the longhand way by using the windows key + TAB to open taskview see all open windows. That essentially shows you all of your windows from all of your screens combined into a virtual thumbnail view. Your mouse has to have clicked on a side screen to make the panel the active screen so that the taskview is shown on it instead of the primary though. Then you click on that system window you wanted in the thumbnails to make it active and then use a displayfusion hotkey to teleport-move it to side screen.
In my case once I got that window active I'd just hit the streamdeck key corresponding to either of my side monitors which places the window in a 2/3 bottom position on either side screen.
 
I let this thread stew a little bit, but on my return I'm kind of disappointed now the thread as a whole seems to have doubled on HDR and isn't even willing to experiment to see if this BFI + VRR thing even works let alone if it's useful.

I find it very interesting that, with high-refresh monitors, BFI + VRR is seen as a sort of "holy grail", and I figured there's be more of those types of people here considering OLED's crazy-fast response time. But it seems I was mistaken and that the crowd here is a third niche between the cinema buff's "BFI good, HDR good, high framerate bad" and the high refresh gamer's "BFI good, high framerate good, HDR unnecessary".

This is making me think that most OLED users actually fall into the more 60fps-to-100fps gaming category rather than the 100fps+ category which, as I'm typing this, I'm kind of coming to the conclusion may be an audience that is exactly as I said - they value high framerate up to a point but will put more focus on static image quality such as resolution and HDR and will very much sacrifice top-end framerates to do so (one only has to note the kinds of GPUs most people here are using... and I very much don't have interest in such high-end GPUs). And it's this 60fps-to-100fps that's simply not going to be as useful with any sort of BFI+VRR combination.


Basically, I made the mistake of figuring that the high frame-rate gamer would be the main PC OLED customer - it turns out it's the high graphics settings gamer instead. And while I'm not really a high frame-rate gamer, I'm even less of a high graphics settings gamer. Really I'm just a "I want to be able to use a screen in the dark without it either blinding me or looking like crap without sacrificing the motion resolution I've become used to on a CRT" and I've been in that camp for over a decade now.

I want to make one thing very clear though - I'm not married to the idea of BFI and will happily ditch it if the screen has a high enough refresh rate to compensate, but "only" 120Hz ain't gonna cut it since that's already what I've been doing on my CRT for ages.

Also while typing this, I'm reminded that the flickering on a CRT is less noticeable than BFI on at least an LED-backlit LCD screen of comparable flicker-rate, presumably because a CRT's PWM is more akin to a sine wave while LEDs output much more of a square wave. And IIRC I'm pretty sure I found the flickering on CRTs to be reduced as you decrease brightness and/or contrast as I do in dark environments as it's simply reducing the amplitude of the PWM waveform, but on LED-backlit LCDs the flicker instead increases as it instead increases the "off" time during the backlight strobing in order to reduce brightness.

For reference I have no idea how a flicker-less LED backlight would behave with any sort of backlight strobing, but with OLED I would imagine that it would be both similar to a CRT where it just simply reduces the amplitude but also like an LED-backlit LCD whereby it operates as square wave on/off rather than a smoother CRT-like sine wave.
 
Last edited:
Back
Top