Navigation
Install the app
How to install the app on iOS
Follow along with the video below to see how to install our site as a web app on your home screen.
Note: This feature may not be available in some browsers.
More options
You are using an out of date browser. It may not display this or other websites correctly.
You should upgrade or use an alternative browser.
You should upgrade or use an alternative browser.
Trippy Apple G5 - PC Mod
- Thread starter GodSpeed
- Start date
crooked_weasel
n00b
- Joined
- Jul 12, 2005
- Messages
- 5
please continue GodSpeed! your idea with the laserpod has inspired me to do something similar with my thermaltake v3000bwa (tsunami case). I need to know how you wired the device into your PSU! (i currently have the antec neopower 480w modular PSU and it is fantastic btw  )
)
You have come so far with it, look at all the interest from the public!
)You have come so far with it, look at all the interest from the public!
Alright, after looking at future options, I'm going to continue, however the insides will be 100% different than what was planned differently. I'm going to have to buy a new "crap case" to get a new back-end area.
Ps. It's my 21 birthday and I just blew away $2k various things since no one else celebrates it. Cheers!
PSS. COUGH COUGH http://www.puttyworld.com/gifcer.html COUGH COUGH
Ps. It's my 21 birthday and I just blew away $2k various things since no one else celebrates it. Cheers!
PSS. COUGH COUGH http://www.puttyworld.com/gifcer.html COUGH COUGH
TSS Modder
2[H]4U
- Joined
- Jun 29, 2004
- Messages
- 2,316
well CONGRATS!!
bored-sarcasm
Gawd
- Joined
- Apr 9, 2003
- Messages
- 888
that's pretty sweet.
D
Deleted member 89137
Guest
just noticed this thread. sweet. /subscribes
Anyone know of good strong cases with removable trays that are CHEAP? I don't care about the looks as I actually just want the back tray area. I'll be looking on the College Street "strip" tommorow for cases.
I actually have a due date for this case because I'm going to the Penny Arcade Expo as an undercover semi-sponser. I can't really talk about it until you see the case
I actually have a due date for this case because I'm going to the Penny Arcade Expo as an undercover semi-sponser. I can't really talk about it until you see the case
http://www.newegg.com/Product/Product.asp?Item=N82E16811164039
$31.50 shipped, Cheapest case on newegg. Has a removable tray too.
http://cgi.ebay.com/ws/eBayISAPI.dll?ViewItem&item=6783325396&category=3669
$30 shipped, full ATX case
http://www.dealsonic.com/skmssialatxm.html
$39 shipped, Skyhawk MSR is all aluminum and has a full size removable motherboard tray with a 80MM fan attachment.
I'm using a full size EATX tray from an AOpen full atx case for my G5 mod, size is perfect, leaves less than 2MM between the tray and the side panel latch.
As an eBay Associate, HardForum may earn from qualifying purchases.
uzor said:Looks like that top link just has a mobo plate, not a full tray. Difference is that it doesn't include the pci bracket/i/o panel, just the bottom part the mobo screws to.
You're right. I should have looked closer.
http://www.newegg.com/Product/Product.asp?Item=N82E16811117029
Newegg has they SkyHawk right now for $34 shipped. I'm half tempted to get it for my second G5 case.
Dew said:....
I'm using a full size EATX tray from an AOpen full atx case for my G5 mod, size is perfect, leaves less than 2MM between the tray and the side panel latch.
You mean while keeping the latch? I really need to be able to keep the side panel locked
I'm still looking for local options, hard to find these at canadian retailers, ugh.
GodSpeed said:You mean while keeping the latch? I really need to be able to keep the side panel locked
I'm still looking for local options, hard to find these at canadian retailers, ugh.
Yep, I kept the side panel latch. I'll be posting my work log this weekend when I'm done with all the hard stuff. (Drilling fan holes, JB Welding the tray to the case, etc.)
This will give you a general idea of my design: http://woods.us/hardocp/g5-airflow.gif
Edit:
Worklog here: http://www.hardforum.com/showthread.php?p=1027960606#post1027960606
Just bought the following from mountainmods.com :
1 x ATX Brushed Aluminum Removable Motherboard Tray
2 x 22 Inch Motherboard Lead (for extending front wiring)
1x Dual 12 Inch Blue Cold Cathode Kit (because I am a consumerwhore)
1 xDual 12 Inch White Cold Cathode Kit (because I was dumb and broke mine)
1 x 3.5 Inch Brushed Hard Drive Rack (maybe it will fit? otherwise I'll make an external HDD toaster mod (more on that at some other time)
Now to wait a week, I'm offically broke, if anyone wants to buy me some of that putty that would be awesome to keep me motivated. I also applied for a dream job at Gas Powered Games, the soon-to-be-makers-of-the-awesome-game Supreme Commander! Penny Arcade Expo is coming up real soon and I gotta get this all ready on time *rush rush rush*
More suprises coming soon!
Image of the tray:
jmroberts70
2[H]4U
- Joined
- Oct 15, 2002
- Messages
- 2,953
uzor said:Looks like that top link just has a mobo plate, not a full tray. Difference is that it doesn't include the pci bracket/i/o panel, just the bottom part the mobo screws to.

Here's a quote from one of the reviews of this case:
"Best feature is the removable MB tray. The whole back slides out; what a pleasure."
Looks like it DOES!! I'm gonna have to check this case out too!!
CrimandEvil
Dick with a heart of gold
- Joined
- Oct 22, 2003
- Messages
- 19,670
I've been thinking about getting one of those trays but for $50 I could get this Skyhawk case as well as pick up a twelve pack or just pocket the extra cash.
When it comes could you give your thoughts on it? I'm still debating with myself over getting it from that case or buying one of those trays (I like how the metal under the mobo is all smooth not like the tray that comes with the Skyhawk case).
When it comes could you give your thoughts on it? I'm still debating with myself over getting it from that case or buying one of those trays (I like how the metal under the mobo is all smooth not like the tray that comes with the Skyhawk case).
It's all up to you, I'm simply limited to places that ship to Canada and making it easier on myself without needing to cut up a whole other case again.CrimandEvil said:Blah blah
T0ddyH0oddy
Limp Gawd
- Joined
- Jul 1, 2003
- Messages
- 394
Dew said:You're right. I should have looked closer.
http://www.newegg.com/Product/Product.asp?Item=N82E16811117029
Newegg has they SkyHawk right now for $34 shipped. I'm half tempted to get it for my second G5 case.
That's probably the nicest $20 case I've seen lately.
Good work.
Since I'm waiting for my main mod items to come, how about a mini-review of:


The professionally packaged box was opened and I was greeted with a thank you note:

Pictures are worth a thosand words so here are the visuals on this pretty thing:


Inside shots because half the keys didn't work (probably got dropped by my small brother), so I opened it up and pushed the wiring all the way in to make sure there was proper connectivity, worked like a charm. I also noticed that this thing is black through and through as far as plastics are concerned as this isn't your cheap spray paint job.


After closing up the keyboard, I connected the board up and we were up and running! The keyboard provides that lovely old IBM keyboard tactile feel and sound and not too hard on the fingers either, it's responsive and feels GREAT! Infact I'm typing on it right now to write the review. It has a solid adjustable hinge for those who preffer the greater inclination with rubber ends so it will stay in place.
Overall, if you want to feel L33T and impress your friends with your speed, accuracy and their inability to use your keyboard (great for people who have noob brothers!) you can pick up this bad boy from http://www.daskeyboard.com or if you are low on cash and have lots of time, you can grab your own keyboard and spray paint it yourself, however the quality of this makes it well worth the price. *Gives Thumbs Up!*
The professionally packaged box was opened and I was greeted with a thank you note:
Pictures are worth a thosand words so here are the visuals on this pretty thing:
Inside shots because half the keys didn't work (probably got dropped by my small brother), so I opened it up and pushed the wiring all the way in to make sure there was proper connectivity, worked like a charm. I also noticed that this thing is black through and through as far as plastics are concerned as this isn't your cheap spray paint job.
After closing up the keyboard, I connected the board up and we were up and running! The keyboard provides that lovely old IBM keyboard tactile feel and sound and not too hard on the fingers either, it's responsive and feels GREAT! Infact I'm typing on it right now to write the review. It has a solid adjustable hinge for those who preffer the greater inclination with rubber ends so it will stay in place.
Overall, if you want to feel L33T and impress your friends with your speed, accuracy and their inability to use your keyboard (great for people who have noob brothers!) you can pick up this bad boy from http://www.daskeyboard.com or if you are low on cash and have lots of time, you can grab your own keyboard and spray paint it yourself, however the quality of this makes it well worth the price. *Gives Thumbs Up!*
rogue_jedi
Supreme [H]ardness
- Joined
- Sep 6, 2002
- Messages
- 4,821
i would LOVE one of those keyboards.... but it is $80
i'll just have to make do with holding my wireless keyboard under the desk on my lap
they can't use the computer if i hide the keyboard!
i think i actually have one of those keyboards (that style - don't know if it works or not or is the true clicky kind) in my basement. and it isn't USB, either. hmm...

 i'm invincible!
i'll just have to make do with holding my wireless keyboard under the desk on my lap
they can't use the computer if i hide the keyboard!
i think i actually have one of those keyboards (that style - don't know if it works or not or is the true clicky kind) in my basement. and it isn't USB, either. hmm...
i'm invincible!AaronP
[H]F Junkie
- Joined
- Jan 13, 2005
- Messages
- 11,527
I'd rather get a normal keyboard and paint it
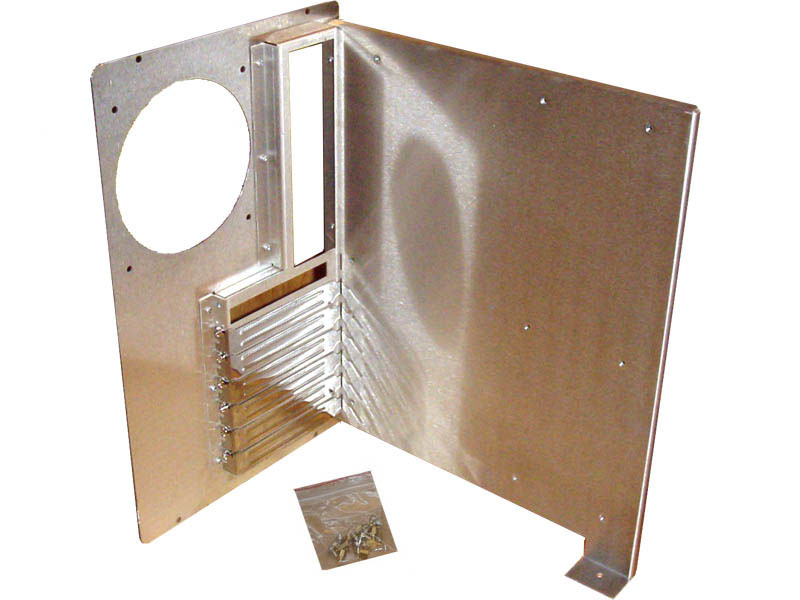
FINISHING PROJECT THIS WEEK, TOTALLY DIFFERENT THAN WHAT I STARTED TO PLAN! Also I got access to a really sweet digital camera, so now all future pictures will be in sexy high resolution!
I got the backplane in the mail:

Chop chop chop!

My fluffy metal assistant was glad to help making the rough surface nice and smooth:

Next step, destroying the G5 case:

Alright I'm kidding, simply making a hole in the back:

More to come tommorow!

Bonus workplace image:

I got the backplane in the mail:
Chop chop chop!
My fluffy metal assistant was glad to help making the rough surface nice and smooth:
Next step, destroying the G5 case:
Alright I'm kidding, simply making a hole in the back:
More to come tommorow!
Bonus workplace image:
TSS Modder
2[H]4U
- Joined
- Jun 29, 2004
- Messages
- 2,316
nooo..... the pretty G5......
We ran out of dremel cutting disks, and since we really didn't have much metal work left we did it the old fashioned way!

After using magical metal studding to keep it in place we ented up with this ugly unsanded beast:

I went out yesterday and purchased some stuff:

Had some spare change and picked up some black PCI/RAM covers (Vantec, RAM ones needed to be sanded down to not pop out :\).

More tommorow!
After using magical metal studding to keep it in place we ented up with this ugly unsanded beast:
I went out yesterday and purchased some stuff:
Had some spare change and picked up some black PCI/RAM covers (Vantec, RAM ones needed to be sanded down to not pop out :\).
More tommorow!
rogue_jedi
Supreme [H]ardness
- Joined
- Sep 6, 2002
- Messages
- 4,821
just curious - how are you planning to sand the back while it is riveted?
rogue_jedi said:just curious - how are you planning to sand the back while it is riveted?
everything will get sanded smooth *evil laugh*, don't worry about it.
Hmmm, You might want to move that left stick of ram over a slot...GodSpeed said:
Bradish said:Hmmm, You might want to move that left stick of ram over a slot...
Nah, that's how MSI does their setup.
Really? Hmm Learn something new everyday.Dew said:Nah, that's how MSI does their setup.
Ok, big news. I got my new part. It's a PSU. It's not "just" a PSU, it's the most sexy thing I have ever laid my eyes on. It's the Coolmax CU-500T. I don't have a camera at the moment so you can see a review/picture of the thing here:
http://www.silentpcreview.com/article257-page1.html
Now before someone tells me, "hey why aren't you using the one you got from Ultra?" or "Wow good ridance, ultra sucks". The truth is it's NOT because of performance or because Kyle's Psu kicked the bucket. It's because their cabling system doesn't fit with my system. The main 24-pin cord doesn't have enough bend to it to be able to mount the CD drive and other extra wiring for lights etc.
So, what will I be doing with that PSU? I'm going to give it out at Penny-arcade Expo OR save it for my companies big launch as another prize (with something on the side because it's open box).
Pictures coming soon of the final thing, trust me... it will be worth it. If you happen to be in the Bellevue, Washington area between the 26th to 28th... PM me and I will hook you up with a pass to PAX (Penny Arcade Expo) to see it up close and personal
Final update to this thread by me will be coming as soon as I get some high-res shots of the final case. It's a beauty... plus a big big big suprise!
If anyone on here is in the Toronto area and has a 3 megapixel+ digital camera, please contact me!
If anyone on here is in the Toronto area and has a 3 megapixel+ digital camera, please contact me!
Oh crap, it's been a while. Uhm, yeah. It's done. Just needs a small plate modification for the back PSU area. That's it finished... It's over. You can go home now! ... Ok fine, here's the high res pics everyone wanted to see! Thanks ImageShack
I have high res (300dpi+ for print) on request. Scroll right to the end for some i-waited-too-damn-long-too-upload-this gifts
Just a boring G5 case

Debug/White Lights!

*flicks off lights*
Red Laser Attack Beams!

Oh god the colours....


Now for the disgusting internals which no one should see
As you can see, the debug lights are perfect for those dark lan parties, to see what's going on with the hardware or simply creating a good non-distracting night light. *loves practical mods*


Oh hey, one last one for the go:

But wait, there's more! (1920x1200, resize as needed) - HORRIBLE WALLPAPER!


If there's any response to this I'll probably post another set showing the back, more different lighting effects (got a nice LED comet chaser in there) and a possible apple logo modification. Again, thanks a ton to LaserpodUSA for having such a wonderful product, I have another one sitting in my room beaming lights off the ceiling
I have high res (300dpi+ for print) on request. Scroll right to the end for some i-waited-too-damn-long-too-upload-this gifts
Just a boring G5 case
Debug/White Lights!
*flicks off lights*
Red Laser Attack Beams!
Oh god the colours....
Now for the disgusting internals which no one should see
As you can see, the debug lights are perfect for those dark lan parties, to see what's going on with the hardware or simply creating a good non-distracting night light. *loves practical mods*
Oh hey, one last one for the go:
But wait, there's more! (1920x1200, resize as needed) - HORRIBLE WALLPAPER!


If there's any response to this I'll probably post another set showing the back, more different lighting effects (got a nice LED comet chaser in there) and a possible apple logo modification. Again, thanks a ton to LaserpodUSA for having such a wonderful product, I have another one sitting in my room beaming lights off the ceiling
CrimandEvil
Dick with a heart of gold
- Joined
- Oct 22, 2003
- Messages
- 19,670
Wow, very nice.
thisisglen
Limp Gawd
- Joined
- Feb 5, 2005
- Messages
- 262
Nice work. Good to see you gave up on the sideways motherboard mount, that looked like more effort than it was worth. Show us the back! I actually did a G5 mod myself and would be interested to see what you made of the back. I did this:

I'm expecting your's is something similar? Eventually my G5 case drove me insane because of the hours required to complete it properly so ended up selling the case for $150 AUD which is about ~$110 USD fully modified to take PC components and with all the wiring done etc... maybe I regret that a little.. (sorry to hijack your thread for that moment)
I'm expecting your's is something similar? Eventually my G5 case drove me insane because of the hours required to complete it properly so ended up selling the case for $150 AUD which is about ~$110 USD fully modified to take PC components and with all the wiring done etc... maybe I regret that a little.. (sorry to hijack your thread for that moment)
CrimandEvil
Dick with a heart of gold
- Joined
- Oct 22, 2003
- Messages
- 19,670
We need a better shot of that if you have any Glen.