Project: Yuugou

You are doing an excellent job.

Since you seem to be doing a lot of it throught he school, do they finance the supplies? The amount of aluminum you are using racks up quite fast, especially at that tickness. Does this double as a project in class?

Also, whats the concept behind the archetectual buildings that you had to do? Did everyone deal with the same platform to do a design on? Were you guys instructed to show more art and conceptulization rather than function?

Thank you and great questions.

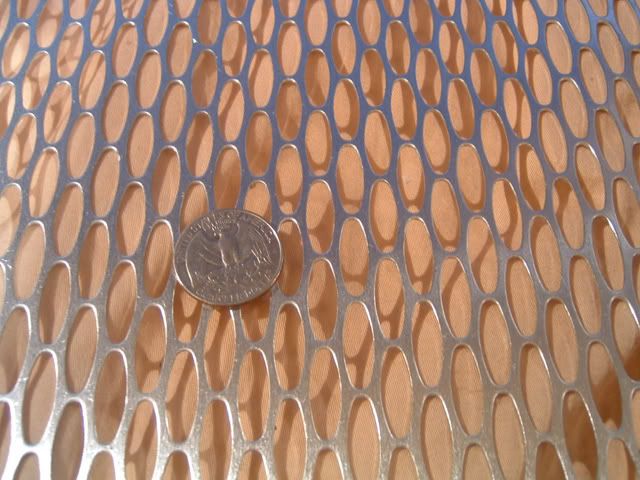
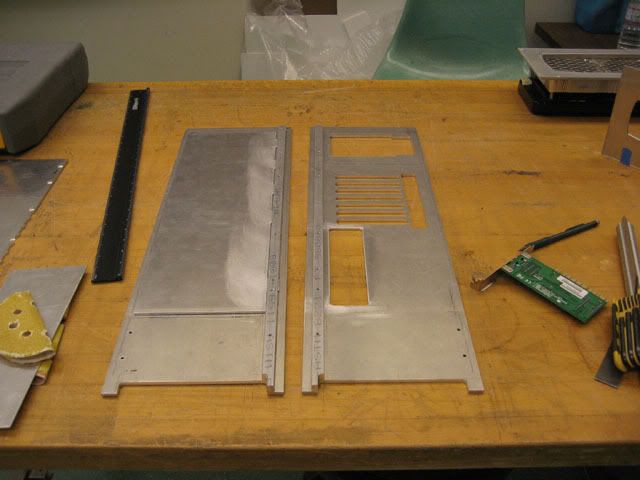
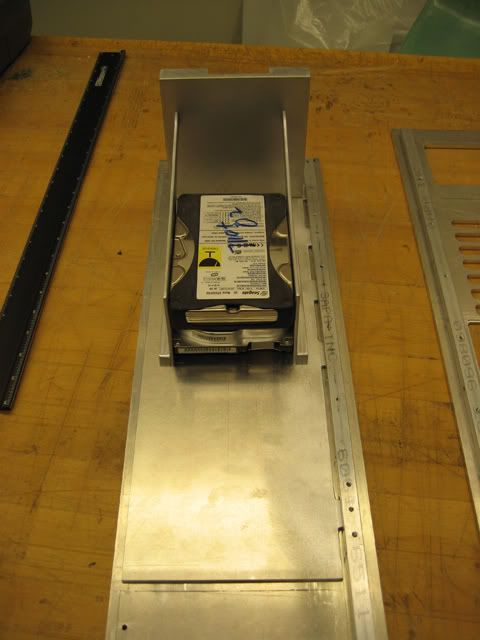
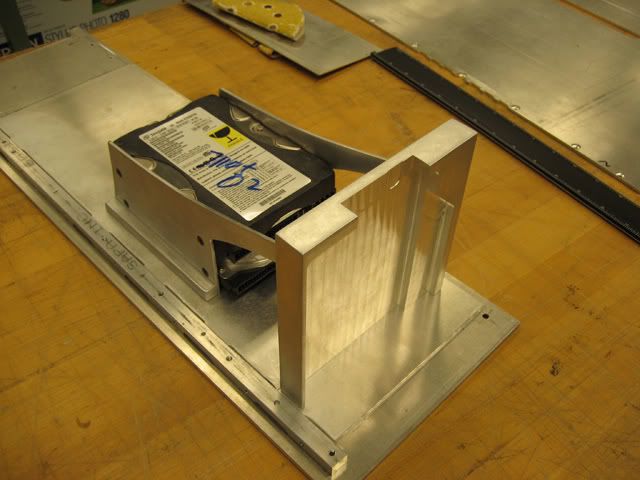
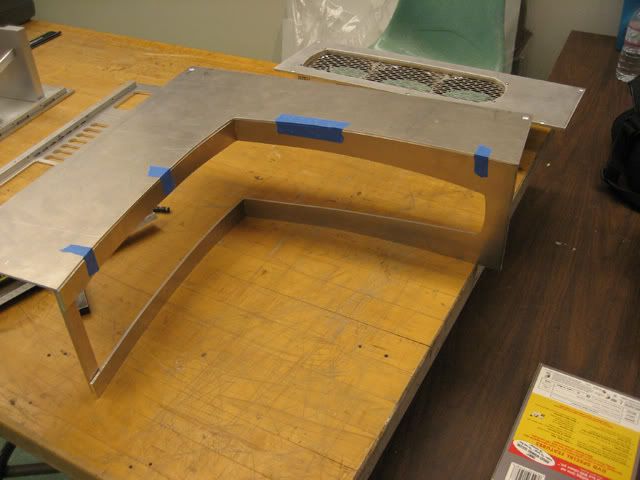
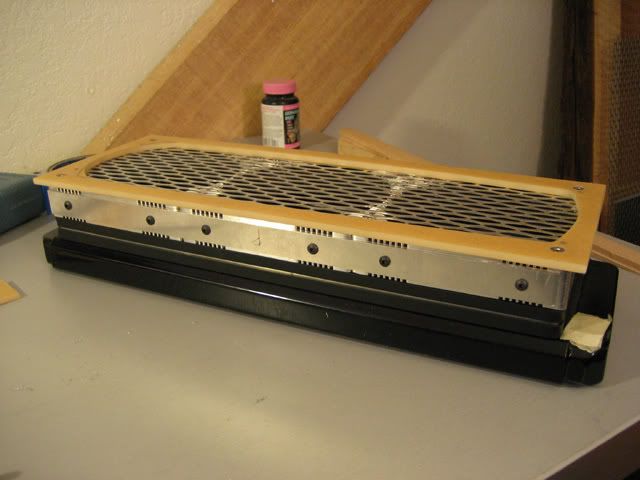
I wish they helped pay for supplies but they don't. My department (architecture) is actually pretty poor so they barely have enough money to get everyone in classes. The alu alone on this case has cost about 300 bucks so yeah it does add up rather quickly. It doesn't really double as a class project either but i work on it during class since I believe its more important.

The concept behind that stupid house gave me a headache for the entire quarter. The "official" project was supposed to be a "biomorphic house" but my professor essentially does not teach. He showed up for a couple hours, painted some stuff, mumbled some words of wisdom, and went to a water polo game or something. He's a genious though and i guess its all part of his plan. We all had the same site but i chose the flatter part of the site (and essentially ignored it anyway) and we basically built whatever we wanted. Some people's were way more sculptural and a couple people's were much more practical. It just depened on your personality I guess.

Sorry these answers ended up so long. Updates coming soon.
 
Man, this work is amazing. And your architecture projects aren't half bad either!

Seriously, though. Keep up the good work!
 
Sometimes looking at the work of others gets me all depressed. I know I'll never be able to gather up enough patience to do that kind of thing.

Your new case is looking awesome already. You obviously know what you're doing. =]

Can't wait to see it when it's finished.
 
Any word on the next update? It's been almost two weeks ;)
 
Sorry about the lack of updates guys and thanks for all of your comments. I have a bunch of updates today but i have a problem. My camera was smashed by a piece of aluminum so I get to buy a new camera. I have tons of work done guys, and everything is looking great.

I've been trying to figure out the side panel and matching up the lines and everything so i can cut the aluminum.

In this photo, the black is the cover made out of aluminum with a black satin finish. The brown cardboard will actually be koa veneer and on top of that, a well lit, very pretty, motherboard.

Here's the picture:
u10000.jpg


there is no more important safety rule than to wear these, safety glasses:
v4.jpg


I've been working on the interior a lot and I made this HDD cage out of some aluminum:
v3.jpg


I put this in the case, and it was too big, and ugly. I did some thinking, a lot of thinking, and this crappy picture gave me some inspiration.
v14.jpg


Being able to see the hdds from the inside with some sort of lighting in there would be really sweet. I know that didn't make much sense but i'll show you what i've come up with. What follows is the process I went through to get the final design.

First off I started with this:
v11.jpg

I'm going to make another plate and attach everything to it and center it off the front.

I'll make a little craddle out of 1/2 inch aluminum:
v10.jpg


Oh i forgot, this little beast is the dvd drive:
v5.jpg


Then I tried this:
v12.jpg


With a little curve:
v13.jpg


Then I had a thought:
v15.jpg


The brown piece would be made out of acrylic with the characters for Yuugou engraved. I've wanted to get those in this mod somehow without having them overpowering since putting characters on a case is somewhat cliche.

Out of the case, this is what it looks like:
v7.jpg


I already made the template for it out of hardboard:
v8.jpg

And i'll cut this out today.


In other news, I've been working on the side panel too.

First I need another template:
v.jpg


after cutting the template and shaping it so the curves are perfect:
v1.jpg


After the trusty router table again:
v2.jpg


And its on:
v6.jpg


And one last pic. This is the mesh that I will be using on the inside of the case:
v9.jpg


I went to my local alu supplier today and got some new material to help finish this mod.

First thing is to build the HDD cage. I made an MDF template again and used it to make a rough cut of the alu:
v901.jpg


I did both of them at the same time to make sure they'd be perfect:
v902.jpg


The screws were too long which means its time for some grinding.

From this:
v904.jpg


I took this pic with one hand while grinding with the other:
v905.jpg


To this:
v906.jpg


And a lot of sanding later, we end up with this:
v913.jpg


v914.jpg


Here is a teaser shot of something in the works when i get back to school, you'll get an idea of what i'm going for though. I picked up this hunk of aluminum today:
v903.jpg


I also got this:
v900.jpg


I decided to make the inner cutout panel thing out of one piece to minimize screws and such. To do that i needed a big piece of alu like the one above.

The templates:
v912.jpg


The shape drawn and ready to be cut with the jigsaw:
v907.jpg


Being routed:
v908.jpg


Finished:
v910.jpg


This piece needs to be bent in the middle and curved in the oven. I can't do this until i get back to school though, my oven isn't big enough to curve it before its bent :duh:
v909.jpg


Next up is getting the hdd cage ready to be mounted to the secondary front plate. More on that later. I also need to finalize a front design so I can get that out of the way. Stay tuned.
 
You sir are a bloody genius to be able to pull of this type of project! You should start up a custom wood case business ;)
 
Looking great as always. Nice to see the PSA a la Norm Abram.
 
Thanks a lot guys.


I had a few pictures on my camera before it got smashed so here they are.

I had a do a bunch of stuff before going back to school since my table saw isn't there. One of these things was to deal with the mesh.

I started with this:
v990.jpg


And after a huge pain in the A and a long time of trying to figure out how to work with this material without destroying it, we get this:
v991.jpg


I think this mesh all the way around is going to look very hot. I cut that mesh to width but need to get the curves done before cutting it to length. I'll have that done later.

I mocked up the interior area with the finished hdd caddy:
v992.jpg


I have a new camera (Canon SD630) and I finally was able to take pictures of all the work i've been doing, and as you'll see, I've been doing a lot.

First off, if you remember that big hunk of aluminum that smashed my camera, I needed to do some extensive milling with it. All told, this took about 6-7 hours but i think it was worth it:

w5.jpg


w4.jpg


w6.jpg


And with the drive in:

w7.jpg


w8.jpg


Next step in the modding marathon was to redo all of the previous milling with a better mill bit. I hate sanding crappy milling jobs so i redid them instead and they came out great.

I redid the back panel and also milled a grove for my homemade i/o shield:

w3.jpg


I also milled the bottom part of the back place as well as the front plate:

w.jpg


The front plate also got some special treatment. Here I can show you guys how the front works finally. There is a plate that the hdd/dvd assembly are attached to. This assembly slips into slots and is screwed, like so:

w2.jpg


w1.jpg


And with the hdd and dvd drive not screwed on yet:

w9.jpg


w10.jpg


This took a while to mill but was worth it.

Some more pictures of the dvd drive assembly... so pretty

w17.jpg


w16.jpg


w15.jpg


The side panel got the same treatment with the bottom and re-milling but there is much left to do on this piece:

w14.jpg


Next came more work on the interior shroud thing. Remember that flat piece of alu that i cut on the router? I bent it using the metal break and then heated it up i the oven to soften it and bent it into a curve. It turned out pretty nicely.

w13.jpg


w12.jpg


w11.jpg


Thats it for now guys. More to come soon once more materials arrive.

Stay tuned.
 
How is the bent aluminum going to stay in place? Is it going to be epoxied, solder, etc? IIRC you can't weld it, but maybe braze it...
 
hey guys, thanks for the comments.

The best way to attach the curved alu would probably be welding. However, the flat part has to come off easily so the two sections actually won't be attached at all. The curved part will be attached to the frame at the bottom and side and maybe the back but for the most part, the two will remain seperate. I'll show you what i'm talking about in a hopefully soon update.
 
Thanks a lot guys for all of your comments. I'm starting to run out of gas on this thing (its been almost a year now) and I really want to finish it. Of course everything has to be perfect so I wouldn't count on me rushing anything. Now, on with the update.

There is still some more work to do with the hdd cage and dvd drive. I needed to mill a slot right here:

w28.jpg


w30.jpg


w29.jpg


I also attached the hdd drive to the front sliding plate:
w27.jpg


The dvd drive isn't attached to the front yet (next update) but it will look like this:
w31.jpg


Next. A random picture of where the card slot things go into:
w21.jpg


Now its time for fans. One will go here:
w20.jpg


The other will go in the back. I could use my circle cutter directly on the aluminum but i made a template out of mdf instead and used the router table like so:

w22.jpg


w23.jpg


Usually with these fans, you have to use bolts because fan screws don't really work but I figured I might as well just screw and tap into the fan casing itself, making the installation very clean.

Holes drilled:
w24.jpg


Screws in the back fan:
w25.jpg


w26.jpg


Next is attaching the dvd drive to the front and figuring out the method for the wiring. I'm thinking of using some sort of tubes with milled aluminum hold downs.

Stay Tuned.
 
will the dvd exit through the bottom of the case?
Since in the pics you posted of the dvd fixture sitting next to the HD cage it looks like the drive exit was facing downwards. Sure you didn´t want it sideways? Or will that be changed later on?
 
wow, this is some really great work. Very impressed.

BTW, the house models were great also.
 
Thanks a lot guys.

will the dvd exit through the bottom of the case?
Since in the pics you posted of the dvd fixture sitting next to the HD cage it looks like the drive exit was facing downwards. Sure you didn´t want it sideways? Or will that be changed later on?

The dvd drive was face down at that point to offset the effects of gravity so I could mock it up. The drive is indeed going sideways, like in some of the other pictures.
 
Thank you very much guys, your comments are much appreciated. I've done a bit of work and have a lot of pictures for you guys so here goes.

Firstly, I put everything back together after installing the fans.
Top Fan:
w100.jpg


Rear fan:
w101.jpg


And the aluminum put together so far:
w102.jpg


Nextly, I installed the back/top part of the inner shield thing, here:
w104.jpg


and here:
w103.jpg


The plexi for this should come tomorrow, once that piece is done, the interior should look very sharp.

I also finally mounted the dvd drive and cut the dvd drive slot:
w105.jpg


w106.jpg


I have a couple more interior shots:
w111.jpg


and:
w112.jpg


And now for your viewing pleasure, a bunch of pictures with the wood and aluminum combined. I'll let them explain themselves.
w107.jpg


w108.jpg


w109.jpg


w110.jpg


w113.jpg


w114.jpg


w115.jpg


w116.jpg


Thats it for now. Some of you might have noticed a taped up case panel in the background. That is part of my semi-secret side project that my roomate and I are working on as a distraction for this case as it gets tedious. The theme of this case should be obvious and those of you who saw me at Geforce LAN probably saw what was on my desktop. I doubt I'll make a true worklog for this project but i'll post pictures of it later but that is to be decided.

I'm going to the powdercoater tomorrow so i'll have a verbal update after that, stay tuned. Oh I almost forgot, a teaser of the side panel of "Project Scarlett"

w117.jpg
 
If you were to ask me, and you surely wouldn't, I think that the aluminum ruins the excellent case. It just looks cheap and out-of-place. Please tell me that it'll be hidden.
 
thank you

If you were to ask me, and you surely wouldn't, I think that the aluminum ruins the excellent case. It just looks cheap and out-of-place. Please tell me that it'll be hidden.

By aluminum, do you mean the color of it or the aluminum itself because believe me, the aluminum definitely is not cheap and I used 1/8 inch and 3/16 in plates just to make sure. The aluminum will all be powder coated a satin or matte black so in a sense, it will be covered. Also, the top and one side of the alu will be covered.
 
Goodgawd... I love this project. And I think the powdercoat on the aluminum is going to look awesome.... Can't wait for your next update:)
 
Goodgawd... I love this project. And I think the powdercoat on the aluminum is going to look awesome.... Can't wait for your next update:)


++

its all coming together VERY nicely!


I am sure you did, but i am going to double check your work....
did you account for the thickness of the powder coat around the DVD drive? i know its not much, but it looks like you where VERY close....
 
Thanks very much guys

++

its all coming together VERY nicely!


I am sure you did, but i am going to double check your work....
did you account for the thickness of the powder coat around the DVD drive? i know its not much, but it looks like you where VERY close....

There are numerous clearance issues throughout the case. I'm not sure if they are actually problems yet but I am taking the case the the would be powder coater in about an hour and I'm going to ask them about every single one and fix everything before it actually gets sent out.
 
Thanks very much guys


There are numerous clearance issues throughout the case. I'm not sure if they are actually problems yet but I am taking the case the the would be powder coater in about an hour and I'm going to ask them about every single one and fix everything before it actually gets sent out.

Ahh very nice!

I have 2nd guessed a couple of things on your case, but not because i don't think you didn't see them, but just in case you haven't because i would hate to see this work of art get ruined (in a sense) because the DVD doesn't fit into the slot.
Having to file out the powder coat right there would be an act against humanity!

I can't stress how awesome this case is, and how well you are putting things together, Gods speed!
 
Thanks for looking out for me. I check everything over and over but I can still miss things since there are so many parts to this case. I have to mill the slot a little bigger anyway since its a couple mm off center, not a big deal and it works, but hey, might as well.

I just got back from the powder coater. Its going to cost about 100 bucks which seems like a great deal. Also i'm going with a semi-gloss black finish and they had it on a motorcycle frame there and it looked very hot. Stay tuned for more hopefully in a few days.
 
Thats gonna look slick when its done!

$100 bones is probably a pretty good deal. My uncle and grandfather have a powder coating shop and they usually charge $20-25 per rim depending on the size, no more than $100 for a set unless they're dubs. :D A case like this is a little more intricate than just blasting a wheel or four then baking 'em I imagine.

I was going to have them do my case this summer since I'm going up to Idaho to visit but I've allready got my case in shop to get painted! :D Maybe I'll get a nice little mid tower with a an aluminum bezel to work on up there...

Keep up the good work!

/subscribed

Edit: have you thought of having it power coated Chrome? I know it might look too industrial for the great wood work but it might amplify the effect.
 
By aluminum, do you mean the color of it or the aluminum itself because believe me, the aluminum definitely is not cheap and I used 1/8 inch and 3/16 in plates just to make sure. The aluminum will all be powder coated a satin or matte black so in a sense, it will be covered. Also, the top and one side of the alu will be covered.
I meant the look, not the cost of the material. But yes, I assume that when "finished" it'll look a lot nicer.
 
I just thought of something kinda neat... Last time I was visiting family up north west my uncle showed me this cool looking powder coat called "Copper Vein" made by DuPont... It's kinda matte/ glossy black when it comes out of the oven but as it starts to cool it cracks all over the place revealing a bright Copper/ Gold finish underneath... The finished product has a very textured look but is quite smooth to the touch. :D Kinda looks like a cracked eggshell pattern.

you can check out all the samples here: DuPonts Sample Page and at DuPont's Web Site


Silver Vein:
silvervein.jpg

Gold Vein:
goldvein.jpg

Copper Vein:
coppervein.jpg


Theses sample photo's look a bit different then when i saw it in person, the spacing between the cracks must depend on the thickness its applied I imagine.
 
Thanks guys. Chroming would be a bit much for this case as the wood is the main focus, but interesting idea for a future project.

@drizzt81: I know you meant the "look" but rest assured, the finish will be superb

@AciDeX: Thanks for the suggestions, that powder coat looks wild, however a bit too much for this case. Semi-gloss black it is.

I've been doing a bunch of planning for things lately, including some sponsor searching. ;)

Stay tuned
 
Time for an update.

First off, I needed to attach those two dangly things to get that whole area working. Since I suck at describing things, here are some pictures:

Interior so far:
w303.jpg


These things will be attached with these blocks:
w302.jpg


They are attached with two 6-32 screw on the bottom:
w306.jpg


And tapped:
w308.jpg


And screwed:
w307.jpg

This was a bigger pain than it may seem, a lot of taking stuff apart.

I also experimented with lighting. My first plan didn't work, at all, so i went to plan B, CCFLs with minimalistic lighting. Right now, there are 2 white 12 inchers in the top of the case shining down.
w309.jpg


w310.jpg


w311.jpg


w313.jpg


w314.jpg


And a couple more pretty pictures:
w305.jpg


w304.jpg


One more thing. My roomate Taro designed and Photochopped a logo for the case:
YuugouLogosm.jpg


Lots more work to do but until then, stay tuned.
 
Dude they make nails.

Just lolling around. This thing looks amazing. Roughly how many hours would you say you have in it?
 
Dude they make nails.

Just lolling around. This thing looks amazing. Roughly how many hours would you say you have in it?

Nails? Ha, i use those to center punch for drilling the holes in the aluminum... actually i use a screw but anyway.

The hours in this case are rediculous. I'd say there were about 200ish in the planning alone. Actual work is somewhere around 800 probably (I work slow and redo things a lot if they're not good enough) and since I think about it almost constantly, I'd say the hours (if i was a lawyer and charging for my time) would be upwards of 1500 hours. Somewhat excessive but hey, its fun.
 
Alright guys and gals, i've been working almost non-stop on this thing and I have two big updates to show for it.

First off, my roomate helped me figure out a design for the front. For a while I played around with a few simple lines doing whatever but I became sick of meaningless designs so we picked a couple characters that look good and mean something that make sense. These two mean "carpentry" which in Japan, is an honorable thing.

Tell me what you think:
x50.jpg


This design will be cut out of the 3/16inch alu leaving either black alu behind it or some sort of paper, we shall see.

Next comes the rad shroud and fans; something I neglected until now.

I made the shroud itself by bending some 1/8 inch alu and putting rubber stripping along the top and bottom:
x3.jpg


To make powder coating easier, i decided to screw all the fans together with an Aluminum bar like so:
x2.jpg


x4.jpg


x5.jpg


Next I got to redo the supports for the interior shroud thing.

After some design changes, the old supports were too short so I needed to replace them with these:
x6.jpg


And done:
x7.jpg


That was the easy part. Attaching the shroud to these was something else.
Actually, i screwed up and the gap was too big:
x15.jpg


After the second one turned out great,
x16.jpg


I decided to do it again and ended up with this:
x17.jpg


x18.jpg


x19.jpg


x20.jpg


x21.jpg


Next comes some water cooling stuff. I milled the holes in the bottom plate to accept the bulkheads:
x14.jpg


Here:
x12.jpg


And here:
x13.jpg


And finally, my card retention mechanism has been shrouded in secrecy (mostly because I didn't have a plan) but heres what I'm planning:
x9.jpg


x10.jpg


Close Up:
x11.jpg


It seems to work quite well. Upon doing this though, i noticed a fundamental flaw in the case design that I'm going to have to work on ( I already figured it out). If you can guess what it is, uh, congratulations. It has something to do with the wood/metal interaction but everything should be fine.

This is part one of this weeks work. I have a lot more to show but i'll save that for tomorrow. Until then, stay tuned and comments are always welcomed.
 
looking sweet

I like the little cord from the fan getting a hole and getting cut down to the bottom
very simple, yet it looks nice

You got me on the flaw, I have been trying to point them out all along the way...

Keep the updates coming!
 
Back
Top