Navigation
Install the app
How to install the app on iOS
Follow along with the video below to see how to install our site as a web app on your home screen.
Note: This feature may not be available in some browsers.
More options
You are using an out of date browser. It may not display this or other websites correctly.
You should upgrade or use an alternative browser.
You should upgrade or use an alternative browser.
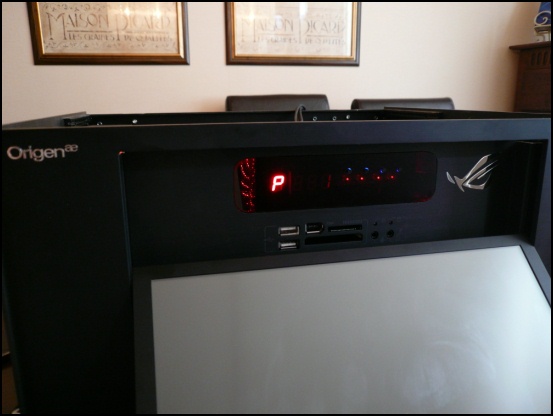
[Project] L3p L4n
- Thread starter l3p
- Start date
l3p
Limp Gawd
- Joined
- Oct 30, 2010
- Messages
- 386
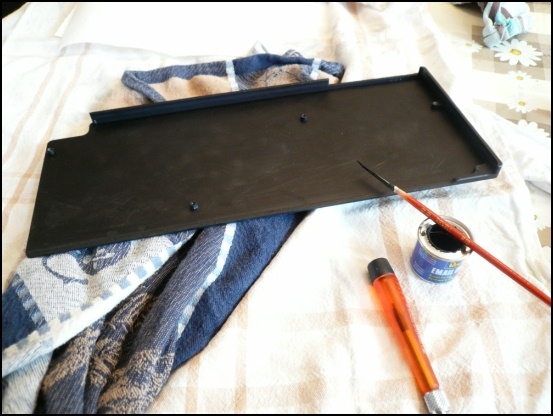
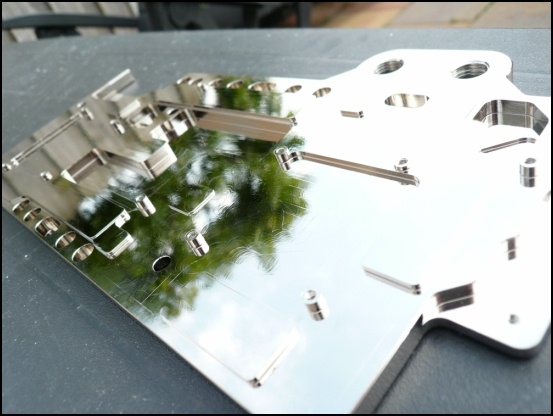
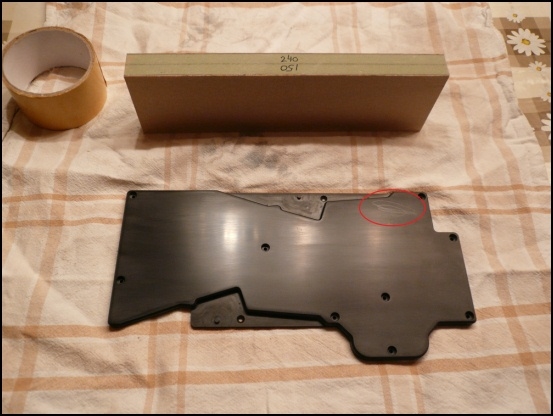
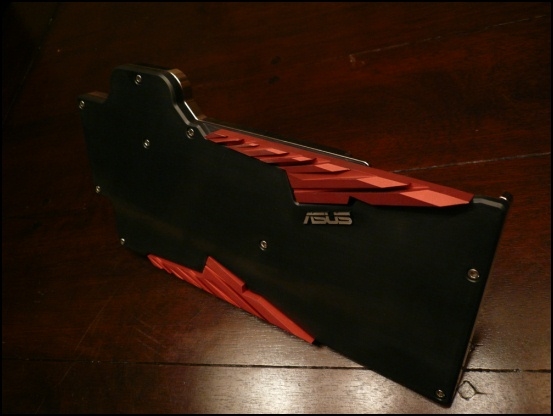
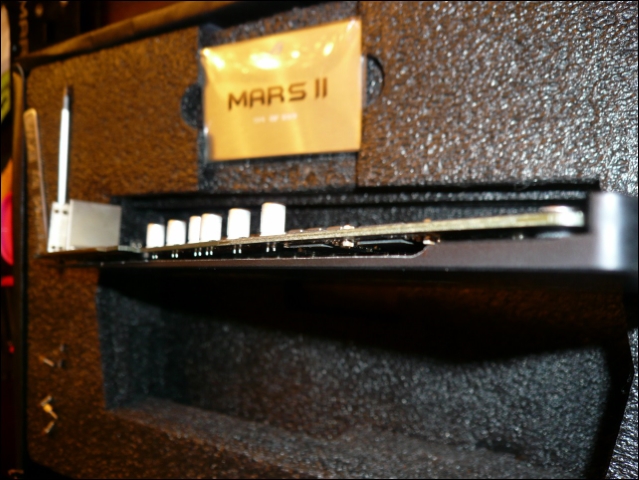
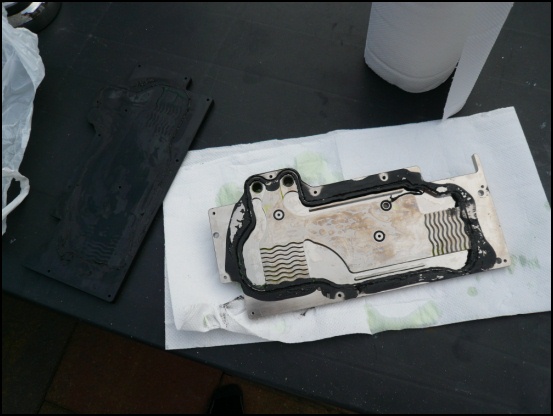
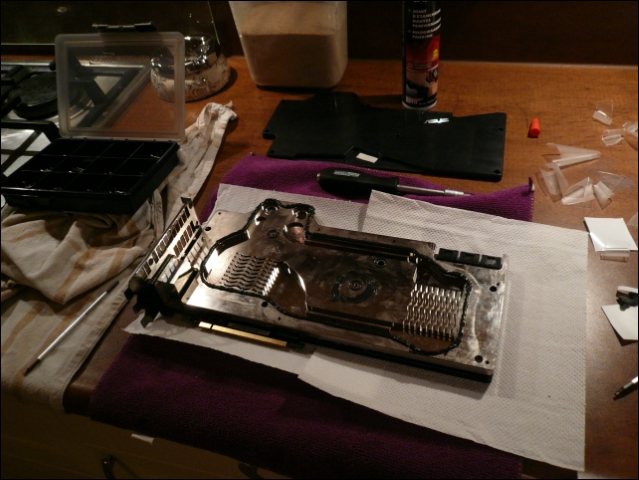
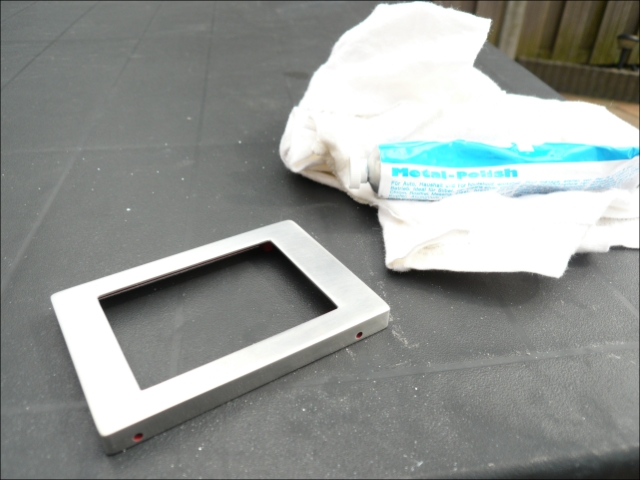
And the promised update ")
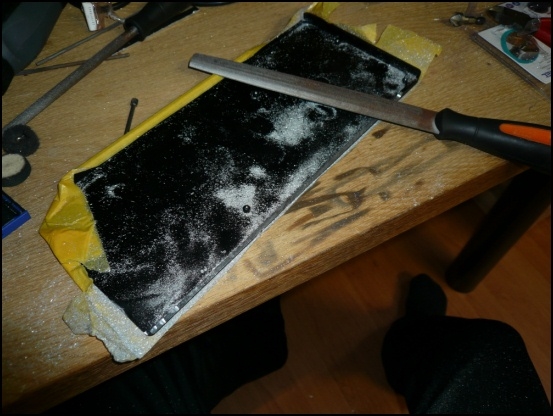
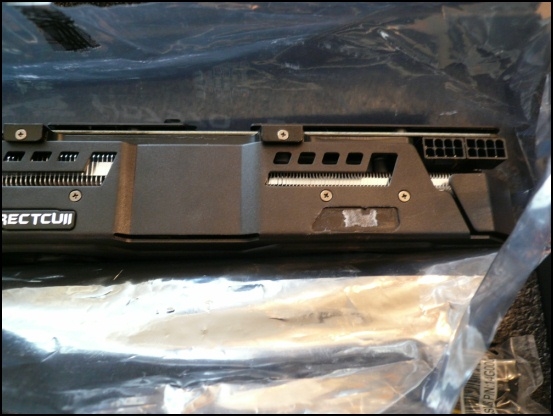
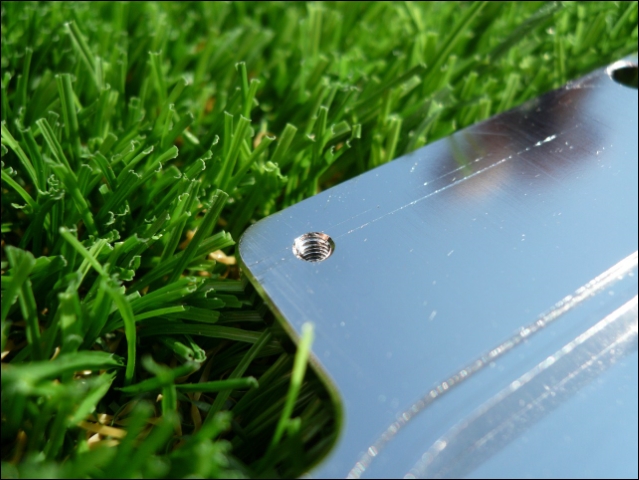
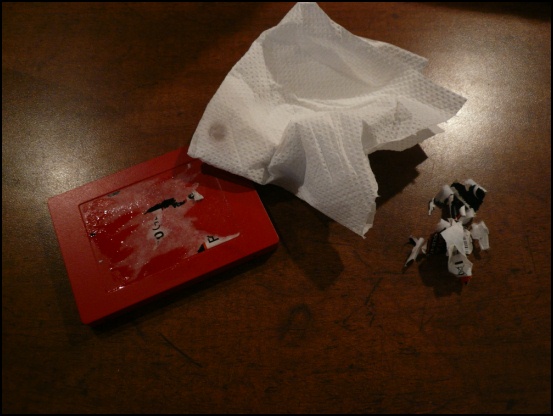
It all didn't start as I want to last week.
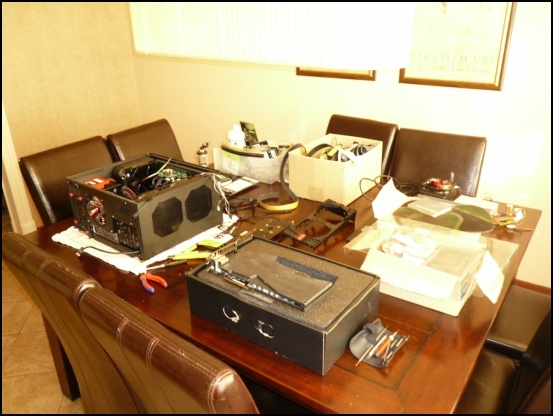
It started with one m3 hole that didn't align.
Forgot the pci bracket holder.
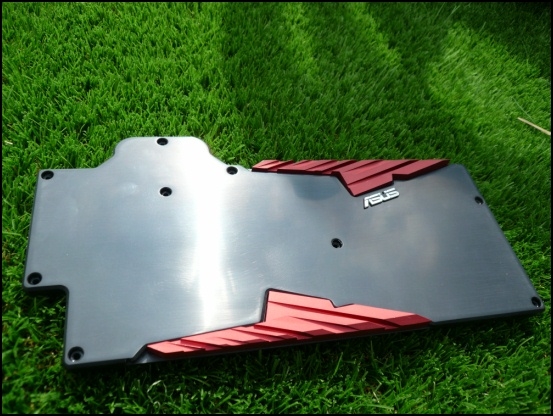
And the bottom border of the backplate.

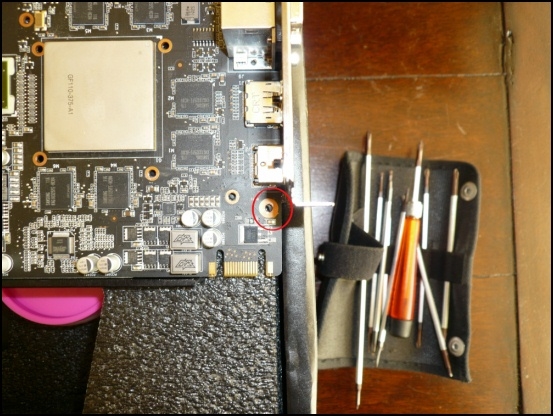
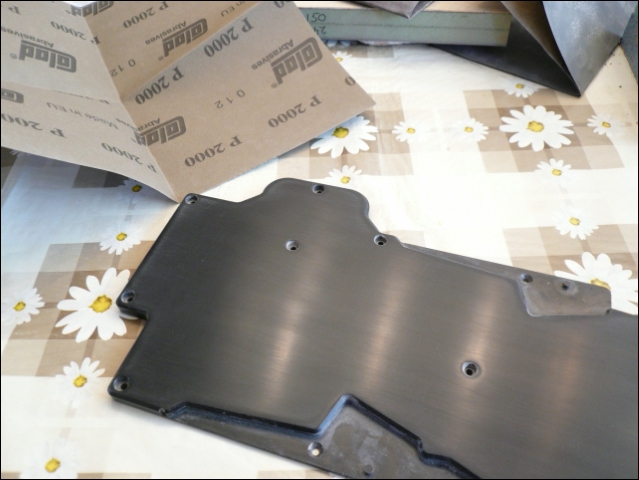
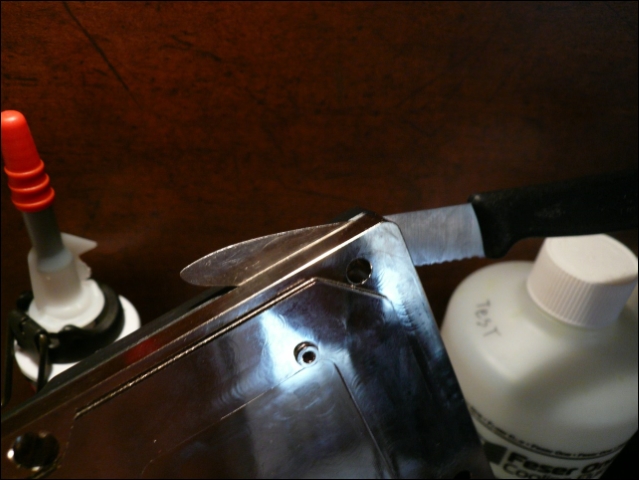
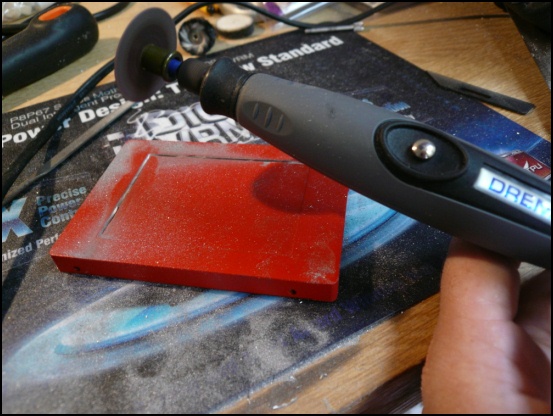
So, let's get the dremel.
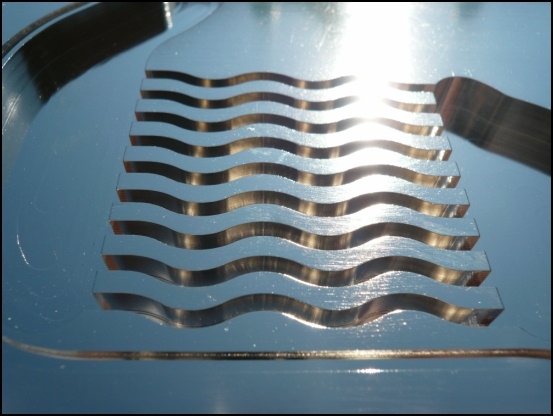
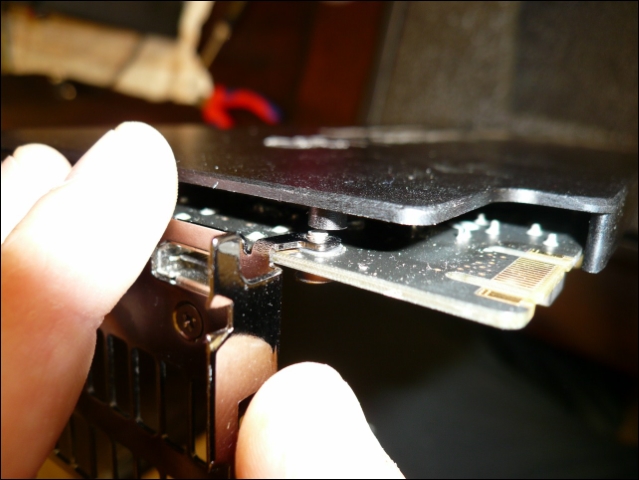
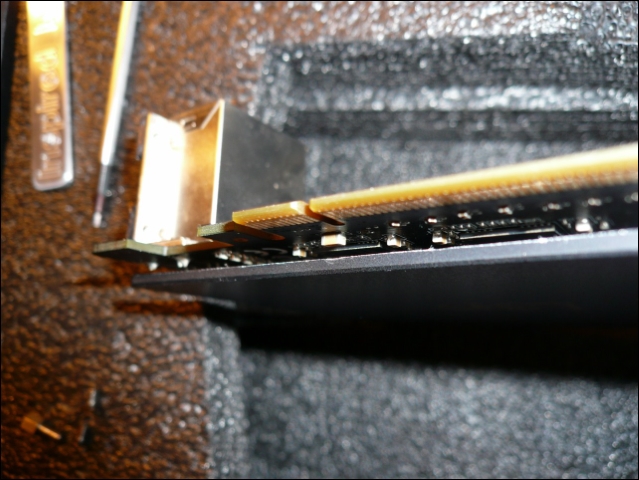
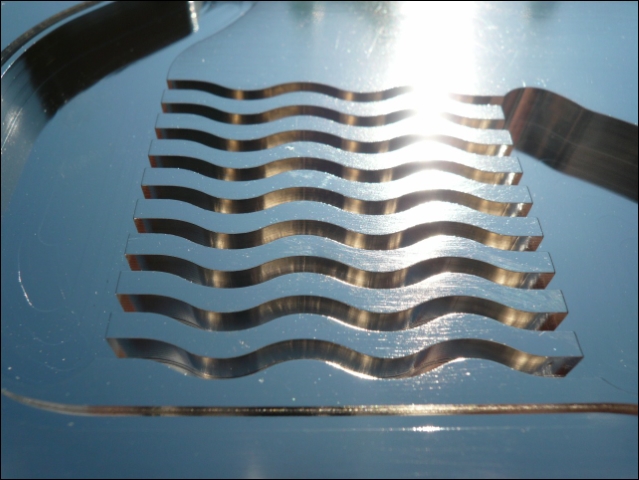
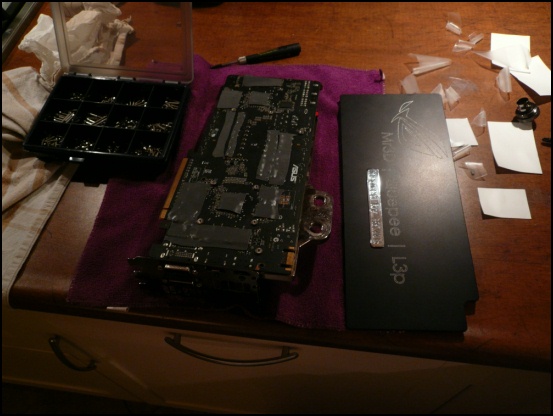
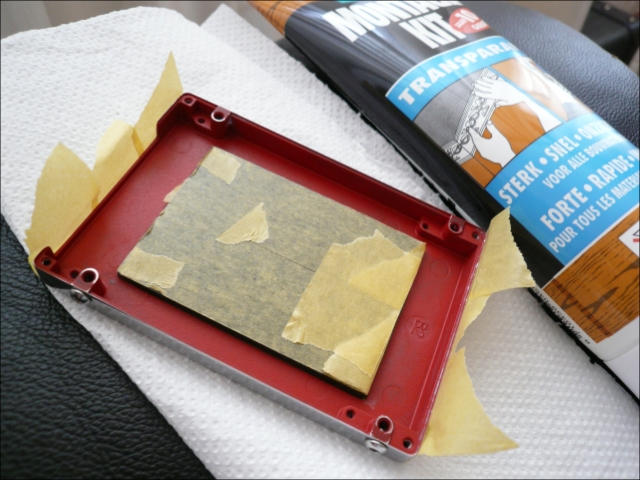
Appears this is possible to do
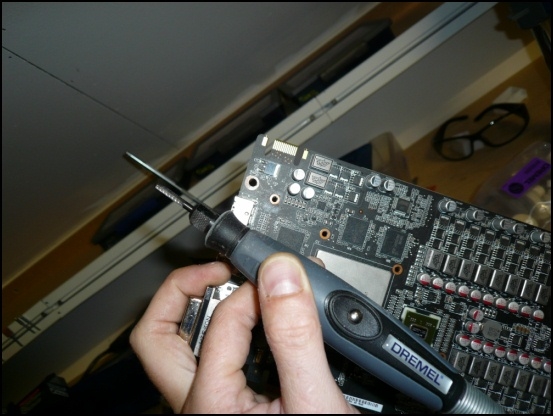
And the raw file.
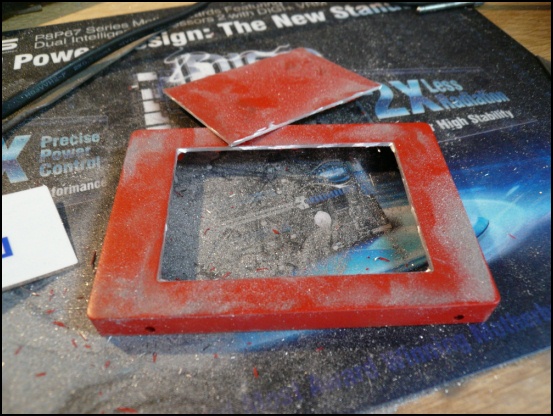
Made the OD of screw hole smaller.
Love these cutters!
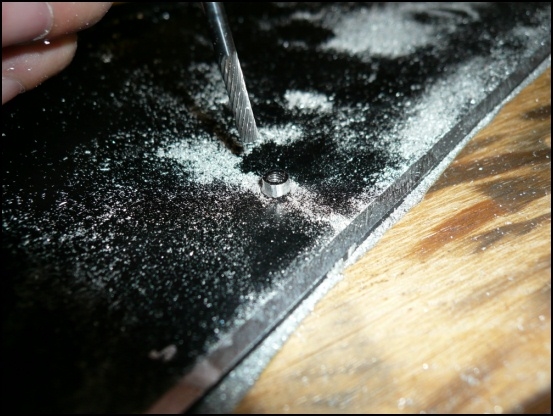
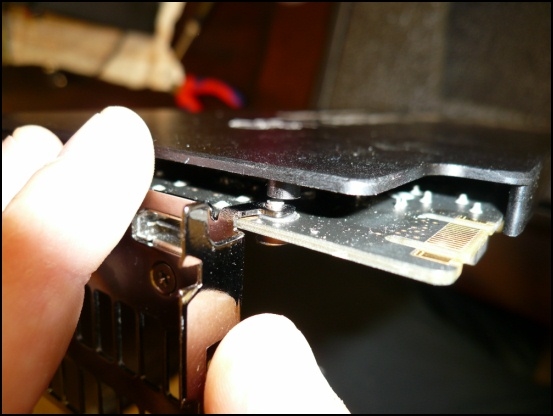
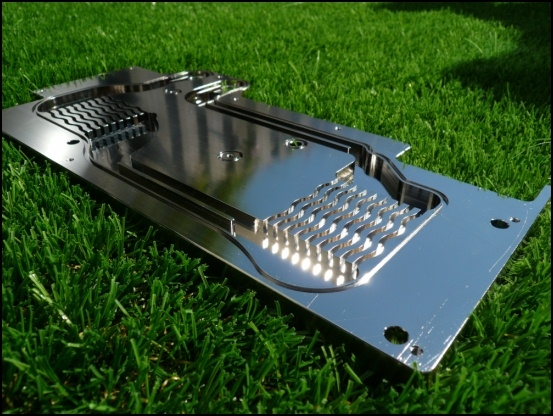
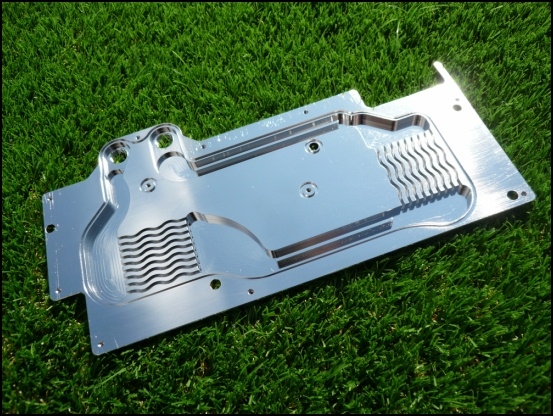
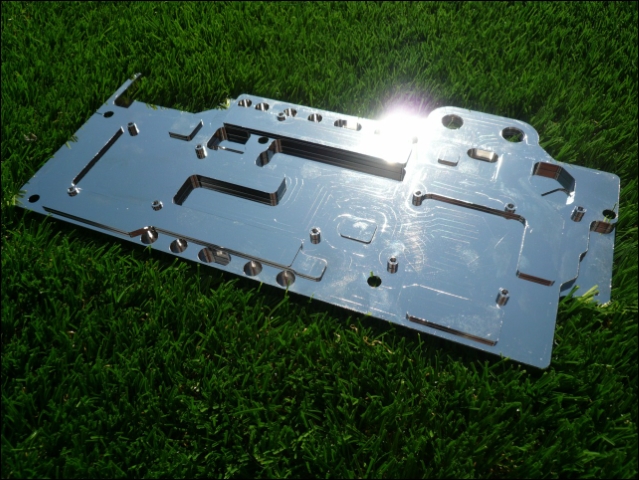
No contact with the backplate anymore.

And backplate screw holes align.
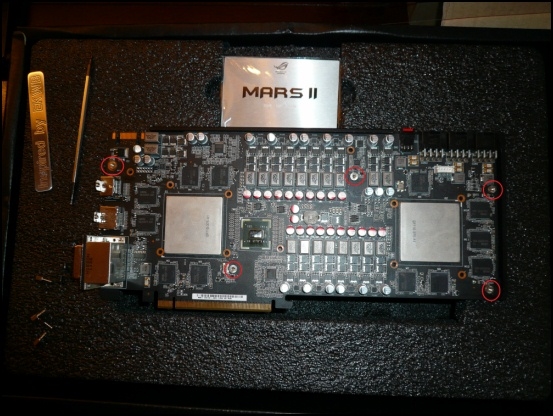
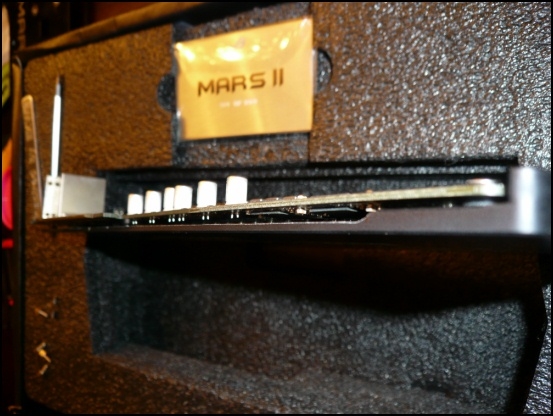
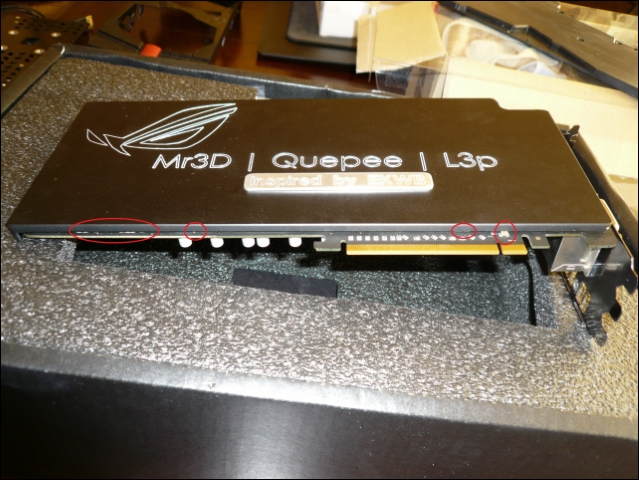
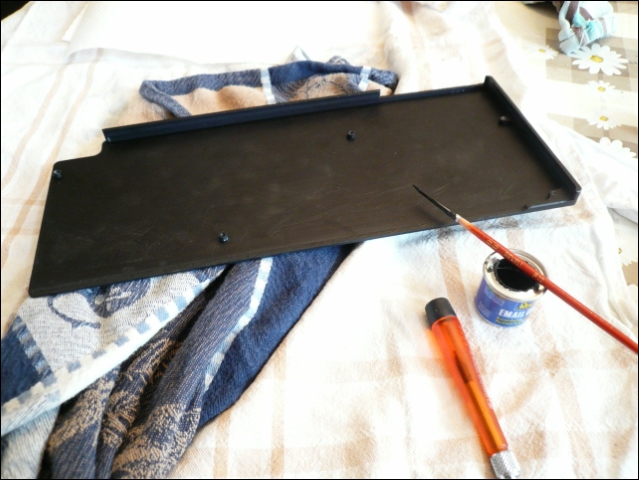
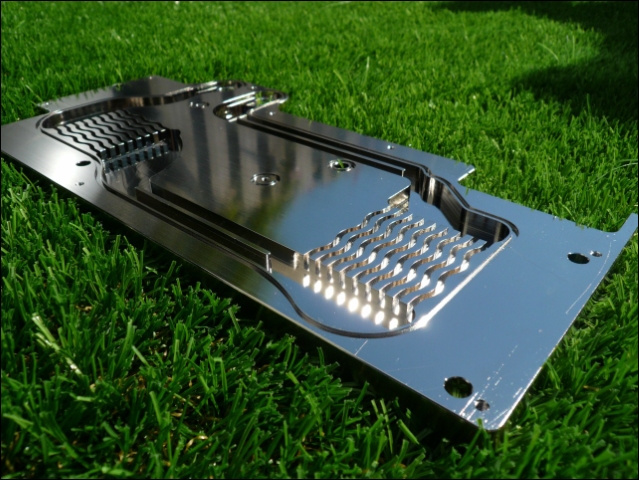
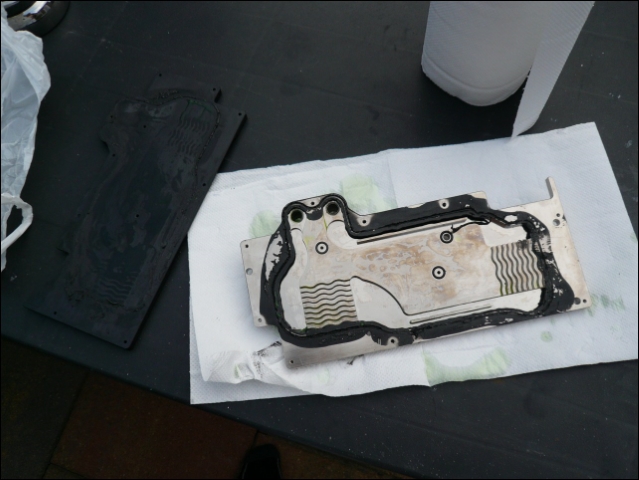
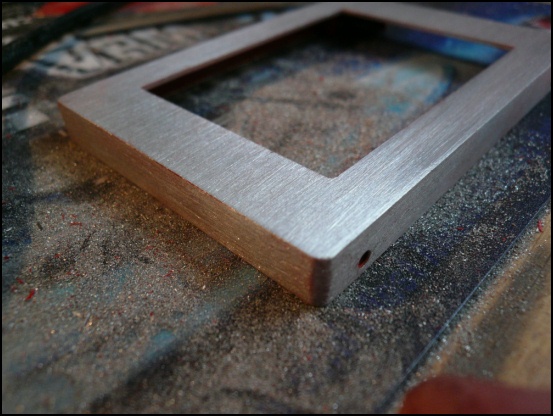
Covering it up. (Even if you can't see it)
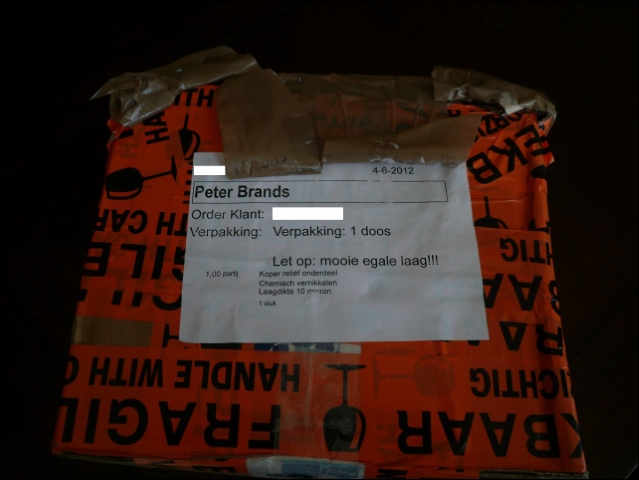
Already ordered some thermal pads from Highflow.
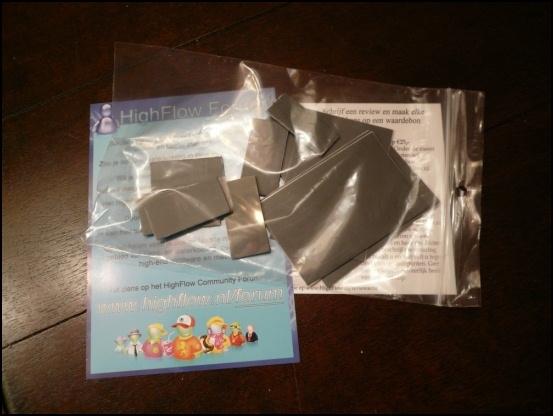
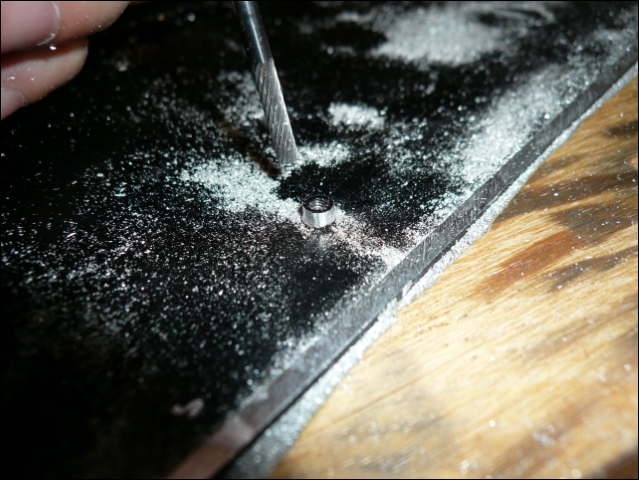
And the package arrived I've been waiting for

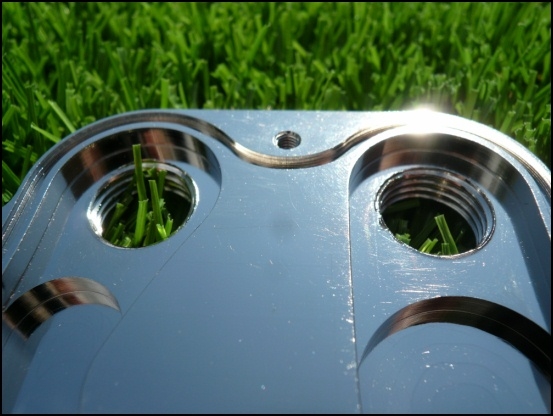
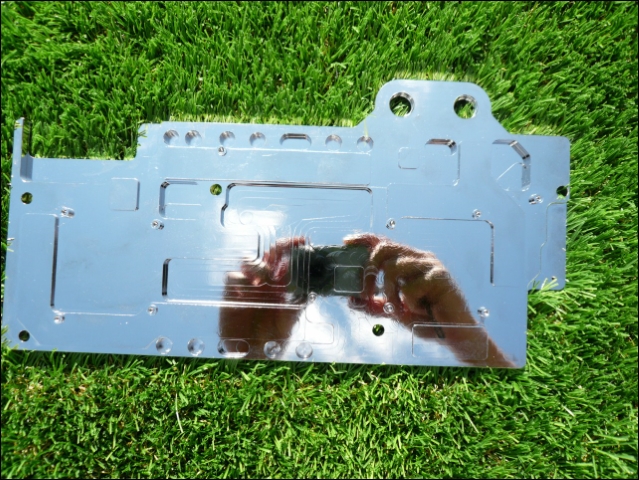
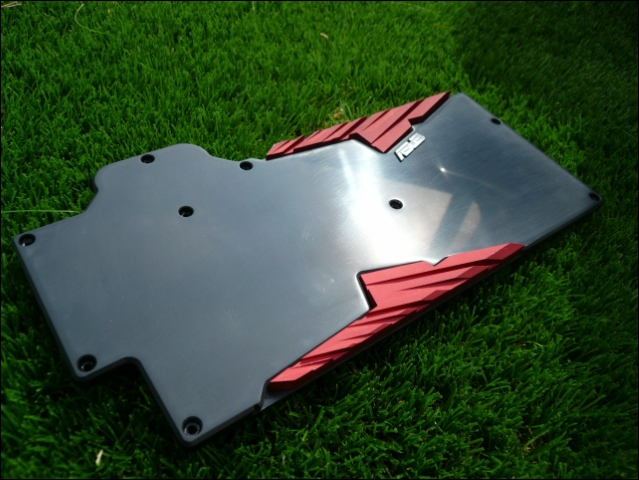
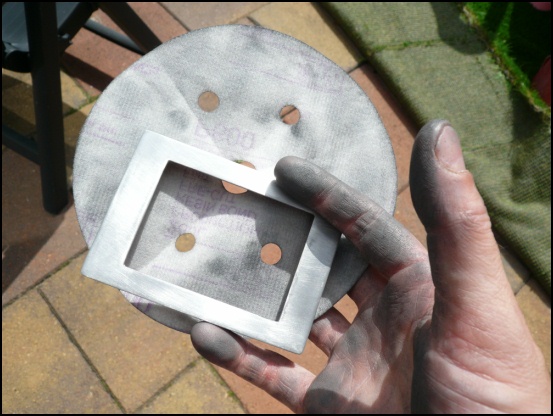
I have to say, all the tiny scratches that were already there are even more visible now in the right light.
However I'm really satisfied!


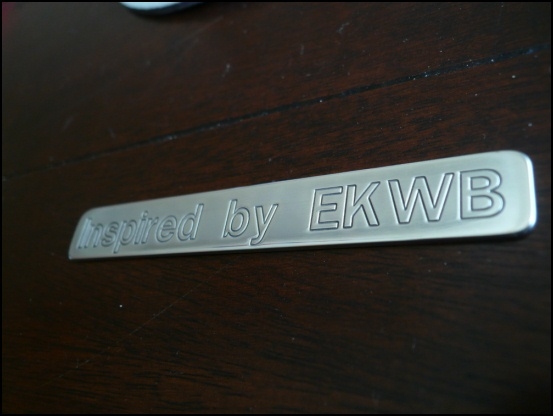
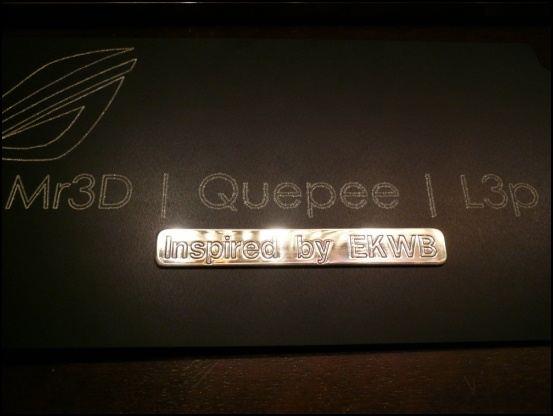
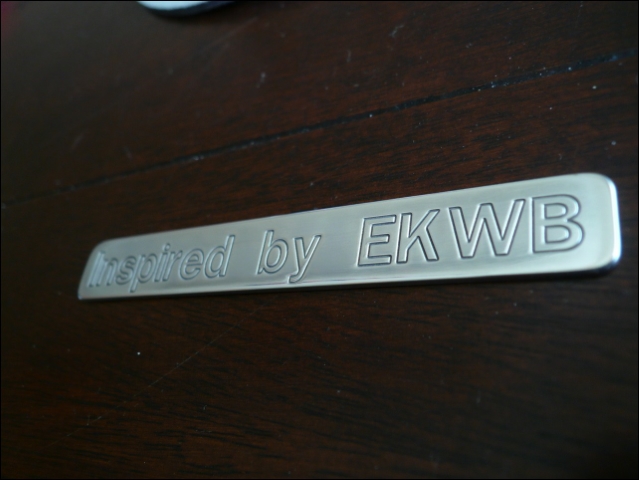
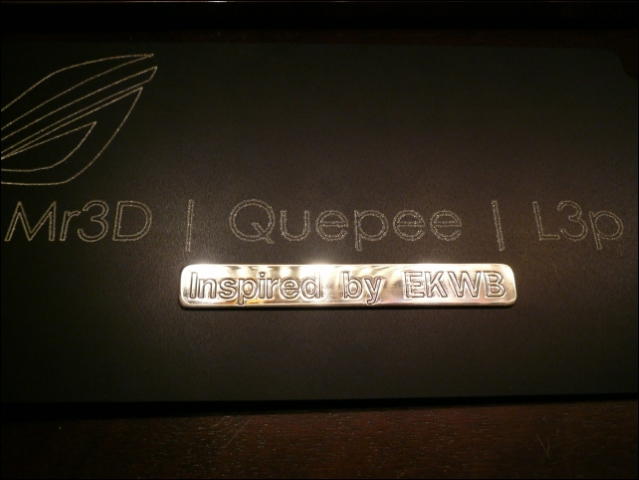
Want the EKWB plate in the same style
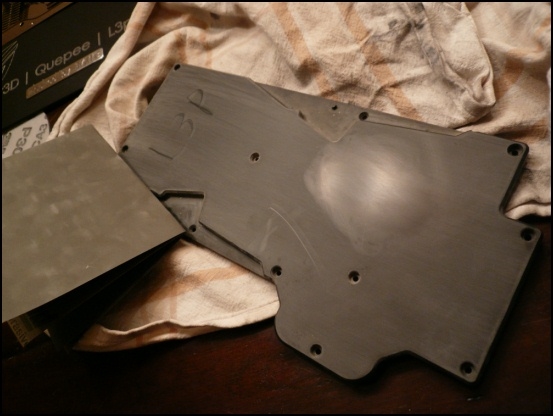
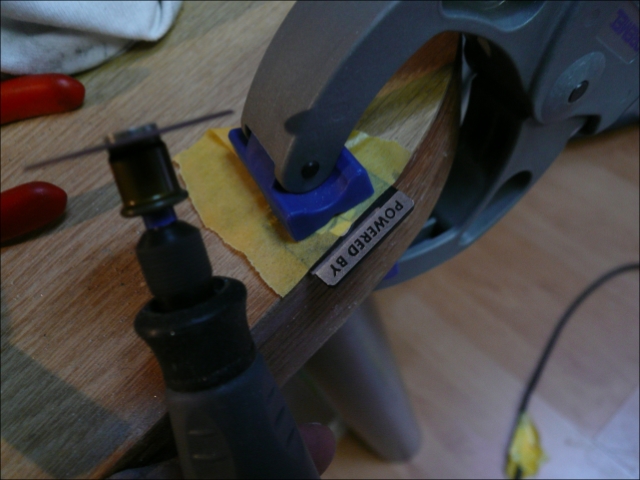
And the next problem ...... POM
When I just got the POM there was a little scratch on it.
I thought lets remove that with some P2500 .....
Well ..forget it.. wish I had asked someone with knowledge before I did that
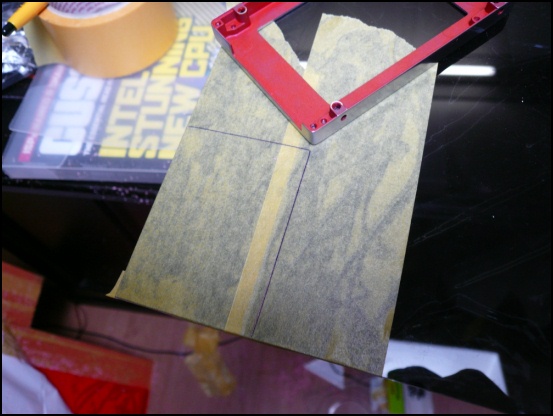
So eventually had to sand the complete top ... what a mess .
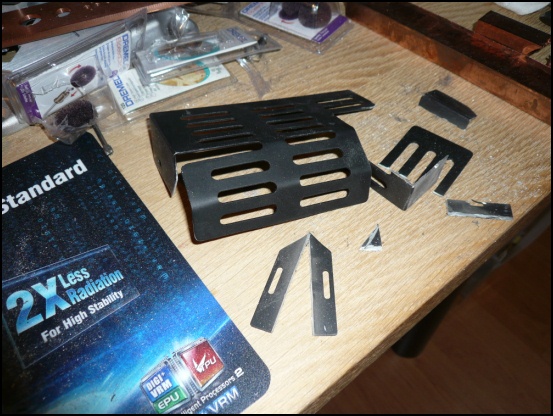
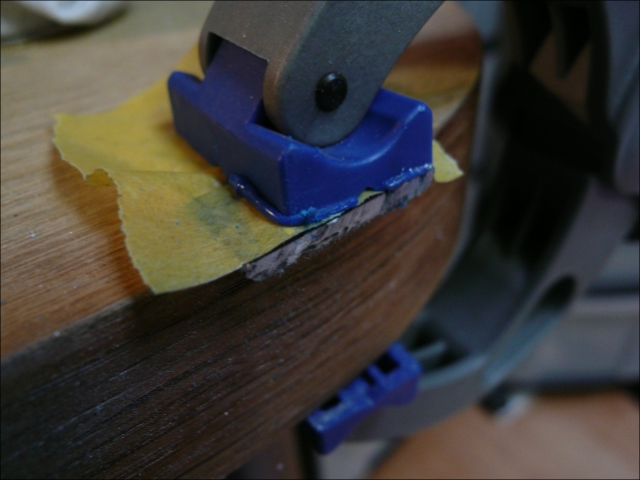
When I just touched it with a nail it already had a scratch on it.
It's like high carpet, when you chuck it in 2 different ways.
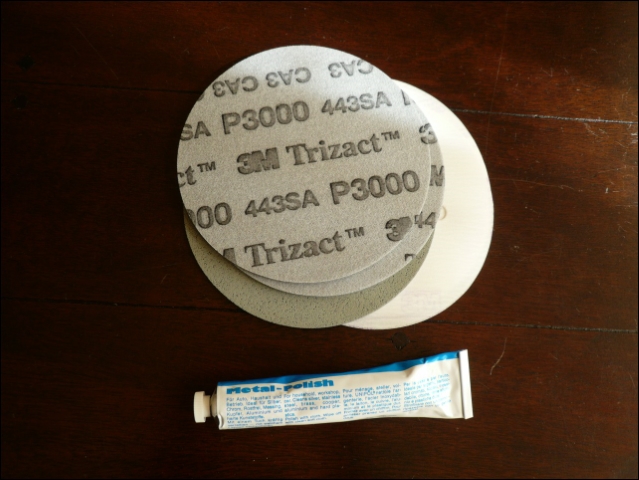
After some google, reading, and asking people I found out there are a few ways to recover it.
Machining it again, flaming it, sanding it in lots of grits
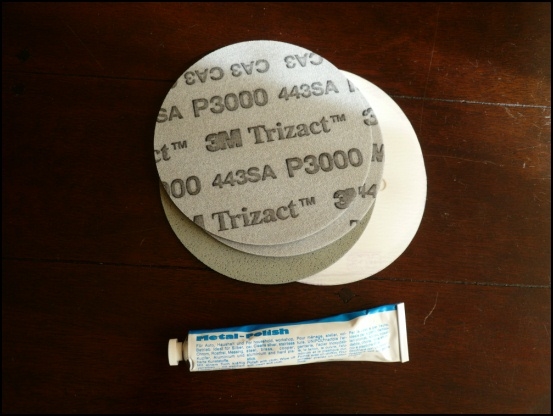
I chose the way to sand it like I lap a cpu. (And never again )
Started with P150, after that P240 (30 min)
You can see you can still easily scratch it with your nail
90 minutes with P600, P1000 and P1500

Next day my arms already didn't want to go further .. let's continue
P2000 it is.
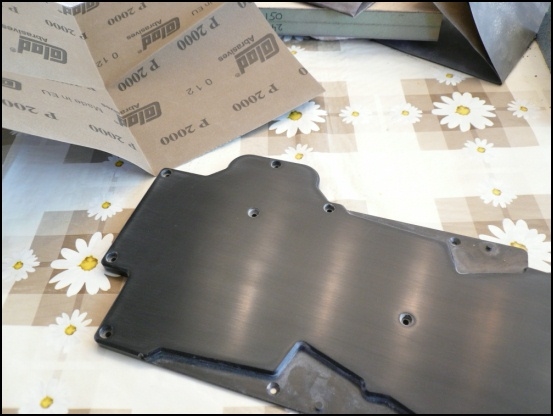
P3000, starts to look like something.
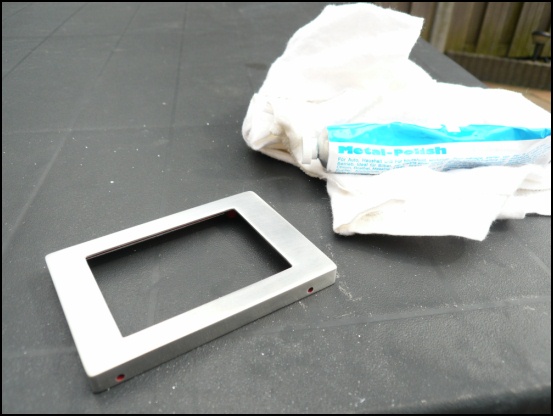
After sanding 3.5 hours I'm done with it
Borrowed something from the marsII's younger brother.
I'm satisfied!
Not able to scratch it anymore with my nails or any other softer object then POM. (Weird stuff)

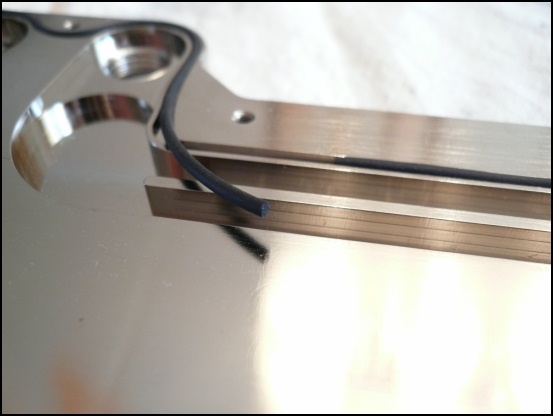
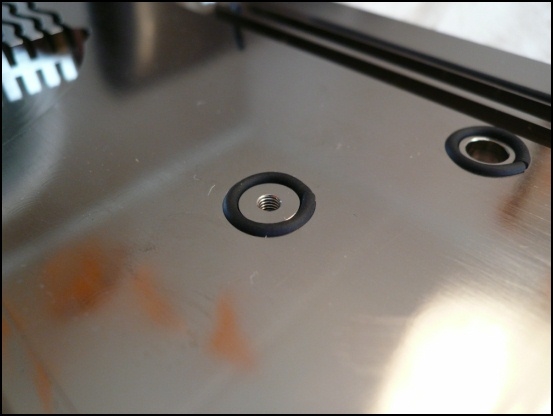
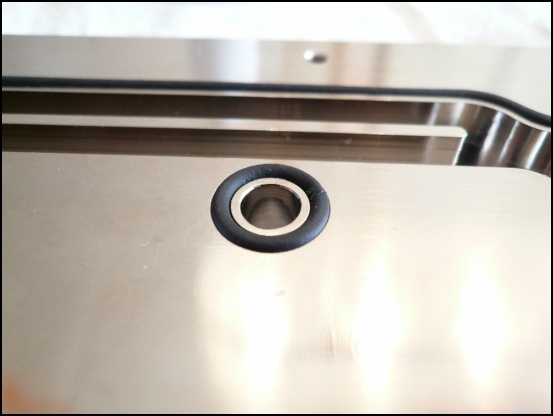
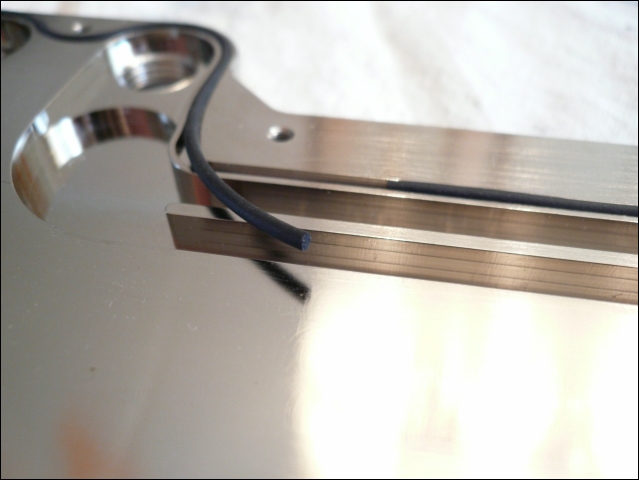
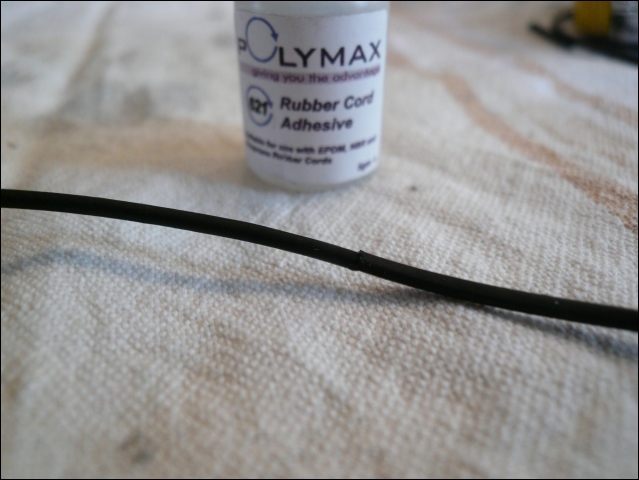
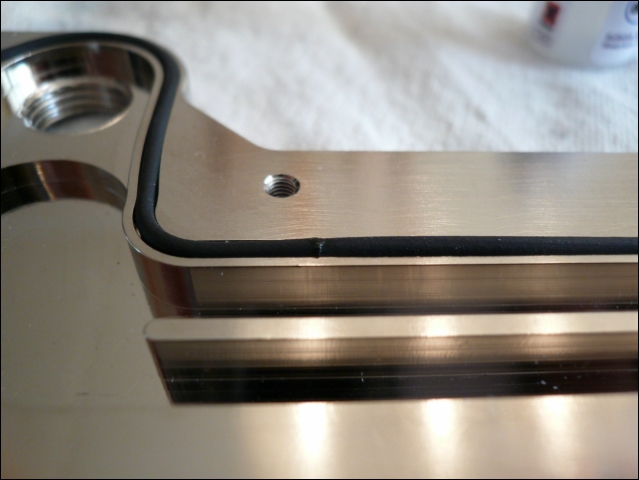
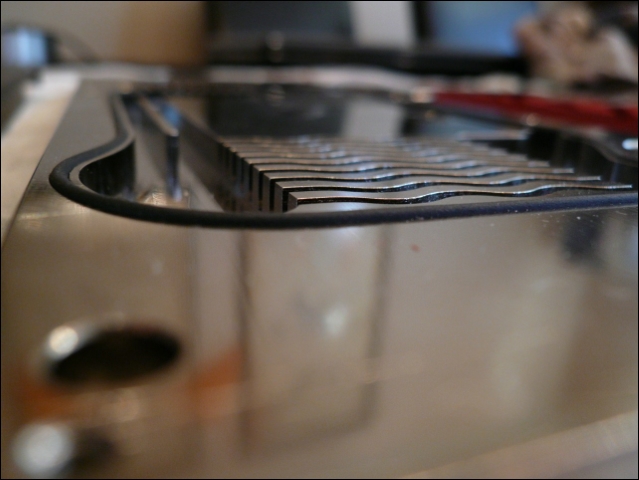
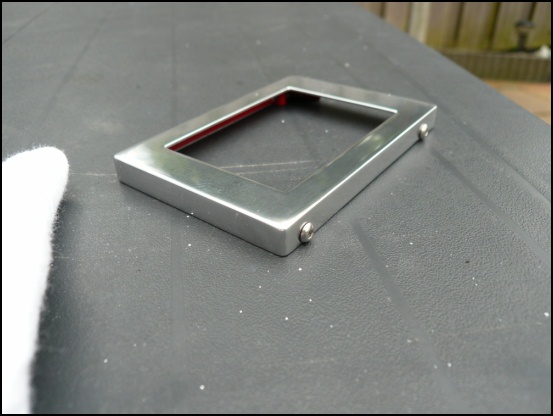
This is easier then I thought.
Put in the rubber, cut it on the exact size and glue it together holding it for 10 seconds.
The 'O-ring glue' smells like superglue. (And sticks to your fingers the same fast way)


I'm done with it for this week
Next week hopefully testing it on pressure and the mounting!

It all didn't start as I want to last week.

It started with one m3 hole that didn't align.

Forgot the pci bracket holder.
And the bottom border of the backplate.
So, let's get the dremel.
Appears this is possible to do

And the raw file.

Made the OD of screw hole smaller.
Love these cutters!
No contact with the backplate anymore.
And backplate screw holes align.

Covering it up. (Even if you can't see it)
Already ordered some thermal pads from Highflow.

And the package arrived I've been waiting for
I have to say, all the tiny scratches that were already there are even more visible now in the right light.
However I'm really satisfied!


Want the EKWB plate in the same style
And the next problem ...... POM
When I just got the POM there was a little scratch on it.
I thought lets remove that with some P2500 .....
Well ..forget it.. wish I had asked someone with knowledge before I did that
So eventually had to sand the complete top ... what a mess .
When I just touched it with a nail it already had a scratch on it.
It's like high carpet, when you chuck it in 2 different ways.
After some google, reading, and asking people I found out there are a few ways to recover it.
Machining it again, flaming it, sanding it in lots of grits
I chose the way to sand it like I lap a cpu. (And never again
)
Started with P150, after that P240 (30 min)
You can see you can still easily scratch it with your nail

90 minutes with P600, P1000 and P1500

Next day my arms already didn't want to go further .. let's continue
P2000 it is.
P3000, starts to look like something.

After sanding 3.5 hours I'm done with it

Borrowed something from the marsII's younger brother.


I'm satisfied!
Not able to scratch it anymore with my nails or any other softer object then POM. (Weird stuff)

This is easier then I thought.
Put in the rubber, cut it on the exact size and glue it together holding it for 10 seconds.
The 'O-ring glue' smells like superglue. (And sticks to your fingers the same fast way)

I'm done with it for this week
Next week hopefully testing it on pressure and the mounting!


l3p
Limp Gawd
- Joined
- Oct 30, 2010
- Messages
- 386
Sometimes everything goes as I want ... sometimes not.
That next to my 2 jobs at the moment, got some problems finding time
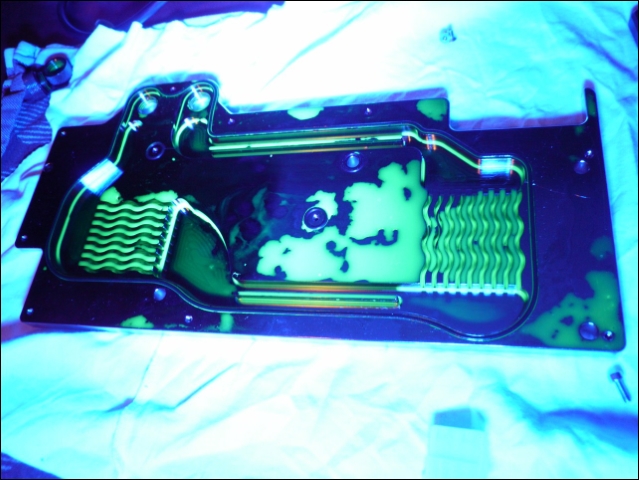
Last week after a 3 hour test I noticed this ...
So time to get my UV light, maybe I can discover more.

Setup.
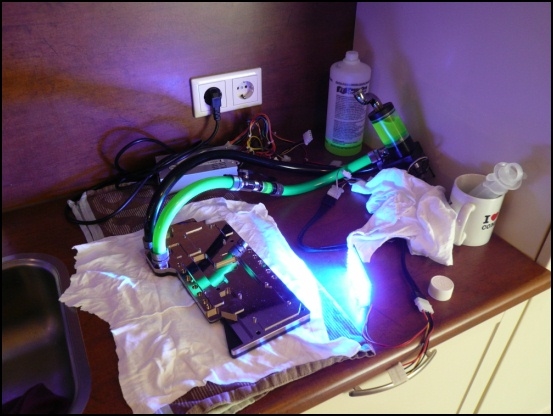
Lights off.
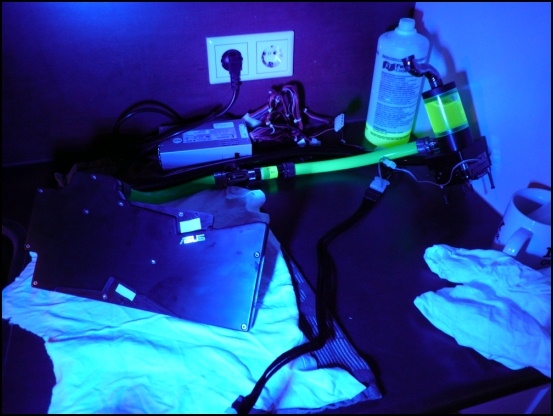
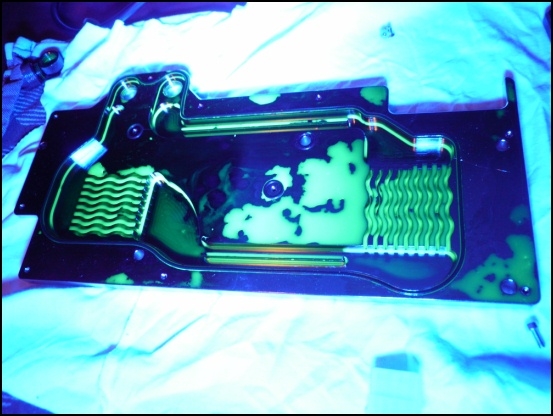
Probably 2 small leaks.
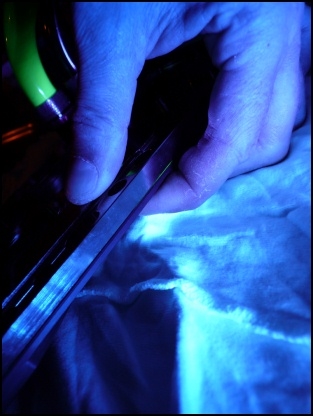
So opened it carefully again, maybe I can see more.
Going to test it once more with a POM remount and 2x serial connected D5's. (This to be really sure)
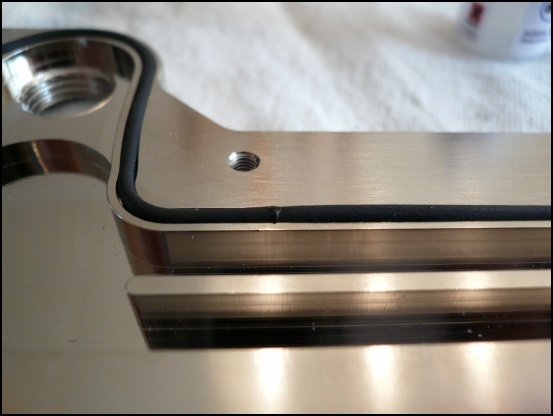
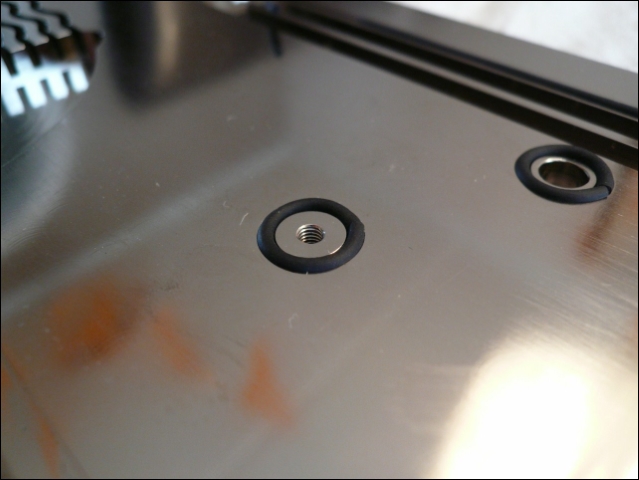
This time with a new glued big O-ring and small cast O-rings.
Problem could be the distance between some of the M3 bolts (6-7cm) to keep the POM really flat on the copper.
It does seem it's completely flat..
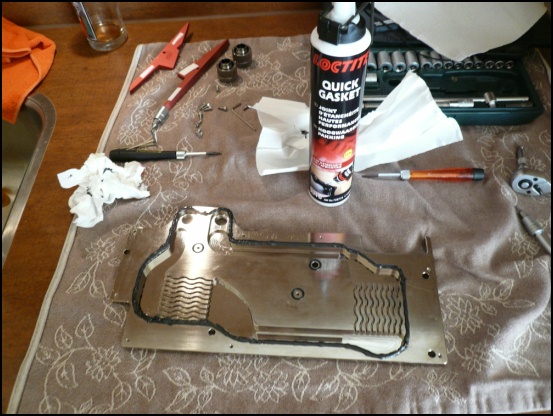
So one solution is to use Loctite Quick Gasket.
Or ... I'm going to add some M3's ... and probably polish the POM again. (I will succeed!! )
Anyway, learned something again
That next to my 2 jobs at the moment, got some problems finding time
Last week after a 3 hour test I noticed this ...

So time to get my UV light, maybe I can discover more.
Setup.

Lights off.

Probably 2 small leaks.
So opened it carefully again, maybe I can see more.
Going to test it once more with a POM remount and 2x serial connected D5's. (This to be really sure)
This time with a new glued big O-ring and small cast O-rings.
Problem could be the distance between some of the M3 bolts (6-7cm) to keep the POM really flat on the copper.
It does seem it's completely flat..
So one solution is to use Loctite Quick Gasket.
Or ... I'm going to add some M3's ... and probably polish the POM again. (I will succeed!!
)Anyway, learned something again
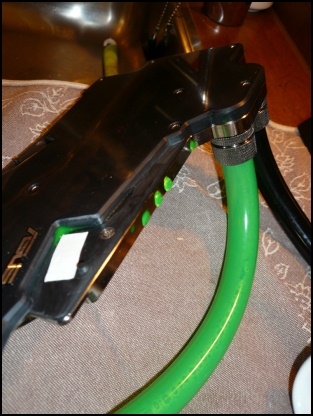
I really think you should go with the gasket maker. I'd expect the hard glued section of the cord to always be a failure point. Not only that, thats o-ring cord looks abit too thin for your application. It doesn't seem to bulge much past the deck.
Still, awesome stuff man.
Still, awesome stuff man.
l3p
Limp Gawd
- Joined
- Oct 30, 2010
- Messages
- 386
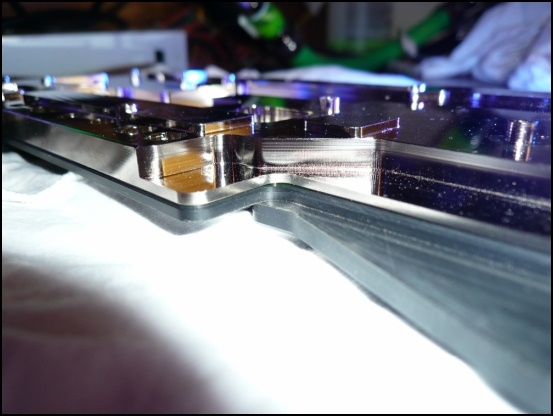
Second remount + leaktest was a failure too
So .. ordered the Loctite quick gasket
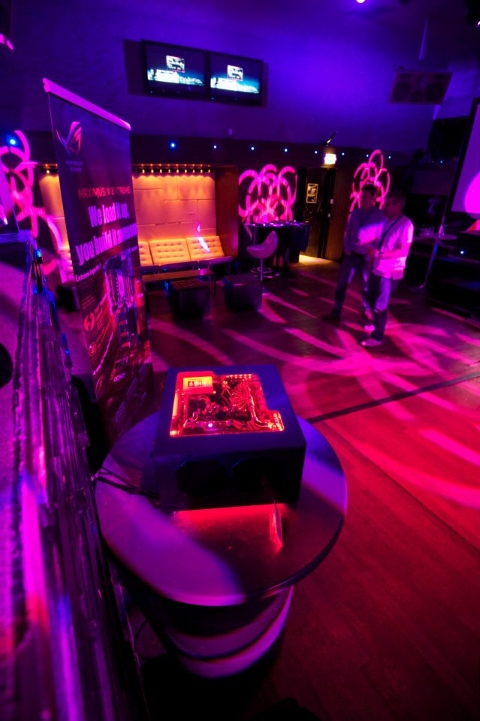
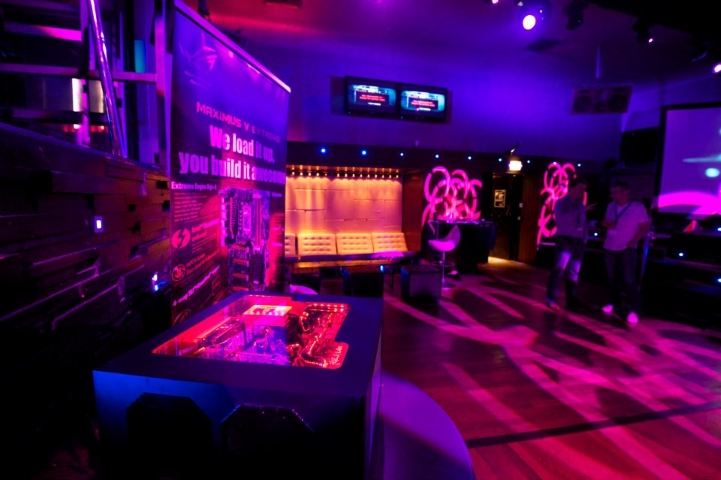
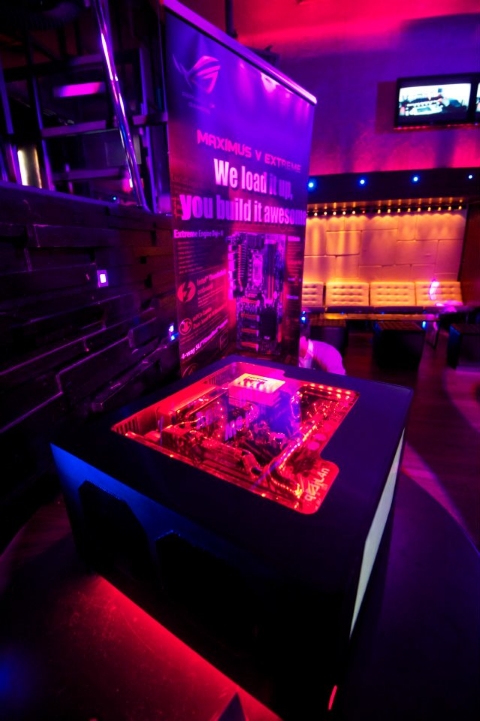
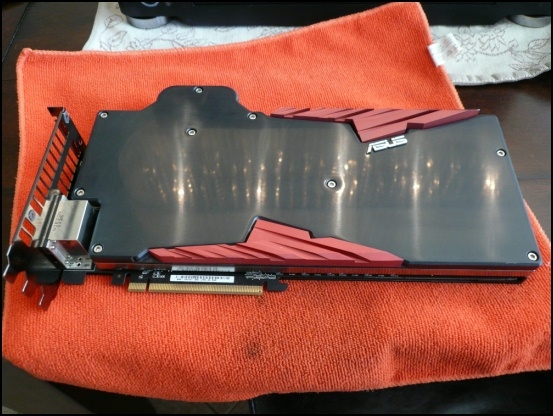
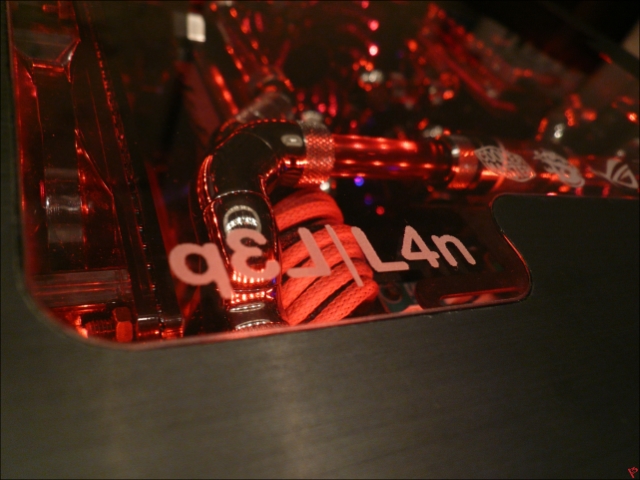
Met Rogier from Asus last friday for a coming project and ..
He asked me if he could borrow L4n for an Asus media event next friday.
Told him I couldn't get it fully running that fast, that was no problem.
So he would pick it up next tuesday..
Oops...
Will be some late evenings this weekend
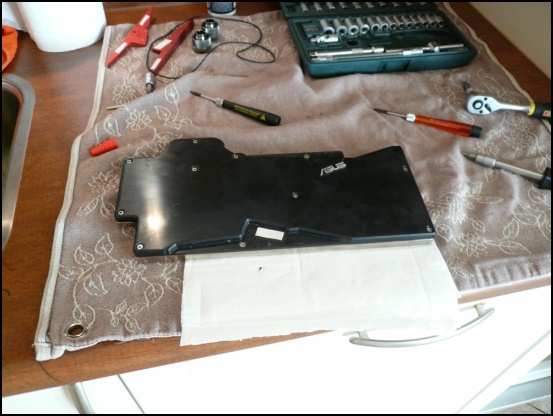
First tests without PCB.
After a full leaktest still dry!!
Also didn't leave any Loctite
And then I had to remove it again for a full mount..pff
I really had to cut it loose.

And clean it for an hour
Used and army of heat transfer pads on back and front

And a new layer of Loctite.

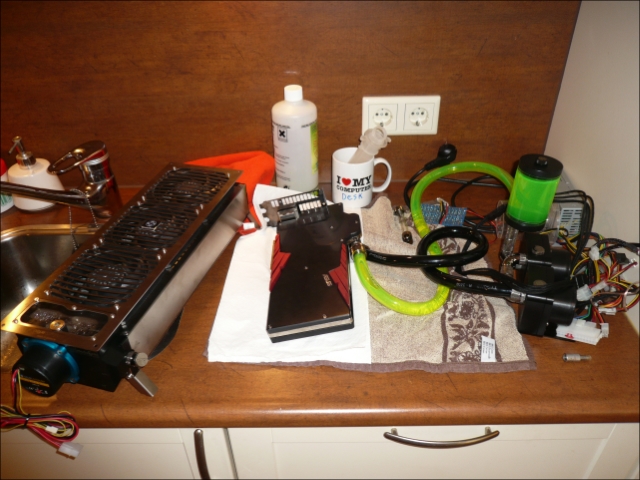
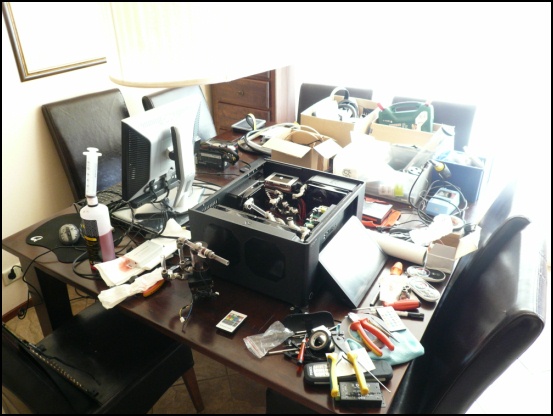
Made a quick movie that night of the mess.

Next day.. change the bracket .. for the third time.
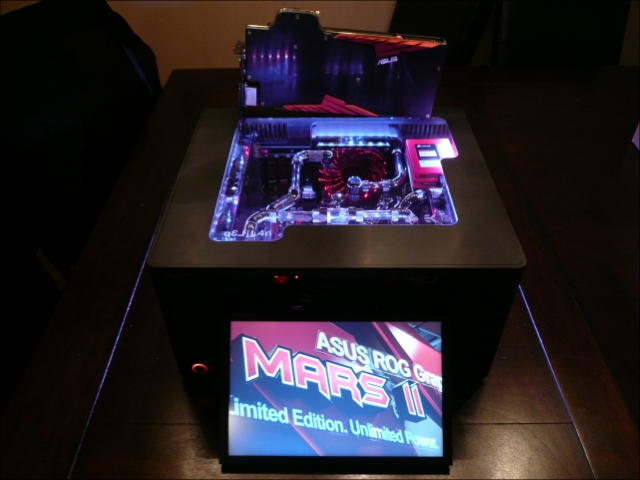
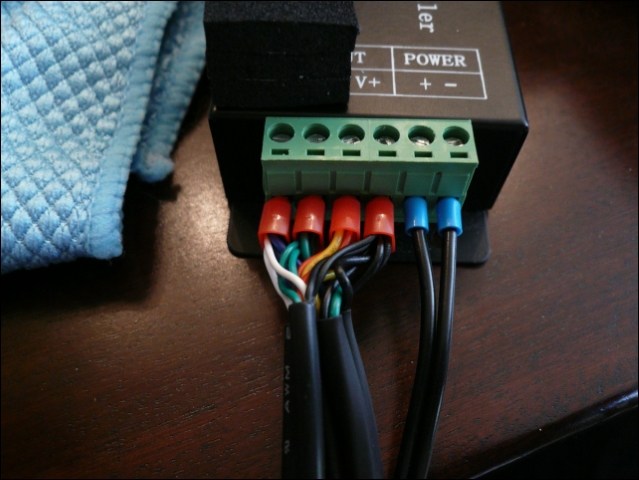
This will be on top of the pump controller.
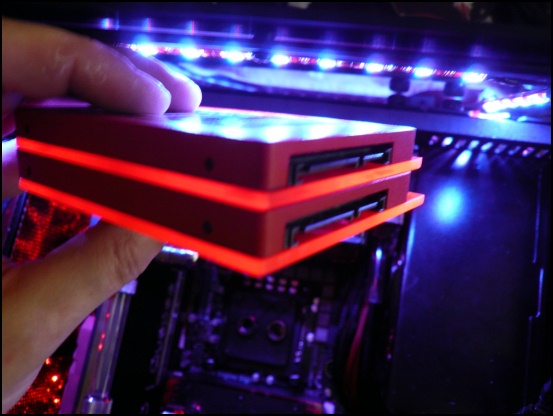
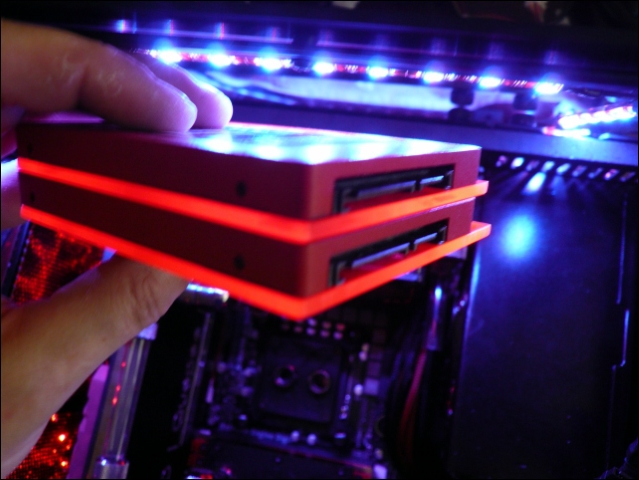
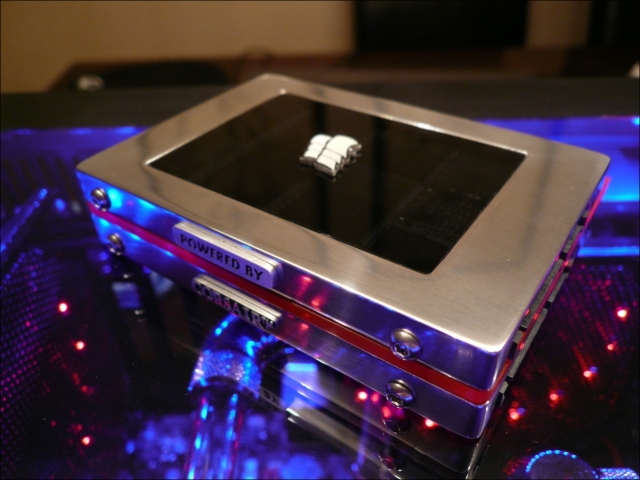
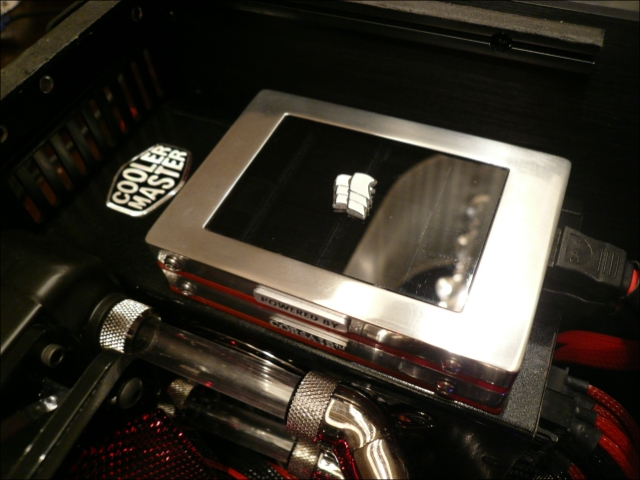
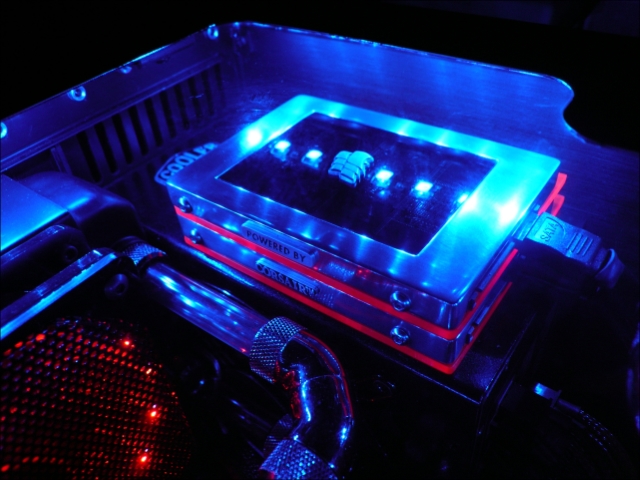
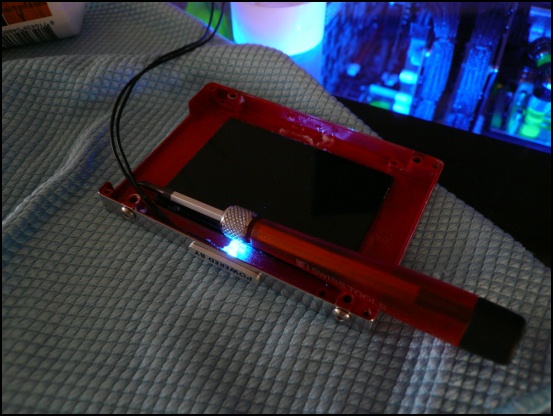
Small idea I got for the ssd's
The backside will be out of sight, but is able to catch light from the RGB leds.
That will give a nice effect on the front side.
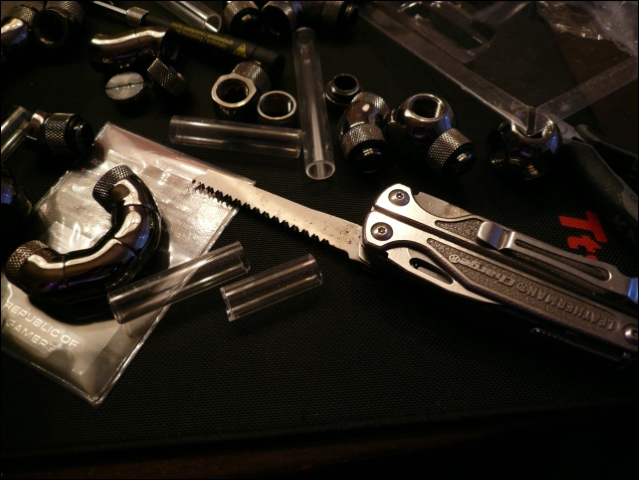
Rest of the day ... Bitspower..
My skin let go on my vingers
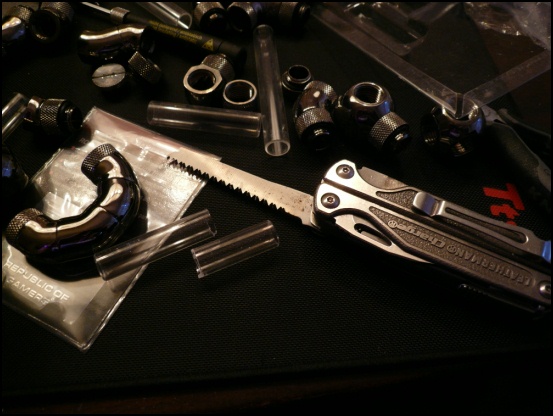
Even sawing the crystallinks .. had to do it with my knife.
Left both of my saws at work :/
Didn't have much time to make pics.
Got 2 hours left tomorrow.
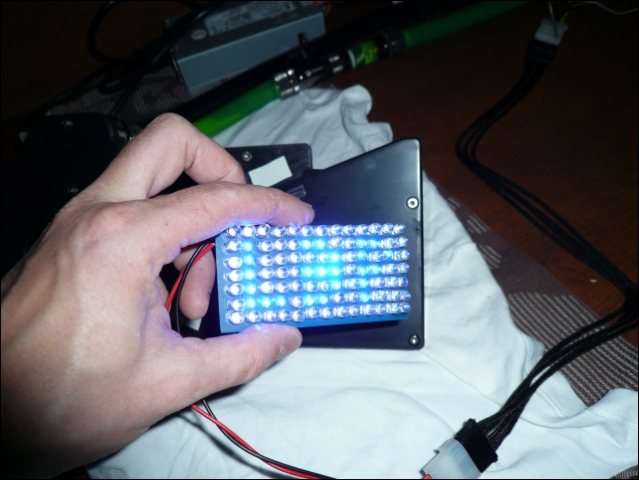
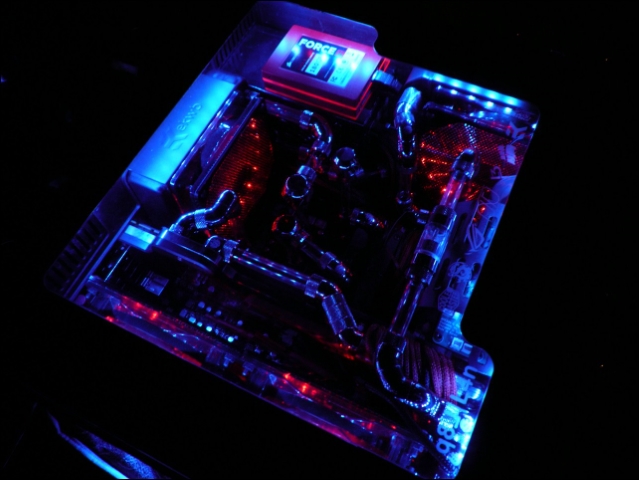
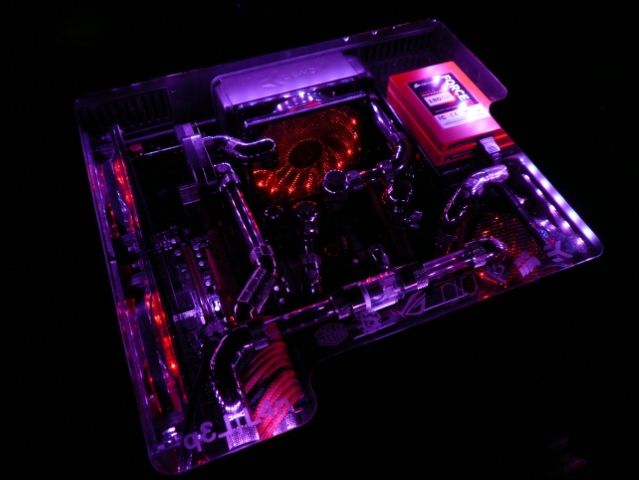
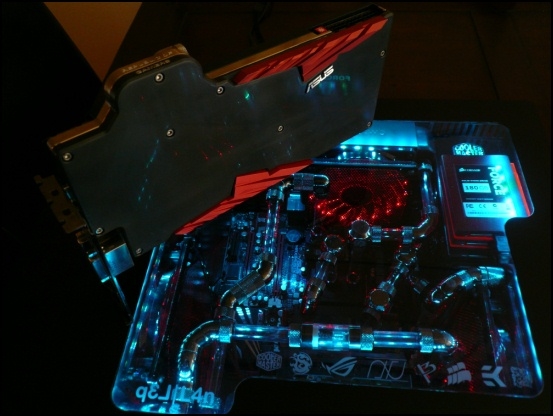
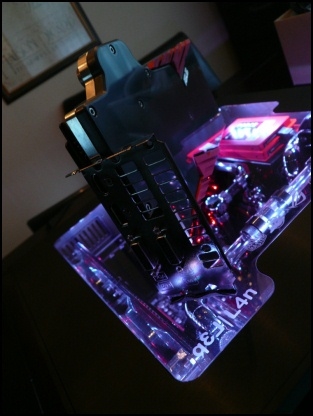
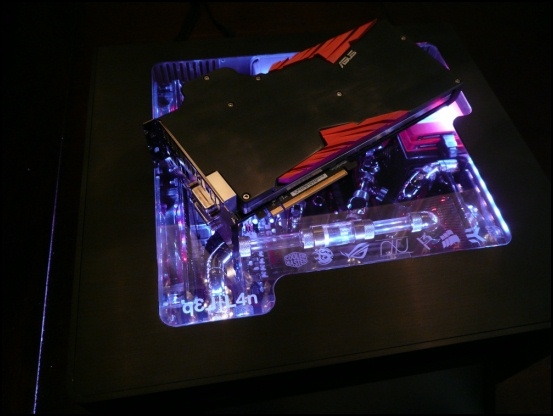
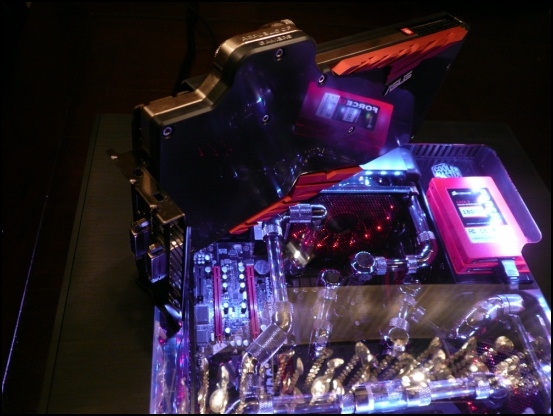
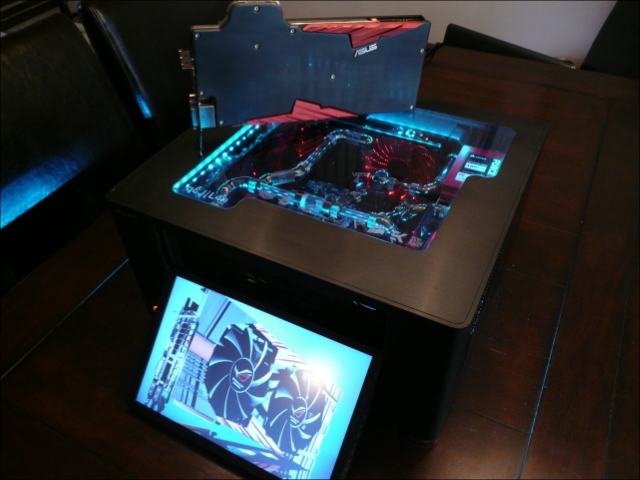
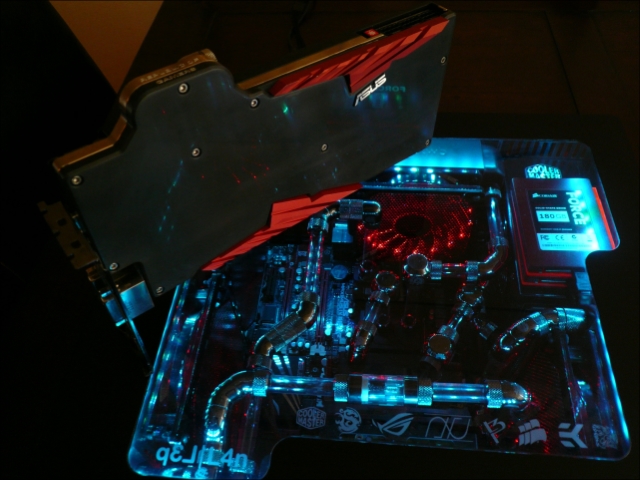
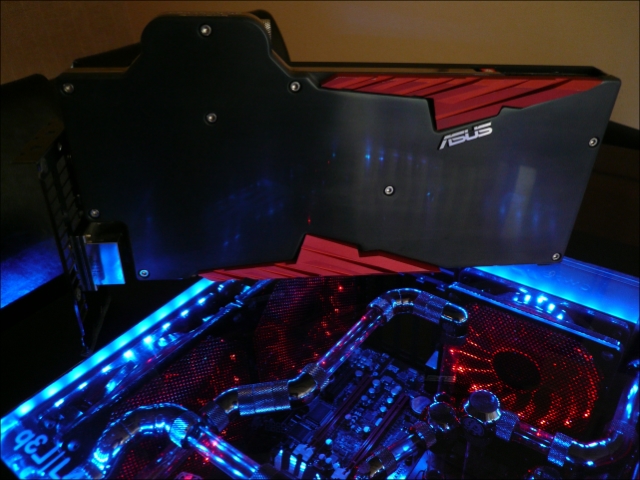
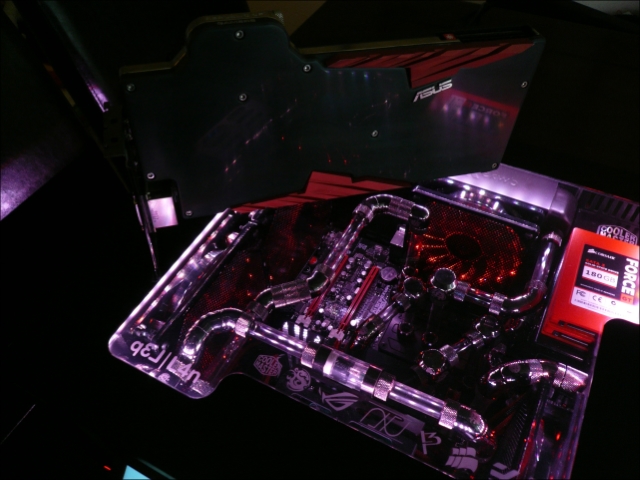
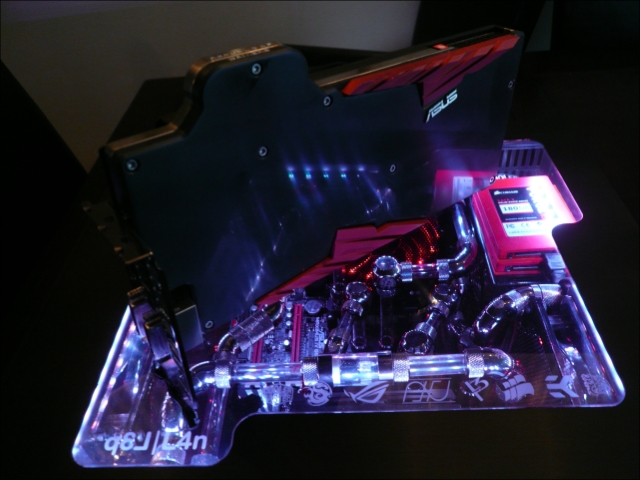
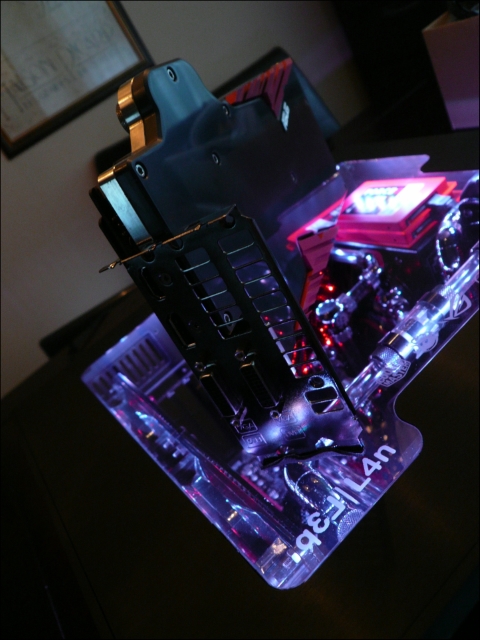
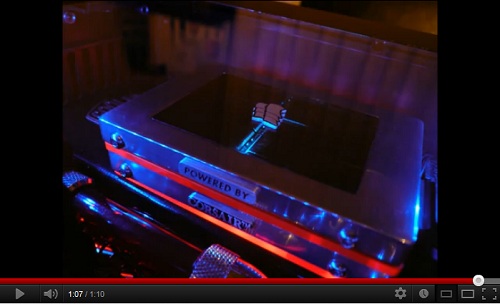
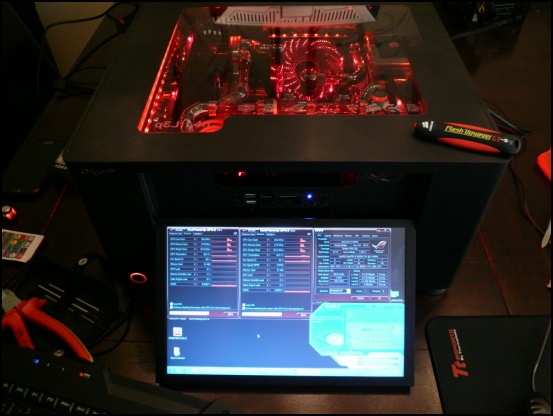
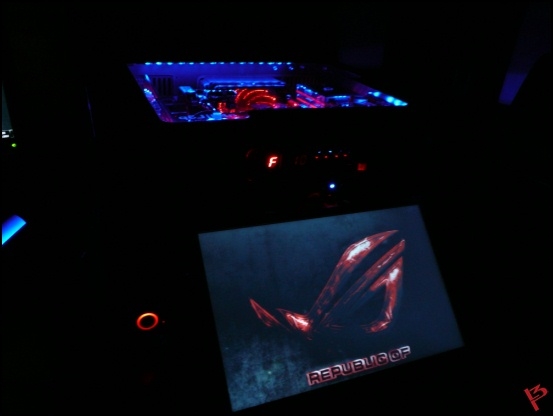
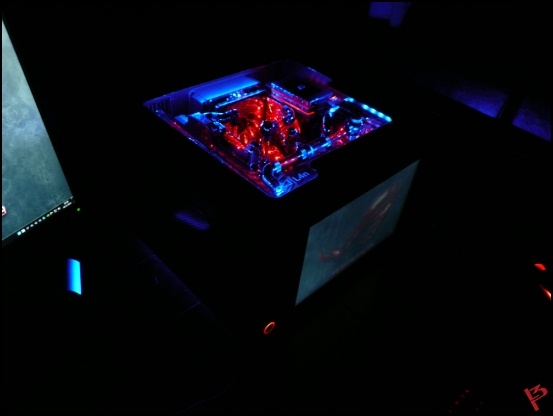
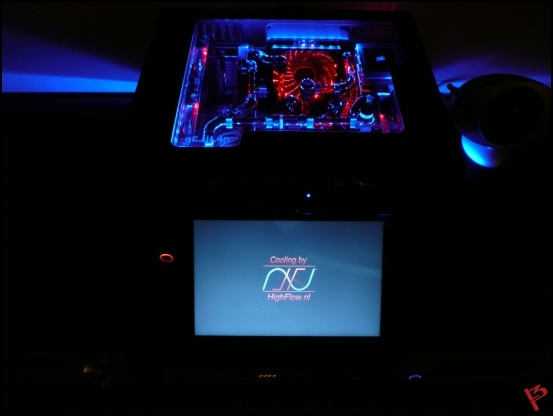
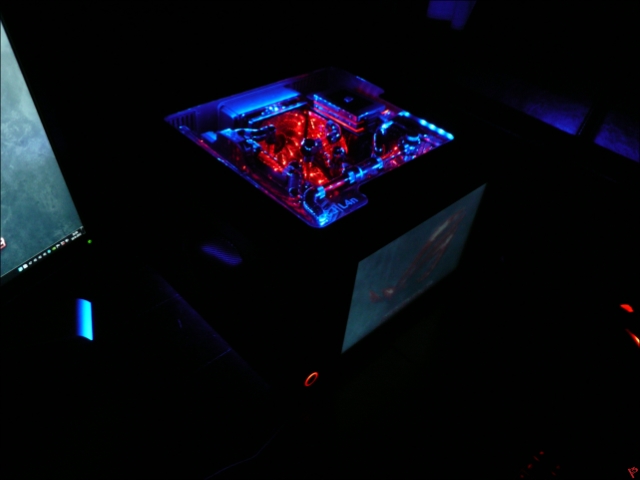
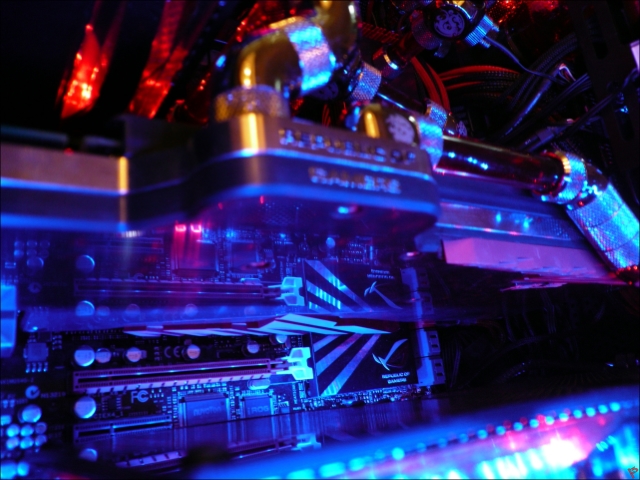
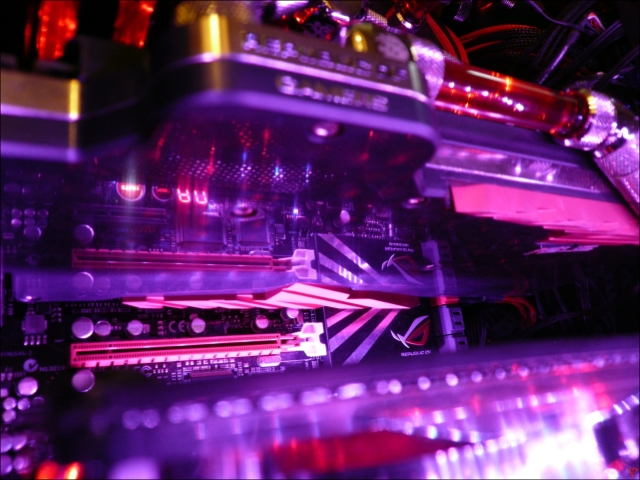
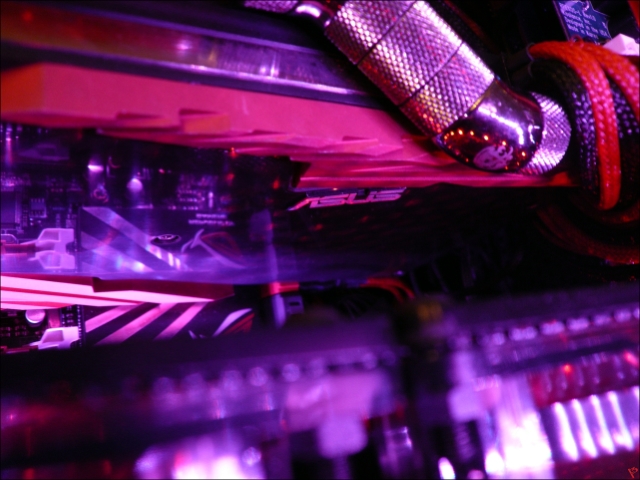
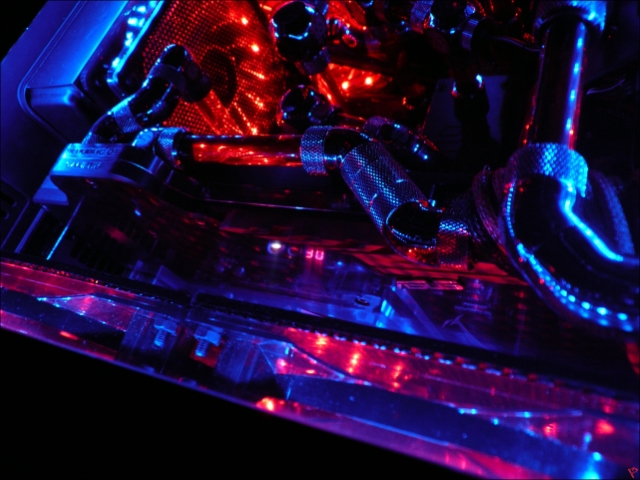
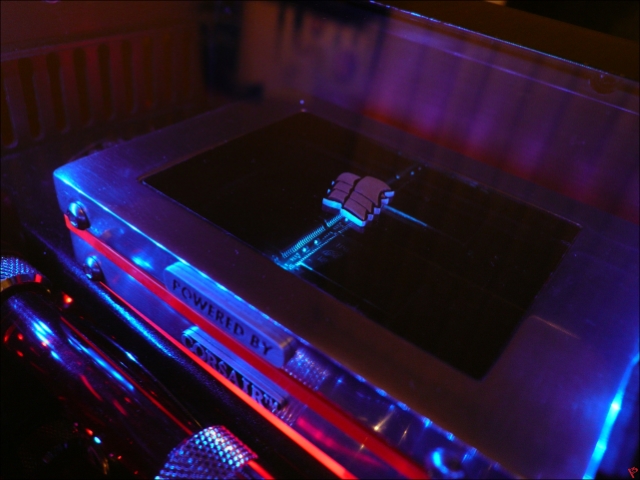
So it will be on the event as below, just the RGB leds and the touchscreen.
When it's back I'll make it 'flowready' and leaktest it completely for multiple days.
And off course some more pictures from the case and MarsII
The loop can still even change, didn't have enough C47's

So .. ordered the Loctite quick gasket
Met Rogier from Asus last friday for a coming project and ..
He asked me if he could borrow L4n for an Asus media event next friday.
Told him I couldn't get it fully running that fast, that was no problem.
So he would pick it up next tuesday..
Oops...
Will be some late evenings this weekend
First tests without PCB.


After a full leaktest still dry!!
Also didn't leave any Loctite

And then I had to remove it again for a full mount..pff
I really had to cut it loose.
And clean it for an hour
Used and army of heat transfer pads on back and front
And a new layer of Loctite.
Made a quick movie that night of the mess.
Next day.. change the bracket .. for the third time.
This will be on top of the pump controller.


Small idea I got for the ssd's
The backside will be out of sight, but is able to catch light from the RGB leds.
That will give a nice effect on the front side.

Rest of the day ... Bitspower..
My skin let go on my vingers
Even sawing the crystallinks .. had to do it with my knife.
Left both of my saws at work :/
Didn't have much time to make pics.
Got 2 hours left tomorrow.
So it will be on the event as below, just the RGB leds and the touchscreen.

When it's back I'll make it 'flowready' and leaktest it completely for multiple days.
And off course some more pictures from the case and MarsII
The loop can still even change, didn't have enough C47's
sortableturnip
Limp Gawd
- Joined
- Aug 12, 2011
- Messages
- 213
There are no words to describe how awesome that looks, so
l3p
Limp Gawd
- Joined
- Oct 30, 2010
- Messages
- 386
Thanks guys!
wra18th
[H]F Junkie
- Joined
- Nov 11, 2009
- Messages
- 8,492
That's so awesome it makes me dizzy. Lol
D
Deleted member 82943
Guest
seriously holy shit man thats a nice build
shadowlord
2[H]4U
- Joined
- Jan 6, 2005
- Messages
- 3,109
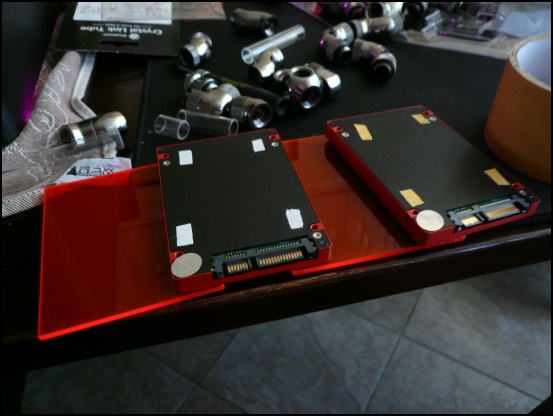
awesome attention to detail. (like the red acrylic under the ssd's)
l3p
Limp Gawd
- Joined
- Oct 30, 2010
- Messages
- 386
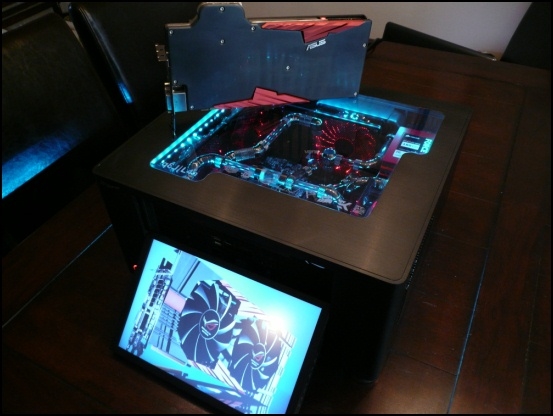
Here a small video from L4n one day before it got picked up.

And 2 days ago Asus BNL called me ...
They were very happy with it!
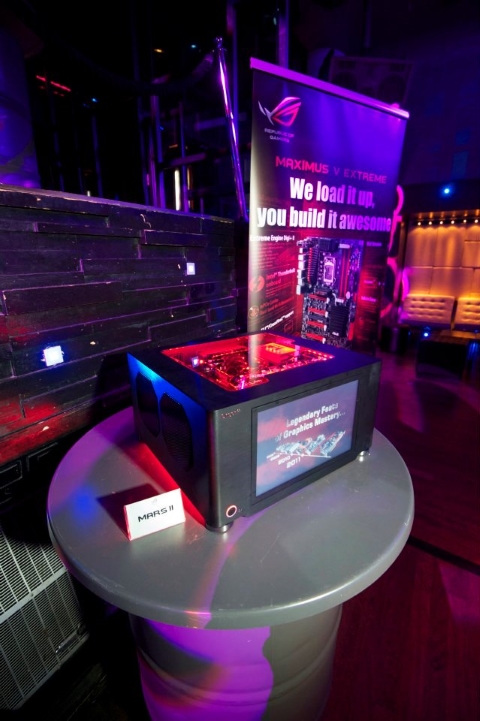
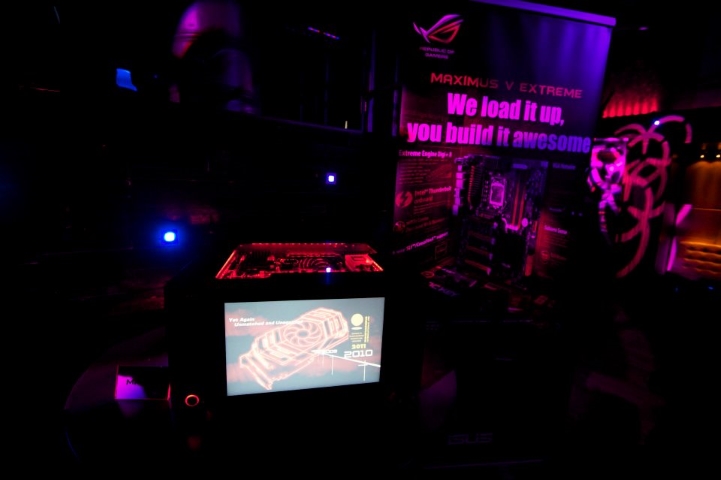
Such a shame I couldn't be there cause of my job :/
And a video on the Asus Facebook where you can see L4n for 3 seconds @ 2:00
http://www.facebook.com/photo.php?v=368991666504515
Now waiting to get it back and resume
Thanks Asus!!
And 2 days ago Asus BNL called me ...
They were very happy with it!
Such a shame I couldn't be there cause of my job :/
And a video on the Asus Facebook where you can see L4n for 3 seconds @ 2:00
http://www.facebook.com/photo.php?v=368991666504515
Now waiting to get it back and resume
Thanks Asus!!
wra18th
[H]F Junkie
- Joined
- Nov 11, 2009
- Messages
- 8,492
Awesome looking rig!
DraginDime
[H]ard|Gawd
- Joined
- Jan 12, 2012
- Messages
- 1,464
Awesome work, looks kickass all lit up and running. Three cheers for you!
l3p
Limp Gawd
- Joined
- Oct 30, 2010
- Messages
- 386
Thanks all of you
l3p
Limp Gawd
- Joined
- Oct 30, 2010
- Messages
- 386
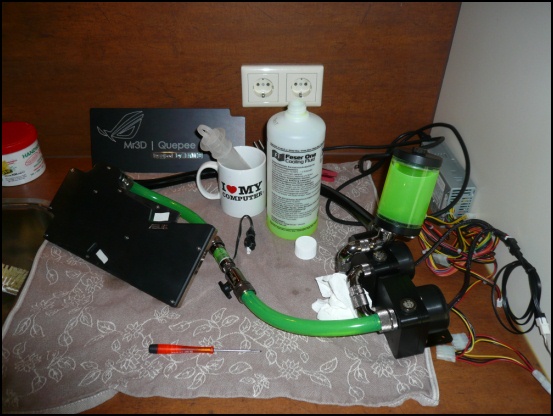
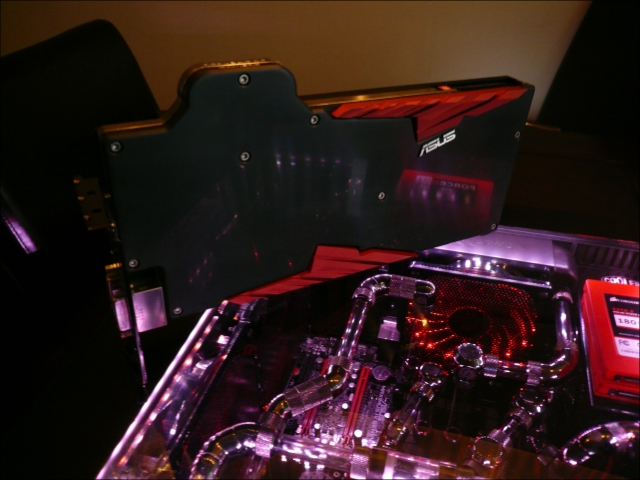
Received L4n last week in a perfect state from Asus
Been leak testing 2 days to see if it's finally leakfree.....
Finally!
With just 2 x D5 at full speed and 1m tube it became pretty hot after a few hours of testing.
So used an AIO solution from Aquacomputer
(Thanks again for this awesome MOTY prize Specialtech.co.uk ! )

After hours of testing and greasy fingers I gave it a last polishing.
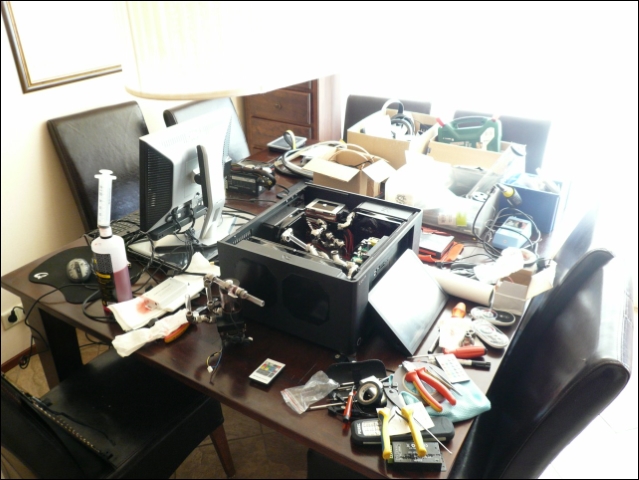
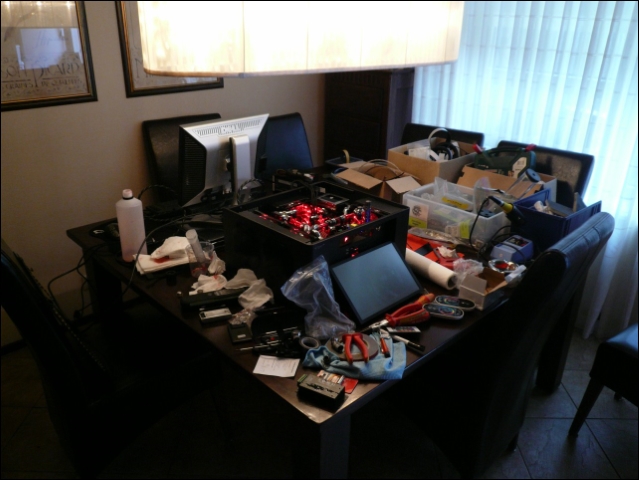
I didn't know what photos to erase, so here they are all of them.


This 'small project-in-a-project' has been quite a learning process for me of cooperation, testing, measuring and even more measuring and testing.
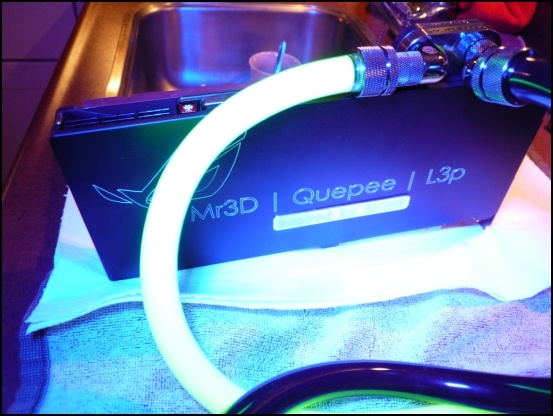
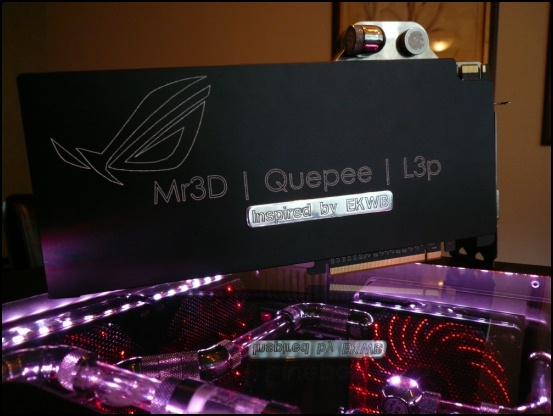
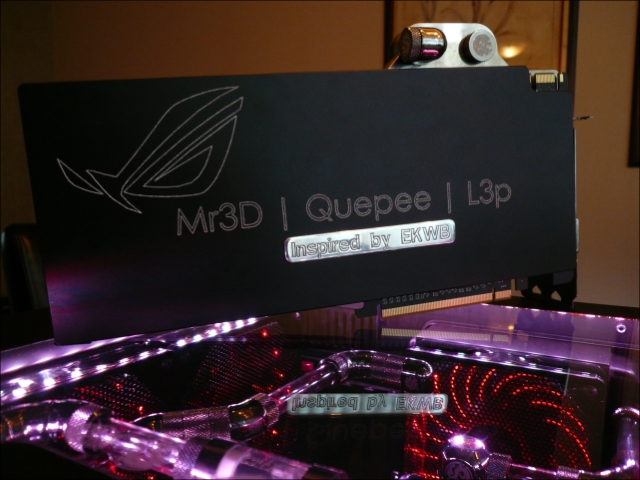
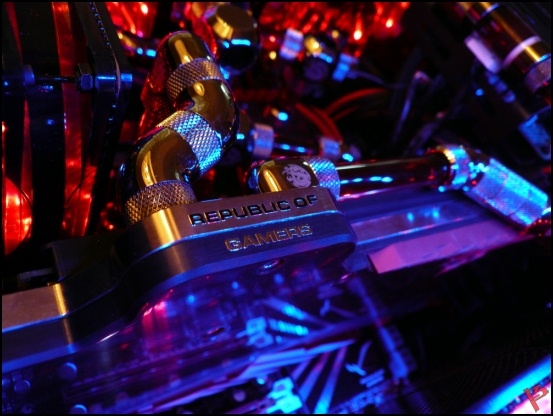
I would like to thank the following persons for cooperating on the MARS II block.
Daniel aka Mr3D
Ivo aka Quepee
Rogier van Asus Benelux
Gregor van EKWB
And everyone who I forgot
This week some small changes on the SSD's and then I will be testing the loop and hardware of L4n.
After that, mount the MARSII and test it all over again
Been leak testing 2 days to see if it's finally leakfree.....
Finally!

With just 2 x D5 at full speed and 1m tube it became pretty hot after a few hours of testing.

So used an AIO solution from Aquacomputer
(Thanks again for this awesome MOTY prize Specialtech.co.uk ! )
After hours of testing and greasy fingers I gave it a last polishing.

I didn't know what photos to erase, so here they are all of them.


This 'small project-in-a-project' has been quite a learning process for me of cooperation, testing, measuring and even more measuring and testing.
I would like to thank the following persons for cooperating on the MARS II block.
Daniel aka Mr3D
Ivo aka Quepee
Rogier van Asus Benelux
Gregor van EKWB
And everyone who I forgot
This week some small changes on the SSD's and then I will be testing the loop and hardware of L4n.
After that, mount the MARSII and test it all over again
l3p
Limp Gawd
- Joined
- Oct 30, 2010
- Messages
- 386
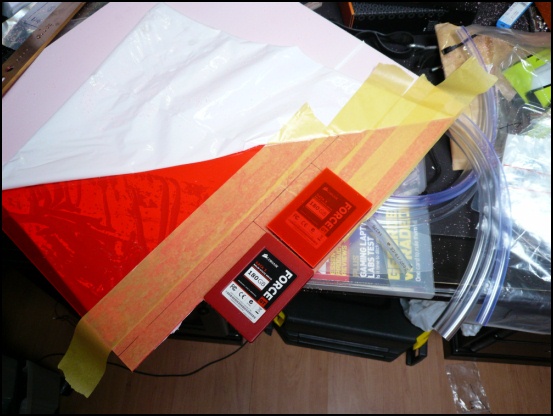
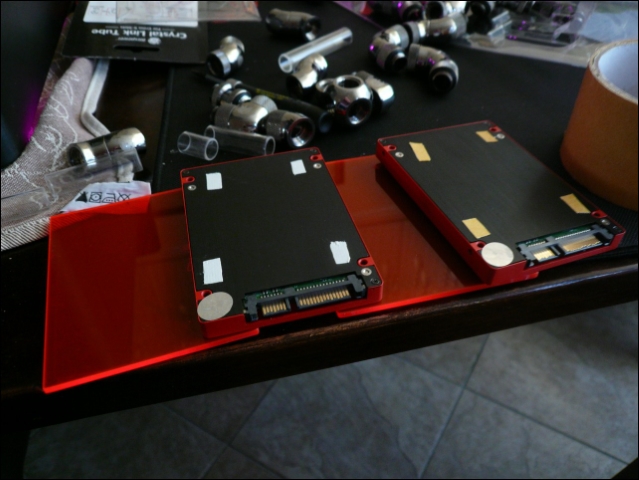
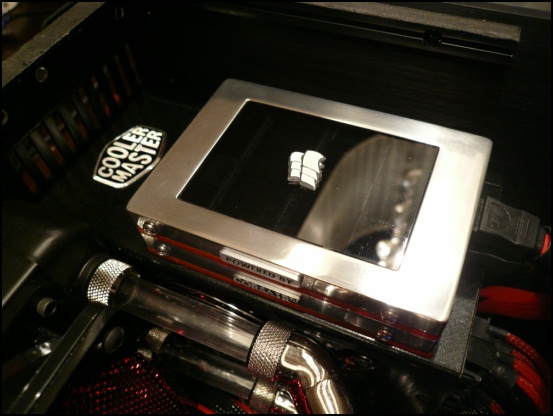
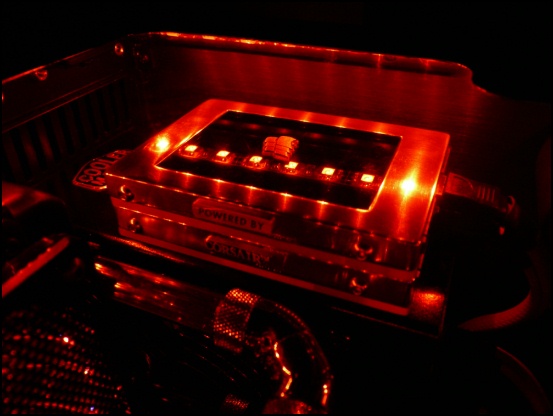
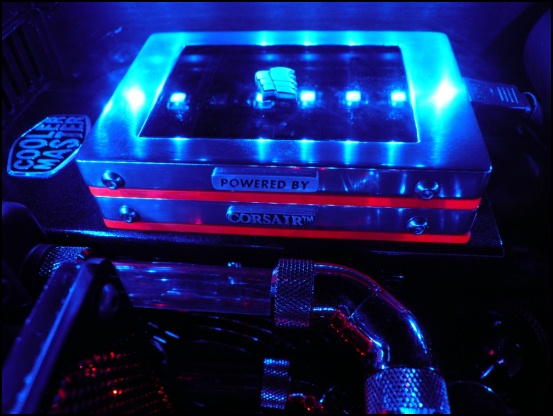
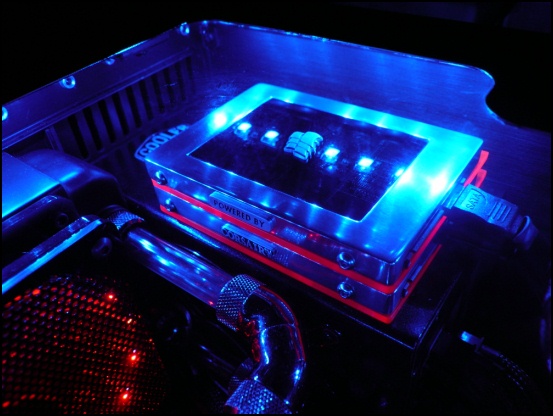
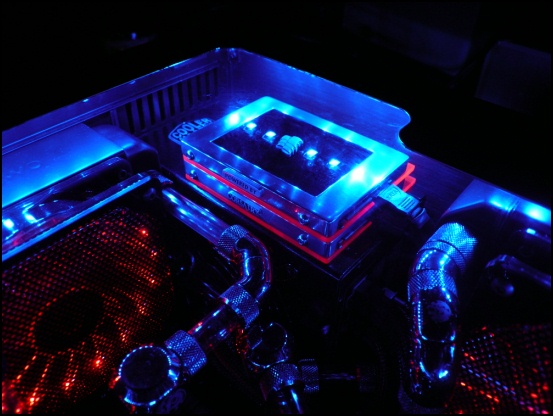
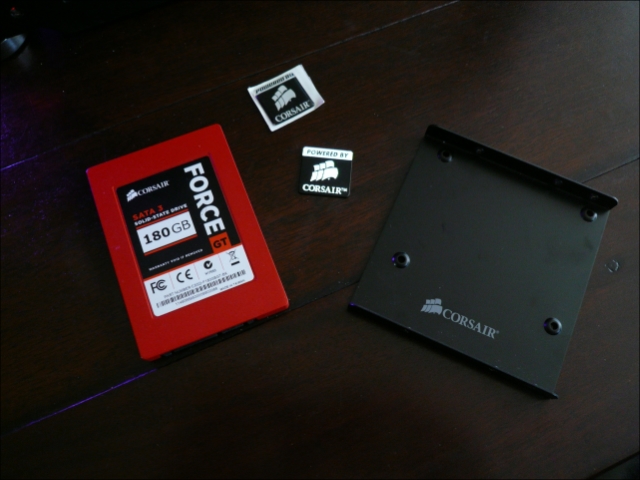
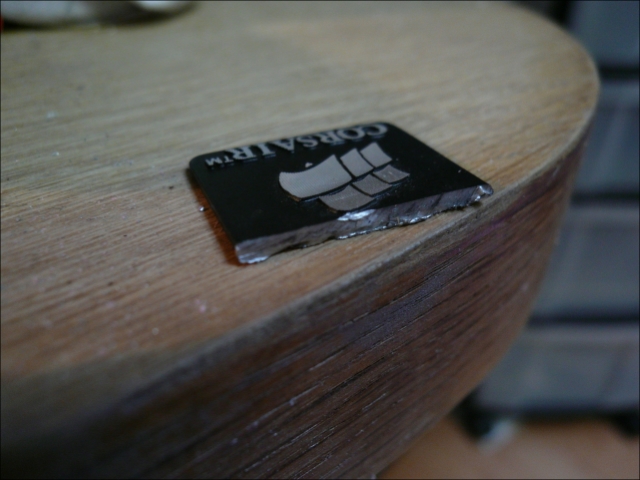
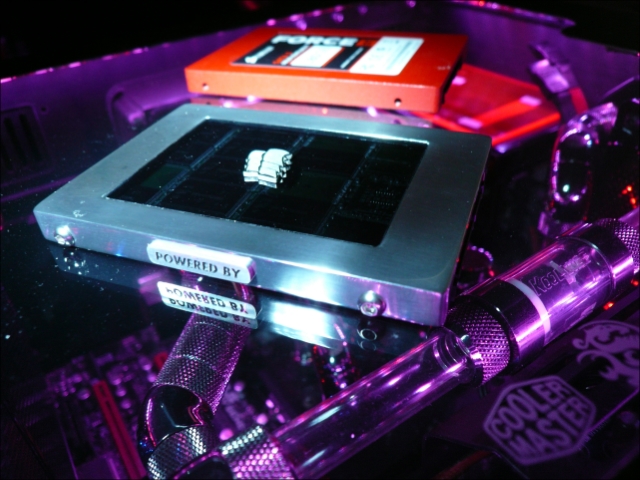
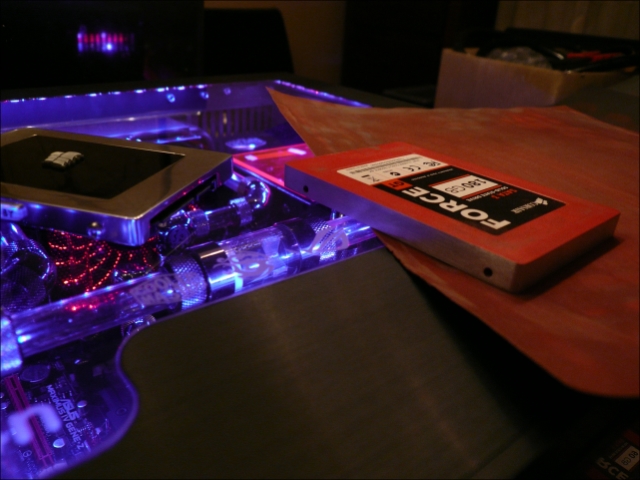
Well .. promised Corsair to do something with the ssd's.
So here we go
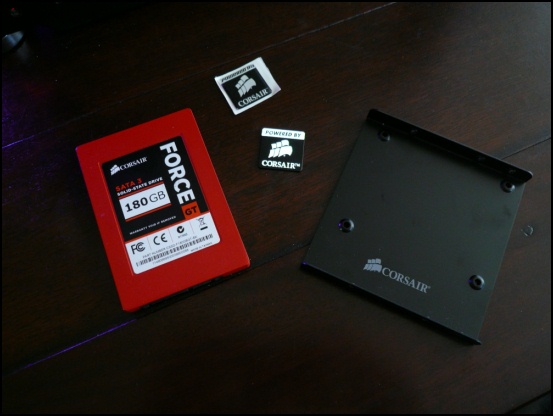
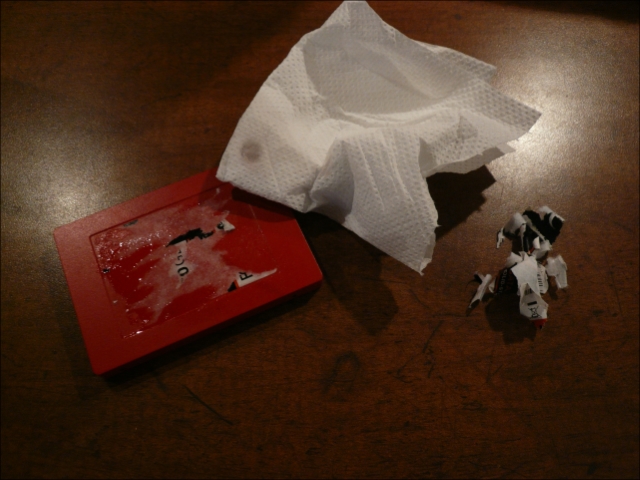
First remove the sticker.
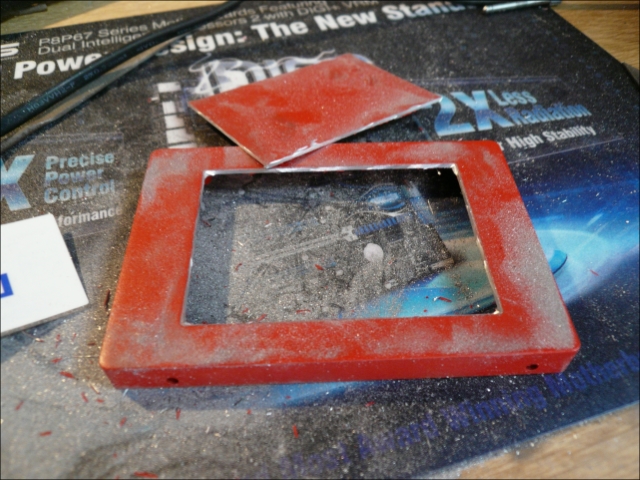
Start dremeling.
Sanded with P220. I have something with brushed alu....
But have other plans.
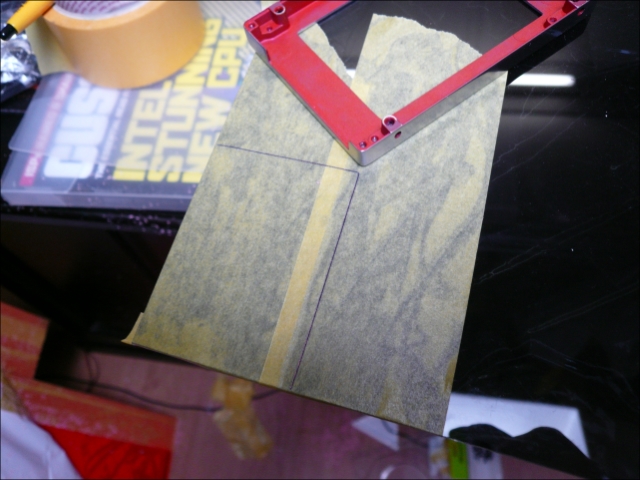
Sawing a piece of tinted acrylic.
Polishing
Taping the acrylic and glue it with transparent glue. (Becomes transparent when it's dry)

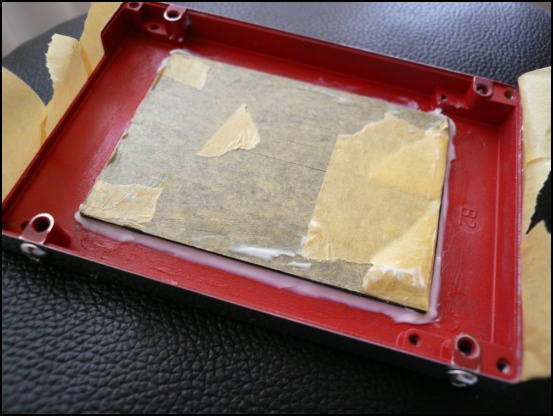
In the meantime further with the casebadge while the glue is drying.
One of the nicest badges I've seen.
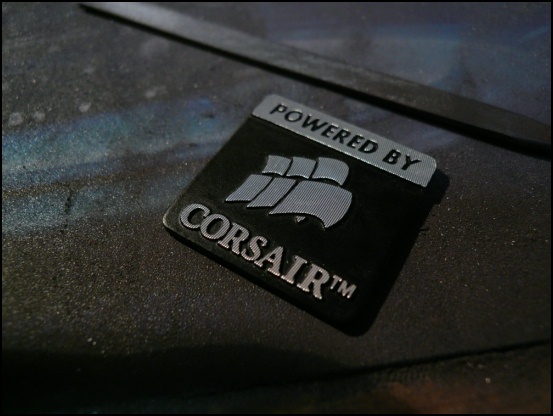
Dr. Dre on it again.
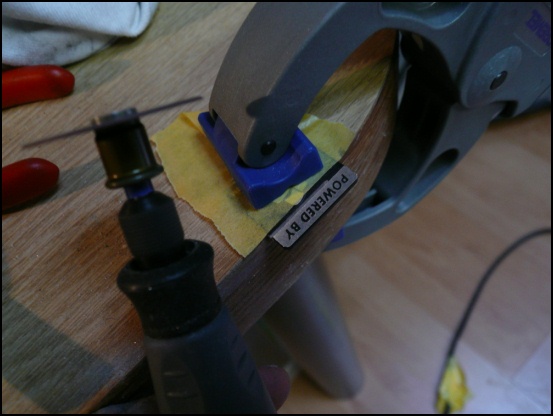
Became hotter then I expected.
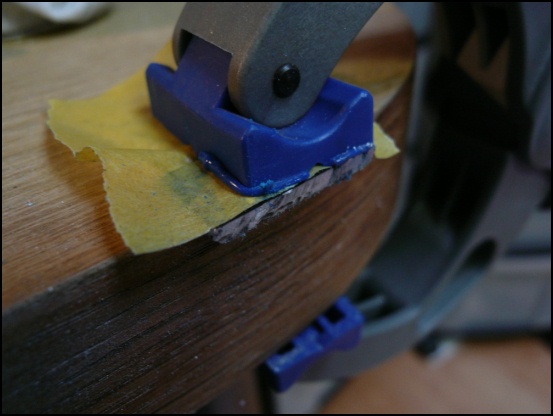
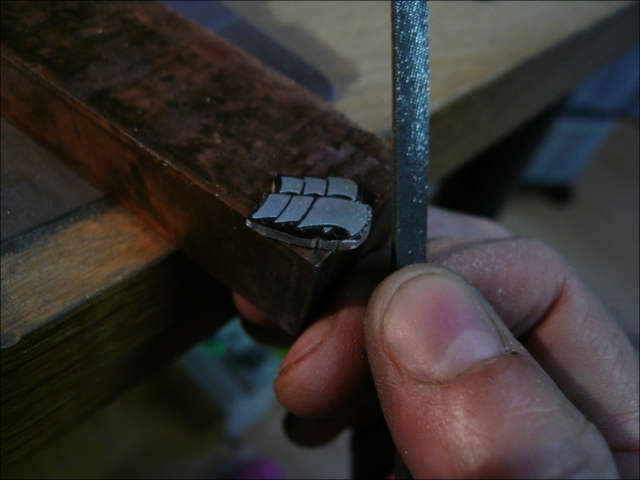
But who the heck makes 2mm thick badges

More then an hour of filing and sanding.

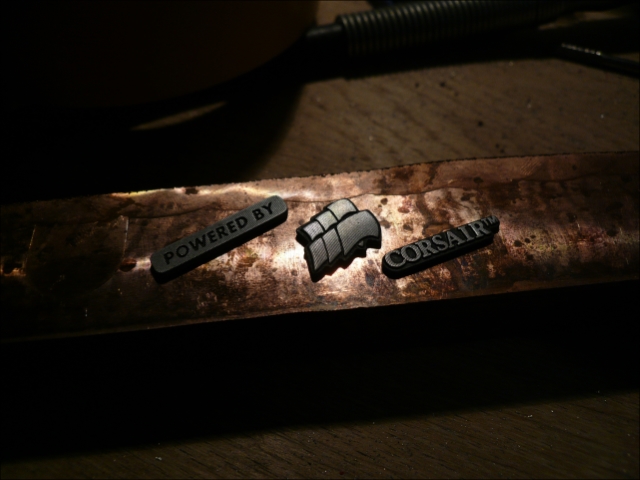
With the result.
Glue nicely dried.
One to go

Same ritual.
And the result.
I'm very happy with it
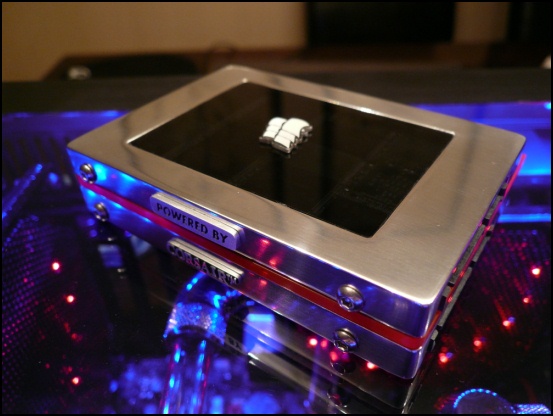
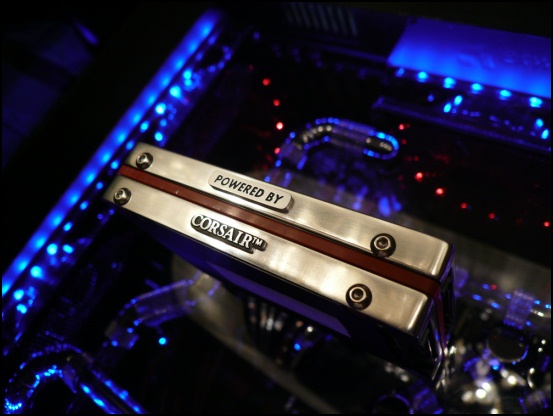
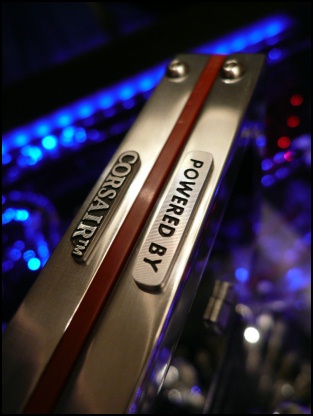
Noticed right now the heatshrink let go cause of all the dis-connecting :/
So here we go
First remove the sticker.
Start dremeling.

Sanded with P220. I have something with brushed alu....

But have other plans.

Sawing a piece of tinted acrylic.
Polishing

Taping the acrylic and glue it with transparent glue. (Becomes transparent when it's dry)

In the meantime further with the casebadge while the glue is drying.
One of the nicest badges I've seen.

Dr. Dre on it again.
Became hotter then I expected.
But who the heck makes 2mm thick badges
More then an hour of filing and sanding.
With the result.
Glue nicely dried.

One to go

Same ritual.
And the result.
I'm very happy with it


Noticed right now the heatshrink let go cause of all the dis-connecting :/


wra18th
[H]F Junkie
- Joined
- Nov 11, 2009
- Messages
- 8,492
Agreed. But looks amazing as is.
omegatotal
Gawd
- Joined
- Mar 15, 2002
- Messages
- 672
Find the act or status light signals and have them blink :-PThe only thing that would make those SSDs cooler is if you had LEDs inside the little window. That would be BAMF.
also consider a dab or two of hot glue on the sata connector where there is a ridge before using a heatgun on the heat shrink tube, OR getting the weather tight type that has some hot glue in it already :-P
DraginDime
[H]ard|Gawd
- Joined
- Jan 12, 2012
- Messages
- 1,464
I'm dying to go home and hack up my 2 corsair SSD cases now. Those drives look awesome man.
shadowlord
2[H]4U
- Joined
- Jan 6, 2005
- Messages
- 3,109
nice, i bet corsair is impressed with your work!
balance101
Limp Gawd
- Joined
- Jan 31, 2008
- Messages
- 411
omg SO SEXY
l3p
Limp Gawd
- Joined
- Oct 30, 2010
- Messages
- 386
What a week .. 28°C inside and I'm busy with 2 builds
To finish L4n I had quite a checklist to walk through.
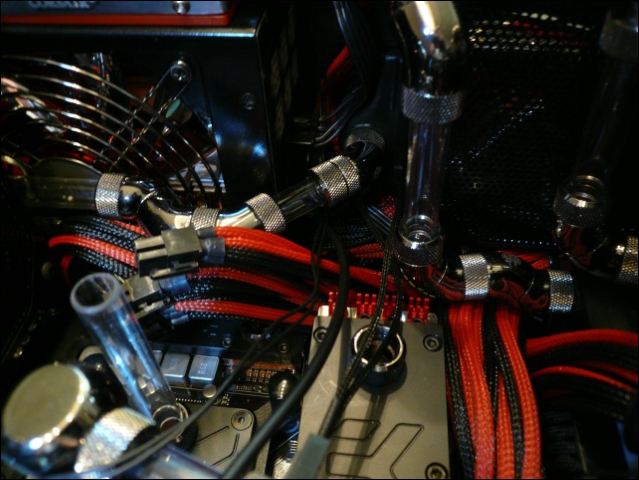
- Add cables for SSD, Leds and pump.
- Change in RGB Leds and wiring.
- RGB controller/remote died, had to replace it.
- Finding the right coolant color.
- Testing loop + blocks + fan/pump controller without MARS.
- Testing all hardware with loop without MARS.
- Testing loop with MARS in it.
- Full stress test of complete system.
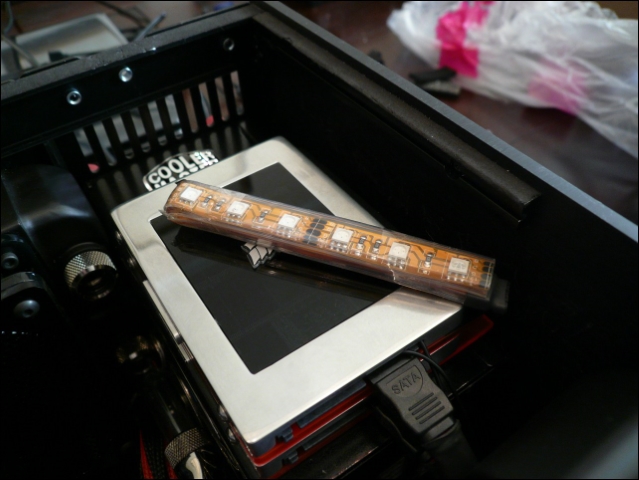
First .. lets add an SDD activity led
SSD in action. (2GB copy)
Also removed the RGB above the SSD and added RGB between the acrylic of the SSD's

Bringing 3 little cables to their destination out of sight.... 45 minutes

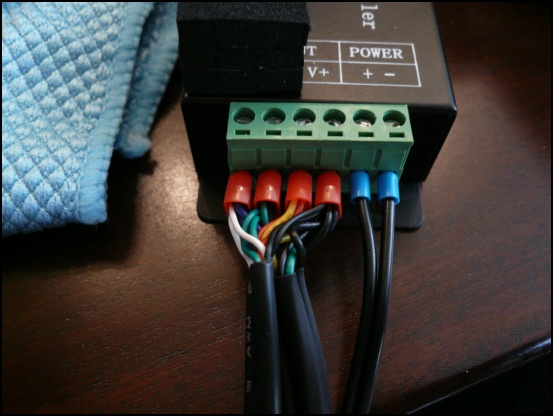
RGB controller replaced and proper connection instead of soldering.
Literally removed the radiator 30 times to get it in.
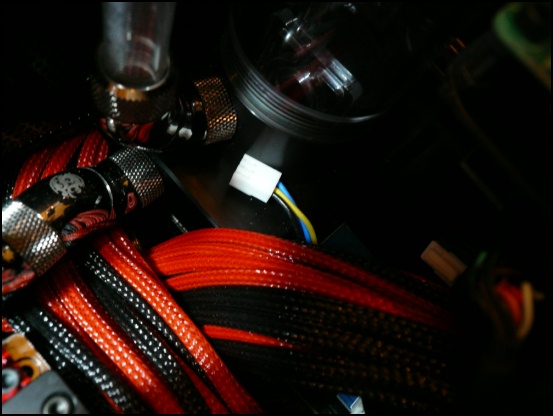
Then I found out I still had to extend the pump wire. -_-
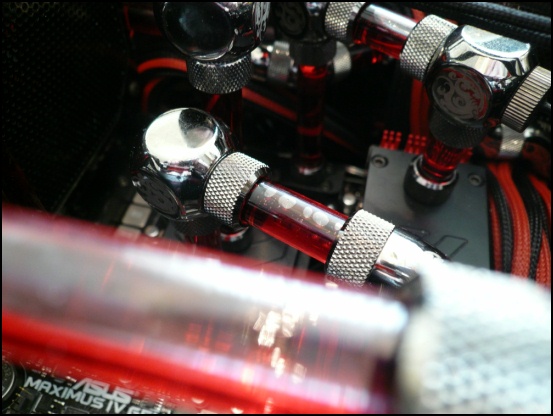
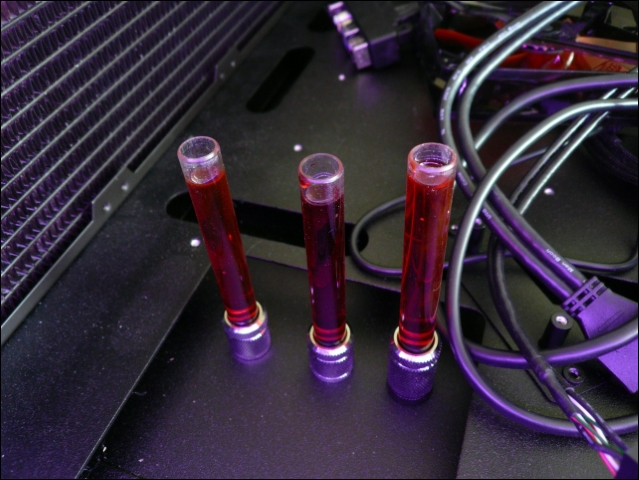
Playing with test tubes in RGB light.
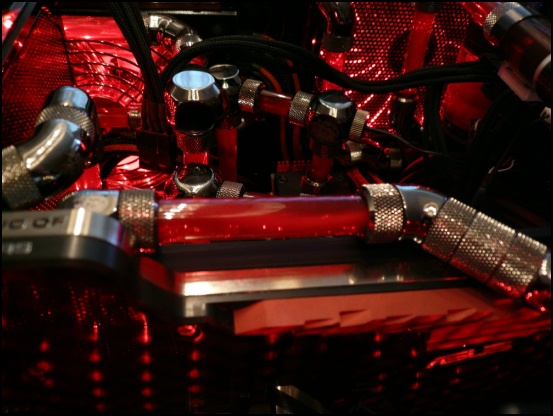
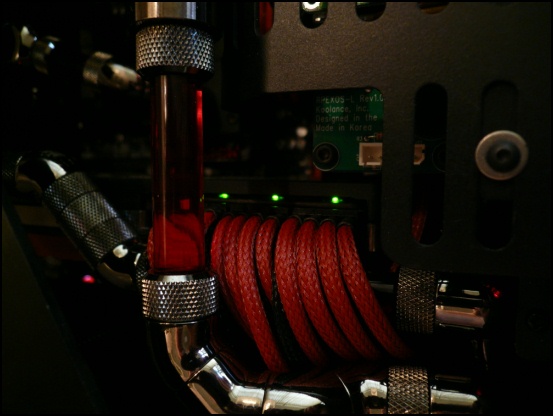
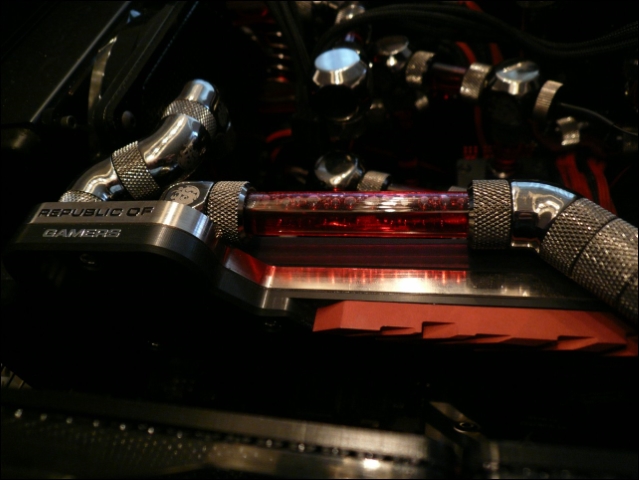
Seems EK blood red looks good in switching red/blue light.

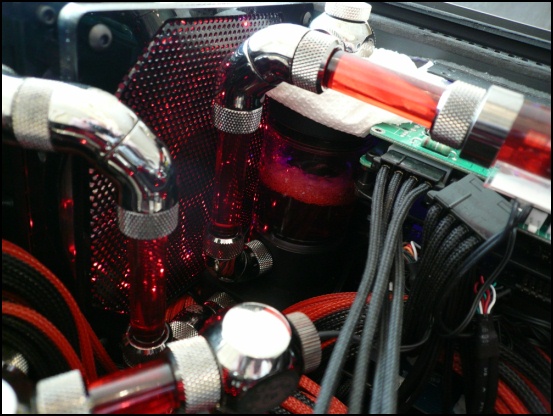
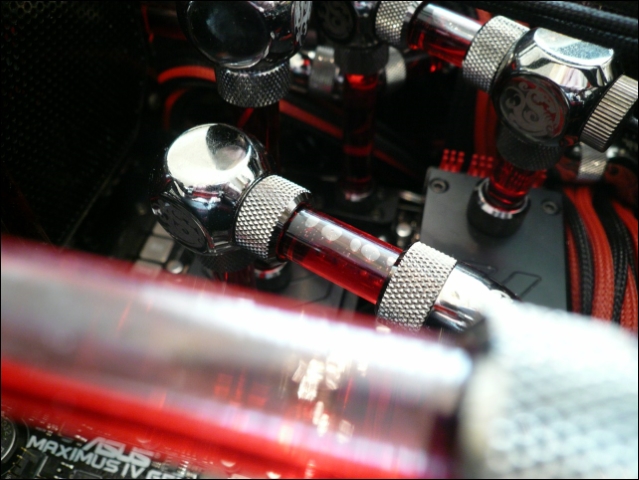
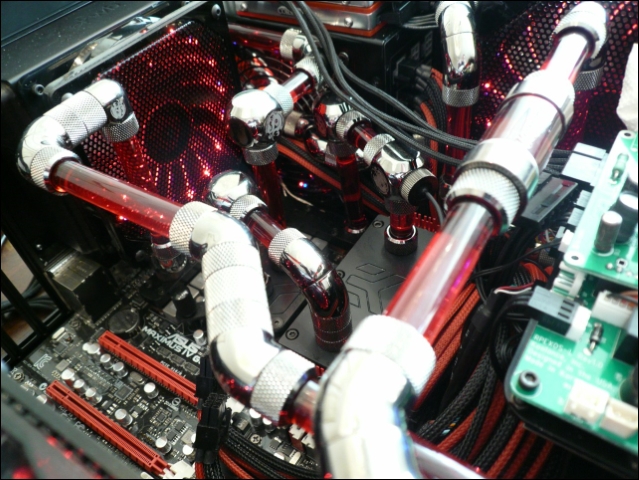
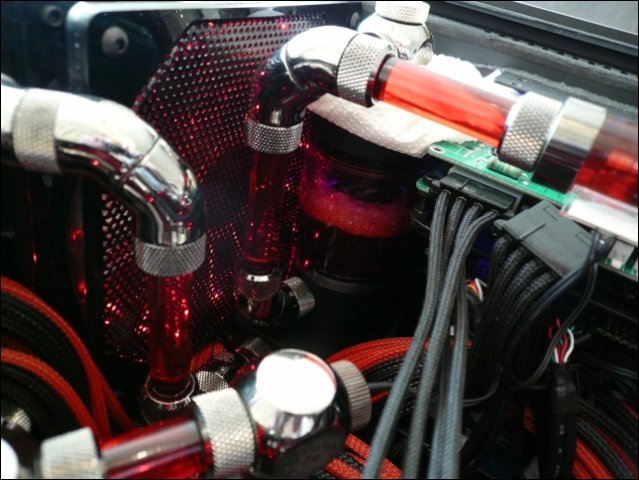
First looptest without MARS.
Loop needed exactly 1 liter.
Never thought something would go easy.
Reservoir isn't the highest point, still it keeps on level nicely and de-aeration works perfect.
Pump on speedsetting 1, completely silent and enough flow to cool it down.
SSd's and memory ... check.
Lapped CPU + cooling ... check
Leaving it running for the night.

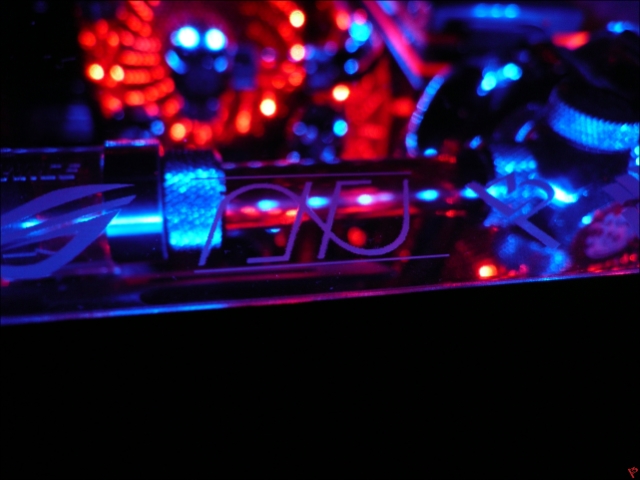
Right before getting the MARS in I changed something on the contrast of the aluminum text.
(Thanks NOCA!)
Not much luck again ... really .. somehow the motorized screen pressed the color-change button of the enermax fan when opening. Cause of that it had blue and red leds on, not something I wanted.
Had to drain the loop and build the pump completely out to reach it and fix it for good.
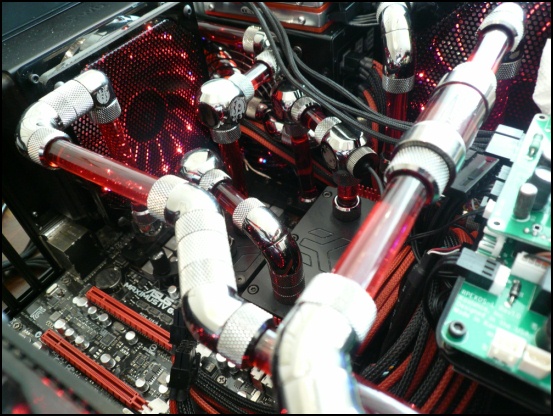
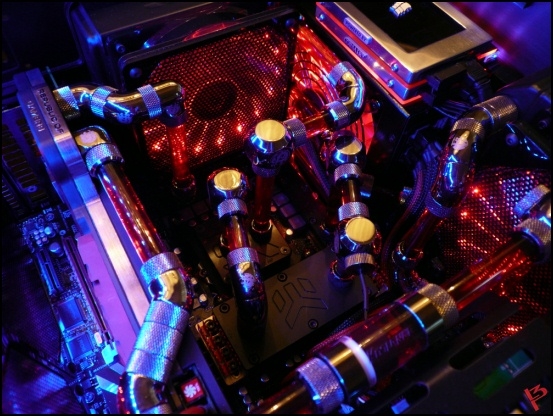
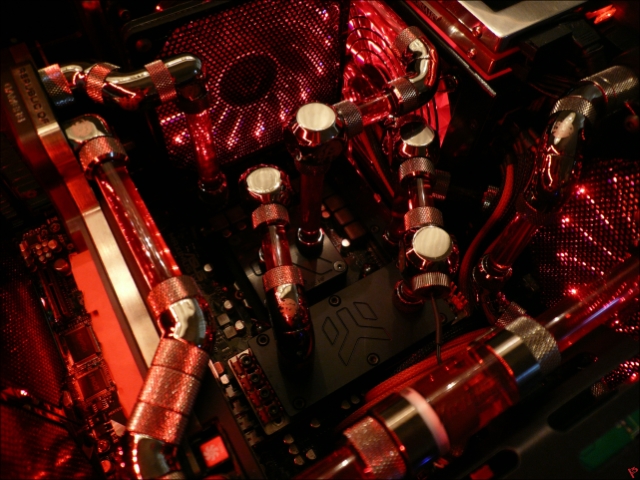
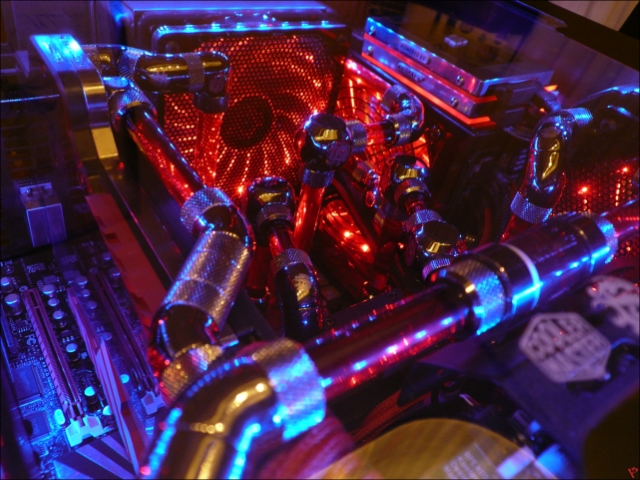
Finally testing the full loop!

Pump on speedsetting 10
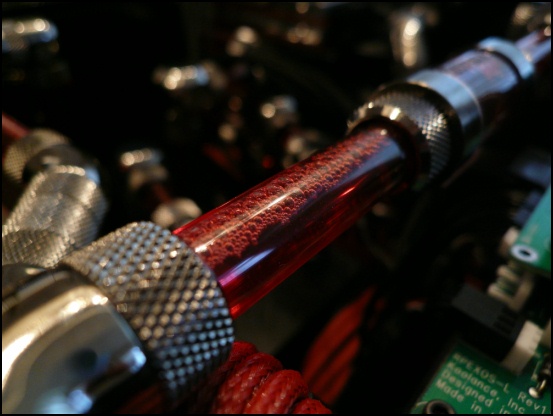
Love bubbles.
And leaving it for another night.

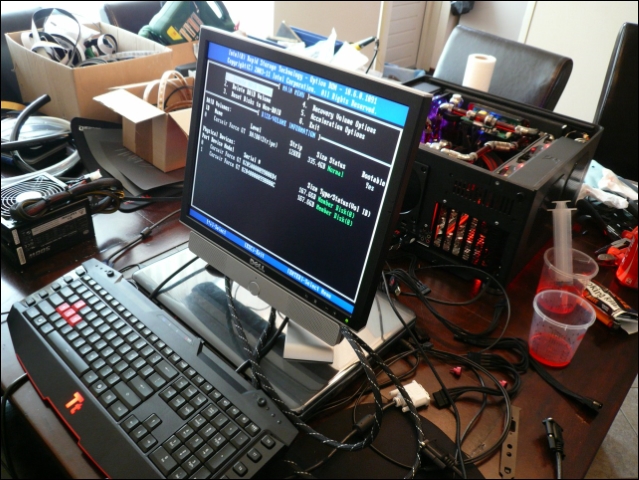
Next day ... testing the complete system.
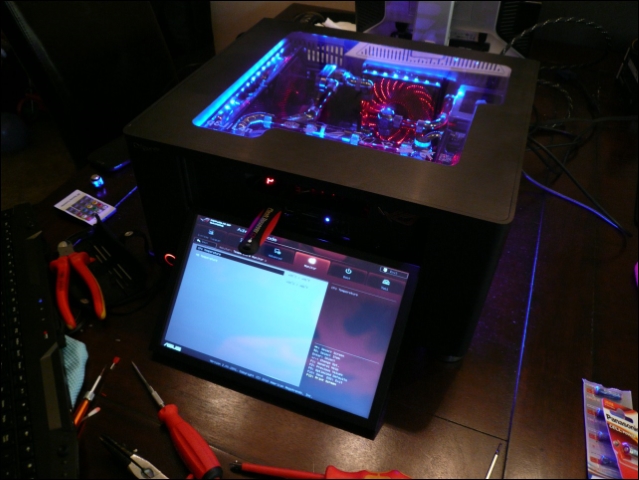
MARS leds lit
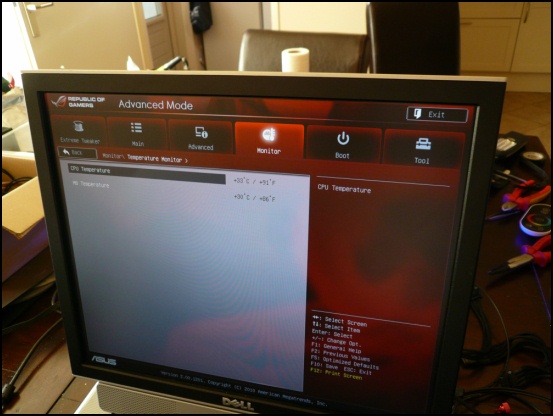
Pretty scary, don't know what the MARS temps are before I'm in windows.
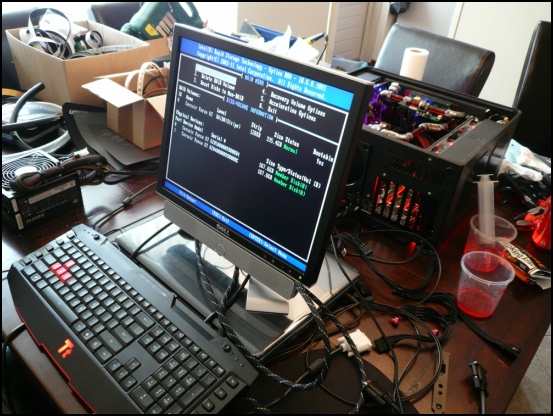
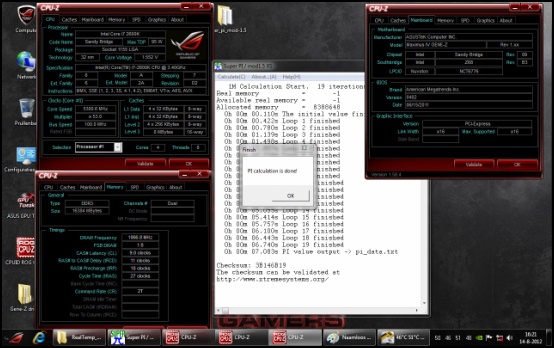
Quick USB install

Unfortunately....
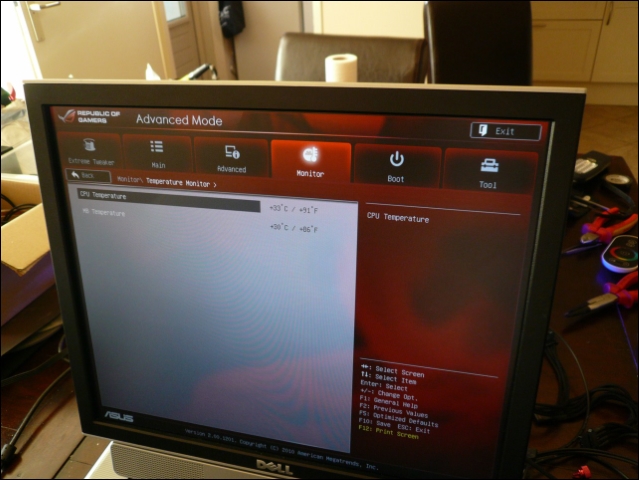
It seems 1 of the 2 cores isn't getting cooled as it should.
With a furmark stresstest in SLI 1 core goes to 65°C, the other one.. goes slowly up to 100°C and starts to throttle.
I'm almost sure it's the thickness of the heatpads I used, I will have to re-open it again completely.
There are a lot of options I can still try with different combinations of heatpads/paste, sure I can solve it.
However .. going to keep that for another time, tired of it for now.
I'm actually more glad both GPU's still work after enlarging 3 holes in the PCB
Atleast the lapped CPU doesn't let me down
Final pics on the way!
To finish L4n I had quite a checklist to walk through.
- Add cables for SSD, Leds and pump.
- Change in RGB Leds and wiring.
- RGB controller/remote died, had to replace it.
- Finding the right coolant color.
- Testing loop + blocks + fan/pump controller without MARS.
- Testing all hardware with loop without MARS.
- Testing loop with MARS in it.
- Full stress test of complete system.
First .. lets add an SDD activity led

SSD in action. (2GB copy)
Also removed the RGB above the SSD and added RGB between the acrylic of the SSD's
Bringing 3 little cables to their destination out of sight.... 45 minutes
RGB controller replaced and proper connection instead of soldering.
Literally removed the radiator 30 times to get it in.
Then I found out I still had to extend the pump wire. -_-

Playing with test tubes in RGB light.
Seems EK blood red looks good in switching red/blue light.
First looptest without MARS.

Loop needed exactly 1 liter.
Never thought something would go easy.
Reservoir isn't the highest point, still it keeps on level nicely and de-aeration works perfect.
Pump on speedsetting 1, completely silent and enough flow to cool it down.

SSd's and memory ... check.
Lapped CPU + cooling ... check
Leaving it running for the night.
Right before getting the MARS in I changed something on the contrast of the aluminum text.
(Thanks NOCA!)

Not much luck again ... really .. somehow the motorized screen pressed the color-change button of the enermax fan when opening. Cause of that it had blue and red leds on, not something I wanted.
Had to drain the loop and build the pump completely out to reach it and fix it for good.
Finally testing the full loop!
Pump on speedsetting 10

Love bubbles.

And leaving it for another night.
Next day ... testing the complete system.
MARS leds lit

Pretty scary, don't know what the MARS temps are before I'm in windows.
Quick USB install
Unfortunately....
It seems 1 of the 2 cores isn't getting cooled as it should.
With a furmark stresstest in SLI 1 core goes to 65°C, the other one.. goes slowly up to 100°C and starts to throttle.
I'm almost sure it's the thickness of the heatpads I used, I will have to re-open it again completely.
There are a lot of options I can still try with different combinations of heatpads/paste, sure I can solve it.
However .. going to keep that for another time, tired of it for now.
I'm actually more glad both GPU's still work after enlarging 3 holes in the PCB

Atleast the lapped CPU doesn't let me down

Final pics on the way!
Last edited:
Looks great. I personally use Ketchup to clean copper. Cheaper than any copper polish and works just as well. High fructose corn syrup free BTW.
Hunts FTW. Excellent work, OP!
What a week .. 28°C inside and I'm busy with 2 builds
To finish L4n I had quite a checklist to walk through.
- Add cables for SSD, Leds and pump.
- Change in RGB Leds and wiring.
- RGB controller/remote died, had to replace it.
- Finding the right coolant color.
- Testing loop + blocks + fan/pump controller without MARS.
- Testing all hardware with loop without MARS.
- Testing loop with MARS in it.
- Full stress test of complete system.
First .. lets add an SDD activity led
SSD in action. (2GB copy)
Why didn't I think of that!
l3p
Limp Gawd
- Joined
- Oct 30, 2010
- Messages
- 386
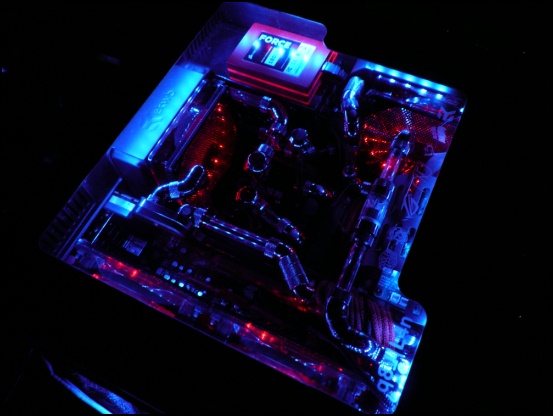
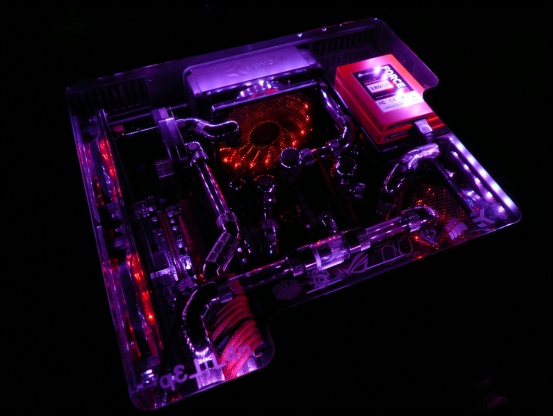
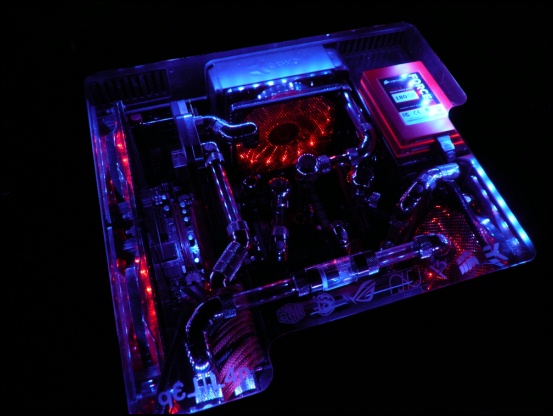
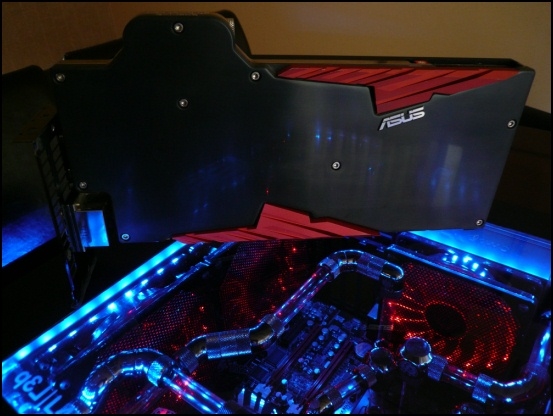
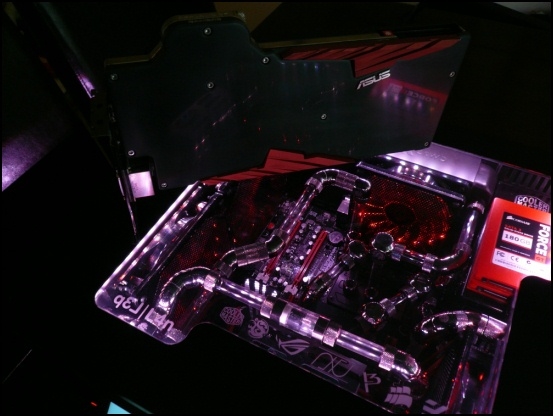
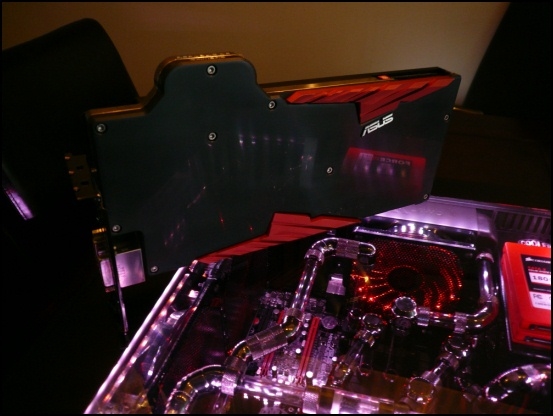
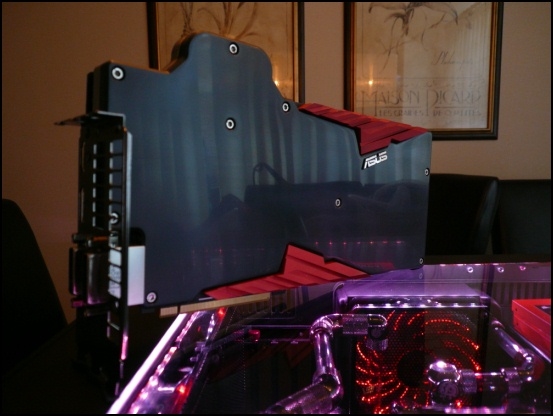
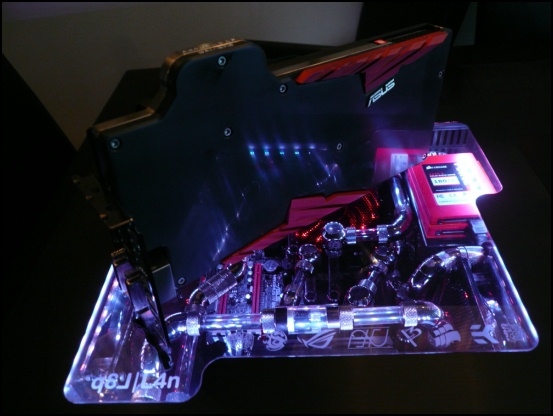
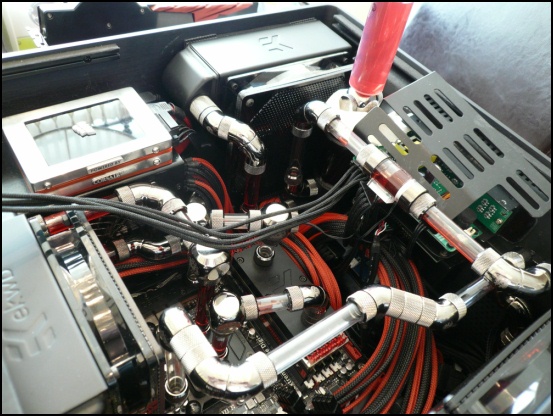
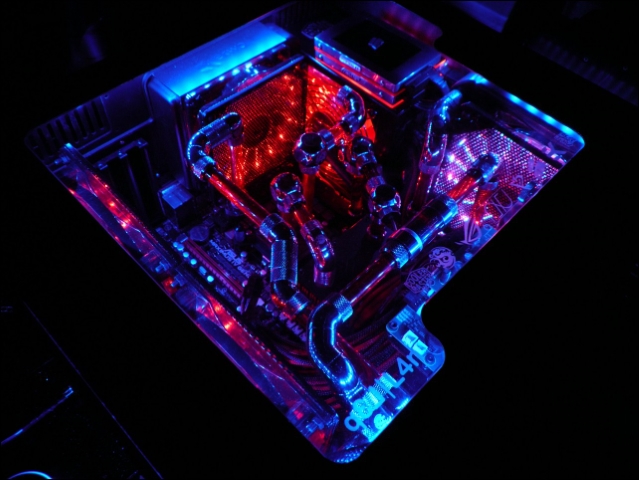
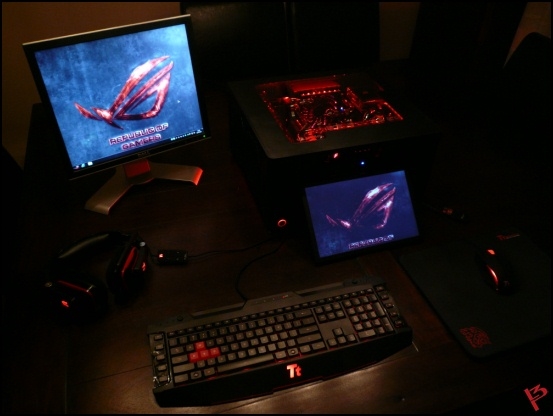
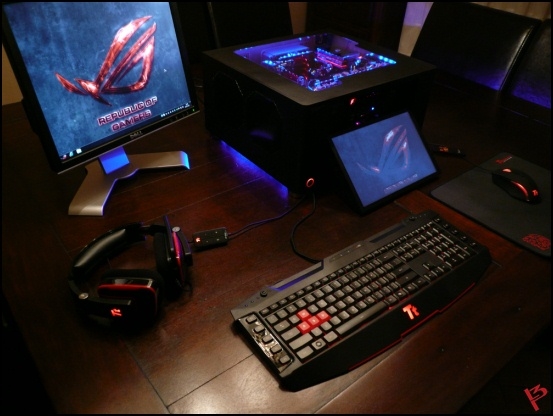
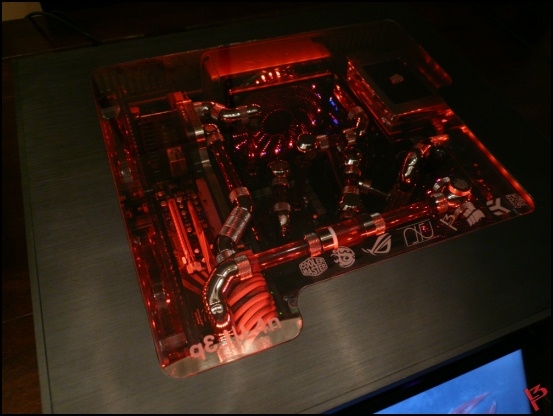
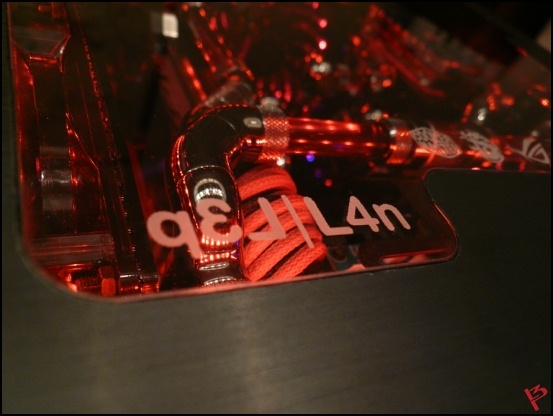
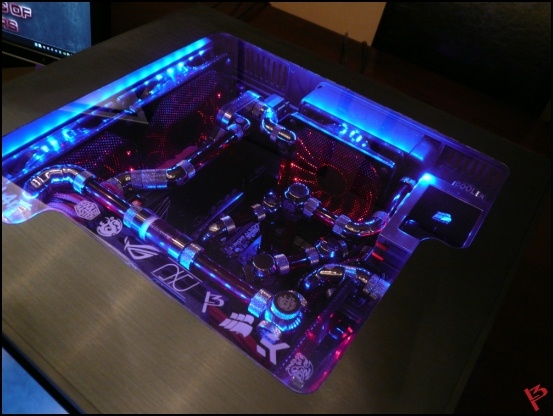
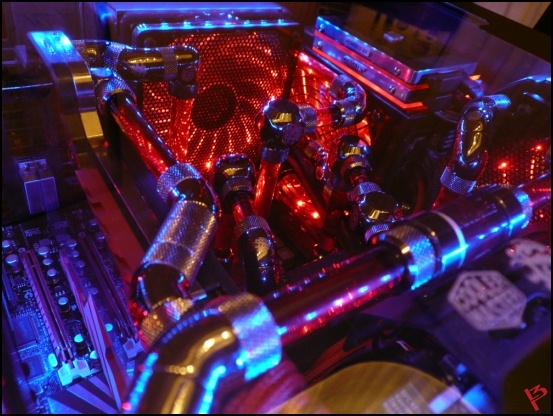
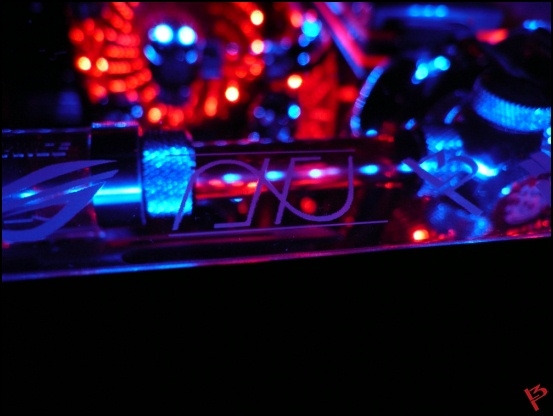
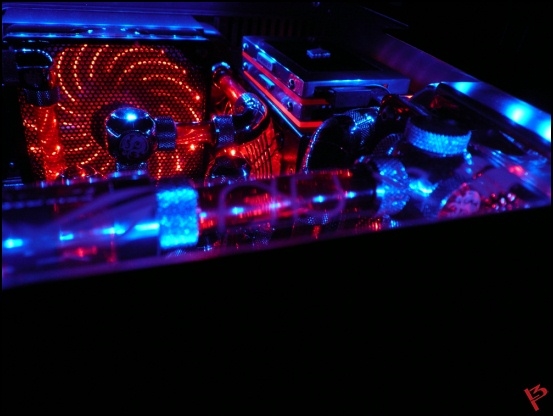
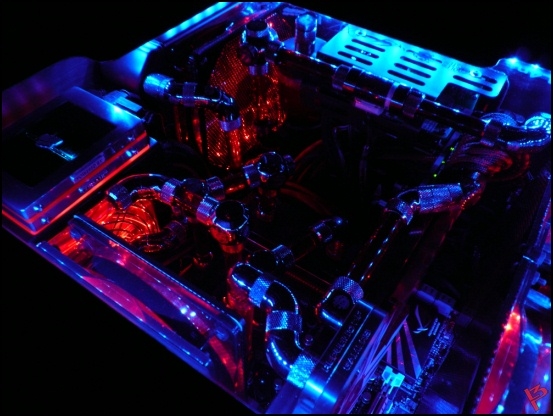
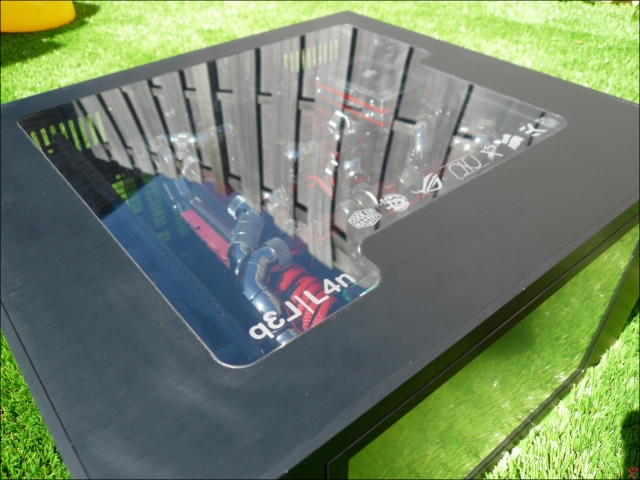
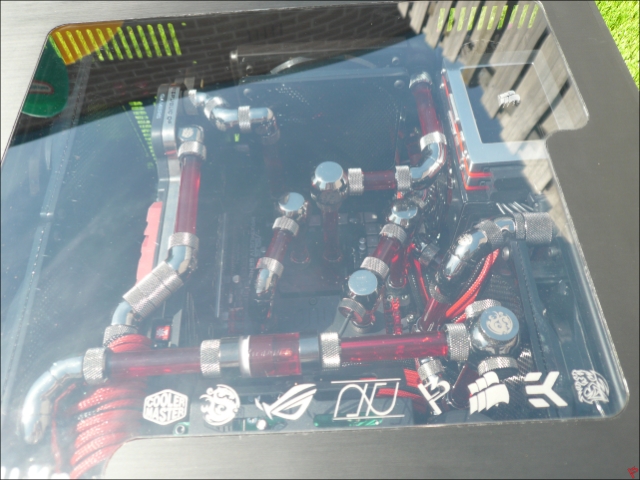
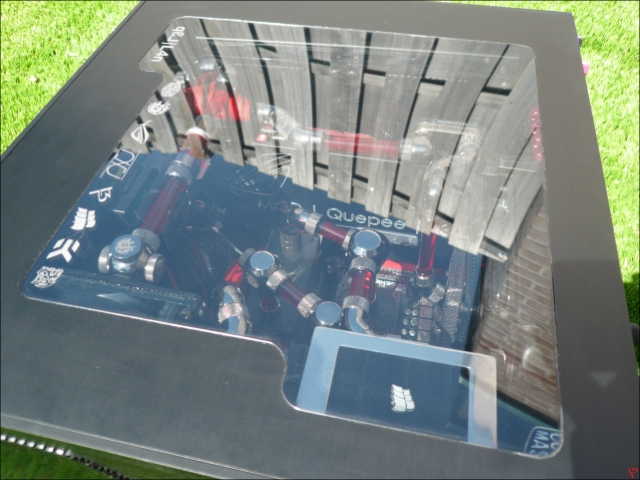
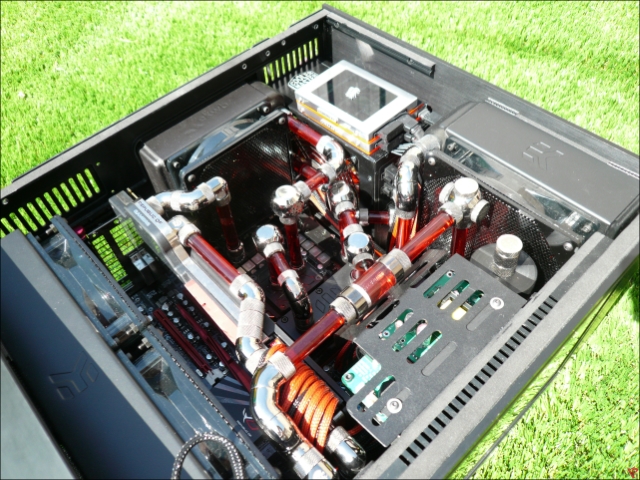
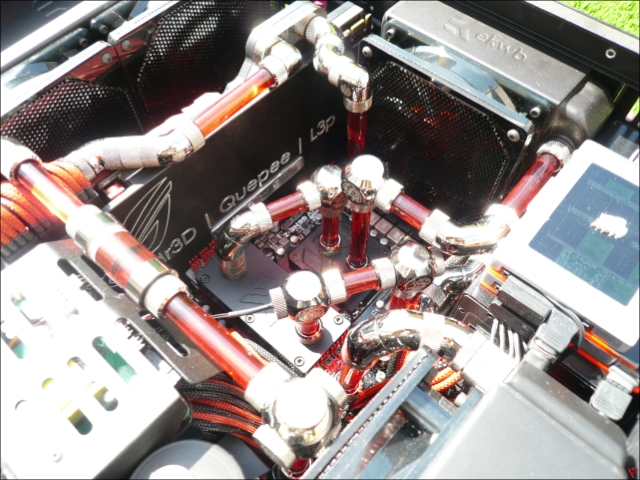
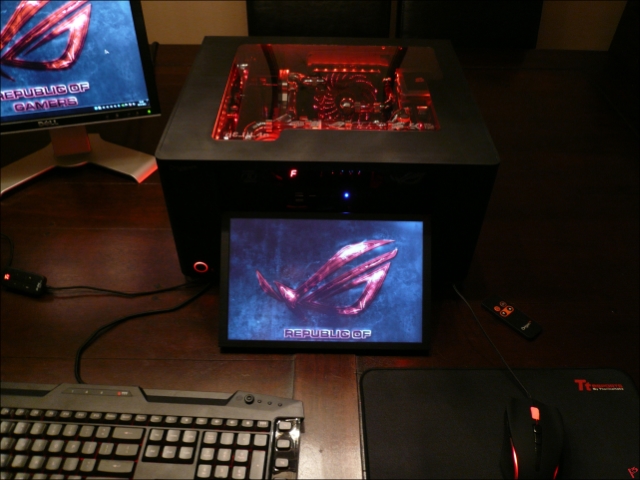
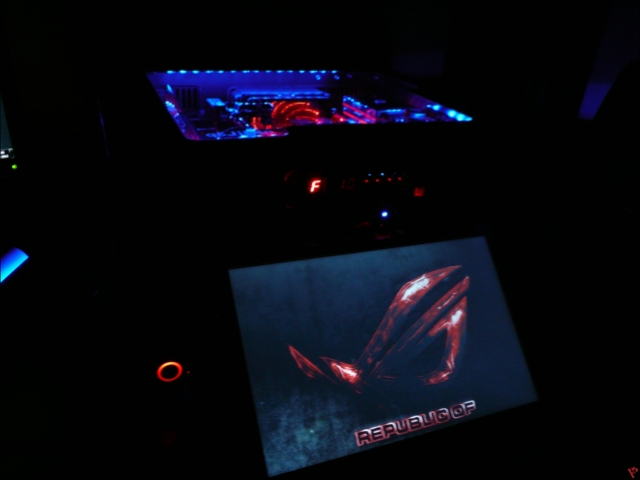
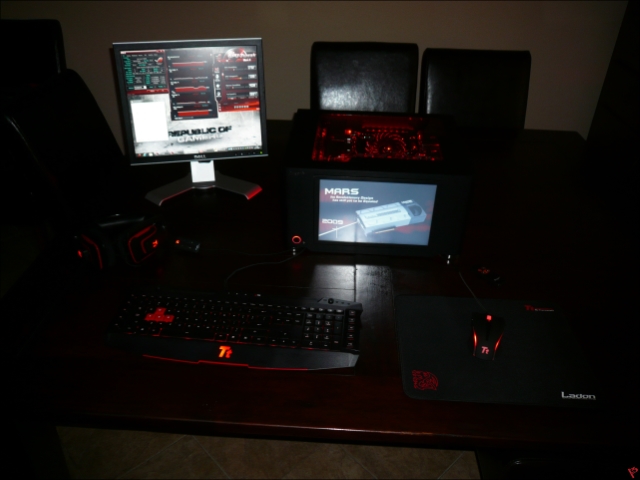
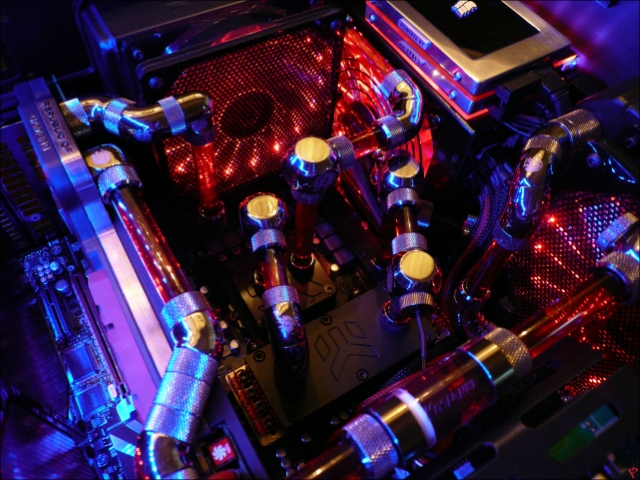
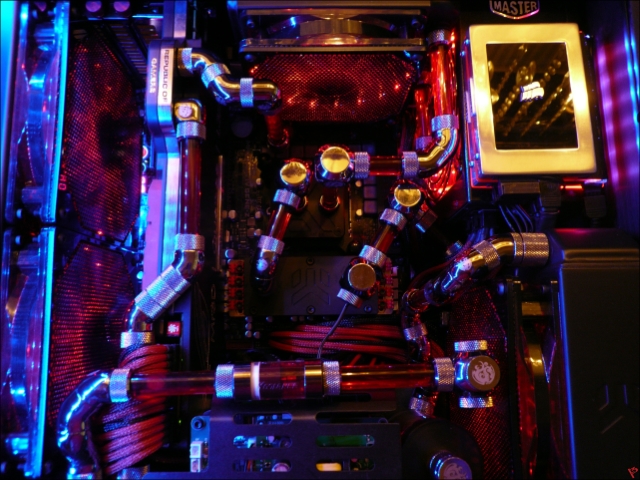
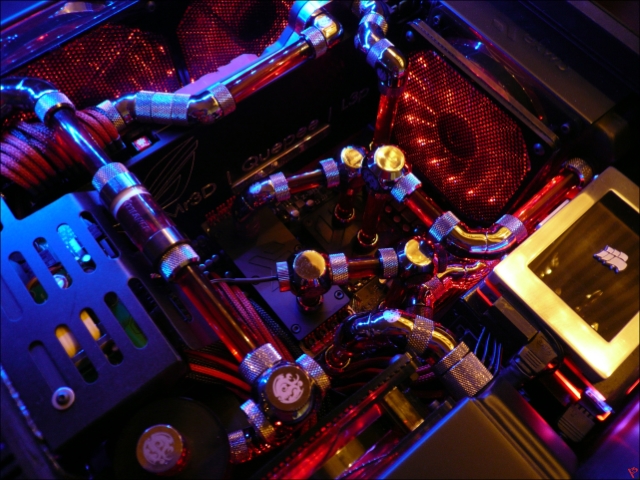
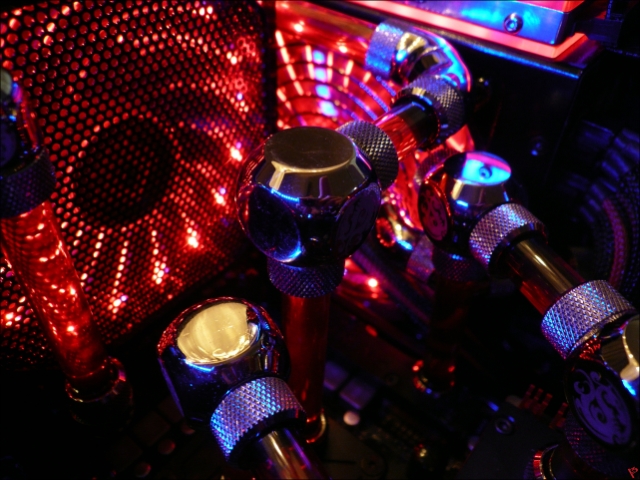
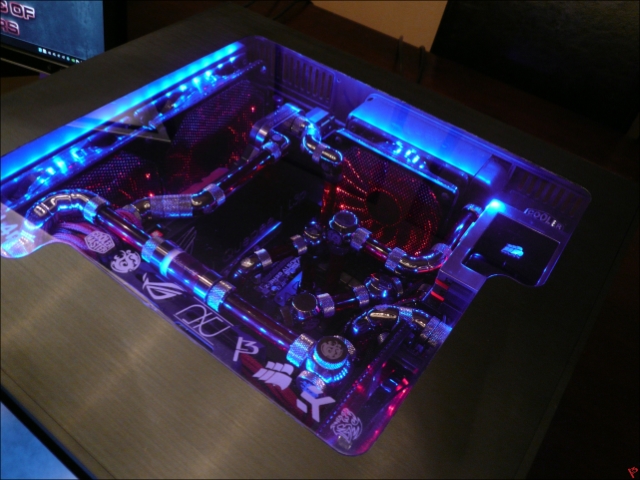
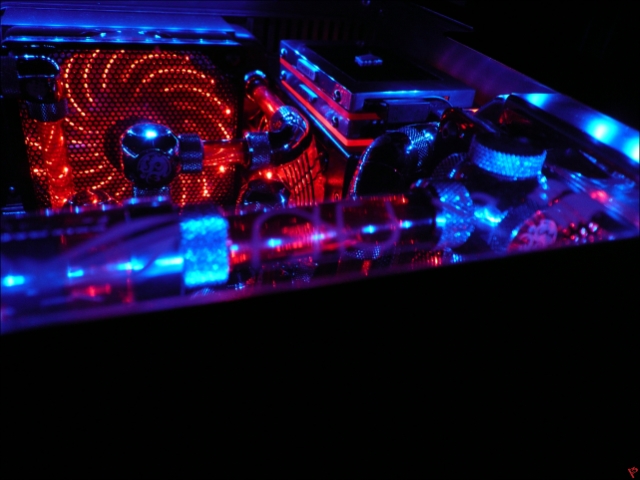
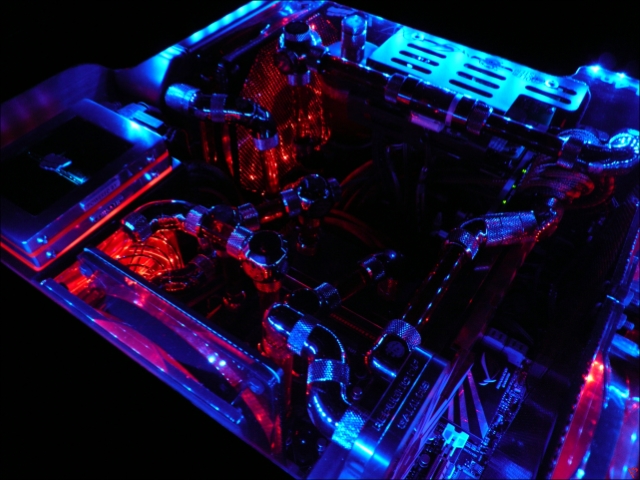
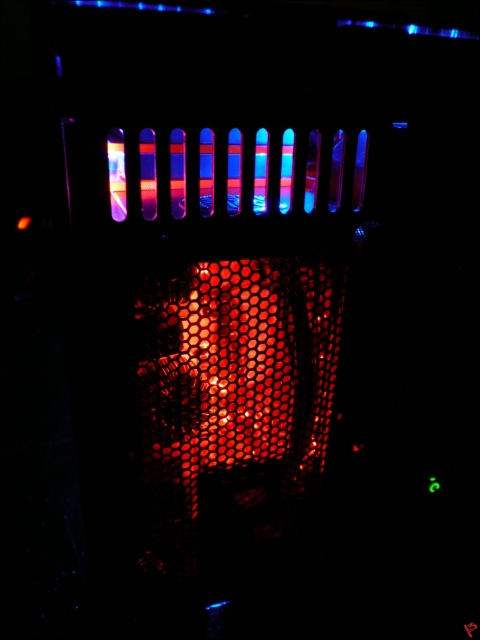
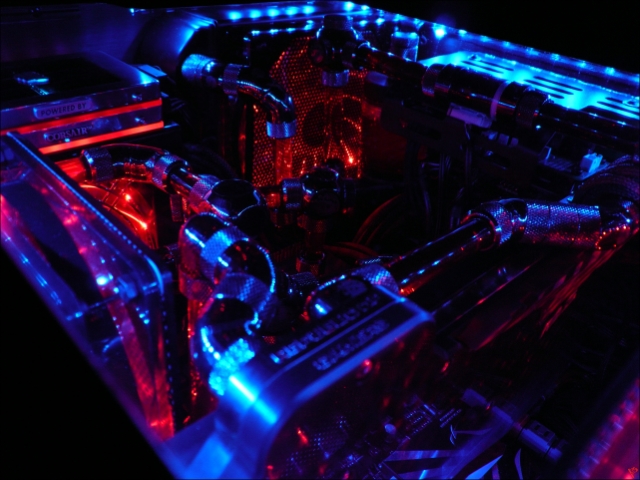
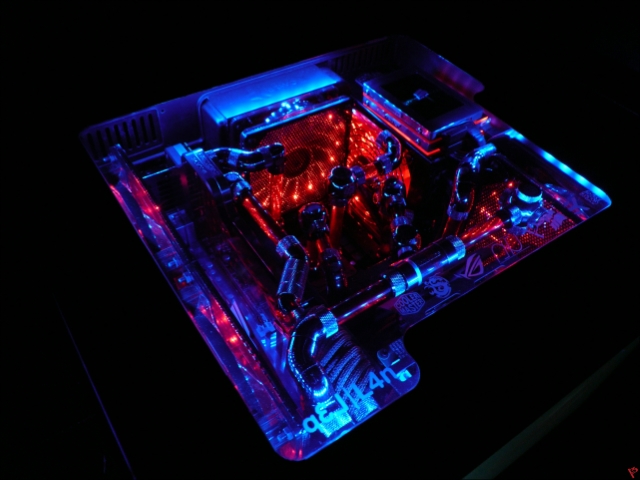
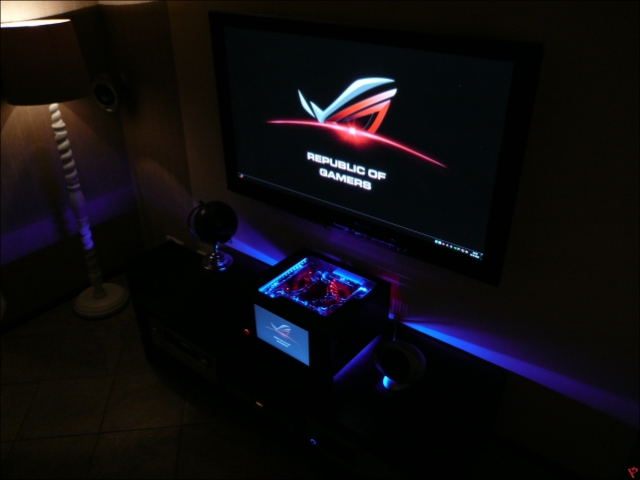
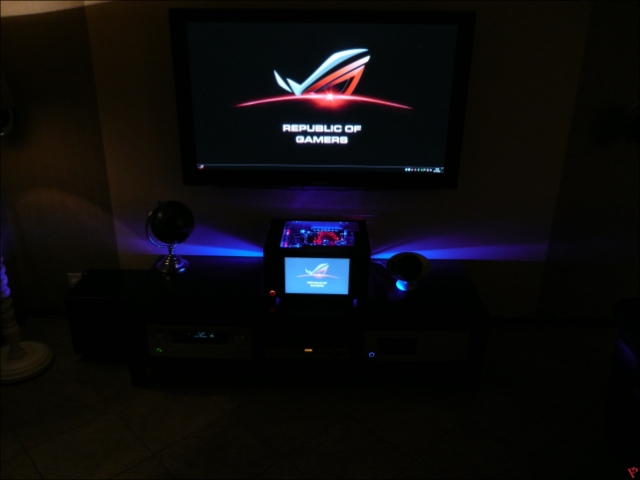
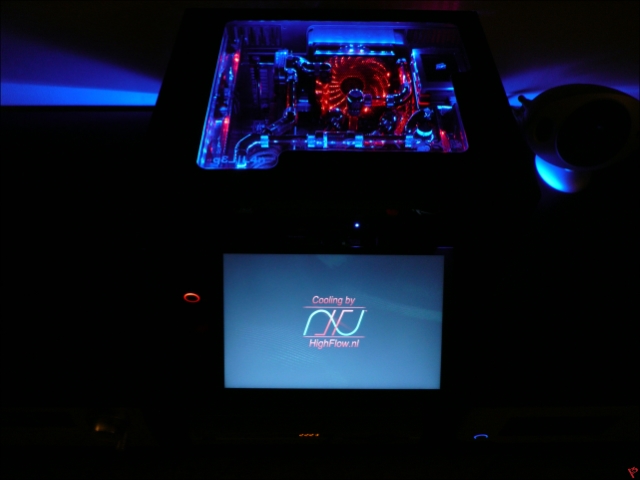
And here the final photos from L4n
Few shots in daylight.

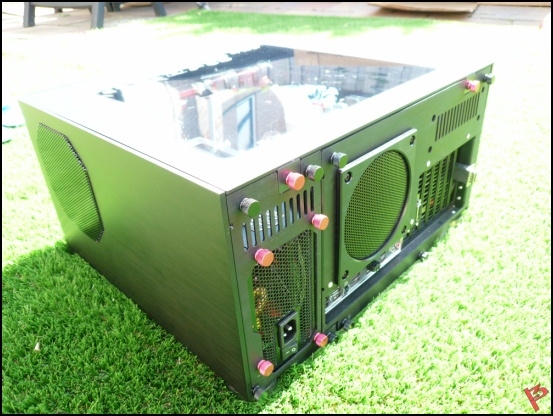
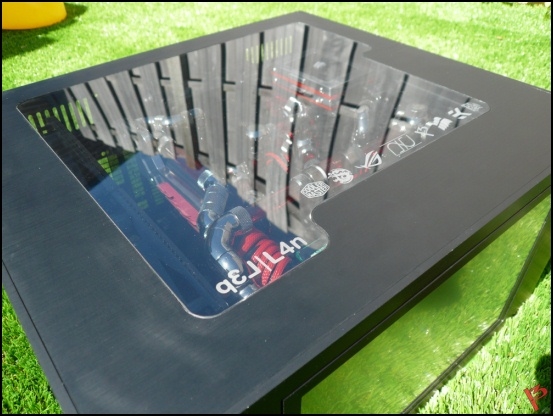
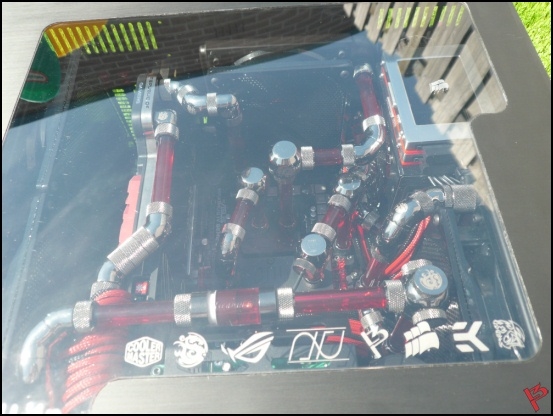
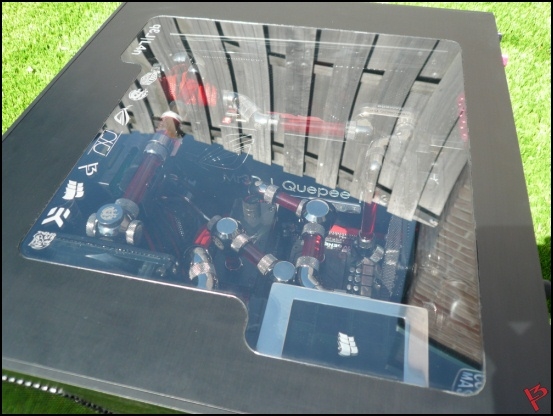
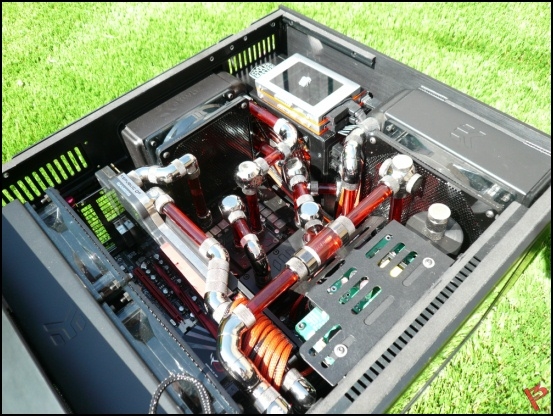

Complete set.

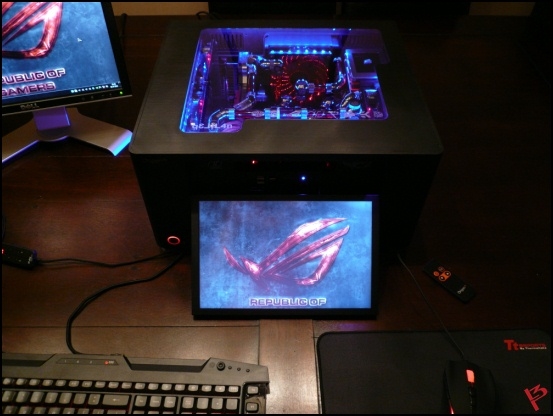
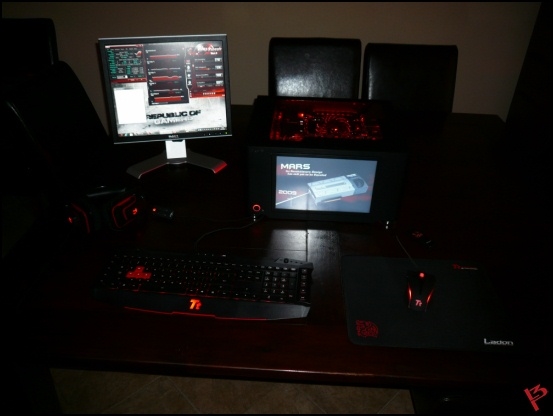
Inside shots.
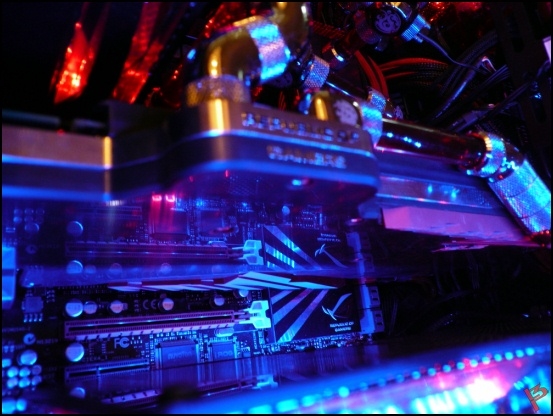
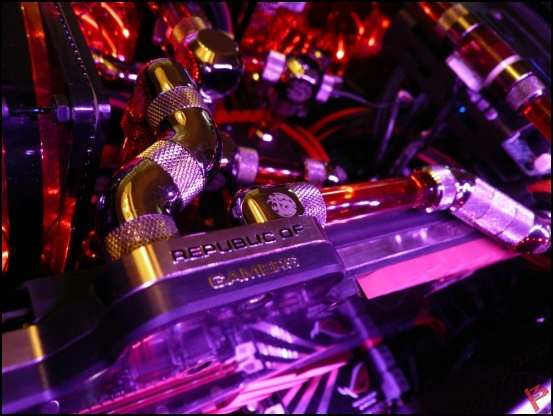

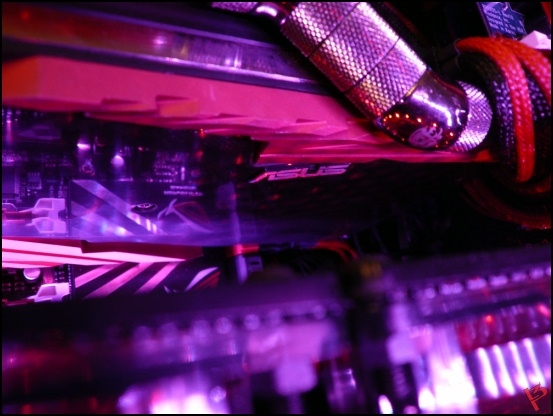
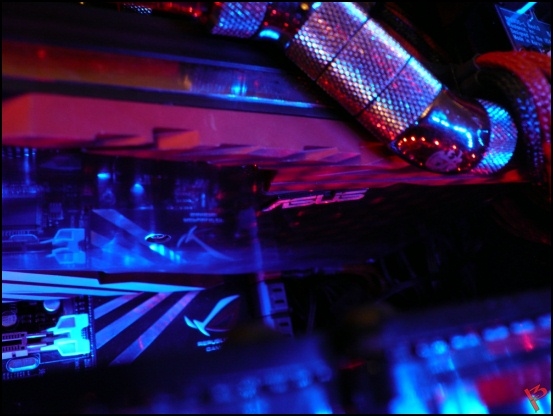
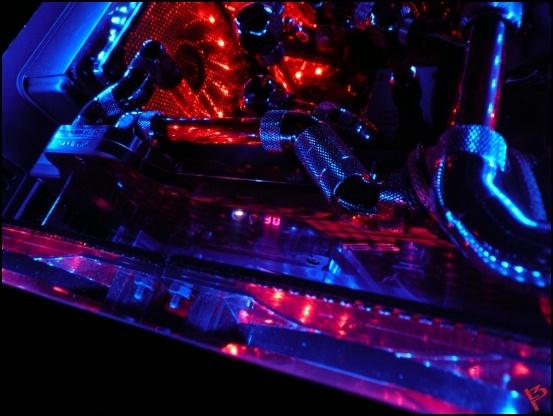


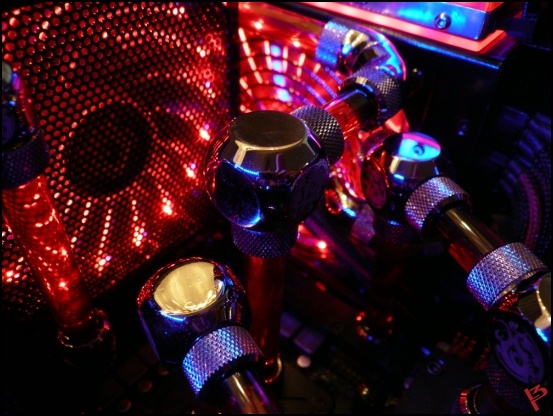

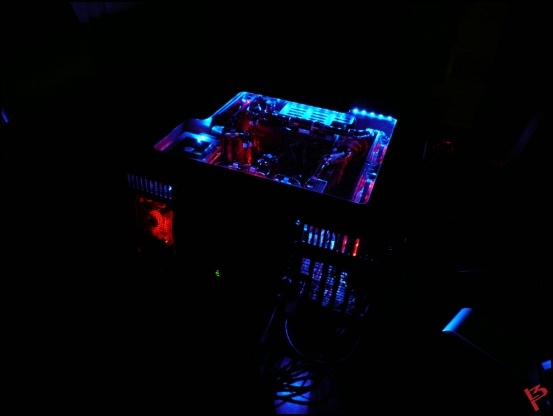
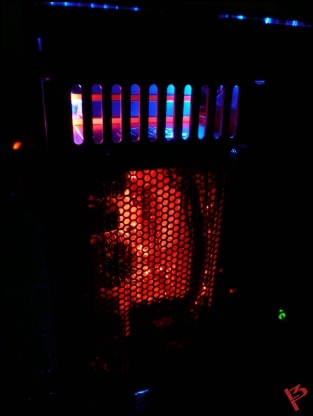
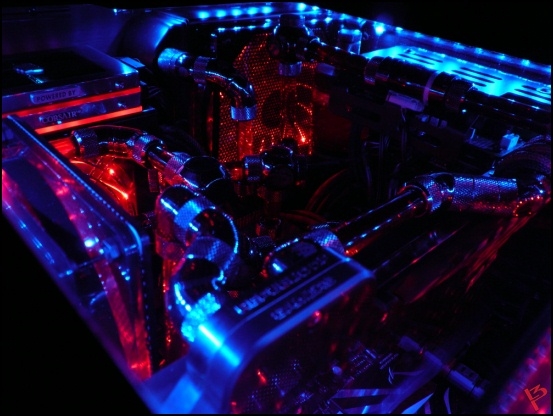
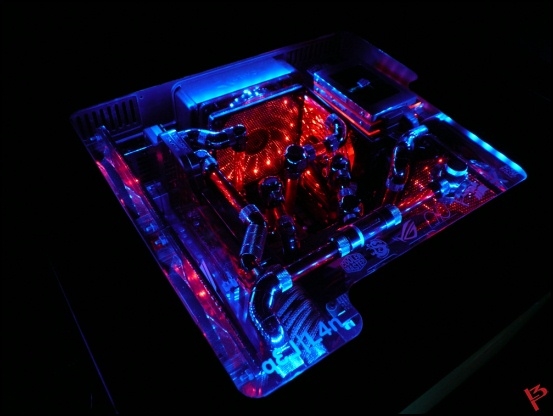
As an Htpc
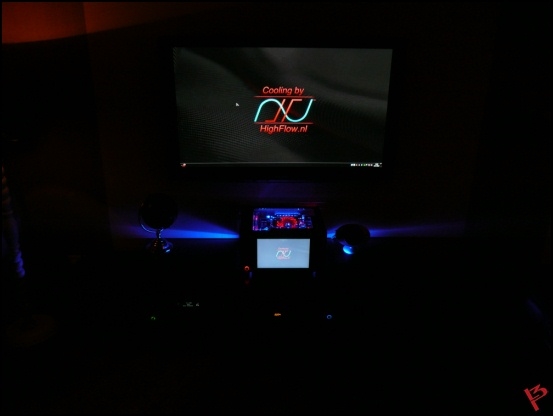
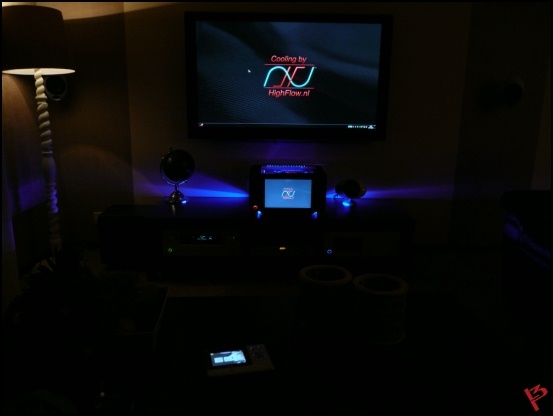
With dimmed lights.

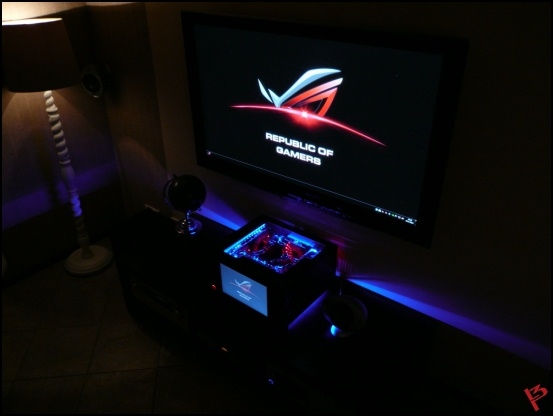
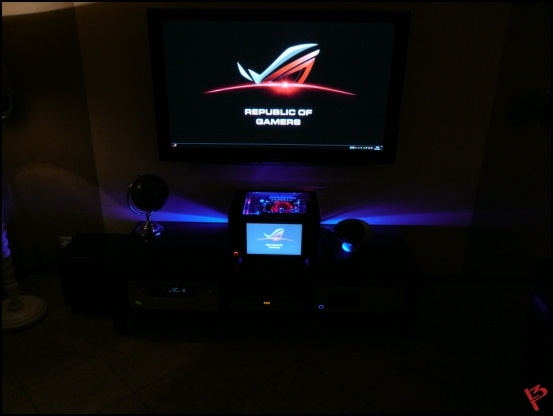
Final video

My thanks to the following persons and company's
Daniel aka Mr3D
Ivo aka Quepee
Richard aka Kier
Rogier Gelling
Gregor Hribernik


And off course everyone I forgot and all readers of this thread!
Off course will continue on the Mars problem later.
For now .... first need a months or two on my next project

Few shots in daylight.


Complete set.


Inside shots.


As an Htpc


With dimmed lights.


Final video
My thanks to the following persons and company's
Daniel aka Mr3D
Ivo aka Quepee
Richard aka Kier
Rogier Gelling
Gregor Hribernik
And off course everyone I forgot and all readers of this thread!
Off course will continue on the Mars problem later.
For now .... first need a months or two on my next project
JosiahBradley
[H]ard|Gawd
- Joined
- Mar 19, 2006
- Messages
- 1,791
Truly an epic work of art and inspiration. Amazing job and I look forward to your *next* build
D
Deleted member 82943
Guest
fantastic! been away from the thread awhile whats wrong with the mars?
Stevennoland
Limp Gawd
- Joined
- Jan 5, 2006
- Messages
- 418
Amazing work! I really appreciate people who take time to get it done right. Exactly right! Your attention to detail is non-compare. Even I'm envious!