LG 48CX

Ok nvm I check the HDMI info, I'm using Game Console for the HDMI input icon, not PC. It says I have HDR BT.2020 at 4k resolution and PCM (no idea what it means by PCM) and that's it, it doesn't tell me if it's 12bit or YCbCr infos

I can't use the PC incon for any of the HDMI inputs cause it 's flickering, no idea why.
 
Last edited:
I'm on a CX outputting 4k/60hz/RGB game mode, input labeled as PC, aspect ratio set to original, I can see it happen in 4k/120hz/4:2:0 too. Firmware 03.10.20 from ~2 weeks ago. I heard from people that have had CX's for awhile that this update messed with pixel shift automatically turning on regardless of the setting in some situations, so it's possible they messed with it in other ways in this firmware and it either hasn't made it to GX's yet or was fixed/never broken there.

That issue was there from the start. Screen shift will turn back on every time you start the TV back on even though it says it's disabled in the menu. Screen shift only causes blurry image at 4K 120 Hz, not 4K 60 Hz.
 
Ok I just place an order for the Club 3D 48gbs HDMI 1m cable, should be here on Friday. The last thing that I want to try is an Optical HDMI cable, but most of the optical HDMI cable that they sell are pretty long. Anyone knows the shortest Optical HDMI cable out there that I can order?
 
Ok I just place an order for the Club 3D 48gbs HDMI 1m cable, should be here on Friday. The last thing that I want to try is an Optical HDMI cable, but most of the optical HDMI cable that they sell are pretty long. Anyone knows the shortest Optical HDMI cable out there that I can order?
Following the suggestions I posted earlier, I now find no difference between my BIFALE 3 m 48 Gbps cable and the CAC-1372. The dropouts are due to to the adapter glitching when changing display modes. I don't think an optical cable would make any difference. For that amount of money I would wait till cables are properly tested for HDMI 2.1 specifications. Fiber optic cables will never be certified, but once certified copper cables are available, the fiber optic cables will undergo the same testing.
 
Following the suggestions I posted earlier, I now find no difference between my BIFALE 3 m 48 Gbps cable and the CAC-1372. The dropouts are due to to the adapter glitching when changing display modes. I don't think an optical cable would make any difference. For that amount of money I would wait till cables are properly tested for HDMI 2.1 specifications. Fiber optic cables will never be certified, but once certified copper cables are available, the fiber optic cables will undergo the same testing.

Well the 1m cable is only $20, so might as well just test it u know. How come my E9 doesn't show the YCbCr infos when i check the HDMI infos? Even when I switched to the PC icon for HDMI, it doesn't show the YCbCr infos. Only shows 4k HDR BT.2020 PCM
 
In regards to trying to get the best possible rendering of text (Windows 10). I have done most things discussed here both with regards to TV settings and Windows settings but even if I adjust for the size difference by increasing viewing distance, I just can't get it good enough. Now, I should perhaps add that I am comparing to a really good IPS and a much smaller screen (Acer X27) but still, the LCD is just better in this regard. Of course, this perhaps isn't really a complete surprise, as these TVs probably where never intended to be used as work monitors, but still a bit disappointing.

So, even though I think I know the answer and has already tried it, I still pop the question regarding what are the best settings on the TV and in Windows to get the best possible text rendering? One thing I have yet to experiment with is scaling. I know from previous experience that sometimes a bit scaling can actually improve text rendering, even if you don't really need it from a eye sight perspective, have anyone experienced with that to achieve better text (again, not because it is needed to actually see stuff but get them to render better).

Thanks.

You could try messing with the ClearType registry settings. Better ClearType tuner exposes some of these and I assume the built-in Cleartype Tuner adjust some but through the registry you can mess with them yourself. Changes to the registry seem to apply as soon as you restart apps. What I have noticed is that for example Google Chrome does not seem to obey these settings very well and has its own text rendering settings you can't edit. Firefox obeys the Cleartype settings though and of course built in apps like Explorer can be used for testing. I can't remember the settings I landed on right now but I think I adjusted the gamma option a bit.

It will never look as good as a monitor with much higher PPI. I run at 125% scaling because it gives me a more comfortable text size as well as better text rendering. It works well enough but even in PC mode I seem to see a bit of fringing on text if I look close enough.

MacOS grayscale font smoothing with the "Smooth fonts" setting turned off (it mainly makes text look like it's bold all the time) looks better to me than what I can get in Windows but that might be because of the way MacOS handles scaling. I use its "looks like 3200x1800" scaling option which would be the equivalent of 120% scaling on Windows if it supported it. What MacOS does though is that it renders the image first to 2x (6400x3600) and then downscales to the desired size. This seems to result in better text rendering than Windows offers but is less flexible with fewer scaling levels. MacOS also doesn't adhere text to the pixel grid so with high enough res text looks better no matter what.
 
Also, when I restart my PC, I lost the BT.2020 and the colors are washed out again.

When the new Nvidia 3000 series cards come out with HDMI 2.1, i think they will be Sold Out really fast due to everyone wants them because we all have been waiting for 4K 120hz HDR forever...
 
How come my E9 doesn't show the YCbCr infos when i check the HDMI infos? Even when I switched to the PC icon for HDMI, it doesn't show the YCbCr infos. Only shows 4k HDR BT.2020 PCM
Are you in the "HDMI Diagnostics" screen? Press "11111" while "Channel Tuning" is highlighted, then click the "HDMI Mode" label. There's a bug where it reports 8-bit for YCbCr though the signal is 10-bit.

Also, when I restart my PC, I lost the BT.2020 and the colors are washed out again.
Yeah, 10-bit RGB is usable only on the CX with HDMI Signalling Override. Stick to 10-bit YCbCr422 on the C9.
 
Are you in the "HDMI Diagnostics" screen? Press "11111" while "Channel Tuning" is highlighted, then click the "HDMI Mode" label. There's a bug where it reports 8-bit for YCbCr though the signal is 10-bit.


Yeah, 10-bit RGB is usable only on the CX with HDMI Signalling Override. Stick to 10-bit YCbCr422 on the C9.

Where do I go to the Channel Tuning ?
 
Ok I got the HDMI Diagnostics, it said :

3840x2160p @ 120Hz RGB 12Bit BT2020_RGBORYCBCR
HDMI Mode: HDMI, HDR Type: HDR10

HOw do I know whether it's YCbCr 422 or not? I didn't see 422 anywhere
 
Starting to think nvidia control panel is the culprit, if you change rez in windows 10, seems to bring hdr back properly without being washed out.

might try uninstalling nvcpanel altogether.
 
It doesn't zoom or overscan - it just shifts the pixels. When you do this with a double subsampled image, the GPU subsampling matrix is no longer aligned with the display's, resulting in further loss.
Even if the matrices are aligned but not identical, there is further loss. That's why outputting RGB from the GPU looks better than YCbCr422 without PC icon, even though the CX renders both at 4:2:2.

Thanks. Is there a good way to reproduce this as to see the effects of it?
 
I'm definitely looking at it zoom slightly when enabling/disabling, and definitely seeing no black border on any side when a full screen image (there would have to be for it to just shift the image without overscanning).

This is really weird. I really can't see any reason for it to zoom in/out for this function but you probably know best what you are seeing and not seeing.
 
I've managed to disable ASBL on my LG 48 CX, it's the same procedure as described on the avsforums as for previous LG models. I'm only posting this for information for those that want to do it, and I want to emphasise you should understand the risks before doing anything.

I would not recommend doing it all, unless you read up and understand potential risks first, and are willing to accept you may damage your TV.

What is ABSL?
  • This is the effect where your screen gets gradually darker, generally when static elements are displayed on screen for a few minutes, but sometimes you might notice it when watching videos with only a small amount of moving content.
  • As has been mentioned earlier, you may be able to avoid or reduce the severity of the ASBL effect by changing your contrast/OLED settings, but for me this didn't work.

What are the risks of disabling ASBL?
  • You could damage your screen, if you don't take precautions to limit the amount of static and/or bright content on your screen.
  • You should take extra precautions to avoid static content on your screen, which could cause OLED burnout. Turn off your TV when not in use, hide your static taskbars, disable static desktop images, use power-saving (auto-off monitor) features in your OS, and test these all work as you'd expect.
  • As the steps below require you to access to the service menu, you could make your TV inoperable if you accidentally click the wrong thing.
  • Be warned and read up on it further before you do anything.
  • I take no responsibility for anyone else following these instructions. Be aware the risk lies with you alone.

What do you need to disable ASBL?
  • The easiest thing for me was to buy a cheap service remote. I bought the MKJ39170828 service remote from Ebay for £6.
  • The alternative is to have a mobile phone with IR blaster, and an app. I don't know the config you need for this, but you should be able to find instructions elsewhere e.g. the avsforum link above.
  • You may need to re-use this in future, if LG provide a firmware update that reverts the setting back.

How do you disable ASBL with the MKJ39170828 remote?

Follow these instructions very carefully - one wrong move and you could brick your TV:
  • Hit the "In Start" button on the remote (top left).
  • When prompted for the code, enter 0413
  • Arrow down on remote to "OLED"
  • Hit right arrow on remote
  • "TPC Enable" is ASBL. Turn it off. Use right arrow button to turn off.
  • Hit Exit button on remote.
  • And that's it - for me, there's no more automatic dimming.
 
Last edited:
Starting to think nvidia control panel is the culprit, if you change rez in windows 10, seems to bring hdr back properly without being washed out.

might try uninstalling nvcpanel altogether.

Could it be that NVCP also sets the color space etc options whereas Windows Display Settings just changes the resolution? Have you tried changing res from say DisplayFusion?
 
That issue was there from the start. Screen shift will turn back on every time you start the TV back on even though it says it's disabled in the menu. Screen shift only causes blurry image at 4K 120 Hz, not 4K 60 Hz.

But can we use 4K@120hz yet without 4:2:2?
 
120 Hz 12-bit RGB may work on the C9 but not on the CX. Check that that the adapter is not falling back to YCbCr420 in the HDMI info screen on the TV.
The C9 will probably also downsample it to 4:2:2. You may want to check the maximum resolution & refresh rate that the TV does 4:4:4 for an RGB input. On the CX, the maximum seems to be 4K 60 Hz 10-bit RGB before it downsamples.


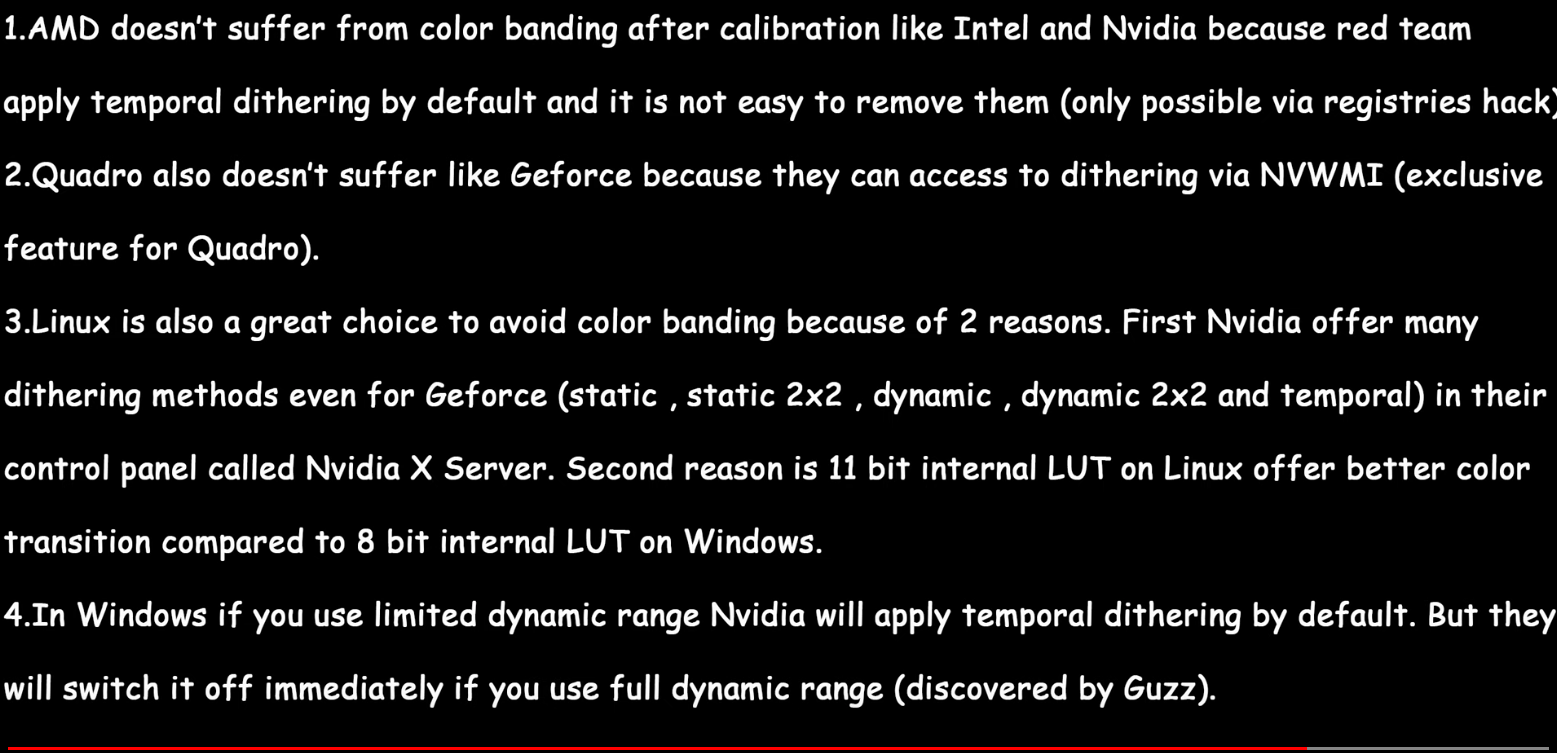
The CX renders 4K 60 Hz 10-bit RGB as 4:4:4 with the adapter. However Windows won't enable dithering at 10-bit. You'll have to resort to a registry hack to force dithering on. There may be additional issues where applications detect the signal bit-depth and only output 10-bit, making the dithering useless - it would only work on certain surfaces and APIs.


I've been playing CS:GO and other FPS games on the Predator X27 at 120 Hz 8-bit RGB with dithering for over a year. I've never noticed any artifacts.

I replied with this a few back that has some links to "hacks" in order to get dithering able to be turned on with nvidia gaming gpus. (That being from the perspective of regular use without using the new displayport adapter).


dithering-hacks_youtube-1.png

----------------------------------------

https://hub.displaycal.net/forums/topic/how-to-enable-dithering-on-nvidia-geforce-with-windows-os/

https://www.reddit.com/r/nvidia/comments/aghfqk/dithering_can_now_be_enabled_via_registry_tweak/

https://www.nvidia.com/en-us/geforc...m-nvidia-x-server-to-geforce-driver-/#5934577


================================================

Nvidia does have support for full dithering control by the user apparently, just not on their gaming cards in windows. So theoretically if they wanted to they could add both 10bit over hdmi and dithering controls at some point. (Maybe we'll get a 10bit internal Lut for windows instead of the current 8bit, unlike Linux's 11bit apparently, someday as well).

Here is a recent method below from 4months ago that has what seems like a good method, though I haven't tried it myself on any of my monitors. I don't represent that app at all so use at your own risk. It was made not just for dithering for for icc color profiles (color management in the may windows update has some bugs though apparently). However it does have dithering controls built in so should be able to use it just for that. The most recent readme update was from January 2020 and the current exe date lists as 2-18-2020.
https://bitbucket.org/CalibrationTools/calibration-tools/src/master/

https://bitbucket.org/CalibrationTools/calibration-tools/downloads/

j10v6m.png

Calibration Tools
Features

  • Create and edit monitor calibration files: adjust backlight, white balance, overall gamma, shadow detail gamma, 10-band gamma, s-curve, highlights.
  • Enforce separate day/night files with automatic dawn/dusk times and gradual transition during twilight.
  • Test for calibration hijacking in games, and solve with ReShade or borderless full screen windowed mode.
  • Enforce per-game calibration files.
  • Enable dithering on Nvidia GPUs for smoother gradients.
  • Portable, malware-free, ad-free, nag-free.
System Requirements

  • 64-bit Windows, Vista or later.
  • Logged in as a Windows administrator.
  • Video card supporting gamma tables for monitor calibration.
  • DirectX June 2010 update (www.microsoft.com/en-us/download/details.aspx?id=8109).
  • Note: Windows 10 version 1903 (May 2019) contains bugs in its colour management system which affect Calibration Tools. For possible solutions, see here.


---------------------------
https://www.nvidia.com/en-us/geforc...-to-port-dithering-from-nvidia-x-ser/2421010/
---------------------------
User - sonicblue83
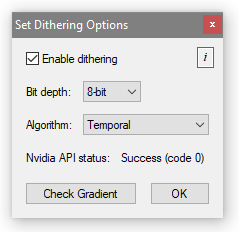
You can try the app below which applies it through the Nvidia API instead of the reg key.

https://tiny.cc/CalibrationTools

https://i1.lensdump.com/i/j10v6m.png

If the Nvidia API status is success (code 0) click Check Gradient. If the gradient is unsmooth, try a hard reboot. If it's still unsmooth, see this post:
https://hub.displaycal.net/forums/topic/windows-10-1903-please-read/

The app also includes some automatic behaviour to try and prevent dithering from dropping out:
1. Disabling dithering at Windows shutdown
2. Refreshing dithering at display mode change
3. Refreshing dithering at display hardware change
4. Refreshing dithering at entering/exiting low power state
5. Refreshing dithering at game launch/exit

1 seems to be necessary to prevent it from dropping out after a reboot.
Only 1, 3 and 4 are enabled by default, as 2 and 5 have caveats.
You can still enable 2 and 5 through the Config.ini file, although it's not recommended. For details open the Readme file and see Config.ini settings - Dithering.
If for some reason the Enable Dithering checkbox is greyed out, try DitherForceSupport=1 in Config.ini.

Mozgus
Nice! This works quite well. Shame it cant apply it to individual monitors though. Have to unload this config when I want to use my 2nd monitor.

sonicblue83
Yes, unfortunately per-monitor calibration is not supported (see Readme file Q&A General section for explanation). However you can still control which monitors receive the calibration, if that is of use to you. For example to only apply calibration to monitor 1, set MultiMonitorDeviceContext=1 in Config.ini. To only apply to monitors 1 and 3, MultiMonitorDeviceContext=1,3 To apply to 1 and 3, but unload monitor 2, MultiMonitorDeviceContext=1,-2,3 (minus means unload). Then restart the app and use the Hijack Test tool to confirm the intended monitors are(n't) turning green. Dithering is always applied to all monitors and that behaviour cannot be changed. If you only want to use the app for dithering, and use another app for calibration, just don't select any calibration files to begin with. If you have already selected calibration files and want to stop applying them, right click tray icon -> Factory Reset.

--------------------
 
Last edited:
I received my Clud3D adapter and their 2m "10K" cable today.

And it all works like shit! I have tried connecting it to every GPU port, tried both USB power from a charger and direct to computer. But noo, it will just show a weirdly garbled image on the display if I try to enable 120 Hz. Power cycling the adapter seems to fix that but in general I am getting all the issues previously reported. Black screen if you try to toggle HDR or change resolutions.

I tried using CRU to delete the 4096x2160 resolutions from the EDID and that also did not do anything. I have had it several times drop to 4:2:0 in 4K 60 Hz and somehow managing to make that really blurry.

EDIT: It seems that it frequently wants to drop down to 1920x2160 @ 120 Hz. Power cycling the adapter fixes this. You can leave the 111111 info menu open and it will stay in place even through resolution changes. Also if I try to use 10-bit color then it will always show 8-bit whether due to a bug or because Nvidia only outputs that on the desktop without using a Quadro card afaik.

I managed to play some Doom Eternal and oh lord, it's glorious in 4K 120 Hz HDR.

EDIT 2: Custom resolutions work at 120 Hz! I was able to add 3840x1600 @ 120 Hz and it does seem to work, also with HDR.

If I could get this working better I would be quite happy with this setup. I will try contacting Club3D.
 
Last edited:
I was curious if anyone had thoughts on using this as a work monitor as well. I work in finance (and now forced to worked from home due to COVID), so I have tons of spreadsheets open, power point / word documents etc. But I do keep OLED light down to 10% (max 15%) when I work. My desk place is limited so I am too lazy to keep switching monitors for when I work vs when I dont. Do you think at such low OLED light the burn-in is a possibility?
I've been working from home just fine on my CX48.
 
I received my Clud3D adapter and their 2m "10K" cable today.

And it all works like shit! I have tried connecting it to every GPU port, tried both USB power from a charger and direct to computer. But noo, it will just show a weirdly garbled image on the display if I try to enable 120 Hz. Power cycling the adapter seems to fix that but in general I am getting all the issues previously reported. Black screen if you try to toggle HDR or change resolutions.
Just leave it in 8-bit / 10-bit RGB mode and use the BT.2020 HDMI signalling override on the CX. This is the best setup as of now. If you lose signal, just power cycle it and it will restore your last RGB resolution.
 
Just leave it in 8-bit / 10-bit RGB mode and use the BT.2020 HDMI signalling override on the CX. This is the best setup as of now. If you lose signal, just power cycle it and it will restore your last RGB resolution.

I guess you mean use the BT2020 override only in HDR mode, right? HDR is definitely washed out when going through this adapter. SDR looks normal even at 4K 120 Hz.

I looked at what the TV diagnostics screen reports and even through just the HDMI 2.0 watching a YouTube HDR video it reports "HDR type: SDR" but the resolution is reported as "3840x2160 8-bit RGB FUTURE" whereas through the adapter "FUTURE" is replaced by "NODATA".

I sent an email to Club3D asking about the power cycling, blank screen and half res issues. Let's see what/if they answer.
 
I was curious if anyone had thoughts on using this as a work monitor as well. I work in finance (and now forced to worked from home due to COVID), so I have tons of spreadsheets open, power point / word documents etc. But I do keep OLED light down to 10% (max 15%) when I work. My desk place is limited so I am too lazy to keep switching monitors for when I work vs when I dont. Do you think at such low OLED light the burn-in is a possibility?

I've worked on mine a few weeks. I'm a programmer and my settings are basically the RTings recommended settings but OLED light turned down to 30-40 (40 during daytime, 30 in the evening), HDR off. Burn-in is a possibility but if you use for example a couple of virtual desktops you would have the equivalent of "mixed content" which helps avoid burn-in. If I take longer breaks (lunch, bathroom etc) I just turn off the TV with the remote.

I also have a black background, use dark modes where I can, taskbar hidden, screensaver set to go on after 5 minutes of idle and display going to sleep shortly after that. I never see the screensaver at inappropriate times (when I am working on something).

It would not be my first choice for a work monitor but I don't want to try to cram in another big monitor just for that.
 
So for all you guys with the Club3D adapter, how are you switching over to Gsync? Unplugging the DP connection then plugging in straight to HDMI? Or do you have BOTH DP and HDMI connected from the PC to the TV at once on different ports then just switch the TV input? My biggest concern was easily swapping back and fourth between the adapter for 120Hz 4:4:4 and then normal HDMI connection for 120Hz 4:2:0 Gsync. I use BFI a lot anyways so if I could have 2 dedicated inputs like say, Club3D adapter -> HDMI 1 for 120Hz 4:4:4 with BFI, and then straight HDMI connection from PC to TV on HDMI 2 for 120Hz Gsync, and just swap back and fourth between the two using the remote then that would be great.
 
So for all you guys with the Club3D adapter, how are you switching over to Gsync? Unplugging the DP connection then plugging in straight to HDMI? Or do you have BOTH DP and HDMI connected from the PC to the TV at once on different ports then just switch the TV input? My biggest concern was easily swapping back and fourth between the adapter for 120Hz 4:4:4 and then normal HDMI connection for 120Hz 4:2:0 Gsync. I use BFI a lot anyways so if I could have 2 dedicated inputs like say, Club3D adapter -> HDMI 1 for 120Hz 4:4:4 with BFI, and then straight HDMI connection from PC to TV on HDMI 2 for 120Hz Gsync, and just swap back and fourth between the two using the remote then that would be great.

You can have both outputs plugged in, the computer just thinks you have two displays connected in that case so you have to toggle both the input and use Win+P to switch to show only one or the other display.
 
You can have both outputs plugged in, the computer just thinks you have two displays connected in that case so you have to toggle both the input and use Win+P to switch to show only one or the other display.

Ok nice. There's been a bunch of discussion on the adapter in the last 24 hours so I haven't fully caught up yet, but I'm assuming 4k 120Hz 8bit RGB Full range works fine without any issues right? I am not going to be using HDR on it obviously since it's going to be left in BFI mode and I won't ever be changing resolutions from that.
 
Ok nice. There's been a bunch of discussion on the adapter in the last 24 hours so I haven't fully caught up yet, but I'm assuming 4k 120Hz 8bit RGB Full range works fine without any issues right? I am not going to be using HDR on it obviously since it's going to be left in BFI mode and I won't ever be changing resolutions from that.

I wish it did but for me it frequently gives a 1920x2160 or just blank output and requires power cycling the adapter. That fixes it until resolution is changed in..well, anything. I tried both my CableMatters HDMI "2.1 48 GBps" and the Club3D "10K 120 Hz" cables, both 2m long and there is no difference in their performance it seems. Different HDMI ports make no difference either and neither do different DP ports on the GPU.
 
I wish it did but for me it frequently gives a 1920x2160 or just blank output and requires power cycling the adapter. That fixes it until resolution is changed in..well, anything. I tried both my CableMatters HDMI "2.1 48 GBps" and the Club3D "10K 120 Hz" cables, both 2m long and there is no difference in their performance it seems.

Thanks. If it's just going to be finnicky even with 2m short cables then I'm not going to bother.
 
Sounds about right. 1m/2m cablematters 48gbps cables here. Same meh experience.
$60 banked towards an Ampere middle tier card late this or early next year (zero care for the performance at cost of high TDP of flagship, enthusiast line models)
 
The good thing about the adapter is that it at least gives us a taste what 4K 120 Hz with HDR will be like. Real, real good is what. It feels good to use on the desktop and looks great in games.

For me the adapter also has no problems with GPU clocks, they stay in the 300-420 MHz range on the desktop.

stop-my-penis-ezulzv.jpg
 
The good thing about the adapter is that it at least gives us a taste what 4K 120 Hz with HDR will be like. Real, real good is what. It feels good to use on the desktop and looks great in games.

For me the adapter also has no problems with GPU clocks, they stay in the 300-420 MHz range on the desktop.

I feel you on that. I already put Death Stranding on hold until I am able to play it at 4k 120fps with HDR enabled on Ampere. Other games like HZD and Control will also be put on hold until I can play them in full glory.
 
I guess you mean use the BT2020 override only in HDR mode, right? HDR is definitely washed out when going through this adapter. SDR looks normal even at 4K 120 Hz.

I looked at what the TV diagnostics screen reports and even through just the HDMI 2.0 watching a YouTube HDR video it reports "HDR type: SDR" but the resolution is reported as "3840x2160 8-bit RGB FUTURE" whereas through the adapter "FUTURE" is replaced by "NODATA".

I sent an email to Club3D asking about the power cycling, blank screen and half res issues. Let's see what/if they answer.

In the HDMI diagnostic screen after using 11111, I got 4k 120hz BT.2020 Full RGB 12bit. And it doesn't fall back to SDR or lose signal, as long as I don't restart my PC. If I restarted my PC , the HDR colors will be washed out again.
 
I feel you on that. I already put Death Stranding on hold until I am able to play it at 4k 120fps with HDR enabled on Ampere. Other games like HZD and Control will also be put on hold until I can play them in full glory.

Good luck getting 120 fps on Control if you want to use raytracing. Even with 1080p DLSS that isn't happening.

IMO Death Stranding is perfectly fine at 60 fps. It's a leisurely paced game most of the time.
 
Those of you who have it working fine, how are you powering the Club3D adapter? 9 or X series TV?
 
Last edited:
Good luck getting 120 fps on Control if you want to use raytracing. Even with 1080p DLSS that isn't happening.

IMO Death Stranding is perfectly fine at 60 fps. It's a leisurely paced game most of the time.

Depends. Ampere is suppose to offer much better RT performance over Turing, less fps penalty for turning RT on. And even if it doesn't, a standard +40% performance boost would still put it north of 60fps.
 
Back
Top