Navigation
Install the app
How to install the app on iOS
Follow along with the video below to see how to install our site as a web app on your home screen.
Note: This feature may not be available in some browsers.
More options
-
Some users have recently had their accounts hijacked. It seems that the now defunct EVGA forums might have compromised your password there and seems many are using the same PW here. We would suggest you UPDATE YOUR PASSWORD and TURN ON 2FA for your account here to further secure it. None of the compromised accounts had 2FA turned on.
Once you have enabled 2FA, your account will be updated soon to show a badge, letting other members know that you use 2FA to protect your account. This should be beneficial for everyone that uses FSFT.
You are using an out of date browser. It may not display this or other websites correctly.
You should upgrade or use an alternative browser.
You should upgrade or use an alternative browser.
ASUS/BENQ LightBoost owners!! Zero motion blur setting!
- Thread starter Mark Rejhon
- Start date
Falkentyne
[H]ard|Gawd
- Joined
- Jul 19, 2000
- Messages
- 1,891
Yes, click the start and minimized buttons and voila, you're using your desktop colours in 3D.
I'm tweaking with my AMD control panel and I've found I get very nice colours in 3D; vibrant. While having the brightness I require.
It's so good now, I'm actually hard pressed to really remember default settings.
I tried CPkeeper but any changes I make in AMD color settings don't seem to take any effect in 3D, even if I lock the profile and click mimimize.
Do I have to actually make/use an ICC profile, or is the CPK profile (saved from AMD color settings) enough?
Mark Rejhon
[H]ard|Gawd
- Joined
- Jul 6, 2004
- Messages
- 1,395
Can you do me a favour and test the ToastyX lightboost.bin file to see if this fixes the problem?yo guys. I got this one question:
When I deactivate 3D in the nvidia driver to remove the annoyning CTRL+T routine, LB just goes off as soon as I start a game :/ whats up with that? Any idea for a fix?
I still have yet to update the LightBoost HOWTO to include some more information about alternatives other than the EDID override methods; but there's always been pros/cons with every approach of enabling LightBoost so I have to change the HOWTO carefully.
It needs to be running, so minimize it to tray.
Ok cool thanks one last question what white point would be the best to use while in LB ? I tried all of them and so far the best one to my eyes is the D65 as it has a more natural color while not still not being to warm. The D55 and D50 are to warm for me and make the screen look a bit reddish. I tried the the Native setting but it made the screen have a blue tint to it and everything looked way to blue in my opinion. BMG It would be great if you can let me know which one you thought looked the best and you used on the XL2720T when you had it ?
Thanks
P.S. I got my colormunki display so if anyone with a XL2720T wants to try out my ICC profiles let me know and I will see if I can send them to you.
Update 1: Here are all the ICC profiles I have created with my colormunki display for my XL2720T.
BenQ XL2720T_D50_100_LB_05012013.icm
https://mega.co.nz/#!nM9AWZBJ!X8Y2whgUpxtHOEXyrI5ZKg56fLIOQqyMLwMrrIj16sA
BenQ XL2720T_D55_100_LB_05012013.icm
https://mega.co.nz/#!GZ9BmDaB!M39iwl6mdoIfSC5UkOArwg3DWEdLzvp1WwIDJNXvdd8
BenQ XL2720T_D65_100_LB_05012013.icm
https://mega.co.nz/#!XNllUZAY!fnl7jFJtGe8T9kd0jlPQIjwKiJk-7P9bI_SoAu61OKo
BenQ XL2720T_Native_100_LB_05012013.icm
https://mega.co.nz/#!XYtTVRBT!AFi3RyHLHGi6zGt8YDUpwBJBUzMeVJHAtrLyYHtBRoc
Last edited:
I tried CPkeeper but any changes I make in AMD color settings don't seem to take any effect in 3D, even if I lock the profile and click mimimize.
Do I have to actually make/use an ICC profile, or is the CPK profile (saved from AMD color settings) enough?
The cpk profile is what you'd want to use. Save the current LUT (with cpkeeper) after it's the way you want it, then that's the one you point cpkeeper to for apply and lock.
Falkentyne
[H]ard|Gawd
- Joined
- Jul 19, 2000
- Messages
- 1,891
I tried it but it completely ignores it/the AMD CCC gamma/color settings as soon as a 3d game is launched. Regardless of what I set it to. Works fine in desktop though or in windowed mode with a game...how are you getting it to work in a fullscreen game? Yes it is minimized to try, too.
I tried it but it completely ignores it/the AMD CCC gamma/color settings as soon as a 3d game is launched. Regardless of what I set it to. Works fine in desktop though or in windowed mode with a game...how are you getting it to work in a fullscreen game? Yes it is minimized to try, too.
Did you have CPKeeper grab the tweaked LUT and save it to a file, then force it? There's apparently a few games that have issues, but most should be ok.
Falkentyne
[H]ard|Gawd
- Joined
- Jul 19, 2000
- Messages
- 1,891
Yes I did.
It's under "desktop color" in the CCC, right? That's the one I saved.
I tried three games so far: Darksiders, Black Ops 1 and CS:Go; all three seem to completely ignore the windows settings.
It's under "desktop color" in the CCC, right? That's the one I saved.
I tried three games so far: Darksiders, Black Ops 1 and CS:Go; all three seem to completely ignore the windows settings.
Yes I did.
It's under "desktop color" in the CCC, right? That's the one I saved.
I tried three games so far: Darksiders, Black Ops 1 and CS:Go; all three seem to completely ignore the windows settings.
For CS:Go try adding -nogammaramp to your shortcut or launch options. No idea if it'll help, but try it. The CPKeeper LUT save I'm talking about is clicking the '*' box next to your monitor number in CPKeeper, probably to the right of "monitor 0", to the left of the box where it shows the file it's locking. You're probably already doing that, but just to be sure.... I haven't tried CPKeeper with the games you mention, but it works fine in my source games, various mass effects, crysis 3, Tomb Raider, Bioshock Infinite, metro2033, old Doom3, and more. I'm sure there's games it doesn't work right with.
l88bastard
2[H]4U
- Joined
- Oct 25, 2009
- Messages
- 3,902
I posted this in the Asus thread, but figured I would post it here too!!
3 stripped bezel Asus VG248QEs in portrait mode with the AG coating removed by Vega and protected by 1/4" tempered glass running in pure motion with the 2D lightboost hack
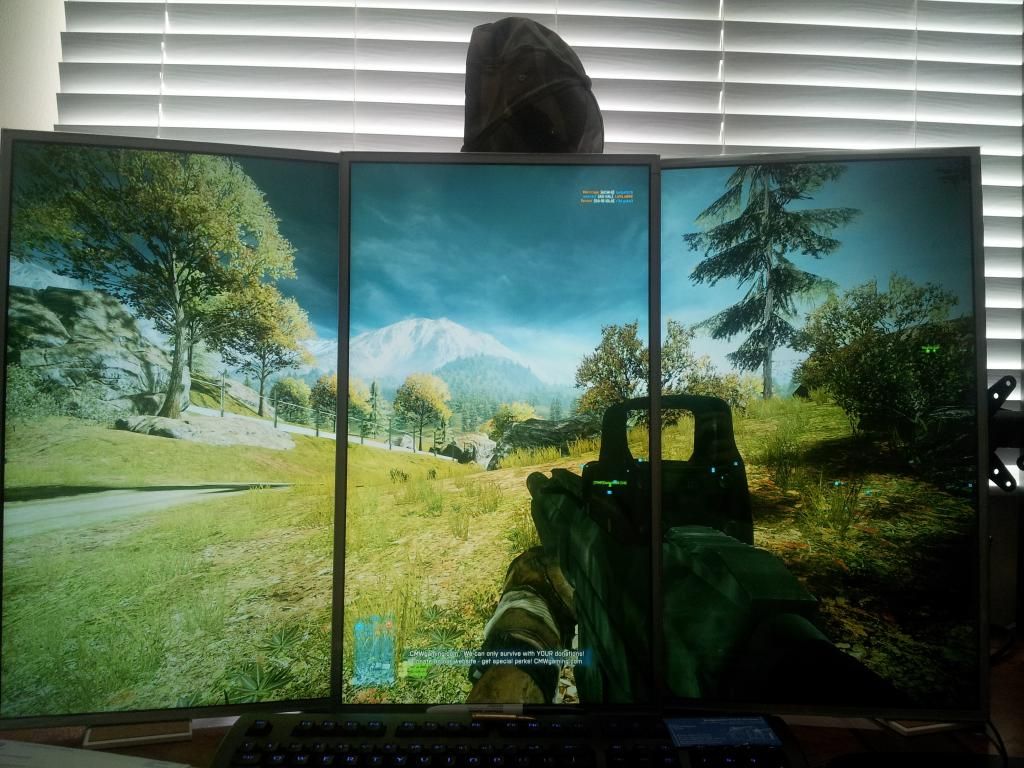
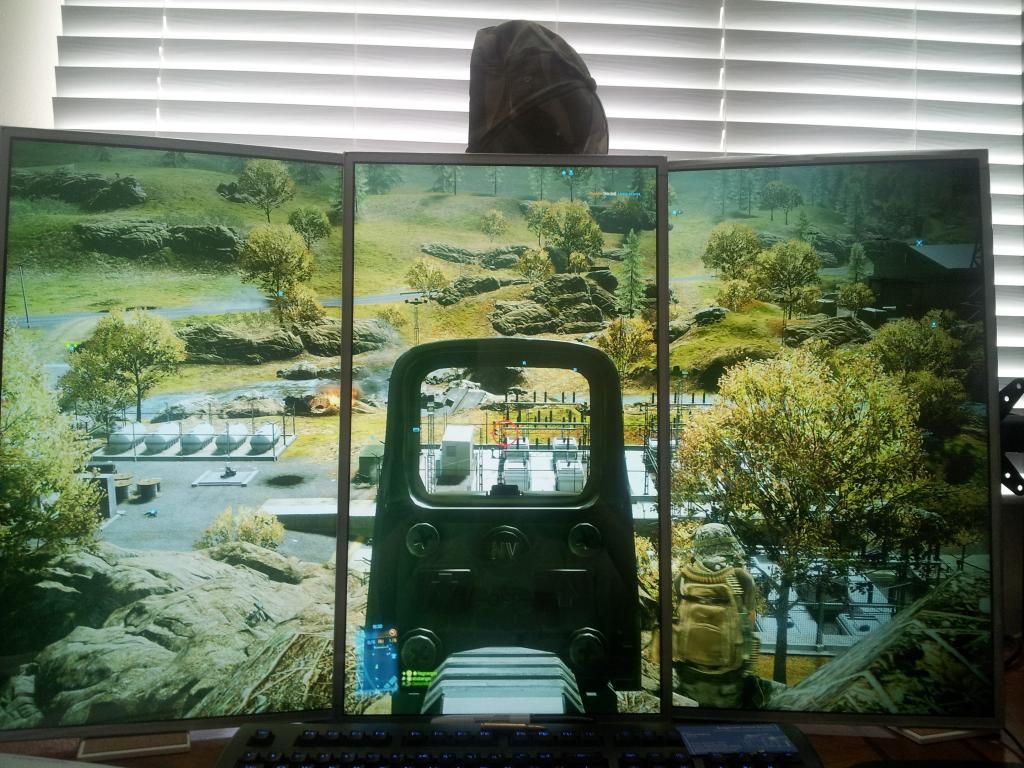
3 stripped bezel Asus VG248QEs in portrait mode with the AG coating removed by Vega and protected by 1/4" tempered glass running in pure motion with the 2D lightboost hack


Mark Rejhon
[H]ard|Gawd
- Joined
- Jul 6, 2004
- Messages
- 1,395
Well, that is impressive too. I notice you're not using bezel correction in your resolution. Have you considered doing a bezel correction factor, like Vega is doing?
l88bastard
2[H]4U
- Joined
- Oct 25, 2009
- Messages
- 3,902
Well, that is impressive too. I notice you're not using bezel correction in your resolution. Have you considered doing a bezel correction factor, like Vega is doing?
Im only running one Titan at the moment (versus Vegas 50 titans) so Im a bit chincy on the extra pixels that bezel correction uses

Wow looking sweet I88! Is that a drink coaster mod I spy.
Lmao good eye, I got rid of the exotic waterblock mount that I used with my old sammys and went with dual inverted ceramic beverage coasters featuring a fantastical cork inlay an a round of .556 in the middle for good juuu juuu
Last edited:
Mark Rejhon
[H]ard|Gawd
- Joined
- Jul 6, 2004
- Messages
- 1,395
Are you getting at least 100fps@100Hz at the detail levels you're running at?Im only running one Titan at the moment (versus Vegas 50 titans) so Im a bit chincy on the extra pixels that bezel correction uses
l88bastard
2[H]4U
- Joined
- Oct 25, 2009
- Messages
- 3,902
I dial settings down until I can average 120fps in all my games. I'm willing to sacrafice some eyecandy cause I'm a gameplay smoothness resolution refresh whore. But as you can see in the pics, games still look great!
Mark Rejhon
[H]ard|Gawd
- Joined
- Jul 6, 2004
- Messages
- 1,395
Makes sense. Still considering a two-Titan SLI, at least? To get a bit more game detail back?I dial settings down until I can average 120fps in all my games. I'm willing to sacrafice some eyecandy cause I'm a gameplay smoothness resolution refresh whore. But as you can see in the pics, games still look great!
l88bastard
2[H]4U
- Joined
- Oct 25, 2009
- Messages
- 3,902
Makes sense. Still considering a two-Titan SLI, at least? To get a bit more game detail back?
Multi-gpu is not worth it until Intel gives us a beefier "gaming" processor. I am blowing 5ghz out of my watercooled 3770k and whether I have one titan or four titans I would still get sub 120hz dips in games like BF3 due to CPU bottlenecking and ratcheting up eyecandy would only tax the processor more. I know this because I had 4 7970 lightnings & 2 680gtx Classified setups running 3x1 & 5x1 portrait setups, and both of those beefy GPU rigs were at the mercy of the CPU.
I have a good amount of eyecandy in BF3 im running textures at ultra, shadows on medium, Terrain quality on high, and AF4x. The game looks awesome with those settings at 1920p in those pics I posted.
- Joined
- May 5, 2006
- Messages
- 5,781
wise. Graphics ceiling any given gen is arbitrary anyway. Dev's always have to whittle down or constrain their models to "fit" real-time game limits. Max settings could be designed magnitudes higher if the people developing the game desired. We are at a point where high and high+ custom settings on a lot of games looks great imo.
Welp, I am out of the de-matte business. Heard reports of super-glue versions of the panel and I finally got one. Ten hours in the soak and the glue was incredibly strong and pulled up the polarizer ruining the screen. Margins are too small for this. Asus must get the panels from different vendors and/or the matte film/glue comes from two separate vendors. One is easy water soluble (most monitors) and another is not. After having done two dozen or so of these monitors, it's a shame to see this variable put into the mix.
Torr Samaho
Weaksauce
- Joined
- Mar 27, 2011
- Messages
- 103
lol, that's quite the wrong way asus is going. is it that hard for them to just omit that ag coating, or don't they read that people take extra steps just to get the coating off their monitors? your closeup here really shows what coating does to an otherwise fine image.
Mark Rejhon
[H]ard|Gawd
- Joined
- Jul 6, 2004
- Messages
- 1,395
Ouch! I am sorry to hear this. The people who have de-matted VG248QE's are the lucky ones, then. The margins will need to go up (e.g. $200 or $250 to dematte, to cover risk of damaged monitors). And I think people will still pay $550 for a glossy 120Hz monitor from an experienced dematter. You could just raise your prices (as well as develop methods of determining whether you got a superglued version), and see if people still bite.Welp, I am out of the de-matte business. Heard reports of super-glue versions of the panel and I finally got one. Ten hours in the soak and the glue was incredibly strong and pulled up the polarizer ruining the screen. Margins are too small for this. Asus must get the panels from different vendors and/or the matte film/glue comes from two separate vendors. One is easy water soluble (most monitors) and another is not. After having done two dozen or so of these monitors, it's a shame to see this variable put into the mix.
rudy
[H]F Junkie
- Joined
- Apr 4, 2004
- Messages
- 8,703
I think the problem is asus might not really be in control. its really silly that we often only have a few choices on the market, in this case it mostly comes down to either benq or asus if either one of them would have gone with a gloss then a lot of people would easily be able to choose one or the other.
But it turns out in business companies will often go the opposite way for various reasons. They will just do the same thing as their competitor and bank on some other feature to sell. For instance benq might know that a lot of gamers will just buy from them no matter what because they really target that e-sports crowd.
But it turns out in business companies will often go the opposite way for various reasons. They will just do the same thing as their competitor and bank on some other feature to sell. For instance benq might know that a lot of gamers will just buy from them no matter what because they really target that e-sports crowd.
l88bastard
2[H]4U
- Joined
- Oct 25, 2009
- Messages
- 3,902
Ouch! I am sorry to hear this. The people who have de-matted VG248QE's are the lucky ones, then. The margins will need to go up (e.g. $200 or $250 to dematte, to cover risk of damaged monitors). And I think people will still pay $550 for a glossy 120Hz monitor from an experienced dematter. You could just raise your prices (as well as develop methods of determining whether you got a superglued version), and see if people still bite.
That or he makes sure the customer assumes the full financial risk. The cost of these monitors is nothing to sneeze at, but at least they are not $1,000 panels. For me the cost of eating one dead display was worth the risk of having three awesome dematted panels so ultimately instead of paying $1,200 for three displays I spent $1,500....costly but still worth it
Welp, I am out of the de-matte business. Heard reports of super-glue versions of the panel and I finally got one. Ten hours in the soak and the glue was incredibly strong and pulled up the polarizer ruining the screen. Margins are too small for this. Asus must get the panels from different vendors and/or the matte film/glue comes from two separate vendors. One is easy water soluble (most monitors) and another is not. After having done two dozen or so of these monitors, it's a shame to see this variable put into the mix.
Sorry to hear about this and I was finally getting set one or two of these screens. Is there any way we can make asus aware and hopefully get a solution to this?
Asus VG278HE lightboost colors were measured in this review:
http://www.overclockers.ru/lab/5379...zor_i_testirovanie_monitora_ASUS_VG278HE.html
http://www.overclockers.ru/lab/5379...zor_i_testirovanie_monitora_ASUS_VG278HE.html
Mark Rejhon
[H]ard|Gawd
- Joined
- Jul 6, 2004
- Messages
- 1,395
That too, but also convenience:Asus VG278HE lightboost colors were measured in this review:
http://www.overclockers.ru/lab/5379...zor_i_testirovanie_monitora_ASUS_VG278HE.html
The out-of-the-box LightBoost calibration is better on the VG278H (no default purple tint) than on the XL2411T (purple tint).
The XL2411T does have its pros, just that it is sometimes a hassle to run utilities such as cpkeeper, etc, to get the appropriate calibration within games. So convenience also seems to play a factor. Gameplay time has declined somewhat as I become busy and the summer season starts, still haven't finished playing solo in Borderlands 2 (the current game I've just started playing) and it clearly had better and more saturated colors (as long as I lowered Borderlands brightness down to "5" to eliminate the gamme wash-out effect)
Mark Rejhon
[H]ard|Gawd
- Joined
- Jul 6, 2004
- Messages
- 1,395
TFTCentral calibrated a VG278HE in LightBoost, check out their article.hi guys!
i recently bought the Asus VG278HE.
i activated the lightboost 2d with the registry trick.
now i'd like to know how to improve the image quality.
which are the best settings to have?
thanks in advance
Also, the VG278HE is more subject to a checkerboard pixel pattern artifact issue than several LightBoost monitors, however, lowering contrast to 65 or 75 produces better color quality and diminishes these artifacts.
Actually, the driver circuit in the VG248QE could be quite different. Even between the BenQ XL2420T and XL2411T are considerable differences (e.g., different driver ICs). It usually boils down to control a resistor connected to the LED driver which sets the max. LED current. In the BenQ XL2411T, there are three resistors which are operated in parallel depending on the mode. For standard mode (no LB), a 8.5kOhm is active, for LB@100Hz 11kOhm is added (i.e. 8k5||11k), for LB@120Hz another 33kOhm is added (i.e. 8k5||11k||33k). The LB resistors are activated by the (digital) LB signals coming from the controller board. So one way to reduce luminance would be to disconnect the LB signals.
The additional 33k at 120Hz only gives a marginal boost, which is interesting in so far as it tells us how delicate it might be to push the limits even further.
Strobemaster's XL2411T info: http://display-corner.epfl.ch/index.php/BenQ_XL2411T
I finally got around to opening up my VG248QE. I hadn't popped open an LCD before, so I was a bit nervous, but it went fine. The driver/power supply board is slightly different than the XL2411T, but very very close. The resistors that are switched in for Lightboost are identical values. The color coding and function of the connections between the controller and driver/power supply boards are identical also.
Since I wasn't happy with the crappy black level in Lightboost mode, I considered increasing Lightboost resistor values, but decided it was overkill, so what I ended up doing was simply cutting the green and grey wires in the cable (the LB100-120hz current boost and LB120hz only additional boost). I soldered the grey wire ( for 33k LB resistor) on the driver to the green controller wire. That gives a modest current boost any time lightboost is enabled. The output will be slightly higher at 100hz if I ever use that refresh rate, but if so I'll just drop down one step on the LB setting to match outputs. I connected the driver's connector pin for the green (for the 11k LB resistor) wire to ground, to ensure it was disabled (unnecessary really). In my gaming/tv room that has subdued lighting, I'm currently at .12cd/m^2 minimum LCD output, and 89cd/m^2 max, that's with LB20 and Contrast 90. That's a contrast ratio of 740, which isn't bad at all. I've got plenty of room to increase the output if needed, but I like around 90cd/m^2. The best black level I could get before the mod was .17cd/m^2 (LB10), which wasn't all that "black". I think the LB black on my monitor might have been worse than what's normal. I made a custom LUT for CPKeeper, and the monitor really looks nice now.
Last edited:
Mark Rejhon
[H]ard|Gawd
- Joined
- Jul 6, 2004
- Messages
- 1,395
You may very well be the world's first person to do an intentional user-modification to a LightBoost monitor for the purpose of improving the LightBoost picture quality.Strobemaster's XL2411T info: http://display-corner.epfl.ch/index.php/BenQ_XL2411T
I finally got around to opening up my VG248QE. I hadn't popped open an LCD before, so I was a bit nervous, but it went fine. The driver/power supply board is slightly different than the XL2411T, but very very close. The resistors that are switched in for Lightboost are identical values. The color coding and function of the connections between the controller and driver/power supply boards are identical also.
Since I wasn't happy with the crappy black level in Lightboost mode, I considered increasing Lightboost resistor values, but decided it was overkill, so what I ended up doing was simply cutting the green and grey wires in the cable (the LB100-120hz current boost and LB120hz only additional boost). I soldered the grey wire ( for 33k LB resistor) on the driver to the green controller wire. That gives a modest current boost any time lightboost is enabled. The output will be slightly higher at 100hz if I ever use that refresh rate, but if so I'll just drop down one step on the LB setting to match outputs. I connected the driver's connector pin for the green (for the 11k LB resistor) wire to ground, to ensure it was disabled (unnecessary really). In my gaming/tv room that has subdued lighting, I'm currently at .12cd/m^2 minimum LCD output, and 89cd/m^2 max, that's with LB20 and Contrast 90. That's a contrast ratio of 740, which isn't bad at all. I've got plenty of room to increase the output if needed, but I like around 90cd/m^2. The best black level I could get before the mod was .17cd/m^2 (LB10), which wasn't all that "black". I think the LB black on my monitor might have been worse than what's normal. I made a custom LUT for CPKeeper, and the monitor really looks nice now.
Black Levels:
BEFORE: .17cd/m^2
AFTER: .12cd/m^2
And getting 90cd/m^2 for LB20 is almost double the brightness of TFTCentral's LB20 measurement.
The contrast ratio of 740 is one of the best I've ever heard from a monitor running in LightBoost mode! Maybe I'll make the mod to my XL2411T, now that you've tried it.
I would have thought the hardware modification would be a "rising tide lifts all boats" -- brightening the LightBoost picture, but also brightening the blacks. Perhaps this is not the case. I didn't know that doing the hardware modification could bump your LightBoost contrast ratio from the 400's-500's to the 700's. Have you confirmed that this was definitely caused by the hardware modification, rather than any software-based calibration? You lose the contrast ratio when you remove the wire? Just want to make sure that the contrast ratio improvement was definitively improved by the hardware modification that you've made. Obviously the warranty is voided, but that's already the case for a de-matted VG248QE, anyway.
Last edited:
Can you do me a favour and test the ToastyX lightboost.bin file to see if this fixes the problem?
I still have yet to update the LightBoost HOWTO to include some more information about alternatives other than the EDID override methods; but there's always been pros/cons with every approach of enabling LightBoost so I have to change the HOWTO carefully.
Ok, I did it! Its even better now that the input lagg has 100% been eliminated/ minimized!
Afterwards I calibrated it with the windows calibration tool.. kinda meh, I think it still has a slight blue tint, but overall it turned out to be great. Any other possibly automatized calibration tools out there?
Last edited:
You may very well be the world's first person to do an intentional user-modification to a LightBoost monitor for the purpose of improving the LightBoost picture quality.
Black Levels:
BEFORE: .17cd/m^2
AFTER: .12cd/m^2
And getting 90cd/m^2 for LB20 is almost double the brightness of TFTCentral's LB20 measurement.
The contrast ratio of 740 is one of the best I've ever heard from a monitor running in LightBoost mode! Maybe I'll make the mod to my XL2411T, now that you've tried it.
I would have thought the hardware modification would be a "rising tide lifts all boats" -- brightening the LightBoost picture, but also brightening the blacks. Perhaps this is not the case. I didn't know that doing the hardware modification could bump your LightBoost contrast ratio from the 400's-500's to the 700's. Have you confirmed that this was definitely caused by the hardware modification, rather than any software-based calibration? You lose the contrast ratio when you remove the wire? Just want to make sure that the contrast ratio improvement was definitively improved by the hardware modification that you've made. Obviously the warranty is voided, but that's already the case for a de-matted VG248QE, anyway.
I had about the same contrast ratio before doing the mod, it's from the high contrast setting. I know people tend to run contrast lower, like 65 or so, but I don't see a problem running it higher on the VG248QE. If the excess blue wasn't brought down by external calibration, I imagine I'd get clipping/crushing with contrast 90. I've run up to contrast 92 with no clipping/crushing of any of the RGB outputs.
BTW, I'm using the i1 display pro colorimeter for doing calibrations, with latest HCFR. I used to get a LUT from the icm file generated by i1profiler, but lately I just use HCFR and VideoEqualizer to generate my LUT. I need to learn how to post pictures, as the result is pretty amazing IMHO. Initially match green to my desired output curve at 10-100% (green dominates luminance), plus at 5% for good measure, then tweak red and blue at the same points for pretty much perfect 6500K color temperature.
Last edited:
Mark Rejhon
[H]ard|Gawd
- Joined
- Jul 6, 2004
- Messages
- 1,395
That's great to hear! That said, there is more crosstalk if you try to push these limits. The LightBoost trailing artifact can look like this or similar (either as a trailing faint sharp ghost, overdrive artifact, and/or a rough checkerboard pixel pattern), if you try to push a contrast of 90. It is much less than non-LightBoost mode, but this improves further if you back off on the contrast.I had about the same contrast ratio before doing the mod, it's from the high contrast setting. I know people tend to run contrast lower, like 65 or so, but I don't see a problem running it higher on the VG248QE. If the excess blue wasn't brought down by external calibration, I imagine I'd get clipping/crushing with contrast 90. I've run up to contrast 92 with no clipping/crushing of any of the RGB outputs.
You can use PixPerAn to test for the trailing artifact, and adjust Contrast, and watch what happens to the trailing artifact since higher contrast ratios seem to amplify the faint LightBoost trailing artifacts.
rudy
[H]F Junkie
- Joined
- Apr 4, 2004
- Messages
- 8,703
I just received my VG278HE, I started to follow the directions to enable lightboost and was immediately rejected. When I right click the inf to install it just says this inf cannot be installed by this method.
If I try to select the inf it just keeps saying the best driver is already installed.
If I try to select the inf it just keeps saying the best driver is already installed.
Mark Rejhon
[H]ard|Gawd
- Joined
- Jul 6, 2004
- Messages
- 1,395
The instructions are not consistent to all Vista/7/8 in both x32 and x64 versions; so there are slight differences. This seems to be a common gotcha of the current instructions.I just received my VG278HE, I started to follow the directions to enable lightboost and was immediately rejected. When I right click the inf to install it just says this inf cannot be installed by this method.
If I try to select the inf it just keeps saying the best driver is already installed.
However, there's an easier method. Try the ToastyX LightBoost method which is much easier. Please let me know if this method succeeds for you. I am considering replacing most of the LightBoost HOWTO with this one.
Last edited:
rudy
[H]F Junkie
- Joined
- Apr 4, 2004
- Messages
- 8,703
I cant figure out where in the OSD to mess with the strobe length on this VG278HE, does anyone know?
Just for initial impressions, this thing is nowhere near as good as the TN panel on my Samsung series 7 gamer. I am going to push it way back to deal with the high dot pitch, and the color also is not yet anywhere near as nice as my crossover Korean IPS.
I played one game for a bit and it was hard to tell as compared to my FW900, something was definitely off, seemed almost like things were a little jittery as well as I would get a weird feeling like parts of the screen were moving in opposite directions. I think it has some input lag I need to deal with. Maybe there is something I can change on it?
Mark Rejhon
[H]ard|Gawd
- Joined
- Jul 6, 2004
- Messages
- 1,395
The strobe length is controlled by the "LightBoost" setting. The name of the adjustment says "LightBoost" with an adjustment from OFF to MAX. If your LightBoost setting is missing, then you are not in LightBoost mode (you didn't successfully enable LightBoost). Does it say "3D Mode" when you bring up the ASUS menu?I cant figure out where in the OSD to mess with the strobe length on this VG278HE, does anyone know?
Also, you may have heard that the VG278HE is worse than the VG278H (hazmatm test side-by-side).
No kidding about poorer color, but there seems to be other things wrong with it that needs to be worked with, to make an accurate assessment of LightBoost benefits & tradeoffs.Just for initial impressions, this thing is nowhere near as good as the TN panel on my Samsung series 7 gamer. I am going to push it way back to deal with the high dot pitch, and the color also is not yet anywhere near as nice as my crossover Korean IPS.
Is this the PWM motion artifact? (If so, then LightBoost is likely disabled).I played one game for a bit and it was hard to tell as compared to my FW900, something was definitely off, seemed almost like things were a little jittery as well as I would get a weird feeling like parts of the screen were moving in opposite directions.
Or is this the checkerboard pixel pattern artifact? (a bigger issue with VG278HE).
Also, remember to compare 120Hz to 120Hz -- LightBoost 120Hz versus Sony FW900 120Hz -- for similarity of motion fluidity. Running 60fps@120Hz will not be as smooth as 60fps@60Hz. You want fps=Hz for good fluidity on stroboscopic displays, LightBoost is hardware limited to work only at 100 through 120Hz, so you need 100 to 120fps for the best fluidity of motion.
Eliminating the need for Control+T will also eliminate input lag, but first -- make sure LightBoost is enabled?I think it has some input lag I need to deal with. Maybe there is something I can change on it?
rudy
[H]F Junkie
- Joined
- Apr 4, 2004
- Messages
- 8,703
OK I don't understand why the H and HE are different, I assumed they would be the exact same monitor / panel. Maybe I need to return this for the H version which is pretty stupid.
Right now the only thing I can say for use is when I run pixperan readability test, I can read it at fast speeds but it looks like their is an artifact of some letters. In grey the faster it goes the further it is away.
Right now it appears it is in 3D mode and I found the lightboost setting, maybe I missed it before because of the place or maybe I wasn't in light boost mode.
Does the H model get rid of the checkerboard issue?