Water-Damaged WD MyBook Studio Edition II Quad Interface 6TB

Joined
Jan 25, 2024
Messages
14
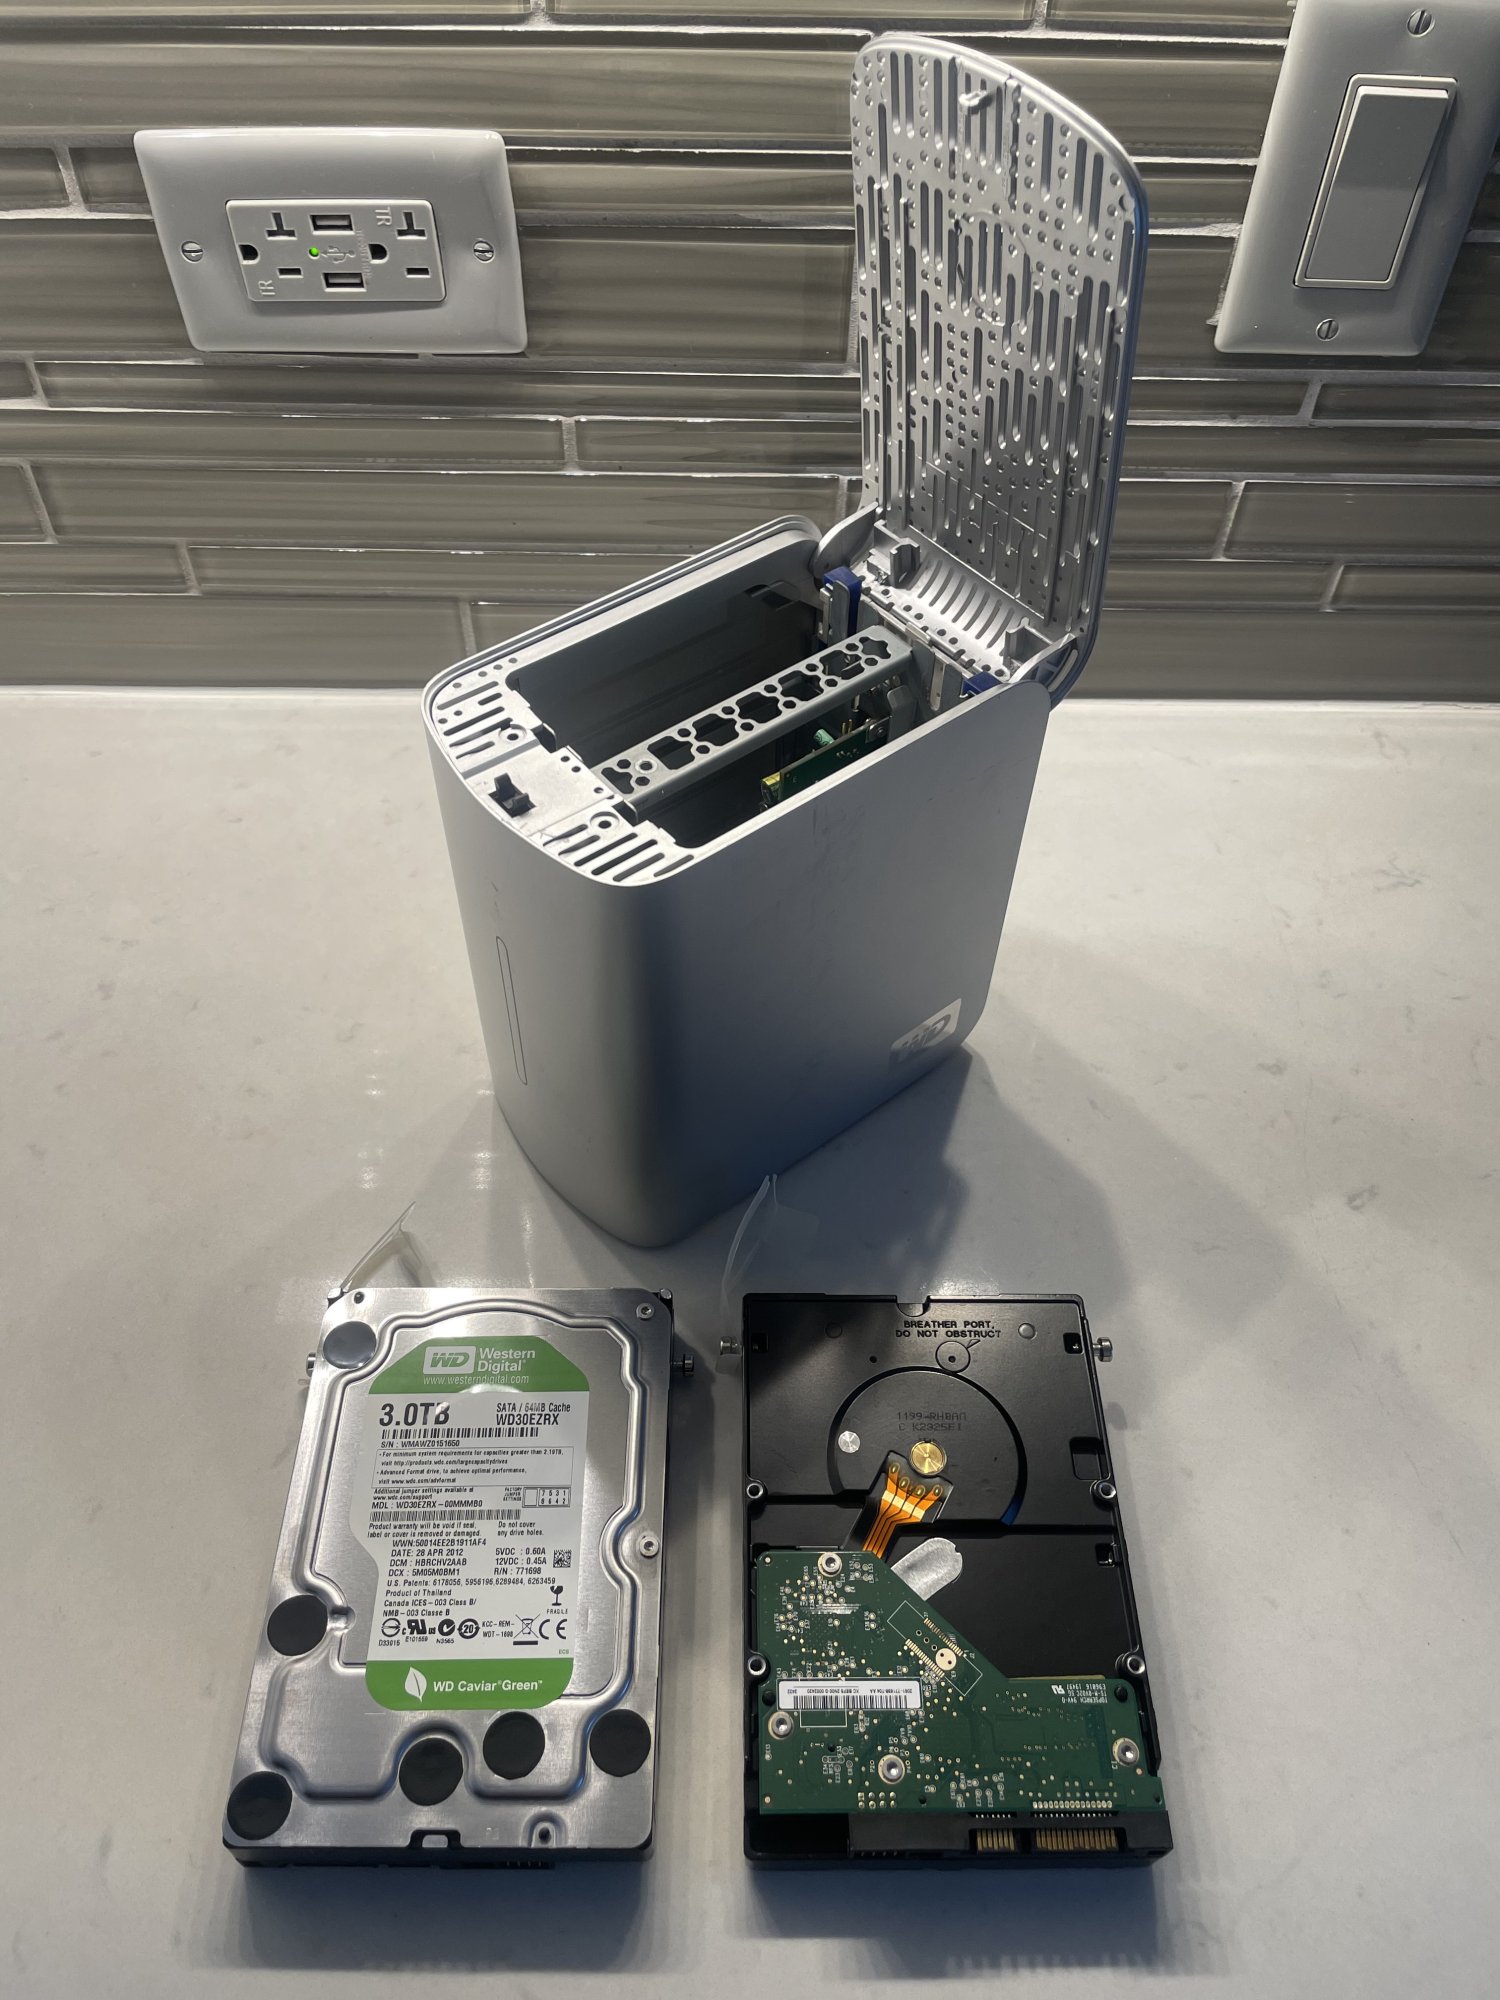
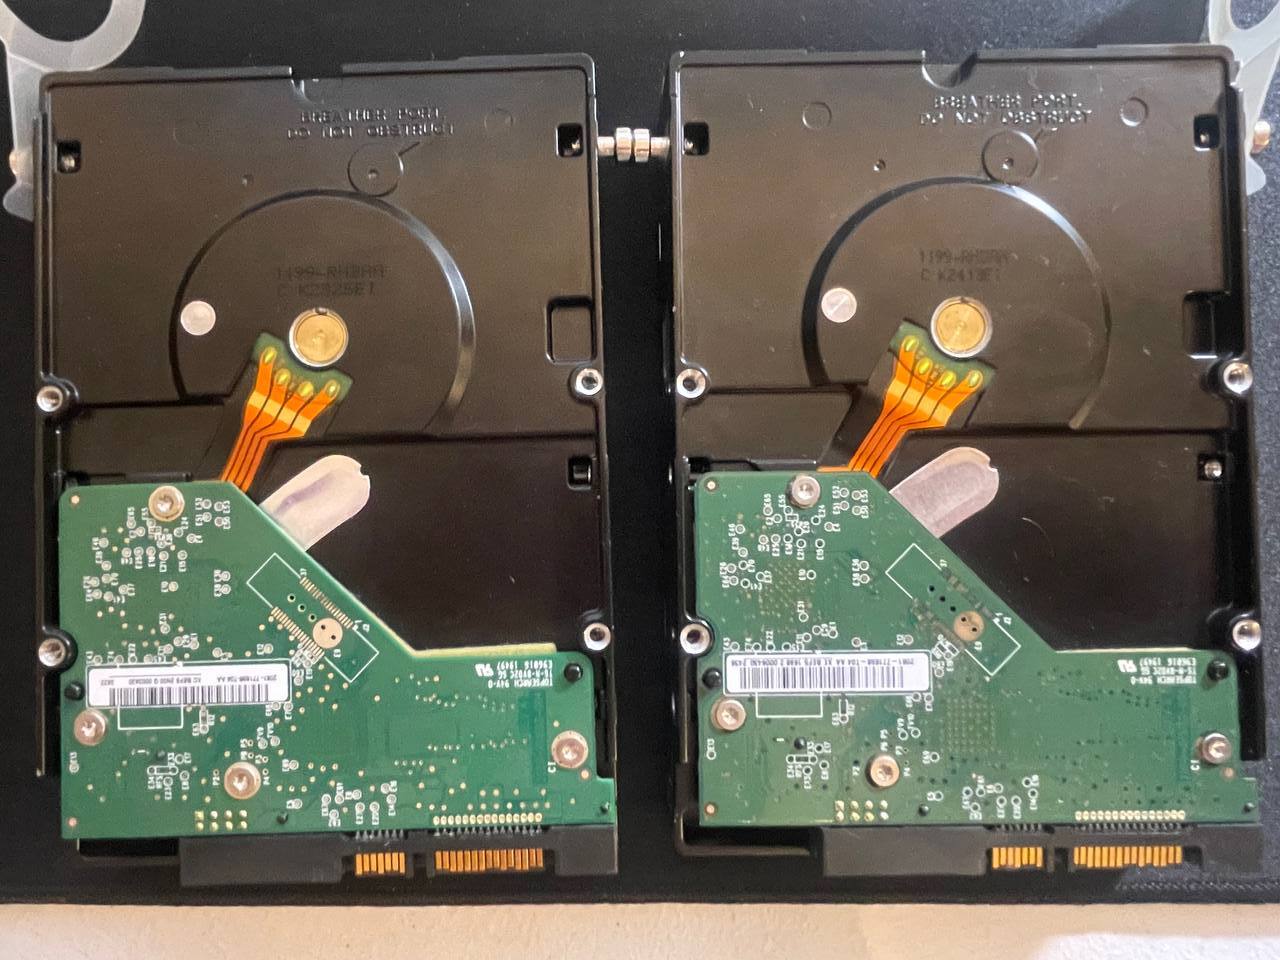
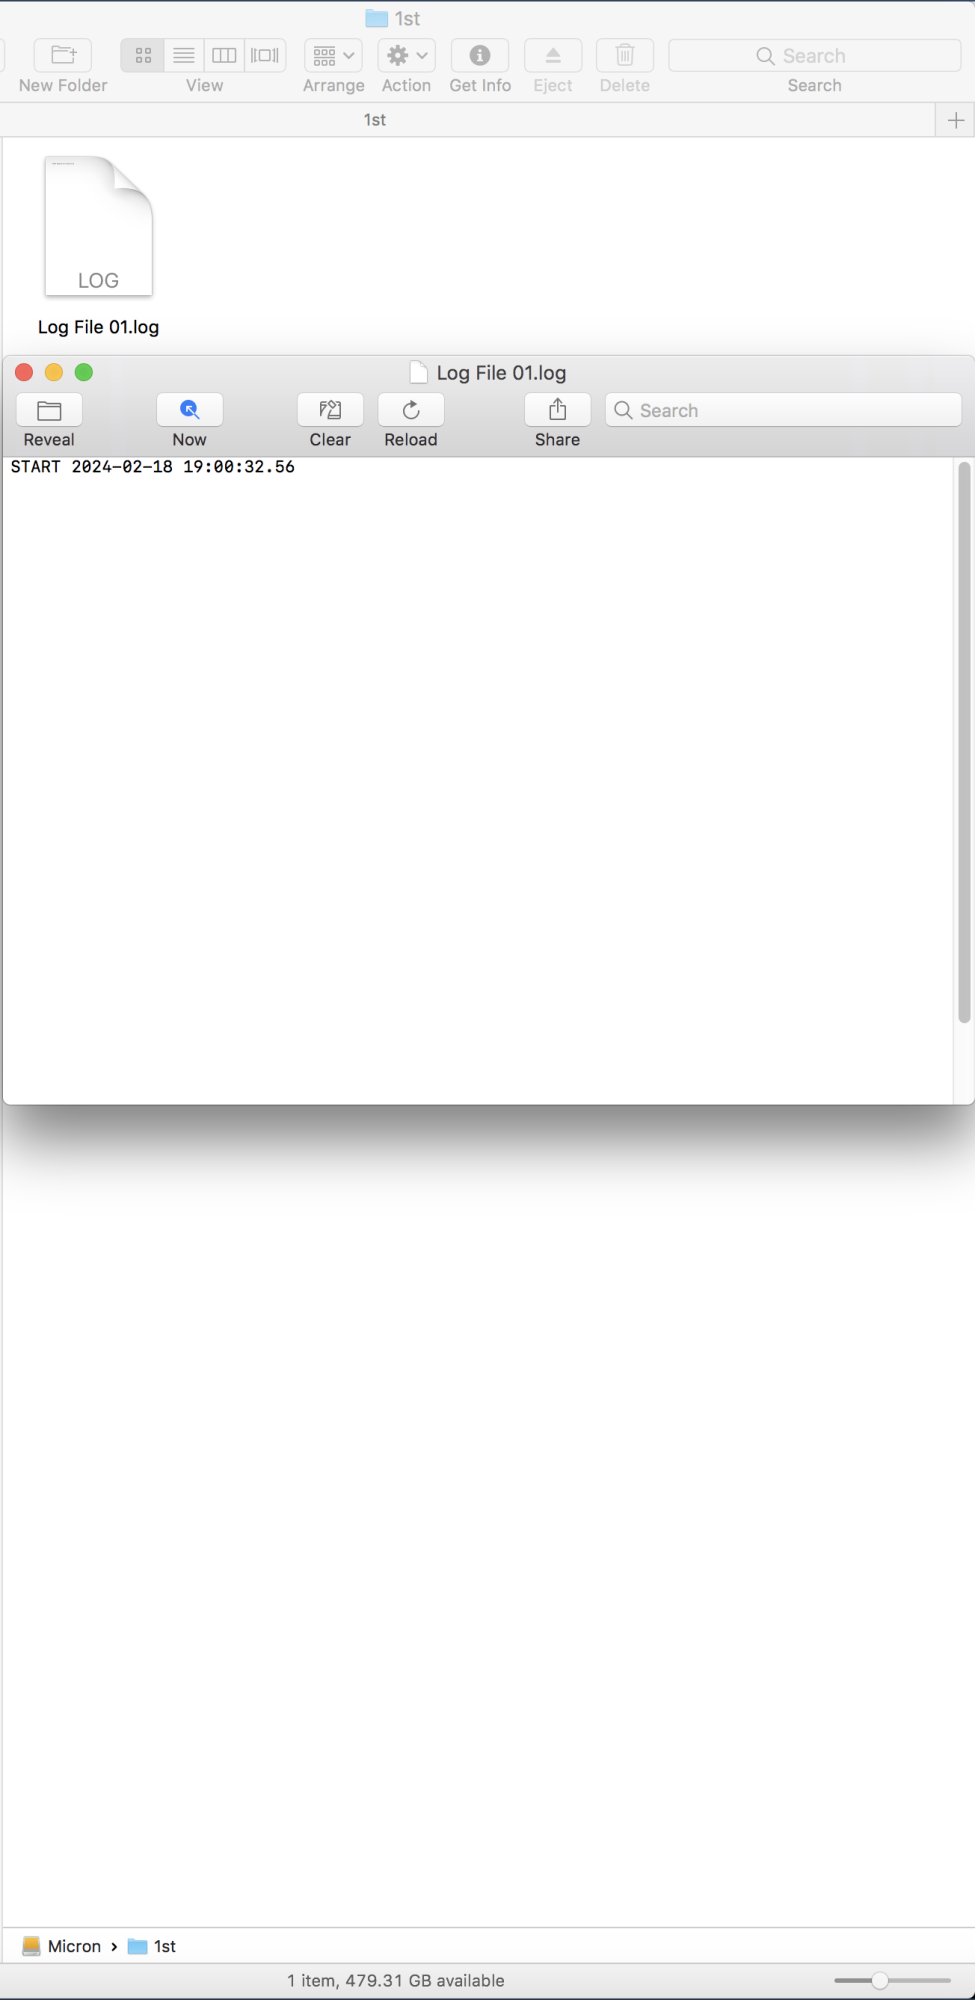
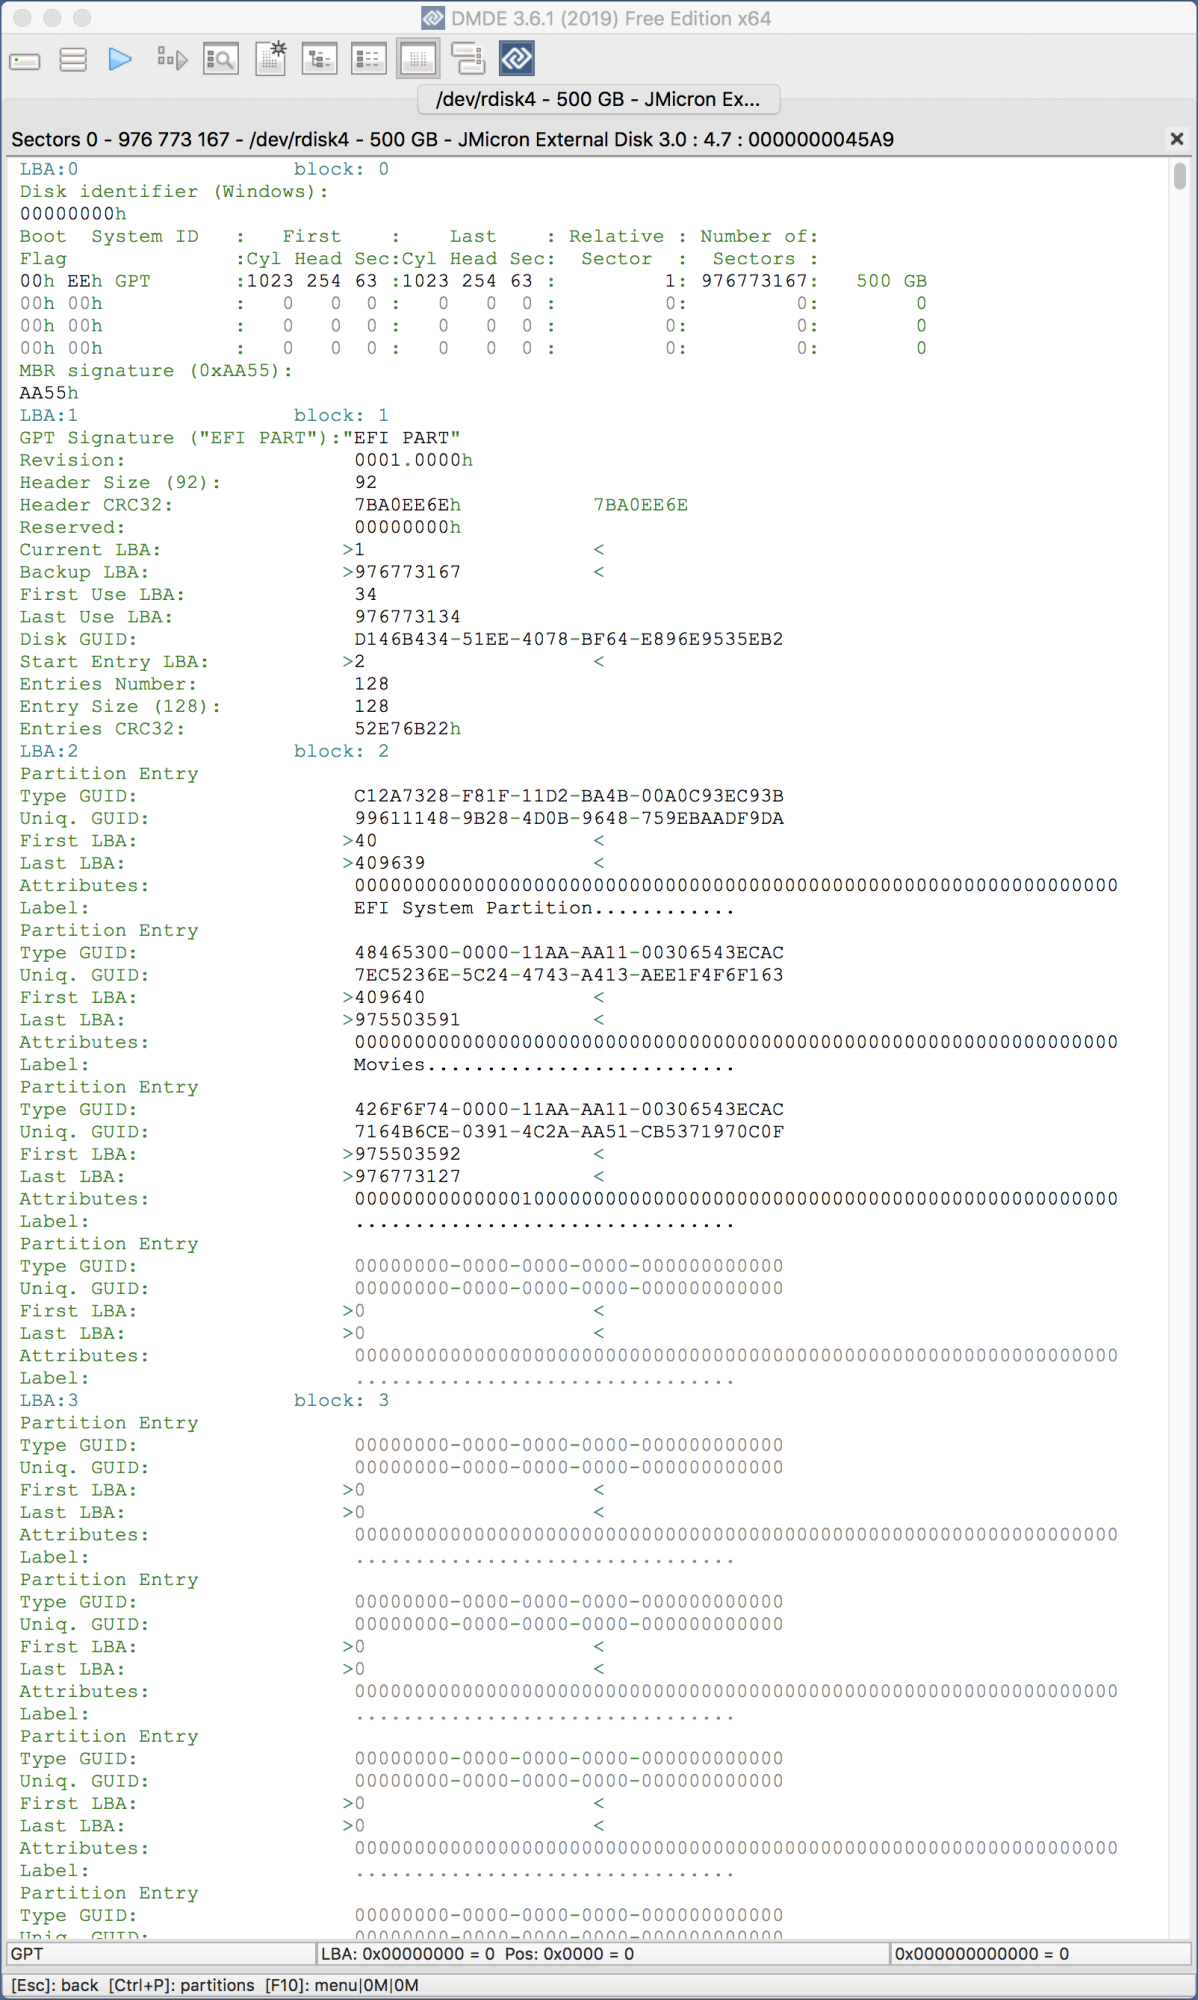
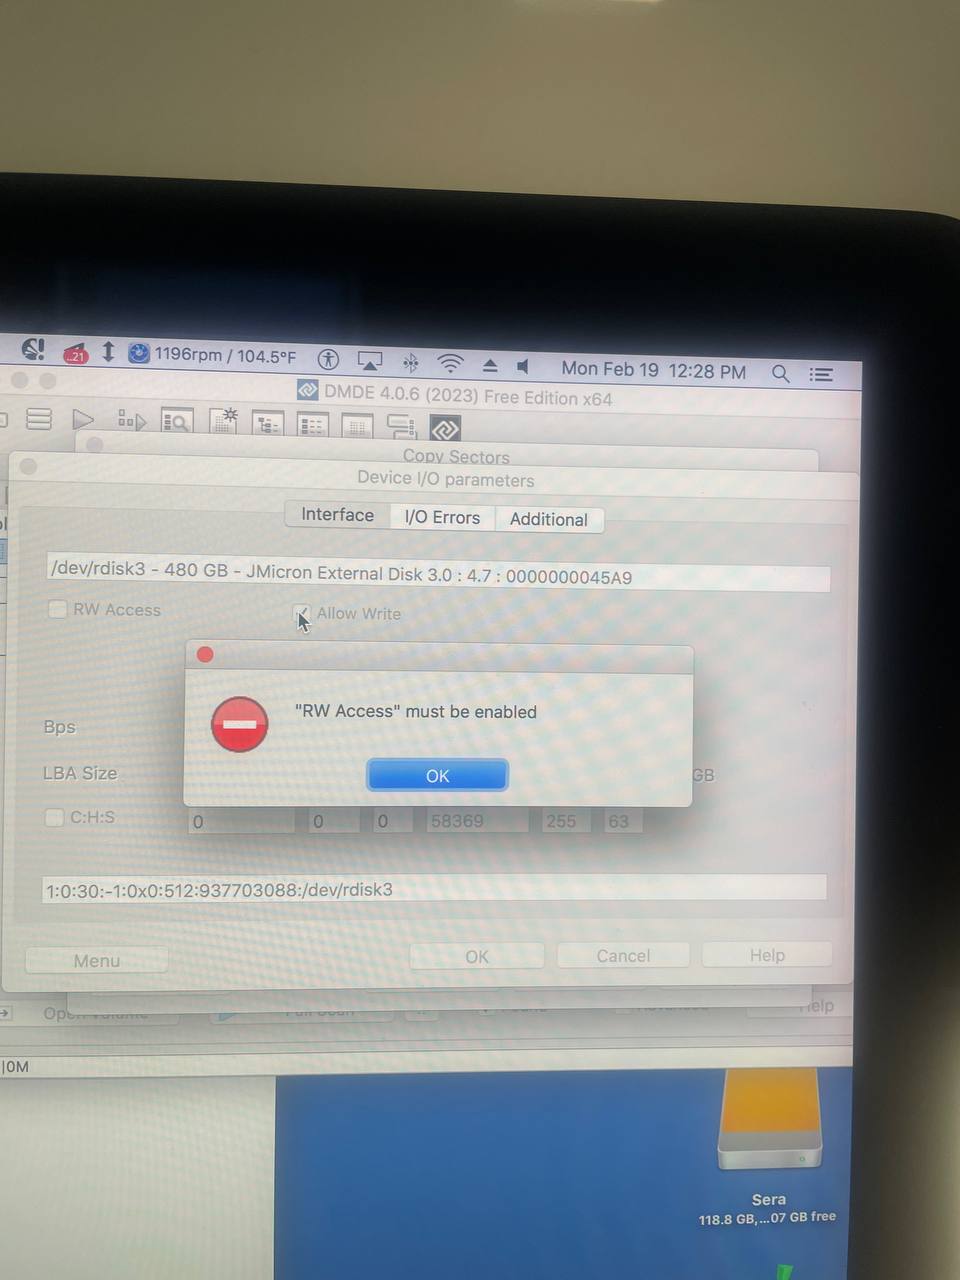
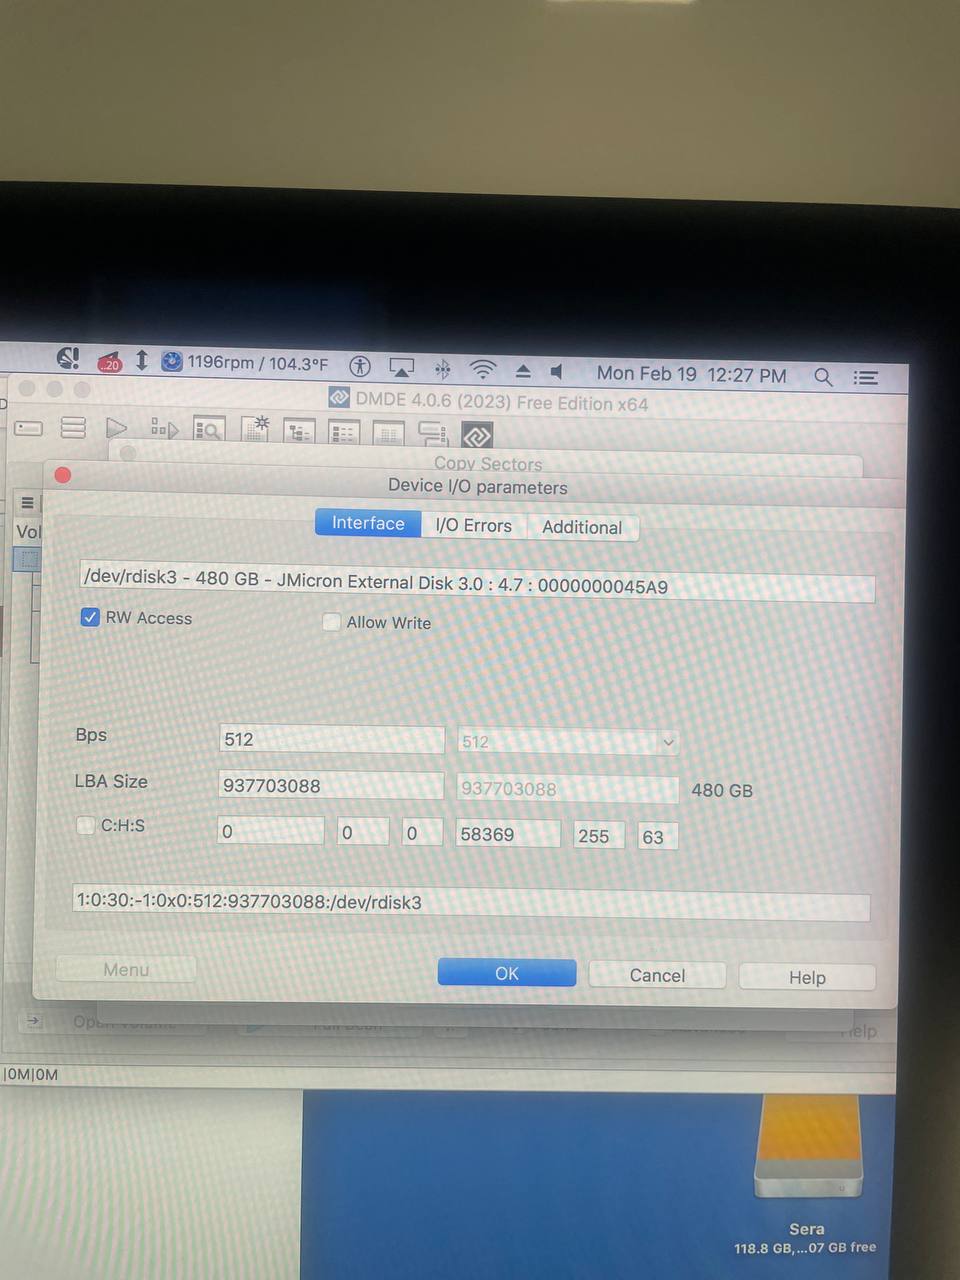
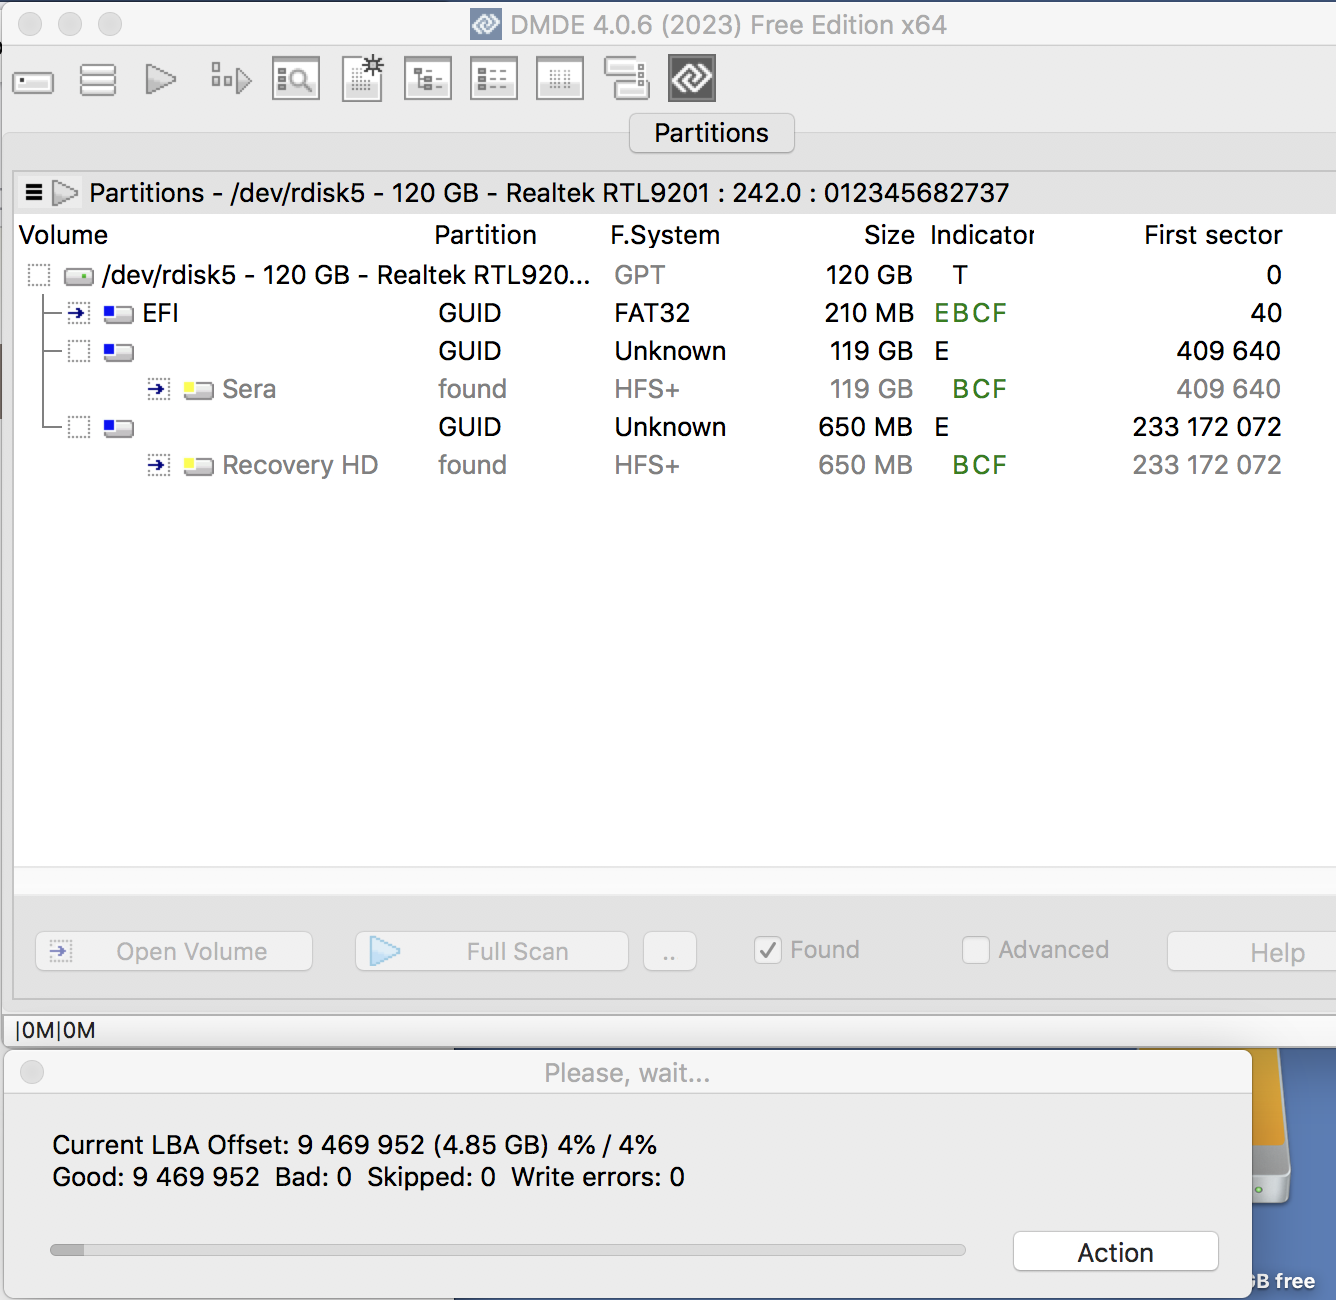
Hello, this is my 1st post and the reason why I joined. I have a water-damaged hard drive 6TB that had water on-or-in it for 1 day and then I dried it out. I see no water corrosion damage anywhere on the drive itself or the internal control board in the chassis or housing.

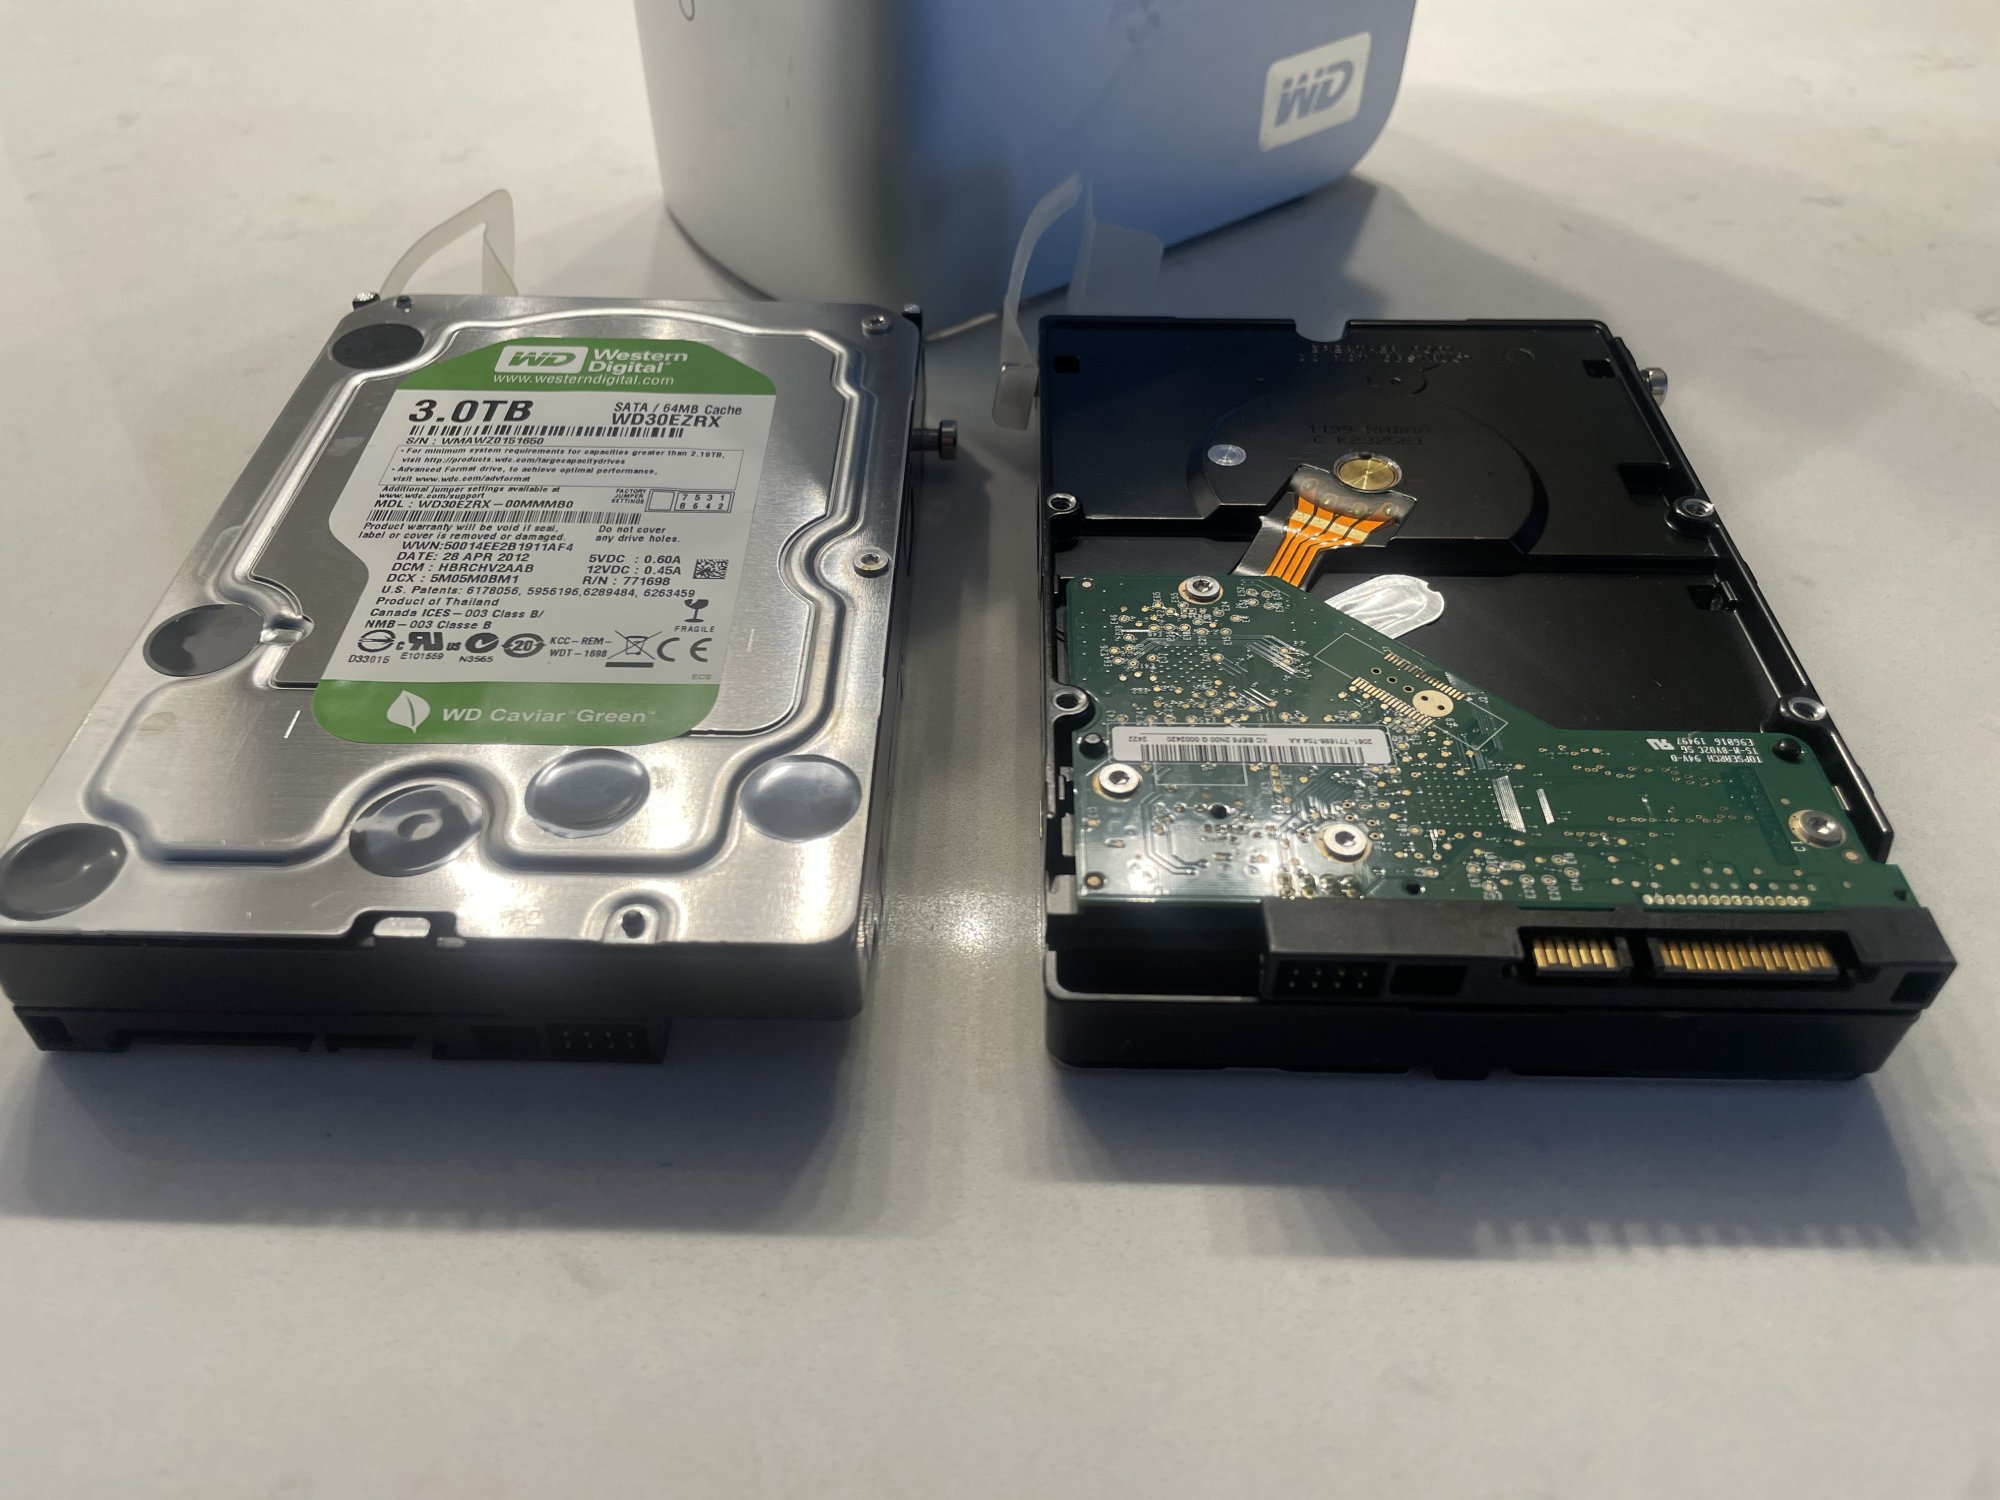
This hard drive would not power up when plugged into a 15" MacBook Pro but it did when plug into a 27" iMac using the same stock AC adapter. The power status with the 27" iMac has the front light blinking but no spinning of the platters.

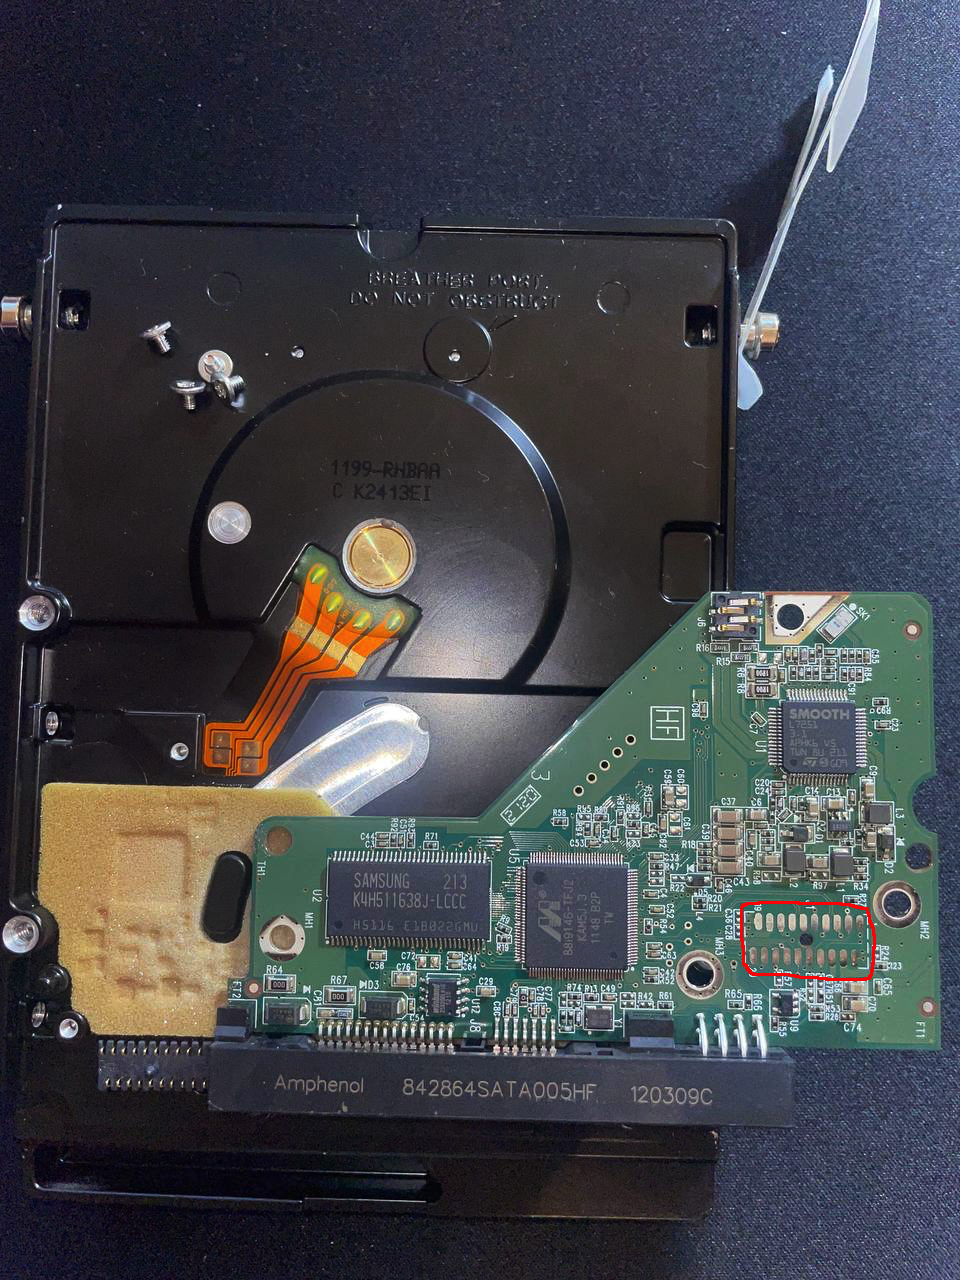
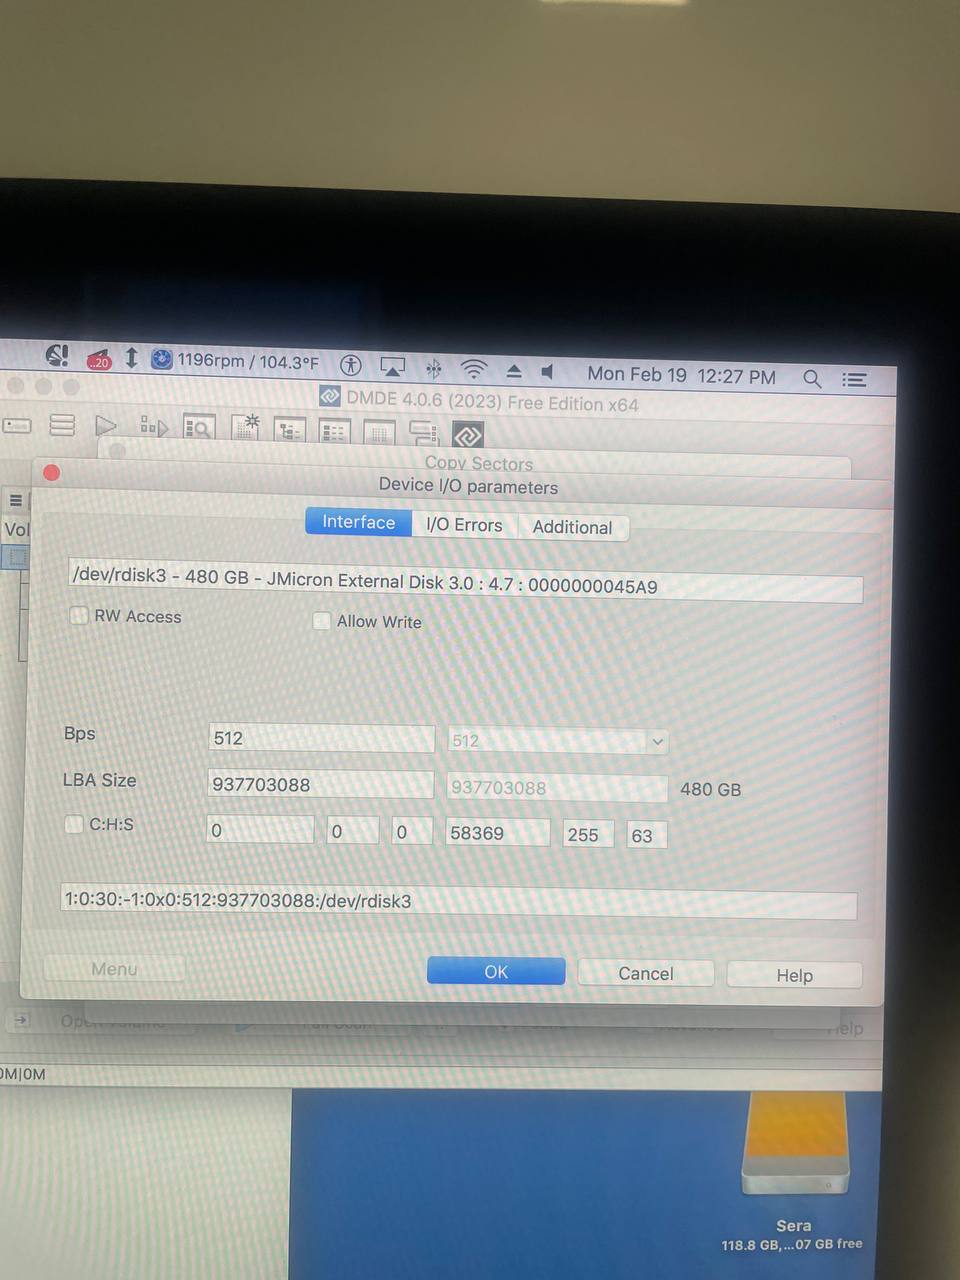
I read that it could be a problem with the control board in the housing unit and to use a SATA-USB connector straight into the computer which I've done to no avail. I've tried this 3.3V pin tape-hack explained in Step 14 here -

https://www.ifixit.com/Guide/How+to+Shuck+a+WD+Elements+External+Hard+Drive/137646

...and still nothing on both drives. I don't know what else I can do which is why I'm asking you. Some extra links to the exact model I have with the online manual and attached photos. Any advice is greatly appreciated, thank you.

Online Manual - https://www.manua.ls/western-digital/my-book-studio-ii/manual

https://www.cnet.com/reviews/western-digital-my-book-studio-edition-2-review/

https://www.anandtech.com/show/4759/western-digital-my-book-studio-edition-ii-6tb-review

https://www.storagereview.com/review/6tb-western-digital-my-book-studio-edition-ii-review-wdh2q60000
 

Attachments

  • WD 2TB My Book Studio Edition II Quad Interface 01.jpg
    WD 2TB My Book Studio Edition II Quad Interface 01.jpg
    397.6 KB · Views: 0
  • WD 2TB My Book Studio Edition II Quad Interface 02.jpg
    WD 2TB My Book Studio Edition II Quad Interface 02.jpg
    351 KB · Views: 0
  • WD 2TB My Book Studio Edition II Quad Interface 03.jpg
    WD 2TB My Book Studio Edition II Quad Interface 03.jpg
    324.9 KB · Views: 0
There may be internal damage or the drives' logic board is fried and needs to be replaced with an identical (including firmware) part.

If you have access to a non-mac computer, download and install "gparted live" to a USB stick, and boot the computer with it. Then plug the drives in and see if the drives can be read or accessed with the included tools. If they won't spin when plugged in directly now, this is not likely to work, but at least it's a step before the worst case in the next paragraph.

If the data is so important that you can't do without, you need a professional data recovery service. It will cost between expensive and extremely expensive. With just water damage, you would have a high chance of a successful result.
 
"If they won't spin when plugged in directly now, this is not likely to work, but at least it's a step before the worst case in the next paragraph."
yeah they are not spinning now on any power-up attempts. how much do you think this will cost me if I went the data recovery service? I'll have to study up on that process to see what they do, is there any other possible approach to do myself?
 
I've not heard real numbers in a long time, but expect a big number. However, if you really have important data on there, stop messing with it and call the experts. https://www.ontrack.com/en-us/data-recovery/hard-drive

These guys have a lot of pre-sales service, so feel free to call them and ask them for a general quote and an explination of what they're likely to do.

I'm guessing $1000/drive ish. Replace the drive controller with one from a same model, same firmware disk, do some sanity checks, then read all the data onto a fresh drive. Maybe change the spindle motor if that got water damaged.

If the data isn't important, you might try getting the boards off to make sure they're dry on the backside too. But better not to mess with it if you're going to send it off.
 
yeah they are not spinning now on any power-up attempts. how much do you think this will cost me if I went the data recovery service? I'll have to study up on that process to see what they do, is there any other possible approach to do myself?
Prices typically start at a few hundred dollars for an "easy" job at a local shop, you could probably find something cheaper online if you're willing to mail the drives out. It can go up to many thousands the more advanced the methods need to be, and sadly, the more you have to spend, the less likely you are to save all of the original data. Thus why I asked how important it is to you.

There are several methods depending on the mode of failure, but specialized access equipment (stuff that can bypass protocols or control chips to force a drive to run or directly read blocks from the platters), simple logic board swapping, platter swapping and variations of electron microscopy (directly measuring the individual magnetic fields on a platter) are some of the tools I know about.

You can do a board swap at home if you are careful, and I have seen videos of people successfully transplanting the platters of their drive into another unit (warning: oil, dust, even the tiniest mote on a platter, can destroy the tracks or the head), but screwing these up can risk total loss or adding a bunch of money to the pro's bill. Try the gparted, at least. It's free and it can't make things any worse.
 
"...but specialized access equipment (stuff that can bypass protocols or control chips to force a drive to run or directly read blocks from the platters), simple logic board swapping... You can do a board swap at home if you are careful... Try the gparted, at least. It's free and it can't make things any worse."

what kind of stuff can bypass and force a drive to run? the external mounted logic board swap I could do at home myself, I'm hoping it is only just that. I don't want to get into the sealed drive and start messing with the platter. About the GParted, will that program force the drive to power up or read the disk somehow?
 
what kind of stuff can bypass and force a drive to run? the external mounted logic board swap I could do at home myself, I'm hoping it is only just that. I don't want to get into the sealed drive and start messing with the platter. About the GParted, will that program force the drive to power up or read the disk somehow?
It's essentially bypassing the board's control circuits and directly powering the motor. The tools these outfits have aren't much different (if at all) than the ones the manufacturers use in developing and testing new drives/components.

It's up to the drive to spin up and run when provided with the right signals and power. Non-macs tend to have broader compatibility and flexibility with plugged-in devices, so there's more likelihood that the drive will power up. Also to be considered: 3.5" drives use a bit of power, can the port even supply enough wattage for spin up or is the adapter using external power? Being able to plug the drive in internally in a system is a good way to check. Just see if it shows up in the BIOS.

If the drive does spin up and communicates with the system, GParted has software recovery tools that can scan and (potentially) fix errors while worrying a bit less about overall file system integrity that would kick a drive out of a normal OS environment, and ideally would allow you to copy off the data to an external source (because even if you are successful, these drives and enclosure should not be considered trustworthy for future use).
 
"The tools these outfits have"... can I buy or download these tools myself? "3.5" drives use a bit of power, can the port even supply enough wattage for spin up" yeah I was thinking about this to because the drive is quite heavy, it's not the normal small platter that goes into a PC bay so I think this might be a hurdle. I'm going to have to look into this GParted idea then, try it out this weekend, thanks for your good advice 👍
 
"The tools these outfits have"... can I buy or download these tools myself? "3.5" drives use a bit of power, can the port even supply enough wattage for spin up" yeah I was thinking about this to because the drive is quite heavy, it's not the normal small platter that goes into a PC bay so I think this might be a hurdle. I'm going to have to look into this GParted idea then, try it out this weekend, thanks for your good advice 👍
It's far cheaper to use the service than buy the tool.

It's more that there are limits to how much power USB ports will allow (as set by the USB-IF standard, the computer design, and/or the attached adapter). Some just can't provide enough from a single port, even for laptop drives. It's getting better with USB 3 and C, but there's no hard requirements to be able to support the 10 or 15 W to start a disk drive.
 
Upon closer inspection I see that one of these PCB's has a darker discoloration on some of the metal mounting points on the PCB. I took side-by-side pics of them here.

So I'm guessing that one of these boards had the water affect it more than the other and maybe has shorted out causing this darker burn-looking discoloration, I don't know, just speculating.

But since this is RAID 0 then I would have to replace this 1 board and reinstall it back into the original chassis and hope it starts up because I won't be able to get the to spin individually because of the RAID 0 configuration.

But I may need to replace the BIOS chip if the firmware is different. I don't know if it is just a clamp or if that chip is soldered because then I would have to bring the old and new PCB to a shop just to do that. Am I correct in any of this perhaps?
 

Attachments

  • PCB 01.jpg
    PCB 01.jpg
    153.6 KB · Views: 0
  • PCB 02.jpg
    PCB 02.jpg
    152.1 KB · Views: 0
If the firmware is different, the WD dashboard software can update it. You'd just do that first before transplant.

IN THEORY: If you know the attributes of the RAID 0 array as it was originally set up (stripe size, etc.), and if you can get the drives to be recognized, you can use a BIOS-level raid setup with those specs and have the array recognized in a new computer or set up a replacement enclosure of the same vintage as raid 0. But it's just in theory.

In more practical terms, thinking over this thread, the data on these drives seems to be very important to you. I strongly encourage you to forget about doing this yourself and seek professional data recovery services.

Playing around with some of these techniques on disposable drives to learn how to do it and not worry if you aren't successful is one thing, but to attempt it on critical stuff for a first outing is risking unrecoverable disaster.
 
I never use that WD Dashboard but I will now if I can get to that point. well I'm not sure how it was set up because I bought the drive used and I don't know if RAID 0 was its manufacturer default setting, but I think so because it said 6 TB for disk info when they are 2X 3TB drives.

Yeah, I don't want to open it up and experiment on it, I need to keep any data intact. I think I should lightly wash the PCB with 90% isopropyl alcohol, I'm reading this has worked for some people, this will not hurt the platter, or even buying a replacement PCB I'll still be in good shape in not damaging anything and that GParted thing. If all that doesn't work then I'll be forced to bring it to a recovery shop.
 
what kind of stuff can bypass and force a drive to run? the external mounted logic board swap I could do at home myself, I'm hoping it is only just that. I don't want to get into the sealed drive and start messing with the platter. About the GParted, will that program force the drive to power up or read the disk somehow?
depends on the exact damage which isnt currently known.
The short version is if its something on the outside of the drive (the board for example) it can be replaced and maybe it'll work... maybe it wont. but its something you could try.
If the problem is on the inside, good luck without a cleanroom.
 
So I have taken the PCB off the drive casing and the other side looks good besides in 1 spot which I have circled. Not sure what those metal contacts are for?, but they are the only area that looks darkened or burnt or corroded besides the screw mounts.

The other dark areas you may see in the pic aren't actually there its only the shadow from a desk lamp to my top right. When I hit it with my flashlight they aren't there. Nothing is wet, but I'm thinking of soft cleaning the darkened metal areas with a new toothbrush and 90% isopropyl alcohol if that may do something. Or maybe the whole board as a 2nd attempt if it doesn't work.
 

Attachments

  • PCB 04.png
    PCB 04.png
    2.3 MB · Views: 0
If I bought a SATA Hot-Swap Docking Station (if they come set up for RAID 0 drives, I don't know?) would the drives sync up and work or would they not because the RAID configuration may be stored in the PCB of the old housing - the WD MyBook Studio Edition II housing that it came with?

Also if I bought a new-used My Book Studio Edition II only to use the housing and pull out the new drives and replace them with my old drives...

I was told that I don’t want to install them into another My Book Studio Edition II chassis only for the new housing PCB to detect that there was a change of drives and that new housing PCB will “helpfully” wipe the partition information so I can use them as empties, loosing all of my data.

Would either or both of these 2 statements be true? Anyone have any experience with these particular RAID 0 setup WD Green Caviar drives?
 
It's not getting wet that usually causes the problem, it's the drying causing corrosion you can't see (under the chips) that does.
I've put motherboards and video cards through the dishwasher and they work fine afterwards.
If it's that important, is look for a data recovery company
 
After reading alot of stuff and watching lots of YouTube videos these past few days, I'm thinking that this is a burnt out voltage diode on the either the PCB attached to the external drive casing or the PCB in the housing enclosure itself or both because this was a water-damaged short somewhere on the logic board. My 2 possible approaches here are...

1) buy another exact sister model; housing, drives the whole package, and swap the BIOS ROM chips from the old PCB's on the drive casings to the new drives' PCB's and mount those new boards onto the old recovery drives. BUT will that work or do I have to do the same swap with the RAID Controller chip on the PCB in the housing enclosure from the old PCB to the new PCB as well?

2) or still do as I explained above but use an aftermarket dual SATA RAID docking station. BUT will that work or do I have to have the WD RAID Controller from the PCB in the housing enclosure for the 2 drives (was set up as RAID 0 by default) to co-mingle with each other to access the data? If it doesn't work then I am forced to do the 1st scenario just to use the WD housing and it's PCB.
 
Grebuloner "Playing around with some of these techniques on disposable drives to learn how to do it and not worry if you aren't successful is one thing, but to attempt it on critical stuff for a first outing is risking unrecoverable disaster."

...that is what I have been doing today, I have been watching YouTube videos comparing the DD Command and DMDE since its a good way to get a visual on their completed steps before I start and come to those steps.

Both approaches seem quite easy to do even for a novice like myself but the DMDE GUI does make things more simplified and explanatory. It's actually quite a powerful program.

Right now I'm testing out these 2 approaches using smaller, mostly empty other SSD's before I start my real recovery. I'm using 2 SSD 480 GB for this bench test.

I also have re-purchased the exact same model WD MyBook Studio II but with 4 TB in size (mine is 6 TB) and that is still in RAID 0 by default. (Could be used for PCB swap and BIOS ROM soldering swap if I need to)

Testing SSD source drive holds only an OSX op system at 18 GB and no other personal files. SSD destination drive is empty, and the write speed is 1% per minute so it's going to take 1 hr and 30 min to complete.

When creating a disk image or cloning it, both DD Command and DMDE wants to use the whole destination disk space. (Side Note: my recovery 6 TB RAID 0 drives have 3 to 4 TB of used data on them)

My question is: the full 3 TB Disk 1 recovery drive will be cloned to the new 4 TB Raid 0 enclosure. Then how will I be able to clone the 2nd 3 TB Disk 2 recovery drive without overwriting the first 3 TB Disk 1 recovery drive as the disk image/clone method wants to use the whole destination disk?

And if I split the new WD MyBook into 2 partitions (to not overwrite the 2nd disk image over the 1st one) then how would I be able to link up those 2 partitions in RAID 0 if it's no longer 1 drive and now 2 separate drives?

Update: I just completed a test run on the 2 SSD 500 GB's and it took 2 full hours to copy sectors to the destination drive which shows nothing copied, no change in disk info or in disk utility, how can that be?
 
My question is: the full 3 TB Disk 1 recovery drive will be cloned to the new 4 TB Raid 0 enclosure. Then how will I be able to clone the 2nd 3 TB Disk 2 recovery drive without overwriting the first 3 TB Disk 1 recovery drive as the disk image/clone method wants to use the whole destination disk?
You will need to use a third drive to clone disk 2 onto. Thinking offhandedly about the next quote, buy 2 identical drives of at least 3 TB, use each one for each disk. Forget about the included 2TB drives you got with the new enclosure, being smaller can be a bit of an issue when cloning unknown data.
And if I split the new WD MyBook into 2 partitions (to not overwrite the 2nd disk image over the 1st one) then how would I be able to link up those 2 partitions in RAID 0 if it's no longer 1 drive and now 2 separate drives?
Take the two cloned drives from above, insert into the enclosure, provide appropriate prayer/sacrifice to digital gods that it will automatically register two halves of a RAID 0 array and just work.
Update: I just completed a test run on the 2 SSD 500 GB's and it took 2 full hours to copy sectors to the destination drive which shows nothing copied, no change in disk info or in disk utility, how can that be?
Not sure what's happening here. Don't suppose you have screenshots of the settings, process at some point, and final drive info showing no bytes used?
(FWIW, I have never used those tools. For my part, I have only needed data recovery on just 2 drives in my life: My dad's main 2GB HDD with critical files and a Seagate 7200.11 without. Both were handled by pros and the Seagate recovery was free under their "our bad" program or I wouldn't have bothered.)
 
Last edited:
Future note, 3-2-1 backup rule, if it is important data, using a Raid anything single device is not a backup.

https://www.veeam.com/blog/321-backup-rule.html

  • Maintain three copies of your data: This includes the original data and at least two copies.
  • Use two different types of media for storage: Store your data on two distinct forms of media to enhance redundancy.
  • Keep at least one copy off-site: To ensure data safety, have one backup copy stored in an off-site location, separate from your primary data and on-site backups.
 
Forget about the included 2TB drives you got with the new enclosure, being smaller can be a bit of an issue when cloning unknown data.
I actually don't know how much used data is on those old drives if there is a way to check? I may have less than 4 TB's maybe even 3 TB's total so then wouldn't my 2 x 2 TB's be enough space for the full clone? Couldn't I theoretically write the 2 old disk images to the replacement enclosure which already has the RAID 0 setup by WD's factory default (if there is a way to separate both disks, but keeping RAID 0 status and target each disk during the cloning) and therefore I would immediately be able to see the readable files?
 

Attachments

  • 02.png
    02.png
    90.3 KB · Views: 0
  • 01.png
    01.png
    783.1 KB · Views: 0
Yeah, I don't want to open it up and experiment on it, I need to keep any data intact.
If you really care about the data on the drives, then don't even think about spinning them up! Call the data recovery experts instead!

If you're doing this for the learning experience and getting the data back is only a bonus, then a few points:
  • These non-helium drives are not hermetically sealed but might even be vented to the outside, so depending on the "mechanics" of the water damage, they might have internal water/moisture damage. Thus my advise above not to spin them up.
  • If you're decided to do this yourself, the first step is to clone each drive separately. The RAID-0 stuff doesn't come into play until you have the disks safely and separately cloned - to disk images which you can then write to new drives to e.g. try in the enclosure.
  • To clone the drives, attach them (one at a time) directly to a computer via SATA and a proper SATA power connector. The computer must have enough "healthy" disk space to hold image files of the disks. The image files will be 3 TB a piece. Use a Linux live-usb for the cloning (look up the details online, but basically 'dd if=/dev/disk/by-id/<your-drive> of=</some/file/name.img> bs=16M conv=fsync status=progress' or similar). If a drive has read errors you might have to use special tools that can skip bad blocks rather than thrashing the drive trying infinitely to read an unreadable block. Edit: Expect about 6 hours to clone a drive, if the drive is healthy. (3 TB/150 MB/s ≈ 5.6 h.)
  • If the drives don't spin up even when properly connected, then either they are too damaged or there's something special about these MyBook drives. You seem to have done some research already and I don't have anything to add to that. Changing circuit boards can work if you are very lucky, but that's a last ditch effort that you should only use if you really don't care much about the data on the drives.
Noone wants backups, but everyone needs restore...
 
Last edited:
I don't have a spare $1 or $2 or $3k large to drop on a professional data recovery shop, I don't have that kind of money. So if I can troubleshoot it myself and figure it out maybe I can either fix it myself or pars out parts to regular computer shop to do a simple BIOS chip swap and that could possibly fix it. I won't know that unless I try it.

I've done a huge amount of research, the drives spin up and the internals are fine. I only powered them up to test them to see if they spin. Now they are dormant while I test data recovery software programs, and I don't use Linux, I'm on a Mac. I'm in the Red Zone here about to push this ball over the line. I'm trying to avoid DD Command in Terminal if possible, but may need to if I can't get DMDE to work.
 
So I ran a 2nd test and some versions of DMDE won't let the user activate R/W by click box on the destination drive for copying sectors from device to device. When you click in the RW box it won't stay clicked, and that is for 3 Mac versions of DMDE (3.8.0.790 (2020) / 4.0.2.804 (2022) / 4.0.6.806 (2023)) see attached. But I am able to clone using the file option instead of device and that seems to be working so far, (although I'm not sure how to unpack it and then stitch up the 2 drives in RAID 0 yet, does anyone know that next step?)
 

Attachments

  • RW 01.jpg
    RW 01.jpg
    107.7 KB · Views: 0
  • RW 02.jpg
    RW 02.jpg
    77.4 KB · Views: 0
  • RW 03.jpg
    RW 03.jpg
    100.9 KB · Views: 0
  • RW 04.jpg
    RW 04.jpg
    102.1 KB · Views: 0
  • 03 bin file.png
    03 bin file.png
    348.5 KB · Views: 0
  • 04 Log.png
    04 Log.png
    100.8 KB · Views: 0
I actually don't know how much used data is on those old drives if there is a way to check? I may have less than 4 TB's maybe even 3 TB's total so then wouldn't my 2 x 2 TB's be enough space for the full clone? Couldn't I theoretically write the 2 old disk images to the replacement enclosure which already has the RAID 0 setup by WD's factory default (if there is a way to separate both disks, but keeping RAID 0 status and target each disk during the cloning) and therefore I would immediately be able to see the readable files?
Yes, there is a way to check...but it would require that you have the drives fully working in RAID 0 to do so, which circles back to the original problem. The way these programs work, and part of why they are so slow, is by being data agnostic. It's a straight block-by-block copy of the drive, which is why you need a destination at least the size of the source. There are more advanced cloners out there that can shrink a volume, but they require being able to read everything through a filesystem. Being part of a RAID 0, only half of any file that is at least the (unknown) stripe size is on each drive, plus, deleted files often aren't actually wiped from the platter until the sector is overwritten with new data, e.g., a well used 4 TB drive with 1 TB of data on it generally doesn't have 3 TB of zero'd out empty space.

Because of this limitation, you aren't going to be able to use the new enclosure as is, unfortunately. The drives are just too small individually, and the enclosures are pretty dumb feature-wise. I don't even think I could do what you're suggesting with one of my enterprise raid cards. You'll need two 3+TB drives to separately clone to and put into the enclosure.
 
yeah they are not spinning now on any power-up attempts. how much do you think this will cost me if I went the data recovery service? I'll have to study up on that process to see what they do, is there any other possible approach to do myself?
I had a hard drive data recovery done last year for my mom and it was 2100.
 
That discoloration of the metallic surfaces of the control board is something I sometimes see even on perfectly healthy drives.
And that's all I can say in this situation. Good luck!
 
okay so I fixed it. I retrieved all of my data off of that one drive atleast. And instead of sending it to a professional shop costing me $1,000's probably $2,000+ it only cost me $75.83 total, a huge difference, owed to perseverance.

Last question on this fact-finding journey - I have this 6TB enclosure and I want to split the 2 x 3TB drives into separate drives working independently of one another, zero link, sync, stitch, communication with each other.

So not a RAID setup of any type, just regular 2 drives on their own that's it. Can I do this inside the enclosure or will the RAID controller on the PCB board in the housing prevent me from doing that and forcing a RAID set up?
 
Back
Top