I guess I got lucky, all my AC blocks are pretty danged flat (older stock). Question: On these small SLI NB cores, would it be necessary to add support around the core for the perimeter of the block surface, or just take care and tweak down evenly. Would the block get hot enough to melt say, a pad similar to cpu's?
Navigation
Install the app
How to install the app on iOS
Follow along with the video below to see how to install our site as a web app on your home screen.
Note: This feature may not be available in some browsers.
More options
You are using an out of date browser. It may not display this or other websites correctly.
You should upgrade or use an alternative browser.
You should upgrade or use an alternative browser.
Teh Uber L33t Aqua-Computer Thread :)
- Thread starter [S]nt|Mods
- Start date
- Status
- Not open for further replies.
Last night I finally got around to installing my twinplexes on my GPUs and I am deinfately glad I did. I was getting about 80-90C under full load on GPU1 and about 70-80 on GPU2. These temps are even better than stock too because I had swapped on the VF700-CU series a while back. Now they are running at 45-47C full load. With only an evo 240.
Couple Quick Questions for the AC gurus:
How tight am I supposed to drive the nuts on the 6800 series twinplexes? Is it best to tighten until no movement or can this crush your core?
Are there any instructions out there for the cuplex pro for CPU?
What thread type are the mounting holes on the Evo 1800 are they M4? I know they aren't m3 type cause I tried...
This is more a suggestion than a question, but shouldn't the airplex series have fan mounting holes on both sides of the radiator? I mounted my 240 to the rear 120mm exhaust on my v2100 and it works great, but it is just a pain mounting the fans on the the opposite side where there are no holes. I had to go ghetto style with zip-ties.
Toonage said:I guess I got lucky, all my AC blocks are pretty danged flat (older stock). Question: On these small SLI NB cores, would it be necessary to add support around the core for the perimeter of the block surface, or just take care and tweak down evenly. Would the block get hot enough to melt say, a pad similar to cpu's?
I think this problem is relatively new, but it would be nice if someone who has some of the older blocks could check for us.
")
Firm pressure switching back and forth a little at a time. I would take off the TIM with some Artic Clean before you put your block on with some Ceramique
hmm.....I would've guessed that those hole were m3. You're right J-Mag......it really is a design flaw IMO about no dual fan mounts. I chose not to go your route this time but just used the stock mounts pulling air out on my 240. Until they change it, I won't buy another Airplex.
J-Mag said:How tight am I supposed to drive the nuts on the 6800 series twinplexes? Is it best to tighten until no movement or can this crush your core?
I tighten down mine till it doesn't move with a little budge. I guess it is one of those things we will never know until someone gets out a torque wrench and purposefully destroys one.
Are there any instructions out there for the cuplex pro for CPU?
What do you want to know?
What thread type are the mounting holes on the Evo 1800 are they M4? I know they aren't m3 type cause I tried.
Almost all screws used by AC are either M3 or M4 so I assume that if M3 doesn't fit that it is probably an M4
This is more a suggestion than a question, but shouldn't the airplex series have fan mounting holes on both sides of the radiator? I mounted my 240 to the rear 120mm exhaust on my v2100 and it works great, but it is just a pain mounting the fans on the the opposite side where there are no holes. I had to go ghetto style with zip-ties.
Known problem with AC design. AFAIK there is no real solution till AC decides to go with a heater core style rad like the BI series. But considering that Asetek is the main distributor of HWL in Europe I don''t think that will be happening anytime soon. MAybe they will cut a deal with Thermochill or that company over here in So Cal that is making them as well. So the real solution is for them to just order them in with both sides having fan holes. Perhaps if enough people e-mail them about this design issue they will change.
Toonage said:hmm.....I would've guessed that those hole were m3. You're right J-Mag......it really is a design flaw IMO about no dual fan mounts. I chose not to go your route this time but just used the stock mounts pulling air out on my 240. Until they change it, I won't buy another Airplex.
Well I was actually refering to the Airplex Evo 1800's mounting holes, because the Airplex evo 1800 has all the standard m3 fan mounting holes on one side and some larger ones on the opposite(only 4). So i guess the only airplex to have holes on both sides is the 1800...
I have had a couple of requests lately about Aquastream and Aquaero interfaces and there was just another one posted to the AC Forum today, so:
The Aquaero can manage two (2) Aquastream pumps.
To do this you need to get a 10 conductor ribbon cable and some 10 pin crimp connectors. This will set you back about $2-$3 at the electronics store. Make sure that the red line on the cable is always aimed at pin 1 on the connector. You might want to check with a multi-meter if you want to be assured of no cross shorts or continuity breaks.
If you have two version 3 and up controllers then make sure you set the Aquastream controllers for different addresses (see the manual). You can also use an older style controller if you also have a newer version controller with the selectable address jumpers. So if the setting you choose doesn't work then switch to the other address and you should be set to go.
While this is in the manual, please do not hook power up to both the Aquastream controller and the Aquaero. The Aquaero supplies power to the Aquastream controller. If you hook them both up then don't be suprised when your Aquaero and Aquastream no workee.
GokuSSL said:btw will I have to buy two of them to fit my 4 sticks of memory?
i believe so. im waiting too
J-Mag said:How to hook it up properly
What kind of MB and what kind of CPU?
GokuSSL said:So when do they expect the memory cooler (RAMPLEX?)
I just cannot wait for this
btw will I have to buy two of them to fit my 4 sticks of memory?
It's going to be a while as their CNC mill broke down. Have no idea when it will be fixed, but I would imagine it shouldn't be longer that 3-4 days till they are up and running. I think you will need two coolers as I think they only will do three ram sticks.
") )
)Shoggy said:First picture of a real Ramplex
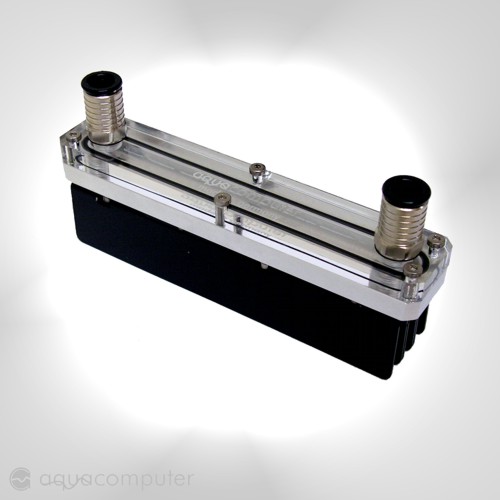
This is not an up to date version. The cooling plates have changed slightly and will be anodised in silver.
Maybe the cooler can be (pre)ordered today.
That looks so amazing!
Top Nurse said:
Thanks much!
Shoggy said:First picture of a real Ramplex
This is not an up to date version. The cooling plates have changed slightly and will be anodised in silver.
Maybe the cooler can be (pre)ordered today.
MUST
HAVE
NOW
ARGH
ERRR
YES
PLEASE
Well since so many people like using these Aqua Computer Evo grills for their rads I thought I would start a thread for tips. Please note that I also posted this into the main watercooling forum as well so people who don't use any other AC gear could benefit as well.
My TN-Tips are:
Cover the whole top of your case with that blue painters masking tape as it easier to get off than the regular cream colored stuff. I usually get the stuff with not much sticky power as it is only their to help protect your case.
Place your grill on top of your template (printed on outside of box) and line up the holes. Tape securely and use an X-acto blade or single edge razor blade to cut it so that it is the exact same size. Place template on part of case where you want it. I found it helpful to use a dial caliper to measure exactly so the template is exactly centered. If your not as anal as I am then eye-ball it. Once you get it where you want it take some blue painting tape and secure it with several small width pieces.
Next drill hole big enough to get a jig saw blade in the area where you are going to cut out. A Dremel reinforced cut-off disc will work, but it is easy to make a mistake. To prepare the jig saw you should clean the plate and tape up with some of the blue tape so that you do not scratch your case. Also I would suggest you use a cobalt blade about 3 1/2" with fairly fine teeth (I used 24 tpi). Then you just follow the dotted line.
Next you take off the template and tape and brush off any aluminum chips (paint brush works great). Now you will assmble your radiator and fans into one unit. Attach fan/rad assembly to the Evo grill. That means the grill is sitting on the box and you screw it together with the rad on the inside of the box. Now you should have everything sitting pretty. Check again for alignment and if necessary remove rad/grill assembly and grind away any high spots on the hole you just cut so your fan will sit the way you want it to. Use your blue tape again to secure your rad/grill assembly so it won't move.
Now comes the fun part. Here you need to make a decision as to whether you want to use bolts and nuts or just bolts and tap your holes. The four holes that the Evo grill attaches with are for 4mm Metric bolts. If you are going to tap your case skip to the next paragraph. If you decide to use bolts and nuts then just follow the same procedure in the next paragraph, but omit the taping sequence and you wil use a drill that will clear the screws you are using. I should mention that even though tapping the case may seem a little daunting it is a lot easier than trying to get a little nut and washer around the radiator to where you need to get it. The easier simple way is to tap.
I used 8-32 stainless steel Button Head socket cap screws instead. You will do one hole at a time. So I drilled the holes with a # 29 drill which is a tap drill. You can also use a 1/8 drill bit if push comes to shove. Then you get out a 8-32 plug tap and using a T-handle tap wrench you tap the first hole. Clean out with some compressed air and gently screw in your 8-32 screw. Remember this is aluminum so just make it snug! Now make sure that you are correctly aligned amd drill and tap another hole on the opposite side of the grill at the other end. Once you have done these two and have your screws in you can just drill all the holes and tap them in whatever manner you wish.
Clean off all your metal chips with compressed air, admire your work, and take a pic!
Notes: The Evo grills have fan spacing to fit the Airplex Evo radiators for the 240 and 360 sizes. The 120 grill fits any 120mm fan. The fan spacing for the popular Black Ice series radiators are different. However you will see that if you are inventive you will be able to either use smaller screws that will work or others might elongate the holes in their fans.
Please note that I also posted this into the main watercooling forum as well so people who don't use any other AC gear could benefit as well.My TN-Tips are:
Cover the whole top of your case with that blue painters masking tape as it easier to get off than the regular cream colored stuff. I usually get the stuff with not much sticky power as it is only their to help protect your case.
Place your grill on top of your template (printed on outside of box) and line up the holes. Tape securely and use an X-acto blade or single edge razor blade to cut it so that it is the exact same size. Place template on part of case where you want it. I found it helpful to use a dial caliper to measure exactly so the template is exactly centered. If your not as anal as I am then eye-ball it.
Once you get it where you want it take some blue painting tape and secure it with several small width pieces.Next drill hole big enough to get a jig saw blade in the area where you are going to cut out. A Dremel reinforced cut-off disc will work, but it is easy to make a mistake. To prepare the jig saw you should clean the plate and tape up with some of the blue tape so that you do not scratch your case. Also I would suggest you use a cobalt blade about 3 1/2" with fairly fine teeth (I used 24 tpi). Then you just follow the dotted line.
Next you take off the template and tape and brush off any aluminum chips (paint brush works great). Now you will assmble your radiator and fans into one unit. Attach fan/rad assembly to the Evo grill. That means the grill is sitting on the box and you screw it together with the rad on the inside of the box. Now you should have everything sitting pretty. Check again for alignment and if necessary remove rad/grill assembly and grind away any high spots on the hole you just cut so your fan will sit the way you want it to. Use your blue tape again to secure your rad/grill assembly so it won't move.
Now comes the fun part. Here you need to make a decision as to whether you want to use bolts and nuts or just bolts and tap your holes. The four holes that the Evo grill attaches with are for 4mm Metric bolts. If you are going to tap your case skip to the next paragraph. If you decide to use bolts and nuts then just follow the same procedure in the next paragraph, but omit the taping sequence and you wil use a drill that will clear the screws you are using. I should mention that even though tapping the case may seem a little daunting it is a lot easier than trying to get a little nut and washer around the radiator to where you need to get it. The easier simple way is to tap.
I used 8-32 stainless steel Button Head socket cap screws instead. You will do one hole at a time. So I drilled the holes with a # 29 drill which is a tap drill. You can also use a 1/8 drill bit if push comes to shove. Then you get out a 8-32 plug tap and using a T-handle tap wrench you tap the first hole. Clean out with some compressed air and gently screw in your 8-32 screw. Remember this is aluminum so just make it snug! Now make sure that you are correctly aligned amd drill and tap another hole on the opposite side of the grill at the other end. Once you have done these two and have your screws in you can just drill all the holes and tap them in whatever manner you wish.
Clean off all your metal chips with compressed air, admire your work, and take a pic!
Notes: The Evo grills have fan spacing to fit the Airplex Evo radiators for the 240 and 360 sizes. The 120 grill fits any 120mm fan. The fan spacing for the popular Black Ice series radiators are different. However you will see that if you are inventive you will be able to either use smaller screws that will work or others might elongate the holes in their fans.
Top Nurse said:Clean off all your metal chips with compressed air, admire your work, and take a pic
Nice tutorial.. I would like to "admire your work" show us the pictures TN...
modsquad2 said:Nice tutorial.. I would like to "admire your work" show us the pictures TN...
Okay how about tomorrow or Tuesday as I got all the radiators and Aquatubes in now. The wiring I figure is going to take about a week or two.
Please note that I cross posted this into the main watercooling forum so people who use gear other than AC might find it useful.
My TN-Tips:
If you are putting your Aquatube into an AquaBay then it should be obvious how it all goes together. This tip is for those who want to drill their case to install it.
As always you want to get all your tools assembled before doing this so there are no late night trips to Home Depot. What you will need is an 3/8" electric drill, an 80mm hole saw (2 1/8") that you can obtain from McMaster Carr. The arbor for it, purchased separately, also usually comes with a stub drill. The arbor I got is not for 80mm hole saws so if you go this route you will need to buy the extra adapter. This works out in the long run as you won't have to go searching around late at night for the arbor for smaller hole saws. You will also need about a 1/8 drill bit to be used as a starter hole for the bigger drill. While this is optional I also suggest you get a piece of thin (approx 1/16) sheet metal of an appropriate size (see text for details). You will of course need your mount plate screws and nuts that came in the package or you may opt to drill and tap your screw holes.
Okay the first thing to do is to carefully plan where you are going to drill. An old carpenter's adage will serve you well: Measure twice and cut once
Okay you know where you want the Aquatube right? First thing you do is toss the template it came with because you won't be needing it. Next you want to take some of the blue painters masking tape and completely cover the area where you are planning to drill. At this point I would recommend you then lay your piece of thin sheet metal down and hold it in place with your choice of clamps. Deep throat C-Clamps work good for this. You will use the Aquatube mounting plate itself for a template. You can use a dial calipers to center the mounting plate if your as anal as me about measurements or you can just eye-ball it with a ruler. Once you are centered you will use a pen or pencil to trace the hole onto the blue tape.
Next you will find the center however you wish. Now use the 1/8" drill bit to drill a small pilot hole in the center of your circle. Make sure you have that extra piece of sheet metal clamped tightly, because now you will use the 80mm hole saw. The reason you put the piece of sheet metal above your case is so you don't accidently mar your case when you pull the drill up. This seems to more happen when you are drilling inside the case though. Some people drill through, stop, and lossen the chuck and remove the hole saw from the bottom. Do what ever feels comfortable, but people often instinctively hit the trigger when coming out of the hole so be forewarned if you don't use the extra sheet metal.
Now that you have the hole drilled you will want to clean the edges with a round swiss needle file after you take out the piece of sheet metal (if you used one). Don't remove the blue tape yet that you afixed to the case originally. You are not looking to remove anything besides the metal burr so you don't cut yourself or scratch your Aquatube. Now you will assemble the Aquatube to the mount. The mount goes on the top and the Aquatube underneath the metal plate. It should be almost a perfect fit. Now that you have the Aquatube and mount screwed together you will locate it in the position you want. Again a carpenters square, ruler, or dial caliper will be helpful in aligning the plate if you want everything sitting at right angles to the case. Once it is situated where you want it you will then take some more blue masking tape and tape the plate down on the four edges.
Now comes the fun part. Here you need to make a decision as to whether you want to use bolts and nuts or just bolts and tap your holes. The four holes that the Aquatube mounting plate attaches with are for 4mm Metric bolts. If you are going to tap your case skip to the next paragraph. If you decide to use bolts and nuts then just follow the same procedure in the next paragraph, but omit the taping sequence and you wil use a drill that will clear the screws you are using. I should mention that even though tapping the case may seem a little daunting it is a lot easier than trying to get a little nut and washer to where you need to get it. The easier simple way is to tap.
I used 8-32 stainless steel Button Head socket cap screws instead. You will do one hole at a time. So I drilled the holes with a # 29 drill which is a tap drill. You can also use a 1/8 drill bit if push comes to shove. Then you get out a 8-32 plug tap and using a T-handle tap wrench you tap the first hole. Clean out with some compressed air and gently screw in your 8-32 screw. Remember this is aluminum so just make it snug! Now make sure that you are correctly aligned amd drill and tap another hole on the opposite side of the mount at the other end of the plate. Once you have done these two and have your screws in you can just drill all the holes and tap them in whatever manner you wish.
Clean off all your metal chips with compressed air, admire your work, and take a pic!
Toonage said:Nice looking block, but I don't see it working for 2 sticks in Dual Channel on some boards due to their slot spacing.
It's not adjustable? I would think in order ot make a universal memory cooler that the fins would have to be adjustable... I mean you have different memory packaging types (TSOP and BGA), then you have single sided and double sided w/ or w/out heatspreaders. This means there is a huge variance on widths of memory modules... Not to mention the spacing differences on MBs... Some have barely a mm between slots while others have rows of capacitors.
I am thinking that AC thought of this.
Keywords: "but I don't see it......" I also would think they've thought of it J-Mag, but as I've seen they certainly aren't above making something proprietary. From whats evident in the picture, everything you just said was exactly what I had in mind in making that comment.
I also would think they've thought of it J-Mag, but as I've seen they certainly aren't above making something proprietary. From whats evident in the picture, everything you just said was exactly what I had in mind in making that comment.Shoggy said:...
Seems that you have not read the last sites in this thread
So what's the good word on the following products:
Tubemeter? Yay, Nay, or No Way
Multi-Switch? Yay, Nay, or No Way
TwinPlex Pro? Yay, Nay, or No Way
RamPlex? Yay, Nay, or No Way
Seems like Aqua Computer is getting a long and longer list of paper releases. When are we going to see the real products? Two weeks ago AC was saying that the Multi-Switch was being released in 3 days? So what's the hold up?
BTW, what ever happened to the Aquastream 2 PC Interface
Depends on how you configured your system, but if you have Aquastream(s) then set it for deaeration mode and go after filling up with coolant. Might have to turn your system from side to side or forwards or backwards to get all the air out. Replace air with water as it returns to you reservoir.
Toonage said:Keywords: "but I don't see it......"
Hey at times I find myself arguing the same point.
For those who are using dual Aquastreams with an Aquaero there is a simple way to mount both Aquastream controllers to the Aquaero. It comes stock with the ability to add one controller to the back. To get both controllers on the back you need to disassemble the main Aquaero board from the display. There are six (6) socket head cap screws that need to be removed. Then you can separate the display from the main board if you have a pin and socket connection on late model Aquaero's. If it is soldered together you will have to figure out how to do this yourself. On the front side of the mainboard there are two socket head cap screws that hold on the hex metal stand-offs. Take this off and replace it with the type that has a female on one end and a male on the other end. I used a 6-32 x 1" stand-off. The female side of the stand-off is screwed to the Aquaero mainboard. You then add an Aquastream controller as usual over the male threads. Then take a double female stand-off of the same thread size you used earlier and screw it on to the other male threaded stand-off. Now you add the second Aquastream controller and tighten it down to the stand-off just like you would normally do if you were using a stock unit. (Please note before taking apart that there are two (2) plastic washers located on one side of the Aquaero between the display and the Aquaero main board. Make sure you put them back in the same place!)
Now you have an Aquaero with both Aquastream controllers conveniently located so that you can easily use the standard 4 1/2" Aquaero-Aquastream 10 pin cable to connect all three devices by just adding a 10 pin ribbon crimp on connector.
One added bonus by using a 1" male/female stand-off and 3/4" double female stand-off is that it moves the Aquastream contoller far enough away from the Aquaero that you can easily attach the relay connector without having to disassemble your hardware.
BlueAqua said:I want one. Shoggy, you should make it so US customers can order directly from AC so we get stuff when it comes out.
You already can order directly from AC Berlin or IT-Trade. Shipping will probably give you a heart attack though + AC Berlin want's you to pay VAT taxes even though it is for export
I should note that as soon as this stuff becomes available IT-Trade will order a bunch of this stuff in for Sharka. It should be here in the USA within a few weeks of the initial delivery in Germany. Last time I spoke to Wes at Sharka he said he would take pre-orders for their new stuff. Last one in the pool is a green meanie Top Nurse said:You already can order directly from AC Berlin or IT-Trade. Shipping will probably give you a heart attack though + AC Berlin want's you to pay VAT taxes even though it is for export
Sounds good Top Nurse. I just ordered a bunch more from Sharka and will continue to do so. I just wish they'd have a preorder section on their website, or some kind of reserve system, or an instock notification system. It's time to work on my 2nd Aqua Computer system.
As an addendum to my previous post about installing grills here is a pic of my V2000 box. On the right side of the grill you will notice a bright straight line. As I mentioned previously the better way to do this is with a jig saw. Seeing as it was my first one I took my brother's advice and did it with a Dremel reinforced cut-off saw. This is a classic example of the rotary tool easily digging into the metal and getting away from your firm grip. The back of the case grill I put in was done with a jig saw and it turned out great. Anyone have any good ideas as to how to fix this "blemish"?
You can also see the Danger Den Fillport I installed using a 1" hole saw. This fillport allows me to fill my front mounted Aquatube without having to lay it on it's back or pop the plexi site plate off. Eventually I will be seeing about having the brass plug either nickel plated or black chromed.
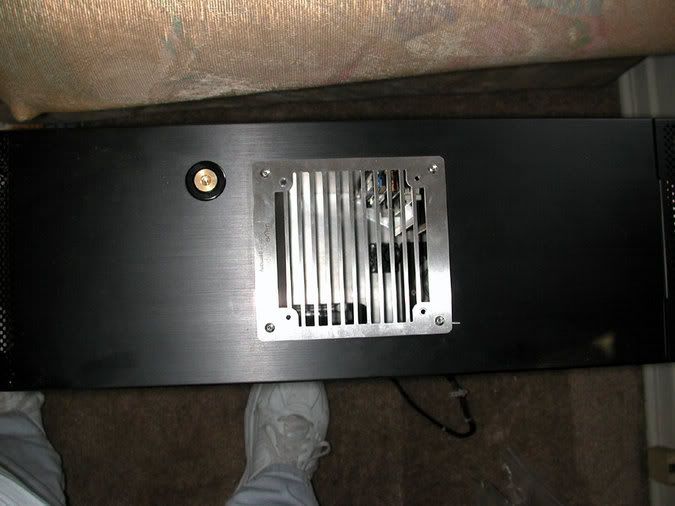
You can also see the Danger Den Fillport I installed using a 1" hole saw. This fillport allows me to fill my front mounted Aquatube without having to lay it on it's back or pop the plexi site plate off. Eventually I will be seeing about having the brass plug either nickel plated or black chromed.
BlueAqua said:I just wish they'd have a preorder section on their website, or some kind of reserve system, or an instock notification system.
I quit asking about that as it was going nowhere.
Perhaps if enough people send them e-mails they will fix the "problem." I do know that they are working with their backup site at the moment through Yahoo and it has certain limitations. They are working on a new website, but when it gets done is anyones guess....move the mounting plate a 1/4''-1/2'' to the right and recut, that is if the hole in the case isn't too big already. I think the screw holes on the left side would still be hidden under the plate. testers flat black model paint would hide it somewhat.
- Status
- Not open for further replies.