Project Open Core: Liquid P5, Hardline Tubing, Illuminated System Panel, VR Ready

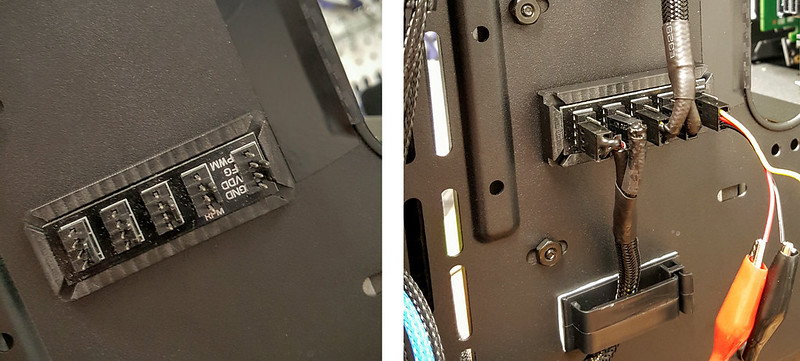
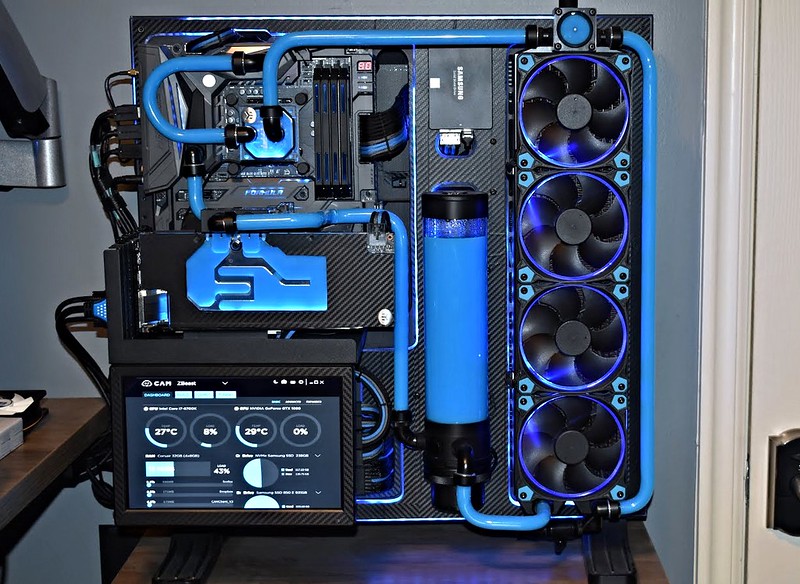
Had a few PM's about how I configured the small display to show System Specs via CAM software, thought I would share this here in case there are future questions.

Running it as a 4th display via HDMI (tiny one at the bottom right).

28285215000_c1acd734bc_z.jpg


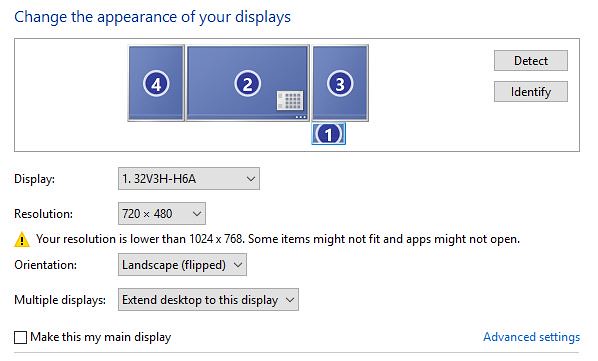
For the most part it works pretty well. I did have to use a simple 2 way HDMI switch when using the Oculus Rift. For some reason the Rift and the small 7in screen don't play well together, so I just use the switch to toggle between them when I have to use the Rift. Simple enough.
 
Love the build, doing something very similar and had a question about your fans. I saw the splitter your using, do you have all 4 fans plugged into 1 fan header on your mobo? Any issues with amps? U have the Asus z170a but can't really find anything on max amp per header. Also your able to control the fans with the Asus software also?
Thanks!

Yes, I have the 4 fans all running off of 1 fan header, via a Phobya 4Pin PWM to 4x 4Pin Fan Splitter. Verified with ASUS that the fan headers on the MAXIMUS Formula VIII support 1.0A per header. Tested these fans and even at peak, none generated more than 160mA (0.64A combined total). Combining 4 fans on one header is still well below the max supported current.


27484941972_14f89714b3_c.jpg


27484941492_c29014a5c9_c.jpg


Controlling the speed via ASUS AI Suite Software. I am usting temperature curves, but honestly I haven't needed to raise the fan speed above 50% even when stress-testing while overclocked. Everything works really well together keeping things nice and cool... and quiet.
.
 
re those fans: I always assume 1a max on all mobos unless specified differently. which in most cases will allow 3-5 fans depending on their draw. I currently have 2x sp120 and 4x cm 120 on one header and their totally at max is just over 1a but their curve is set to 60% max so they never come close to the 1a. it makes things so much simpler, cooler and quiet!
 
Awesome thanks for the info. Had neck of a time finding a 4x hub but did find 6x for $8.50 on Amazon so that's probably what I'll be getting.
 
Hey Mr_Armageddon, could you tell me what fan header your using on the motherboard and how you have it set in bios? I have my 4 fans all hooked up and using Asus Dual Intelligent Processors 5 software but it's not detecting my fans or changing speeds. I'm missing something just not sure what.
 
Hey Mr_Armageddon, could you tell me what fan header your using on the motherboard and how you have it set in bios? I have my 4 fans all hooked up and using Asus Dual Intelligent Processors 5 software but it's not detecting my fans or changing speeds. I'm missing something just not sure what.

I am using the Phobya 4-Pin PWM to 4x 4-Pin Fan Splitter. Amazon link here. I know I have a fan curve set up in the bios, but can't remember of the top of my head what my specific settings are. Traveling for work, but when I get back home in a few days, I will check for you.

61G-A3PVD0L._SL1200_.jpg
 
As an Amazon Associate, HardForum may earn from qualifying purchases.
I am using the Phobya 4-Pin PWM to 4x 4-Pin Fan Splitter. Amazon link here. I know I have a fan curve set up in the bios, but can't remember of the top of my head what my specific settings are. Traveling for work, but when I get back home in a few days, I will check for you.

Thanks, the bios settings are what im looking for. I have the Phobya 4 pin splitter 6 port version, but some reason asus suite software isn't detecting the fans or giving me an option to set curve/fan strength etc.
 
As an Amazon Associate, HardForum may earn from qualifying purchases.
Thanks, the bios settings are what im looking for. I have the Phobya 4 pin splitter 6 port version, but some reason asus suite software isn't detecting the fans or giving me an option to set curve/fan strength etc.

I set up a custom curve to run the Radiator fans (Chassis Fan Header #4) based off of the CPU temp. Pretty straight forward. Keeps it very quiet unless I am converting video files or something else CPU intensive. Idle temps range from 28-32C. At those temps fans only spin at 50%. Once I go above 55C, the fans spin up a bit more.

31487666803_d18c015c84_z.jpg
 
I set up a custom curve to run the Radiator fans (Chassis Fan Header #4) based off of the CPU temp. Pretty straight forward. Keeps it very quiet unless I am converting video files or something else CPU intensive. Idle temps range from 28-32C. At those temps fans only spin at 50%. Once I go above 55C, the fans spin up a bit more.

Oh your setting the curve in the bios. I thought you were using the asus suite software in windows to set the curve. I couldnt get it to adjust the fan speed at all, tried dc and pwm setting in bios but never thought to try and set the curve there. Ill take a look at that.

Thanks
 
You don't happen to have a link to those RGB led strips do you? I'm not finding any online that have a molex connection and would be nice to avoid another wall plug.
 
You don't happen to have a link to those RGB led strips do you? I'm not finding any online that have a molex connection and would be nice to avoid another wall plug.

Here is the link to the ones I used. You will still have to wire a 4-pin molex connector to the IR Receiver if you want to be able to adjust your colors and brightness.

Just snip the wires on the DC barrel plug side and wire it directly to the 12v line coming from a 4-pin molex. No getting around that if you want the LEDs powered by your system and not a wall plug.
 
As an Amazon Associate, HardForum may earn from qualifying purchases.
Here is the link to the ones I used. You will still have to wire a 4-pin molex connector to the IR Receiver if you want to be able to adjust your colors and brightness.

Just snip the wires on the DC barrel plug side and wire it directly to the 12v line coming from a 4-pin molex. No getting around that if you want the LEDs powered by your system and not a wall plug.

Haha i never thought of you cutting and making your own cable, from the picture it looked manufactured and thought it just came with the kit. Thanks!
 
As an Amazon Associate, HardForum may earn from qualifying purchases.
Goofy question for you - anything you wish you had done differently, now that you've had the build up and running for a little while?
 
Goofy question for you - anything you wish you had done differently, now that you've had the build up and running for a little while?

I have been pretty happy with it so far. I do wish I had added 1 more USB 3.0 Card to a PCI-E slot, as the Oculus Rift + Touch + 2 Sensors is eating up USB ports quickly. Adding a new expansion card is tricky because I would have to modify the GPU riser cable, which is very temperamental. Aside from that, I would do a better System Stats display with better viewing angles.
 
Upgraded System Stats Display

I have received a lot of PMs and questions on YouTube regarding how I put together and mounted the small display that shows system stats. So decided to put together a more detailed "How-To" post, and upgrade the display in the proces. The Post can be found on my Project Blog, with lots of pictures showing the step by step process.
Hit up the link below for more info.

PC Upgrade - Mounted System Stats Display

32370962512_9c87807e4e_c.jpg


If you don't want that much detail, here is a summary video showing a few of the key steps.

PC Upgrade - Mounted System Stats Display Running CAM

 
Last edited:
Hey Mr_Armageddon, did you ever try hooking up the LEDs to your rgb aura header on mobo? wondering if it can power them and possibly sync with aura
 
Hey Mr_Armageddon, did you ever try hooking up the LEDs to your rgb aura header on mobo? wondering if it can power them and possibly sync with aura

All of the LED strips are RGB LEDs, and are controlled by Aura. So Motherboard, GPU Block, and Acrylic Panel all can change and match colors vua the software.

The Reservoir and CPU block are normal blue LEDs as I couldn't find the single LED type that would work with the RGB headers, and I can't use an LED strip in those locations due to their smaller footprint.

ok cool, when you spoke about the molex cable for LEDs i wasnt sure if the motherboard just couldnt handle that length of lights or if you just weren't using it. Wanted to make sure it was compatible. I'm getting ready to order an asus ix formula but been having a heck of a time trying to find RGB fans that will sync up. Ideal setup is to sync all lights up together so i can change my color setup on the fly.
 
ok cool, when you spoke about the molex cable for LEDs i wasnt sure if the motherboard just couldnt handle that length of lights or if you just weren't using it. Wanted to make sure it was compatible. I'm getting ready to order an asus ix formula but been having a heck of a time trying to find RGB fans that will sync up. Ideal setup is to sync all lights up together so i can change my color setup on the fly.

Sorry for the confusion, and good luck with getting all your LEDs syncd up.
 
I do not know what steals the show more, your wicked case or your wicked work bench! Fantastic work on your case, it has been really fun to see the progress and the finished work. Your work bench...... Yeah I have some work to do.. haha Good job!
 
I do not know what steals the show more, your wicked case or your wicked work bench! Fantastic work on your case, it has been really fun to see the progress and the finished work. Your work bench...... Yeah I have some work to do.. haha Good job!

Ha, thanks. The workbench definitely makes working on this stuff a bit easier.
 
Reaching out to anyone with ideas as to how to fix this issue...

Having major video playback issues. Pixilation when watching content both online streaming and local video players. Tested online with YouTube and Vimeo. Local playback with VLC and PotPlayer.

All system drivers have been updated, Flash up to date. Have wiped codecs, and then tried other codecs. Power Settings set to “Performance”.... Any ideas??? Wondering if perhaps there is something wrong with my video card? May have to do a complete system wipe, but hoping I can avoid that.


Video showing the issue below.

 
maybe ddu and install newest nv drivers. try disabling hardware acceleration in your browser.
 
My bad - didn't listen, nor watch much of the video.

I feel like I had this happen to me at some point. Not that the previous comment is going to help, as I don't remember what I did to resolve. Sorry.
 
maybe ddu and install newest nv drivers. try disabling hardware acceleration in your browser.

Thanks for the recommendation of DDU. I had done a manual uninstall of all drivers and software before, but it seems to make things a bit better after I used DDU. Still getting occasional glitches, but nowhere near as often as I was before.
 
I've had some wonko corruption shit happen to me when using a USB Monitor in conjunction with my 144hz monitor. Worked fine if I set it to 60hz for both monitors, but when running anything above that, it would eat shit. Maybe disconnect the little monitor and see if it still screws up?
 
Figured I would add a few of my recent Additions to this build since its been a while without any updates.
3 months ago, went ahead an upgraded to a 1080Ti, using an EK waterblock. Stock temps are 5-10C less than the EVGA Hybrid cooler solution my GPU shipped with. Very happy with that upgrade. Video of the install can be found here:


hfmiJC9.jpg


HPqmjIT.jpg


Also added some 3D Printed Fan Grills to the build, for some color pop. 2 part construction. I posted the STL files here if anyone wants to give it a go.

qDUk5uF.jpg


8h7S8Kl.jpg
 
Last edited:
Very nice work! The more I read through this log, the more I fall in love with that P5. I'm about to build myself a showpiece and it's currently at the top if my list. Thanks for the inspiration
 
Back
Top