Navigation
Install the app
How to install the app on iOS
Follow along with the video below to see how to install our site as a web app on your home screen.
Note: This feature may not be available in some browsers.
More options
You are using an out of date browser. It may not display this or other websites correctly.
You should upgrade or use an alternative browser.
You should upgrade or use an alternative browser.
Project: Beast III
- Thread starter Stevennoland
- Start date
How much is this thing going to weigh, 300 pounds case only?!?!
depends, if he continues like that it will probably need it's own aqueduct for all this tubing hehe
Kidding aside, GREAT work man! Some part are a bit too much for my own taste, but damn you have amazing skills to build part and obviously a great imagination. Continue the great work!
Do you want to be my friend
 .... friends help each others, you can make parts for me and i can give you pizza lol
littleaznbag
n00b
- Joined
- Mar 15, 2007
- Messages
- 1
this is legendary
no vacation allowed when building a great case!!!!!
No you got it wrong, No vacation and not allowd to leave us un updated on a 1337 mod your doing, most expensive and best looking mod even half way through for me at least
get your a** back on [H] and update us! we miss your updates!!
Read every single page of this post a few weeks ago, though this is my first time posting in it.
Your work seriously makes me consider a career in your field, it's just beautiful, as non-manly as that may sound.
But seriously, your work is amazing.
Your work seriously makes me consider a career in your field, it's just beautiful, as non-manly as that may sound.
But seriously, your work is amazing.
Stevennoland
Limp Gawd
- Joined
- Jan 5, 2006
- Messages
- 418
Hey all. Thanks for all the kind words. I really do admire your patience. I hope this post will keep you interested and coming back for more (you can bet I'll be back to post more).
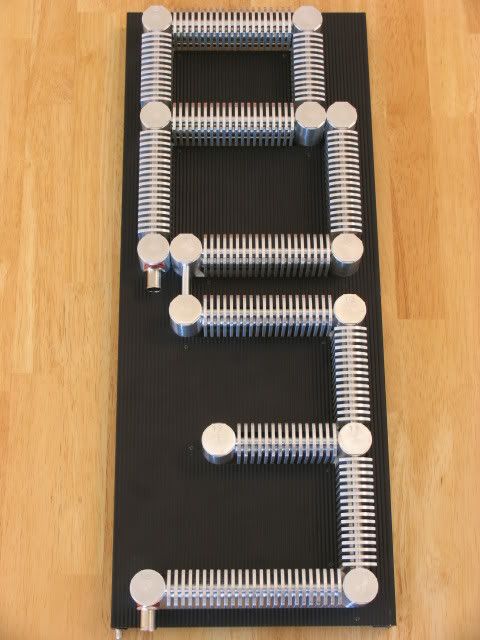
This post is the 'DOORRAD' up to now. It is not quite finished, but it's at a point where you can see what it's going to look like. On with the post!
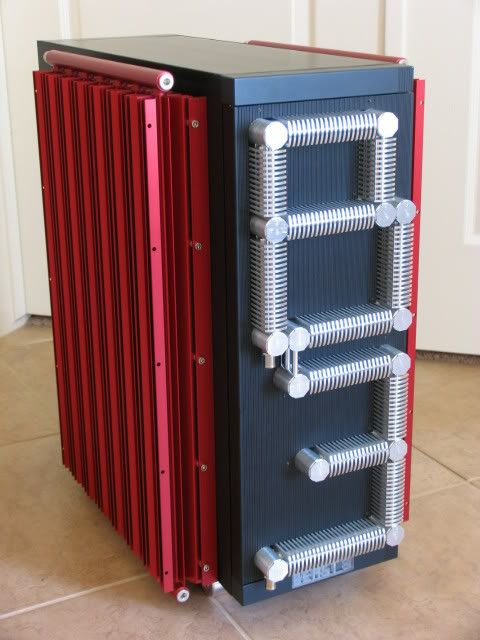
Here is the front door to the Lian Li case (repost)
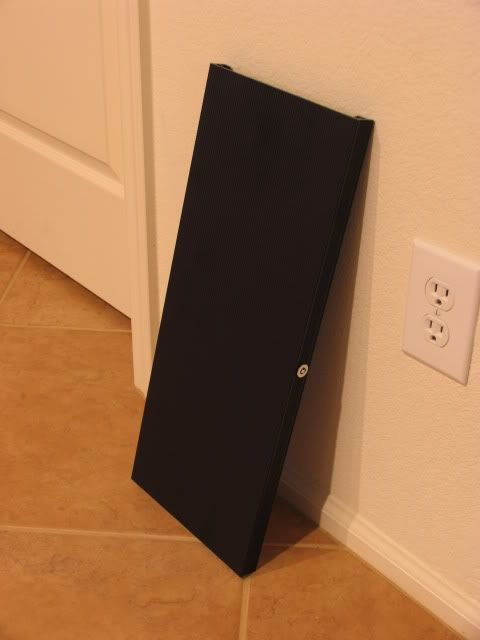
Here is the cut out for the 'Doorrad'
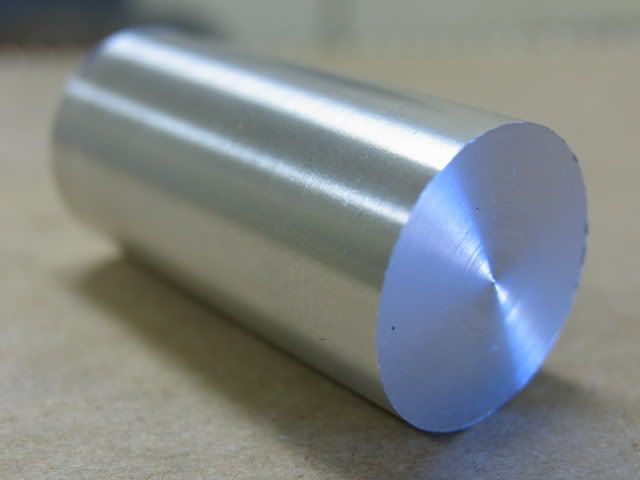
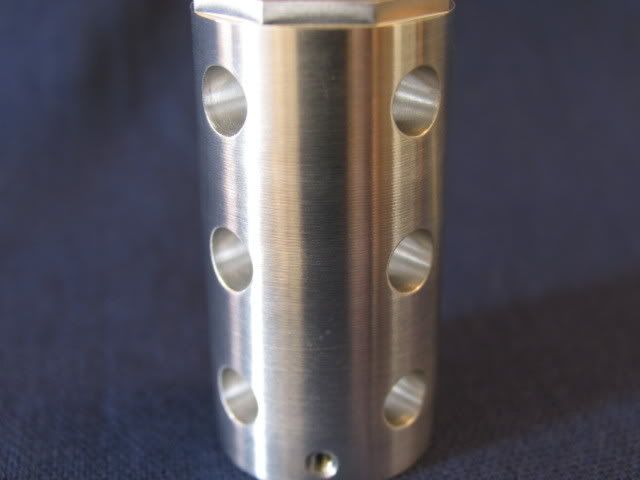
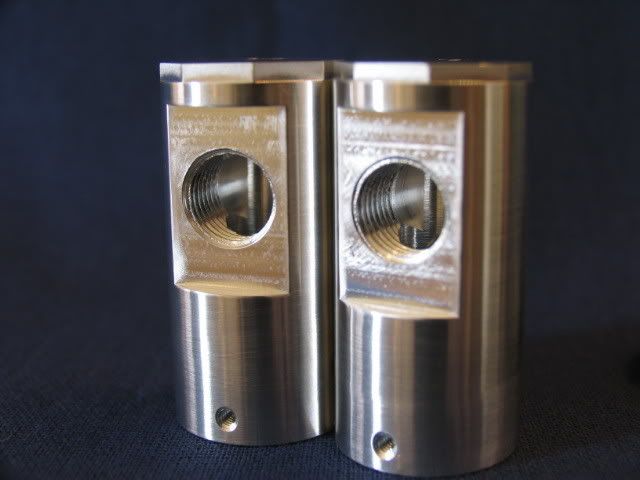
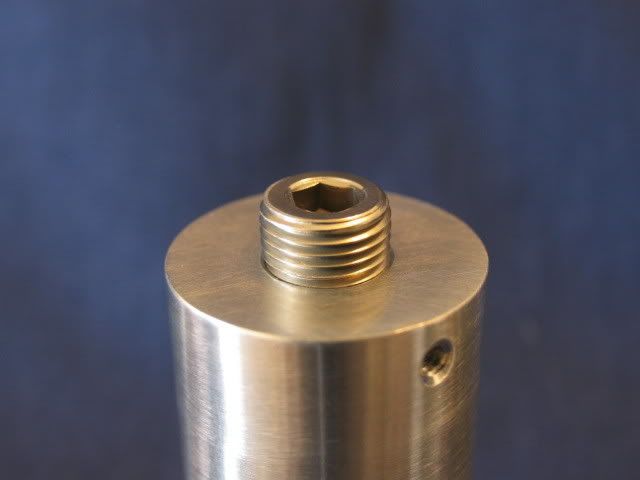
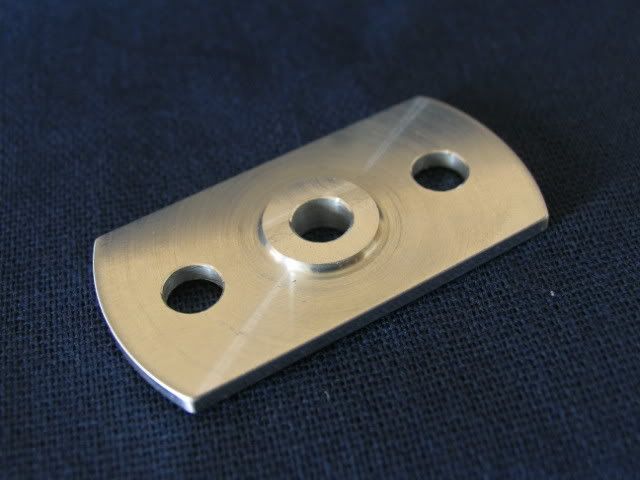
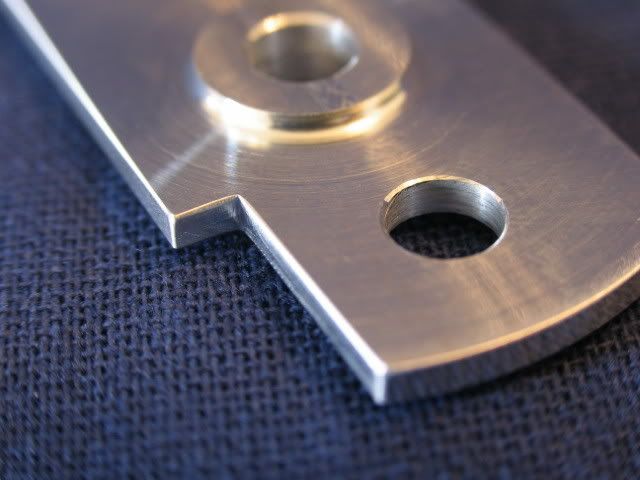
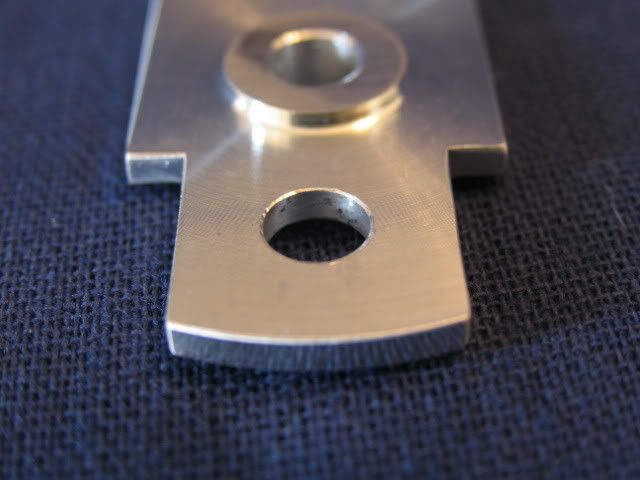
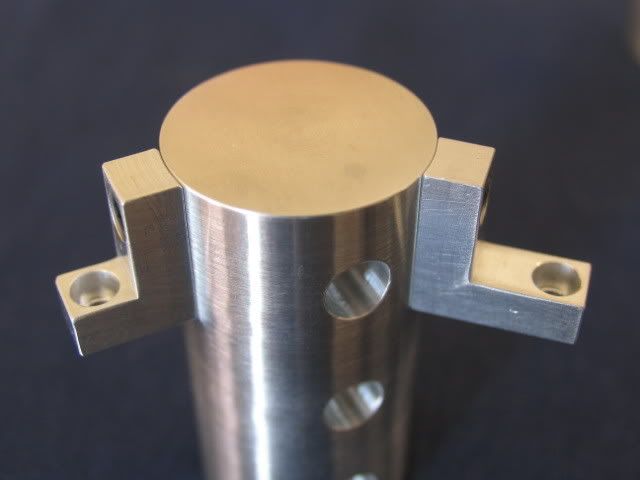
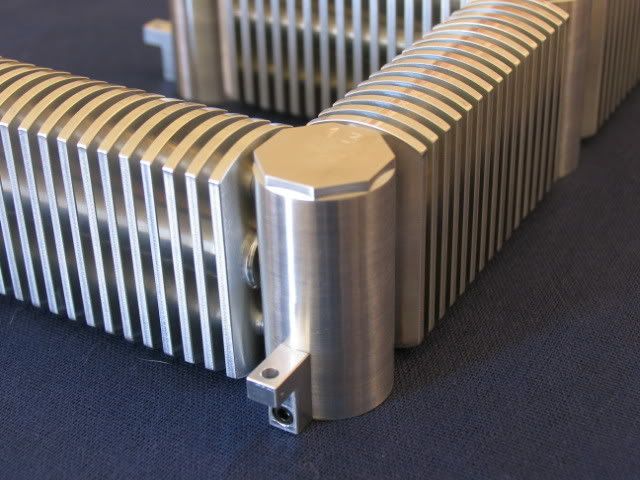
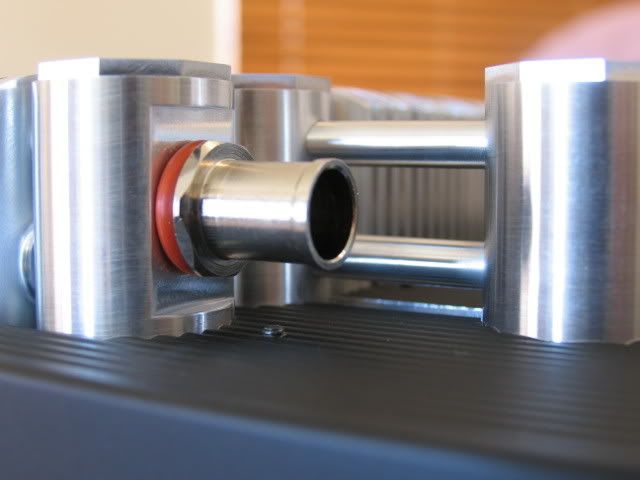
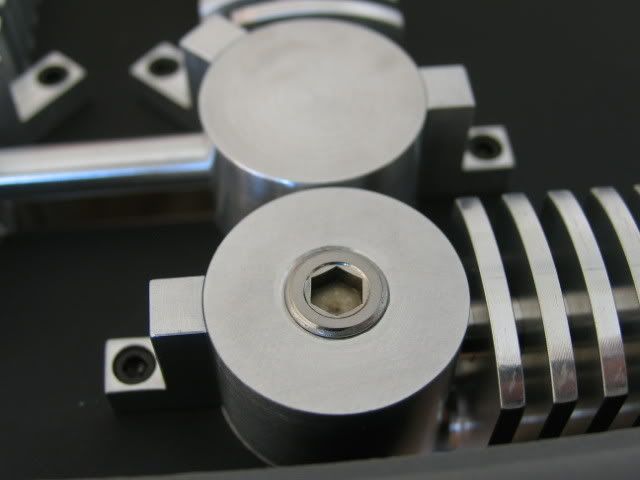
Here are the door rounds. Your reading this post because I have these almost finished. The round:
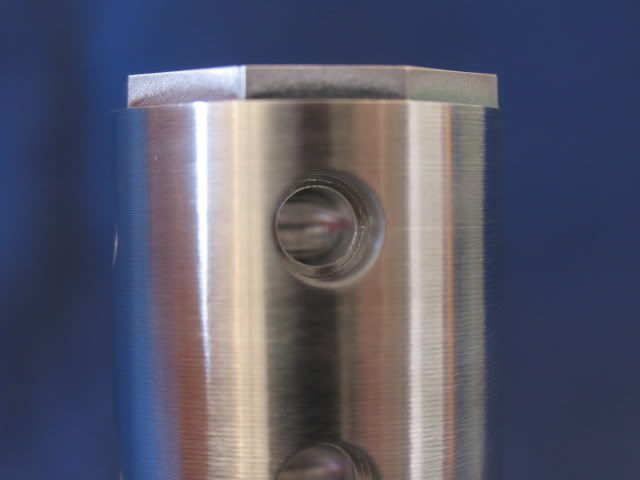
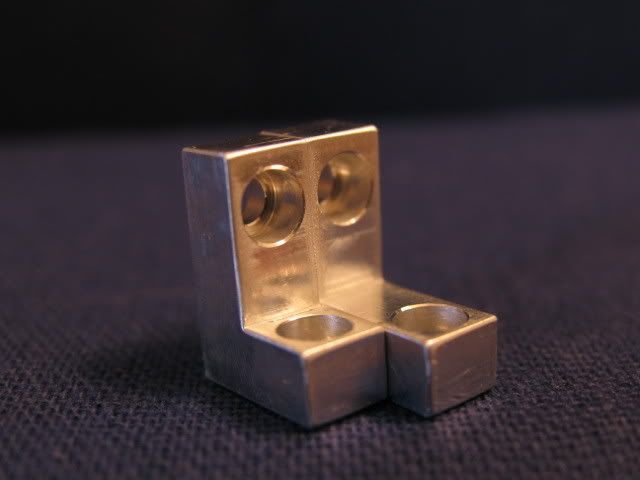
I then added this 4-40 tapped hole to bolt the L bracket on
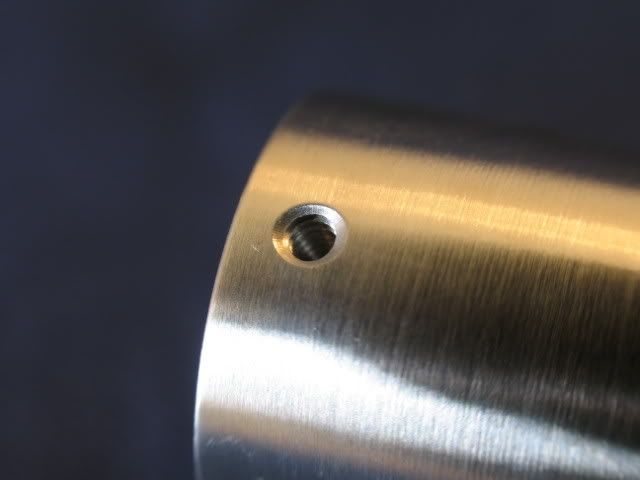
I then drilled a .188" hole to center (thru on some rounds) and added a .252" pocket .251' deep
(inside this pocket there will be a groove for an O-ring to seal in the coolant)
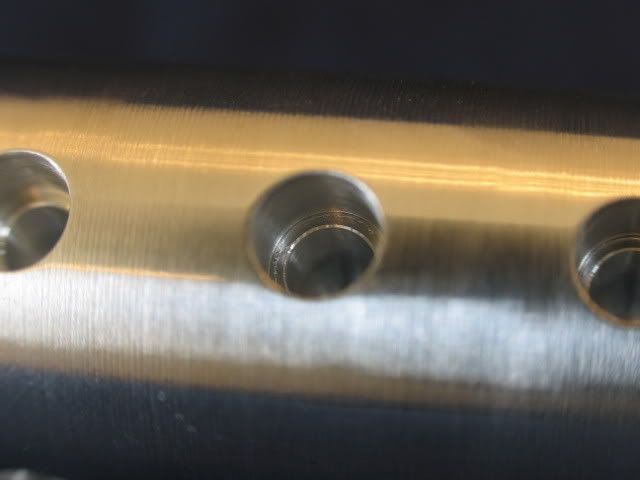
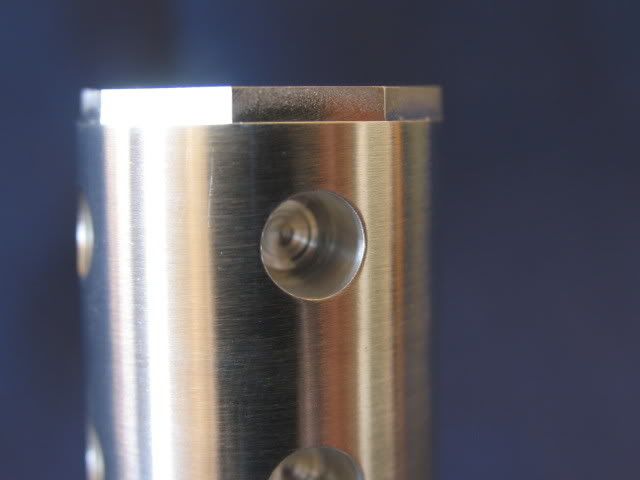
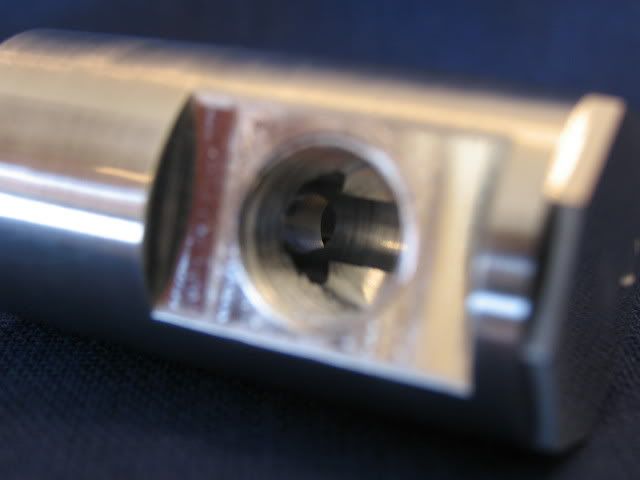
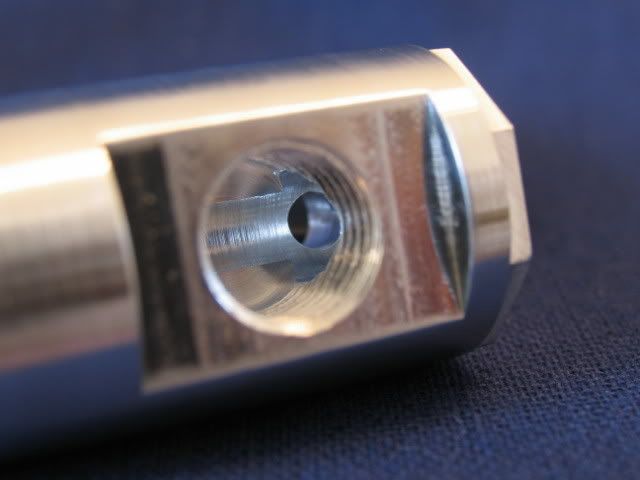
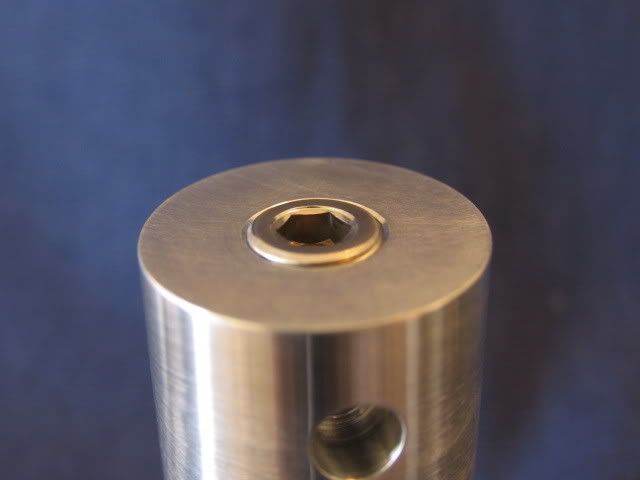
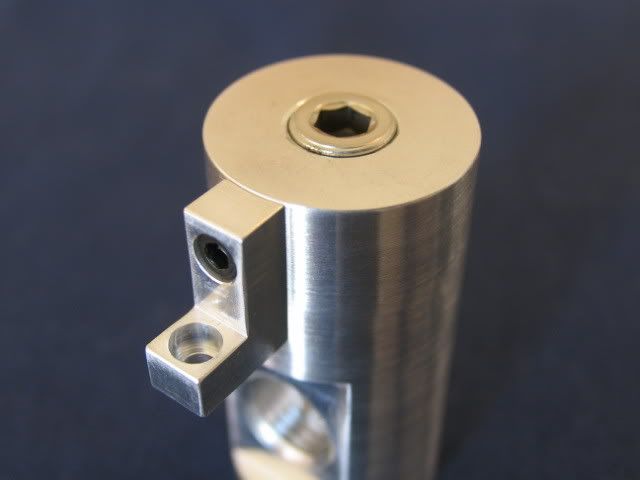
Here is the 3/16" dia ball end mill I used to add a curve to the bottom of the 90 degree elbow bend inside each hole

It's hard to see but imagine the curve inside there, also the hex cut into the top was for me so I could get the 45 degree timing for the proper location of holes
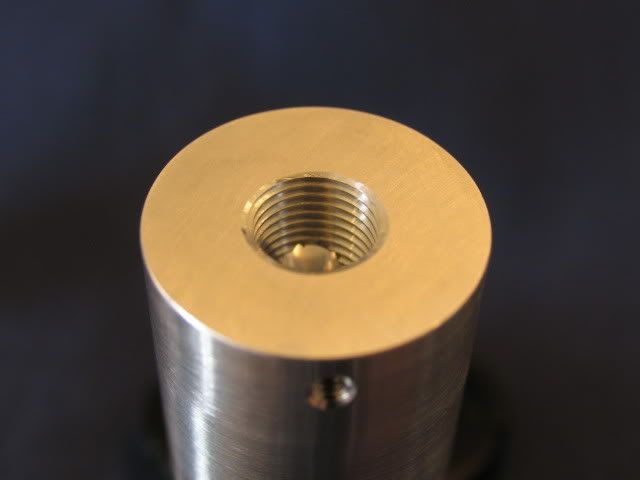
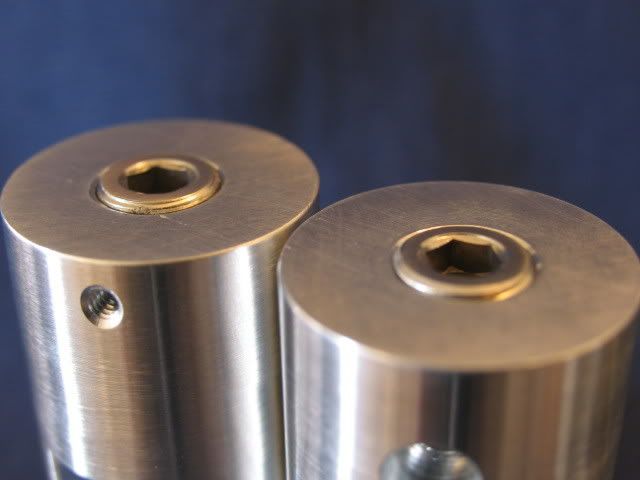
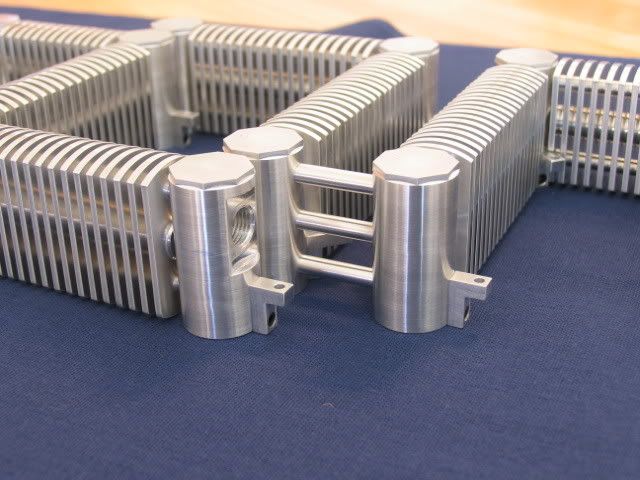
Here are the pockets for the rails then don't have coolant flowing through them
The lot

Here are the feed and retrun rounds
Shots of the inside looking out the 3/16" holes
On the back side of the feed and retrun rounds, I had to join all three holes and to seal the hole, I'm using some 1/4" pipe plugs

Threaded end
The lot
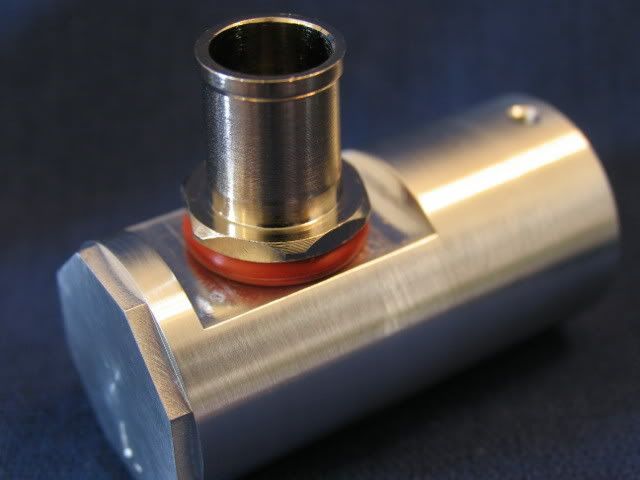
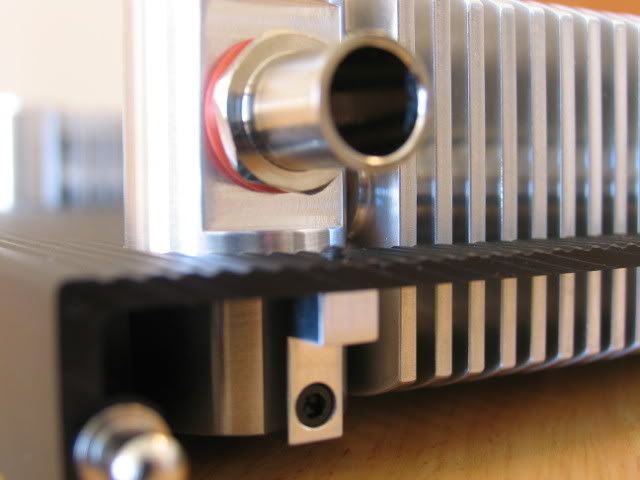
Feed with G1/4 fitting
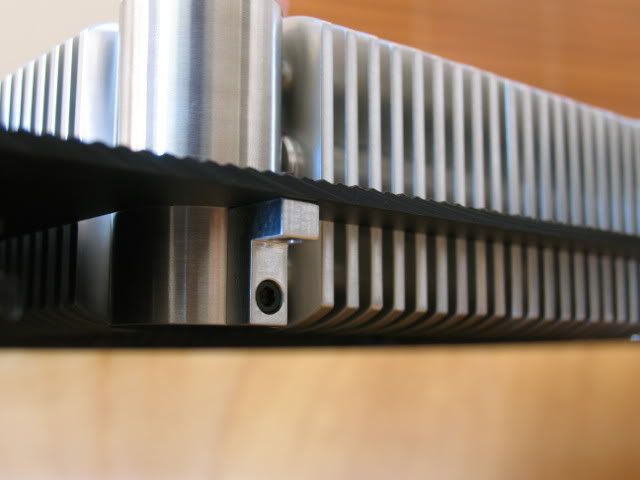
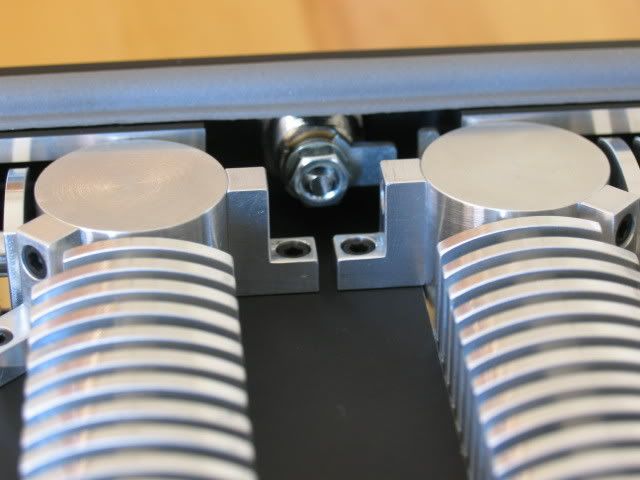
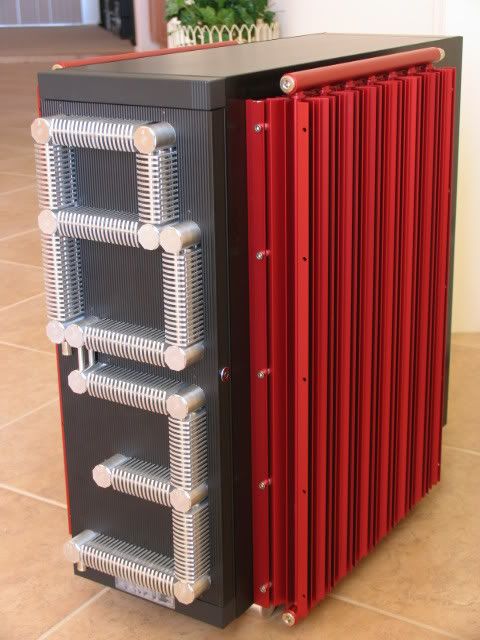
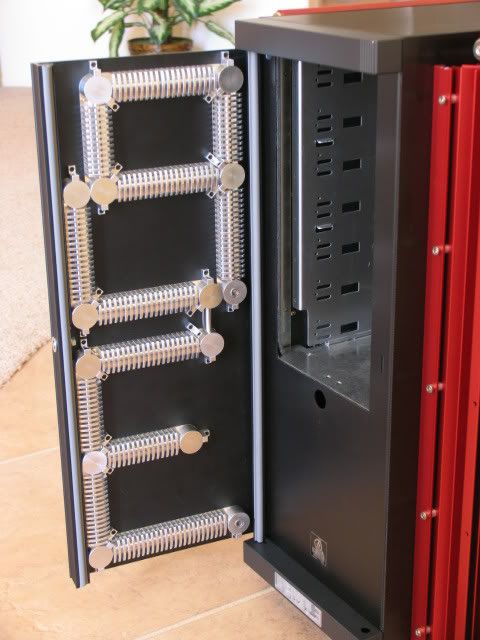
Here are the L mounts to attach the rounds to the door
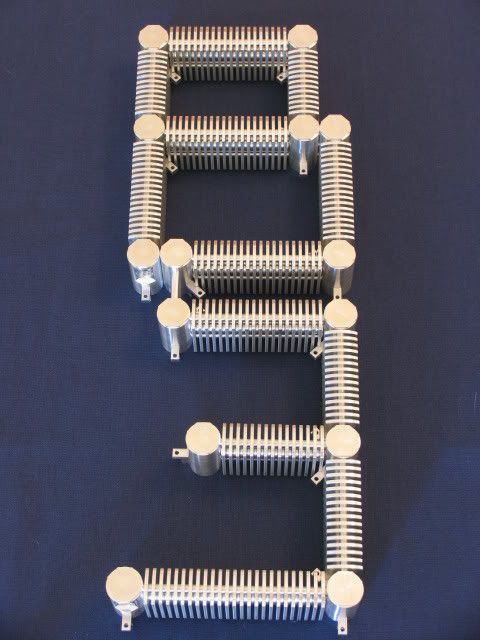
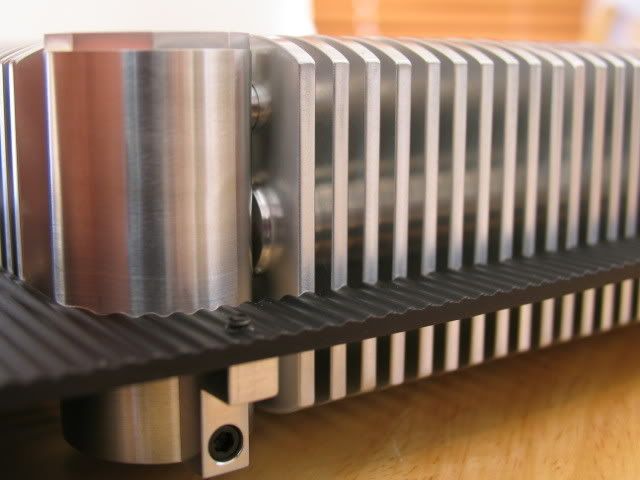
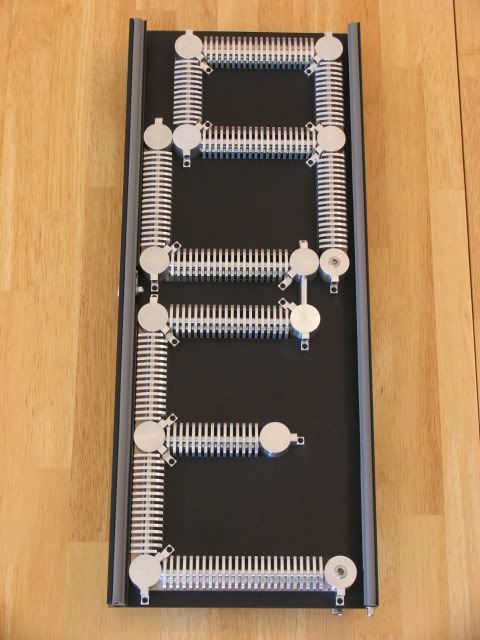
Here are the fins
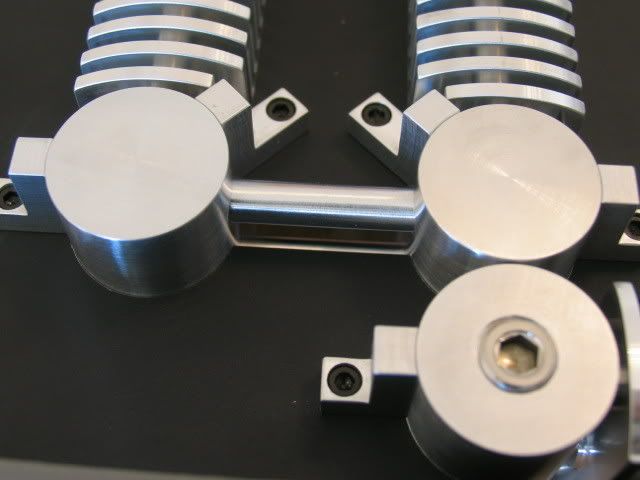
To clear the L mounts, I had to notch some of the fins
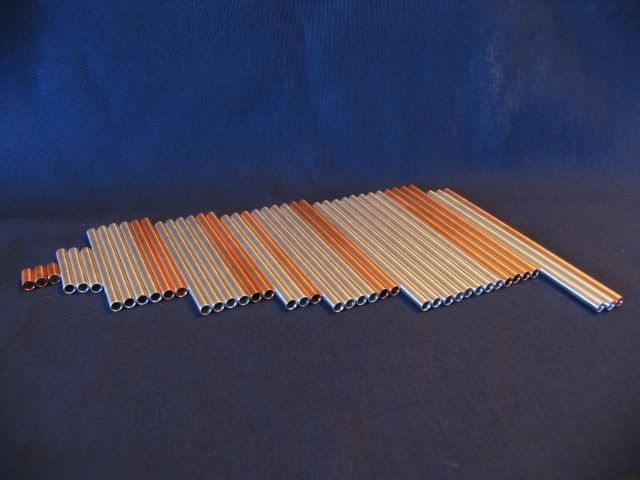
And all the tubes
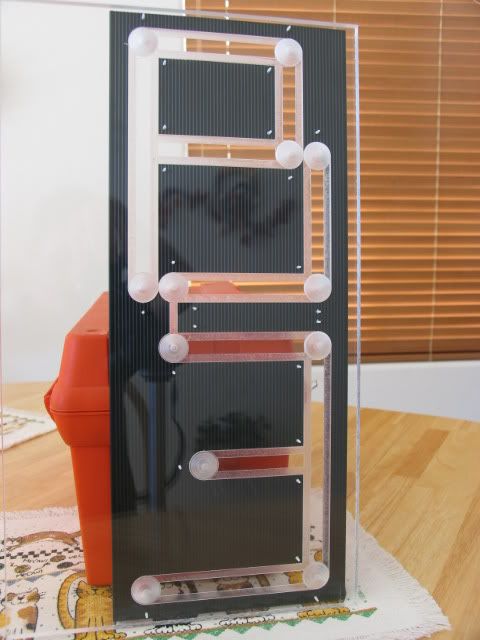
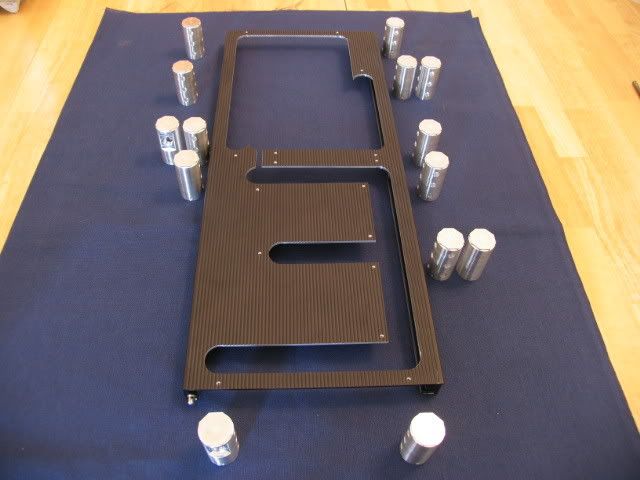
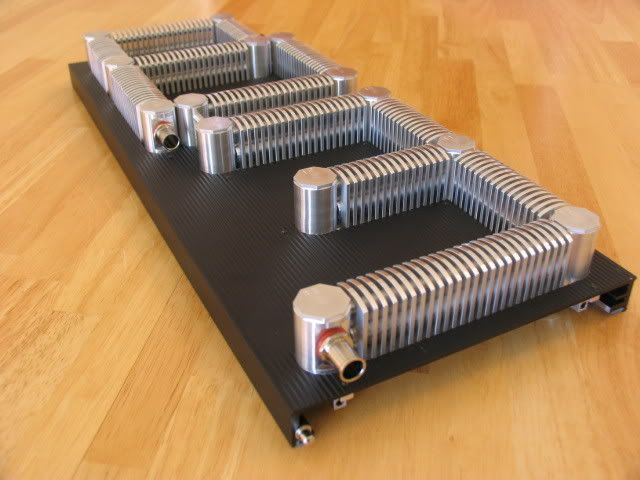
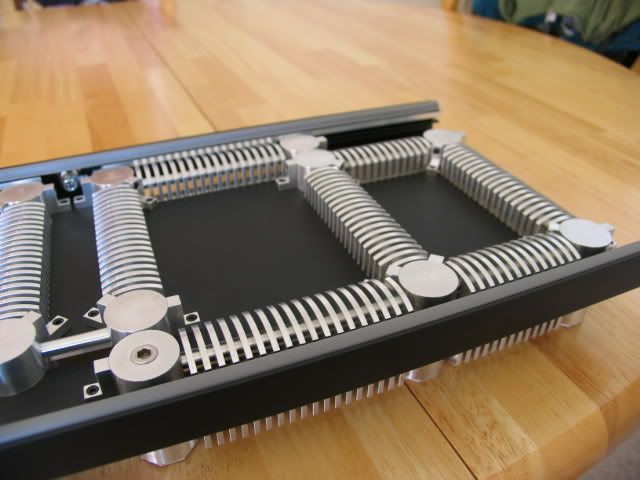
Here is the assembly process. I started by laying out all the hardware in its general location. The door with rounds
No door, tubes added (note, the copper tube goes in the center of the fins, the aluminum tubes are on the ends)
The notched fins and the L brackets
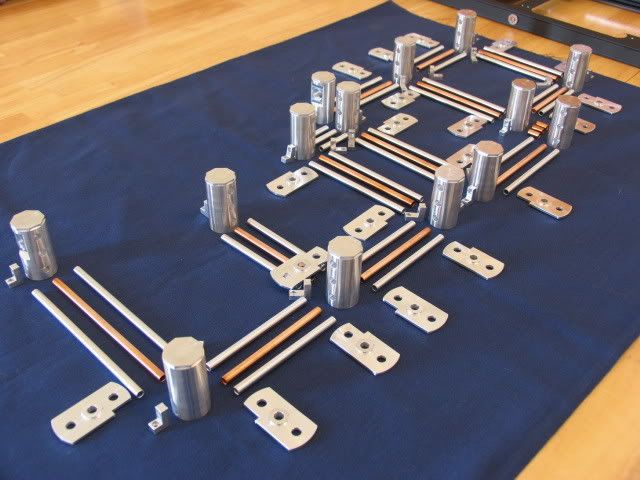
I started by attaching the L brackets to the rounds
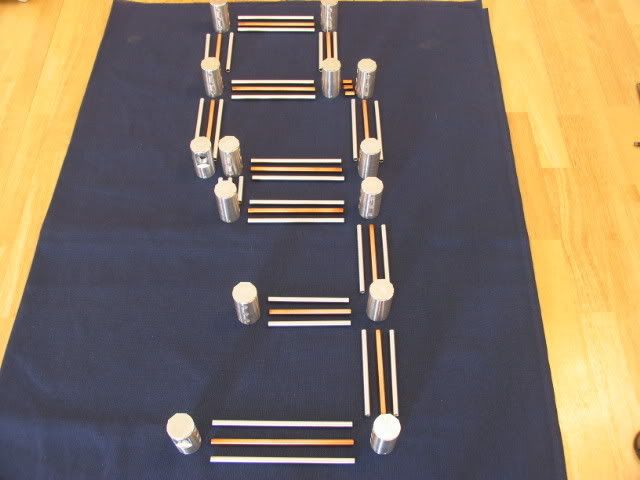
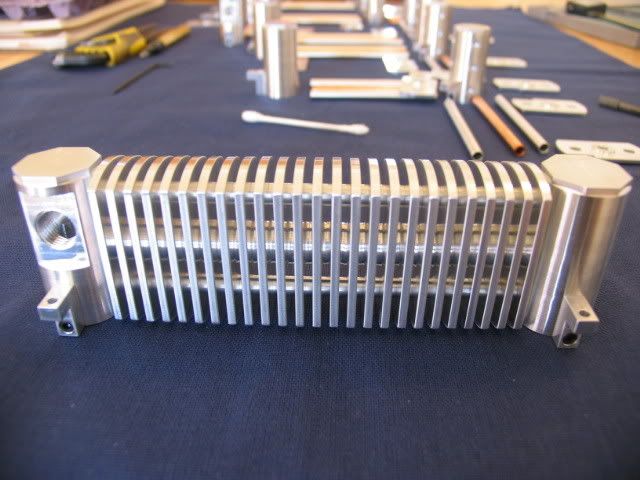
I then assembled the tubes and the fins. The bottom rail
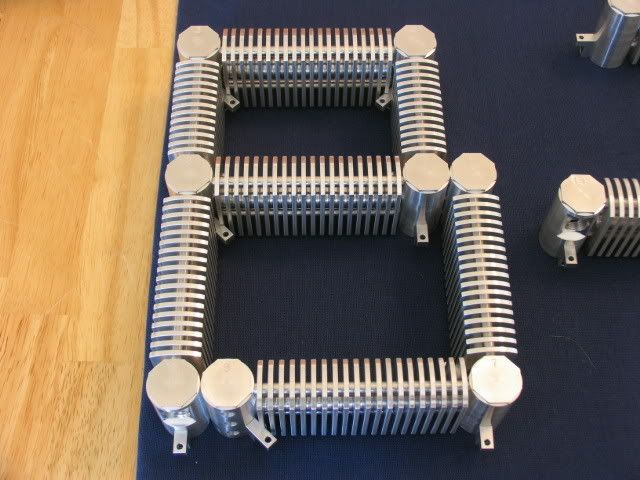
The B
The whole shebang! (sans door)
Optional views


Close-ups

With the door installed (This was a real pain. I only made the gaps between the assembly and the door .005 of an inch (that is only .0025 per side)) not a lot of room for error
Close up
Optional view
Close up's
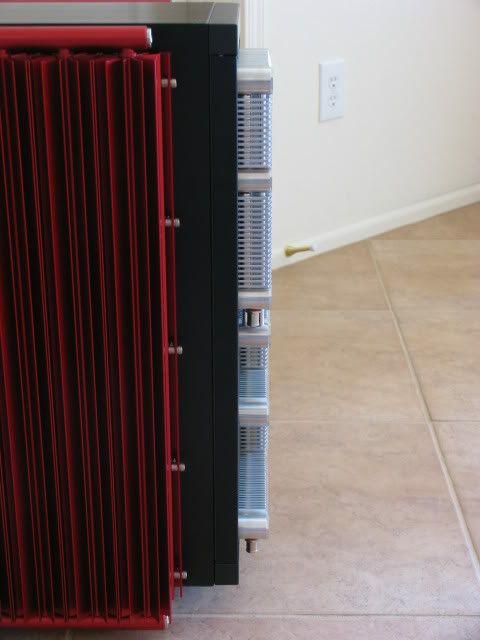
Oh, the back side!
Close up's

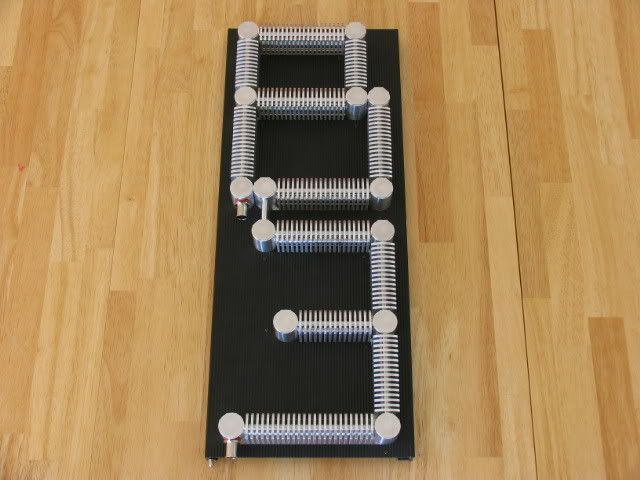
Here is the 'Doorrad' installed on the case

You can see here how it protrudes out from the front of the door by about 1.125" (doors added)
Optional views
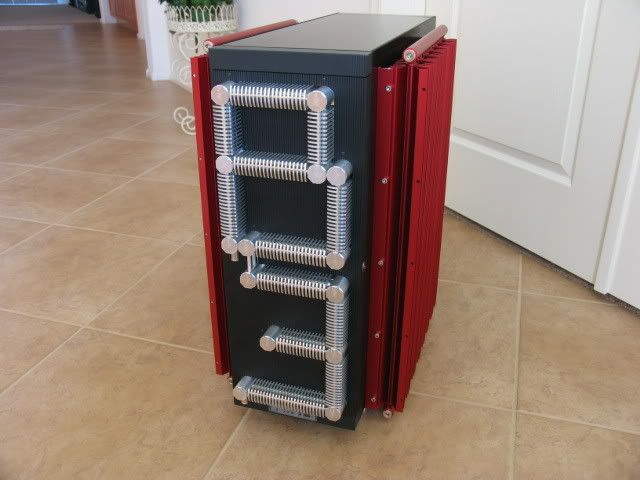
The empty case (with stock wheels), front door assembly, and side panels (with rads) weighs in at 60 pounds! This thing is going to be really heavy!!
Well that's all for now. I'm still cranking on other projects for Beast 3.
Please stay tuned!
This post is the 'DOORRAD' up to now. It is not quite finished, but it's at a point where you can see what it's going to look like. On with the post!
Here is the front door to the Lian Li case (repost)
Here is the cut out for the 'Doorrad'
Here are the door rounds. Your reading this post because I have these almost finished. The round:
I then added this 4-40 tapped hole to bolt the L bracket on
I then drilled a .188" hole to center (thru on some rounds) and added a .252" pocket .251' deep
(inside this pocket there will be a groove for an O-ring to seal in the coolant)
Here is the 3/16" dia ball end mill I used to add a curve to the bottom of the 90 degree elbow bend inside each hole
It's hard to see but imagine the curve inside there, also the hex cut into the top was for me so I could get the 45 degree timing for the proper location of holes
Here are the pockets for the rails then don't have coolant flowing through them
The lot
Here are the feed and retrun rounds
Shots of the inside looking out the 3/16" holes
On the back side of the feed and retrun rounds, I had to join all three holes and to seal the hole, I'm using some 1/4" pipe plugs
Threaded end
The lot
Feed with G1/4 fitting
Here are the L mounts to attach the rounds to the door
Here are the fins
To clear the L mounts, I had to notch some of the fins
And all the tubes
Here is the assembly process. I started by laying out all the hardware in its general location. The door with rounds
No door, tubes added (note, the copper tube goes in the center of the fins, the aluminum tubes are on the ends)
The notched fins and the L brackets
I started by attaching the L brackets to the rounds
I then assembled the tubes and the fins. The bottom rail
The B
The whole shebang! (sans door)
Optional views
Close-ups
With the door installed (This was a real pain. I only made the gaps between the assembly and the door .005 of an inch (that is only .0025 per side)) not a lot of room for error
Close up
Optional view
Close up's
Oh, the back side!
Close up's
Here is the 'Doorrad' installed on the case
You can see here how it protrudes out from the front of the door by about 1.125" (doors added)
Optional views
The empty case (with stock wheels), front door assembly, and side panels (with rads) weighs in at 60 pounds! This thing is going to be really heavy!!
Well that's all for now. I'm still cranking on other projects for Beast 3.
Please stay tuned!
NukeULater
Gawd
- Joined
- Sep 12, 2006
- Messages
- 917
That is so cool...unhappy_mage
[H]ard|DCer of the Month - October 2005
- Joined
- Jun 29, 2004
- Messages
- 11,455
Hawt as always
So uh.. how are you going to power the water through all of those intricate radiators? Like 6 DDC+ or D5 pumps?
What hes going to do is put this up in a public space, and then put a manual pump outside of it. anyone who wants to look at it has to pump while they look!
SWEET JESUS! I must say, you make me want to hang up my dremel for good. Absolutely beautiful work. Its just crazy. The work you are doing and the craftsmanship in all of this is done as a "hobby". Yet I doubt that most people who would create anything even remotely close to this have the ability for such an intricate design and creation, even in their occupation. And this is what you do for "fun"? I would love to see what kind of stuff you make for a living! I would give my left leg for access to the equipment you use. (no, really I would, its a bum leg anyway) Of course, then I would have to give my other leg for your ability! Keep the updates coming! Once again, absolutely beautiful!
Wahoomcdaniel
Weaksauce
- Joined
- May 2, 2005
- Messages
- 117
The door rounds have pockets for the rails and I read where you drilled two different sized openings in each location.
If I am reading correctly, the rail will have an O ring and be inserted. The rails will be held in place just by friction? I understand that the door rounds are screwed in place and will prevent movement, but will the O ring be enough to prevent seepage?
If I am reading correctly, the rail will have an O ring and be inserted. The rails will be held in place just by friction? I understand that the door rounds are screwed in place and will prevent movement, but will the O ring be enough to prevent seepage?
digital_exhaust
[H]ard|DCer of the Month - May 2008
- Joined
- Aug 14, 2006
- Messages
- 6,903
Ohmygawd....
So, uh how many gallons of water is that thing gonna hold??
Amazing man.. really really amazing.
So, uh how many gallons of water is that thing gonna hold??
Amazing man.. really really amazing.
Ohmygawd....
So, uh how many gallons of water is that thing gonna hold??
Amazing man.. really really amazing.
Maybe 2gallons the least?
brasherman
Gawd
- Joined
- Sep 10, 2004
- Messages
- 713
That door rad looks amazing.
A question though, how come you didn't put the hose barbs on the inside of the door for an even cleaner look when done?
Great minds think alike! I was wondering the same thing, as I thought you would run them along the inside of the door panel.
Still pwnz though. Good to see some work done.
shadowlord
2[H]4U
- Joined
- Jan 6, 2005
- Messages
- 3,109
awesome looking....this will be a killer rig when finished !!
but you will need a pump from the space shuttle to maintain some flow rate, but then again you could cool the space shuttle with that many rads
but you will need a pump from the space shuttle to maintain some flow rate, but then again you could cool the space shuttle with that many rads
brasherman
Gawd
- Joined
- Sep 10, 2004
- Messages
- 713
Nah, my dad's got a pump with a gas engine he uses to fill the sprayer. Should do the trick!!!
Nah, my dad's got a pump with a gas engine he uses to fill the sprayer. Should do the trick!!!
Now that's quiet cooling
FrEaKy
[H] Movie and TV Show Review Guy
- Joined
- Jan 31, 2003
- Messages
- 14,113
This is a freaken awesome case dude Cant wait to see the finished product
Cant wait to see the finished productBinarySynapse
[H]F Junkie
- Joined
- Feb 6, 2006
- Messages
- 15,103
I'll be sad to see the case finished. That mean that the innovation and awe inspiring work will be over. Hasn't he already said he's not going to do another project this in depth again?
gopherscanswim
Limp Gawd
- Joined
- Oct 25, 2005
- Messages
- 203
Impressive work. I just skimmed all the pictures. Can you update your original post with more info on the design idea such as the number of radiators and what each one is for?
Stevennoland
Limp Gawd
- Joined
- Jan 5, 2006
- Messages
- 418
So uh.. how are you going to power the water through all of those intricate radiators? Like 6 DDC+ or D5 pumps?
I'm not quite sure which pump I'll use for each. The only pumps I have purchased are the ones for the Konveckt-O-Matic radiators mounted outside the doors.
Stevennoland
Limp Gawd
- Joined
- Jan 5, 2006
- Messages
- 418
That door rad looks amazing.
A question though, how come you didn't put the hose barbs on the inside of the door for an even cleaner look when done?
I knew someone was going to ask this. First off, there isn't a whole lot of room inside the door. Form the back of the door to the front inside is only about .875" . I also would have had to route the hose inside the font panel. Getting a nice bend for the tubing would have created more work on the front of the case (not something I would have relished). In retrospect, routing the tubing on the inside would have been much cleaner looking, but this mod isn't all about clean lines though. I am going to sleeve the tubing for the front and I'll route it so it can move somewhat freely with the opening and closing of the front door.
Stevennoland
Limp Gawd
- Joined
- Jan 5, 2006
- Messages
- 418
The door rounds have pockets for the rails and I read where you drilled two different sized openings in each location.
If I am reading correctly, the rail will have an O ring and be inserted. The rails will be held in place just by friction? I understand that the door rounds are screwed in place and will prevent movement, but will the O ring be enough to prevent seepage?
Here is a picture of #2 round. This might clear up any confusion. Yes this will be held in place by friction, but the constraints of the door and the tight fit (ugh) of the rad into the door will prevent any movement (I hope).
I sure hope this thing doesn't leak, I'm fully prepared to omit having any coolant flowing through this thing if it does.
Stevennoland
Limp Gawd
- Joined
- Jan 5, 2006
- Messages
- 418
i want the next upgrade. whats going to be water cooled and what pump, res etc?
As of right now:
Water cooled
#1 GPU
#2 CPU (and chipset, ?mem)
#3 HDD
Rads
#1 120mm
#2 dual 80mm
#3 Konvect-O-Matic's
#4 x3 custom coils
#5 Doorrad
The radiator in the reservior is to cool the res (doesn't count).
I don't know what rad is going to cool what component. I suppose the way I have it set up, it really doesn't matter since all the loops start and end in the same well (so to speak).
As the system heats up, I'm assuming I'll reach a state of equilibrium (sp?). As the system is taxed, all the rads will be working in unison to cool the whole well.
Remember, I have 5 loops entering the res. If one or two loops are coming in hot, they will mix with the 3 other cooler loops in the top half of the res. My theory is that the five feeds at the bottom of the res will pretty much all be the same temp (hopefully cooler than the one component that is the least hot).
I hope all that makes sense.