Have an old Klipsch 4.1 speaker system? Did it die? I bet you can fix it!

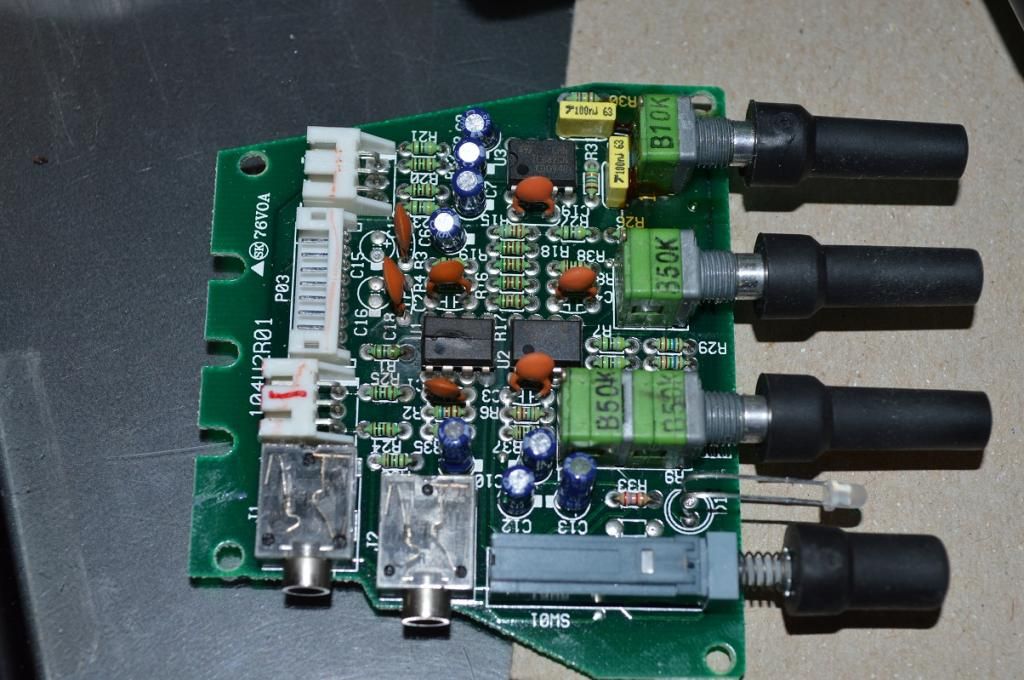
Next, I opened up my control pod. Unfortunately, my control pod is a different revision than the pod in the diagram
2-400_contol_rev7-710x550.gif
described on its parent page: http://www.thompdale.com/bash_amplifier/bash_amp.htm.

I was looking at the wrong pod diagram. The diagram for my pod
4-1_control_pod_997x631.gif
is linked and described from http://www.thompdale.com/bash_amplifier/4-1/4-1_bash_amp.htm

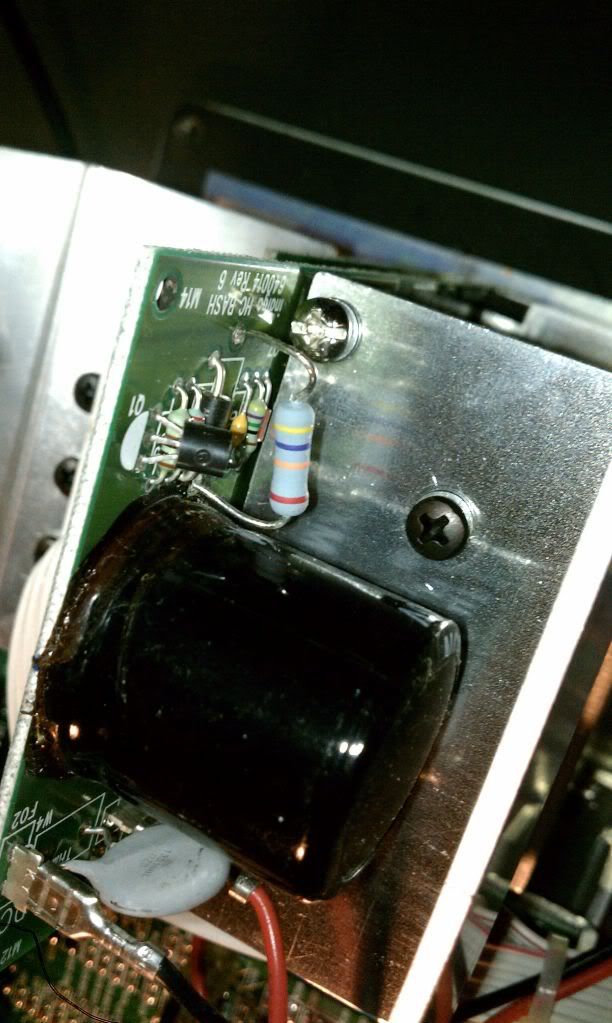
I checked the voltages on the Klipsch 4.1 DIN plug for the pod. The control pod isn't getting power. I went back to the DC-DC converter 640014 Rev 6 board
4-1_dc-dc-974x606.gif
which is also described in the "DC to DC Converter" section of http://www.thompdale.com/bash_amplifier/4-1/4-1_bash_amp.htm

I do see the correct +53V input between F01/W3/DC+ and F01/W4/DC- but I'm only finding 7.2V between F03/W2 and F04/W1.

I'm wondering whether the simplest solution is to replace the entire DC-DC converter board. Is there a salvage market for these amps?
 
Sorry to do a huge necro post, but i am in need of some help.
i have the 4.1 system that gets zero power.
By this i mean when plugged in there are no lights or sound.
I opened it up to find a few interesting things.
fuse is fine
R26 burnt to heck but oddly still within range.
R27 Was no longer function, replaced with new resistor 1W, within 1min of running the new resistor started to smoke.
Other resistors are not the nice cream/tan color but a grey/dark brown. they all seem to still be within the normal resistance.
C36 was blow.
C7 is a tiny bit domed.
It outputs 60v at F01 and F02.
but at the connector for the logic board where i am to be getting +30 +30 GND -30 -30 i get nothing.
So i am looking for some advice or to send out the part for a repair.
I am about to place a large order from digikey and thought that if i could possibly find the fail points i would just throw this in.
but it was also suggested to me it may be better of finding a new psu due to the bad and underrated parts in the current.
I am only decent in electronics so i understand about 70% of the schematics but want to know if there might be other parts of common repair or just replace for better sound for less problems down the road.
And there are several areas for capacitors that are empty, all going from traces to planes, would these be good to add as it may have been just opted out for cost reasons?
thanks for any help.
Again i am sorry for digging this thread up, but i see no reason when most but not all has been talked about here..
 
Last edited:
Yeah I need some help too. My unit gets no sound from sat or sub, but headphones still work and the pod still works.

I replaced the relay switch with one from Omron (Digikey) and it isn't switching.

I see no bulging caps or burnt resistors.

Any more ideas for things I can check? I really don't want to get rid of this system.
 
Another post from the grave (though not as far). Anybody know where I can get pots that fit on the control pod (for volume)? I don't want to risk buying a few only to find they don't work :)
 
It's probably a multi-layer PCB and the trace between R33 and the LED is between layers where you can't see it. That'd be my guess anyway.
 
Nice work! Can you fix my Z-5500 Logitech subwoofer next? :D

The front left audio jack outputs sound whenever it feels like it - very annoying.
 
Am I to assume that because the POD unit does not turn on that the Circuit Board inside the subwoofer went Bad, and if thats the case what would I look for to get this fixed
 
Well after having my 4.1's sitting unused in my room for the last 2 years due to the obnoxious nonstop hissing/static, I decided to try and fix it.

Thanks to Tool, I discovered my r26 was burned to hell and out of spec, so I replaced both it and r12 with higher wattage resistors, but that didn't fix the problem :( I tested all the other resistors mentioned in this thread and they are all within spec.

Even with only the sub plugged into the wall, it was hissing (and I did notice the sound changed when my microwave (at 40% power) turned the magnetron on and off, so I'm guessing that the static is actually related to the 60hz hum.

Anyways, the sub always got super hot since it started giving static, and I narrowed down the heat source to the aluminum heatsink right next to the white Bash card. Though none of the 3 mofsets seem to be producing this heat, so I am not sure where it is coming from :confused: I'm not the most gifted when it comes to electrical gremlins so I don't know what my next step is.

With the board out of the sub, I can hear static coming from around the tall copper coil with yellow tape around it, something in there.

:(
 
I'm using 5.1s and have yet to have any trouble with mine but I'm bookmarking this thread.
 
Hi guys.

I have just registered, because I felt obliged to give back to the community the same kind of help that I have received by reading the plethora of useful postings including the schematics for our beloved Klipsch.

Here's the story, intentionally both LONG and detailed, for one to be able to follow the logic behind the fix:

I have bought a 4.1 system off Ebay, having the known issue of NO POWER/DEAD.

I have started by checking the two famous-by-now resistors R26 and R12, and although they look a bit "tired" they measure ok on the digital meter. That being covered, I have started checking the voltages or should I say, the lack of them...

I have, obviously started with the DC-DC converter as it was getting the 127vDC from the I/O board, but only 52VDC was coming out...The needed 33VDC was missing completely!

I have followed the schematics and that lead me to find the first victims: C22 and C23 both 47uF/50V. I have used an Capacity/ESR meter and found both completely dead, ZERO.

Replaced them with two good quality Nichicon caps of the value as the original, but rated for 105 degrees Celsius. I am assuming the original ones dried out due to heat, as they were not a good quality anyway (Samxon).

Excited enough, I gave it a test and...NO GO !...The damn 33Vdc was still not present..

It just didn't make any sense, since the schematic is sooo simple on that side...I soon realized that either the transformer is fried or...maybe R27. Actually it turned out to be R27 ! NOTE: on the diagram is listed as 4.7ohms/ 1/2 watt. The color coding on mine said 41ohms, which is non-standard, unless the colors went nuts ! I have replaced it with a 47ohms 1/2 watt.

So, thunderdem0n you were on the right track ! I have replaced it and then just like thunderdem0n said, I have started seeing a bit of smoke coming out and I've cut the power right away...Bizarre. Why would that happen???

Well, keep on reading as it gets really interesting.

I figured that it must have something to do with an excessive load on the 33Vdc rail. Therefore I have disconnected J1 connector that goes to the I/O board. Surprise !!! No smoke and my voltages are normal now !!!

It's time to check the I/O board for culprits: checked all the electrolytic caps on my 33Vdc rail, but all turned out to be in perfect shape (C24,25,26,28,29). Hmmm, what gives then? The U1 and U5 ic's are the next, as they are supplied by +15V and -15V through U2, U3 and U4 stabilizers (which checked out ok too). It was enough to put the meter on pins 4 and 11 of the U1 and U5 to find a resistance of 1ohm across !!! Ahaaaa, gotcha !

While I was preparing to pull these IC's off the board to see which one is fried, I had to remove the 20 pin connector J2 that goes to the Amplifier board. For some reason (luck or inspiration ?) I have re-checked across the pins 4 and 11. Guess what?- the short was gone !!! Thank goodness it's not the I/O board !

Ok, now what ? Time to check the Amplifier board for the shorted component. Looking at the schematics, you'll see that +15Vdc and -15Vdc are powering the ic's U0 and U1 on pins 4 and 8. A quick check with the meter confirmed the short across these pins. Ahaaa, we're getting very close !

Eeny, meeny, miny, moe ?! It would be nice, but we're talking about 10 smd ic's which all looked great, no overheating or smoking signs at all.

Oh well, I've got so far, so I might as well start removing them one by one. NOTE: a heat gun soldering/desoldering station is required for this, otherwise it would be a nightmare..

Don't panic, read on !

After removing all the red/black wires for the speakers, I could see much better the Amp board, and the REVELATION came in all it's intense beauty (yeah right...). I have found the culprits without removing the IC's !!!

It turned out to be 2 tiny brown smd caps C9 and C10 which at a closer look (thanks to my magnifying glasses) were clearly showing a crack through them and signs of overheating !!! They are mounted in series over +15V/-15V rail and they have failed miserably by shorting out !

One mention here: the schematics of the Amp board represents only one speaker channel, so in real life, on the board, you'll see the circuitry x 5 times (one for each speaker), therefore the caps will be numbered as C109, C209, C309, C409, C509 and C110,210,310,410,510 respectively.

In my case, the victims were C309 and C310. It doesn't mean on your board the same ones will fail. You'll have to check them all !

Once I have removed them I could confirm the shortcircuit disappeared.

Since they are not marked and the scematics do not provide us with the value, I have assumed they must be standard 100nF/50V, which are very common- typically mounted across the power pins of IC's. You can find them on a lot of boards that you keep for parts in your closet (at least I do...:)) .

I have replaced them, reconnected everything the way it was, and.....SUCCESS !!!!! Houston we now have ignition ! :cool:

One more word of advice: when you remove the speaker wires off the Amp board, you may want to tie them in pairs (red/black) using some painters tape and write on the tape the designation of the speaker - FR, FL, RR, RL and SUB, otherwise it would be almost impossible to tell which was the original location.

So, to conclude the detective work here's the reconstruction of the "crime":

1- the two electrolytic caps C22 and C23 gradually dried up and eventually they became non-existent

2- the now unfiltered 33Vdc made it's way to the Amp board, where probably a nice voltage spike killed the two smd caps C9 and C10.

3- in return, the caps shorted out the main +/-15Vdc, which overloaded the 33V secondary circuit on the DC-DC board. The resistor R27 was the first to give up acting as a protection fuse...

Please ALWAYS take the necessary precautions when performing any work on the circuits while connected to power, as there's LIVE 110V and even HIGH-VOLTAGE going through the boards = high ELECTROCUTION HAZARD.

Story being told, I'd like to thank everybody for their help with schematics,photos and tips and wish you good luck reviving your Klipsch and I'll be more than happy to answer any related questions.
 
Last edited:
I have a problem similar to x33.

My r12 resistor went. I replaced it (and the r26 one to be safe) but the c309 surface mount is completely toasted as well. Any one know a replacement for that?

After replacing the resistors I tried running it without anything in c309 (I removed the surface mount and cleaned the joints). I didn't get any power to the preamp (which I'm not sure would be expected or not. Everything else looks good and after leaving it running for a bit (no more than 15-20 seconds) nothing seemed or smelled wrong.

This is the only thing I have left to fix I just don't feel like it would still be causing no power to the preamp.

Also, I don't think it may be possible, I'm pretty sure there should be 2 silver squares under the surface mounts. However, when c309 blew it looks like it took a chunk of the board with it (one of the squares is missing, but it didn't go all the way through the board).
 
Last edited:
I replaced a resistor on my Promedia 4.1 and now it's working again!


Long version: I bought a Promedia 4.1 10 years ago and after some years of use, the rear left satellite did not produce any sound. As someone who didn't know how speakers worked other than that they should make noises when you turn them on, I sent it to Klipsch for repair. The new set worked great for a while but one day it could not power on (when I press power it goes out). So I left the 4.1 in the garage hoping that some day I would get it repaired on my own(Klipsch had declined to receive it for repair because the product was out of warranty or end of life or something like that).

Fast forward to today, after reading a bunch about Promedia's and all the problems people had with them, I decided to try to fix it myself. There were some folks on eBay who do repairs on our units but the quotes they gave me were a little too much for me ($80+ not including shipping). So armed with a $10 multimeter and a $15 soldering kit and crash course DIY videos on youtube, I checked the resistance on the 2 most promblematic resistors that plagued the 4.1 set: the R12 and R26 resistors. R12 showed proper resistance but R26 was completed dead (no resistance at all). So a quick trip to Radioshack was in order I came back with a 4 pack of 47k Ohm 1W resistor and replaced the R26 resistor. Just as I was applying heat onto the joint I came to realization that the soldering kit didn't come with a solder wick. No matter, I used a needle-nosed plier and pushed the resistor ends through the hole as I heated the old solder (yes it was a hack job!). After a mild burnt finger tip (that soldering iron was hot!) and 15 mins later, voila!, the 4.1 set is alive again! and it sounds good, much better than my creative set.

I was lucky that my set did not have other problems that plaged some sets. If you have a 2.1, or 4.1, or 5.1 Promedia's don't be afraid to open that sucker up and look for bad parts. You could bring a dead set back to life!

My hack job:
IMG_20111023_201012.jpg


Here are some resouces I used:

http://www.thompdale.com/bash_amplifier/bash_amp.htm

http://hardforum.com/showthread.php?t=975613&page=9

http://hardforum.com/showthread.php?t=1268387

http://hardforum.com/showthread.php?t=975613&page=9
 
Thread necromancy here! I just attempted this repair and in my rusty, sleepy state, I grabbed a 47-ohm resistor instead of 47k and dropped it into R26. Obviously, it didn't work--the fuse blew in a glorious show of light.

At this point, I'm game for replacing it again with the correct part, but something nearby did seem to smoke. Every other component on the same board tests fine so far and nothing looks burned, any other suggestions or guesses as to what other damage is done?

(Kids, stay off the iron when it gets late)
 
Thi thread goes way back, but keeps rising from the dead due its wealth of info. Of course, I've never paid it any mind until my 4.1's crapped out the other day.

My issue revolves around the initial AC-DC rectification circuit. My fuse will blow as soon as the cord is plugged into the wall. I've disconnected the DC+/- lines that go to the DC-DC inverter, which effectively isolates the circuit to:

AC input ("L" and "N")
220uF cap
some sort of MOV
bridge rectifier
torroid transformer (19 coils per side)
DC +/-

The 220uF cap was removed and checks our fine. It reads 221uF on my Fluke model 111 DMM and the resistance builds to infinite over a period of a couple of seconds when tested. I removed the MOV and tested the resistance, but I can't recall what is was off the top of my head. I am in the process of removing the bridge rectifier and checking the diodes. I suspect that one of them has given up the ghost and creating a short. Hopefully Radioshack will have a desoldering heat gun or somesuch.

UPDATE: My bridge rectifier was shorted out. One of the internal diodes was bad, allowing 120VAC to pass straight through. I ordered a new one (well, actually 3 new ones) rated at a higher amperage and voltage. I also ordered the resistors mentioned in the linked repair page. So far, so good.

 
Last edited:
Not sure if anyone can point me in the right direction but what the hell. I have a set of the 4.1 Promedia's and today my subwoofer gave out however upon closer inspection if I put my ear right onto the subwoofer I can just barely hear it pumping away. All my satellites work fine it's just the sub and I have tried adjusting the sub volume as well as giving them a warm up period but no go. Anyone have any suggestions?
 
Not sure if anyone can point me in the right direction but what the hell. I have a set of the 4.1 Promedia's and today my subwoofer gave out however upon closer inspection if I put my ear right onto the subwoofer I can just barely hear it pumping away. All my satellites work fine it's just the sub and I have tried adjusting the sub volume as well as giving them a warm up period but no go. Anyone have any suggestions?

Sounds like the amplifer for the sub has gone out or the cross-over has failed, or perhaps the subwoofer pot has failed. Open up the back and check the resistance of both subs independently. I think they are each 4ohm, but don't quote me on that. Since your satellites work fine, that eliminates the AC-DC converter, which was my problem. I would use the schematics provided on the other page and try to track down the faulty component.

 
Great thread! My Klipsch 4.1 speakers which have served me day in and day out for the last 10 years has started making a crackling noise when the volume levels rise.

I plan on tearing into it this weekend, but was wondering if anyone knows where I should start looking. I'm getting power, and all speakers are pumping out sound. The crackling comes from all the sattelites simultaneously, so I don't think it's a single channel failing. I'm thinking it might be the cross over circuit, but wasn't sure if that's in with the sub, or the pod.
 
Do you get the noise when you are actually adjusting the volume, or when the volume is set high (and you are not adjusting the knob)?

I would start with the guides listed above. Replace all of the components that are weak ( R12, R26, etc). Per my question above, if the noise is present when you are NOT adjusting the volume, this typically means that the issue is power-dependent, ie more power is flowing through your circuitry, causing a component to act poorly. This may get fixed if you replace the resistors per the linked guides. I have some extras that I ordered when I fixed my unit, that I'd be willing to sell cheap. PM me.

In addition to the resistors, this may be coming from a failing bridge rectifier, which was my problem. If one of the diodes in the rectifier is intermittently failing (especially with dirty/noisy incoming power) it could be passing AC onto your amplifier circuitry, causing spikes in power, which equates to crackles when it reaches your speakers.

You can try to download some test tones or a digital cross-over/equilizer. Use the tones to see if you get the crackles at all frequencies. Note that at high frequencies try not to turn it up too far as the tweeters are not typically designed for this much power. If you can't find any tones, you can try using an EQ or similar to reduce the strength of all but one slider.


Well a few years back I started getting the static sound when adjusting the volume. Every so often I open up the pod and clean the pots, which makes it go away for a bit.

This problem occurs without touching the volumeknob. I hear a very loud crackling noise. It is most noticeable when listening to music. As the music peaks, the sats start to crackle in unison. Not like you would hear on a blown speaker, but just this odd crackling sound.
 
Troubleshooting part 1:
Try using headphones connected to the headphone jack on the control pod. If you do not hear any crackling, then the issue is in the circuitry inside the main amp (located inside the subwoofer box). If you notice the crackling with the headphones, then the issue is inside the control pod.

 
Well I opened up the sub, and R26 was pretty much fried. I put it all back together until I can grab a new resistor, and now all I hear is a hum which increases in octaves like some one playing scales. No other sound is coming out at all. I'll try the headphones test when I get home.
 
Here's my recent saga of fixing the Klipsch ProMedia 4.1:

The first thing I noticed was a popping noise when I turned the speakers off. Soon after that while my new Razer headset was plugged into the control pod, the earcups really heated up and the sound in the ear cups went out. Unfortunately whatever problem the Klipsch had killed that headset (although the mic still works). After a couple days like that, the speakers gave a louder popping noise and there was a slight burned electronics smell and the LED power light faded off.

After internet research, I opened up the amp. I ordered and replaced 3W resistors for R12 and R26. R12 (I think) had darkened the PCB and even cracked it a little bit. Luckily I could still solder to the through holes. Anyway, that didn't fix the problem. Rats! :mad:

After more research - took the DC-DC converter off and tested R27 - it was bad. This was the component that got burned and gave off the smell. Replaced it with a 3W unit and tried it again. Within 1 second of plugging everything back in, I heard a sizzling/crackling noise and smell that burned smell again. Opened it back up and sure enough, that brand new resistor was toast. :rolleyes:

More research. Learned some basic EE - studied the circuit board diagram as best I could, talked to coworkers. I decided to remove C22 and C23 right near R27 on the DC-DC board. One of them tested bad with my capacity meter. After replacing those two with identical capacitors (but with improved 105° C heat handling), I plugged the amp in by itself and the resistor did not burn out. Encouraged by this, I plugged in the control pod DIN and tried again ...within a second, I heard crackle noises and immediately unplugged it from the wall. The 4.7ohm resistor is a little bit brownish in the center now, but it still tests ok with the ohm meter.

Reasoning that something on the DIN connector side was causing the problem, I opened up the control pod again (I had looked at it before but had not noticed anything). It took me a minute to realize that one of the op amps was cracked and a little burned!

DSC_0055_smaller.jpg


Up close:
DSC_0054small.jpg


So I ordered a replacement op amp from Mouser. It's a Texas Instruments NE5532P just like the one next to it. Less than $1.

Replaced it:

DSC_0060cropped.jpg


It's not very easy to replace because the back of the board is covered in hardened epoxy. I was able to remove a lot of the solder from the legs using my iron and copper solder wick. Then I kept heat on it and kept tugging with needle nose pliars. The dead op amp broke into quite a few pieces, but I was able to clean the holes enough to prepare them for the new part. I used a cheap 40w plug-in Weller iron for the first half of this project, but then I got a used temperature controlled Weller soldering station from work and that helped.

IT LIVES!!! I guess the dead op amp was the root cause, and it made R27 burn out. If any of you keep blowing R27, check the amplifier board and check the control pod circuit board. :)
 
This thread has saved me quite a bit of money, and major thanks go out to the OP and everyone else involved in the DIY fix of the Promedia 4.1

I too noticed major static issues after unboxing my 4.1s following a recent move from state to state. The static was especially bad if I wiggled the volume knobs on SURROUND and MAIN.

Internal examination of the sub showed a cooked R26, which I replaced with a 3W variant (Thanks, OP, for the suggestion!)

Static still present, and a check of the headphone jack also showed static if the volume knob was turned. Ah-hah, issue is in the control pod, specifically the pots.

Only thing is: after squirting some contact cleaner onto the joint between the moving element and the fixed pot, the static is still present. Granted, it's been greatly diminished, but it is still there.

Do I keep applying contact cleaner until the problem goes away? Or is there an access port I can open somewhere on the pot? If anyone knows of a drop-in replacement part for these little bastards, please let me know!

(Yes, it's literally been years since I last posted. That's why the sig is so dated. :) )
 
I was able to apply the fix to the R26 and R12 resistors. Sound works great now except for my front left channel. It comes through very weak. If I adjust the volume I hear static and eventually it may produce a normal sound out of it.

Any ideas? I've checked the resistors on the main amp board for that channel. They look good.
 
How does it sound when you plug in headphones to the pod? If it sound okay, then the problem more than likely is within the main amp circuitry. If the headphone channel sounds bad, then the problem is within the pre-amp circuitry in the pod.

My first guess would be the pod circuitry.

 
When I plug a headset into the pod, the music still comes out of the speakers. Is that suppose to happen?

The audio is very quiet out of the headset and I have to crank up the volume through the head set. It has it's own volume control.
 
When I plug a headset into the pod, the music still comes out of the speakers. Is that suppose to happen?

The audio is very quiet out of the headset and I have to crank up the volume through the head set. It has it's own volume control.

You should be able to turn off the speakers (the red light should come on), plug in your headphones, and still hear normal sound from the headphones.

How is the volume slider adjusted within the OS? Sometimes the volume in the OS is turned way down, forcing you to turn up the speakers greatly, causing excessive static.

 
That works. There is static when i turn the volume control but sounds coming through clearly.

I normally use a headset that has it's own volume control. WIndows volume is at max even when I use the speakers. I just adjust the volume through the volume knob.

I read someone who stated they cleaned the pod with some solvent. I suppose that wouldn't hurt as well.

Any recommendations on what to use to clean the electronic components in the pod?
 
I normally go to an auto parts store and get some MAF sensor cleaner. It is residue free and safe for electronics.
 
I've not read the thread so apologies if this has been covered but if you're getting static from one of the pots, best thing to do is get yourself a bottle of red deoxit and spray it liberally inside each of the pots, this will clean up the contacts.
 
Mine died the other day. After seeing this thread I'm tempted to crack it open and see what got fried. All I get is massive static out of it right now.
 
I was looking at deoxit. Do I spray it on the control pod and it's components or in the jack where the speaker cable plugs into (or both)?
 
Just to give an update I bought some Deoxit and sprayed it on the components of the pod unit as well as the ports where the speaker wire connects to plus the connection from the woofer to the pod unit. Sound is much better. I still lose some volume out of the front left speaker when I turn the volume knob but it's not bad. A slight adjustment and it usually plays fine. Something I can live with.
 
Thanks for all the information. My Klipsch Promedia 4.1's recently stopped working and upon opening the control pod the part labeled U5 is cracked. The schematic (http://www.thompdale.com/bash_amplifier/4-1/4-1_bash_amp.htm) does not match what I'm seeing so I'm not exactly sure what U5 is...

This is the second time I've had to repair my control pod. I just can't seem to justify spending money on new speakers.
 
post a photo and I will see what I can do to help.


Thank you for the offer. I was able to determine it's a TL084CN OP-AMP, which I can buy online for $1.00. While my soldering skills and my soldering iron aren't the best, I think I can manage it.

Well, successfully removed the chip. The new OP-AMP will be here Monday. I already purchased a 10" sub and Energy Take Classic 5.0 speakers but I might as well fix these up :)

https://dl.dropboxusercontent.com/u/24697861/DesolderingKlipsch.JPG
 
Last edited:
I replaced the chip successfully but now I am having a completely new issue.

While the subwoofer was powered on an animal chewed through the power chord and caused a short circuit. I repaired the chord but now every time the unit is plugged in it blows a fuse... I isolated the IO board and the problem persists but I do not see visible damage besides the fuse posts being blackened. What would a short-circuit damage that would cause it to blow fuses instantly?
 
Last edited:
You will need to try to isolate whatever components that you can from the incoming power and check them with an ohmmeter. You are looking for a source of low/no resistance. Within my unit, one of the diodes within the bridge rectifier went out and caused a similar issue. It looks like a tall, thin, black block with a hole through it and 4 leads.

 
Back
Top