I just finished my new dragon case last week and wanted to praise xoxide for all of their help. None of this would be possible without the superior customer service of Jason at xoxide.com:
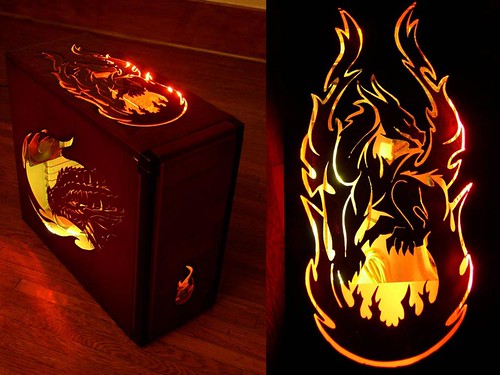
To stave off some of the questions, here's a brief description. I began with a sketch of a red dragon I had done and a concept of how to work this into a Dragon themed case. The case started out as a beige AMS CF-1729. The side vent holes were hammered flat and smoothed over with Bondo. The Red Dragon on the side was cut using #409 cut off wheels and a #9909 tungsten cutter with a Black & Decker RTX.
The top center dragon was cut out of 1/8 Plexiglas using a scroll saw and then painted on the underside. The profile was enlarged 1/8 all around and cut into the top panel. I wanted the case to have texture so a scaled pattern was sculpted into a thin layer of clay on the top panel and then covered in fiberglass resin.
Keeping with the fire theme, I cut a fireball design into the front panel, removing the power switch and relocating the reset switch and LEDs. The resulting holes were covered with Bondo. A power switch for the lights was installed next to the front audio and USB ports.
The entire case was primed and then painted with Dupli-Color Toreador Red. Black was then airbrushed around the edged of the cutouts and at the bottom of the case to fade the paint to a deep red-black. With the paint complete, all of the Plexiglas was attached using Loctite 2 part epoxy. A red dot Bulgin switch was installed in the center of the fireball and backlit with a 4 LED 120mm fan. The top design was lit with 2 12 red cathodes while a single yellow 12 helped to light the design on the side. Additional photos of the case can be found here.
