• Some users have recently had their accounts hijacked. It seems that the now defunct EVGA forums might have compromised your password there and seems many are using the same PW here. We would suggest you UPDATE YOUR PASSWORD and TURN ON 2FA for your account here to further secure it. None of the compromised accounts had 2FA turned on.
    Once you have enabled 2FA, your account will be updated soon to show a badge, letting other members know that you use 2FA to protect your account. This should be beneficial for everyone that uses FSFT.

Project: Rogue (NZXT SFF)

i cant wait to see the finished result but please dont rush it .. ... its too dam sweet to rush

anyway i got my Rogue and was amazed at the quality .. attempted to ATX mod the box but ....... i rushed it :D and with the striker II installed but before cutting the back panel out i popped in a 9800GX2 ... it was pressing up against the dvd cage so hard it was leaning in an angle ... so since i need it for work soon i popped in a mATX board .. went with the ASUS P5E-VM HDMI and i have to tell you it totaly amazed me with its OC'ing options in the Bios ... the kinda options usually only found in big boy boards anyway i paired it up with an E8500 and so far its running a 24/7 OC @ 4.0ghz @ only 1.27v ... CPUz

anyway full system specs
E8500 @ 4.0ghz and counting ( stock HSF from my QX9650 on Vapo LS )
EVGA 9800GX2
2 74gb raptors Raid 0 w/500gb seagate storage
GEIL Esoteria DDR2 800 @ 1000mhz @ 2.25v
20X DVDRW & Tagan BZ 700w Modular PSU
replaced all fans w/ 3pin 120mm Red LED fans

anyone needing a mATX board that OC's like mad supports 45nm Chips and 6 SATA ports with ICH9R Raid support looks no further than Asus P5E-VM HDMI
 
What a busy weekend! I've made a little progress on the Rogue, but even more on the basement...

rogue261go9.jpg


rogue263ny2.jpg


rogue262tk7.jpg


Each bedroom has a recessed pocket for a desk...

rogue265nm4.jpg


rogue264ns5.jpg


rogue266ro4.jpg


Taping and finishing started!

rogue275eb4.jpg


rogue276yu8.jpg


So, how about the Rogue? Here I've got the front of the case installed. Maybe someday I'll actually get started on that door...

rogue267ck6.jpg


The motherboard sitting in place. I've not screwed it down yet. I may need to move it a little to get the second radiator in place...

rogue269th0.jpg


Okay, so what now? I've got a little wiring to finish. I need to make a custom cable for the LCD screen and the Via. Due to the way that the Via is situated, I need more clearance above it, than I currently have. There's no way a normal VGA connector would work... not if I wanted to clear the fans on the top of the case anyway. So, a little bit of old-fashioned hackery was in order.

Here I've got the stock VGA cable.

rogue271qv7.jpg


A few minutes later...

rogue272yd2.jpg


That should about do it... almost... I still need a little more clearance.

rogue273tm3.jpg


About 45 seconds with a heat gun, and I was left with this... Up next, I'll clean it up a little more, and sleeve it...

rogue274bo9.jpg
 
Thought you guys were going to cut in a bigger window? I am not sure about building codes in your area, but you need a certain amount of square footage of window exit for a bedroom to be considered a bedroom in a basement. At least it was when I changed a room in our basement into a bedroom and wanted to be able to list the house with 4 bedrooms and not 3.

Can't wait to see the Rogue done. It's gunna be sweet!!!
 
Thought you guys were going to cut in a bigger window? I am not sure about building codes in your area, but you need a certain amount of square footage of window exit for a bedroom to be considered a bedroom in a basement. At least it was when I changed a room in our basement into a bedroom and wanted to be able to list the house with 4 bedrooms and not 3.

Can't wait to see the Rogue done. It's gunna be sweet!!!

Doesn't it fall under the emergency egress rule for an occupied room (non-storage area)? At least one window must be of sufficient size to permit the occupants to escape a fire and also to allow a fully outfitted firefighter to enter. I also remember something about international residential codes or something that gave minimum specs for window sizes. Anyway back on topic, the case is looking amazing and I am truly envious of your skill with SFF cases :D
 
LOL international building codes......lollerskates......i work construction and i once asked the local instructor about the IBC's and he just started laughing, anyways that basements looks sweet, i really cant wait to build a house with a basement so i can have a sweet home theater.

ON TOPIC.....
the rogue is intense, hope you get some time to finish up some more on it so we can see more pix.
 
Yeah, in order to be considered a bedroom, it needs a window large enough to meet egress codes. You're right about the fully equipped fire fighter being able to get through, it's something like a 20sqft opening, with minimum dimensions on height and width. You can get away with not adding a larger window by calling it an office, but when it comes time to sell the house, you wouldn't be able to count it as a bedroom if it doesn't meet egress code. That's the case where I live anyway, not sure what the codes are there.

Back on topic though, both the basement and the Rogue are looking awesome!!! I have been looking for a new case, as what I have now just doesn't cut it for the cooling I need. How well does that Rogue perform on just air?
 
Thought you guys were going to cut in a bigger window? I am not sure about building codes in your area, but you need a certain amount of square footage of window exit for a bedroom to be considered a bedroom in a basement. At least it was when I changed a room in our basement into a bedroom and wanted to be able to list the house with 4 bedrooms and not 3.

Can't wait to see the Rogue done. It's gunna be sweet!!!

Doesn't it fall under the emergency egress rule for an occupied room (non-storage area)? At least one window must be of sufficient size to permit the occupants to escape a fire and also to allow a fully outfitted firefighter to enter. I also remember something about international residential codes or something that gave minimum specs for window sizes. Anyway back on topic, the case is looking amazing and I am truly envious of your skill with SFF cases :D

LOL international building codes......lollerskates......i work construction and i once asked the local instructor about the IBC's and he just started laughing, anyways that basements looks sweet, i really cant wait to build a house with a basement so i can have a sweet home theater.

ON TOPIC.....
the rogue is intense, hope you get some time to finish up some more on it so we can see more pix.

Yeah, in order to be considered a bedroom, it needs a window large enough to meet egress codes. You're right about the fully equipped fire fighter being able to get through, it's something like a 20sqft opening, with minimum dimensions on height and width. You can get away with not adding a larger window by calling it an office, but when it comes time to sell the house, you wouldn't be able to count it as a bedroom if it doesn't meet egress code. That's the case where I live anyway, not sure what the codes are there.

Back on topic though, both the basement and the Rogue are looking awesome!!! I have been looking for a new case, as what I have now just doesn't cut it for the cooling I need. How well does that Rogue perform on just air?

Just an FYI guys, the windows you see in the picture belong to the family room (and the area close to where my office is planned). The egress window hasn't been put in yet. We had to special order it, and once it arrived... it rained for a week straight. We actually started digging the window well tonight. I'll post pics of that as we progress. I appreciate your safety concerns though!

Oh, and thanks for the positive comments on the Rogue! :D
 
Update time baby!

I'll start off with a little basement recap. As I mentioned earlier, I needed to put an egress window in one of the bedrooms. To do that, I needed a hole... A shovel and concrete saw, got me this far...

pic029ye5.jpg


pic028vp0.jpg


pic009wp3.jpg


I've got no pics with the window installed yet, but they are coming. With the window installed, we've been busy hanging a little more rock, and doing some finishing work. Since I've been neglecting progress on the Rogue while working on the basement, the fiance said she was willing to help me out. She can put screws in like a pro. I told her it wasn't bad for a girl. :D Actually, I told her I was going to put pictures of her 'screwing' on the internet...

pic024du5.jpg


pic025hy9.jpg


Well, enough basement work, let's get on to the Rogue! Assembly, assembly, assembly... that's where we are at. I've got just a small amount of fabrication left, but I need to get some things put together first. What you are about to see, represents hours worth of work, but I'm not sure a few pictures represent that. I may be pretty good at packing things in small spaces, but there is one downside, assembly is a pain!

The second radiator has rejoined the case!

rogue277rw0.jpg


rogue278ge9.jpg


See the wiring for the switches? Um, yeah, I need to get some 3/4" tubing through there. I knew it would be tight, but damn...

rogue279se9.jpg


Finally, the tubing is in place. Sure, it's tight, but it's still clean. Yeah!

rogue280wa9.jpg


rogue282qu3.jpg


Up next, more tubes!
 
ur gonna run out of room pretty fast there Craig. What about using smaller dia. tubing?
(the metal coil from Koolance is thinner , can bend tighter and will last a LOT longer than the plastic stuff)

Im using bendable copper tubing for my new rigs (the tubing gets rid of a bit of heat the water is carrying compared to plastic which retains the heat)

PS: the case looks beautiful.
 

Thanks man!

ur gonna run out of room pretty fast there Craig. What about using smaller dia. tubing?
(the metal coil from Koolance is thinner , can bend tighter and will last a LOT longer than the plastic stuff)

Im using bendable copper tubing for my new rigs (the tubing gets rid of a bit of heat the water is carrying compared to plastic which retains the heat)

It'll be tight, no doubt. Believe it or not, this is the second time I've actually laid out the tubing. The first time was about 2 months ago, when I was trying to get the case done for Netwar. The layout wasn't bad at all, but I've revised it a little this time around. I probably could have/should have, went with a smaller tubing, but the purchase was already made. It may not look like it, but to change tubing at this point would be relatively easy in the grand scheme of things. Got a link to the copper tubing?

Oh, and thanks!

PS: the case looks beautiful.

thanks for the update.

No problem man. The best stuff is yet to come!
 
"SCREWING ON THE INTERNET!!!" LOL, the basement looks like it is turning out pretty damn awesome. Man I can't wait to see how this case is gonna look all buttoned up and finished.
 
How about some more assembly? I've got several small things that I've been working on. Not a single one of them are very large (well, with one exception), but they all are needed just the same. So, let's get on with it!

One small problem... I needed to make a new mount for the Via system. The following pics will show you exactly why.

The fan assembly on the case...

rogue287eo3.jpg


Here you can see the problem. The VGA output on the Via, is directly below where the contacts for the fans need to be. There was no way to modify things to fit, so a new mount was needed.

rogue288ol0.jpg


Here I've got the new mount marked out, and ready for cutting.

rogue290lx5.jpg


Cutting done, and ready for bending. (I'll get the finished pics up tonight hopefully)

rogue291zw3.jpg


After the bracket was bent and painted, I decided to move on to a few other things while paint dried. One of the things I did, was to drop the auxiliary PSU in to place and double check fitment. Fits like a glove!

rogue283py5.jpg


There is minimal clearance on both sides, but it's pretty much what I expected.

rogue285br5.jpg


rogue286on2.jpg


Another small project... Due to the numerous wires surrounding the motherboard's 8 pin connector, it was virtually impossible to connect the PSU cables after assembly. Obviously, I wanted the PSU to be relatively easy to remove. So, to fix that little problem, I bought a pair of 8 pin connectors...

rogue294oj9.jpg


I found a suitable location on the PSU cable...

rogue295gr5.jpg


I painted the connectors black, and installed them inline... I can now plug in the PSU cable, in a much more convenient location.

rogue297yi5.jpg


More coming soon...
 
looking great, the basement i mean... but i love the theme, of the computer... sooooooo, does the computer go in the basement? or are these just parallel projects? will the basement match? lol
 
looking great, the basement i mean... but i love the theme, of the computer... sooooooo, does the computer go in the basement? or are these just parallel projects? will the basement match? lol

Lol, thanks. The basement and computer are two parallel projects. I just mentioned the basement work taking away from my modding time, and people wanted pics. I figured I might well show updates on that too. :D

BTW, the basement won't match...
 
I painted the connectors black, and installed them inline... I can now plug in the PSU cable, in a much more convenient location.

sorta DIY modular cables, v/nice :) also helps keep you from voiding the PSU warranty (though i'm guessing you don't care, and may have already done so anyway).
 
...voiding the PSU warranty (though i'm guessing you don't care, and may have already done so anyway).

Warranties are for pansies! :D

Anything I'd say here will basically mirror anything I'd say or probably already have said over @ Bit-Tech, so just wanted to say the Rogue kicks major ass, Craig! Can't wait for you to get the beast together, just in time to start on the next build. ;)
 
Warranties are for pansies! :D

Anything I'd say here will basically mirror anything I'd say or probably already have said over @ Bit-Tech, so just wanted to say the Rogue kicks major ass, Craig! Can't wait for you to get the beast together, just in time to start on the next build. ;)

Warranty? I've never needed one in my life, so why worry about collecting now? :D

Thanks E.E.L. Funny you should mention it... I just had a few parts arrive at my house for the next project... However, it's much smaller in scale. Who wouldn't love a watercooled router though? :eek:
 
Warranty? I've never needed one in my life, so why worry about collecting now? :D

Thanks E.E.L. Funny you should mention it... I just had a few parts arrive at my house for the next project... However, it's much smaller in scale. Who wouldn't love a watercooled router though? :eek:

:p heh i figured you were too [H] for warranties. my dad used to say, "if you ever need to use a warranty, you bought the wrong thing to begin with."
 
I thought you guys might get a laugh out of this. It was created courtesy of MrWizard on the Bit-tech forums...

roguezk2ef3.jpg
 
Eveytime I peak at your worklog, I'm blown away. I want to start randomly mod things around the house with my dremel tool. Great stuff, sir, great stuff indeed.
 
Update time! I'm so close to having this thing running, it's a little scary. This has taken up so much of my time since last November, I'm really going to miss working on it when I'm done... :(

First thing up... a small update on the basement progress. Remember the egress window? Here's a couple shots from inside one of the bedrooms.

rogue298qk0.jpg


rogue299tc4.jpg


Now on to the Rogue...

A few posts back, I mentioned needing a new mount for the Via system. Here are the finished results. Everything now fits perfectly.

rogue300py5.jpg


rogue301sr5.jpg


rogue302mp6.jpg


rogue303ds8.jpg


Next up is the lower mount for the fan assembly contact strips. Here I've got the mount all marked out.

rogue305hx7.jpg


All cut out...

rogue306pi3.jpg


A pair of braces...

rogue307ip3.jpg


Here the mount is bent, and assembled.

rogue309zs8.jpg


Let's see if it fits... Perfect!

rogue308ai2.jpg


Moving on to the contacts... I've mounted them on a strip of square metal.

rogue304cl4.jpg


This jumble of wires represent all the fan wiring. I've got to attach it to the contacts, and sleeve it.

rogue311vz3.jpg


Soldering in progress.

rogue312xx2.jpg


All sleeved! If you look closely, you might see an additional lone wire. That attaches to the motherboard for RPM monitoring.

rogue313fi0.jpg


Finished!

rogue314uf8.jpg


With the fan wiring done, I've moved on to a little more plumbing.

rogue310ep0.jpg


It's pretty much all assembly from this point on. Wish me luck guys!
 
The build looks amazing man, good luck. I'm psyched to see how it turns out.

I still can't get over the fact that you're putting a computer in a computer too... epic win.:D
 
Not just a computer within a computer, but a TEC as well. ;) It's an amazingly original build, and will be awe-inspiring for years to come I'm sure.
 
So, is it running? Not quite, but I've only got about 15 minutes of work until I can add coolant. I was up until about 2 AM last night, and decided to stop for myself... and the Rogue's safety. I was just too tired to continue. No worries though. I'll be off work a little early today to work on it!

Well, how about a few pictures then? Here is the inline temperature sensor...

rogue315nz5.jpg


I revised the tubing layout slightly...

rogue316kk0.jpg


Almost ready to drop the tray in...

rogue317ym0.jpg


Video cards in place...

rogue318bq8.jpg


Testing Paladin (the Via system)...

rogue319gi6.jpg


The tray is in place!

rogue320wb7.jpg


From here, I've got to route two more tubes, and I can add coolant. Expect updates tonight!
 
And I thought you had run out of room a month or two ago, this build just keeps blowing my mind.:cool:
 
I was at a LAN yesterday, and .. what did I see ... ??? THE ROGUE PROJECT! I saw it, in person, with my own two eyes. It's creator explaining stuff to me and showing me how it all worked. I was blown away. I had not seen or heard about this before that day, but I am now looking through this thread and I am impressed at the amount of work that went into it.

NICE WORK CAP'N!

(This is Cuda BTW)

The LAN was http://www.mhoc.net. Check the website out in the next couple of days for pictures of this mod at the party!
 
Congratulations on the reaching the finish line. I'm looking forward to the "as finished" pics.
As a favor when posting the final pics, would you add arrows explaining where everything is located, so I don't overlook something. I'm still scratching my head figuring out how everything was fit into the case.
 
And I thought you had run out of room a month or two ago, this build just keeps blowing my mind.:cool:

i don't know how you keep finding nooks and crannies for all of the components

Thanks guys! I challenge anyone to put more in a case! Come on, I dare ya! :D

I was at a LAN yesterday, and .. what did I see ... ??? THE ROGUE PROJECT! I saw it, in person, with my own two eyes. It's creator explaining stuff to me and showing me how it all worked. I was blown away. I had not seen or heard about this before that day, but I am now looking through this thread and I am impressed at the amount of work that went into it.

NICE WORK CAP'N!

(This is Cuda BTW)

The LAN was http://www.mhoc.net. Check the website out in the next couple of days for pictures of this mod at the party!

Hey man! It was good to see you there! I'm glad Chicken and I came up. We both had a good time, and it was much needed break from my hectic schedule lately. I'm looking forward to those pics, as I forgot to take any myself when I was up there...

Congratulations on the reaching the finish line. I'm looking forward to the "as finished" pics.
As a favor when posting the final pics, would you add arrows explaining where everything is located, so I don't overlook something. I'm still scratching my head figuring out how everything was fit into the case.

Well, there's a difference between a running rig, and actually 'finished'... I've still got a bit of work left to do, but I'll get there yet!

I'll see what I can do about pics explaining where everything is at. ;)

This is amazing!

Thanks man!
 
Well guys, I'm a little behind on my posting here, so I'll give you all a little recap. As of Thursday night, I ran into a little problem... that problem entailed a smoking DDC pump... Well, since pumps aren't supposed to smoke, I was left with finding someplace that would overnight me a new one. This was at about 5:30 PM central time, mind you... Anyway, I finally found one at Sharka, and they had tracking info to me in half an hour. Thanks for coming through for me guys! So, after paying almost $50 extra in shipping, I had a nice little Laing pump taking flight from California!

So, with no pump Thursday night, I managed to get the following work done...

This case is getting custom length cables throughout. I don't have room to stash any extra length, so it's cut, splice, and connect time! This is the start of one of the new SATA power cables.

rogue321sp2.jpg


More pics of assembly (sans pump).

rogue322kv4.jpg


rogue323nj2.jpg


The pump arrived on Friday as scheduled and I got the rig running by 1:30 AM Saturday morning. I ended up getting a few hours of sleep before I had to get up for the LAN. In fact, this is what I posted to my Bit-tech worklog...
It's about 1:30 AM... and the I'm typing this from the Rogue! So much to tell when I get a chance guys, but right now sleep is calling me. I've got to get up for a LAN in a few hours. Oh, and for all of you wondering about temps, the CPU is a frigid -26 degrees. Cooling will not be a problem. Those San Aces rock! Water temp changes with fan speed, anywhere from 33 to 45 degrees. That's only the water temp from cooling the TEC mind you, the freaking CPU is subzero! Yeah!

So, that brings you all up to speed, so...

Okay guys, pic time... What I'd like you to keep in mind, is that the following pics are a little messy. This represents me trying to get the machine running in time for a LAN. I've still got quite a bit of detail work to finish. I'm waiting on a few parts to arrive, then I'm making custom length cables for the video cards. I literally need to take about 18" off of each of them. Luckily the modular NZXT PSU makes the job pretty easy. I'll also recap a few of the problems I had after installation, following the pics...

So, here I'm trying to stuff all the excess cable in the rig. I managed to do it, and still get airflow! You can see here why I need the shorter cables. This thing is a mess! I've also got to shorten and sleeve the pump power cable...

rogue333zr8.jpg


A work in progress pic from the back...

rogue329gk6.jpg


A side shot...

rogue338ab6.jpg


From the front. (I still need to make that dang door!)

rogue341wt6.jpg


Let's light it up!

rogue339xk7.jpg


rogue340ko3.jpg


rogue342nh3.jpg


Now let's take a look at those temps. The reading varies on both Speedfan, and Everest, but it doesn't matter... they are well below 0! Also note the reasonable (considering the case) GPU temps...

rogue343zb5.jpg


rogue345gm5.jpg


Okay, now I mentioned a few problems. For some reason, I couldn't get the front panel power button to work. No matter how I tried, the machine simply wouldn't start with it plugged in. Believe me, I tried quite a few different possibilities, but my time was short, so testing will continue later. Also, for some reason, anything plugged in to the USB hub under the motherboard tray, isn't working. All tested fine before assembly, but nothing is working now. That includes the Matrix Orbital display, bluetooth, wireless, and a thumbdrive for ReadyBoost. I may need to disassemble to investigate. I've also noticed a hairline crack in the reservoir. Nothing leaks, but I may replace it as a precaution. Lastly, the lower LED on the fan controller doesn't seem to be functioning. Not sure why, but I'll get it straightened out as well. All in all, I'm more than happy with it's performance and function. I'll gather the parts I need to fix, and take the time in a week or two to fix what needs fixed. In the meantime, I'll try and finish the long neglected front door. I'll also need to finish my basement above all else. One last thing, I'm going to get some gaming in!
 
Sorry im a little late to the thread! I wasn't even aware of this project until it walked in my front door! Thanks Craigbru for coming to my LAN and bringing that awesome case with ya. Very VERY cool. Here are the better case pics from the LAN, temps picture was half way through the day of gaming if i remember correctly. Special thanks to dagger for taking the pictures because i forgot my camera.

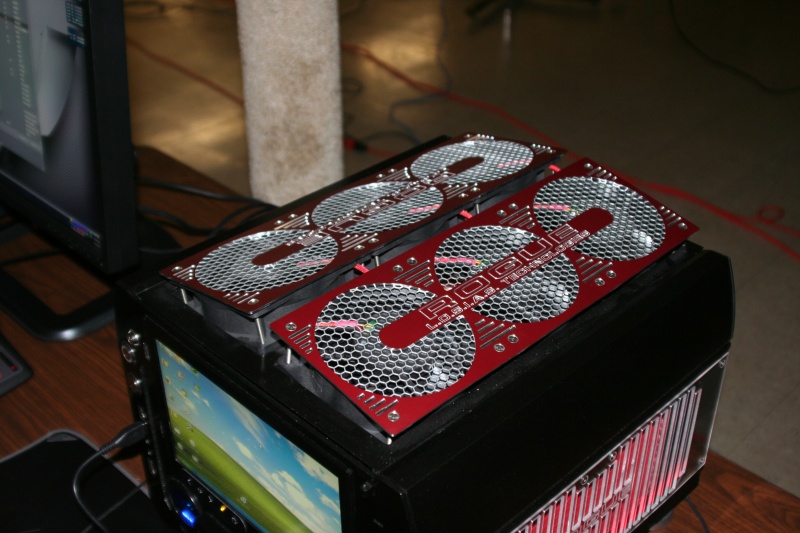
Lights on view of the case
IMG_4928s.jpg


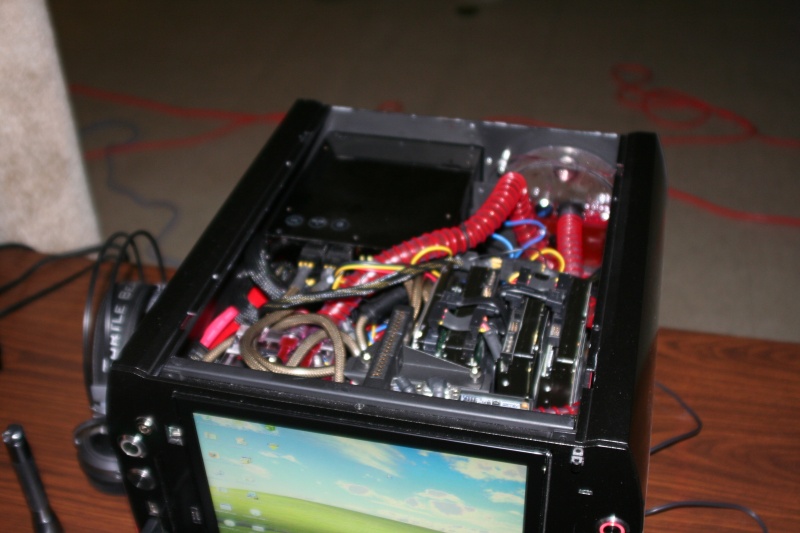
Under the hood (dear god there is alot of stuff in there)
IMG_4926s.jpg


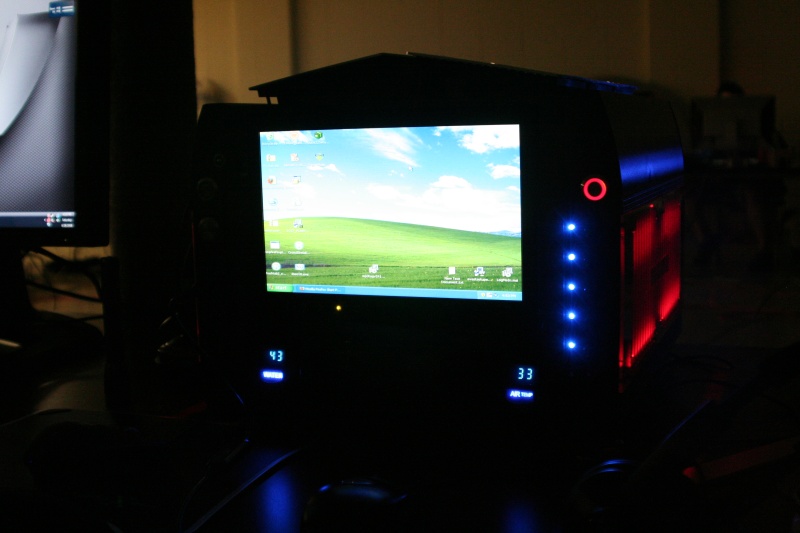
Lights out
IMG_4925s.jpg


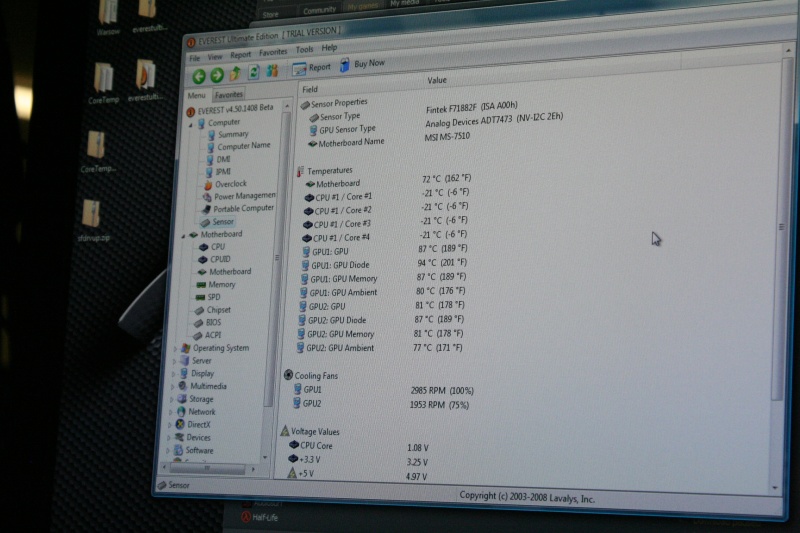
Temps
IMG_4930s.jpg


Hopefully posting this doesn't kill my poor little webhost. :)
 
Back
Top