Navigation
Install the app
How to install the app on iOS
Follow along with the video below to see how to install our site as a web app on your home screen.
Note: This feature may not be available in some browsers.
More options
You are using an out of date browser. It may not display this or other websites correctly.
You should upgrade or use an alternative browser.
You should upgrade or use an alternative browser.
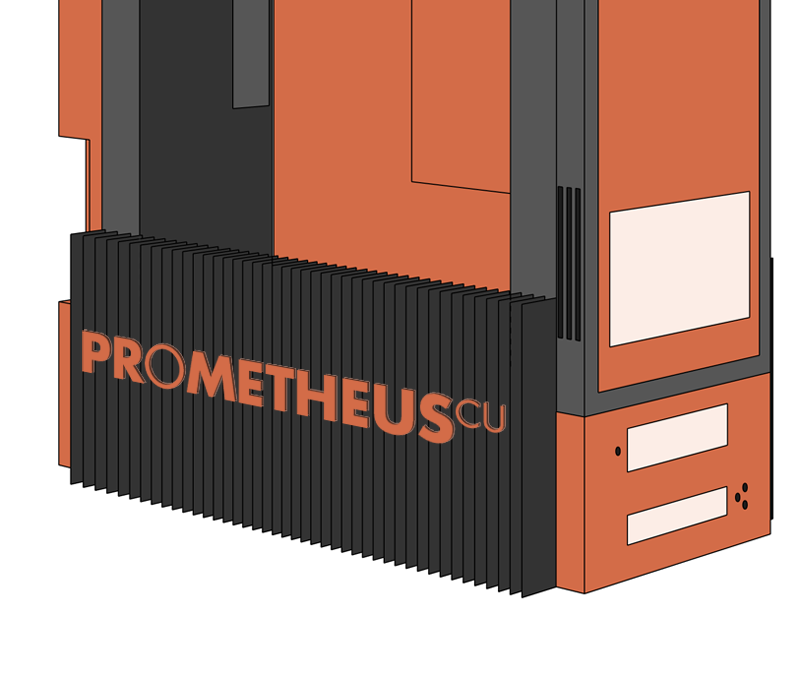
Project: PrometheusCu
- Thread starter SaibotC
- Start date
I definitely don't like the mac look... to mainstream.
I love the Omen and I want one, but a starting price of $11500...I cant afford that right now.
Here's my revision 2, but I've been given ideas for a couple other directions to take it which I'm going to sketch out (one is more like the omen).
*click for big*
I love the Omen and I want one, but a starting price of $11500...I cant afford that right now.
Here's my revision 2, but I've been given ideas for a couple other directions to take it which I'm going to sketch out (one is more like the omen).
*click for big*
Concentric
[H]ard|Gawd
- Joined
- Oct 15, 2007
- Messages
- 1,029
Wow, impressive stuff. Is the workshop in your basement?
I really like the concept on this page., Add a few LEDs on the bottom and it'll look sick. In this concept are you still using the carbon fibre? I think the copper would look pretty cool but i'm not sure how that will look with the carbon fibre side panels.
Here is another idea for feet, inspired by the Omen.
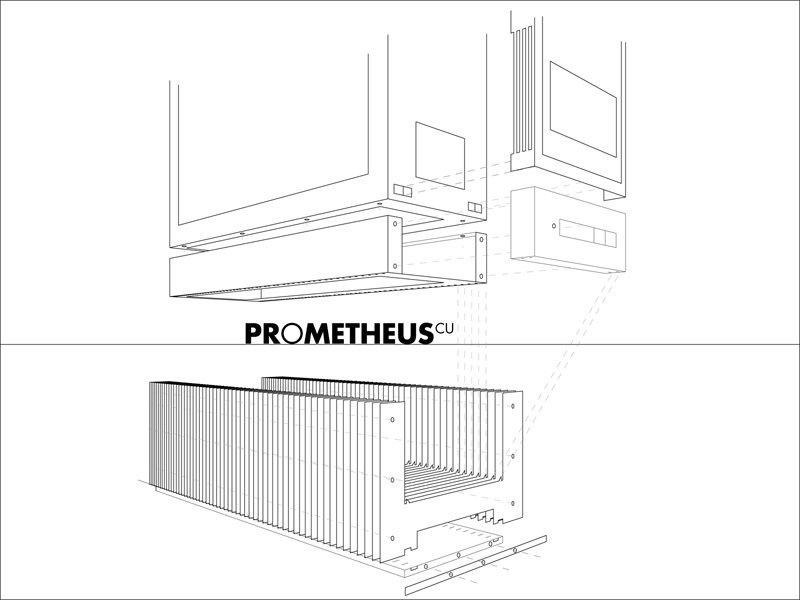
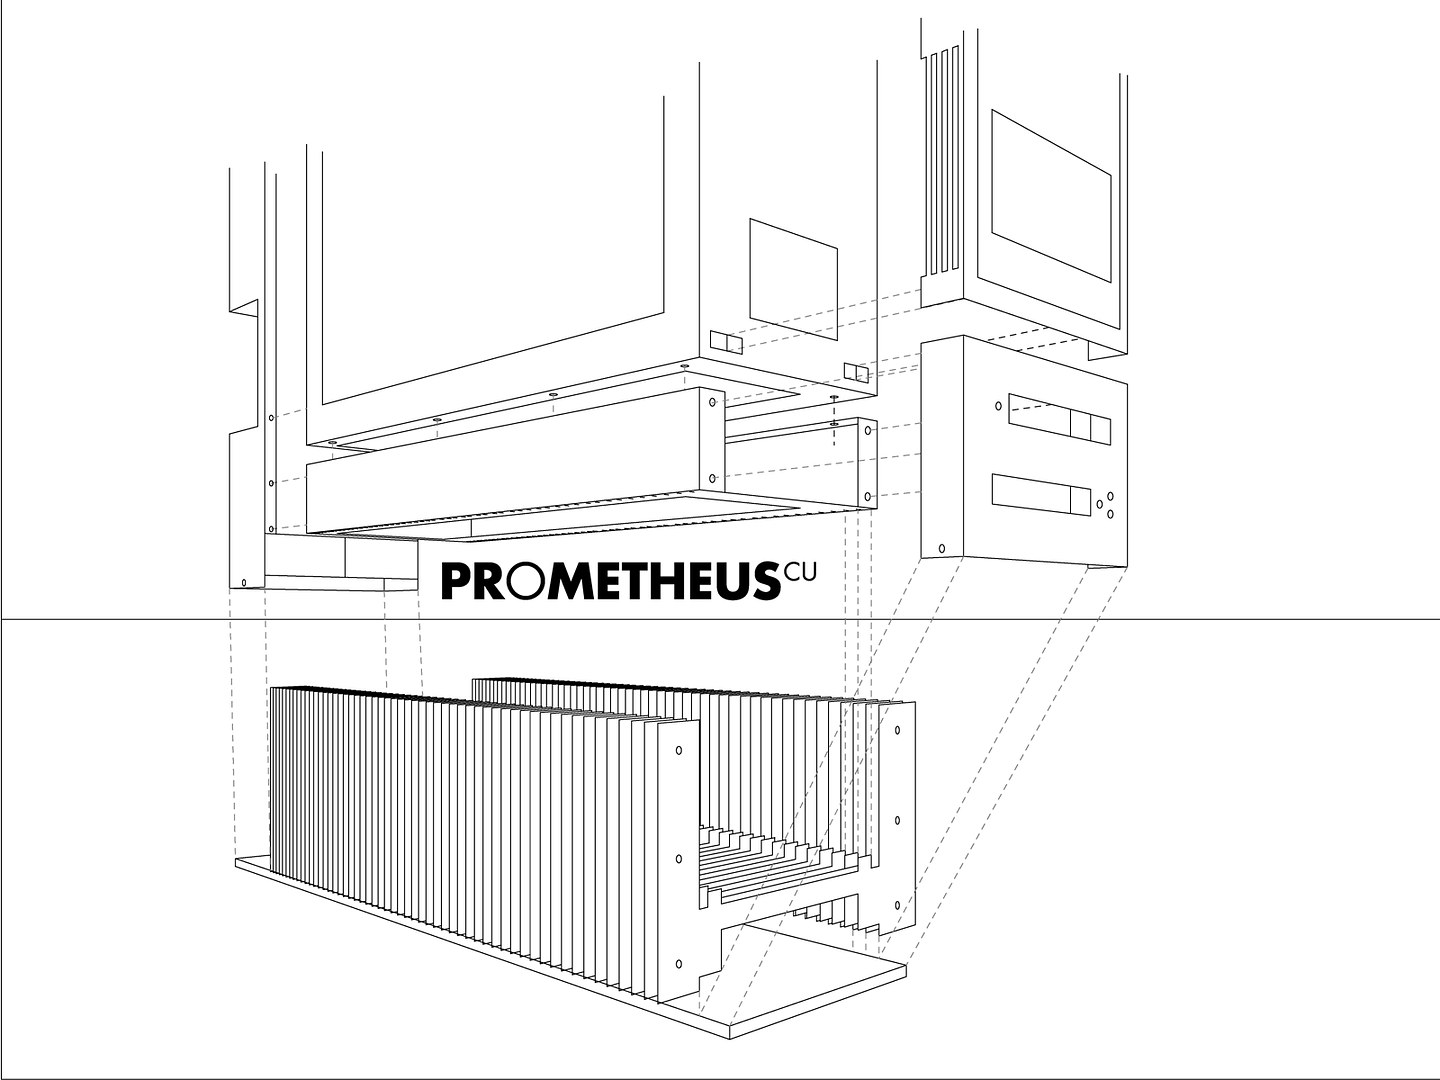
All the concepts have a cable management back like the one featured in the picture below - the chunk removed from one corner is for the rear mounted AquaComputer Multiswitch.
In this design we extend the height of the back tray and the front Matrix Orbital Housing.
This also helps by offering a location for the Aquaero to be installed, below the Matrix Orbial Typhoon.
formula409
Limp Gawd
- Joined
- Apr 7, 2005
- Messages
- 311
The omen idea is cool, but the second design is pretty nice too.
silent-circuit
[H]F Junkie
- Joined
- Sep 18, 2005
- Messages
- 16,136
I like the last best, certainly.
With the low 'ribs' sticking out at the sides it looks like an Alien case or the many cases like it. Cases I, to clarify, do not particularly consider 'pretty' ")
Keeping the ribs but having them follow the lines of the case is a far cleaner and attractive option. I assume it'd help with airflow as well?
Keeping the ribs but having them follow the lines of the case is a far cleaner and attractive option. I assume it'd help with airflow as well?
I don't like the look of the "organic" style ribs, either. I think it takes away from the clean, industrial look you have going, and would certainly ruin the style of the mod. Sticking to a clean, seamless extension of the height of the case would be the route I would go. Just my .02, but you did ask for feedback.
ben chi(f4)
2[H]4U
- Joined
- Mar 4, 2008
- Messages
- 2,339
I definitely don't like the mac look... to mainstream.
I love the Omen and I want one, but a starting price of $11500...I cant afford that right now.
Right now? I don't think I could ever afford that unless I got a loan.

Reality
[H]ard|Gawd
- Joined
- Feb 16, 2003
- Messages
- 1,937
Gorgeous
Much better looking imo Langer, those organic curves on the bottom fins in the first revision looked out of place. That is a much cleaner look, and should flow well! Looking forward to some more pictures instead of line art! Good to see you have progress on what is definitely an epic build/mod.
jackofalltrades
2[H]4U
- Joined
- Feb 7, 2006
- Messages
- 3,740
This reminds me of the old packard bell cases stick with the other variations just my .02
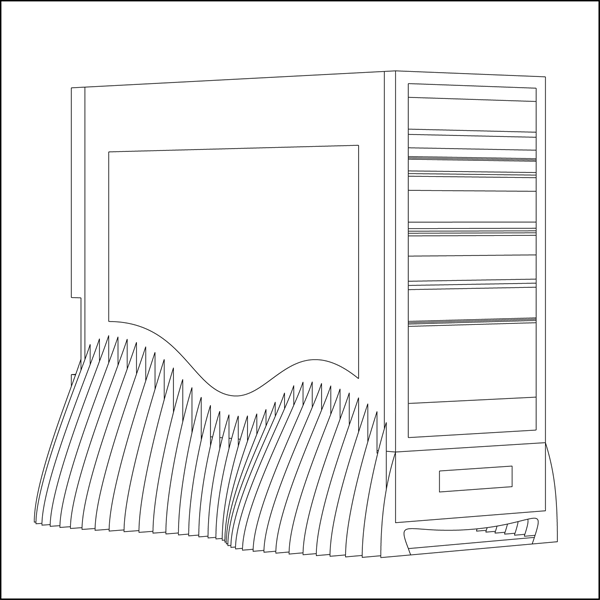
Rev 4 - assembled.
http://img.photobucket.com/albums/v60/Langer/PrometheusCu/prometheusfeetconcept-05-LOW.png
*click for big*
Reminds me a bit of the beige/purple IBM cases
Always liked that look ^_^Thanks a lot guys, I think I'm going to go ahead with rev4, only some very minor revisions to add to it... and I'll let those be a surprise.
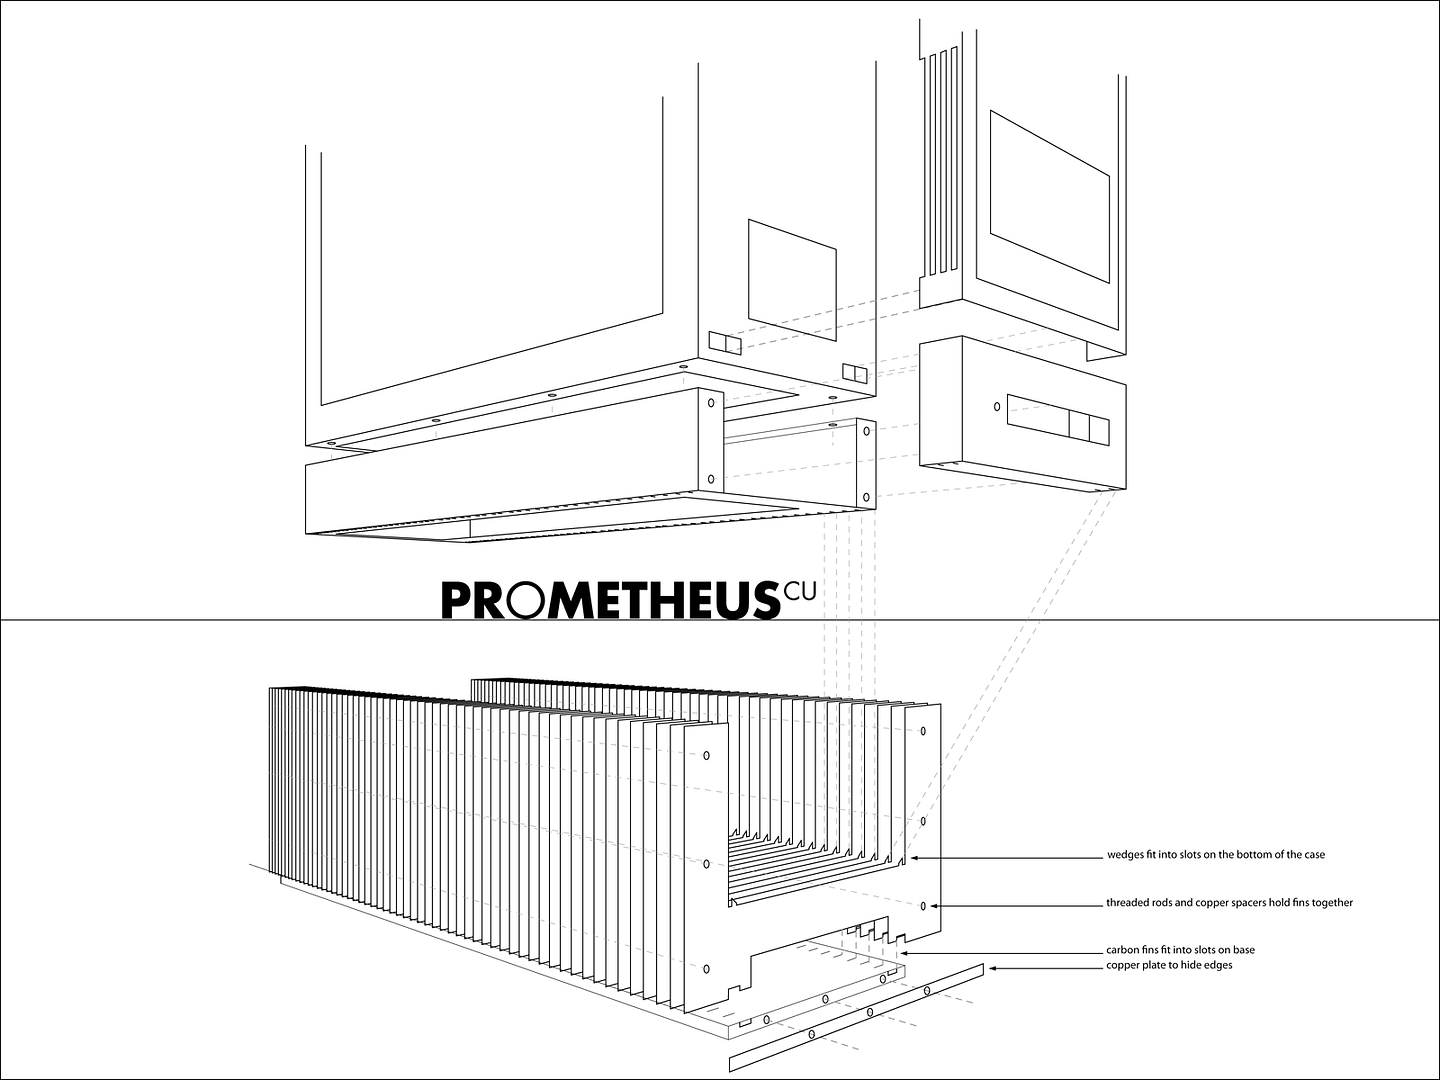
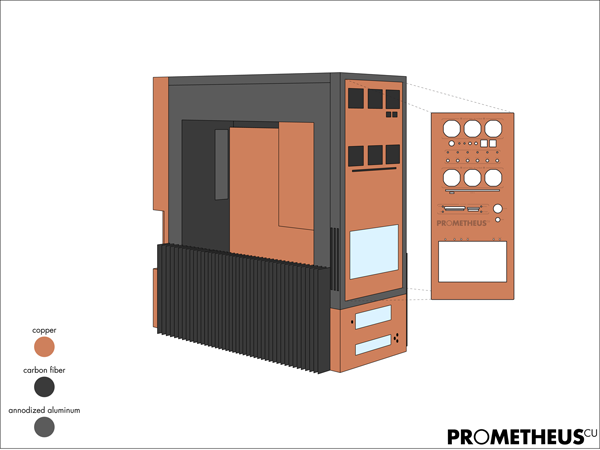
I added a splash of colour to the illustration, just to give a better idea of which parts will be made of which material:
*click for big*
I added a splash of colour to the illustration, just to give a better idea of which parts will be made of which material:

*click for big*
best [486]
Limp Gawd
- Joined
- Aug 28, 2005
- Messages
- 476
Cool! The fin things remind me of the old [P-2] IBM intellistation M-PRO cases. [they had the fins , except almost all over the outside]
Markistehnamezor
Gawd
- Joined
- Jun 16, 2008
- Messages
- 808
It looks funky on paper, I can't wait till its real.
0ptional
Don't Trust Your Friends with Your Decanter
- Joined
- Feb 22, 2003
- Messages
- 5,593
i really love the side-fins design you've got going, the bulbous one was way too much, but this new one is just perfect, can't wait to see it come to life
Thanks a lot for the support everyone, I really appreciate and value your opinions.
Rest assured that I still have a few tricks up my sleeve with the case feet design, and a few ideas to better integrate the fins along with the rest of the case... but I'm going to leave you all guessing what they are.
I've gotten quite a few questions asking me what software and technique I used to produce my concept Illustrations.
So...
As with my earlier "prototype part illustrations" the case feet concepts were drawn Adobe Illustrator. The images above are not 3D models - like you'd get with Sketchup - they are only 2D perspective illustrations. In fact it would have been easier and faster for me to do these perspective drawings by hand... but everything is just so much cleaner on screen.
I'll post a couple of images tonight showing how the drawings are done. Essentially they are just drawn using the line tool - one line at a time, doing my best to eyeball the proportions while staying true to the perspective.
I do it this way because of two major reasons:
1: I like to do perspective drawings, and I like to leave a certain degree of the design to my own internal vision. When I use 3D apps I find myself letting the program dictate my design, often this happens when trying to conform to the limitations of the tools available in the software.
2:Illustrations like the above depend less on exact dimensions and allow more flexibility (at the cost of time).
The only major disadvantages to 2D illustrations is that when you want another view, or even a subtle camera shift you need to do the drawing over again. Also... drawing curves - like the ones in my first foot revision - is a real pain in the ass, and takes a fair bit of understanding perspective principles.
The last of the parts for the 2nd loop have been ordered today.
Again a big thanks to AquaComputer for their support; they are responsible for providing even more hardware for this project.
1 x aquastream XT USB 12V Pumpe - Ultra Version
2 x Connector set for Aquastream to G1/4
6 x Rotary elbow adapter G1/4
Thanks Sven.
Again a big thanks to AquaComputer for their support; they are responsible for providing even more hardware for this project.
1 x aquastream XT USB 12V Pumpe - Ultra Version
2 x Connector set for Aquastream to G1/4
6 x Rotary elbow adapter G1/4
Thanks Sven.
One minor change... I don't like to add things that don't serve purpose, so in adding fins to the top I had to create purpose.
This is what I came up with - there's a bit more to the whole process, but this should give you the idea:
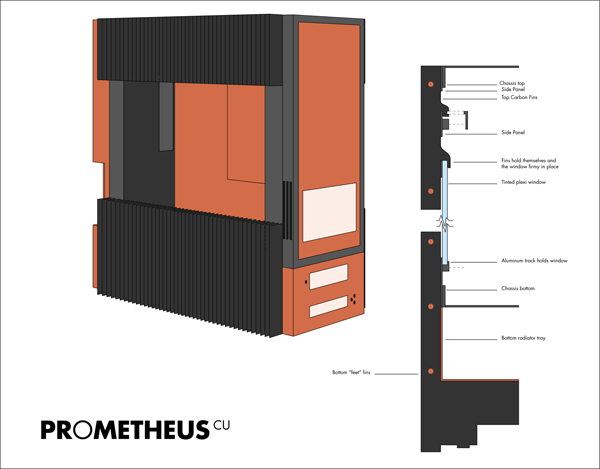
*click for big*
I haven't shown this feature yetm because it would be a bitch to draw the inlays in perspective, but I'll do my best to explain.
My plan is to cut the PROMETHEUS[sup]CU[/sup] logo lettering out - leaving me 3-4" tall solid 1/8" thick copper letters.
Then I want to cut an 1/8" slots into the cross section of the fins. Letting me inlay the lettering perpendicular to the fins.
Ok I got half way though that last bit and figured I could just make a pic in less time:
Opinions?
[edit]
forgot to add:
here is how the drawings are made... more or less:

*click for big*
[/edit]
Markistehnamezor
Gawd
- Joined
- Jun 16, 2008
- Messages
- 808
You should start your own line of cases! I'd love to help fund it.
matrix563
Fully [H]
- Joined
- Sep 1, 2006
- Messages
- 19,136
awesome can't wait till its done
PAo_ReVoLT
[H]ard|Gawd
- Joined
- Apr 4, 2008
- Messages
- 2,036
very nice
@Markistehnamezor - I'd love to... product design is my exact dream career path.
@matrix563 - Thanks man, me too.
@PAo_ReVoLT - Thank you.
@SoAndSo - I hope so, thanks.
@Elledan - I cant wait to see it in mine... so it can start earning my money back. haha
@TooBooKoo - Haha, you uncovered my naming secret. I laugh with my friends about that being the reason for the name. Thanks man.
I got an email a few moments ago from Watercool... and it was very good news.
Production of revision 3.0 of the Watercool Heatkiller CPU block is complete - and it's a thing of beauty.
A huge thanks goes out to Rico, from Watercool, who says they'll be able to ship it out next week.

BEHOLD:
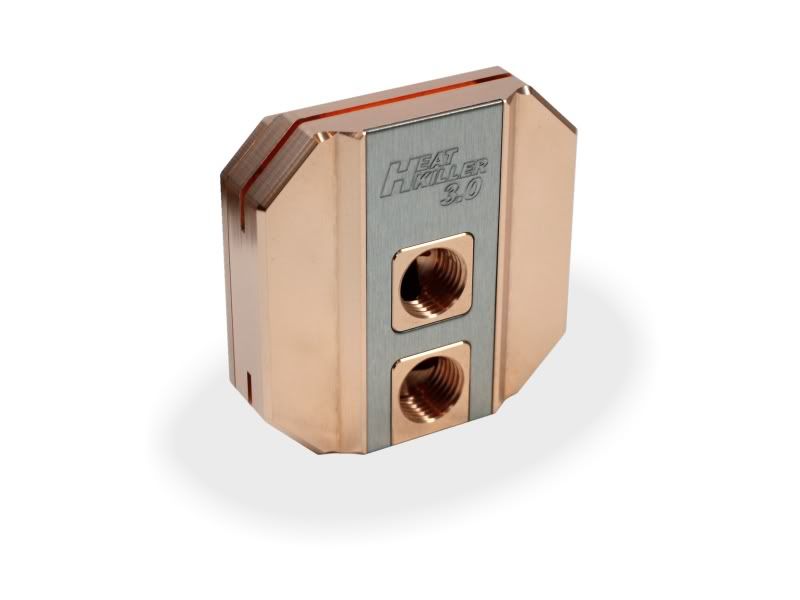
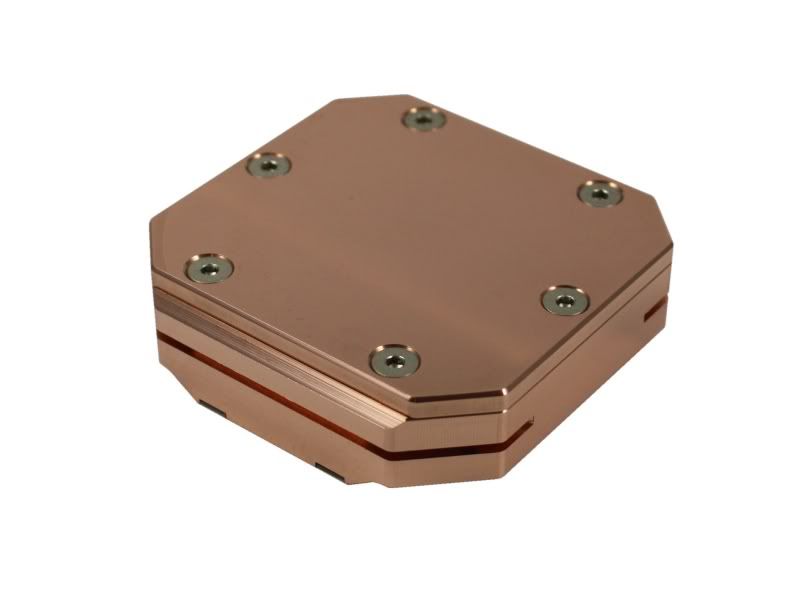
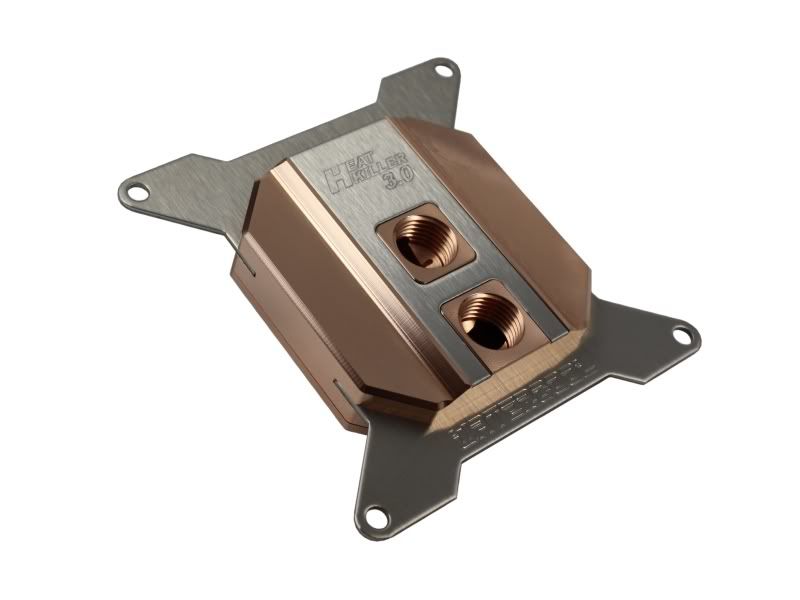
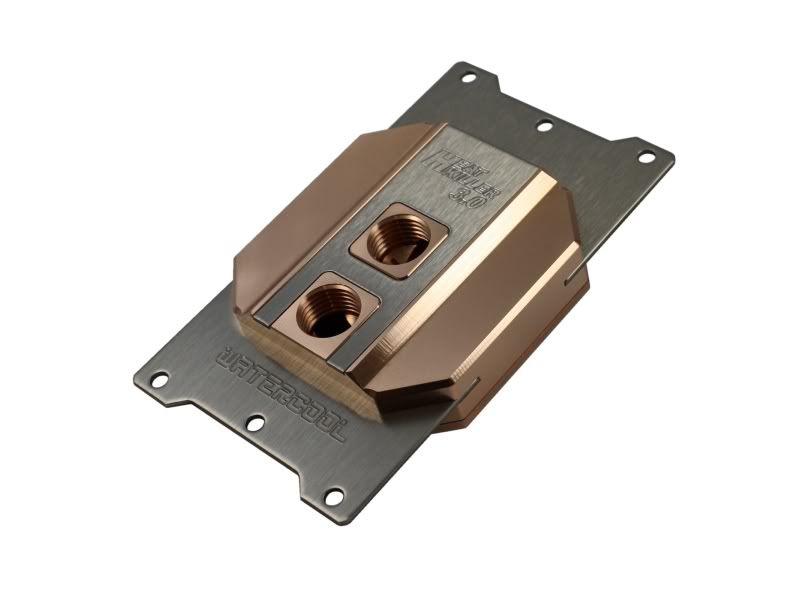
I cannot wait to add this baby to Prometheus... the stainless accents will match perfectly with the existing blocks too.
@matrix563 - Thanks man, me too.
@PAo_ReVoLT - Thank you.
@SoAndSo - I hope so, thanks.
@Elledan - I cant wait to see it in mine... so it can start earning my money back. haha
@TooBooKoo - Haha, you uncovered my naming secret. I laugh with my friends about that being the reason for the name. Thanks man.
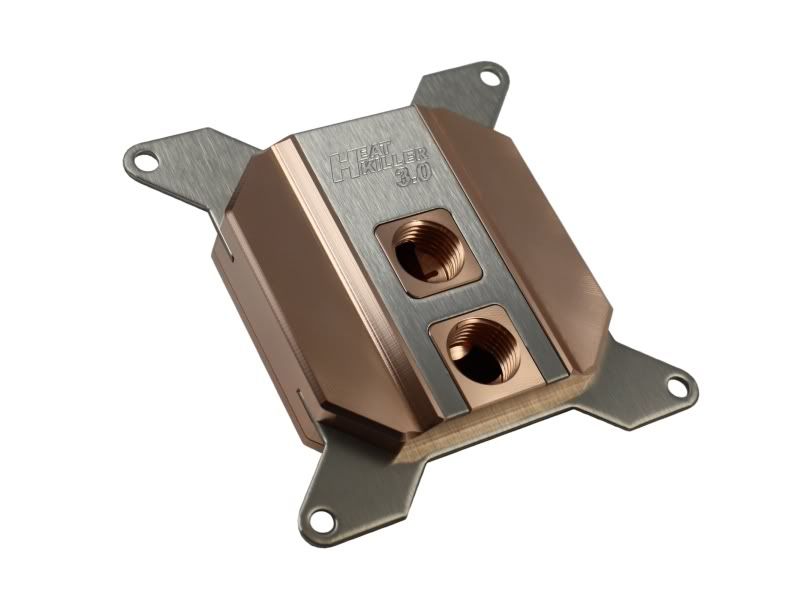
I got an email a few moments ago from Watercool... and it was very good news.
Production of revision 3.0 of the Watercool Heatkiller CPU block is complete - and it's a thing of beauty.
A huge thanks goes out to Rico, from Watercool, who says they'll be able to ship it out next week.
BEHOLD:
I cannot wait to add this baby to Prometheus... the stainless accents will match perfectly with the existing blocks too.
Markistehnamezor
Gawd
- Joined
- Jun 16, 2008
- Messages
- 808
Those blocks look sexy and simple. It looks deadly too, that thing must way a lot for its size.
0ptional
Don't Trust Your Friends with Your Decanter
- Joined
- Feb 22, 2003
- Messages
- 5,593
*weigh
The black keyboard keys FINALLY arrived, and I'm quite pissed.
The keys fit, they fit really well... small caveat:

As you can see, some of the black keys are designed with a twist:
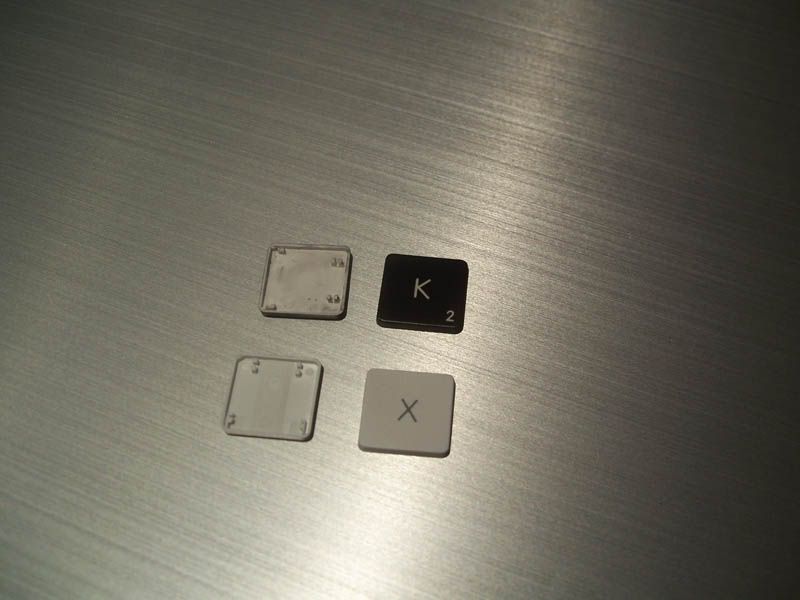
Normally I'd just scrap the plan, but this was a very expensive plan - that I was uncertain of from the beginning.
I've been running though a bunch of ideas and I've come up with this:
using an x-acto knife cut away the clips on he bottoms of the black keys, then cut the walls and corners off the existing white keys...ONE BY ONE!
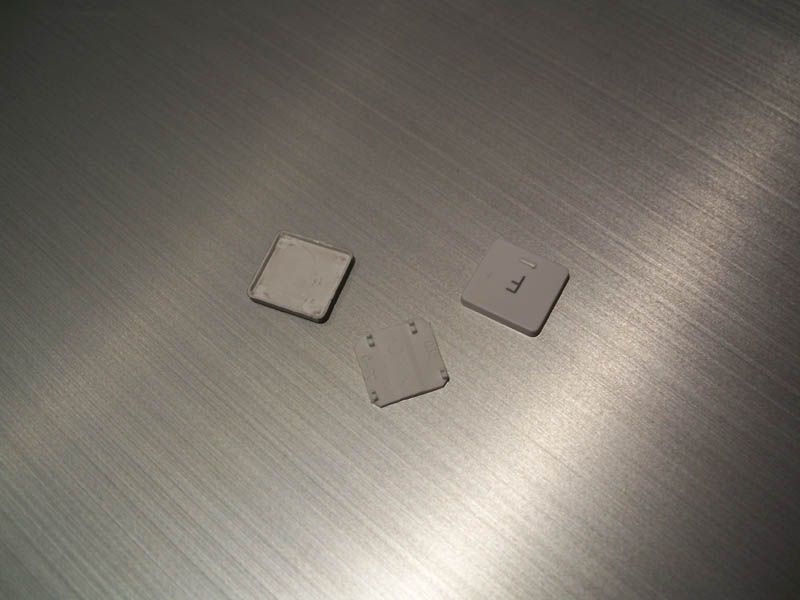
The end result will work well with a few drops of super glue:
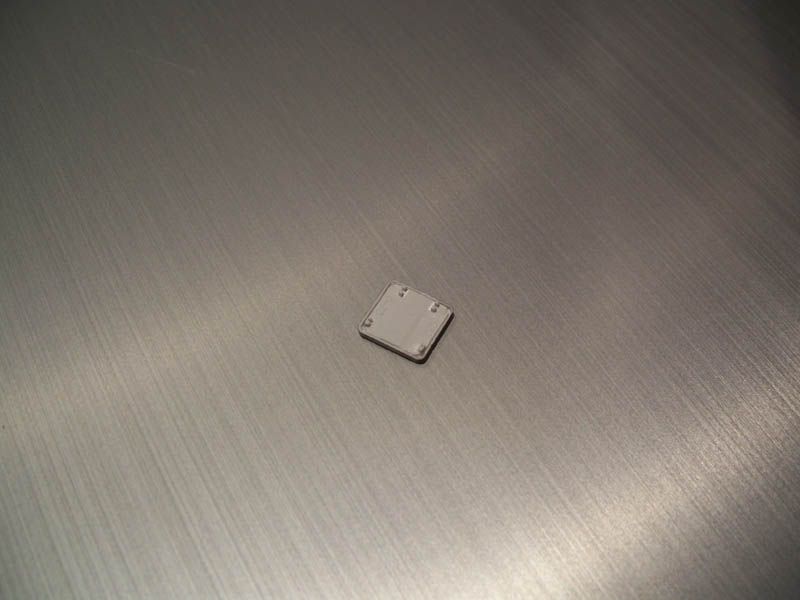

If you'll excuse me I have some grumbling and cutting to do.
The keys fit, they fit really well... small caveat:
As you can see, some of the black keys are designed with a twist:
Normally I'd just scrap the plan, but this was a very expensive plan - that I was uncertain of from the beginning.
I've been running though a bunch of ideas and I've come up with this:
using an x-acto knife cut away the clips on he bottoms of the black keys, then cut the walls and corners off the existing white keys...ONE BY ONE!
The end result will work well with a few drops of super glue:
If you'll excuse me I have some grumbling and cutting to do.