Navigation
Install the app
How to install the app on iOS
Follow along with the video below to see how to install our site as a web app on your home screen.
Note: This feature may not be available in some browsers.
More options
-
Some users have recently had their accounts hijacked. It seems that the now defunct EVGA forums might have compromised your password there and seems many are using the same PW here. We would suggest you UPDATE YOUR PASSWORD and TURN ON 2FA for your account here to further secure it. None of the compromised accounts had 2FA turned on.
Once you have enabled 2FA, your account will be updated soon to show a badge, letting other members know that you use 2FA to protect your account. This should be beneficial for everyone that uses FSFT.
You are using an out of date browser. It may not display this or other websites correctly.
You should upgrade or use an alternative browser.
You should upgrade or use an alternative browser.
Project PowerMac G5/X86 - SLI you bet!
- Thread starter MrBean_Oz
- Start date
@ Killa: Thanx, things will move at a faster pace now ")
Hello Guys,
I am glad to report that I have received acknowledgement that Swiftech will sponsor me an Apogee-Drive for this Project Wow, thanx Gabe, and the team at Swiftech, you guys do so much for us modders!!
Good on ya!
Well, at least this let's me stick to another one of my "pre-requisites" for this project, i.e. keeping it very much in line with the original Apple setup - at least, in this case, the pump/block setup is similar enough to the original Apple watercooled setup - yeay.
I can hardly wait for this little beast to arrive.
Watch this space.
Hello Guys,
I am glad to report that I have received acknowledgement that Swiftech will sponsor me an Apogee-Drive for this Project
Wow, thanx Gabe, and the team at Swiftech, you guys do so much for us modders!!Good on ya!
Well, at least this let's me stick to another one of my "pre-requisites" for this project, i.e. keeping it very much in line with the original Apple setup - at least, in this case, the pump/block setup is similar enough to the original Apple watercooled setup - yeay.
I can hardly wait for this little beast to arrive.
Watch this space.
Hello Guys,
Firstly, Compliments of the Season to everyone, may this New Year be your best ever!
Anway, had a few days off, basically recovering after coming back from Bangkok with Hep A - probably to much shellfish
I have been doing a little bit of modding the last few days, very little (but significant) work on the G5 - more so on a new little Commell LS-372 3.5" motherboard I received from Commell.
This I modded into a very neat little dual external 3.5" harddrive cage, what a beaut - will post pics tomorrow evening, with the Apple G5 updates - it looks stunning, (the 3.5" Core-2-Duo setup) to say the least.
Well, what have I done on the Apple mod?
Very early on in the mod I was going to use the Apple 600W PSU, then decided on an Enermax 650W - well, with the requirements of newer hardware (viscious circle) I but down the dough and got myself a 1kW PC Power & Cooling monster, which was powering my hardware in my in-between case, the Lian-Li PC71.
I have now fitted a 750W in there, and donated the box to my wife, and rescued nmy 1kW unit, to be fitted in the G5 - how?
Well, the PSU is still going in the top, as planned originally - by very careful fitting, and measuring, I managed to squeeze that monster in there, behind the standard length DVD multiburner, and have 3cm room between the 2! I had to manufacture a new top plate, going immediately below the PSU/DVD rom, but boy-oh-boy, it looks stunning - things are coming very nicely together now, and having received the Apogee-Drive setup, and fitted it to my WS-Pro Asus board, it's smooth sailing.
Will post pics tomorrow evening, need to update my Photobucket account before I can submit more pics.
Please check back.
rogue_jedi
Supreme [H]ardness
- Joined
- Sep 6, 2002
- Messages
- 4,821
That sounds very interesting, can't wait to see pics.
Ok, as mentioned yesterday, I decided to mod the PC Power&Cooling into the G5 case, to provide for future upgrades - the next evolution is just around the corner, at the most 3 months away, for some serious horsepower to go into this box - think 2x Xeons, 2x 8800Ultras, SkullTrail
Yep, 8-core of goodness, 2x decent gfx to drive my 30" ACD - yes yes, I know I don't need al that power, I just want to do it!
Here's the monstrous PSU to force into this case - the G5 is upside down here, PSU will sit on the top....
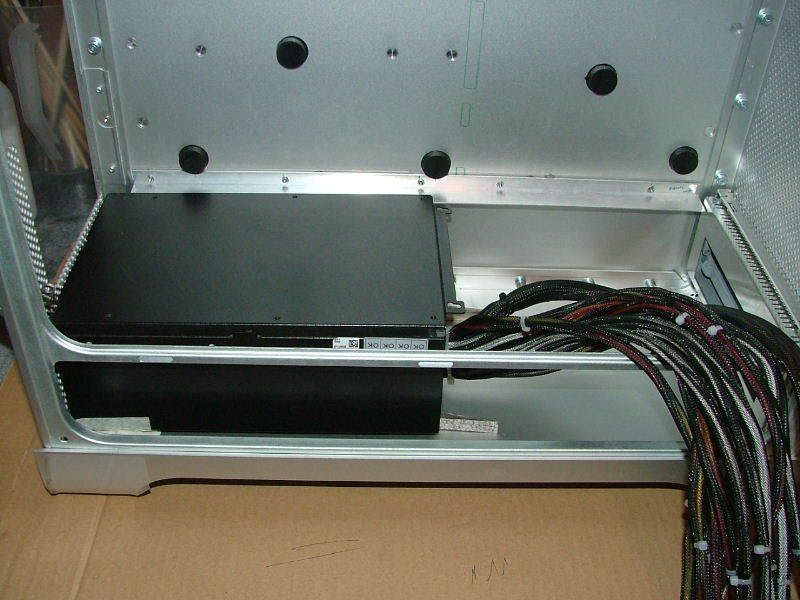
With the DVD fitted, to show how tight squeeze it is....
and for the metrically inclined amongst us (which I am one of...)...
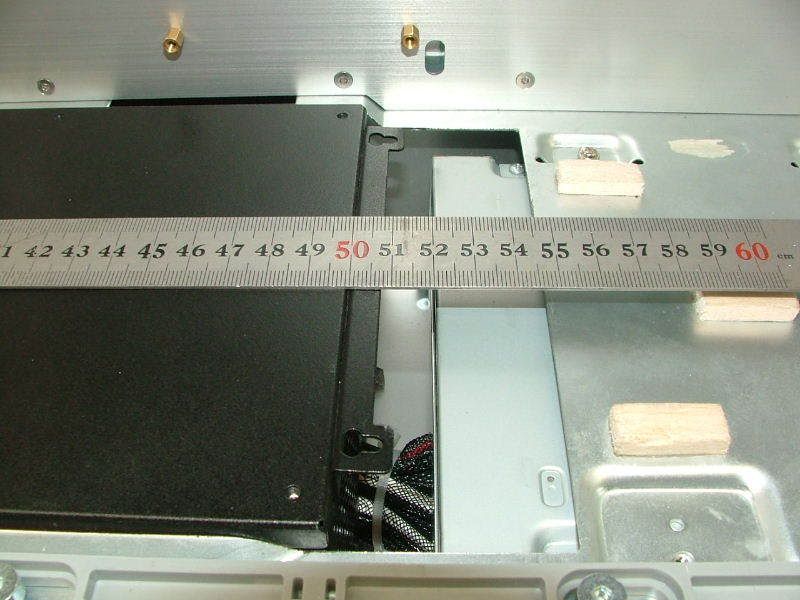
Not much space, if you consider the not-so-insignificant amount of cables the PSU comes with, and it's not modular....well, problem solved, as the cables can go between the top of the DVD, and the G5's roof, no worries.
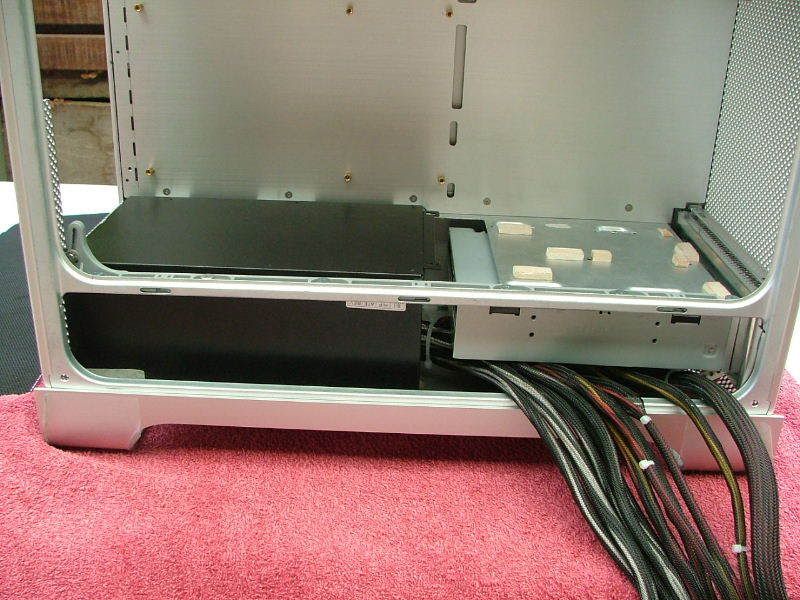
To fit the psu, I had too demolish the original dvd/harddrive mount Apple supplied, and reduce it to this:

Doesn't look like much after some dremel-action, but it will still enable the dvd to mount in the correct location.
a long time ago, I picked up some AC Ryan modders mesh from PcCasegear in Melbourne, which I thought may come in handy......a bit of the tin-snips, little drilling, and we have this
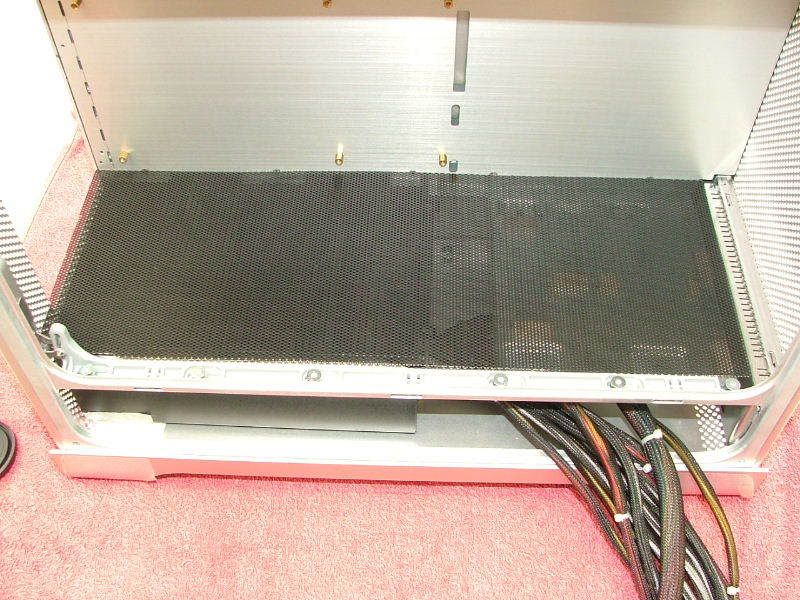
and a close-up shot.....

Which looks absolutely crap in my opinion - it's to thin, flabby like an old man's tummy, and won't support the psu at all....
What do do.....
Ah well, I had to keep with the somewhat decent-level of sheet-metal work up to now, and decided to do a new plate out of the same Lian-Li PC70 sidepanels I have used up to now.....so, here, from right to left, is my attempts - the original I made a while back on the right, the mesh in the middle, and my final attempt at the left....closest to the ruler
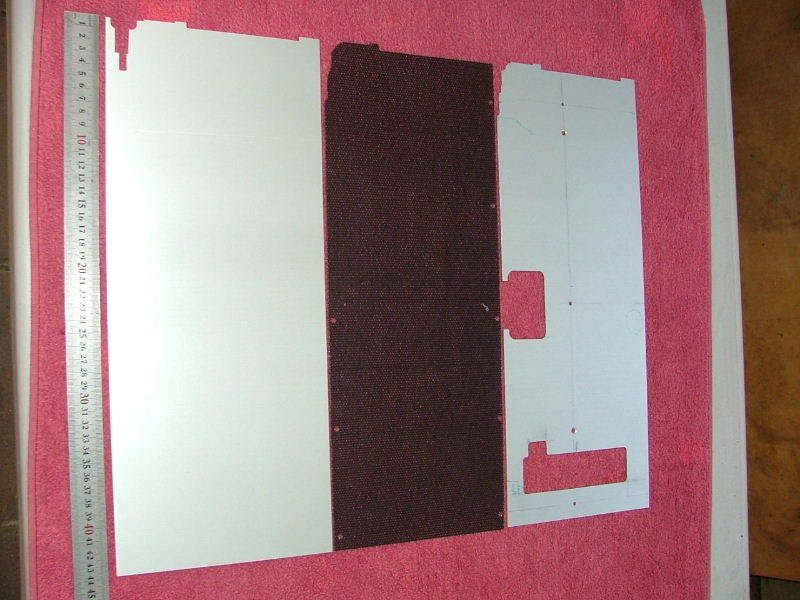
Did not come bad at all, and it fits like a well-sized glove.....
a few shots showcasing my latest attempt....
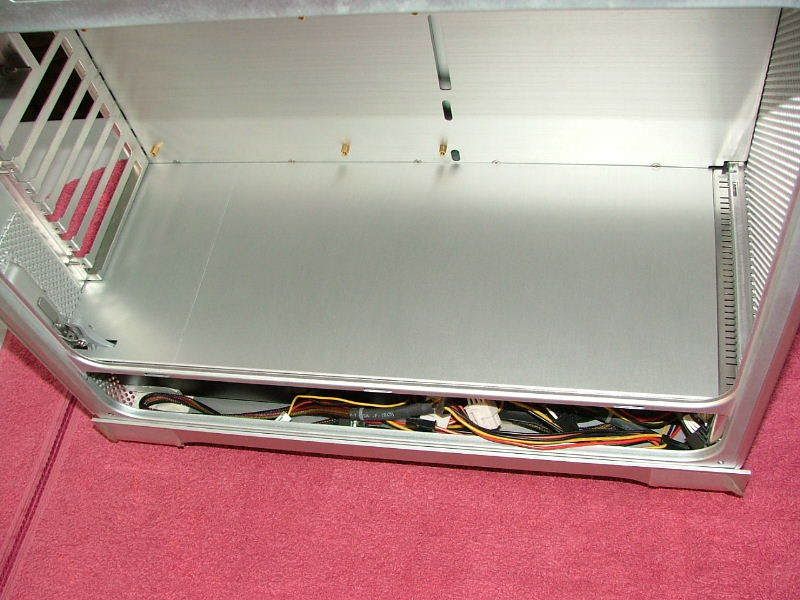
and some shots showing how I cut it out to accommodate the hinge at the back, and how well it covers right up to the case edge - getting rid (hiding) of the ugly grey plastic sidepanel locking mechanism, and utilizing those six hex-headed screws to secure the new top tray....
Here....
and another here....
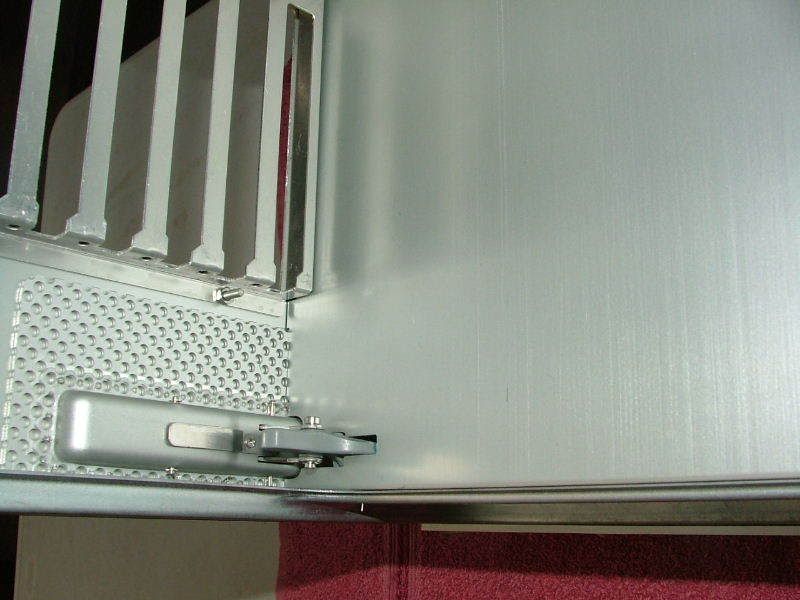
so, to recap, this was my first version, but with the locking mechanism still showing, for when I was going to use a modular 750W psu....
then, my next iteration, trying to mount the PC P$C unit, but realizing the mesh was...well a mess....
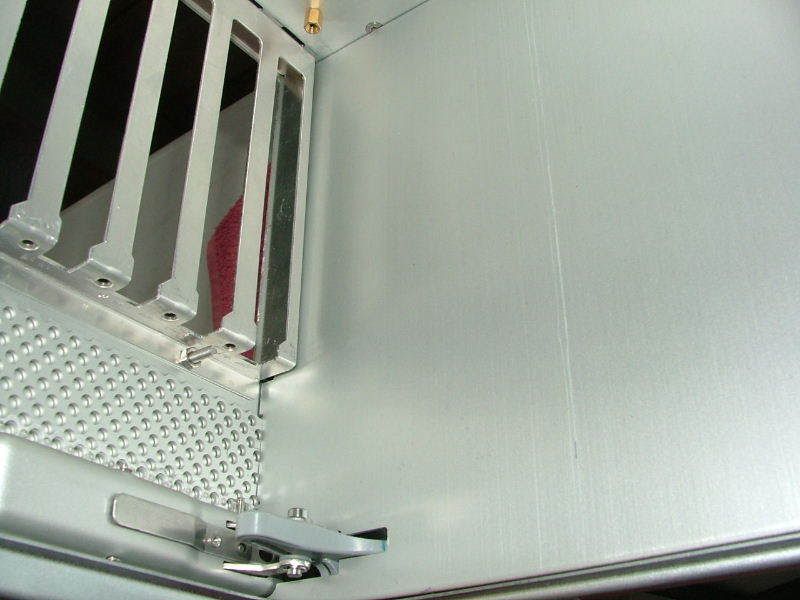
and the last one
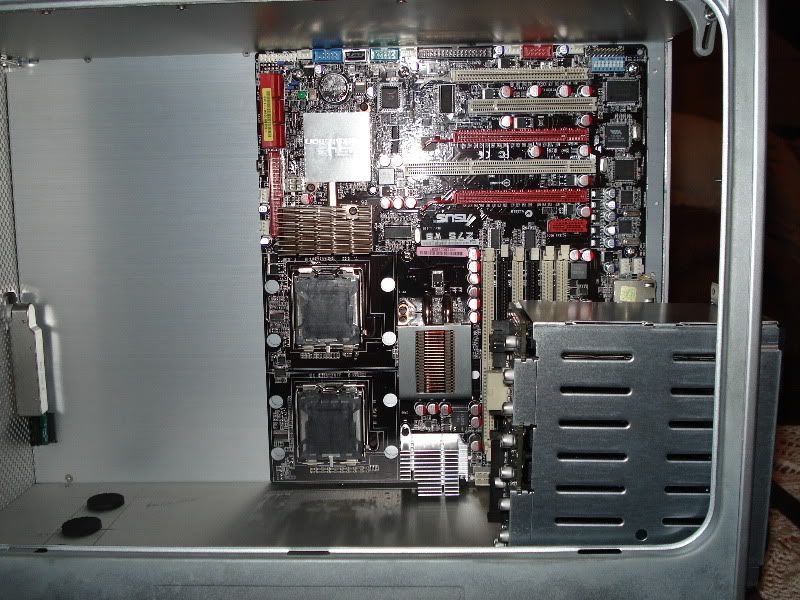
Here is just one or 2 random shots.....
showing what the mobo looks like with the Apogee-drive fitted - I luv this thing!
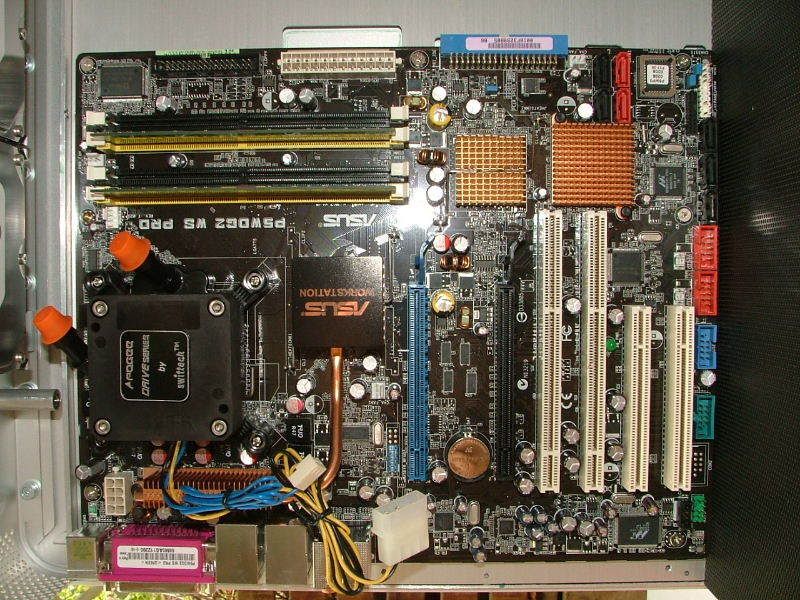
and a while back, I machined some receptor-slots in the back of the mobo-tray, to properly locate the PCI-cards....
and here a close-up slot.....
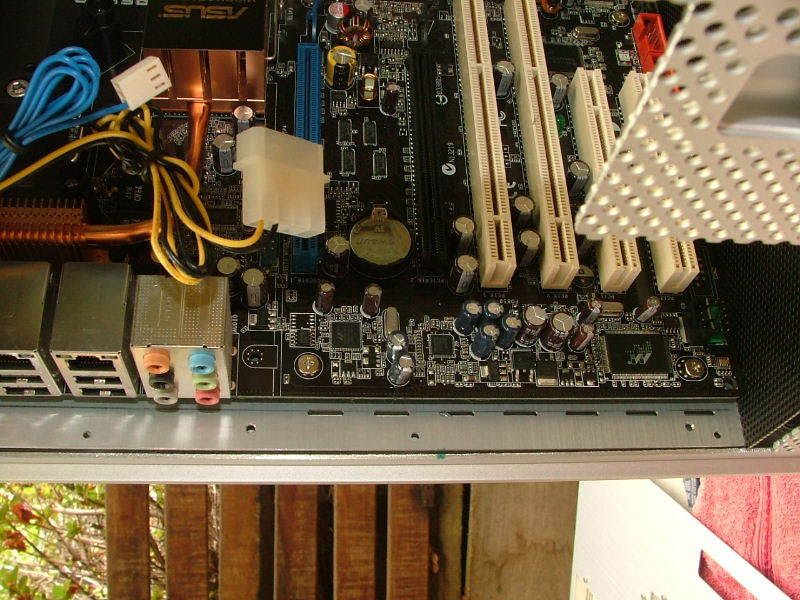
Not looking to bad, does it?
Yep, 8-core of goodness, 2x decent gfx to drive my 30" ACD - yes yes, I know I don't need al that power, I just want to do it!
Here's the monstrous PSU to force into this case - the G5 is upside down here, PSU will sit on the top....
With the DVD fitted, to show how tight squeeze it is....
and for the metrically inclined amongst us (which I am one of...)...
Not much space, if you consider the not-so-insignificant amount of cables the PSU comes with, and it's not modular....well, problem solved, as the cables can go between the top of the DVD, and the G5's roof, no worries.
To fit the psu, I had too demolish the original dvd/harddrive mount Apple supplied, and reduce it to this:
Doesn't look like much after some dremel-action, but it will still enable the dvd to mount in the correct location.
a long time ago, I picked up some AC Ryan modders mesh from PcCasegear in Melbourne, which I thought may come in handy......a bit of the tin-snips, little drilling, and we have this
and a close-up shot.....
Which looks absolutely crap in my opinion - it's to thin, flabby like an old man's tummy, and won't support the psu at all....
What do do.....
Ah well, I had to keep with the somewhat decent-level of sheet-metal work up to now, and decided to do a new plate out of the same Lian-Li PC70 sidepanels I have used up to now.....so, here, from right to left, is my attempts - the original I made a while back on the right, the mesh in the middle, and my final attempt at the left....closest to the ruler
Did not come bad at all, and it fits like a well-sized glove.....
a few shots showcasing my latest attempt....
and some shots showing how I cut it out to accommodate the hinge at the back, and how well it covers right up to the case edge - getting rid (hiding) of the ugly grey plastic sidepanel locking mechanism, and utilizing those six hex-headed screws to secure the new top tray....
Here....
and another here....
so, to recap, this was my first version, but with the locking mechanism still showing, for when I was going to use a modular 750W psu....
then, my next iteration, trying to mount the PC P$C unit, but realizing the mesh was...well a mess....
and the last one
Here is just one or 2 random shots.....
showing what the mobo looks like with the Apogee-drive fitted - I luv this thing!
and a while back, I machined some receptor-slots in the back of the mobo-tray, to properly locate the PCI-cards....
and here a close-up slot.....
Not looking to bad, does it?
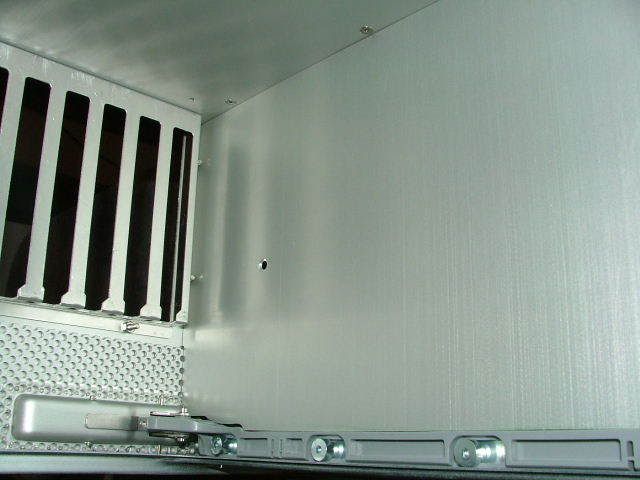
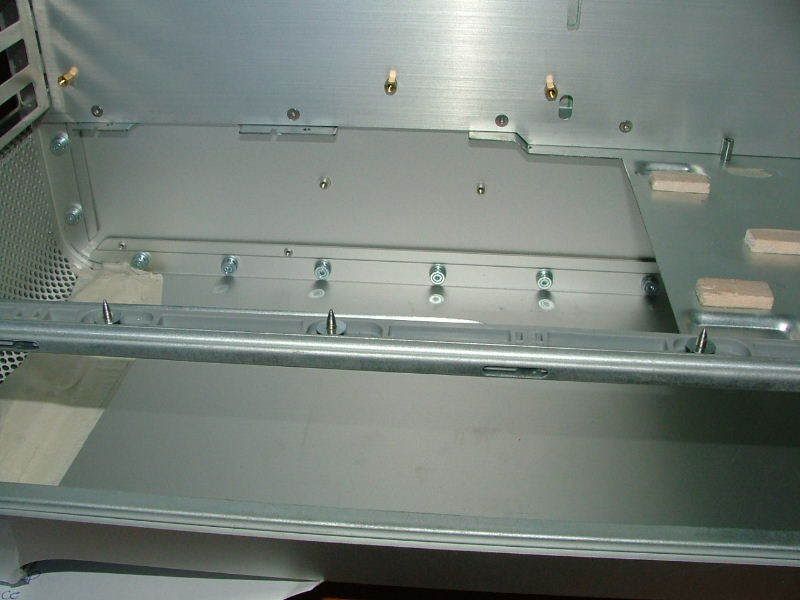
Well, as mentioned earlier, I will use the original locking-mechanism allen-cap screws (sort of) to locate the new tray on the front of the case, and then use rear (custom) standoffs to secure it closest to the mobo-tray side - I need to properly secure this tray, as it will carry the full 1.5kgs (odd) of the PC P&C psu.....
This is what I am talking about......
Front location screws.....
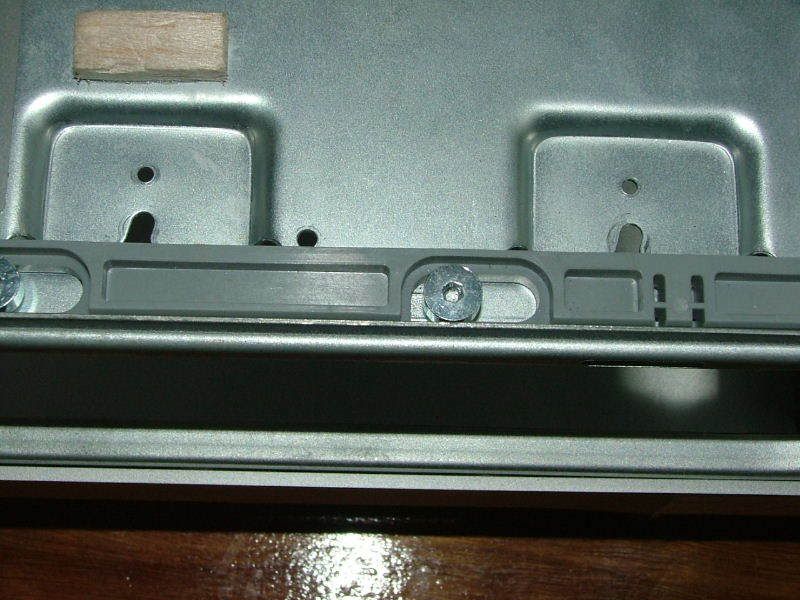
and studs at the rear, there will be a total of 5, although only 2 is pictured here - the rear-most ones will be shorter, as there is a step in the original Apple top-tray plate, which I have to compensate for....
Take note the balsaood will be completely removed, it assisted in levelling the previously (failed) mesh-tray.
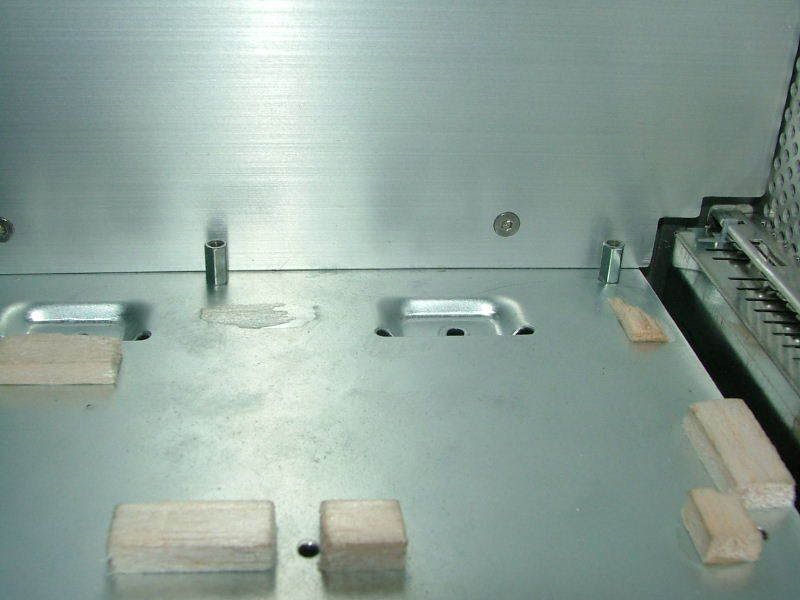
But, how did I mark the centers of the front location holes, considering there were dowels with threaded centers located there? See first photo in this post for clarity?
Well, I made 3 of these.....
They are basically 3mm bolts, clamped in my pedestal drill, spinning at 1000rpm, with a fine-file to dress the tip to a point, and cut to length.
Then bolted them into 3 of the 6 locating (Apple) dowels:
and finally putting the top tray in place, and just pressing down on those 3 areas, making a center mark where to drill on the top tray - you don't meed to press down to hard, just enough to make pin-holes.
Then, drill the 3 holes, and move only 2 of the pins, using one to locate the top tray, and repeat the procedure until all siz are done
Too easy, ain't it?
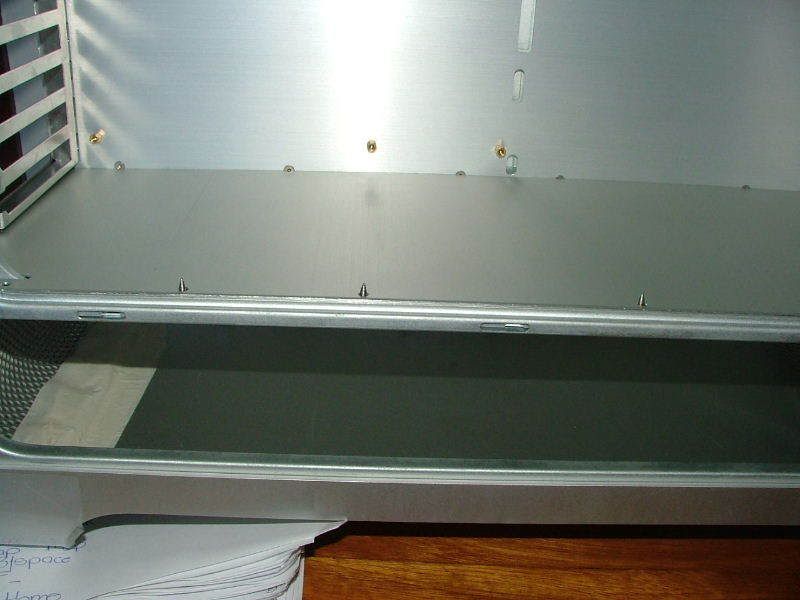
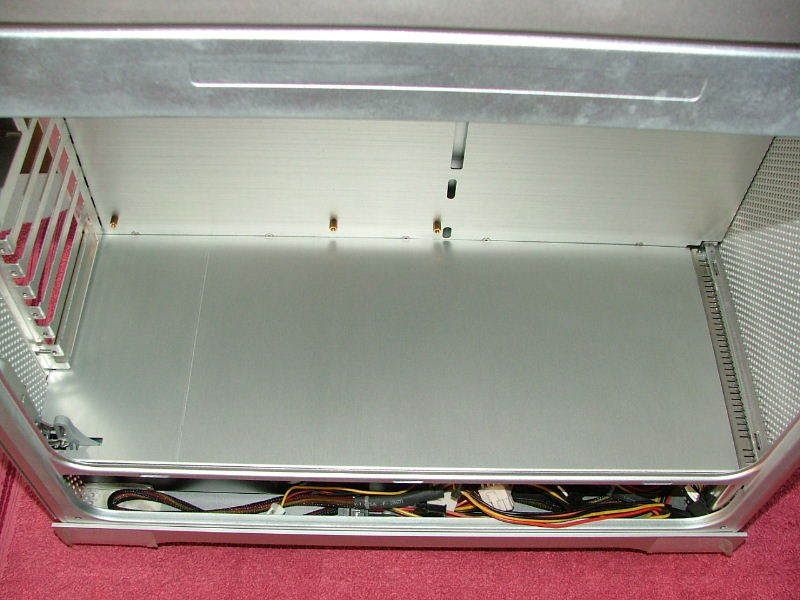
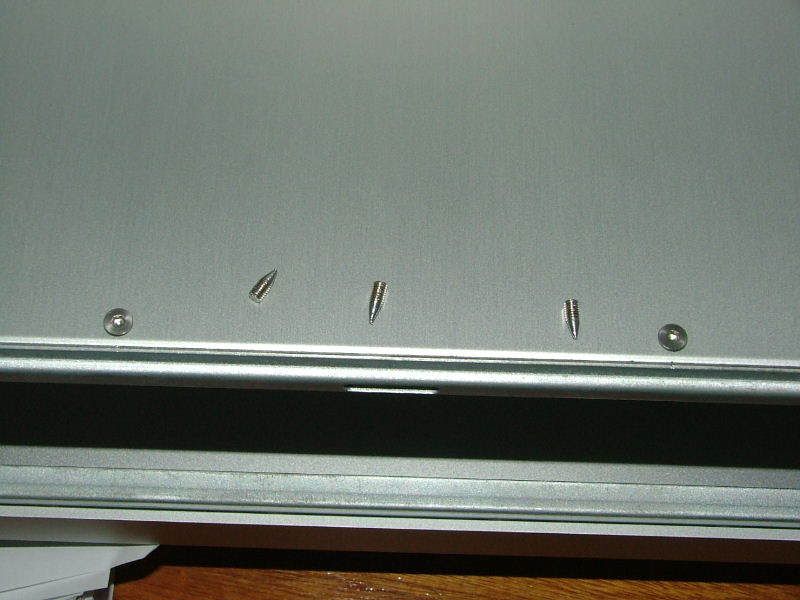
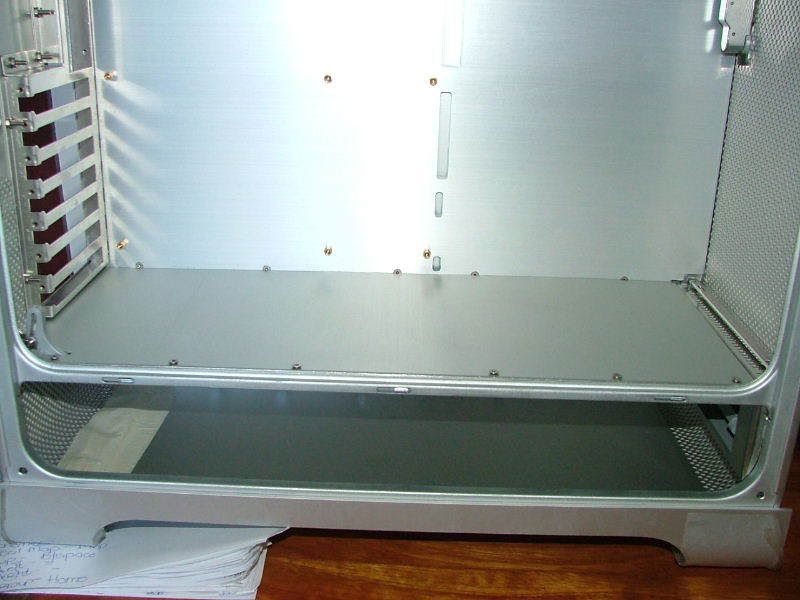
and the final result, for the front bolts - they still need counter-sunking, but you get the idea - the back still needs to be done, same procedure...
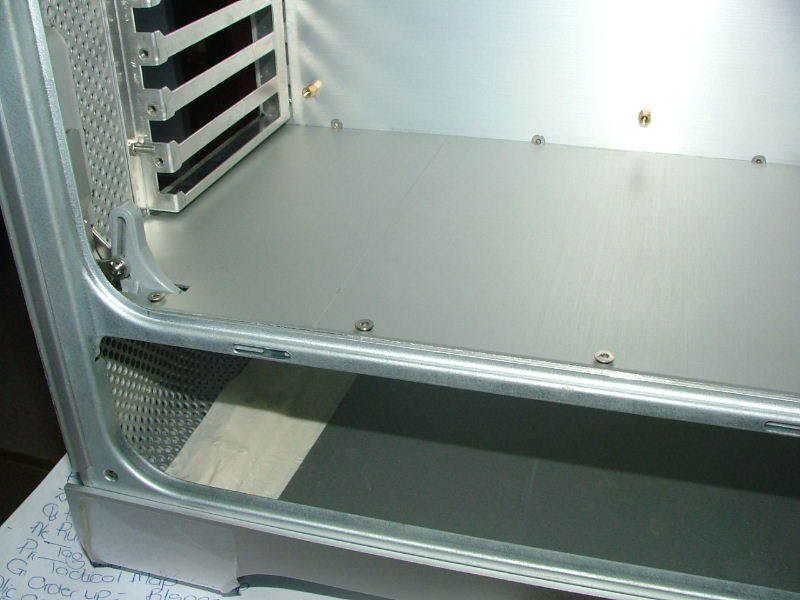
and here, a full-frontal....
Soz for all the (needless) explanations, but quite a few guys want to mod these G5's, and this may make the process a little easier for them.
This is what I am talking about......
Front location screws.....
and studs at the rear, there will be a total of 5, although only 2 is pictured here - the rear-most ones will be shorter, as there is a step in the original Apple top-tray plate, which I have to compensate for....
Take note the balsaood will be completely removed, it assisted in levelling the previously (failed) mesh-tray.
But, how did I mark the centers of the front location holes, considering there were dowels with threaded centers located there? See first photo in this post for clarity?
Well, I made 3 of these.....
They are basically 3mm bolts, clamped in my pedestal drill, spinning at 1000rpm, with a fine-file to dress the tip to a point, and cut to length.
Then bolted them into 3 of the 6 locating (Apple) dowels:
and finally putting the top tray in place, and just pressing down on those 3 areas, making a center mark where to drill on the top tray - you don't meed to press down to hard, just enough to make pin-holes.
Then, drill the 3 holes, and move only 2 of the pins, using one to locate the top tray, and repeat the procedure until all siz are done
Too easy, ain't it?
and the final result, for the front bolts - they still need counter-sunking, but you get the idea - the back still needs to be done, same procedure...
and here, a full-frontal....
Soz for all the (needless) explanations, but quite a few guys want to mod these G5's, and this may make the process a little easier for them.
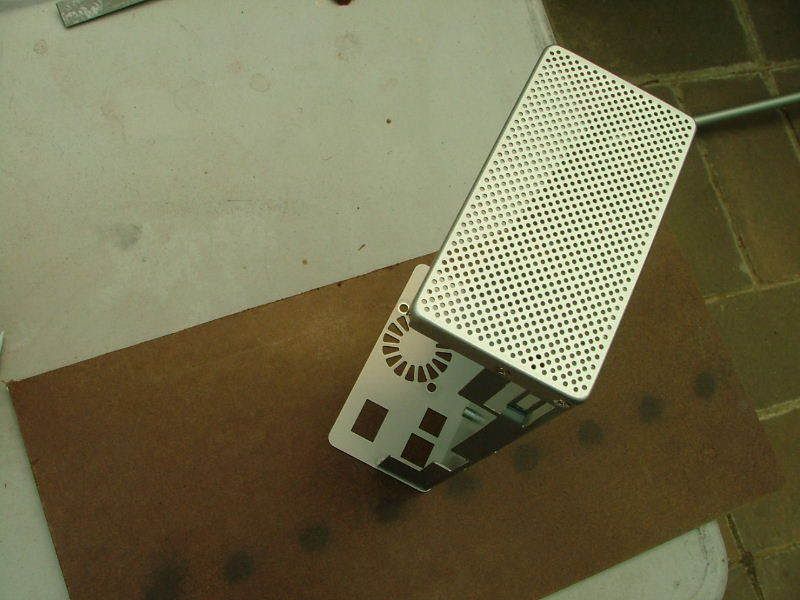
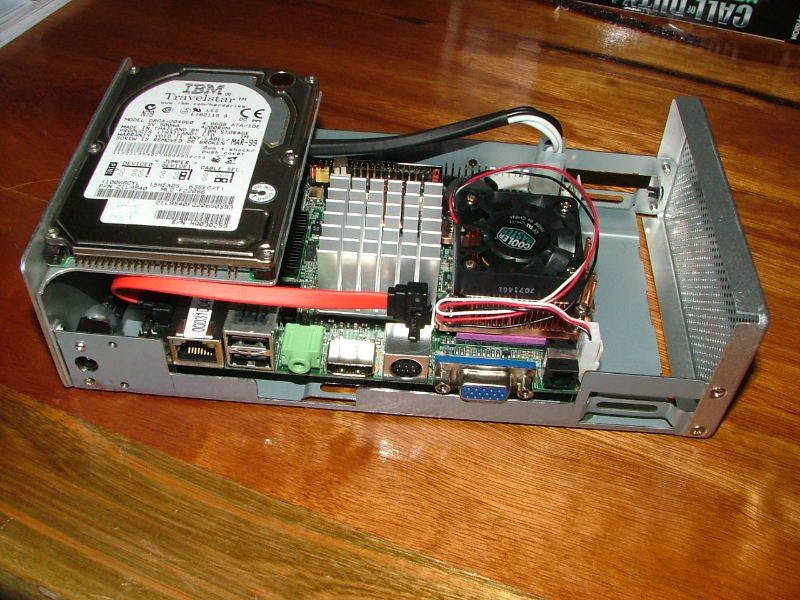
Before I forget, yesterday evening I mentioned that I was busy modding a little Commell LS-372 motherboard into a dual 3.5" harddrive cage.
I wanted this specific model cage, as it looks Apple G5, and I recently picked one up in Bangkok at IT Fortune City, where I got a single-bay version a few months back.....
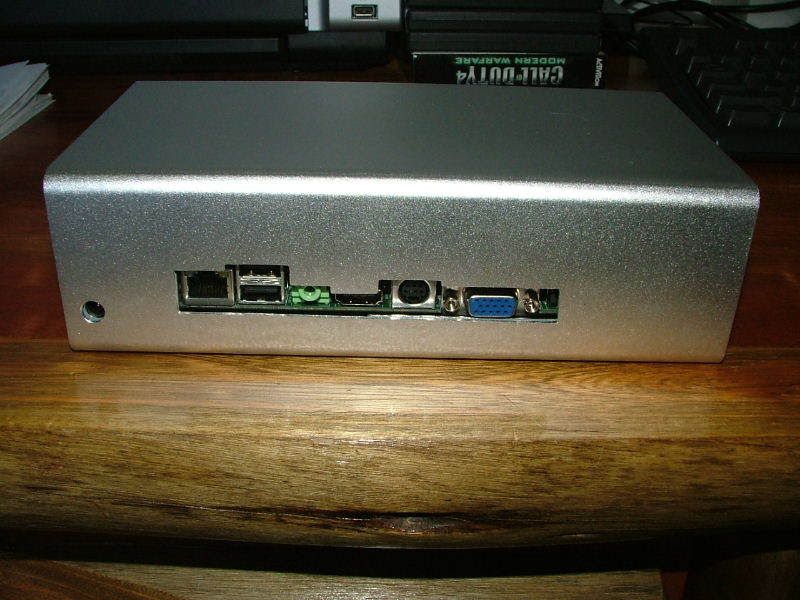
Here it is stripped down, USB/Firewire electronics removed, and lid off - the front reminds you a bit of a G5, doesn't it?
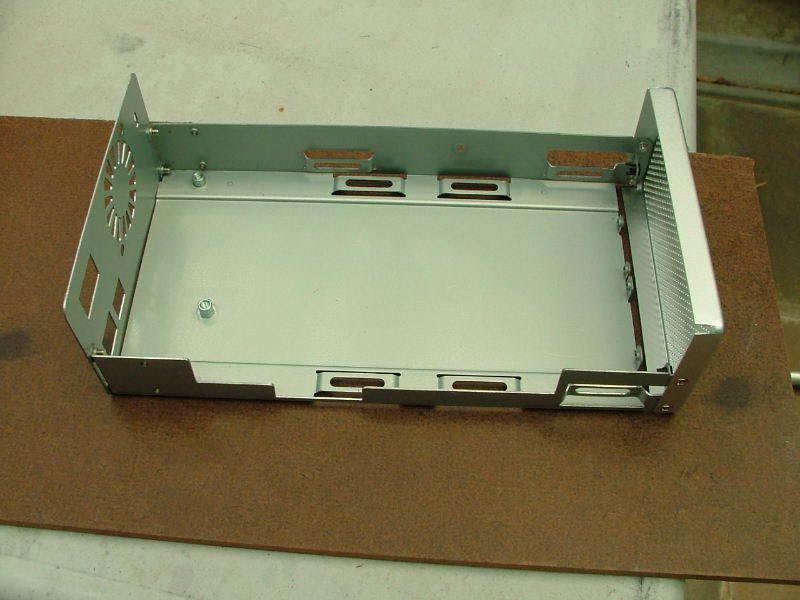
Nice, here is a few shots of the top, and side, one of them cut away to allow for fitment of the IO-ports.....
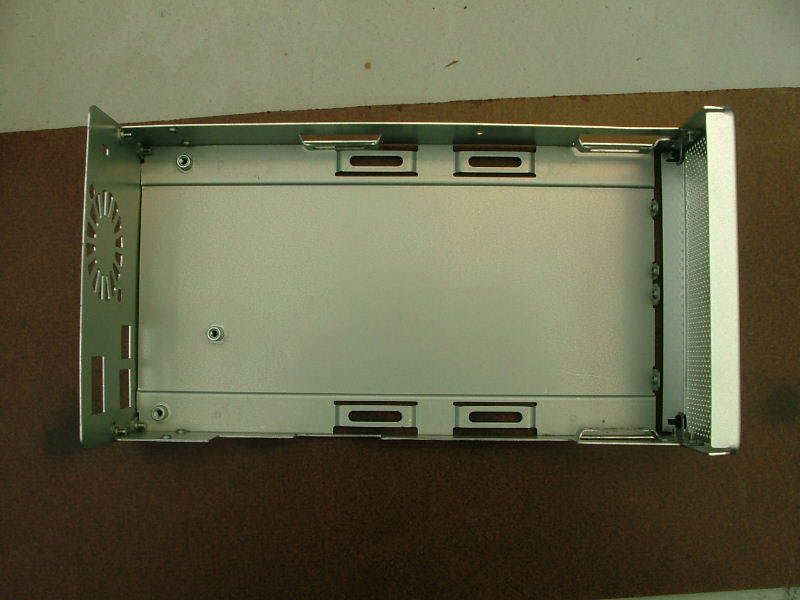
and side, with cut-outs done....

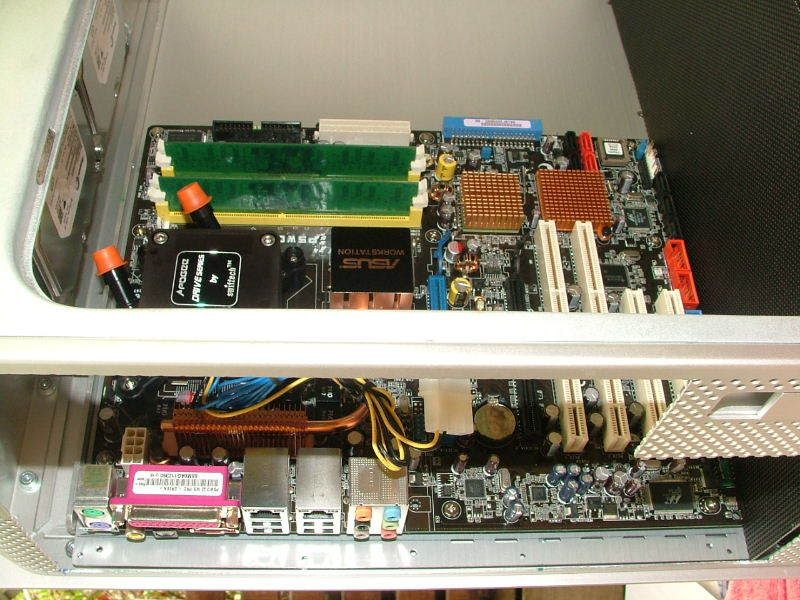
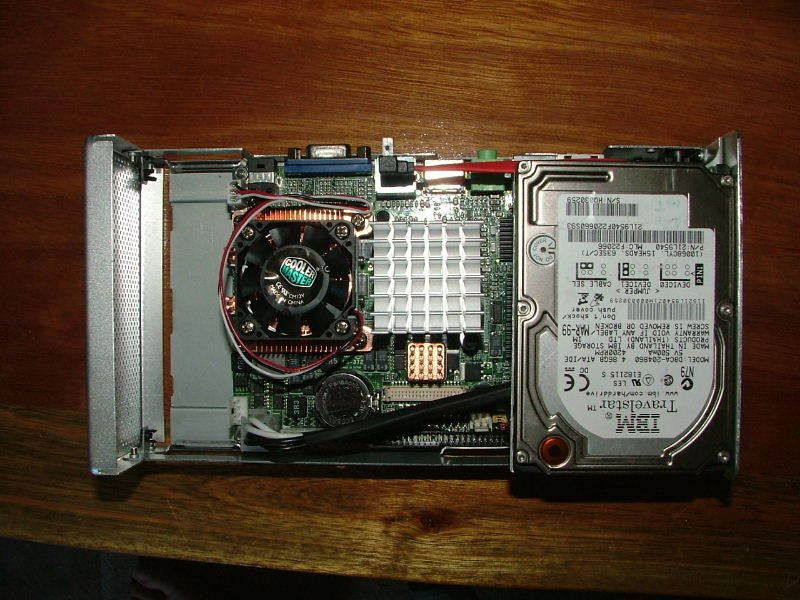
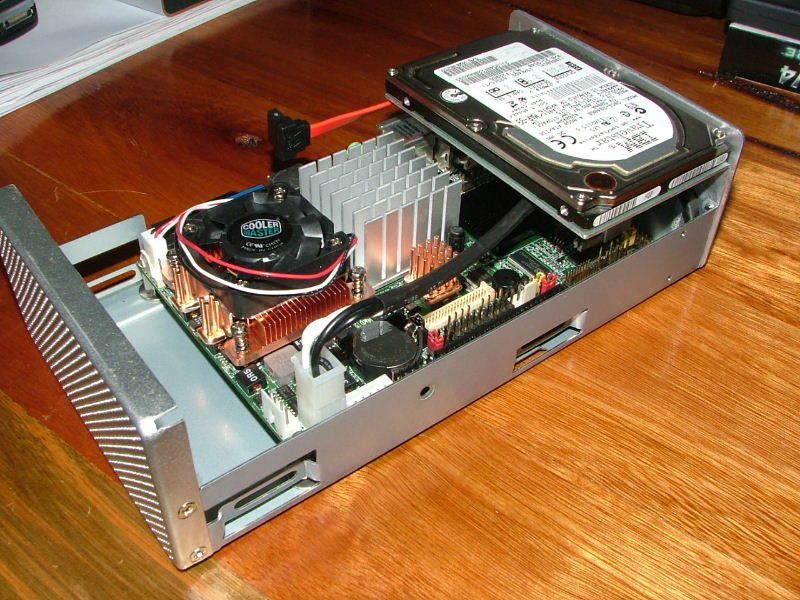
Here's a few shots showing how I fitted the motherboard, and (temporary) harddrive into the space available - the harddrive is for testfitting only, I am awaiting arrival of my Seagate Momentus 7200rpm 2.5" disk....
I also made a new back-plate, to replace the crappy stock galvanized-metal one....
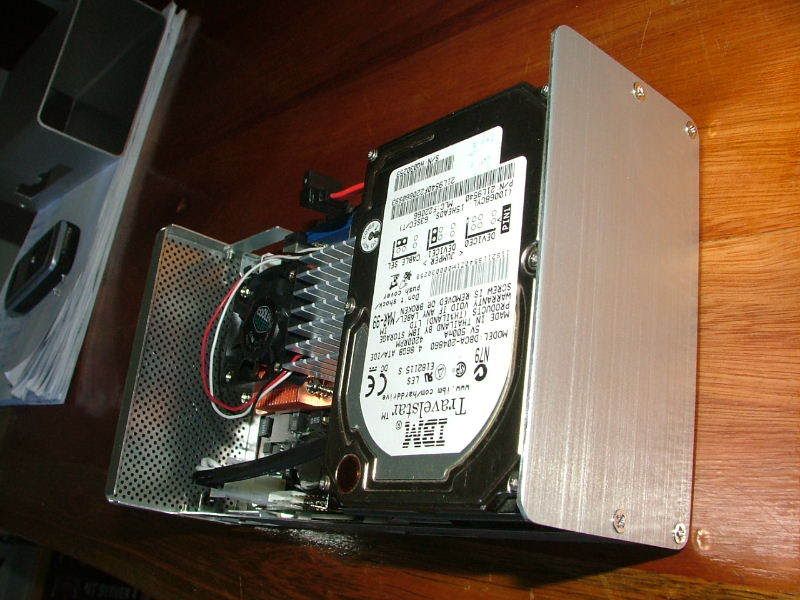
And here, with the cover fitted, compared to a standard DVD...
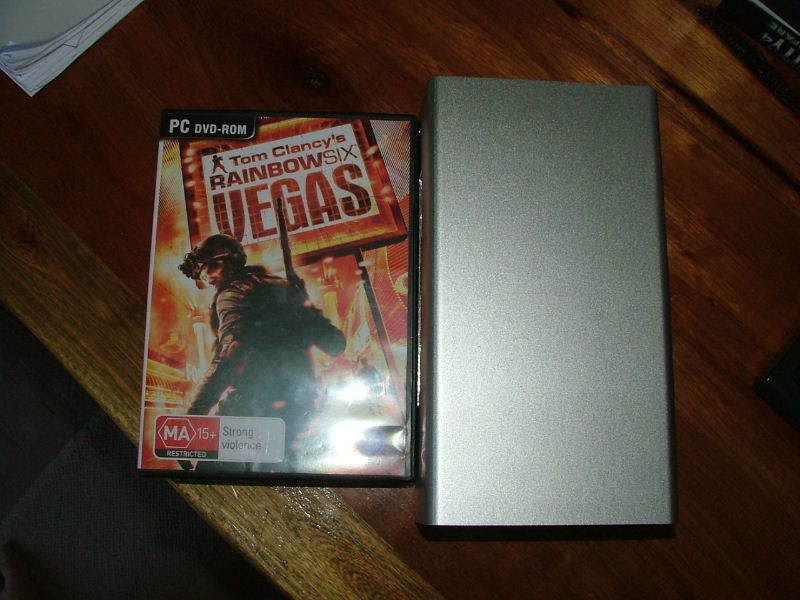
a shot showing the io-plate area, which is only temporary, and will get a lasercut custom aluminium one.....
and here, resting inside my G5 case, nice and cosy, ain't it?


It is very powerful, sports a T7300 Socket-P Core-2-Duo processor, 2gigs of SODimm ram, and a very nice 4gig 233x CF bootable card - as mentioned, I am still awaiting the harddrive, and won't be fitting a DVD multiburner, as it won't be needed for this application - just something I am developing for a Industrial solution.
Nice.....
I wanted this specific model cage, as it looks Apple G5, and I recently picked one up in Bangkok at IT Fortune City, where I got a single-bay version a few months back.....
Here it is stripped down, USB/Firewire electronics removed, and lid off - the front reminds you a bit of a G5, doesn't it?
Nice, here is a few shots of the top, and side, one of them cut away to allow for fitment of the IO-ports.....
and side, with cut-outs done....
Here's a few shots showing how I fitted the motherboard, and (temporary) harddrive into the space available - the harddrive is for testfitting only, I am awaiting arrival of my Seagate Momentus 7200rpm 2.5" disk....
I also made a new back-plate, to replace the crappy stock galvanized-metal one....
And here, with the cover fitted, compared to a standard DVD...
a shot showing the io-plate area, which is only temporary, and will get a lasercut custom aluminium one.....
and here, resting inside my G5 case, nice and cosy, ain't it?
It is very powerful, sports a T7300 Socket-P Core-2-Duo processor, 2gigs of SODimm ram, and a very nice 4gig 233x CF bootable card - as mentioned, I am still awaiting the harddrive, and won't be fitting a DVD multiburner, as it won't be needed for this application - just something I am developing for a Industrial solution.
Nice.....
hacosxuser
n00b
- Joined
- Feb 17, 2008
- Messages
- 1
and updates? amazing case
tylerdustin2008
[H]ard|Gawd
- Joined
- May 6, 2006
- Messages
- 1,834
and updates? amazing case
Yea same here. I have been watching this thread for a LONG time.
You start then stop...
Burning_Sensation
Weaksauce
- Joined
- Nov 14, 2007
- Messages
- 108
That's a serious Mod, and with all the hardware changes over time it's amazing you're still going on with it. Keep the updates coming....we're all anxiously awaiting the next installment...
Well, after much deliberation, and careful consideration, I decided to heed the words of Angel OD over at Bit-Tech
This is what I will receive Monday morning (19/05/08) - order placed, and payed for:
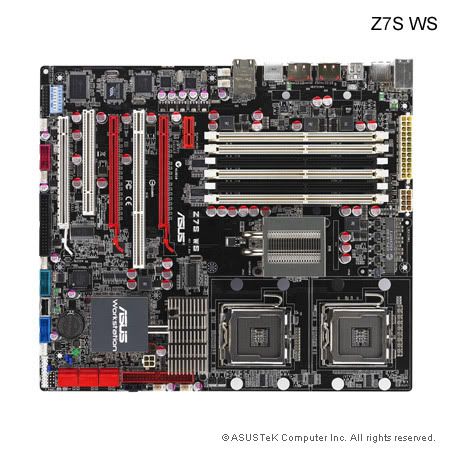
I had to wait a fair while for the proper motherboard to do this mod justice - well, finally it's here. Yes. it's overkill, I know, but it's not called Project Bad Apple for nothing
With this setup will go 2x E5430 Xeons, and 8gig of FB-Dimms - 4x 2gig config to realize full potential. The cpu's are 2.66gig units, 1333fsb - memory will be DDR2-800 speeds, and board will be running 1600fsb - hence at the default 8x multi, chips will be cosily potting along at 3.2gig, slightly overclocked.
I already have 2x HP SAS harddrives, and just received my HP ML370 G5 Server hot-plug 8x HD cage too.....look out for some real progress in the very near future.
I will post detailed pics on Monday night.
edit: Sometimes these type of mods take a lot of time, and, as was the case here, I did have no option than to wait for the proper hardware.
I will still be stuffed for a while without the GFX, as I am planning getting 1 of Nvidia's new 280's being released mid June. Well, I will finish this, guys, just be patient with me.
My plan was always to make something special of this one, and seeing there's quite a few very good examples out there now, ie Angel OD and Cyprio, I have to just go that extra mile
I don't receive sponsorship for this, so it takes a bit of saving up to buy the proper goodies.
This is what I will receive Monday morning (19/05/08) - order placed, and payed for:
I had to wait a fair while for the proper motherboard to do this mod justice - well, finally it's here. Yes. it's overkill, I know, but it's not called Project Bad Apple for nothing
With this setup will go 2x E5430 Xeons, and 8gig of FB-Dimms - 4x 2gig config to realize full potential. The cpu's are 2.66gig units, 1333fsb - memory will be DDR2-800 speeds, and board will be running 1600fsb - hence at the default 8x multi, chips will be cosily potting along at 3.2gig, slightly overclocked.
I already have 2x HP SAS harddrives, and just received my HP ML370 G5 Server hot-plug 8x HD cage too.....look out for some real progress in the very near future.
I will post detailed pics on Monday night.
edit: Sometimes these type of mods take a lot of time, and, as was the case here, I did have no option than to wait for the proper hardware.
I will still be stuffed for a while without the GFX, as I am planning getting 1 of Nvidia's new 280's being released mid June. Well, I will finish this, guys, just be patient with me.
My plan was always to make something special of this one, and seeing there's quite a few very good examples out there now, ie Angel OD and Cyprio, I have to just go that extra mile
I don't receive sponsorship for this, so it takes a bit of saving up to buy the proper goodies.
Yep, thanx, I know the issue with snoop filter and factory release Bios - latest one sitting on my usb stick, waiting for the board
I use the Dell Perc 5i, with battery - not the fastest, I know, but at $120 with battery and 256m cache I just could'nt let it go....
I use the Dell Perc 5i, with battery - not the fastest, I know, but at $120 with battery and 256m cache I just could'nt let it go....
Just some quick input required: Does anyone know where I can get a power distribution block, that will accept std SATA power cable input, and give me the option of gnd/3.3v/5v/12v output via a little distribution block?
Similar to the ones you get where you plug one std molex into, yet have various fan connections, 4-pin power connections etc out?
Will appreciate.
Kind regards,
Beanie.
Similar to the ones you get where you plug one std molex into, yet have various fan connections, 4-pin power connections etc out?
Will appreciate.
Kind regards,
Beanie.
Herewith a few (crappy) pics, my little Sony DSC-W50 not that good at night, and close-up - the bigger camera's batteries are flat, soz about quality. Will post some later as I make progress.
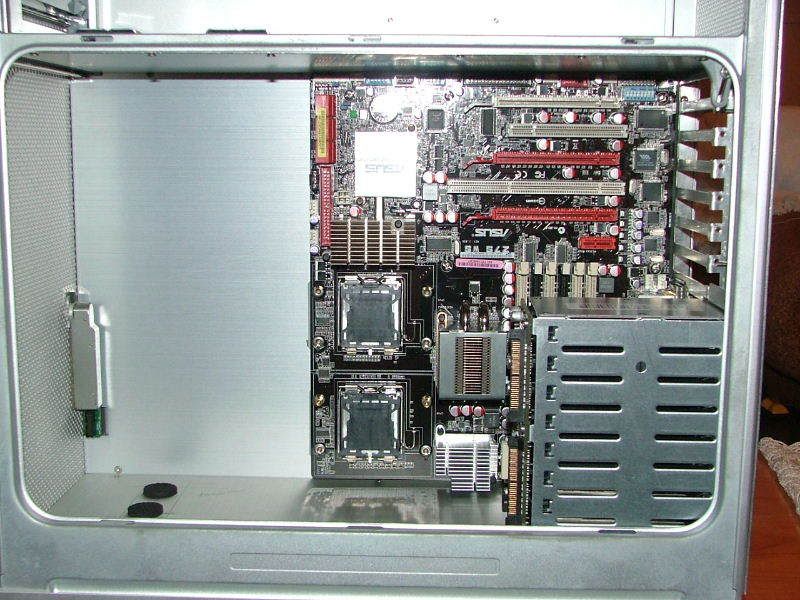
Here's a side-on with new motherboard fitted to motherboard backplate - I still have to secure the rear-cpu plates, but will only do so once I receive the D-Tek Fuzions.
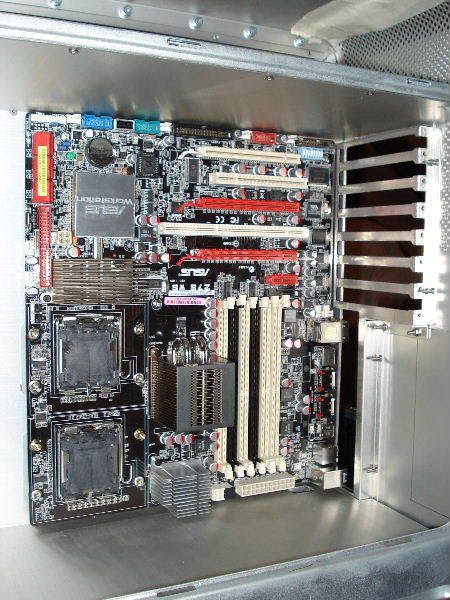
Here's a shot from the io-plate side:
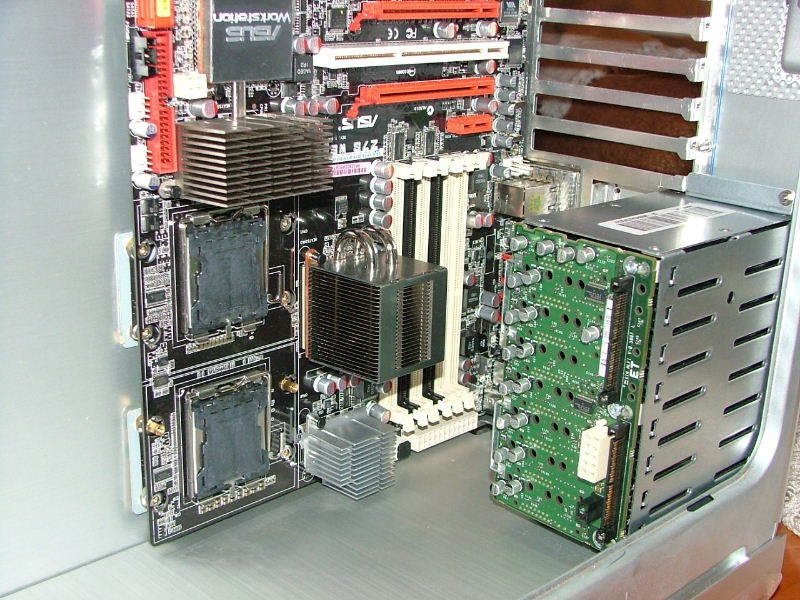
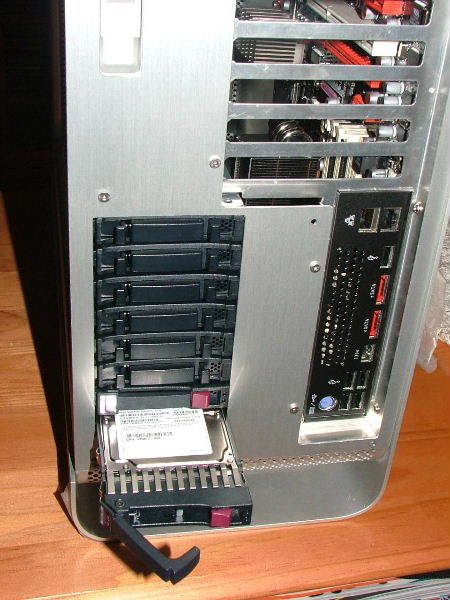
Here's one with the HP 8x Hot-plug drive cage I am using for this mod....bottom-right, also where it will be located, mounted to the backplate where a 120mm fan would usually go.....
Here's one of the cage from the rear io plate side, with 2x 146 SAS drives fitted...
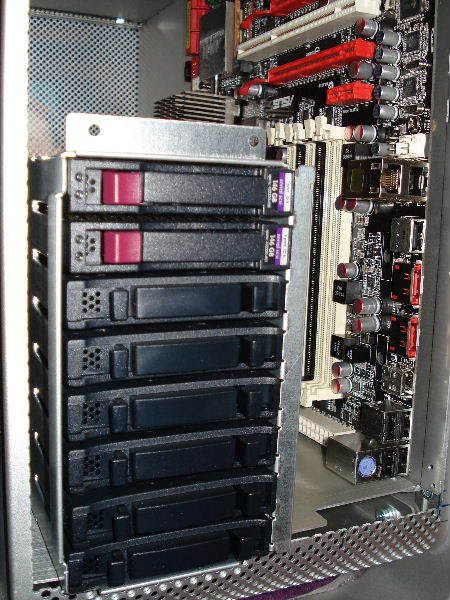
Here's the cage connector-side...
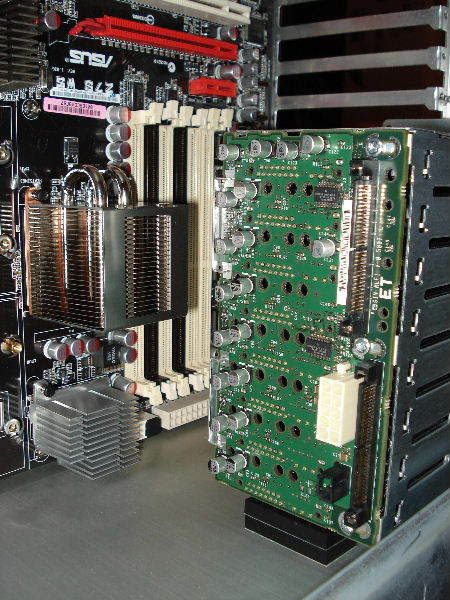
and the space left between motherboard and drive cage....
Better pics to follow, this is just to give you a brief of what I am busy with
Feedback appreciated.
Here's a side-on with new motherboard fitted to motherboard backplate - I still have to secure the rear-cpu plates, but will only do so once I receive the D-Tek Fuzions.
Here's a shot from the io-plate side:
Here's one with the HP 8x Hot-plug drive cage I am using for this mod....bottom-right, also where it will be located, mounted to the backplate where a 120mm fan would usually go.....
Here's one of the cage from the rear io plate side, with 2x 146 SAS drives fitted...
Here's the cage connector-side...
and the space left between motherboard and drive cage....
Better pics to follow, this is just to give you a brief of what I am busy with
Feedback appreciated.
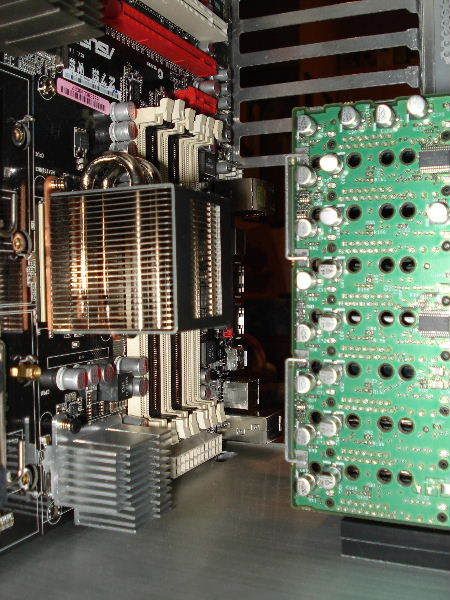
I'd be careful enclosing the fb-dimms like that, they run hot and need some sort of airflow around them. With the SAS cage on top and the northbridge heatsink beside them, you may end up with a dead air zone. Looks like you may have room to fit some 80 or 92 mm fans under the cage to suck air out, that may work.
Burning_Sensation
Weaksauce
- Joined
- Nov 14, 2007
- Messages
- 108
Nice, love the SAS drives as I use them in our HP's at work....keep the pics coming....
bicycle_wreck
[H]ard|Gawd
- Joined
- Nov 16, 2007
- Messages
- 1,202
SWEET.
Hey Guys,
Just a quick update: I have ordered 2x Kingston KTA-MP800K2/G4 800mHz kits, for a total of 8gig for the rig. They should be here on Thursday, same for the 2x Xeon E5430 2.66gig 1333fsb cpu's.
These will be run at 1600fsb for a total of 3.2gig, without anything else being run out of spec.
Nice, should have cpu's same time as the memory, so by the weekend I can look forward testing the hardware out.
Will keep you posted.
Burning_Sensation
Weaksauce
- Joined
- Nov 14, 2007
- Messages
- 108
Can I get a Woop, Woop!!!
NickS
[H]ard|Gawd
- Joined
- Sep 22, 2005
- Messages
- 1,953
Wow, subscribed!
I made real good progress tonight, skipped gym, and did some modding - I fitted the SAS HP harddrive cage, and jeesh, it looks seksi from behind - wow......absolutely stunning, and the first ever Apple G5 to go that route
Pics as soon as batteries are charged!
Br,
MrBean
Pics as soon as batteries are charged!
Br,
MrBean
Ok, here's the photos as promissed.
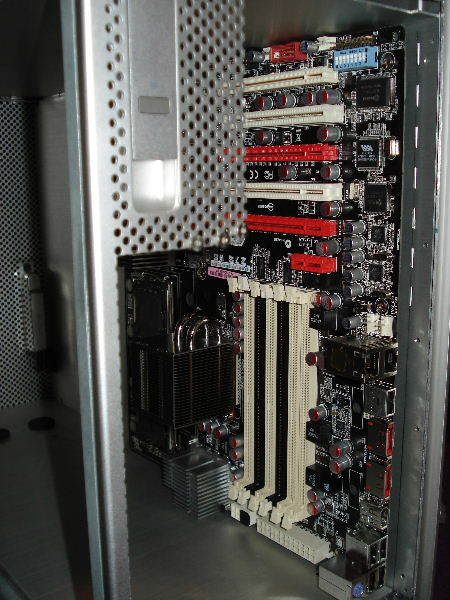
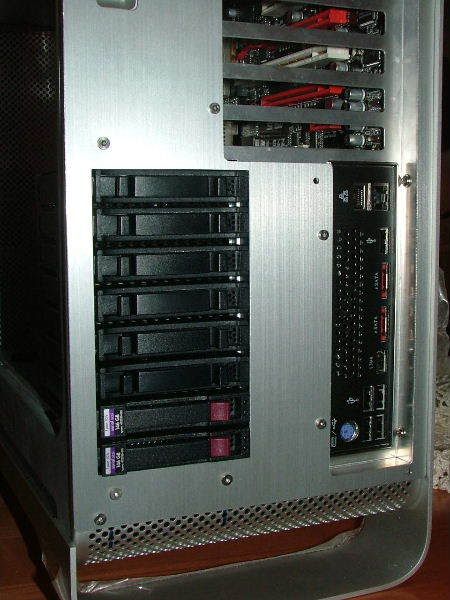
Here's a side-on view, showing harddrive cage location, and relationship to motherboard:
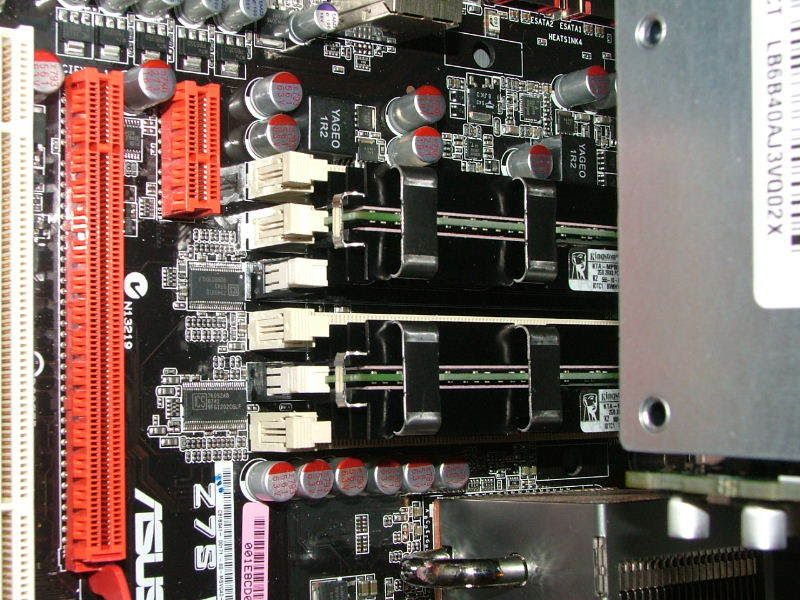
a better view, highlighting the ample space between FB-Dimm slots and HD Cage:
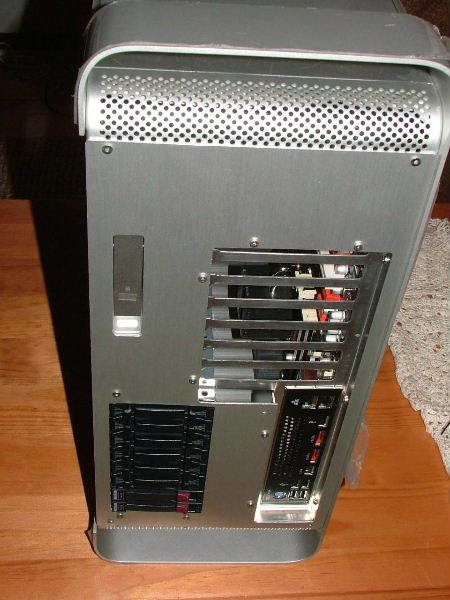
And here is the shots that do it for me, I did not think it would come this good, first G5 with SAS and hot-plug cage. I am really glad I could keep this mod unique, with quite a variety of (very good quality) G5 mods out there.

another 1:
a close-up shot:
and lastly, one showing 1 of the drives semi-ejected:
Your feedback and critisism would be appreciated, as always.
Kind regards,
MrBean
Here's a side-on view, showing harddrive cage location, and relationship to motherboard:
a better view, highlighting the ample space between FB-Dimm slots and HD Cage:
And here is the shots that do it for me, I did not think it would come this good, first G5 with SAS and hot-plug cage. I am really glad I could keep this mod unique, with quite a variety of (very good quality) G5 mods out there.
another 1:
a close-up shot:
and lastly, one showing 1 of the drives semi-ejected:
Your feedback and critisism would be appreciated, as always.
Kind regards,
MrBean
0ptional
Don't Trust Your Friends with Your Decanter
- Joined
- Feb 22, 2003
- Messages
- 5,594
yeah these G5 mods aren't cheap
coolchu001
Limp Gawd
- Joined
- May 27, 2007
- Messages
- 506
woah awesome job! great idea with the swappable hdds in the back!
Thanx Coolchu.
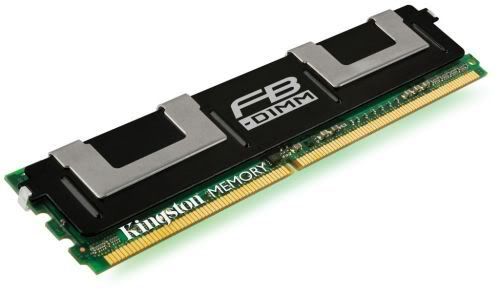
Small update - this arrived this afternoon - 8gig of pure FB-Dimm goodness:
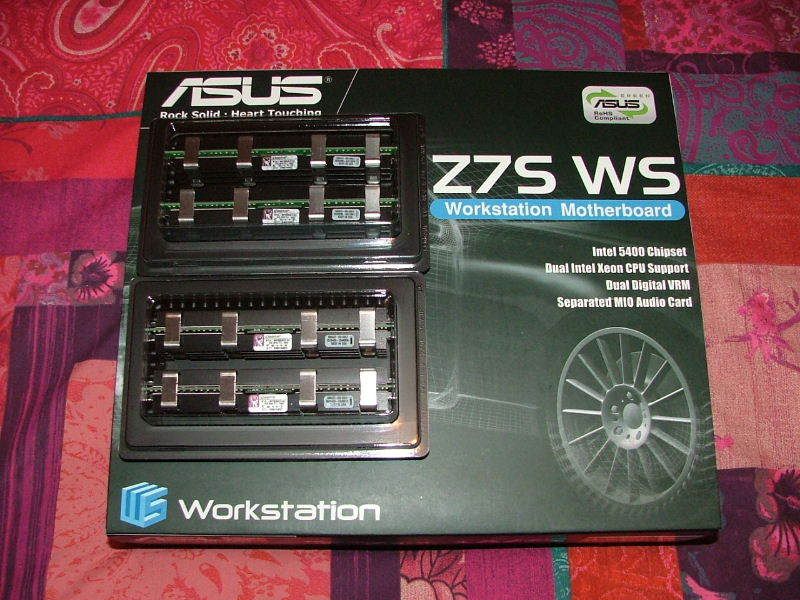
2x 2gb modules per pack, nice and cosy:
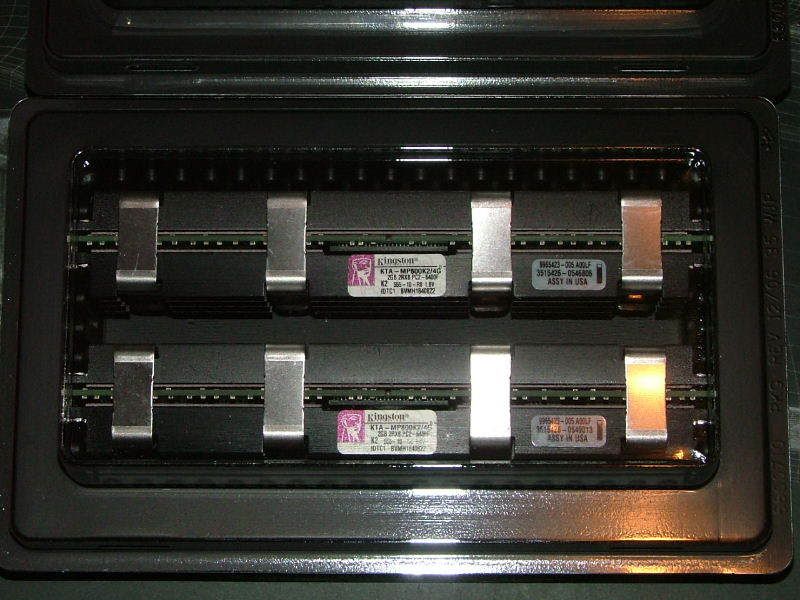
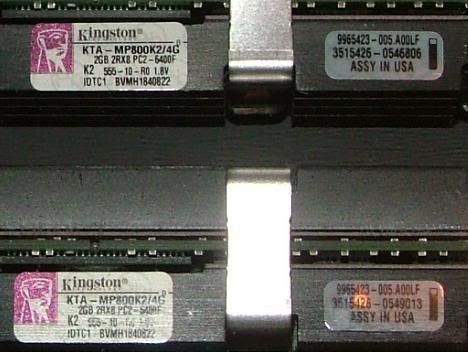
a close-up shot of the memory - so you can peek at the partnumbers:
and of course I knew when I opened the packaging, and saw the ramsinks, which were different to those displayed on the internet, that they won't fit proper - I can only get 2x in the 6 slots:
So, I guess I have to rip off the heatsinks, which is Apple MAc Pro default spec by the way, and try and get my hands on the std Kingston ones as fitted to their normal FB-Dimms.....
For now I will only run 2 (4gig total) until I can find smaller footprint heatsinks
Jeesh, I wish they would stick the proper pics on ebay.
Anyone knows where I can find decent, small-footprint ramsinks for these babies?
Small update - this arrived this afternoon - 8gig of pure FB-Dimm goodness:
2x 2gb modules per pack, nice and cosy:
a close-up shot of the memory - so you can peek at the partnumbers:
and of course I knew when I opened the packaging, and saw the ramsinks, which were different to those displayed on the internet, that they won't fit proper - I can only get 2x in the 6 slots:
So, I guess I have to rip off the heatsinks, which is Apple MAc Pro default spec by the way, and try and get my hands on the std Kingston ones as fitted to their normal FB-Dimms.....
For now I will only run 2 (4gig total) until I can find smaller footprint heatsinks
Jeesh, I wish they would stick the proper pics on ebay.
Anyone knows where I can find decent, small-footprint ramsinks for these babies?
First I love your mod, really clean, just the sas rack I don't like.
For your ram , take off the heatspreader , and buy a pair of Thermalright HR-07 Duo , but I not shure about height with your rack. http://www.thermalright.com/new_a_p..._hr07duo.htm?art=MTQyMywxLCxoZW50aHVzaWFzdA==
Your new motherboard is not sli
For your ram , take off the heatspreader , and buy a pair of Thermalright HR-07 Duo , but I not shure about height with your rack. http://www.thermalright.com/new_a_p..._hr07duo.htm?art=MTQyMywxLCxoZW50aHVzaWFzdA==
Your new motherboard is not sli
This was what was advertised, albeit with copper-colored heatspreaders:
I guess I can nicely ask Kingston to sell me just the heatspreaders?
@ Ultimeus: Thanx for the info/feedback But, those coolers do not support fb-dimms?
Yep, the title is old, this mod through many plans/motherboards, originally was going to be SLi - well, I could always use GX2 derivative gfx, strictly speaking still SLI...hehe
I guess I can nicely ask Kingston to sell me just the heatspreaders?
@ Ultimeus: Thanx for the info/feedback
But, those coolers do not support fb-dimms?Yep, the title is old, this mod through many plans/motherboards, originally was going to be SLi - well, I could always use GX2 derivative gfx, strictly speaking still SLI...hehe
This was what was advertised, albeit with copper-colored heatspreaders:
I guess I can nicely ask Kingston to sell me just the heatspreaders?
@ Ultimeus: Thanx for the info/feedback
Yep, the title is old, this mod through many plans/motherboards, originally was going to be SLi - well, I could always use GX2 derivative gfx, strictly speaking still SLI...hehe
Really don't know if HR-07 support fb-dimm, maybe you should contact them.
For sli I see your answer on Bit tech ^^ someone else says same thing , well I say yes for 9800gx2 to be native sli
I look @ thermalright site and HR-07 doesn't support FB-dimm , and googling I didn't find any heatspreader for Fb-dimm.
Edit :
This is the only one who sell fdimm heatspreaders I found http://www.avc.com.tw/products/FB DIMM.htm
Edit :
This is the only one who sell fdimm heatspreaders I found http://www.avc.com.tw/products/FB DIMM.htm
formula409
Limp Gawd
- Joined
- Apr 7, 2005
- Messages
- 311
For a heads up in case you didnt know about how the Z7S runs with only 2 sticks of memory, It runs much slower then it should provided you give each Channel (Per CPU) a stick if you only have 2 to use. There are two independent buses for the memory. One per CPU. Many people have had terrible results with this board speed wise because they stuck just two sticks on the one bus leaving a CPU starving and thus nearly cutting the boards overall speed by half in all the benchmarks / tests they threw at it blaming ASUS rather then the way they set it up. 6 sticks on this board also kills speed as each bus is also dual channel
I know you have 4 sticks, but if you must run two for any amount of time, make sure a stick is put on each bus.
I know you have 4 sticks, but if you must run two for any amount of time, make sure a stick is put on each bus.
formula409
Limp Gawd
- Joined
- Apr 7, 2005
- Messages
- 311
I'd be tempted to contact the seller and see if he'll take them back. They are clearly NOT what the picture shows
he picked up the Apple versions...
he picked up the Apple versions...
He received the Apple Specs ones...sounds like he wasn't expecting them. Most FB-DIMMs have the thin heat spreaders. Only Apple uses the finned version.