Hellraiser is hands down cool and quite scary, there are a fair amount of existing modded cases that pay tribute to the puzzle box but face it, the box isn't scary. Cenobites are scary, so I am shooting for a "what if the box opened and a case modder were transformed into a cenobite" kind of theme, here is my work log so far.
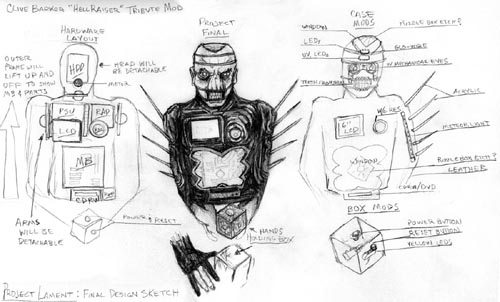
There is a lot happening in the picture below but the drawing tells the basic story and will be what I try to go by and will hopefully be close to what I end up with.
The mod officially begins with a few cuts... Boglin eyes have eyelids, both a moveable top eyelid and a static lower that need to be removed.
http://www.casemodgod.com/Hell00.jpg
I taped off the section to cut out of the torso and outlined it with a Sharpie.
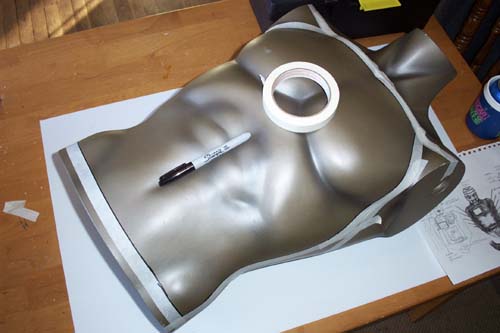
I cracked it open with a Dremel and a jigsaw, no easy task as the contour of the torso was a factor and also it wanted to melt as I cut it.
http://www.casemodgod.com/mannequinhack01.jpg
I cut down a Lian Li motherboard tray, it is not finished yet and more material will be taken off the top. I was concerned with the amount of room (or lack of) around the sides of the board so I mounted it to the tray and set it and the PSU in for a test fit.

I used an old 4GB drive as a template to get everything lined up, the IDE and power cables will connect at the bottom of the drive behind the motherboard tray.
http://www.casemodgod.com/Hell13.jpg
Cutting straight lines into a contoured surface isn't easy so I bought a contour guide and set about cutting a hole for the LCD. I also taped off and outlined the abdomen window cut out.
http://www.casemodgod.com/Hell19.jpg
I put the plexi into my electric oven at 275 degrees for 12 minutes, when it looked softened I took it out, and wearing 'Ove' gloves began quickly forming it around the felt covered abdomen cut out. After the Plexi cooled I traced the edges with a Sharpie marker.

Here is a test fit of the window, the shape is great but the edges are not as tight as I expected and will require a little more work...

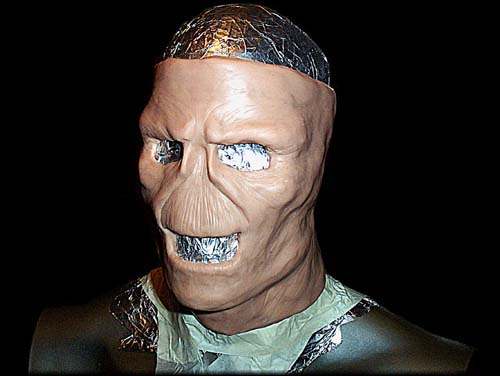
I decided to move onto working on the head. First I covered the masking tape wrapped head in aluminum foil, this should make removing the Sculpey a lot easier.
]http://www.casemodgod.com/Hell28.jpg
The picture below shows the continuing process of filling everything in, I added some final details and it looks pretty evil so far, the Super Sculpey has proven to be a very workable sculpting medium, I hope it stays as easy to work with after cooking it.
The Fass-o-Matic reservoir was a little smaller than I had envisioned but no big deal.
http://www.casemodgod.com/Hell47.jpg
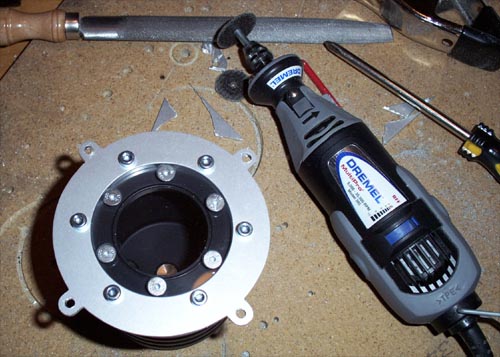
I used an 80mm hole saw bit on my trusty Black&Decker corded drill to rip a hole, the drill seized up a few times when the hole saw would catch up in the cooling plastic.
http://www.casemodgod.com/Hell49.jpg
After an hour and a half of cutting, drilling and filing the modded cover plate is finally finished.
Next to take an atomic grill and cut it down to make a border for the outside of the reservoir cutout.
http://www.casemodgod.com/Hell66.jpg
I also super glued the window in place which was a nightmare but wound up being ok in the end, below is a picture of the almost finished abdomen section.
The pump fits into the cutout and will be attached to the Alum-angle for the MB tray and also to the base when I make it.
http://www.casemodgod.com/Hell76.jpg
I also positioned and then cut a hole for the radiator, it lines up nicely with everything else and thankfully the torso is still structurally sound
http://www.casemodgod.com/Hell77.jpg
I outlined the handle cutout with terra-cotta Milliput and marked the holes for the bolts.
http://www.casemodgod.com/Hell82.jpg
I used a 1" hole saw to cut the opening for the fill port and tested for fit, the plexi glass nut that comes with it will not fit so I plan to screw it into the mannequin itself.
http://www.casemodgod.com/Hell83.jpg
I decided to dump the hard drive in the head idea in favor of putting a Laserpod inside the head, below is the unit in red.
I did a test fit of the top window using masking tape, I also cut out the teeth and placed them inside the head for a test fit.
http://www.casemodgod.com/Hell91.jpg
I took the newly formed plexi window and drew a brain pattern onto the outside of it using a silver Sharpie marker.
http://www.casemodgod.com/Hell96.jpg
A couple hours of Dremeling later and I had a cool custom brain etch. I then used Magic Sculpt on the inside edges to hold the window in.
Once everything was dry it was time to mock up the lighting mods for the head and see how it looked.
http://www.casemodgod.com/Hell98.jpg
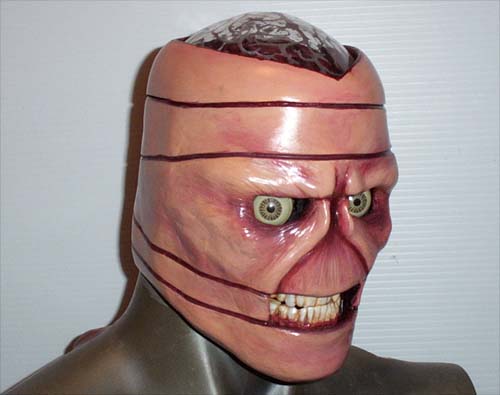
I began painting the head by laying down a base coat and working it up with more color as I went.
http://www.casemodgod.com/Hell102.jpg
Here is the top of the head removed, since you will be able to see it from the top window I painted the inside of the head a dark blood red.
Below is a test fit of the Glo-wire, I almost talked myself out of using it because it looks so cool with just the bloody lines in the face but it looks kick ass installed and on. I also did a little more paint detailing
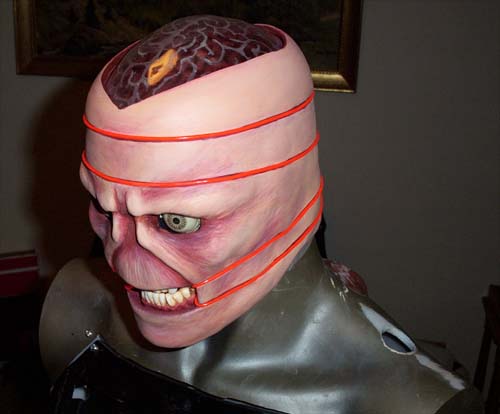
I removed the eyeballs and painted the assembly for them black, I also added the final detailing to the head (including making the top window cutout bloodier and jagged) in preparation for varnishing. Three coats of varnish and the eyeballs reinstalled, the finished product is below.
I started wrapping the torso in leather, or I should say I wrapped the abdomen window section. The window has been simplified in comparison to my original sketch, but I think it will tie in better when finished this way.
http://www.casemodgod.com/Hell109.jpg
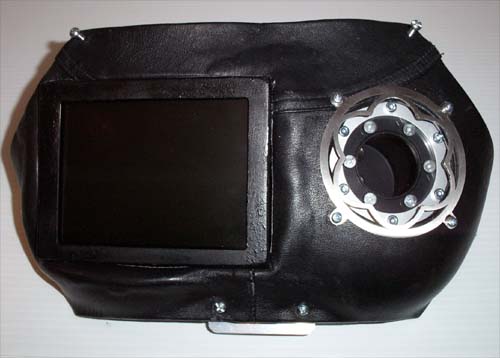
Below is the finished chest section, I added the cover plate to the LCD to hide the wires on the side of the unit.
I put everything together to get a rough idea of what the finished mod should look like...
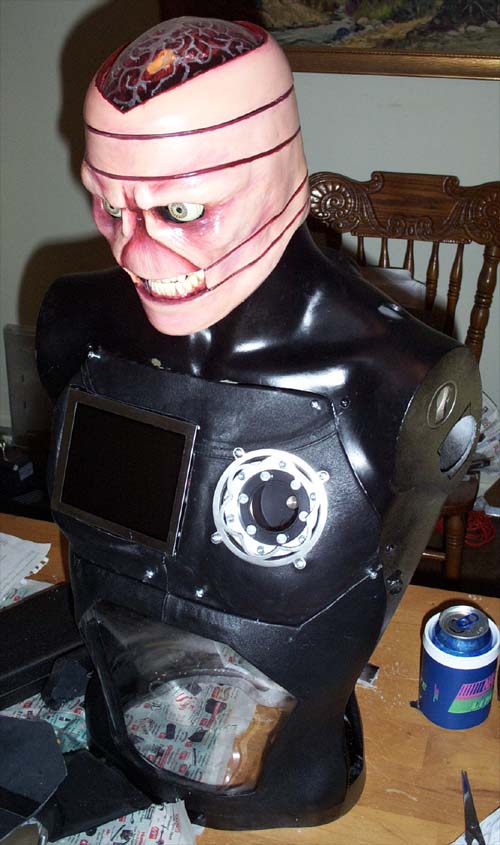
More updates soon, See the entire work log: http://www.casemodgod.com/cmg/Worklog-story--9.html
There is a lot happening in the picture below but the drawing tells the basic story and will be what I try to go by and will hopefully be close to what I end up with.
The mod officially begins with a few cuts... Boglin eyes have eyelids, both a moveable top eyelid and a static lower that need to be removed.
http://www.casemodgod.com/Hell00.jpg
I taped off the section to cut out of the torso and outlined it with a Sharpie.
I cracked it open with a Dremel and a jigsaw, no easy task as the contour of the torso was a factor and also it wanted to melt as I cut it.
http://www.casemodgod.com/mannequinhack01.jpg
I cut down a Lian Li motherboard tray, it is not finished yet and more material will be taken off the top. I was concerned with the amount of room (or lack of) around the sides of the board so I mounted it to the tray and set it and the PSU in for a test fit.
I used an old 4GB drive as a template to get everything lined up, the IDE and power cables will connect at the bottom of the drive behind the motherboard tray.
http://www.casemodgod.com/Hell13.jpg
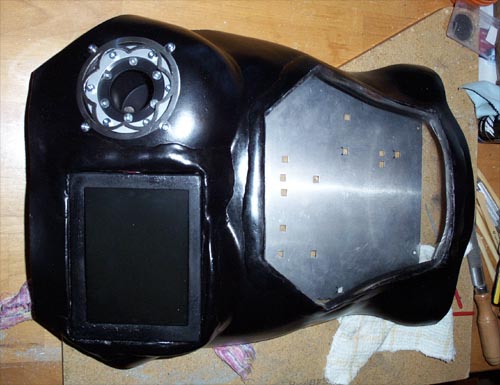
Cutting straight lines into a contoured surface isn't easy so I bought a contour guide and set about cutting a hole for the LCD. I also taped off and outlined the abdomen window cut out.
http://www.casemodgod.com/Hell19.jpg
I put the plexi into my electric oven at 275 degrees for 12 minutes, when it looked softened I took it out, and wearing 'Ove' gloves began quickly forming it around the felt covered abdomen cut out. After the Plexi cooled I traced the edges with a Sharpie marker.
Here is a test fit of the window, the shape is great but the edges are not as tight as I expected and will require a little more work...
I decided to move onto working on the head. First I covered the masking tape wrapped head in aluminum foil, this should make removing the Sculpey a lot easier.
]http://www.casemodgod.com/Hell28.jpg
The picture below shows the continuing process of filling everything in, I added some final details and it looks pretty evil so far, the Super Sculpey has proven to be a very workable sculpting medium, I hope it stays as easy to work with after cooking it.
The Fass-o-Matic reservoir was a little smaller than I had envisioned but no big deal.
http://www.casemodgod.com/Hell47.jpg
I used an 80mm hole saw bit on my trusty Black&Decker corded drill to rip a hole, the drill seized up a few times when the hole saw would catch up in the cooling plastic.
http://www.casemodgod.com/Hell49.jpg
After an hour and a half of cutting, drilling and filing the modded cover plate is finally finished.
Next to take an atomic grill and cut it down to make a border for the outside of the reservoir cutout.
http://www.casemodgod.com/Hell66.jpg
I also super glued the window in place which was a nightmare but wound up being ok in the end, below is a picture of the almost finished abdomen section.
The pump fits into the cutout and will be attached to the Alum-angle for the MB tray and also to the base when I make it.
http://www.casemodgod.com/Hell76.jpg
I also positioned and then cut a hole for the radiator, it lines up nicely with everything else and thankfully the torso is still structurally sound
http://www.casemodgod.com/Hell77.jpg
I outlined the handle cutout with terra-cotta Milliput and marked the holes for the bolts.
http://www.casemodgod.com/Hell82.jpg
I used a 1" hole saw to cut the opening for the fill port and tested for fit, the plexi glass nut that comes with it will not fit so I plan to screw it into the mannequin itself.
http://www.casemodgod.com/Hell83.jpg
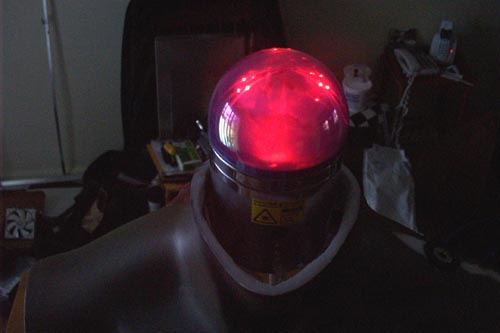
I decided to dump the hard drive in the head idea in favor of putting a Laserpod inside the head, below is the unit in red.
I did a test fit of the top window using masking tape, I also cut out the teeth and placed them inside the head for a test fit.
http://www.casemodgod.com/Hell91.jpg
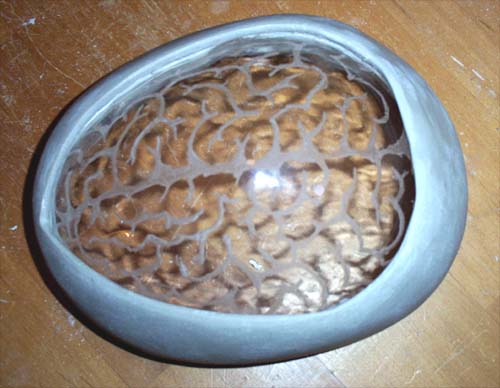
I took the newly formed plexi window and drew a brain pattern onto the outside of it using a silver Sharpie marker.
http://www.casemodgod.com/Hell96.jpg
A couple hours of Dremeling later and I had a cool custom brain etch. I then used Magic Sculpt on the inside edges to hold the window in.
Once everything was dry it was time to mock up the lighting mods for the head and see how it looked.
http://www.casemodgod.com/Hell98.jpg
I began painting the head by laying down a base coat and working it up with more color as I went.
http://www.casemodgod.com/Hell102.jpg
Here is the top of the head removed, since you will be able to see it from the top window I painted the inside of the head a dark blood red.
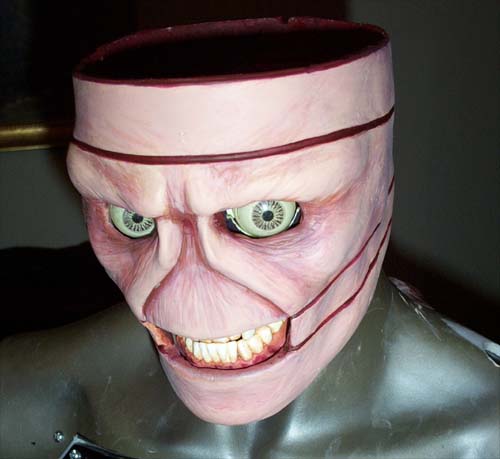
Below is a test fit of the Glo-wire, I almost talked myself out of using it because it looks so cool with just the bloody lines in the face but it looks kick ass installed and on. I also did a little more paint detailing
I removed the eyeballs and painted the assembly for them black, I also added the final detailing to the head (including making the top window cutout bloodier and jagged) in preparation for varnishing. Three coats of varnish and the eyeballs reinstalled, the finished product is below.
I started wrapping the torso in leather, or I should say I wrapped the abdomen window section. The window has been simplified in comparison to my original sketch, but I think it will tie in better when finished this way.
http://www.casemodgod.com/Hell109.jpg
Below is the finished chest section, I added the cover plate to the LCD to hide the wires on the side of the unit.
I put everything together to get a rough idea of what the finished mod should look like...
More updates soon, See the entire work log: http://www.casemodgod.com/cmg/Worklog-story--9.html


