Dude wtf, you gotta go for the assless chaps! (assless chaps, classic!) Seriously tho I love your mod so far, I am a huge Hellraiser fan. So is my brother, he is so much a fan of Clive Barker (he is the creator of hellraiser FYI) that he has 2 orginal drawings done by Clive tatooed on his left and right shoulders. I cant wait to show him your work. Keep it up.
Navigation
Install the app
How to install the app on iOS
Follow along with the video below to see how to install our site as a web app on your home screen.
Note: This feature may not be available in some browsers.
More options
-
Some users have recently had their accounts hijacked. It seems that the now defunct EVGA forums might have compromised your password there and seems many are using the same PW here. We would suggest you UPDATE YOUR PASSWORD and TURN ON 2FA for your account here to further secure it. None of the compromised accounts had 2FA turned on.
Once you have enabled 2FA, your account will be updated soon to show a badge, letting other members know that you use 2FA to protect your account. This should be beneficial for everyone that uses FSFT.
You are using an out of date browser. It may not display this or other websites correctly.
You should upgrade or use an alternative browser.
You should upgrade or use an alternative browser.
Project Lament: HellRaiser Tribute Mod
- Thread starter ARTbyTROY
- Start date
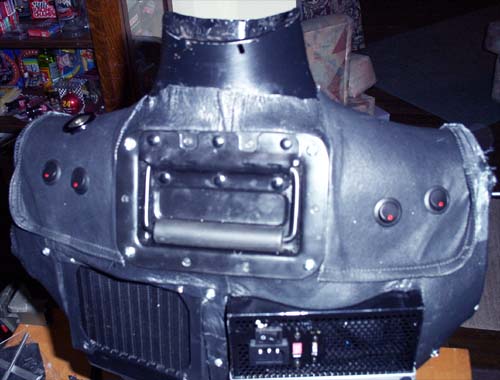
I installed four red LED rocker switches onto the shoulder blades to control the lighting mods.
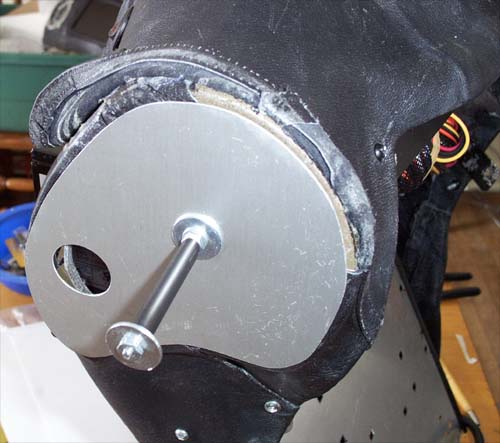
To begin making arms I first drew and cut out a template to trace onto the scrap aluminum from the top window on MOBY2... never throw good scraps away.
http://www.casemodgod.com/Hell121.jpg
I cut them out with a Dremel and filed them smooth, next I puzzled together some hardware so that they can attach to the torso.
http://www.casemodgod.com/Hell122.jpg
Below is a test fit, everything lines up good and feels solid.
I removed the base from both Viewsonic speakers then cut and drilled four strips of flat Alum-Angle to hold them in place.
http://www.casemodgod.com/Hell124_copy.jpg
Here is a parting shot of both speakers installed, not too shabby considering I built the assemblies on the fly with no real plan.
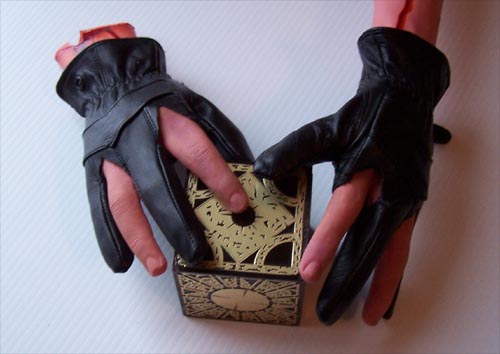
I took the two right hands and made one of them a left hand by cutting off the thumb and pinky and duct taping them on their opposing side. I also removed the lining and cut down the pair of leather gloves.
I connected together and then soldered a fan power cable onto each of the two side by side 12 LED brake light assemblies, heat shrinking all the connections as I went. I used door edge molding to line the strips up to each other and then wrapped them with electrical tape in the center and on the ends.
http://www.casemodgod.com/Hell127.jpg
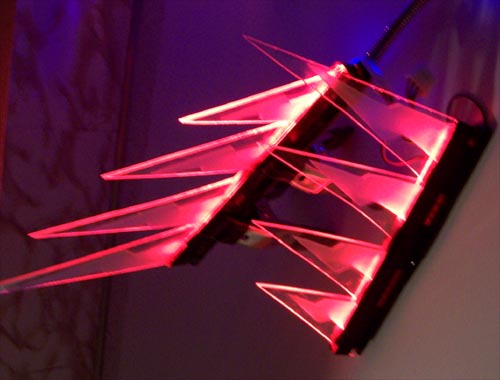
Below are the spikes for the backs of the arms being assembled, I made the spikes out of scrap plexi from the local hardware and each consists of four layers of plexi. The middle two layers are the spikes, the zig-zag spike layer was sanded for a frosted effect and the inside edge was heat polished, the outer two layers are there only to provide a channel for the rows of LEDs. I glued the layers together and when dry I placed the LED strip inside the channel and wrapped it with duct tape for good measure.
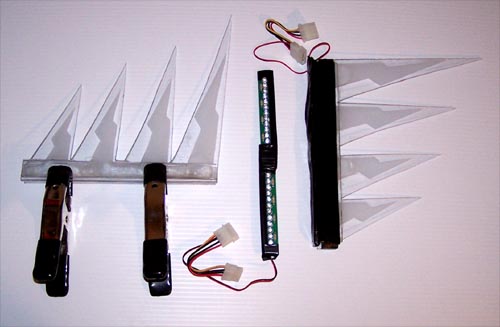
Here they are all lit up (with flash on)...
http://www.casemodgod.com/Hell129.jpg
Below, no flash... much bling.
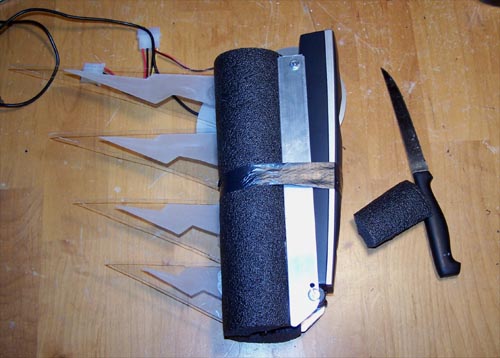
We recently replaced our hot water heater and didn't use all the foam for the pipes because they were short, the leftover piece (top of below pic) will be formed into the flesh of the arms. I also bought a long length of a smaller diameter thinner foam to fill in the musculature of the arms. Everything I used to make the arms is shown in the picture below.
http://www.casemodgod.com/Hell131.jpg
Below shows the upper arm assembly roughed out and ready for some foam detailing. The insulating foam tubing cuts easily with a serrated edge steak knife. I also plugged in all the cables for the speakers before I started filling it in.
And below you can see why... it is all held together by good old black duct tape.
http://www.casemodgod.com/Hell133.jpg
Here they are almost finished, I added a little more foam to the left forearm since the below picture was taken and it no longer looks deformed (though for something like this deformity wouldn't really matter). The arms are very light weight (around 5 lbs. each), which is a good thing.
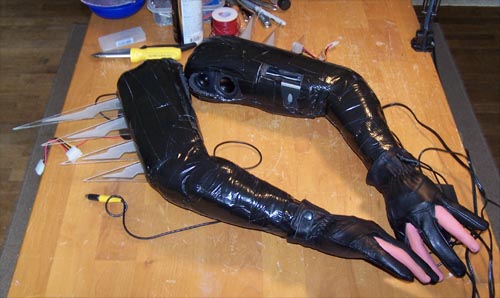
The picture below shows the arms fleshed out (minus what I added to the left forearm) and installed. The arms go on and come off really easily, which was one of my big goals for this mod and necessary for the removal of the abdomen and chest sections. Now I have to wrap them in leather, that's not as easy as it sounds due to the spikes and speakers... but I have a plan.
http://www.casemodgod.com/Hell135.jpg
I connected together and then soldered a fan power cable onto each of the two side by side 12 LED brake light assemblies, heat shrinking all the connections as I went. I used door edge molding to line the strips up to each other and then wrapped them with electrical tape in the center and on the ends.
http://www.casemodgod.com/Hell127.jpg
Below are the spikes for the backs of the arms being assembled, I made the spikes out of scrap plexi from the local hardware and each consists of four layers of plexi. The middle two layers are the spikes, the zig-zag spike layer was sanded for a frosted effect and the inside edge was heat polished, the outer two layers are there only to provide a channel for the rows of LEDs. I glued the layers together and when dry I placed the LED strip inside the channel and wrapped it with duct tape for good measure.
Here they are all lit up (with flash on)...
http://www.casemodgod.com/Hell129.jpg
Below, no flash... much bling.
We recently replaced our hot water heater and didn't use all the foam for the pipes because they were short, the leftover piece (top of below pic) will be formed into the flesh of the arms. I also bought a long length of a smaller diameter thinner foam to fill in the musculature of the arms. Everything I used to make the arms is shown in the picture below.
http://www.casemodgod.com/Hell131.jpg
Below shows the upper arm assembly roughed out and ready for some foam detailing. The insulating foam tubing cuts easily with a serrated edge steak knife. I also plugged in all the cables for the speakers before I started filling it in.
And below you can see why... it is all held together by good old black duct tape.
http://www.casemodgod.com/Hell133.jpg
Here they are almost finished, I added a little more foam to the left forearm since the below picture was taken and it no longer looks deformed (though for something like this deformity wouldn't really matter). The arms are very light weight (around 5 lbs. each), which is a good thing.
The picture below shows the arms fleshed out (minus what I added to the left forearm) and installed. The arms go on and come off really easily, which was one of my big goals for this mod and necessary for the removal of the abdomen and chest sections. Now I have to wrap them in leather, that's not as easy as it sounds due to the spikes and speakers... but I have a plan.
http://www.casemodgod.com/Hell135.jpg
SpangeMonkee
[H]ard|Gawd
- Joined
- Dec 18, 2001
- Messages
- 1,435
where did you get the hands?
Here are the arms all wrapped up and installed, they came out better than I could have hoped and things are moving right along.
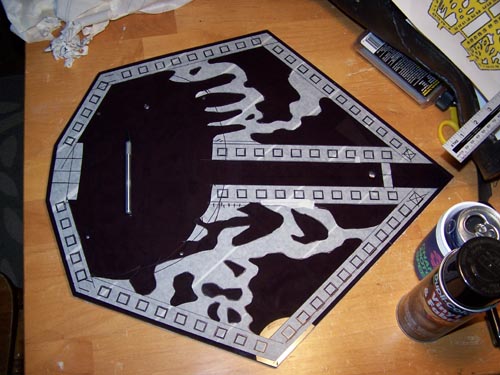
ACRyan sent one of their smoked Acrylpanels for me to use as a base for this mod, I have nothing but good things to say about this product... it is thick as hell and very easy to work with. I masked the entire sheet off both front and back and marked it with a sharpie for cutting.
http://www.casemodgod.com/Hell138.jpg
Now that it is cut to shape I will mark and drill the holes that will hold the mannequin to the base. While I was at it I also drilled holes for the puzzle box and wiring to go through.
http://www.casemodgod.com/Hell139.jpg
I had decided right after I got the Acrylpanel that even though it was plenty sharp looking as is that it would look better if I vinyl dyed a section from the puzzle box onto the bottom of it.
http://www.casemodgod.com/Hell140.jpg
So I re-masked the whole thing, drew my pattern onto it and attacked it with an X-Acto knife. Below is the masked section all cut out and awaiting a coat of black vinyl dye.
And in the next picture you can see it after I removed the mask, next I sprayed it with a very pale yellow coat and topped it off with a final coating of black.
http://www.casemodgod.com/Hell142.jpg
And the finished back painted Acrylpanel base is below.
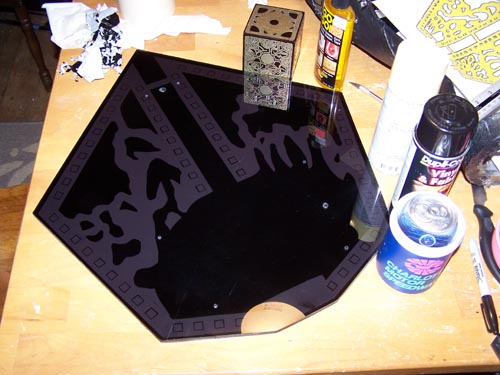
Since there will be wiring for the power button below the base I decided to use some case feet from a Lian-Li and two that I snagged from my daughters PC on the bottom of the base. I vinyl dyed all of the feet black and installed them.
http://www.casemodgod.com/Hell144.jpg
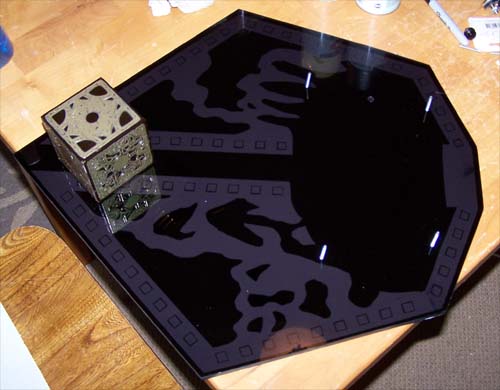
Next I test installed the puzzle box, it will be held in place two screws inside it.
http://www.casemodgod.com/Hell145.jpg
I have already installed the power switch into the box, but haven't taken a picture of it yet. Below is the finished base, all that is left now are wiring mods and final assembly... not far now.
ACRyan sent one of their smoked Acrylpanels for me to use as a base for this mod, I have nothing but good things to say about this product... it is thick as hell and very easy to work with. I masked the entire sheet off both front and back and marked it with a sharpie for cutting.
http://www.casemodgod.com/Hell138.jpg
Now that it is cut to shape I will mark and drill the holes that will hold the mannequin to the base. While I was at it I also drilled holes for the puzzle box and wiring to go through.
http://www.casemodgod.com/Hell139.jpg
I had decided right after I got the Acrylpanel that even though it was plenty sharp looking as is that it would look better if I vinyl dyed a section from the puzzle box onto the bottom of it.
http://www.casemodgod.com/Hell140.jpg
So I re-masked the whole thing, drew my pattern onto it and attacked it with an X-Acto knife. Below is the masked section all cut out and awaiting a coat of black vinyl dye.
And in the next picture you can see it after I removed the mask, next I sprayed it with a very pale yellow coat and topped it off with a final coating of black.
http://www.casemodgod.com/Hell142.jpg
And the finished back painted Acrylpanel base is below.
Since there will be wiring for the power button below the base I decided to use some case feet from a Lian-Li and two that I snagged from my daughters PC on the bottom of the base. I vinyl dyed all of the feet black and installed them.
http://www.casemodgod.com/Hell144.jpg
Next I test installed the puzzle box, it will be held in place two screws inside it.
http://www.casemodgod.com/Hell145.jpg
I have already installed the power switch into the box, but haven't taken a picture of it yet. Below is the finished base, all that is left now are wiring mods and final assembly... not far now.
The switch is installed into the box and the wiring is run beneath the base, the water pump is also installed onto the base. The long bunch of wire at the bottom of the picture is how much I removed from the back of the pump.

I got all the wiring finished up, what a nightmare. It still needs to be cleaned up, but everything is set to be plugged in. You can see the power button on the box in the lower right corner of the picture below.
Finishing up the wiring also meant hooking up the 6" LCD screen and changing out the blue Fass-o-matic LED for a red one. I plugged in a SpongeBob handheld video game to test the screen out... SpongeBob.

Not far now and I will be able to let my wife have the dining room back... LOL.
I got all the wiring finished up, what a nightmare. It still needs to be cleaned up, but everything is set to be plugged in. You can see the power button on the box in the lower right corner of the picture below.
Finishing up the wiring also meant hooking up the 6" LCD screen and changing out the blue Fass-o-matic LED for a red one. I plugged in a SpongeBob handheld video game to test the screen out... SpongeBob.
Not far now and I will be able to let my wife have the dining room back... LOL.
undeadsac said:can someone post the pics for this thing, they're all broken links.
repeat
bored-sarcasm
Gawd
- Joined
- Apr 9, 2003
- Messages
- 888
wow. that paint turned out pretty damn good. creepy, but awesome.
Modch1ld88
n00b
- Joined
- Apr 22, 2005
- Messages
- 50
DAMN! Troy didnt even know you had the project here too. cool to see all the dif. ppl on the dif. forums talk about it.
That Case is GOD!
wish i had the talent and experience to do that man... right now im just figuring out things but im on my way, tho i dont know what type of lcd to use in my case like what interface and what not? lol oh well ill figure it out.
nice work man. also love the fact that the rank on you is noobie kinda funny in a way.
Copenhagen69
2[H]4U
- Joined
- Apr 25, 2005
- Messages
- 2,290
wow good job there....
i just dont know about makin a case that would give me nightmares") haha
haha
i just dont know about makin a case that would give me nightmares
hahaThanks everyone, truth be told I am kinda sick of this thing (already nicknamed him the HellRaiser fucko) and reading all the positive feedback is what is inspiring me to finish it.
In the meantime I have painted the leather black using acrylic paint to cover all the spots of vinyl flooring adhesive that were all over it from gluing down the leather, I plan to glaze it tomorrow. I am also hoping to do some more work to the inside of the head tomorrow, sorry there aren't any pics to show but this part isn't that exciting anyway.
Not far now.
I keep getting new ideas as time passes and the mod progresses, like the need for a CDRW/DVD combo drive to make it a complete and self contained computer... so I ordered and installed one.
http://www.casemodgod.com/Hell154.jpg
Here is the back of the chest section with everything all wired up and ready to be installed. I added a couple red lazer LEDs to the bottom to help better light the interior.
The view from the front, I painted and glazed the whole thing and it can be set aside because it is FINISHED.
Next up, adding lighting to the inside of the abdomen. I am using some flexible LED strips from Sunbeam for the main interior lighting held in place with zip ties.
http://www.casemodgod.com/Hell150.jpg
But the LED strips are white... this will not do. A coat of paint later and they blend perfectly.
While I was at it I enamel painted the draw latches that hold the abdomen window in place...
http://www.casemodgod.com/Hell152.jpg
And below is the result of my labor, abdomen window section... FINISHED.
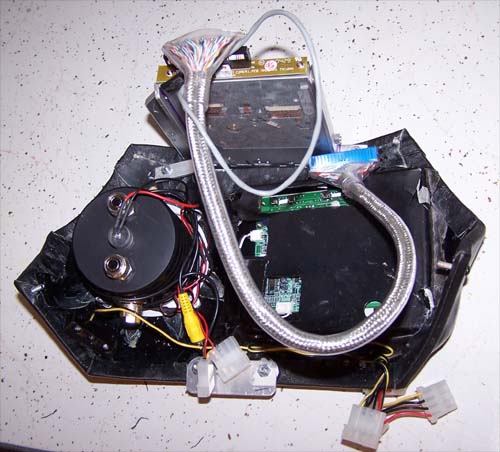
The instructions for the LaserPod implicitly state not to disassemble it... so I did.
http://www.casemodgod.com/Hell158.jpg
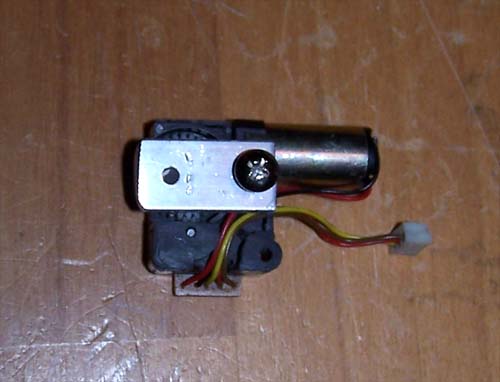
Below is the motor that will control the movement of the eyes, it has an extra wire that when hooked to a momentary switch make the motor turn a single revolution... which gave me an idea. I am not going into detail about how the motor makes the eyes move, I am just happy it worked.\
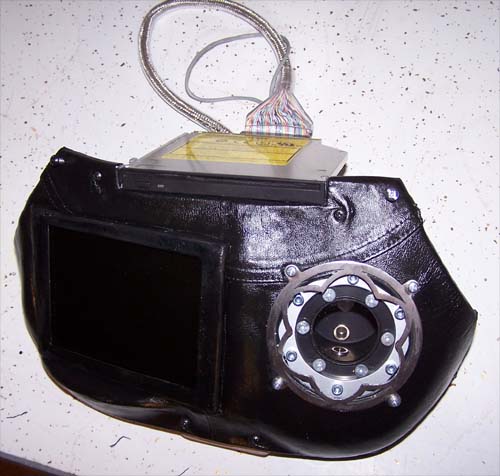
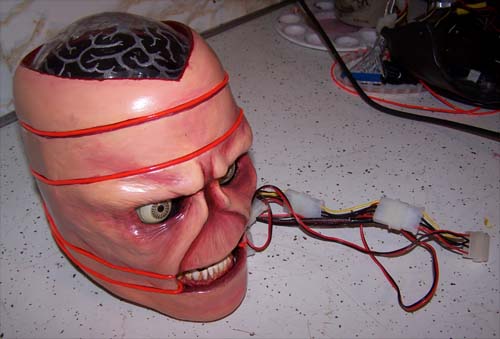
A top down shot showing the Laserpod installed, there is also a red laser LED in the forhead area (not visible) for extra lighting. I cut a piece of plexi to fit the inside of the head, next I cut a hole just big enough for the Laserpod to fit through into the plexi and backpaint it black with Krylon Fusion.
http://www.casemodgod.com/Hell159.jpg
I also installed a UV laser LED above the eyes, since they are made of glow in the dark plastic it only made sense. I then hooked up the EL wire that wraps around the outside of the head making this part (the hardest part)... FINISHED.
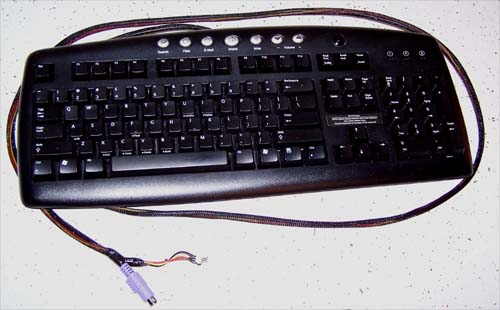
Last up on my full days work list, the keyboard. I installed a small SPST momentary switch into the top right of the keybaord to control the movement of the eyes, I also sleeved the wires together and that makes this part also FINISHED.
Here is a short video of the motorised eyes in action... they came out better than I had hoped.
http://www.casemodgod.com/Hell154.jpg
Here is the back of the chest section with everything all wired up and ready to be installed. I added a couple red lazer LEDs to the bottom to help better light the interior.
The view from the front, I painted and glazed the whole thing and it can be set aside because it is FINISHED.
Next up, adding lighting to the inside of the abdomen. I am using some flexible LED strips from Sunbeam for the main interior lighting held in place with zip ties.
http://www.casemodgod.com/Hell150.jpg
But the LED strips are white... this will not do. A coat of paint later and they blend perfectly.
While I was at it I enamel painted the draw latches that hold the abdomen window in place...
http://www.casemodgod.com/Hell152.jpg
And below is the result of my labor, abdomen window section... FINISHED.
The instructions for the LaserPod implicitly state not to disassemble it... so I did.
http://www.casemodgod.com/Hell158.jpg
Below is the motor that will control the movement of the eyes, it has an extra wire that when hooked to a momentary switch make the motor turn a single revolution... which gave me an idea. I am not going into detail about how the motor makes the eyes move, I am just happy it worked.\
A top down shot showing the Laserpod installed, there is also a red laser LED in the forhead area (not visible) for extra lighting. I cut a piece of plexi to fit the inside of the head, next I cut a hole just big enough for the Laserpod to fit through into the plexi and backpaint it black with Krylon Fusion.
http://www.casemodgod.com/Hell159.jpg
I also installed a UV laser LED above the eyes, since they are made of glow in the dark plastic it only made sense. I then hooked up the EL wire that wraps around the outside of the head making this part (the hardest part)... FINISHED.
Last up on my full days work list, the keyboard. I installed a small SPST momentary switch into the top right of the keybaord to control the movement of the eyes, I also sleeved the wires together and that makes this part also FINISHED.
Here is a short video of the motorised eyes in action... they came out better than I had hoped.
RobotOverlord
n00b
- Joined
- Apr 30, 2005
- Messages
- 60
Possibly one of the coolest mods I have ever seen 0.0;
Good job 10/10
Good job 10/10
cornelious0_0
[H]F Junkie
- Joined
- Apr 6, 2003
- Messages
- 12,783
$hit dude, I'm not even gonna try and act all excited and overwhelmed, because I have no words to describe that......truely amazing work, you are my hero.
CrimsonSky
Gawd
- Joined
- Jun 14, 2003
- Messages
- 711
Looking pretty slick--Is there any vertical movement to the eyes?
Modch1ld88
n00b
- Joined
- Apr 22, 2005
- Messages
- 50
the eyes scare me esp. after a drink or two...
No... there is no vertical movement to the eyes, they were from an old 80's Boglins puppet toy and they have limited motion (L/R). Making the motor work to move them left and right was enough of a chore but it came out pretty well I think, and since the head tilts down the left to right eye movement makes it look like he is leering... evil enough for me.
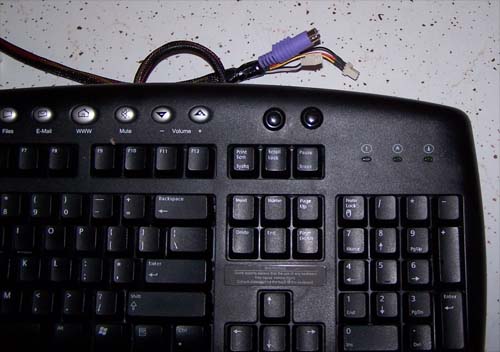
Did some more detail work today. The keyboard was not as finished as I thought, so I added another momentary switch to control the UV LEDs above the eyes. I only have a small amount of detail work left now... and since my wife imposed a Wednensday deadline (mods took over the dining room for 6+ months now) I will be wrapping this bad boy up soon, not that my wife is the boss, but hopefully I am done by Wednesday.
Did some more detail work today. The keyboard was not as finished as I thought, so I added another momentary switch to control the UV LEDs above the eyes. I only have a small amount of detail work left now... and since my wife imposed a Wednensday deadline (mods took over the dining room for 6+ months now) I will be wrapping this bad boy up soon, not that my wife is the boss, but hopefully I am done by Wednesday.
Crazystick
Limp Gawd
- Joined
- Oct 10, 2004
- Messages
- 235
dude thats some f(^@#ed up s(-)it.
damn
nice skillz very nice indeed. And you have some scifi sickness if it comes to hellraiser. keep up the good work.
damn
nice skillz very nice indeed. And you have some scifi sickness if it comes to hellraiser. keep up the good work.
BOGLINS! I had all 3 of the originals, but when they came out with the other 3 losers, I chose not to bite. I always left mine in the box/cage it came in and put my hand inside the box and made it look like it was trying to get out. I knew those eyes looked familiar. Oh...also...great mod!
05/19/2005 Update... It will not die!
Things that I thought to be (and well could have been) finished have been worked on even more to make them just that little bit better, like the above pictured keyboard... it still needed something. Since I did not need for the UV LEDs above the eyes to be on all the time and did not want to hook them to any of the switches on the back of the torso I decided to run a second SPST momentary switch to the keyboard so that I can make the eyes completely freak out with light and motion all from one spot.
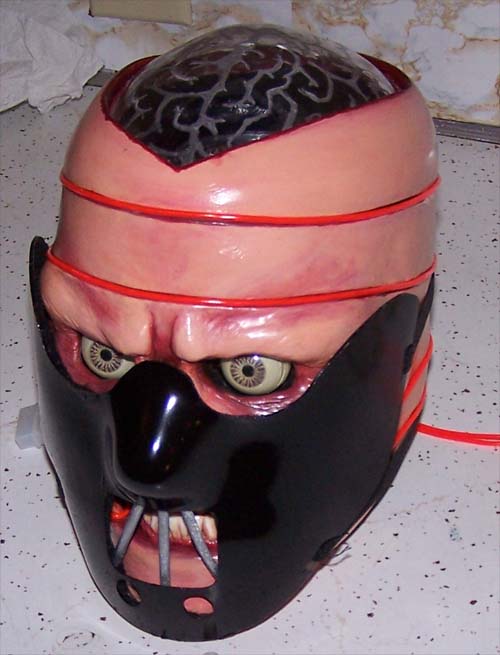
I remembered an old Hannibal Lechter mask that I had, just goofing around I decided to put it on the head... it looked pretty freaked out, but it was a coppery color and made of thin plastic. Four coats of vinyl dye to the mask and the same in silver spray paint for the mouth section, along with felt lining the inside of the mask for both support and protection from scratching up the face and the newest addition to the mod is finished. It easily slips on and off and will mainly be used when transporting it.
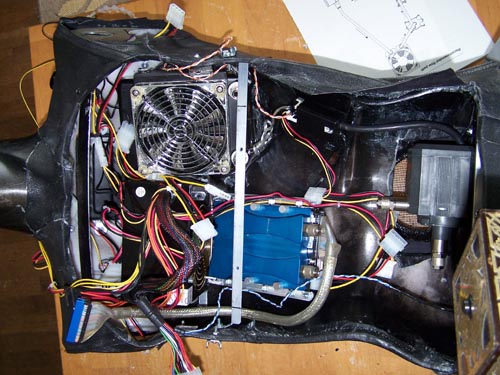
Installing the hardware and water cooling...
Well, installing hardware is easy (done it a million times) but water cooling is admittedly new to me. I got everything inside the abdomen and installed the window... which caused a few kinks in my tubing. I have some springs already installed on most of the hoses and have ordered more to cover the rest. I also have to shorten a couple other hoses to make sure that nothing gets kinked when the window is on... I am learning and thankful that I did not jump the gun and fill it with water before noticing the problems.
Almost there, once the springs arrive I will redo the tubing, tidy up the wiring and probably add a pair of meteor lights into the abdomen... then I can finally fire this bad boy up.
Things that I thought to be (and well could have been) finished have been worked on even more to make them just that little bit better, like the above pictured keyboard... it still needed something. Since I did not need for the UV LEDs above the eyes to be on all the time and did not want to hook them to any of the switches on the back of the torso I decided to run a second SPST momentary switch to the keyboard so that I can make the eyes completely freak out with light and motion all from one spot.
I remembered an old Hannibal Lechter mask that I had, just goofing around I decided to put it on the head... it looked pretty freaked out, but it was a coppery color and made of thin plastic. Four coats of vinyl dye to the mask and the same in silver spray paint for the mouth section, along with felt lining the inside of the mask for both support and protection from scratching up the face and the newest addition to the mod is finished. It easily slips on and off and will mainly be used when transporting it.
Installing the hardware and water cooling...
Well, installing hardware is easy (done it a million times) but water cooling is admittedly new to me. I got everything inside the abdomen and installed the window... which caused a few kinks in my tubing. I have some springs already installed on most of the hoses and have ordered more to cover the rest. I also have to shorten a couple other hoses to make sure that nothing gets kinked when the window is on... I am learning and thankful that I did not jump the gun and fill it with water before noticing the problems.
Almost there, once the springs arrive I will redo the tubing, tidy up the wiring and probably add a pair of meteor lights into the abdomen... then I can finally fire this bad boy up.
DthInd
2[H]4U
- Joined
- Nov 20, 2000
- Messages
- 2,984
Great job, but it scares me...
Like, it could come alive and seek out revenge or something.
Like, it could come alive and seek out revenge or something.
DarkenReaper57
2[H]4U
- Joined
- Oct 2, 2003
- Messages
- 2,173
Just...wow. I swear, if I had something like that in my room, I would be scared shitless in the middle of the night. Very cool though
Since I made additions to both the head and the keyboard (both were supposedly done) I felt that an addition could be made to the abdomen window to make things better too. I painted and installed another strip of flexible red LEDs that will sit inside the bottom base of the belly and light the area around the processor block up to the video card.
http://www.casemodgod.com/Hell166.jpg
I also decided to upgrade the chest section as well by adding two meteor lights that I cut up to fit inside, they will shine down into the abdomen window section and provide an animated lighting effect to offset the lasers in the head. I used black vinyl dye to make the box, switch and button match and then installed the modded cover plate behind the section of leather with velcro on the top and bottom...
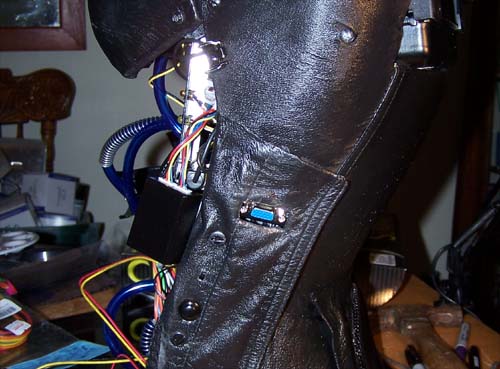
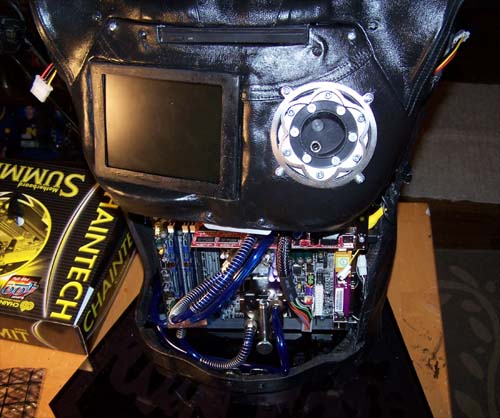
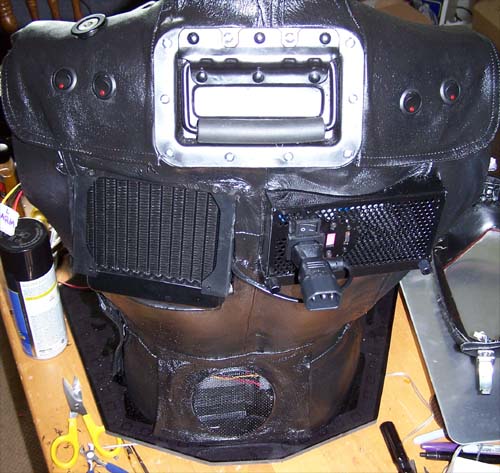
Everything plugs in on this side. Some of the components like the mouse and keyboard plug into the PC beneath the flap, for the monitor plug I made its own cutout (as seen below). The cover flap was actually one of the biggest design hurdles of this project, but I think I made good use of space by having nearly EVERYTHING (external and internal) plug in from this area, including the monitor and also control of the meteor lights.
http://www.casemodgod.com/Hell168.jpg
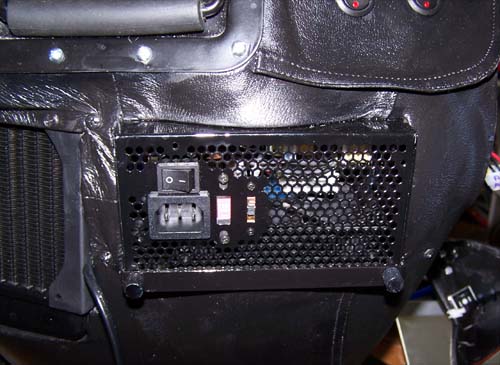
For the back cutout I used a black mesh speaker grill that is held in place with liquid electrical tape, it looks a lot better than the black plastic mesh I had wedged in there before.

The top is glued down and the bottom is held down by velcro, it makes for easy access to the pump and is also the air intake for the PC.
http://www.casemodgod.com/Hell170.jpg
I painted the PSU tray with black enanel paint and changed out the silver thumb screws for black.
Below is the back of the beast, one of the things that I decided early on was that it would have to look good from all angles, including the back. It was tempting to just ignore detailing the back since it would hardly be seen but now that it's done it really paid off.
Just waiting for the springs I ordered to arrive so I can fix the tubing and leak test it.
http://www.casemodgod.com/Hell166.jpg
I also decided to upgrade the chest section as well by adding two meteor lights that I cut up to fit inside, they will shine down into the abdomen window section and provide an animated lighting effect to offset the lasers in the head. I used black vinyl dye to make the box, switch and button match and then installed the modded cover plate behind the section of leather with velcro on the top and bottom...
Everything plugs in on this side. Some of the components like the mouse and keyboard plug into the PC beneath the flap, for the monitor plug I made its own cutout (as seen below). The cover flap was actually one of the biggest design hurdles of this project, but I think I made good use of space by having nearly EVERYTHING (external and internal) plug in from this area, including the monitor and also control of the meteor lights.
http://www.casemodgod.com/Hell168.jpg
For the back cutout I used a black mesh speaker grill that is held in place with liquid electrical tape, it looks a lot better than the black plastic mesh I had wedged in there before.
The top is glued down and the bottom is held down by velcro, it makes for easy access to the pump and is also the air intake for the PC.
http://www.casemodgod.com/Hell170.jpg
I painted the PSU tray with black enanel paint and changed out the silver thumb screws for black.
Below is the back of the beast, one of the things that I decided early on was that it would have to look good from all angles, including the back. It was tempting to just ignore detailing the back since it would hardly be seen but now that it's done it really paid off.
Just waiting for the springs I ordered to arrive so I can fix the tubing and leak test it.
cornelious0_0
[H]F Junkie
- Joined
- Apr 6, 2003
- Messages
- 12,783
themark said:It's so good it gives me the creeps, which I suppose... is the point.
Yeah man, it's fricken awsome that a case mod could give me the willies.