• Some users have recently had their accounts hijacked. It seems that the now defunct EVGA forums might have compromised your password there and seems many are using the same PW here. We would suggest you UPDATE YOUR PASSWORD and TURN ON 2FA for your account here to further secure it. None of the compromised accounts had 2FA turned on.
    Once you have enabled 2FA, your account will be updated soon to show a badge, letting other members know that you use 2FA to protect your account. This should be beneficial for everyone that uses FSFT.

Project: BudgetBox

IAmHard

n00b
Joined
Jul 20, 2008
Messages
54
Hello everyone, thought it would be about time to write up my case build thread from the past year and a half. The project is NEVER finished. I learnt this from my car projects... Hope you enjoy the pictures :)


Current System Spec:

Motherboard: DFI Lanparty JR 790GX M2-RS (matx form factor)
CPU: AMD Athlon X2 6000+ @ 3300mhz, mild overclock (next in upgrade queue!)
RAM: Kingston HyperX 2x2gb DDR2 @ 1100mhz
GFX: Peak ATI Radeon 5750 1gb @ 870mhz core / 1300mhz mem
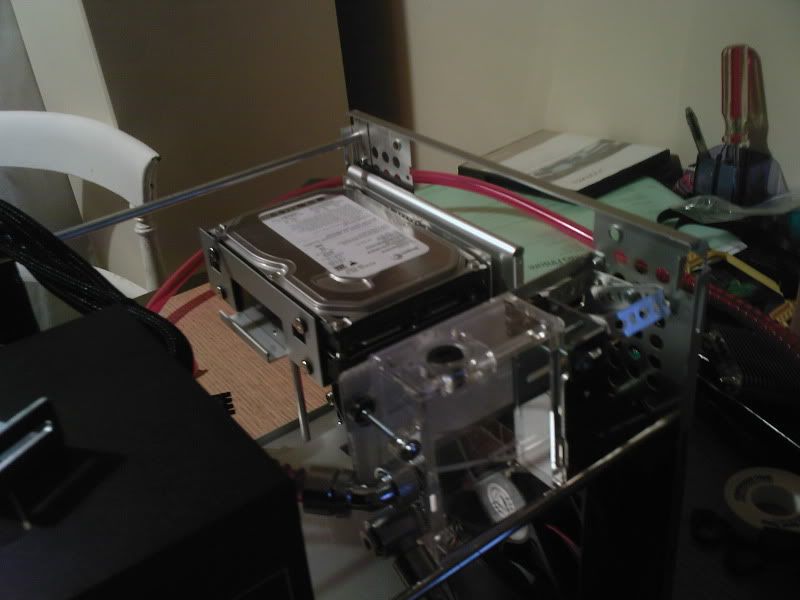
HDD: Seagate Barracuda 640gb (will become SSD once prices fall a bit)

Watercooling Loop:
Radiators: 120mm XSPC RS120 and 240mm XSPC RS240
Pump/CPU Block: Swiftech Apogee Drive (No longer stocked?)
GPU Block: Swiftech MCW60
Res: Swiftech MCRES (Revision 1) - Revision 2 is now available offering improvements as described here. I am tempted to upgrade to compare them!
Hose: Feser Tube 3/8" ID 1/2" OD (UV Red), Primochill Anti Kink Coils (Gloss Red - I now want to replace this with black)
Coolant: Feser One non-conductive (UV Red)

Aim: Build mAtx crossfire ready (not enough £££ for 2nd card YET) cube PC on a low budget. CPU and Graphix to be watercooled (haven't worked out mobo cooling yet).

I will take this opportunity to say (shameless plug inc) a massive thanks to the guys at Specialtech for the watercooling equipment order, they had the best prices for all of the items I wanted and the service was great :)

Ok so the case was some cheap £40 job from the interweb somewhere. Quite flimsy design and so naturally I started chopping bits:
Photo-0046-1.jpg

Photo-0049-1.jpg

This was over a year ago now, I have no clue what I was doing at the time but found this:
Photo-0077.jpg

A certain package arrived in the post (excited!):
Photo-0092.jpg

DFI Lanparty JR 790GX :)
Chop chop:
Photo-0096.jpg

Offering up rear 120mm rad:
Photo-0100.jpg

More cutting etc:
Photo-0112.jpg

120mm rad mounted and ready to roll:
Photo-0116.jpg

I then crafted a support beam from some alloy tube to improve rigidity (to replace chopped metal support):
Photo-0118.jpg

Next up: 240mm rad fitted at the front and side-panels meshed.
 
Last edited:
Front rad fitted and fans mounted:
Photo-0119.jpg

Photo-0120.jpg

Hard drive mounting cage, I want to change this in the next iteration of BudgetBox:
Photo-0121.jpg

Added a support to hold up the HDD shelf:
Photo-0122.jpg

DFI motherboard:
Photo-0124.jpg

2900XT which I had at the time, ready to be watercooled:
Photo-0125.jpg

Photo-0126.jpg

Swiftech Apogee Drive (I love this) fitted and testing clearance:
Photo-0127.jpg

Photo-0128.jpg

2900XT is quite a big PCB:
Photo-0129.jpg

Photo-0132.jpg

Riveted some mesh to the side panels:
Photo-0148.jpg

Next up will be fitting reservoir, HDD, cabling, hoses, etc and final build.
 
Last edited:
Ok reservoir was pretty easy to mount, but I messed it and it sits wonky lol:
Photo-0134.jpg

Hard drive next to res above front rad:
Photo-0137.jpg

Fitting hoses:
Photo-0138.jpg

Fitted a laptop DVD drive (now removed):
Photo-0146.jpg

Photo-0147.jpg

Once the chassis was complete, I gave it some fresh paint. Sorry I do not have many pictures of the next stages, all of this work was done in a few weeks before going back to university so I think it was rushed! Fast-forward mode if you please......

Here you can see my wifi card fitted, the mobo installed,GFX watercooled and hoses all fitted:
Photo-0150.jpg

Photo-0151.jpg

Photo-0152.jpg

Now leak testing with some paper towels :)
Photo-0153.jpg

Photo-0154.jpg

Photo-0155.jpg

I am now hunting down some pictures of the outside while it was in this state for about 12 months!
There is no front panel the original one was terrible so I just rocked it without front on.
 
Ok so I can't really find any :O I just wanted to enjoy using the PC I guess!

Added some impro cooling to the 2900 since it was so hot:
DSC00006.jpg


I'm pretty tired after work, I'll update tomorrow with some photos of the outside of the case (nothing pretty really). Also update with the next gfx and to explain what my current plans are.
 
Thanks man, appreciate your comment :) This project is on-going so should evolve some more internally. Deciding what to do about crossfire 5750 cooling... dual watercooling is possible if I find some core blocks..

Btw should this be in the worklogs section? Sorry if it's wrong place :p
 
Thanks man, appreciate your comment :) This project is on-going so should evolve some more internally. Deciding what to do about crossfire 5750 cooling... dual watercooling is possible if I find some core blocks..

Btw should this be in the worklogs section? Sorry if it's wrong place :p

Well, I doubt anybody made full cover blocks for those fellows :p But it should be feasible (and awesome!), at the very least.

If you think it is an ongoing project (I think it is), the request a mod to move it :)
 
Oh man...

What case did you start with?

I'm looking to do a similar thing, packing an mATX system in to a small case with some internal WC. So far I've been looking at the Lian-Li cases...

I'm not as ambitious as you, but I'd love to see if I could mess around with something like this and get it fitting. :D
 
Apevia X-QPACK2, iirc. I've seen that layout at Fry's, so I am just guessing from there.
 
Yea it was the same as a Q Pack 2 (something like an A Plus I think). Cheap and cheerful.

The front panel was modded but I can't get it to fit well, so I'm going to fabricate something this week hopefully :) Plus installing some LEDs tonight.

Could a mod move this to work logs please?
 
Ok done a bit more cable tidying today and managed to break the on/off switch ... oops!
So the front is still ugly, but inside is starting to look better.
About 1 month ago I took out the gfx card and tried to run onboard gfx for a temp fix while I worked out how to watercool the 5750... but forgot to plug in the watercooling pump! :O Normally my BIOS would just shut down my PC, but I had to reset so that the onboard graphics would work... which removed all fail-safe checks for CPU fan speed (pump speed is linked to mobo). Anyway to cut a long story short, this happened (it got a lot worse):
DSC00187.jpg

After reassembling the pump it sealed again which was good. No damage to anything! :D Just coolant residue everywhere including my desk and floor lol.
So I removed the rear 120mm rad because I had to air cool the graphics card:
DSC00188.jpg

Which brings us to the current day, and a cube that looks like this:
DSC00283.jpg

DSC00285.jpg

DSC00284.jpg

DSC00286.jpg

I fitted some LED strips that were sent over from china for next to nothing.
DSC00287.jpg

Still not sure on one of them because you can see them from above and it looks a bit crap, so I may relocate one strip. Heres a pic:
DSC00288.jpg

I will wait til nighttime to take another pic of the whole case from the outside, and maybe relocate the LEDs but for now I think they will work.

I need to work out how to watercool two 5750s in crossfire, with no clearance (2mm) above the cards (any core blocks that fit???). Will also have to switch to a usb wifi N card to allow the two gfx to fit, not sure how this will affect wireless performance. Hard drive bay will be modified again so that the drive is not visible and mounted out of the way leaving a clearer view of the case interior.
 
I like the build. I just went though installing WC for the first time, I underestimated how much of a pain it is.

Please tell me, Pink or Red? I can't tell from the pictures, and for some reason the pink would look good.
 
Glad u like it :) Yea it can be a pain, this is my 3rd WC build so I'm getting used to it.

And red, blood red. They are only phone pics so the colour doesn't show well. Red/black was the theme.
 
Ok tomorrow at work I will find some hardware to mod my MCW60 block to fit the gfx card. Decided to watercool since aircooling is tricky with the limited space/airflow. Have an idea about the chipset cooling as well (which hits 70 degrees idle with no fan). This will all be done with bits I have lying around so should cost me nothing extra :D
 
Ok tomorrow at work I will find some hardware to mod my MCW60 block to fit the gfx card. Decided to watercool since aircooling is tricky with the limited space/airflow. Have an idea about the chipset cooling as well (which hits 70 degrees idle with no fan). This will all be done with bits I have lying around so should cost me nothing extra :D

I had a similar issue with chipset cooling:

SG02 mATX lanbox
i7 930/ASUS Rampage II GENE X58

At idle, the chipset would get, slowly, to about 70C.

I added a 50mm fan and used the soft rubber fan mounts to attatch it to the NB (since the R2G NB cooler was a "bent pin" type), and my load temps went to 60C (previously, if I loaded it, it would crash).

Another solution would be to aircool my CPU, but since I had a H50 attatched, that wasn't going to happen.

I'm curious as to what you will be doing. :)
 
Yes I have a ghetto mounted fan right now which has helped temps, but I warn you the solution for me won't be very exciting ;) Just a heatsink I have which does look quite nice I will admit... more will be revealed once I do some work on it and not on my other project (car).
 
Glad u like it :) Yea it can be a pain, this is my 3rd WC build so I'm getting used to it.

And red, blood red. They are only phone pics so the colour doesn't show well. Red/black was the theme.

Ok, I was pretty sure it was just the pics. :p
 
Great build man, well done...but I feel compelled to say something (no doucheyness, I swears it!)

Instead of going with watercooling, why not spend that money on a better graphics card? Or was this one of those "I watercooled it because I could" sort of things :)

EDIT: nevermind, just read your post about why you didn't want to aircool. It isn't TOO difficult, as long as you stick with hardware that doesn't generate much heat. A 5770 and a 95w proc would work great...you could even do an H50 for the CPU.
 
Thanks pojut :)

You're welcome to say that, and you answered it already! I enjoy building things ;) So I just wanted to watercool for fun, in a small case. The plan is to add another 5750 - I bought the parts all at different times (gfx this month, watercooling 2 years ago, etc) as I don't have a lot of money to spend.

The 2900XT was to be upgraded with the 5-series and 5750s are quite cheap in the UK. Also they can be clocked up to 5770 relative performance with enough cooling. The watercooling will help this, the stock cooler hits 95 degrees so something has to be done, and I already have a Swiftech MCW60 lying around from the old card...

Which brings me to the next update, the gfx cooling. I have seen some people on the net build a MCW60 on 5750 before, one guy even redrilled the PCB to allow larger screws. I didn't want to do this, so have sourced some small long screws to hold the block together and then onto the card. Here's me splitting the block and modding the screws to fit:
DSC00292.jpg

DSC00294.jpg

DSC00297.jpg


I will also attempt to fit this to the chipset to improve cooling. It is a Thermalright HR-05 Sli from an old NF4 mobo I bought years ago and I just found it in a box haha!!
DSC00293.jpg

This thing is quite tall, so I'm going to cut a slot in the back of the case to allow the mobo tray to slide in and out... although this may require the rear radiator to be moved (how often do you remove a mobo though? not often), and who looks at the back anyway? :D
 
Ok update soon, I managed to watercool the 5750 using the MCW60 :) Idles at 28 degrees instead of 53! Unfortunately the Thermalright heatsink would interfere with a number of components so it is not worth trying to fit. I will source a cheap low-profile cooler instead...

EDIT: Overclocked the GPU to 870mhz (highest CCC will go..) and memory to 1400mhz and runs like a charm, 40 degrees under load!

Anyway I'm off to the pub, updates maybe later tonight if I'm sober enough!!
 
Last edited:
Defo not gonna happen:
DSC00298.jpg

The exhaust fan had poor airflow so I cut out this restrictive vent. There's now a grill covering the hole that is much less restrictive.
DSC00299.jpg

Sleeved the exhaust fan too:
DSC00300.jpg


Ok onto the 5750 watercooling, this is to help other people looking to cool their 5750/5770 on the cheap with Swiftech MCW60/80. If you can get some M2.5 x 40mm (iirc) machine screws, these will work, although you also need some low-profile nuts to clamp the block together. I tried using washers as well to help spread the load but this pushed the block above the chip leaving a gap:
DSC00304.jpg

So I took out the washers and tightened the nuts, checking that the block was airtight and sealed. I then had to get a small round needle file and enlarge the PCB holes very slightly until the block made contact with the chip. Sorry no photos of this stage, but it is self explanatory once you start to fit the waterblock.
The ram chips had no heatsinks as stock, so I fitted some low profile aluminium sinks onto each chip:
DSC00305.jpg

I almost took a swig from the Feser One bottle at one point...
Bit of thermal paste and win:
DSC00306.jpg

DSC00307.jpg

Take care not to overtighten this setup, you can crack the chip if too tight! Anyway I'm very happy with the results, the core went from 90+ degrees load unable to overclock, to 40 degrees load @ 870mhz. Ram chips get pretty toasty due to low airflow, which I hope to fix with a clever fan mounting in the near future. Btw does anyone know some overclocking tools that let me go higher than Catalyst Control Center?
 
A pic from putting the mobo back in:
DSC00310.jpg

And in its current state, waiting for a front panel to be fabricated from something (I'm adamant it will cost virtually nothing!).
DSC00314.jpg

Yes I know, spiral wrap and dust...the 80mm fan is going to be replaced with something like this:
DSC00319.jpg


Once I have the case mostly done, I'll start designing my next build, which will be a scratch built case even smaller than this one hopefully.
 
Back
Top