• Some users have recently had their accounts hijacked. It seems that the now defunct EVGA forums might have compromised your password there and seems many are using the same PW here. We would suggest you UPDATE YOUR PASSWORD and TURN ON 2FA for your account here to further secure it. None of the compromised accounts had 2FA turned on.
    Once you have enabled 2FA, your account will be updated soon to show a badge, letting other members know that you use 2FA to protect your account. This should be beneficial for everyone that uses FSFT.

Project:Big Loud Server

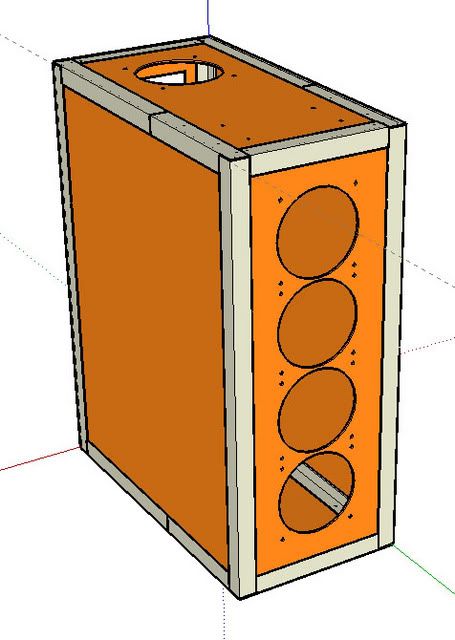
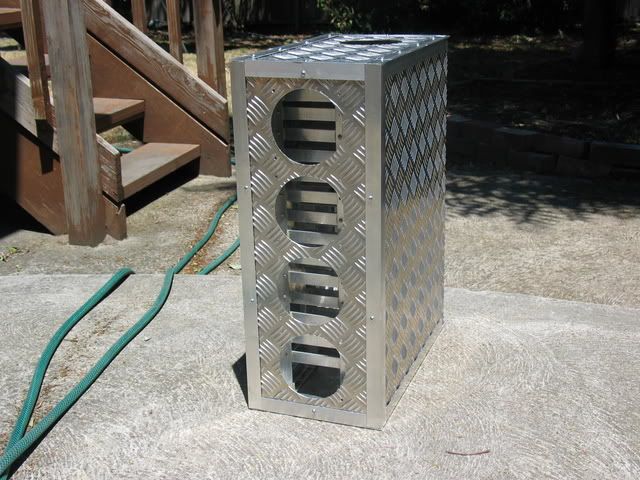
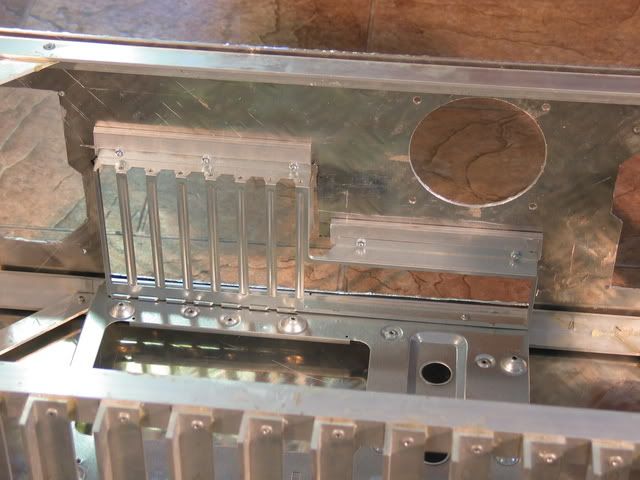
your hard drive rack looks cool but the mounting seems funky. it looks like you're planning to mount all the drives by screwing them in from the bottom. that'd be a good system and all but pretty impractical if you need to change a drive out. can you explain your hard drive mounting system a little better so we know you're not crazy?

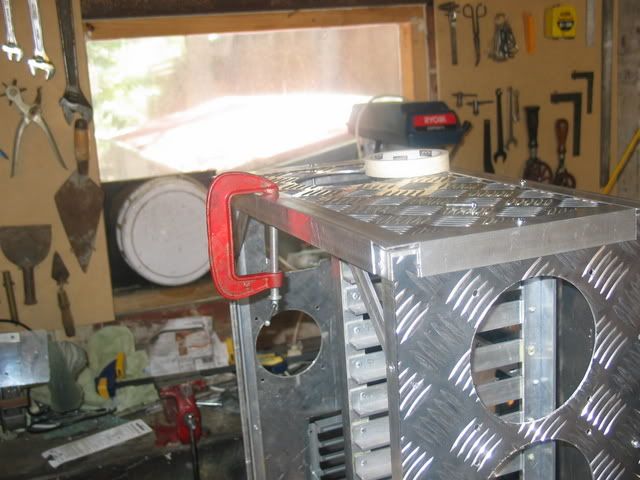
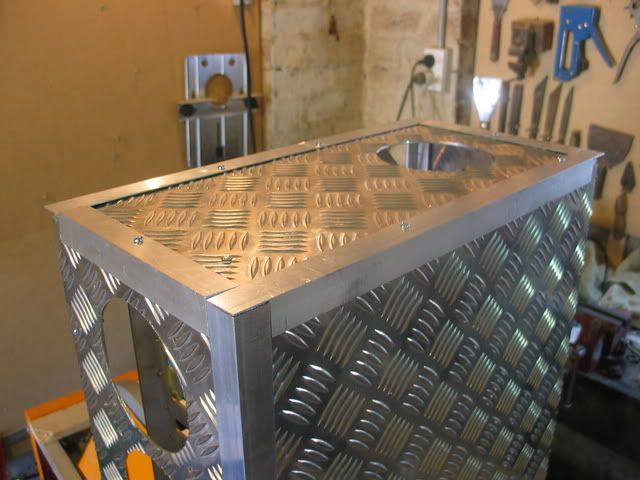
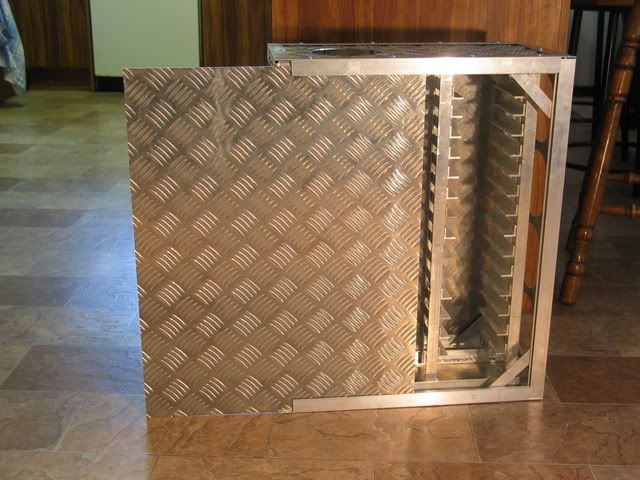
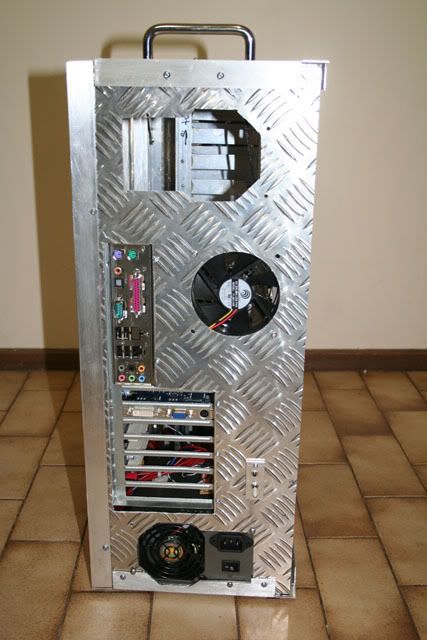
otherwise i like the build, i'm a fan of big server cases and the metal frame looks cool. the outside is a little shiny for my taste but i supposed you could change them to brushed aluminum panels if you wanted to later on down the line, since you have the basic framework set up well. panels are just cosmetic.
 
Nope you've got it. I know it will be a bit of a bitch to remove a drive if it dies, but aside from that this design enables me to use a simpler approach to fit more drives into a smaller space. As well as in construction it allowed me to use a wooden template to achieve the necessary accuracy.
 
This soooooo makes me wanna build my own case :(

Nice job so far. The diamond plate is a nice touch.
 
Crazylittleman said:
Nope you've got it. I know it will be a bit of a bitch to remove a drive if it dies, but aside from that this design enables me to use a simpler approach to fit more drives into a smaller space. As well as in construction it allowed me to use a wooden template to achieve the necessary accuracy.

Makes sense, but wouldn't you get similar accuracy by just installing a bar instead of a L and screwing in the harddrives from the side? Just curious, but it works for me :) Nice case, I've always wanted to build a case of mine, and someday i hope to follow your footprint and build my own :)
 
Edging

The next stage of the project is the edging around all edges of the case. The edging is made from 25mm x 1.4 mm L rail aluminium. The idea is to cover the rough cut edges of the checkerplate, cover the mounting holes through the checkerplate thus I don’t need to counter sink the screws and to hold on the side panels while allowing them to easily slide on and off.
edgingsketchup.jpg


edging001.jpg

I used 3mm thick off cuts of aluminium from the frame as spacers then clamped the edging piece of aluminium to the frame, marked the original mounting holes on to the edging and then drilled it on a drill press.
The same process is repeated for all sides.

edging005.jpg

finished017.jpg


finished013.jpg

The side panels have their sticky points but they more or less slide on and off with ease.

finished014.jpg

Because the rear I/O plate was riveted to the inner most edge of the frame i had to put in spaces to allow it to be bolted to the back panel. The spacers are made from 2 lengths of 20mm x 3mm aluminum flat bar which are glued together with araldite, then drilled and screwed on with 1/8" x 12mm screws and nuts.

That’s pretty much all of the construction work done. There is a little bit of wiring plus just a general clean of all the crap on the case before I can start to put components in it.
 
you should perforate the metal by the I/O panel so you can exhaust all of the air those 4 fans in the front will bring in.
 
You have 4 120's in the front, one in the rear, sounds like you are going to have a noise issue and airflow.

Slow on the front fast on the back?

Also, looks like you could use set screws to secure your harddrives from the fan side or the inside?
 
Ockie said:
You have 4 120's in the front, one in the rear, sounds like you are going to have a noise issue and airflow.

Slow on the front fast on the back?

Also, looks like you could use set screws to secure your harddrives from the fan side or the inside?

There's two exhaust visible, one in the rear and one in the top. There's also two PSU's that are going to be exhausting. If you look at the thread title you might also see that the server is fully expected to be loud.
 
Skrying said:
There's two exhaust visible, one in the rear and one in the top. There's also two PSU's that are going to be exhausting. If you look at the thread title you might also see that the server is fully expected to be loud.

Firstly, the question wasn't directed at you.

2 does not equal 4 in terms of airflow, hence my original question. PSU's do not add much into the calculation of airflow.

Also, the OP didn't mention that the server is expected to be loud in terms of air noise, but thank you for speaking for him and noting the obvious. Once the OP can confirm that it's his objective to restrict airflow and make it as loud as possible, then you can speak for him.
 
sweet, I subscribed I'm also going to build a case on my own but I'm going to do most of it with a metal bend/ brake using aluminum sheeting and welded steel frame.
 
Ockie said:
Firstly, the question wasn't directed at you.

2 does not equal 4 in terms of airflow, hence my original question. PSU's do not add much into the calculation of airflow.

Also, the OP didn't mention that the server is expected to be loud in terms of air noise, but thank you for speaking for him and noting the obvious. Once the OP can confirm that it's his objective to restrict airflow and make it as loud as possible, then you can speak for him.
Yes there is more airflow into the case then out, and yes this will create a positive pressure inside the case, yes this will help to keep dust out of the case, no this will not cause the case to explode in my face. At the moment I'm only running one PSU thus theres a freakin huge hole in the back of the case which will equalize any pressure difference between the in and out sides of the case.
 
Wiring

IMG_5861.jpg

IMG_5862.jpg

http://i114.photobucket.com/albums/n270/323987025/Server%20Case/IMG_5863.jpg[/imgl]
[img]http://i114.photobucket.com/albums/n270/323987025/Server%20Case/IMG_5868.jpg
the wiring for the front four 120mm fans connects via a 12 pin connector. Wiring for this runs along the base of the case to the fan controller at the back.

IMG_5871.jpg

Due to the lack of a windows appearance was unimportant so adhesive mounts and cable ties will do to secure everything.
IMG_5872.jpg

Once the panels slide on they are secured but a piece of L rail edging screwed on in two places.
 
Anyone who takes the plunge to build their own case is to be congratulated. Your skills are also to be commended. Looks like it will suit your intended purpose. Good job.

I do have a few questions though, why use rivets? I would think screwing the whole thing together would be just as easy, and if your needed to change something (like a mistake) it would be as simple as remove the screw and relocate.

Second, if your not going to be moving this beast around, instead of actually screwing the hard drives in, you could use a small rubber bumper (in the location of the screw hole) and rest each hard drive on them. This might cut down on some of the noise, and IF a drive goes south, removal is a snap.

Lastly, if your going to take the time to build your own case, and then share it with the whole planet, why wouldn't you want to sleeve all your wires? Please, take that extra step.

All in all, your project turned out great!
 
Stevennoland said:
I do have a few questions though, why use rivets? I would think screwing the whole thing together would be just as easy, and if your needed to change something (like a mistake) it would be as simple as remove the screw and relocate.

I chose rivets over screws for a few reasons.
a) Rivets will always end with a lighter and cheaper build, I would have been looking at 2 or 3 times the cost for the same number of screws as rivets.
b) If I make a mistake the rivets can be drilled out just as easy as screws could.
c) Screws would require me to tap threads into the L alu which would add complication and be difficult on the thinner pieces.
d) Using screws to enable them to be removed would be pointless due to the use of Araldite epoxy on all the joins.

Stevennoland said:
Second, if your not going to be moving this beast around, instead of actually screwing the hard drives in, you could use a small rubber bumper (in the location of the screw hole) and rest each hard drive on them. This might cut down on some of the noise, and IF a drive goes south, removal is a snap.

I can't remember if I said this at some point back in the thread but I am planning on taking this case to regular LANS so having proper mountings for the drives is important.

Stevennoland said:
Lastly, if your going to take the time to build your own case, and then share it with the whole planet, why wouldn't you want to sleeve all your wires? Please, take that extra step.

Other then keeping the wiring neat with cable ties I didn't bother to sleeve them properly as the case doesn't have a window and other then photos in this project log no one is ever going to see the inside.
 
Back
Top