Navigation
Install the app
How to install the app on iOS
Follow along with the video below to see how to install our site as a web app on your home screen.
Note: This feature may not be available in some browsers.
More options
You are using an out of date browser. It may not display this or other websites correctly.
You should upgrade or use an alternative browser.
You should upgrade or use an alternative browser.
Phanteks Enthoo Pro 2 Full Tower
- Thread starter Bigbacon
- Start date
hititnquitit
2[H]4U
- Joined
- Apr 16, 2018
- Messages
- 2,575
Its a great case for water cooling from what ive seen. My friend built his cpu/gpu (10850/2080ti) loop with a hwl gtx 420 in front and a gts 360 up top with a d5/res combo (cant remember the make) mounted in front of the 420. His temps were great and he ocs to the teeth. Knowing him hes probably upgraded by now being that its been a year or more since this build and he upgrades frequently. But thats one of the reasons he went with the enthoo pro 2. Theres alot of ways to configure your gear and none of that air flow killing solid front panel shite. He didnt have any fans mounted on the right panel if memory serves. Only front, top and back. Im not sure if he had any mounted on the bottom.
Wcing in it will be a breeze.
Wcing in it will be a breeze.
I have the Enthoo 719 which is a similar case, with the main differences being that the enthoo 719 has solid front and top panels that are low restriction, but kill off a good amount of high pitched noise from pumps etc. With an air based setup the temp diff would most likely be in the 2-3 degrees range, but in a water cooled setup it is a lot less (decimals). There is also slightly different top mount and overall slightly higher build quality with hinged door, nicer side panel etc. Outside of that the chassis is pretty much the same so most of the issues below would apply to the Enthoo Pro 2. It is a good case and I like it a lot, but there are some minor issues that has to be planned for when building.
I would have liked the case to be 4cm taller, 3cm wider and 5cm longer to allow for more radiator combos. The bottom doesn't take wide radiators so you are limited to around 122mm or so wide radiators and the side mount only has about 2.5cm of clearing to the front mount with a 130mm wide radiator. Basically you become limited as soon as you use a fat 480mm radiator at the front, which is what I am running in my main setup. There is also a not that much motherboard clearance at the top so it is likely that one runs into clearance issues with a 140mm class rad at the top.
If I were to add more radiators to my setup then it would have to be bottom or side mounted as a top mounted exhaust makes little sense due to a high efficiency radiator heating up the air to almost water temp. It is possible to mount a 360mm at the top along with a fat 480 at the front, but it requires a bit of "creative" mounting as the screw holes will not line up for all the slots. Unfortunately I would be limited to running 240mm at the bottom or swapping to either a 420mm or slim 480 at the front if I wanted to run 360mm at the bottom. The side mount would be difficult to use with the front slot occupied, but it is possible to use both with certain combos.
pendragon1
Extremely [H]
- Joined
- Oct 7, 2000
- Messages
- 52,226
yeah youll have plenty of options with it

notarat
2[H]4U
- Joined
- Mar 28, 2010
- Messages
- 2,501
Anyone have this case AND water cool?
thinking of getting one but curious how people have them setup inside for water cooling. I really want a nice full tower to replace my rather aged and inadequate 2001 circa thing.
I have one. I've not been very impressed with it thus far...
pendragon1
Extremely [H]
- Joined
- Oct 7, 2000
- Messages
- 52,226
why...I have one. I've not been very impressed with it thus far...
I have the Enthoo 719 which is a similar case, with the main differences being that the enthoo 719 has solid front and top panels that are low restriction, but kill off a good amount of high pitched noise from pumps etc. With an air based setup the temp diff would most likely be in the 2-3 degrees range, but in a water cooled setup it is a lot less (decimals). There is also slightly different top mount and overall slightly higher build quality with hinged door, nicer side panel etc. Outside of that the chassis is pretty much the same so most of the issues below would apply to the Enthoo Pro 2. It is a good case and I like it a lot, but there are some minor issues that has to be planned for when building.
I would have liked the case to be 4cm taller, 3cm wider and 5cm longer to allow for more radiator combos. The bottom doesn't take wide radiators so you are limited to around 122mm or so wide radiators and the side mount only has about 2.5cm of clearing to the front mount with a 130mm wide radiator. Basically you become limited as soon as you use a fat 480mm radiator at the front, which is what I am running in my main setup. There is also a not that much motherboard clearance at the top so it is likely that one runs into clearance issues with a 140mm class rad at the top.
If I were to add more radiators to my setup then it would have to be bottom or side mounted as a top mounted exhaust makes little sense due to a high efficiency radiator heating up the air to almost water temp. It is possible to mount a 360mm at the top along with a fat 480 at the front, but it requires a bit of "creative" mounting as the screw holes will not line up for all the slots. Unfortunately I would be limited to running 240mm at the bottom or swapping to either a 420mm or slim 480 at the front if I wanted to run 360mm at the bottom. The side mount would be difficult to use with the front slot occupied, but it is possible to use both with certain combos.
thanks, yea I don't need that many rads and I'd probably use a 3 fan and a 2 fan rad. What about the pump placement? I use flexible tubing and old school barb fittings to complete the loop.
notarat
2[H]4U
- Joined
- Mar 28, 2010
- Messages
- 2,501
why...
- It looks bigger (on paper)than it actually is to build in
- The bottom Rad placement is horrible in advertised size versus actual size available.
- The bottom Rad area has far less airflow than it should since 2 of the 3 holes are very restricted. One of the three spots for a fan is restricted for anything other than an 80mm fan
- There is an un-necessary mount on the bottom for the Rad..Should have been better designed and the extra "plate" shouldn't have been necessary.
- The "screwless" feature is not good. The knurled screws are tightened down as tightly as an NZXT case. (which means you can try your unscrewing them only to end up removing your fingerprints, rather than the screws) That's "some" of the screws...others are not knurled enough and slip out of your fingers
- For a case that size, width-wise, it has difficulties accepting thick radiators (specifically, XSPC 54mmx120mmx360mm rads)
- Mine had sharp edges to it, which resulted in multiple bleeds requiring band-aids and Neosporin applications
- Vertically-mounting a video card with one of the Phantek adapters (not included, btw) makes the back of the case flex more than it should.
- Included vertical GPU mount "brace" is not as effective as it should be, mainly because the back plate should just be of thicker gauge metal.
I'll say this as a summary...I can build a hardline dual rad system (H2O cooled CPU/GPU) in an O11 Dynamic XL easier than in either the 7000D and Enthoo Pro 2...and that's sad.
EDITED TO ADD: I'm very demanding when it comes to grading cases... I acknowledge this. If I am going to pay upwards of $275 for a case, I expect perfection, and 99.999% of cases fail miserably to live up to my standards...
Here's a quick look at the initial loop.

If I move my stuff back to this case from the 7000D I'll be mounting the Liquid Devil vertically where the Asrock OC Formula card is in this picture, and removing the NVME Adapter card shown in the pic above. That should let me re-arrange the mounting of the pump/res and allow me enough space to use a Aquacomputer LeakShield in the build when they're more "available".
Last edited:
There is so much room that you can place it many places. I had it mounted on the bottom to begin with on one of the 120mm fan mounts, but decided to move it to the front and mount it on the radiator. I have about 27cm of clearance from the bottom of the interior up to the GPU and unless you are running a 60mm radiator then the res should clear the GPU. My GPU is almost 33cm and the res would clear the GPU on a 40mm rad, but not a 60mm rad at the front. My pump+res combo is a EK Quantum kinetic 200 and is mounted on the bottom fan on my 480 and still has a couple of centimeters up to the the triple slot cooler on my GPU.thanks, yea I don't need that many rads and I'd probably use a 3 fan and a 2 fan rad. What about the pump placement? I use flexible tubing and old school barb fittings to complete the loop.
While I have the Enthoo 719 the main chassis is the same, outside of the top plate. We do agree on it being slightly more restrictive than it should with large radiators (should have been a few centimeters larger in each direction). I didn't have any sharp edges on my case or any problems with the screws, not sure if that is unit to unit variance or if they put more effort into the more expensive versions of the chassis.It does have good features as well...which is why I still may end up using it in this build, but only because I feel the 7000D has at least as many flaws (though not necessarily the same flaws) as the Enthoo Pro 2.
- It looks bigger (on paper)than it actually is to build in
- The bottom Rad placement is horrible in advertised size versus actual size available.
- The bottom Rad area has far less airflow than it should since 2 of the 3 holes are very restricted. One of the three spots for a fan is restricted for anything other than an 80mm fan
- There is an un-necessary mount on the bottom for the Rad..Should have been better designed and the extra "plate" shouldn't have been necessary.
- The "screwless" feature is not good. The knurled screws are tightened down as tightly as an NZXT case. (which means you can try your unscrewing them only to end up removing your fingerprints, rather than the screws) That's "some" of the screws...others are not knurled enough and slip out of your fingers
- For a case that size, width-wise, it has difficulties accepting thick radiators (specifically, XSPC 54mmx120mmx360mm rads)
- Mine had sharp edges to it, which resulted in multiple bleeds requiring band-aids and Neosporin applications
- Vertically-mounting a video card with one of the Phantek adapters (not included, btw) makes the back of the case flex more than it should.
- Included vertical GPU mount "brace" is not as effective as it should be, mainly because the back plate should just be of thicker gauge metal.
I'll say this as a summary...I can build a hardline dual rad system (H2O cooled CPU/GPU) in an O11 Dynamic XL easier than in either the 7000D and Enthoo Pro 2...and that's sad.
EDITED TO ADD: I'm very demanding when it comes to grading cases... I acknowledge this. If I am going to pay upwards of $275 for a case, I expect perfection, and 99.999% of cases fail miserably to live up to my standards...
notarat
2[H]4U
- Joined
- Mar 28, 2010
- Messages
- 2,501
While I have the Enthoo 719 the main chassis is the same, outside of the top plate. We do agree on it being slightly more restrictive than it should with large radiators (should have been a few centimeters larger in each direction). I didn't have any sharp edges on my case or any problems with the screws, not sure if that is unit to unit variance or if they put more effort into the more expensive versions of the chassis.
It's likely a QC issue so some units are more prickly than others...
I have purchased a Corsair Distro Plate (for use in my 7000D but it may work better in this case) AND I have already ordered flexible tubing and compression fittings to replace the hard lines , if the Distro Plate doesn't let me do what I want with the build
To me, this case has potential, a lot actually, but it's just not up to the standards of what I wanted out of it so I feel disappointed. (doubly so since I also bought a 7000D and it, too, is not up to snuff for what I want to do.)
notarat
2[H]4U
- Joined
- Mar 28, 2010
- Messages
- 2,501
I've revisited the Pro 2 with some changes in parts, and a change in my desire to keep the case unblemished. Since the purity has been put in the bin(!), I'll be taking the dremel tool to the bottom of the case to enlarge the very restrictive holes so it breathes much better...(that's a weekend project.
I am now able to fit an XSPC 54mm x 120mm x 360mm Radiator in the bottom of the case. I can neither confirm nor deny that a hammer is a vital component in anyone's "computer build" tool box.

One thing to note in that pic is that the (3) 140mm fans in the front are mounted outside the frame. Here's a better look. (they can be re-positioned to eliminate the gap in the pic below)

They are occupying the area where the large sized mesh front was originally. You can (carefully!) remove that mesh and the plastic frame in order to mount fans in that hole. That frees up space inside the frame of the case to add a 3rd Radiator at the front.
Specifically, a 25mm x 120mm x 360mm (at least) radiator will then fit in between the Distro Plate (sold separately) and the front frame.
I tried it. It DOES fit. You have to first mount the 140mm fans to the front of the frame, not inside it, Then, you need to reach through the fan blades to mount the radiator to the 120mm mounts. Then you can insert the Distro Plate and secure it.

The pic above shows the fans mounted inside the frame, not outside. When I was looking at the fitment of the front cover to see how I need to reposition the fans to eliminate the gaps, I got the idea that the newly-freed up room in the case could hold another radiator. I then moved the fans to the outside of the frame (as shown in the first pic). You reach through the fan blades with the screwdriver to mount the radiator to the places highlighted in the yellow boxes.
One other note to add:
I really wanted to jam an icepick into my ear and twirl it around in my brain to make the pain stop when I realized what a bitch it's going to be to do hard lines on this case. Seemingly all the runs at the front of the case require chicane bends because nothing lines up properly...(see the pics below)


So...I'm taking a hybrid approach to the build. The CPU/GPU runs will be Soft Tubing so I can remove them without draining the system in case I need to troubleshoot, while the rest will be hardline
I am now able to fit an XSPC 54mm x 120mm x 360mm Radiator in the bottom of the case. I can neither confirm nor deny that a hammer is a vital component in anyone's "computer build" tool box.
One thing to note in that pic is that the (3) 140mm fans in the front are mounted outside the frame. Here's a better look. (they can be re-positioned to eliminate the gap in the pic below)
They are occupying the area where the large sized mesh front was originally. You can (carefully!) remove that mesh and the plastic frame in order to mount fans in that hole. That frees up space inside the frame of the case to add a 3rd Radiator at the front.
Specifically, a 25mm x 120mm x 360mm (at least) radiator will then fit in between the Distro Plate (sold separately) and the front frame.
I tried it. It DOES fit. You have to first mount the 140mm fans to the front of the frame, not inside it, Then, you need to reach through the fan blades to mount the radiator to the 120mm mounts. Then you can insert the Distro Plate and secure it.
The pic above shows the fans mounted inside the frame, not outside. When I was looking at the fitment of the front cover to see how I need to reposition the fans to eliminate the gaps, I got the idea that the newly-freed up room in the case could hold another radiator. I then moved the fans to the outside of the frame (as shown in the first pic). You reach through the fan blades with the screwdriver to mount the radiator to the places highlighted in the yellow boxes.
One other note to add:
I really wanted to jam an icepick into my ear and twirl it around in my brain to make the pain stop when I realized what a bitch it's going to be to do hard lines on this case. Seemingly all the runs at the front of the case require chicane bends because nothing lines up properly...(see the pics below)
So...I'm taking a hybrid approach to the build. The CPU/GPU runs will be Soft Tubing so I can remove them without draining the system in case I need to troubleshoot, while the rest will be hardline
Last edited:
What is the true width of the XSPC radiator? If it was 120mm wide it would fit. Based on your photos it looks like it is in the 126-130mm range.I've revisited the Pro 2 with some changes in parts, and a change in my desire to keep the case unblemished. Since the purity has been put in the bin(!), I'll be taking the dremel tool to the bottom of the case to enlarge the very restrictive holes so it breathes much better...(that's a weekend project.
I am now able to fit an XSPC 54mm x 120mm x 360mm Radiator in the bottom of the case. I can neither confirm nor deny that a hammer is a vital component in anyone's "computer build" tool box.
notarat
2[H]4U
- Joined
- Mar 28, 2010
- Messages
- 2,501
notarat appreciate the detailed review of the case but what kind of potato are you using to snap those pictures?
Kindle fire. Left my Cell Phone at work yesterday. Yep. Definitely potato quality, but I wanted to get some shots before it slipped my mind.
It's odd...when I made the post with the pics last night on my home system the pics were far clearer. When I went to Amazon Photo and downloaded them, they unzip fine and are far higher quality...
Last edited:
notarat
2[H]4U
- Joined
- Mar 28, 2010
- Messages
- 2,501
What is the true width of the XSPC radiator? If it was 120mm wide it would fit. Based on your photos it looks like it is in the 126-130mm range.
In order to figure that out I'd have to go to the XSPC Site to see if they have it listed or grab my calipers and measure it. I may do that when I remove all the radiators this weekend when I bend the tubing.
Bottom Radiator has to come out again anyway because there is no way to connect the drain line with it in the case (The lever on the valve hits the bottom of the case, so you can't screw it in) and the Top Rad has to come out to add the Fill Port
Seems there is a definite build "sequence" to be performed, at least in my build...
- Install front 140mm fans
- Install bottom Rad with drain port already connected
- Install Distro Plate (since I'm not using a front-mounted Rad)
- Install Fans on bottom Rad
- Install Top Rad with Fill Port to align it with the Frankenstein hole I cut into the top of the case
- Install Vertical GPU Mount
- Install tubing
notarat
2[H]4U
- Joined
- Mar 28, 2010
- Messages
- 2,501
I've been meaning to follow up on my previous post.
Here's a shot of the completed system for now. I decided to go soft tube to make upgrading later to the 5950X with the large L3 cache easier.

I still need to print out 3 more hub caps for the top mounted fans and I need to cable manage the wires from the Distro Plate.
I will say that, after making the mods to the bottom of the case I'm now satisfied with the cooling capability of the dual rad system. It idles at 30°C - 31°C and I've yet to see it hit 80°C under full load.

That said it's still using completely stock settings in BIOS so I really need to brush up on tweaking the Dark Hero board.
Here's a shot of the completed system for now. I decided to go soft tube to make upgrading later to the 5950X with the large L3 cache easier.
I still need to print out 3 more hub caps for the top mounted fans and I need to cable manage the wires from the Distro Plate.
I will say that, after making the mods to the bottom of the case I'm now satisfied with the cooling capability of the dual rad system. It idles at 30°C - 31°C and I've yet to see it hit 80°C under full load.
That said it's still using completely stock settings in BIOS so I really need to brush up on tweaking the Dark Hero board.
Last edited:
notarat
2[H]4U
- Joined
- Mar 28, 2010
- Messages
- 2,501
are those like extra thick rads?
Yes. 360x120x54, though the 120 part is more like 125 with the XSPC Rads.
Yes. 360x120x54, though the 120 part is more like 125 with the XSPC Rads.
scared me for a second, made me think the case was small inside.
notarat
2[H]4U
- Joined
- Mar 28, 2010
- Messages
- 2,501
scared me for a second, made me think the case was small inside.
It's larger than the 7000D but it could be a bit wider, TBH.
I added my hardware monitor screen to it but i haven't set up everything on it yet. Just basic temps for now.


My 40mm and 60mm thick rads are 130mm wide so 125 isn't that bad to be fair.Yes. 360x120x54, though the 120 part is more like 125 with the XSPC Rads.
well, I ended up ordering one. First new case for me since....2001.
Going to redo my entire water loop, new tubing, new fittings. Been using the same loop setup and what not since 2009. Going to go all black this time instead of clear tubing and chrome fitting. Time to let the old Chieftec monster tower go. Think this case say Dual AMD MP, P4, Athlon X2, Core 2 duo, i7 920, Xeon, 2700x, and now 3800x. I don't even think I can remember the videos cards it has seen, 9700pro, AIW800 something, SLI 7800gts, SLI 280gtx, SLI480GTX, SLI980s, 1080ti.
![DSC_0045[1].JPG](https://cdn.hardforum.com/data/attachment-files/2021/08/thumb/491746_DSC_00451.jpg "DSC_0045[1].JPG")
Going to redo my entire water loop, new tubing, new fittings. Been using the same loop setup and what not since 2009. Going to go all black this time instead of clear tubing and chrome fitting. Time to let the old Chieftec monster tower go. Think this case say Dual AMD MP, P4, Athlon X2, Core 2 duo, i7 920, Xeon, 2700x, and now 3800x. I don't even think I can remember the videos cards it has seen, 9700pro, AIW800 something, SLI 7800gts, SLI 280gtx, SLI480GTX, SLI980s, 1080ti.
![DSC_0045[1].JPG](https://cdn.hardforum.com/data/attachment-files/2021/08/491746_DSC_00451.jpg "DSC_0045[1].JPG")
notarat
2[H]4U
- Joined
- Mar 28, 2010
- Messages
- 2,501
well, I ended up ordering one. First new case for me since....2001.
Going to redo my entire water loop, new tubing, new fittings. Been using the same loop setup and what not since 2009. Going to go all black this time instead of clear tubing and chrome fitting. Time to let the old Chieftec monster tower go. Think this case say Dual AMD MP, P4, Athlon X2, Core 2 duo, i7 920, Xeon, 2700x, and now 3800x. I don't even think I can remember the videos cards it has seen, 9700pro, AIW800 something, SLI 7800gts, SLI 280gtx, SLI480GTX, SLI980s, 1080ti.
View attachment 390105
It's taken some time but the case has grown on me a bit so I feel now that it's a better case than my initial review would indicate. You should be happy with it. It looks like your pump is mounted on the bottom of the case in that picture. If you're going to mount it to the bottom of the Pro 2, you may want to pick up a piece of black ABS Plastic from Amazon so you can mount the pump to it and then mount the plate on the bottom of the case since there is not enough of a flat space to mount the pump. (see exploded view pic below)

notarat
2[H]4U
- Joined
- Mar 28, 2010
- Messages
- 2,501
I have a completely different pump to use for this that can mount to a 140mm fan.
So i was going to mount it to a 140 at the bottom
Are you mounting three 140s at the bottom of the case or on the front panel, and then mounting your pump to the bottom-most 140 fan?
Just wondering because the part I circled in the pic above is, frankly, very restrictive as far as airflow is concerned.
I was "done" with my build but I still have a few things I need to change around...I am printing a HDD Mount to mount a spinner to the back bottom part of the case and I'm re-doing the connections to my internal 5" LCD so the cables exit the back of the LCD Case I printed instead of the bottom. Here are some pics (and a pick of the hardest run I had to make in this build)


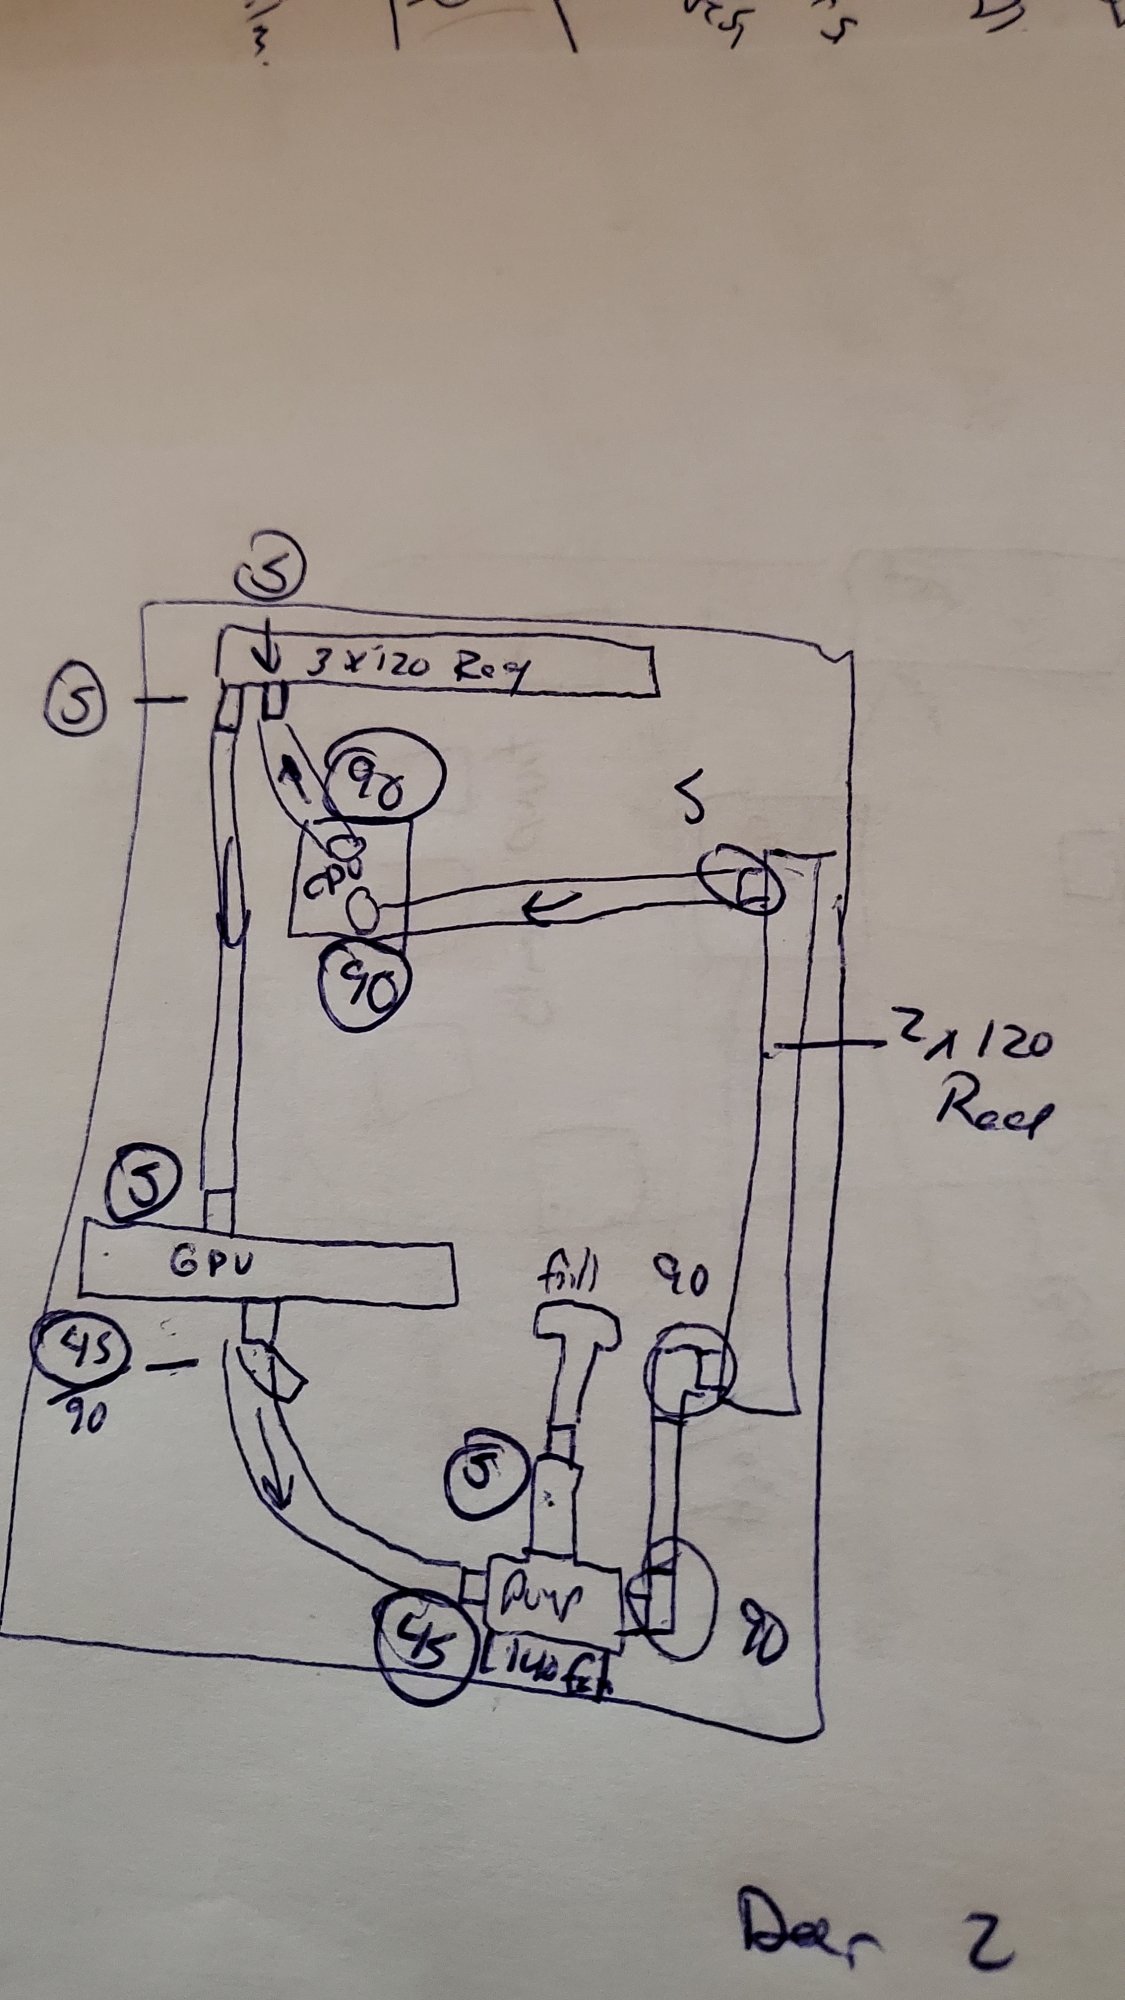
Here is my crude drawing of what i was thinking. My new pump is one of the EK ones with the little res attached to it.
Im not sure what other fans i will put in it. I haven't even ordered any fitting yet because I want to see the stuff in the case first before spending like 100 bucks on fittings. Flex tubing so it shouldn't easy enough to route but I plan to try and keep the tube length to a minimum.
Im not sure what other fans i will put in it. I haven't even ordered any fitting yet because I want to see the stuff in the case first before spending like 100 bucks on fittings. Flex tubing so it shouldn't easy enough to route but I plan to try and keep the tube length to a minimum.
Attachments
Last edited:
That will work fine if it is a 40mm or 30mm thickness, you may have to measure if it is a 60mm thickness radiator. I've had my EK D5 quantum kinetic 200 pump+res combo bottom mounted with a 40mm 360 in the front but never tried it after I went with a 60mm 480 at the front as I chose to mount it to the radiator. Be aware that the largest versions of the res+pump (300) may be too tall to clear your GPU if the GPU is 30cm or so in length (you will need to measure or do a mock up). Out of curiosity, is there any specific reason you are not going with a 360 or a 480 in the front? A slim 480 shouldn't cause issues with clearance at the top as long as you mount it tubes down and a thick 360 mounted to the lower portion of the front with res mounted to rad would be fine as well.Here is my crude drawing of what i was thinking. My new pump is one of the EK ones with the little res attached to it.
Im not sure what other fans i will put in it. I haven't even ordered any fitting yet because I want to see the stuff in the case first before spending like 100 bucks on fittings. Flex tubing so it shouldn't easy enough to route but I plan to try and keep the tube length to a minimum.
That will work fine if it is a 40mm or 30mm thickness, you may have to measure if it is a 60mm thickness radiator. I've had my EK D5 quantum kinetic 200 pump+res combo bottom mounted with a 40mm 360 in the front but never tried it after I went with a 60mm 480 at the front as I chose to mount it to the radiator. Be aware that the largest versions of the res+pump (300) may be too tall to clear your GPU if the GPU is 30cm or so in length (you will need to measure or do a mock up). Out of curiosity, is there any specific reason you are not going with a 360 or a 480 in the front? A slim 480 shouldn't cause issues with clearance at the top as long as you mount it tubes down and a thick 360 mounted to the lower portion of the front with res mounted to rad would be fine as well.
I don't think I need that much rad. A single 360 has been doing fine but I figured I'd split it to cool between the hot bits. Sadly I don't know the thickness of the 360 I have, the 240 I have coming is about 1.5 inches thick without the fans. I also have slim fans for everything. It was also a cost thing. Although I could have ordered whatever, I was seriously trying to keep costs lower but that may go out the window anyway since I'm going to switch up to compression fittings which cost more.
yea I didn't even order fittings yet because the plan was to move things to the new case to figure out what worked and what didn't, then order what I need.
I would consider puting the 360 in the front as it will be drawing cool air while the one at the top is drawing hotter air from the case. Also consider blocking of the unused fan slots on the front to avoid re circulation of the air. Loop order doesn't matter that much as once it reaches steady state the difference in temps inside the loop is unlikely to be much more than 1 degree, unless your water temp is way above ambient.I don't think I need that much rad. A single 360 has been doing fine but I figured I'd split it to cool between the hot bits. Sadly I don't know the thickness of the 360 I have, the 240 I have coming is about 1.5 inches thick without the fans. I also have slim fans for everything. It was also a cost thing. Although I could have ordered whatever, I was seriously trying to keep costs lower but that may go out the window anyway since I'm going to switch up to compression fittings which cost more.
yea I didn't even order fittings yet because the plan was to move things to the new case to figure out what worked and what didn't, then order what I need.
I would consider puting the 360 in the front as it will be drawing cool air while the one at the top is drawing hotter air from the case. Also consider blocking of the unused fan slots on the front to avoid re circulation of the air. Loop order doesn't matter that much as once it reaches steady state the difference in temps inside the loop is unlikely to be much more than 1 degree, unless your water temp is way above ambient.
My thought was front pulls in, tops pushes out. Kind of house the current case is. Or front out top out other fans in.
I will have to play around. I have at least a bench mark of how cool the current case keeps things.
notarat
2[H]4U
- Joined
- Mar 28, 2010
- Messages
- 2,501
I received my Zeskit HDMI adapters (I know...nothing to get excited over...) but; I have to say they're pretty damn well made for an adapter. Actually, they're probably the best made adapters I've ever found.
Not shilling for them...Just comparing them to the average Starlink brand adapters I use(and used previously) and they seem WAY better engineered and made. The Starlink ones would not fit in the LCD case I printed because they're physically too large. The Zeskit ones are SMALL compared to them.

Now that the in-case LCD doesn't have cables sticking out the bottom I went to work on designing a hard drive mount in Tinker-cad. It spaces the hard drive out enough that the data/power connectors are not butting up against the indented portion of the I/O slots on the back of the case, and it has rubber pads in the mount to dampen vibration.
I just ordered a new heat shrink tubing kit and Left-Angle SATA Power to Molex adapter and SATA Left-Angle Data cables and an 18TB Hard Drive which should arrive Saturday.
I'm very near the end of the build so I am feeling far less stressed now that I got to test everything while the parts were in the return window in case of a DOA part.
Last edited:
I think it will work. Only tight part might be the pump out to the front rad.
Now to wait for my lime 180 dollars worth of fittings and a fan controller.
Interesting that in so.e ways the old case was easier to work with but not in other ways.
Very glad this case is way lighter. Old case was beastly.

Now to wait for my lime 180 dollars worth of fittings and a fan controller.
Interesting that in so.e ways the old case was easier to work with but not in other ways.
Very glad this case is way lighter. Old case was beastly.
Last edited:
notarat
2[H]4U
- Joined
- Mar 28, 2010
- Messages
- 2,501
I think it will work. Only tight part might be the pump out to the front rad.
Now to wait for my lime 180 dollars worth of fittings and a fan controller.
Interesting that in so.e ways the old case was easier to work with but not in other ways.
Very glad this case is way lighter. Old case was beastly.
View attachment 390996
If you find you're having too much of a hassle with the pump to front rad run, you can put your fans outside the frame (after removing the mesh from the front panel) and that'll give you 25mm more to play with for that tubing run.
If you find you're having too much of a hassle with the pump to front rad run, you can put your fans outside the frame (after removing the mesh from the front panel) and that'll give you 25mm more to play with for that tubing run.
I may do that then, its going be tight i think the get a little pice of tubing between 2 90s.
I did use some skinny yate loot fans i had to get more. I mean they arent that much smaller, maybe 5mm or something.
notarat
2[H]4U
- Joined
- Mar 28, 2010
- Messages
- 2,501
I may do that then, its going be tight i think the get a little pice of tubing between 2 90s.
I did use some skinny yate loot fans i had to get more. I mean they arent that much smaller, maybe 5mm or something.
I like that you were able to retain mounts for (2) HDDs. I think that, at most, I'll only be able to mount 1 spinner HDD so I had to order an 18TB drive earlier today...meh...
90°s right off the pump aren't the best solution, though it will work...I played around with the idea of going with three 360mm rads (thick top and bottom rads with a 25mm thick cross-flow rad in the front location where your 240 is located. It's definitely doable...but you do have to remove the front mesh panel.
IF you decide to go that route, you can use three 140mm fans on the front after removing the mesh (see attached pic below)

Then mount the 240mm rad inside the frame by reaching through the fan blades with your screw/screwdriver (since the 120mm wide rad uses different mounting holes.)
Edited to add: I was leaning toward this configuration when I was considering hardlines and decided against it. Now that I've gone with soft tubing, I may actually reconsider adding it.
notarat
2[H]4U
- Joined
- Mar 28, 2010
- Messages
- 2,501
Im not sure how else to run it without 90s
You could move your pump back 1 spot, to the middle fan, to also clear up some room and make the angle less severe. Since your video card is also water cooled it is not as absolutely vital to have all 3 bottom fans blowing at it directly...blocking "some" of the airflow (by having the pump on the middle fan) is not going to cause major problems with your layout.
You could move your pump back 1 spot, to the middle fan, to also clear up some room and make the angle less severe. Since your video card is also water cooled it is not as absolutely vital to have all 3 bottom fans blowing at it directly...blocking "some" of the airflow (by having the pump on the middle fan) is not going to cause major problems with your layout.
as I looked at it this morning I determined I can just rotate the pump itself 90 degrees and it solves it. It 90s out of the pump still but goes straight into the radiator so no need for two 90s. I ordered the bracket to attach it to a 120 if needed. if I move it back its a straight shot out of the pump and into the radiator.
Stupid me also should have used my old fittings when messing around but for some reason I didn't even think about it but I think I have everything I need to make it work just fine, keeping the tube lengths to a minimum and trying to have them all as straight line as possible to the next point.