InvisiBill
2[H]4U
- Joined
- Jan 2, 2003
- Messages
- 2,608
I was researching a number of the parts for this in my other threads. I really liked the Accelero setup I saw on a card for sale by another member, and wanted to make mine almost exactly the same.
My 9800GT's stock cooler had a 4-wire PWM fan controlled by the VGA BIOS. I wanted to reuse this connection for my custom cooler, to allow for automatic fan control as well as keeping it from being plugged into the motherboard. I wanted to use a larger, quiet fan to avoid the whine of the stocker ramping up and down. I also wanted a slim fan, to keep it as far away from the next card as possible.
The best fan I could find to meet those requirements seemed to be the Scythe SY1012SL12H(PWM). Unfortunately, the fan only seems to come attached to the Shuriken CPU cooler. I went so far as to contact Scythe's sales department, with no luck. I ended up buying the whole Shuriken just to get the fan.
Now that I had a fan that would work with the card's PWM and fit nicely on the S1, I had to actually make it plug into the card. I started searching for parts on electronics sites, without much luck. I didn't have the exact measurements or a way to get them from the plug (I need to get some digital calipers one of these days...) so I was sort of searching in the dark. Then I struck gold. Another one of my projects in process is the white J1 connector on Dell sound cards. I happened to notice that the PWM fan plug was similar to the plug on the Dell cable on my desk. Studying it more, it wasn't just similar, it was actually the same plug but with fewer pins. I was able to look up the provided part number, and on the same page was the part number for the 4-pin version that I needed. I ordered the connector and pins, cut the plug off the Scythe fan, soldered on the new pins, and clipped them into the connector.
The only part I haven't finalized yet is actually securing the fan to the S1. I really dislike the look of zipties. I'd like to come up with something using silicone mounts, but I haven't really gotten anywhere with that yet. For now, I'm using some nicer wire ties that came with some new part that I bought in the past. They're a silver-ish wire with a thick clear plastic coating. I simply looped them around the heatpipes, then came up through the mounting holes in the fan and twisted them around tightly. I then trimmed off the wire ties as close as possible without being so close as to let them come undone. For what it is, I think it looks decent for a temporary solution.
The final step was to edit the VGA BIOS to match the fan speed to the proper temperature range. I ended up using the basic automatic settings, ramping the fan up from 30% to 100% over the 40°C - 60°C range. The GPU now stays in the low 40s during regular usage, maxing out around 50°C when I'm CUDA crunching. With the stocker, it never got below 60°C at idle and was mid 70s under load. The new setup is quieter than my Yate Loon case fans, compared to the noisy stocker which I could hear ramping up and down during games.
And now, the pictures...

The finished product

The fan cable could be a little shorter, but I thought it could be handy if I were able to plug it into other video cards too, so I left a little slack. I also wasn't sure how many times I'd screw up the pins on the end and need to clip it off and start over.

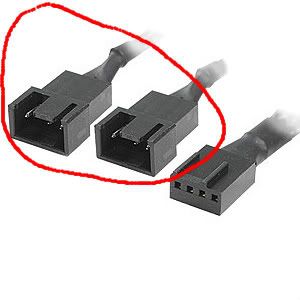
A closeup of the plug. The black wire could be just a little shorter to match the others better.

Slightly different angle of the plug

A little wider shot of the bottom of the card, showing the fan and the plug

The whole assembly installed

A straighter shot to show the space between the fan and second video card
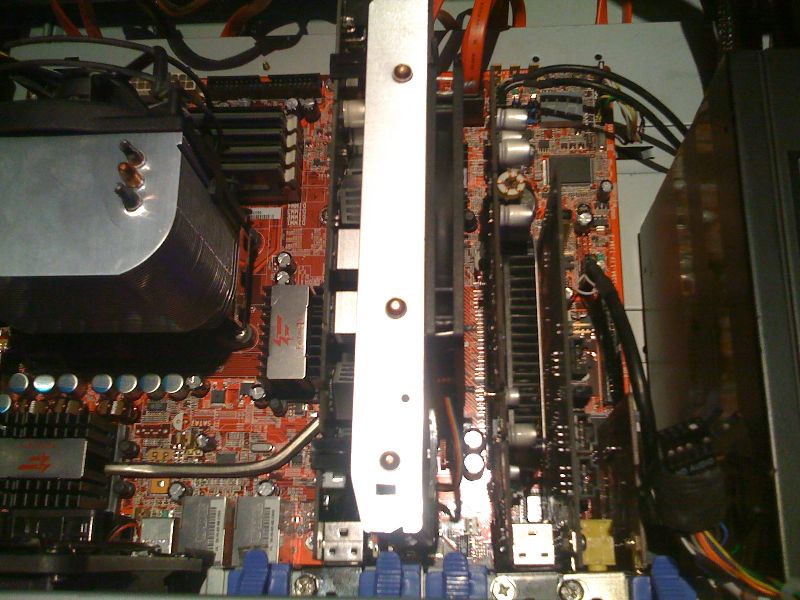
A closer shot of the fan and second video card
Sorry for the crappy cameraphone pics, and thanks to everyone who helped me figure something out for this project or got me thinking of another way to solve a problem with it.
My 9800GT's stock cooler had a 4-wire PWM fan controlled by the VGA BIOS. I wanted to reuse this connection for my custom cooler, to allow for automatic fan control as well as keeping it from being plugged into the motherboard. I wanted to use a larger, quiet fan to avoid the whine of the stocker ramping up and down. I also wanted a slim fan, to keep it as far away from the next card as possible.
The best fan I could find to meet those requirements seemed to be the Scythe SY1012SL12H(PWM). Unfortunately, the fan only seems to come attached to the Shuriken CPU cooler. I went so far as to contact Scythe's sales department, with no luck. I ended up buying the whole Shuriken just to get the fan.
Now that I had a fan that would work with the card's PWM and fit nicely on the S1, I had to actually make it plug into the card. I started searching for parts on electronics sites, without much luck. I didn't have the exact measurements or a way to get them from the plug (I need to get some digital calipers one of these days...) so I was sort of searching in the dark. Then I struck gold. Another one of my projects in process is the white J1 connector on Dell sound cards. I happened to notice that the PWM fan plug was similar to the plug on the Dell cable on my desk. Studying it more, it wasn't just similar, it was actually the same plug but with fewer pins. I was able to look up the provided part number, and on the same page was the part number for the 4-pin version that I needed. I ordered the connector and pins, cut the plug off the Scythe fan, soldered on the new pins, and clipped them into the connector.
The only part I haven't finalized yet is actually securing the fan to the S1. I really dislike the look of zipties. I'd like to come up with something using silicone mounts, but I haven't really gotten anywhere with that yet. For now, I'm using some nicer wire ties that came with some new part that I bought in the past. They're a silver-ish wire with a thick clear plastic coating. I simply looped them around the heatpipes, then came up through the mounting holes in the fan and twisted them around tightly. I then trimmed off the wire ties as close as possible without being so close as to let them come undone. For what it is, I think it looks decent for a temporary solution.
The final step was to edit the VGA BIOS to match the fan speed to the proper temperature range. I ended up using the basic automatic settings, ramping the fan up from 30% to 100% over the 40°C - 60°C range. The GPU now stays in the low 40s during regular usage, maxing out around 50°C when I'm CUDA crunching. With the stocker, it never got below 60°C at idle and was mid 70s under load. The new setup is quieter than my Yate Loon case fans, compared to the noisy stocker which I could hear ramping up and down during games.
And now, the pictures...

The finished product

The fan cable could be a little shorter, but I thought it could be handy if I were able to plug it into other video cards too, so I left a little slack. I also wasn't sure how many times I'd screw up the pins on the end and need to clip it off and start over.

A closeup of the plug. The black wire could be just a little shorter to match the others better.

Slightly different angle of the plug

A little wider shot of the bottom of the card, showing the fan and the plug

The whole assembly installed

A straighter shot to show the space between the fan and second video card

A closer shot of the fan and second video card
Sorry for the crappy cameraphone pics, and thanks to everyone who helped me figure something out for this project or got me thinking of another way to solve a problem with it.