E22 - K2 prototype

editor22

n00b
Joined
Jul 24, 2012
Messages
29
FINAL SHOTS - STAGE ONE

K22.jpg


K21.jpg


k23.jpg


K2full.jpg


K2Detail.jpg


Hey there everyone, I have been wanting to get another computer built for a while now but have never been able to find the time!

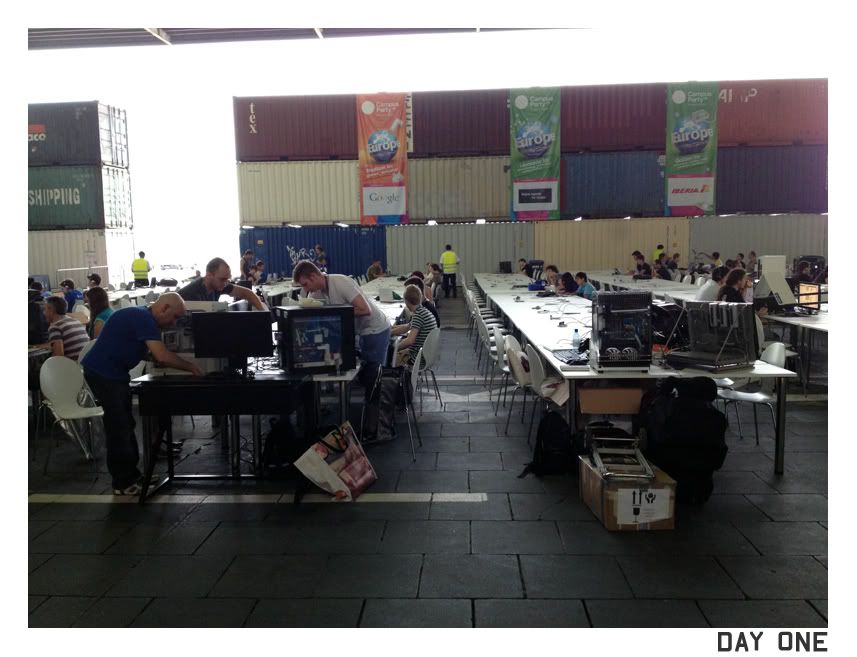
A couple of days ago I was invited to head over to Berlin for the campus party, as soon as I found out I knew that I needed a new case to take with me!

Obviously this log may not be as in depth or action packed in the beginning as I have around 5 days to finish this :eek: or at least get a working prototype up!

Plus there is always the possibility of everything going wrong and having to hold it together with duct tape for a week until I can get back from Berlin and work things out. What ever happens I'm hoping it's awesome :)


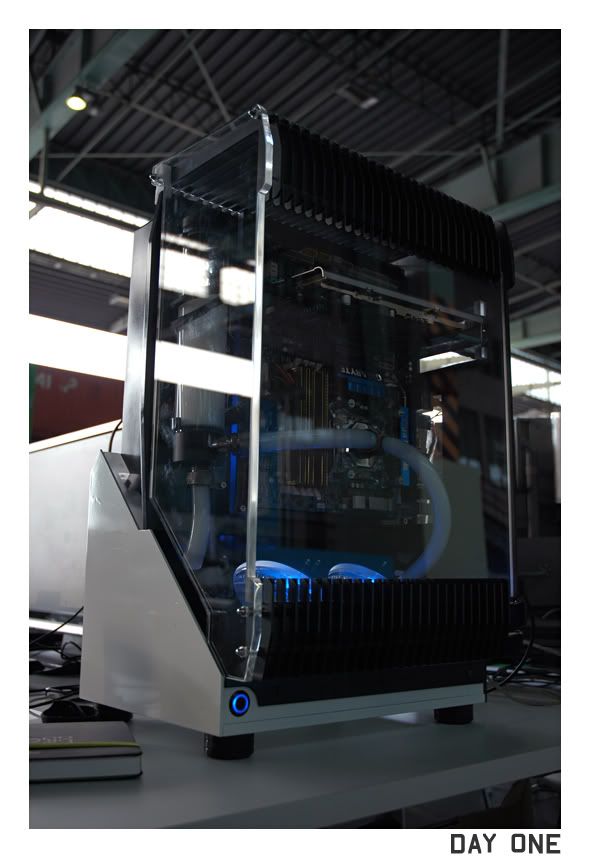
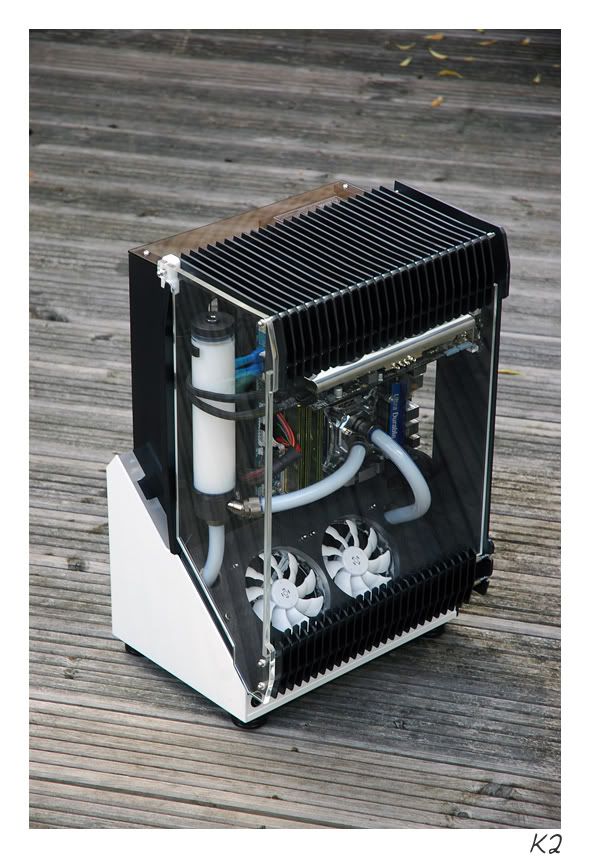
So without further ado, I present the K2 concept:

K206.jpg


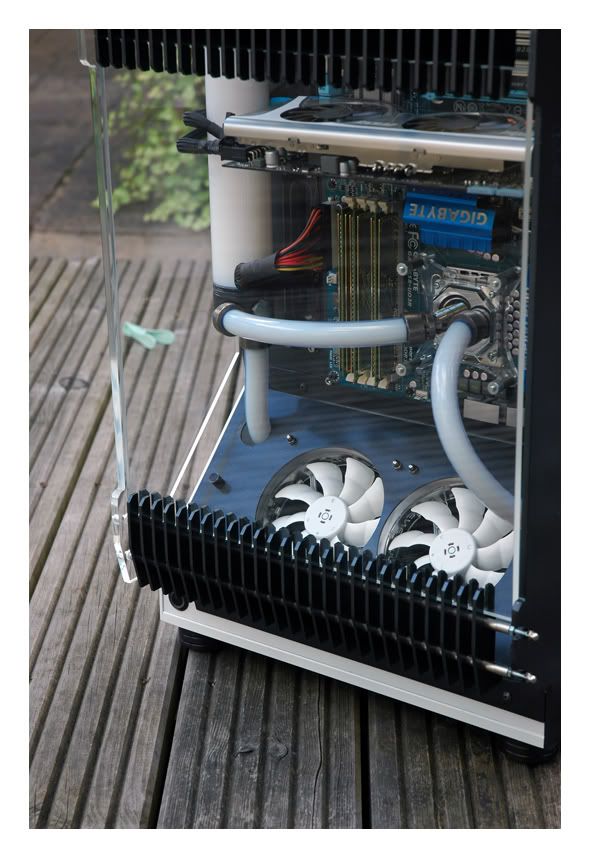
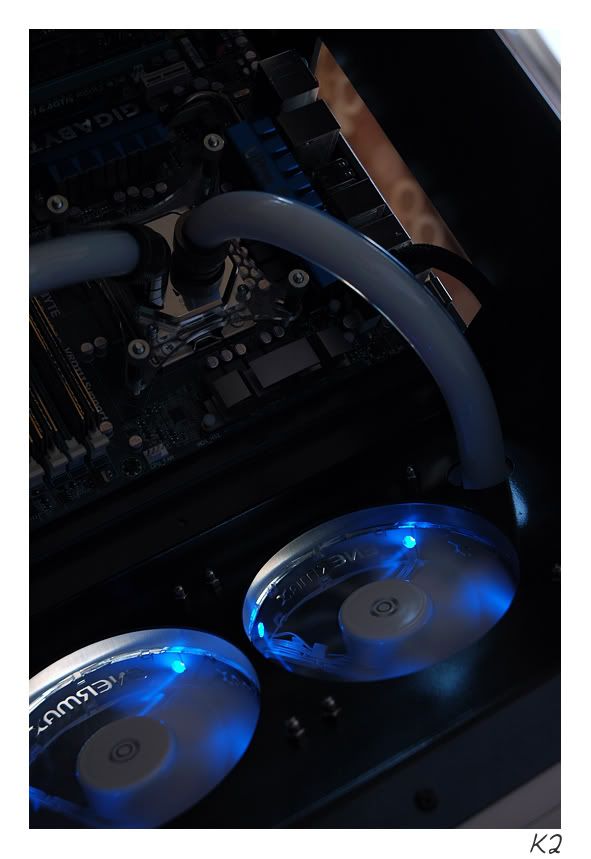
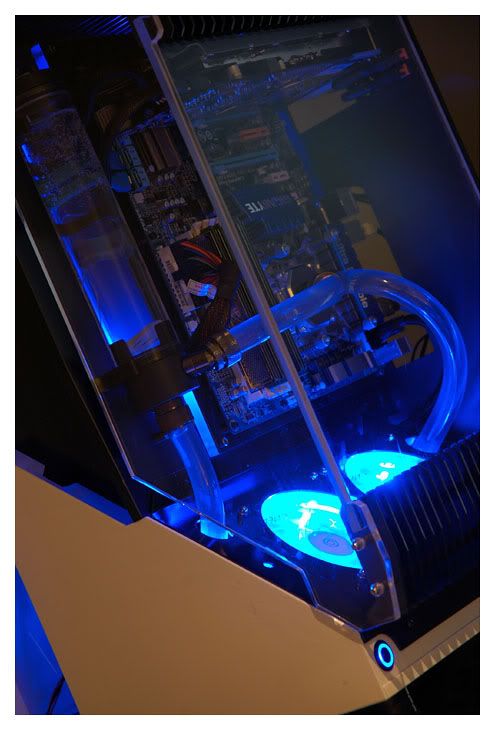
Simple in essence, cooled by a single radiator drawing air through the open finned design.

I had originally designed this to make use of an AIO cooler but unfortunately that wont be ready in the next week so I'll be installing a standard loop in until then.


Again; sorry for the poor pictures I'm just taking them on the phone as I go.

First up.. Safety! and a new hat that I can't wear till winter :(

Safety.jpg


Ok so now a random mixture of images from the last 2 days!

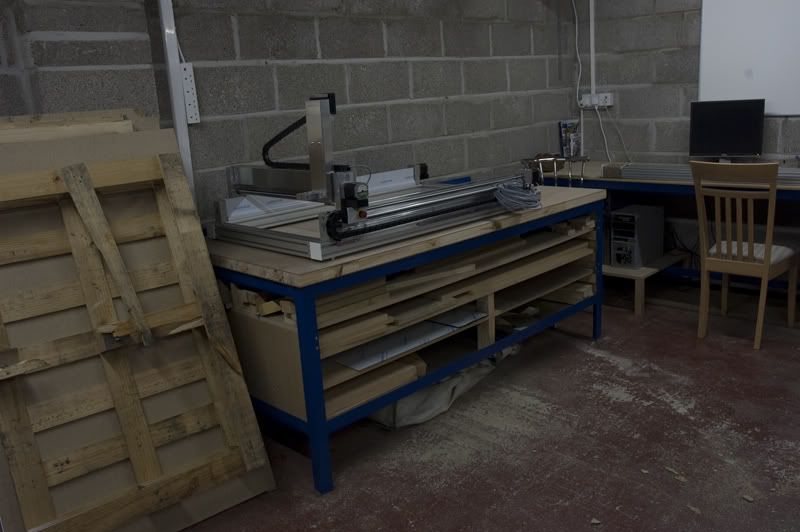
Set some tool paths for the CNC

smallfindesign.jpg


And off she goes :)

smallfinsmill.jpg


I'm just using what ever scraps I have left over in the shop for this as its a prototype and I also don't have time to wait on a delivery.

partscut.jpg


Some 10mm stock goes under the mill for some framework.

mill.jpg


All the fins get a coat of Graphite sparkle spray and then it's a lovely sit down in the garden to assemble.

Gerden.jpg


The bottom fin set.

Smallfins.jpg


The radiator also got a quick coat to help it blend in.

Radpainted.jpg


Time for a test fit (using my wife as a wonderful assistant)

Sidepaneltest.jpg
 
Last edited:
I'm in. This look great. Going to be awesome... just dont get any dust in it or you will be sorry!
 
Nice! Looking like it will be rather sweet, GL, Have fun, and keep us updated!

:D
 
I wish I had the skills and equipment to create something like this. Maybe someday.
 
Awesome. Extremely awesome. :) Can't wait to see the finished product.

F'in AWESOME! Did I mention it looks awesome? Because it does. Definitely watching this until finish.
 
Having been privy to seeing this during it's planning stage, it's awesome to see it come to reality. Excellent work bro!
 
That's a PROTOTYPE :) ?

*dribble*

Lol well kind of, more of a "lets see if it all fits together and if not just glue it" kind of thing :D

Looks awesome so far!

Thanks cnealjr

This will be fun to watch. Awesome work so far

Thank you DraginDime

Can you post pics of your CNC machine?

Looks home-made, which is awesome.

Hey Lee, The CNC machine I have is a HEIZ S-1000, heres an old old shot but probably the best I have of the actual machine.

CNC2.jpg


It's not home made unfortunately but rock solid none the less :) I have made a few minor modifications like the clamping bed and clamps, vacuum holders etc but nothing major. It was pretty good right out of the box :D

Looks good. +1 for cnc :)

Thanks cmadki4 :p

I'm in. This look great. Going to be awesome... just dont get any dust in it or you will be sorry!

lol that's the only thing I'm worried about! still, my case is like a dust bunny paradise at the moment so it can't possibly get any worse lol.

Nice! Looking like it will be rather sweet, GL, Have fun, and keep us updated!

:D

Thanks Mosher :) I'll do my best to keep the updates coming! only 4 days left to finish it now so its going to be a bit hectic :eek:

I wish I had the skills and equipment to create something like this. Maybe someday.

I always say the same thing here "if you have hands (please tell me you do and I haven't put my put in my mouth) then you can make anything"

Even if your not a natural designer or craftsman, just practice and the more you do the better you'll get :D

Awesome. Extremely awesome. :) Can't wait to see the finished product.

F'in AWESOME! Did I mention it looks awesome? Because it does. Definitely watching this until finish.

Lol read that and laughed the wrong way forcing apple pie yoghurt out my nose : / thanks for that Ur_Mom! :(

Having been privy to seeing this during it's planning stage, it's awesome to see it come to reality. Excellent work bro!

Cheers Craig :cool:

;) GOOD WORK!

Thank you Jcazz :)


-----

So on with the log! this will feature all of the adventures from day two!

First I set up the CNC to mill out the plexi part of the motherboard tray.

mobotray.jpg


Bit of a jump now... but here's the assembled motherboard / mid section

mohbotraytest.jpg


Next victim is the panel that holds the radiators and also connects the mid section to the base.

Hot off the CNC
radplate.jpg


Bit of de-burring and its a quick test fit

radplatetest.jpg


All together now :) that 5 day deadline is looking achievable :D

testfit2-2.jpg


So I'll leave this update with my favourite shot of the day. Sadly you will all have to wait to find out what this block is being turned into :)

newpart1.jpg


4 days to go!

PS: I'm always updating the E22 Facebook page as I go throughout the day, so if your interested in watching the project come together in real time as well as keeping up to date on how I fair in Berlin head over and join the fun :)
 
now do this without the machines
Not one of these comments again...

There is skill in hand crafting and there is skill in cad/cam/machining. Don't hate those with skills in BOTH and the means to do so.

:)
 
Wow, just wow.

You certainly have skillz. Beautifully simple, elegant design.:)

Thanks featsdontfailme :)


Not one of these comments again...

There is skill in hand crafting and there is skill in cad/cam/machining. Don't hate those with skills in BOTH and the means to do so.

:)

that's why i edited my comment :)

but you replied before i did it

I know the previous comment has been edited but it is a really common misconception that anyone who uses a CNC cannot work with their hands. I think in actual fact most people who are frequently using CAD/CAM these days have moved to it from a background in hand modding or a in traditional engineering etc.

What it gives you is the ability to speed up processes and automate your production. As I worded it on another forum.

"using a CNC is like using an aimbot... it just makes the inevitable quicker"

In essence its also like another person helping and allows me to be cutting out panels while sorting more for painting or working on wiring etc

Thank you for editing your post p.i.m.p and thanks to you both for the kind words :)

Have a listen to the LOSIAS designer podcast:
http://www.losias.net/showthread.ph...l-Designer-Edition-Designing-to-Build?p=16278
Featuring Editor22 himself. Good discussion in there about using CNC machines and how much work actually goes into it - it's not just click a couple buttons and walk away!

That was a fun one to record :p I think I do drone on a bit though : /
 
Subscribed. This is going to be a beautiful work of art and function. Great job so far and best of luck making the deadline. :)
 
Wow. Love the concept.

I have no money, but could you make a few extras and send one my way? :D
 
Subscribed. This is going to be a beautiful work of art and function. Great job so far and best of luck making the deadline. :)

Thanks AceGoober.. all I can do is carry on working on it for 12 hours a day and hope for the best lol.

Wow. Love the concept.

I have no money, but could you make a few extras and send one my way? :D

lol maybe I'll do a competition or something for this prototype version... will have to see if it's up to standard first :D

Like the design, really nice.

thank you formula409 :p

----

So day 3!

Started off by cutting the back panel out of some 5mm black plexi

bacl.jpg


backfitted.jpg


Next it was time to return to that mysterious block of clear plexi from yesterday.

Checking to make sure to audio i/o fits

audioio.jpg


back panel screwed on.

audioio2.jpg


finally all together :) contemplating using this piece of smoked plexi for the left top as the PSU should look fairly nice once its all done :)

caseday3.jpg


---

On to the door :D

I made this little fellow out of some white POM and then squeezed a spacer into it to create a bracket for the door to hang on and swivel in.

POMbracket.jpg


The basic action is shown here in video form, this still needs a bit of work and mainly tightening up but I am waiting for the last delivery of small components :)

CLICKY FOR FUN VIDEO OF THE K2 DOOR :D
 
Just a quick Day 4 log update as day 5 looks to be just as hectic!

Made some support blocks to hold the smoked plexi top in place.

IMG_0827.jpg


Fitted it in and then sanded it flush

IMG_0829.jpg


Trying something a bit different out for the storage mounting

IMG_0833.jpg


Needed to generate some clearance between the radiator and the panel to allow for the 180deg fitting combo I have. Grabbed a scrap piece of 10mm plexi and started hacking it up. just needs a bit more sanding and were done :D

IMG_0837.jpg


After all that I finally managed to start the painting! unfortunately seeing as I have less than 48 hours to finish and box it all up I will only be able to get in 2 coats and minimal sanding between. Still it should look ok :)

Gloss white base

IMG_0841.jpg


BMW graphite sparkle back

IMG_0840.jpg


Mid section

IMG_0835.jpg
 
Been one hell of a week! at least now I have something to show for it and also something to show on my desk in Berlin :D


Here is a sneek peek, Will get some more shots doen when I have time to do the worklog :)

K2Detail.jpg
 
Only one question, how do you carry it without getting fingerprints on it?

//love the final BTW!
 
Only one question, how do you carry it without getting fingerprints on it?

//love the final BTW!

Thanks Skripka! fingerprints are not so bad on the painted surfaces but they are a nightmare on the clear plexi. Saying that the base is solid 10mm thick plexi so carrying it by that is fine :)

What in the world did you use for coolant... milk?

I'd wager Mayhem's dye.

Indeed, Mayhems ice white pastel to be exact :) I'll be going for that in the end but for now I may use some Ec6 blue.

it would have been alsome if you had the time to sleeve that beauty

Agreed :( sadly 5 days just wasn't long enough. I'll be going for charcoal / white when I get back. Hopefully with some new hardware to match it all a bit better :)
 
great work.

Love the fact people are starting to nit on the hardware. Modding never meant first dropping $1000 in hardware. Some old school modding right here, original idea, great execution, quick timing.
 
great work.

Love the fact people are starting to nit on the hardware. Modding never meant first dropping $1000 in hardware. Some old school modding right here, original idea, great execution, quick timing.

Agreed! still when I find a few thousand I would love to upgrade :D

----

figured you guys and girls may like to see some shots from the first day at Campus party Berlin :D

IMG_0896.jpg


DSC_2547.jpg


IMG_0899.jpg
 
Back
Top