Gilthanis
[H]ard|DCer of the Year - 2014
- Joined
- Jan 29, 2006
- Messages
- 9,051
** If you want updated instructions with newer OS's, skip to post 21 below. **
*If you want to install BOINC on Ubuntu Linux, skip down to post 11 below.*
There are two important ways to install the standard BOINC client within Windows. Installing as a user and installing as a service.
To install as a user, it is pretty straight forward. Download and run the installer for the BOINC client.

Click Next

Click “I accept the terms in the license agreement” and then click Next.

Verify that the only box checked is the bottom one. If any others are checked, click the Advanced button and deselect the other options. You can always turn on the BOINC screen saver if you want, but you can also activate it under Windows Screen savers. If you plan on using the GPU for crunching, it is advisable to not use a screen saver at all. If you choose BOINC to run as a service, you will NOT be able to use the GPU to crunch any work. Running as a service disables the function. However, running as a service does not require a user to be logged in for BOINC to run it's CPU work.

Click Install

Click Finish and BOINC should load. If it asks for a reboot, do so because you wont be able to attach to projects until you do.

Here you can choose to either Add a project or attach to an account manager.

If you choose an Account Manager, you have a few options listed. There may be others, but you would need to know the credentials for setting it up. I use BAM! So, I select it and hit Next.

I enter my BOINCStats BAM information which is the same as your login for BOINCStats.
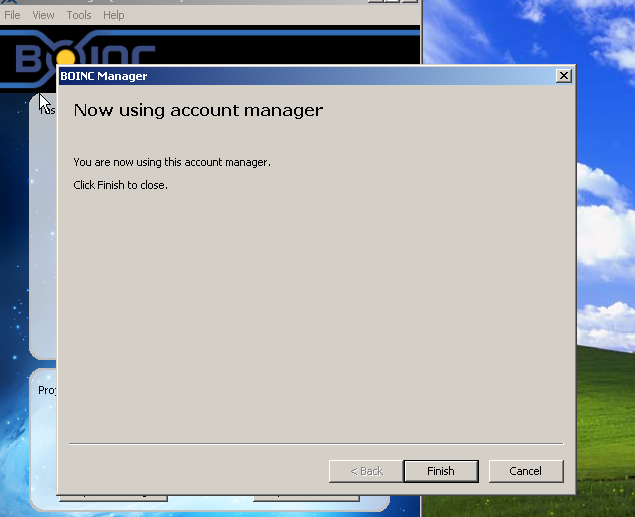
Click Finish and it should attach to any projects that you have designated BOINCStats to automatically attach to. If you have not set this up yet, you can do so from the website www.boincstats.com. Otherwise, you can manually add projects.

Click on View at the top and select Advanced View

Click on Tools Add Project… Note, that if you have BOINCStats setup to attach projects for you, this step is not necessary. Choose Add project.

Click Next

Choose the project you want from the list on the left, or if your preferred project is not listed, you can manually type the Project URL and click Next.

If you already have an account with that project, choose Yes, existing user. Otherwise, choose No, new user and you can create an account without ever visiting their website. (Make sure to use the same email and password for all BOINC projects and with BOINCStats BAM!.) Click Next

Click Finish

You should now see your client attaching to the projects you have added. You now will want to configure your client.

Click on Tools. Click on Computing preferences.

Here is where you will decide how BOINC will behave. If you wish for the client to always run, make sure to check the box While computer is in use. You will want to also pay attention to a few other settings. While processor usage is less than should be set to 0 if you don’t want BOINC to ever pause. Otherwise, by changing the percentage setting will determine how much non-BOINC load the processor can reach before it automatically pauses BOINC. You can determine what hours of the day BOINC is scheduled to run as well as what days. On multiprocessor systems, use at most should be changed to how much of the total cores/threads you want BOINC to use. If you want them all, change this to 100%. BOINC will round down when calculating threads. So, an 8 threaded i7 920 will only run 7 threads if you change it to anything between 87.5 and 99%. Use at most means that it will pause BOINC a portion of the time. Some use this to control heat or to leave processing cycles free.

Here you can limit your bandwidth and cache settings. You can also determine when your BOINC client can access the network. This is handy if you have tiered usage or do not have unlimited data.

This tab allows you to decide how much space to set aside for BOINC as well how much memory to allow BOINC access to. I highly recommend checking the box Leave applications in memory while suspended. That way when BOINC pauses, you do not lose your progress. If LAIM is left unchecked, your work units will start over from the start or from the last check point. The downside to having LAIM checked is if you have many RAM hungry apps in memory and your system doesn’t have enough for other processes. This can bog your system down a great deal if not properly managed.

This last tab is very handy because you can designate BOINC to automatically pause if a specific program is running. Especially if you are running that app for more than an hour. Many gamers find this option to be a blessing.
*If you want to install BOINC on Ubuntu Linux, skip down to post 11 below.*
There are two important ways to install the standard BOINC client within Windows. Installing as a user and installing as a service.
To install as a user, it is pretty straight forward. Download and run the installer for the BOINC client.
Click Next
Click “I accept the terms in the license agreement” and then click Next.
Verify that the only box checked is the bottom one. If any others are checked, click the Advanced button and deselect the other options. You can always turn on the BOINC screen saver if you want, but you can also activate it under Windows Screen savers. If you plan on using the GPU for crunching, it is advisable to not use a screen saver at all. If you choose BOINC to run as a service, you will NOT be able to use the GPU to crunch any work. Running as a service disables the function. However, running as a service does not require a user to be logged in for BOINC to run it's CPU work.
Click Install
Click Finish and BOINC should load. If it asks for a reboot, do so because you wont be able to attach to projects until you do.
Here you can choose to either Add a project or attach to an account manager.
If you choose an Account Manager, you have a few options listed. There may be others, but you would need to know the credentials for setting it up. I use BAM! So, I select it and hit Next.
I enter my BOINCStats BAM information which is the same as your login for BOINCStats.

Click Finish and it should attach to any projects that you have designated BOINCStats to automatically attach to. If you have not set this up yet, you can do so from the website www.boincstats.com. Otherwise, you can manually add projects.
Click on View at the top and select Advanced View
Click on Tools Add Project… Note, that if you have BOINCStats setup to attach projects for you, this step is not necessary. Choose Add project.
Click Next
Choose the project you want from the list on the left, or if your preferred project is not listed, you can manually type the Project URL and click Next.
If you already have an account with that project, choose Yes, existing user. Otherwise, choose No, new user and you can create an account without ever visiting their website. (Make sure to use the same email and password for all BOINC projects and with BOINCStats BAM!.) Click Next
Click Finish
You should now see your client attaching to the projects you have added. You now will want to configure your client.
Click on Tools. Click on Computing preferences.
Here is where you will decide how BOINC will behave. If you wish for the client to always run, make sure to check the box While computer is in use. You will want to also pay attention to a few other settings. While processor usage is less than should be set to 0 if you don’t want BOINC to ever pause. Otherwise, by changing the percentage setting will determine how much non-BOINC load the processor can reach before it automatically pauses BOINC. You can determine what hours of the day BOINC is scheduled to run as well as what days. On multiprocessor systems, use at most should be changed to how much of the total cores/threads you want BOINC to use. If you want them all, change this to 100%. BOINC will round down when calculating threads. So, an 8 threaded i7 920 will only run 7 threads if you change it to anything between 87.5 and 99%. Use at most means that it will pause BOINC a portion of the time. Some use this to control heat or to leave processing cycles free.
Here you can limit your bandwidth and cache settings. You can also determine when your BOINC client can access the network. This is handy if you have tiered usage or do not have unlimited data.
This tab allows you to decide how much space to set aside for BOINC as well how much memory to allow BOINC access to. I highly recommend checking the box Leave applications in memory while suspended. That way when BOINC pauses, you do not lose your progress. If LAIM is left unchecked, your work units will start over from the start or from the last check point. The downside to having LAIM checked is if you have many RAM hungry apps in memory and your system doesn’t have enough for other processes. This can bog your system down a great deal if not properly managed.
This last tab is very handy because you can designate BOINC to automatically pause if a specific program is running. Especially if you are running that app for more than an hour. Many gamers find this option to be a blessing.
Last edited:


