AMD Ryzen Threadripper TIM Application

FrgMstr

Just Plain Mean
Staff member
Joined
May 18, 1997
Messages
55,598
This was a good experiment, I've not had a chance to work on Threadripper, this has good tips for applying paste for other multi-core designs too.
 
editing or something hugely threaded....other than that I don't know there's stuff where it can't even get some of the higher frames. Idk their mining with it....
 
1. Diggin the Zer0 hoodie there.
2. Got a kick out of how you emphasize the H in "white" and "whole"
3. Great article. Made me rethink how I shouldn't half-ass my TIM application. Gonna use my wHole ass next time.
 
Great vid. Didn't realize there was so many considerations when mounting one of those bigger chips.
 
Nice video, I actually used a similar method when installing my Threadripper setup and I was able to mount my TR4 cooler just fine with footprint coverage.
 
Have you tried an "X" pattern of TIM going from center of all 4 dies?
 
Have you tried an "X" pattern of TIM going from center of all 4 dies?
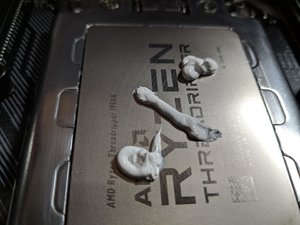
When it comes to AMD's Threadripper and applying the TIM, we have found it to be a totally different animal in terms of how we have applied TIM to smaller sized CPUs in the past. The old "dot in the center" application did not work well. The old "X across the IHS" did not work well. The old "coat the entire IHS" did not work well. The size of the Threadripper IHS does not play well with the way we have learned to apply the TIM in the past. However, a couple of those techniques used together are what we have found to be the answer.
 
Why no temperature data to see the benefits and drawbacks of the different application methods you've tried?
 
Why no temperature data to see the benefits and drawbacks of the different application methods you've tried?
Sorry, I have not kept logs on that for the past 6 months.
 
The article isn't very useful without it, though, as TIM spread doesn't help much by itself. Is it 0.1 °C better than the conventional methods? 1 °C, 10 °C?
I apologize for the information that we have gleaned after hundreds of TR mounts is useless to you.
 
Nice video. This info is good to know as I plan to go the Ryzen route for my next build.

Every time I see a TIM application video I can't help but think of Futurama.
 
Wonder how the old method of "take heat gun to heatsink+cpu to get to above 80c, then smear runny TIM" works.
 
Wonder how the old method of "take heat gun to heatsink+cpu to get to above 80c, then smear runny TIM" works.
As noted in the video, it works, but heating it up from the inside works so much better. :)
 
The article isn't very useful without it, though, as TIM spread doesn't tell much by itself. Is it 0.1 °C better than the conventional methods? 1 °C, 10 °C?
The fact is it's a better way to apply TIM, your mileage will likely vary. It's good to know that there is a way to make it better, I'll take that over no knowledge any day.
 
The fact is it's a better way to apply TIM, your mileage will likely vary. It's good to know that there is a way to make it better, I'll take that over no knowledge any day.
Yeah, and while he may not have the temperatures written down, overtime as the process is developed you can be aware that the temps are getting better/worse after each attempt, slowly whittling away until you arrive at a good working solution.
 
Kyle, great work on vids, they are a plus and always check them out even if I "think" I know what it's about.

Q: With TR are the active dies and inactive dies always positioned same place in the package?
I think this has been answered before, but I forget now.
 
So umm, no summary of findings without watching the video? How about something written for those of us at work??
 
Kyle, great work on vids, they are a plus and always check them out even if I "think" I know what it's about.

Q: With TR are the active dies and inactive dies always positioned same place in the package?
I think this has been answered before, but I forget now.
You ask that and I am about to answer, and you have made me understand that I am using an assumption here. I will ask to make sure.
 
Kyle, just noticed on the second application you fastened the inactive cores screws first rather than the actives, that was maybe one of the reasons why the application was not optimal :).
 
Kyle, just noticed on the second application you fastened the inactive cores screws first rather than the actives, that was maybe one of the reasons why the application was not optimal :).
IIRC I did not tighten those down first however. The mating footprint I got verifies this.
 
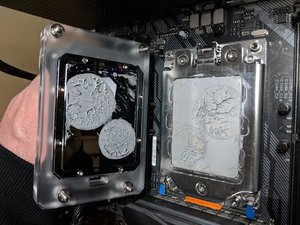
This is what you get when your hold down springs are weak. This is on the Iceman TR4 water block. Immediately went to 85C+ and hard-locked.

Mate spread with two dots.jpg
 
Last edited:
You would think it would of spread with that much paste, those springs must be real weaklings.
 
Or needs lapping, that is the problem with such large surface area of these things.
It needs to be perfectly flat.
Too many good blocks on the market to purchase a project block for what these cost.
 
Or needs lapping, that is the problem with such large surface area of these things.
It needs to be perfectly flat.

Lapping is to get rid of machining marks, I'd need to invest in a knee mill before I bothered to fix what looks like 3 thou of bow
 
Lapping is to get rid of machining marks, I'd need to invest in a knee mill before I bothered to fix what looks like 3 thou of bow
At least that is a testament to my l33t PK-1 spreading skills. ;)
 
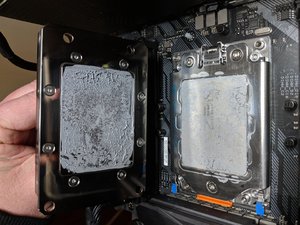
And this is what you get with the method shown after your TIM has had time to flow under temperature with a good block and a good mount. Just took this one off the bench.

IMG_20180221_004256.jpg
 
Looks good, on the other block, from that pic IMO it wouldn't take much to make it flat as its problem is mainly on very edge, it "looks" to be like 0.005-0.007 range, but I could be wrong.

I do agree water blocks are more mainstream now and there many options so just get a good one.
 
Looks good, on the other block, from that pic IMO it wouldn't take much to make it flat as its problem is mainly on very edge, it "looks" to be like 0.005-0.007 range, but I could be wrong.

I do agree water blocks are more mainstream now and there many options so just get a good one.
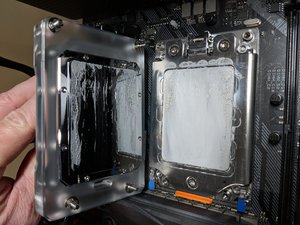
This much TIM did not fill the gap well.

IMG_20180220_200234.jpg
 
Q: With TR are the active dies and inactive dies always positioned same place in the package?
AMD Engineering verified this morning that the active and inactive die placement is always in the same position on the Threadripper substrate. Thanks for making me check my assumption. Good information to KNOW.
 
Having two dies under the lid does indeed make a big difference in how to spread or apply the TIM. I would not have thought of that, lately I've been getting lazy and doing an X with a little extra in the middle, the extra in the middle would be worthless, the X would probably get the die somewhat - meaning for TR that would not work well. What worked before may not work good with different configurations I see now. Great video and good information masterfully shown.
 
Great follow up video to the mounting. But I still have to say, this is 2018, is machining and manufacturing really worse than what we had in the late 90's? Dies and blocks should be flat these days.
 
Back
Top