• Some users have recently had their accounts hijacked. It seems that the now defunct EVGA forums might have compromised your password there and seems many are using the same PW here. We would suggest you UPDATE YOUR PASSWORD and TURN ON 2FA for your account here to further secure it. None of the compromised accounts had 2FA turned on.
    Once you have enabled 2FA, your account will be updated soon to show a badge, letting other members know that you use 2FA to protect your account. This should be beneficial for everyone that uses FSFT.

Why did I ever start this! :(

HaxEJxuK

Gawd
Joined
Aug 28, 2007
Messages
696
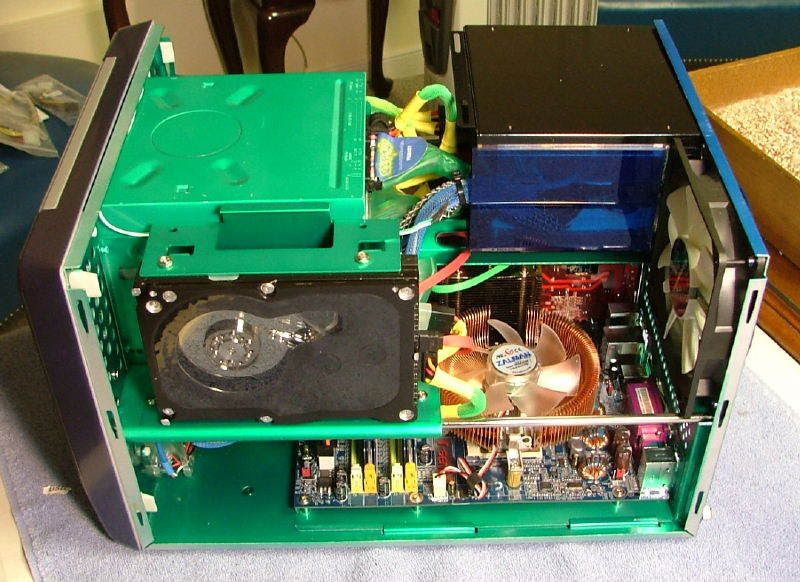
Here I go again. Another try at building new PC. After so many failed tries to build myself a PC(as in not completed not never up and running) for one reason or the other. I won’t go about previous ones as there are so many. This time I decided to make a use of old case which I got it like 4 x-mas back. It’s still like new as after 4 years I haven’t even ripped plastic film off of window. I have moded it a little previously which I cut out fan grill and cut out PSU open for more airflow but that was it as shown below. I’m aiming to finish this around November. Sorry about dust as this case wasn’t used much.
100_6638.jpg
14483db7.jpg
774e5258.jpg
1d36e600.jpg
75a20c60.jpg


Parts are everything I've listed in my sig. Main use of this one would be Video Editing and Gaming. Hope L4D and D3 would be as good as it looks. Main goal of this one would be to make it look nice but not too flashy, do good number crunching for Video Editing, stay cool enough with 3.6Ghz OC while keeping it as quite as possible. Am I asking too much? Also Blue will go as I want to keep color to black and red.
 
I've found some pictures of work that I did about a week ago but haven't made any progress since then. I have very limited time to work on this due to work, kids etc.

Well here it goes.
32aea41f.jpg
6a124371.jpg
6409553d.jpg
12303051.jpg

What is that hole next to exhaust fan??? I'll tell you after I take close up shot of it. I thought about just cutting support beam like other people but decided to take entire thing out including bracket to mount 5 1/4 drives. I have something in mind for that. Since case is flexing without that support beam(which was expected) I'll put up aluminum rod in place of it so it can take tower heatsink which in this case is Xigmatek.


Here is poor man's workbench. Right next to trash cans on kitchen floor when everyone's asleep. I had nice big den that I used for computer then took over a room since my wife didn't like to see computer parts. Now I got kick out of that room and my computer sits in little corner where I don't even have room to work on it cause now we have a son. Yeah, my son took my computer room and kicked me out. :p So, I have to gether all the parts and fire it up then disassemble everything and put away and repeat step everytime I work on it. I had stable 3.6Ghz Q6600 but neglected to save BIOS info and lost setting while this was going on so I'm trying to OC to stable 3.6 again here.
a735a983.jpg


Here's couple of shots of my lapping work on Q6600.
d27c2777.jpg
740f4bc3.jpg
2324a388.jpg
fe49ed6b.jpg


More coming................. ummmmmm don't expect it too soon. :D
 
Built three MicroFlys (1 MX 6 and 2 "originals" that is) and had a lot of fun! Look forward to watching how your mATX case goes together. :D

EDIT: Okay read you sig and found out this is a X-Qpack, the chassis caught me off guard as everything was looking like my ultras until I couldn't find the front fan and took a better look at the case face.

Can't wait to see where this is going and................ I keep asking myself the same question as you title everytime I get about halfway through a build!! :eek:;)
 
Dude, if a woman told me to get out my room, I would be like, "get in the kitchen and make me some pie!" But that's because I'm not married yet, and God knows that's change...

I've played around with a couple of these cases, and was always pained by how cramped everything was. I like how you remedied that. Also, sweet lapping job.

How's the 6800 do on video editing?

Keep it up!
 
.......What is that hole next to exhaust fan??? I'll tell you after I take close up shot of it. I thought about just cutting support beam like other people but decided to take entire thing out including bracket to mount 5 1/4 drives. I have something in mind for that. Since case is flexing without that support beam(which was expected) I'll put up aluminum rod in place of it so it can take tower heatsink which in this case is Xigmatek.

Finally was able to read more closely your text and this answered one of my big questions!! Was wondering how you would do the tall hsf!! That was one of the reasons I went with flat zalmans, could leave 'em in place and still use the mobo tray. Will keep in touch to find what you're going to do with the extra "big" drives. When I removed the equivalent brace I chickened out and left the front half for my hdd and used a support rod I managed to wiggle out of Ultra's support group. Was going to use a threaded rod but that didn't look as nice.

Keep up the good work as best you can and provide for thr family! :D
 
it wouldnt be fun if it was easy.......keep it up or loose the wife or kid to make things easier
 
Dude, if a woman told me to get out my room, I would be like, "get in the kitchen and make me some pie!" But that's because I'm not married yet, and God knows that's change...

I've played around with a couple of these cases, and was always pained by how cramped everything was. I like how you remedied that. Also, sweet lapping job.

How's the 6800 do on video editing?

Keep it up!

Ha ha yeah, life changes after you get married. You'll be like cold leftover food especially after you have kids. :) 6800 isn't bad as video editing is more of number crunching than graphics. I will be replacing it though. I'm thinking about GTX260 but I won't get it till almost end of this build.


Finally was able to read more closely your text and this answered one of my big questions!! Was wondering how you would do the tall hsf!! That was one of the reasons I went with flat zalmans, could leave 'em in place and still use the mobo tray. Will keep in touch to find what you're going to do with the extra "big" drives. When I removed the equivalent brace I chickened out and left the front half for my hdd and used a support rod I managed to wiggle out of Ultra's support group. Was going to use a threaded rod but that didn't look as nice.

I'm think about possibly using only one 2.5" drive for system for less heat and less noise. I'll probably have two 1TB in Antec MX-1 for data. As far as mobo tray goes, I won't use it. I'll be riveting it to case. There's no use for removable tray since tower heatsink can't go under it. Also since I'm cutting out lots of case supporting parts, it will help to make the case more solid. As far as tower heatsink goes, it's not much of an issue. You can pretty much use anything as I was going to use TRUE initially, As long as you don't get one's that are too wide you are in good shape.


it wouldnt be fun if it was easy.......keep it up or loose the wife or kid to make things easier
ha ha I'm a lazy person. easier the better. :) Lose wife and kids, I wish but even though they kicked me out to kitchen I still love them. I guess I gotta move my lazy butt and work harder. ;)
 
So, I got some work done(not much) last 2 days. I was trying to install all the heat sinks on Friday but I wasn't able to. I wasn't sure if HR-05 would fit cause of center support beam. My worry became true and wasn't able to. Well, if I would to remove/reinstall HR-05 everytime I take mobo out, than it's possible but I'm too lazy to do that so I had to come up with new idea. 2 picture with HR-05 is just rough idea how close it is. It looks like it won't fit but it should fit though.
100_6889.jpg
100_6890.jpg
100_6891.jpg
100_6892.jpg


Here is picture of heat sinks I'll be installing once I can. Also, there's that hole that I've mentioned before. What is it you ask? This is for 2 e-sata ports for MX-1. Space is limited so you've gotta use all you can.:D
100_6910.jpg
100_6893.jpg


Here's picture of work that I've done today(again very little was done due to limited time) ha ha actually yesterday. It's already 4:30am. I've mentioned I don't have much time to do anything right???
100_6912.jpg
100_6914.jpg


Looks like it would get crushed by light breeze, doesn't it? I would have to add some support but this was only way that I could make it so that I don't have to take out HR-05 every time I take out mobo. I'll give more info on this later.
 
For the extra support again think of using a threaded rod unless you can find a rod that is threaded at both ends! The easiest is the threaded rod double nutted at each end and use the rivit holes form the cross brace as your guide.....much like I did here. The biggest difference, for me, was leaving the hdd rack.

2ndAssyTop-RghtSideSM.jpg
 
That's pretty much what I had in my mind. Use the hole that I drilled out rivet and use aluminum rod with screw. Basically support that's going to hold case will be all rods. That way I can unscrew everything and have open access to mobo and when I'm done, I can just screw everything back and have solid case rather than case that breaks in half as soon as you lift it up. :D But I'll be avoiding threaded rod though. I don't think it will come out clean but that would be easier than the way I'm going though. Very tempting.;) Now, I just gotta find rod that have hole in center. One that is about same size as one that comes with case on PCI slot side.

For the extra support again think of using a threaded rod unless you can find a rod that is threaded at both ends! The easiest is the threaded rod double nutted at each end and use the rivit holes form the cross brace as your guide.....much like I did here. The biggest difference, for me, was leaving the hdd rack.
 
Now, I just gotta find rod that have hole in center. One that is about same size as one that comes with case on PCI slot side.

Hit up your case manufacturer service dept. as I did with Ultra. Worse case maybe they'll at least sell you one! :D
 
I can't believe I haven't even thought about that and was thinking about going to home depot or something. I'll shoot Apevia an email and see what they can do. Thanks


UPDATE: Sent email to Apevia to see if I can get those Aluminum rods from them.

Hit up your case manufacturer service dept. as I did with Ultra. Worse case maybe they'll at least sell you one! :D
 
Well, I've got reply back from Greg at Apevia which was pretty fast reply. Unfortunately, they can't provide/sell oem rod. Although he suggested one way would be to buy 4 X-Qpack and take out...... Yeah, it was a joke what he said at the end. Although I didn't get the answer that I wanted, I like the fact that he got back to me pretty quick. Well I guess I just got make my own then.(Yay! An excuse to take time! lol)
 
Sadly that is how it is at Ultra now. :( If you fubar any part of your case one is pretty much SOL. Not sure where you'll find a small dia. rod that will be threaded internally at the "exact" length you need. For aesthetics guess you could always try to hid a threaded rod in a piece of tubing! ;)
 
If I am reading this correctly, you are trying to find a piece of rod that is threaded on the inside, to match the piece of rd thats already in the case?

If so, try getting a piece of stainless brakeline, and get some slightly larger screws to tap into the brakeline.

You could also check Home Depot and see what they have in the metal section. Maybe get a piece of solid rod and have it tapped at a machine shop? I can't imagine that being very expensive.

Or, why not go with acrylic rod???
 
Any machine shop could fix you up cheap out of leftovers just check out a real small machine shop they will listen more than a big one, they are usally too busy!
 
If you want to stick with aluminum and avoid adding weight

Check your local sporting goods shops for arrow parts

You can cut an arrow shaft down to size. Buy a set of pdp inserts tip inserts

Like these http://www.archerysportsusa.com/store/index.cfm/c330/i6882

and use a machine screw at each end of the case

Most shops have extra shafts laying around bad anno jobs on them aka color or dings on them

You might be able to get the 4 ends and probably 2 shafts for next to nothing if not free
 
Well, I've got reply back from Greg at Apevia which was pretty fast reply. Unfortunately, they can't provide/sell oem rod. Although he suggested one way would be to buy 4 X-Qpack and take out...... Yeah, it was a joke what he said at the end. Although I didn't get the answer that I wanted, I like the fact that he got back to me pretty quick. Well I guess I just got make my own then.(Yay! An excuse to take time! lol)

strange , i ordered quite a few parts from apevia when i was modding my QPacks.Last thing i got was a HDD cage about 4 month ago.Sad to hear they dont do that anymore.
 
This work was stopped for a while for couple of reasons. I wanted to get SG01 as it's much easier to mod, better cooling option and everything just works out better overall after mod. But I have to face another case(still have like 4 cases that are not in use and new), lack of fund and scary monster called wife. Also thought about ways to mod Q-Pack, dealing with reality(life), kids, cook, wash dish, laundry, bath kids........ ha ha where am I heading with this. Basically I was stuck and didn't know what to do. So now, I've decided to ditch my original plan on how to mod my Q-Pack and came up with new one(on most of mod) so some of mod that I've already done......well..... either I didn't have to do it or could have had better option. Oh well it's too late now. With new plan, it's going to be either I complete this or end up with non usable case. If it ends up being none usable case, I'll just get SG01 :). One thing though is I won't be able to complete till next year. Painting is issue. I don't think weather is warm enough to dry and no I can't use oven but everything else other than painting should be completed. Hopely.....
 
Everything you stated [except kids, the wife fills that roll also! :eek: ] is why I've had three partial projects "just sitting" all summer! So I feel your pain! :rolleyes: :D
 
I have every intention of finishing this minus paint till end of year. Yeah I don't think I'll be able to finish by mid Nov. Lack of fund won't let me get decent graphics card. I'm going to let my wife to get it for x-mas. hopely GTX260 :)
 
Best of luck on the 260!! :D

Luckily for me two of the three shouldn't require any painting - reworking a skt A system for a friend and water cooling /swapping cpu in DreamCatcher. The third project will require some cutting so we'll have to wait and see on the painting!

So where's the link to the SG01 project?? :eek: ;)
 
ha ha you'll see one for SG01 if you don't see this thread not getting updated which means I modded it till it's unusable and failed. but till then, I'll hold myself back as much as possible not to get it. Either case, I really want to finish this cause L4D is looking better and better everytime I get to see updated video.:D
 
I may be interested in buying the "shell from you if you decide to not hack it up too much.

I've got a X-QPack2 that UPS decided to drop off the top of a 12 story building that needs repaired.
 
:( I can't make any progress cause I'm stuck trying to find right IEC cable. This cable is crucial to make mount for PSU . :(
 
Well, I gave on up hope to find perfect IEC cable and decided make my own which was holding up modding case. It will be very close to what I wanted but not 100%. Just made an order so hope to get it soon and start modding again. :)
 
Yeah. I could have started without it but it's very close fit between PSU and heatsink so I have to get it just right. I though about leaving PSU where it belongs and place 2x120mm fan up front and rad grill which would have looked nice but that mean big holes in front which goes very against my intented quiet build. :)

I'll also stop by my brother's house tonight cause his GPS was delivered yesterday. I updated it and dropping it off to him and while I'm at it, I'll take his hand break to bend some metal. Wish he still had 6' bending machine but he said he sold it. I could have made more professional metal work with that and even for future build too.

I also decided not to make rod to brace case but decided to go with L shaped aluminum bars for brace it and make it even more solid. So, as soon as I finish IEC cable it's going to be PSU bracket and braces that I'll be working on.

BTW I might just get 8800GTS SSC from my brother instead of GTX260. Hey, it's free why not? lol but I might still go for GTX260 though. I like the idea of low 2d power usage. I think it was something like 40w or something like that when idle or none graphic intensive instead of like 180w contantly.
 
Back
Top