• Some users have recently had their accounts hijacked. It seems that the now defunct EVGA forums might have compromised your password there and seems many are using the same PW here. We would suggest you UPDATE YOUR PASSWORD and TURN ON 2FA for your account here to further secure it. None of the compromised accounts had 2FA turned on.
    Once you have enabled 2FA, your account will be updated soon to show a badge, letting other members know that you use 2FA to protect your account. This should be beneficial for everyone that uses FSFT.

Welded computer desk design

ochadd

[H]ard|Gawd
2FA
Joined
May 9, 2008
Messages
1,450
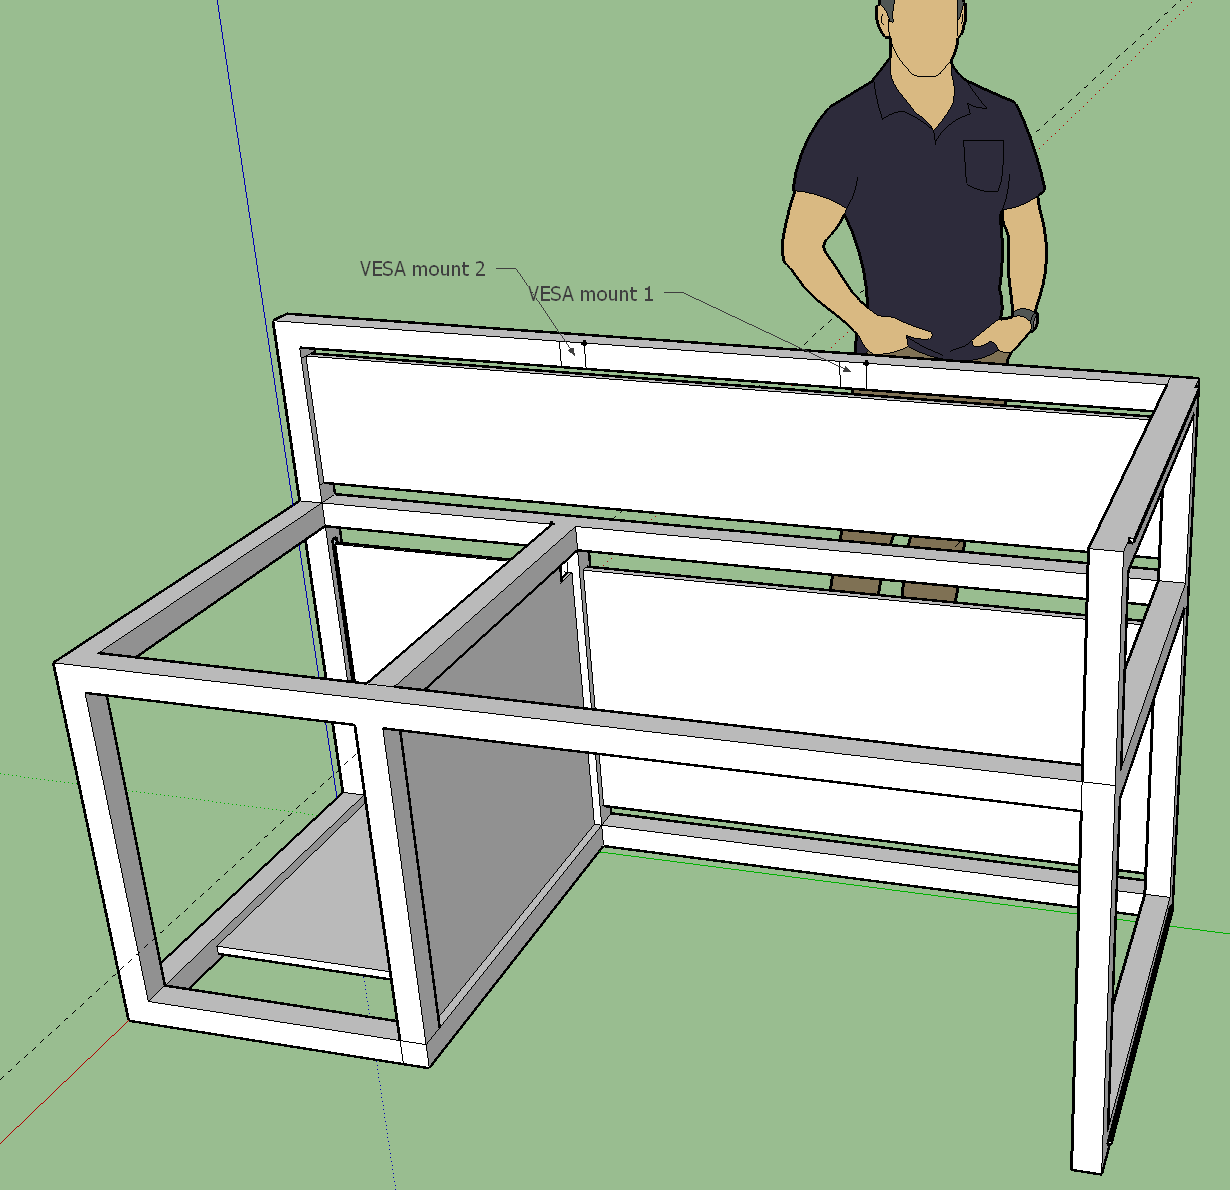
Thinking about building myself a computer desk. I have 7 different versions so far but my two favorites...

1721231804098.png

1721227654991.png

Frame made from 2" square tubing and some kind of wood or wood/steel counter top. Key features:
1. Compartment for a tower case. Fit a 12U 19" rack inside. Sound insulated but allow for ventilation as needed. Interchangeable perforated metal panels, extruded metal, or insulated plywood panels I'll make.
2. Attachment points for VESA monitor mounts
3. Great cable management. Pet proof.
4. Overbuilt to last lifetimes.
5. Separate compartment or chassis for water cooling components.
6. Speaker locations provisioned.
7. Incorporate a 32"x42" heavy stainless sign would be cool.

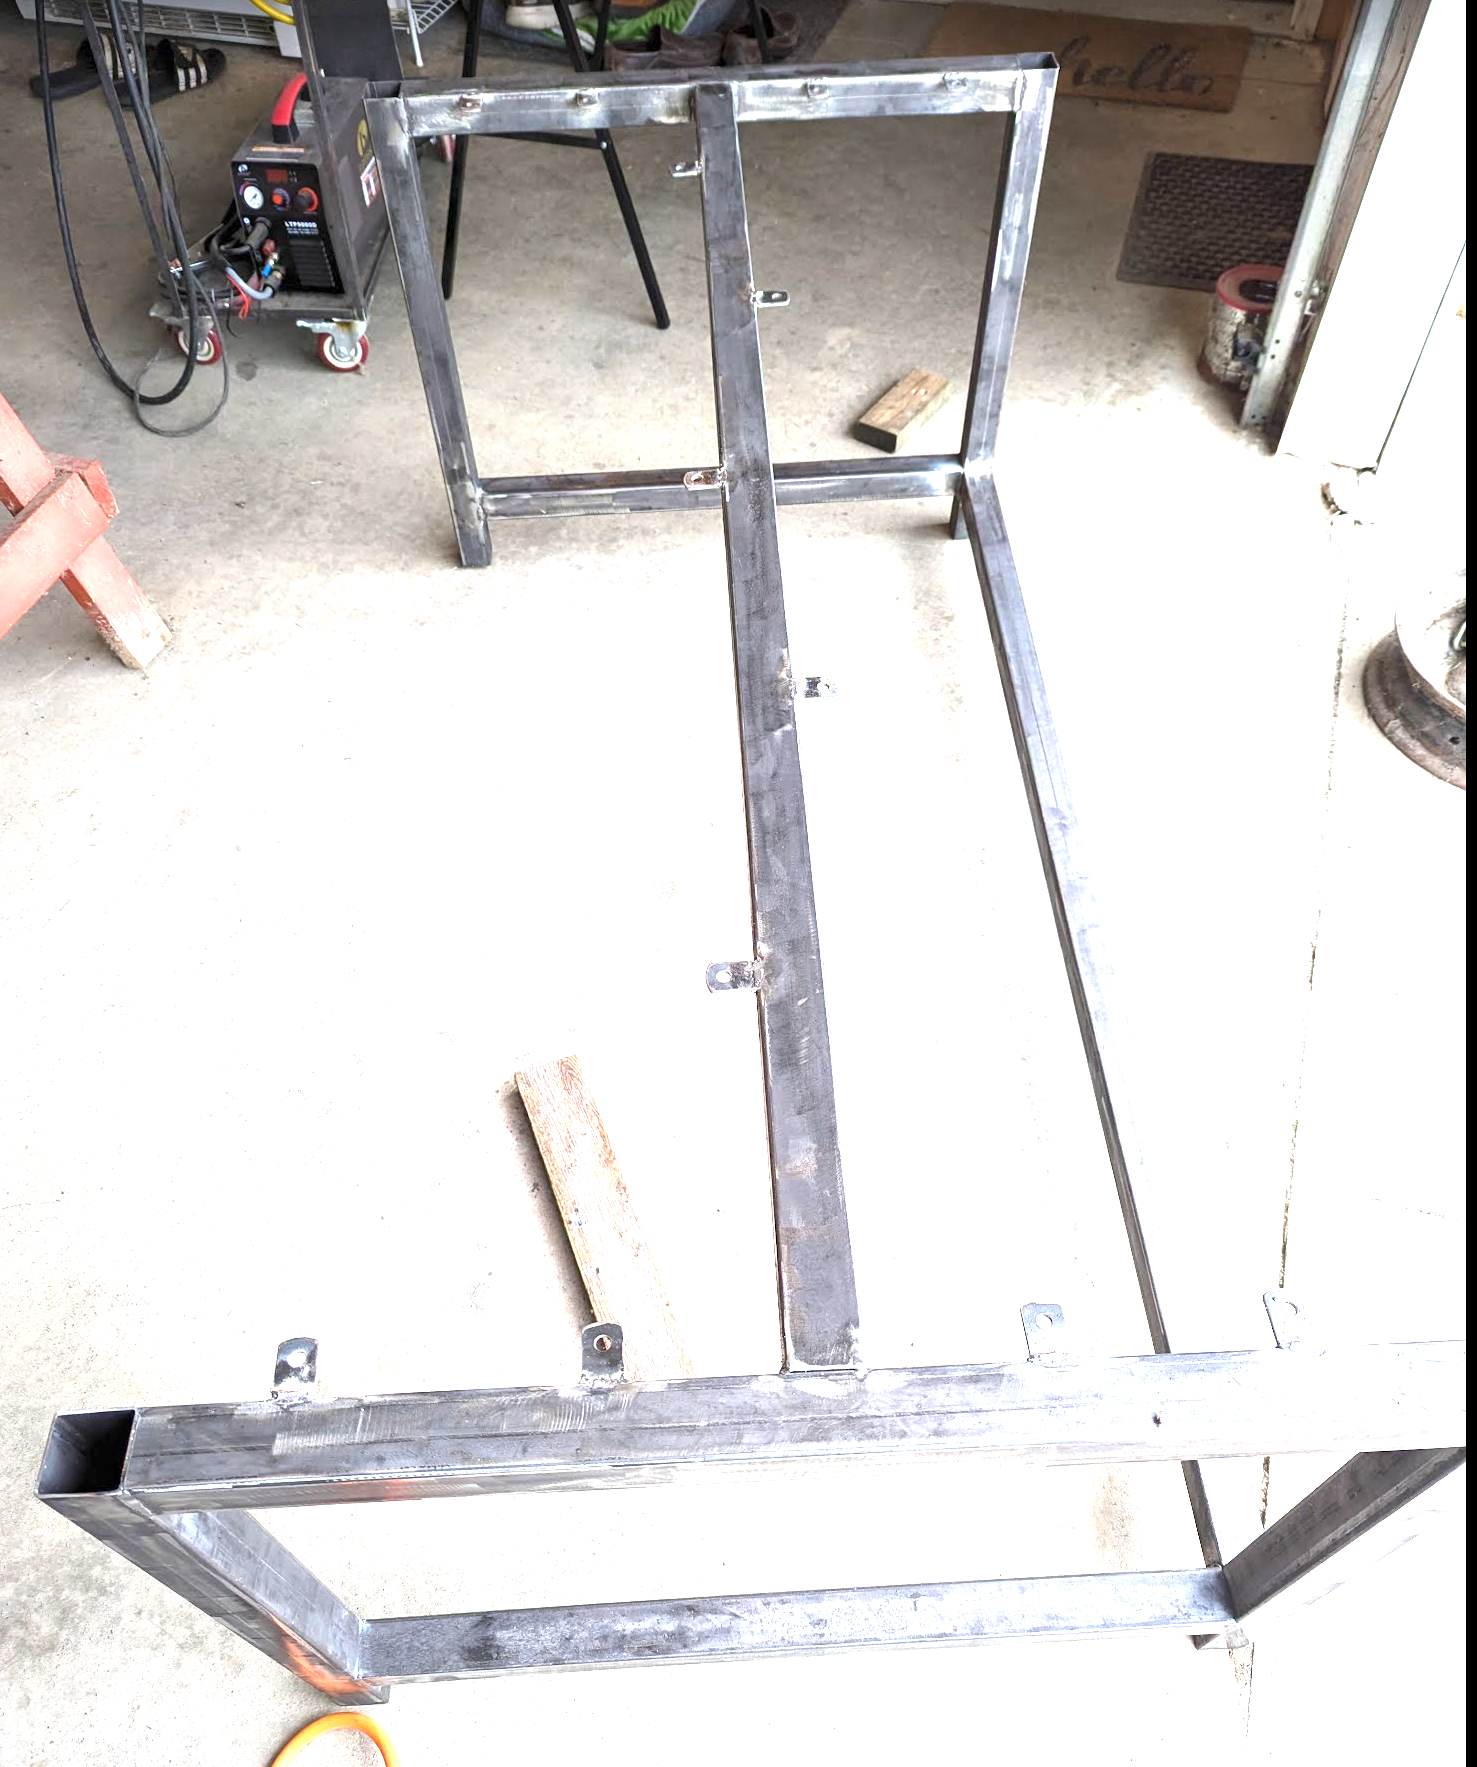
There's 55-70 foot of 2" steel tubing. Plate gussets for reinforcing the corners that double as panel fastener points. 3x140mm intake at the bottom that can be filtered. Any of the panels could be made to intake/exhaust. I don't want to engineer myself into a corner, not an engineer. If none of my HVAC/silencing ideas work it can become a simple shelf.

Think this is worth building? Every other day I talk myself out of it and think a simple table would be fine.
I want to allow for elaborate water cooling even if my next computer is simply air cooled.

1721226871505.png
 

Attachments

  • 1721230177654.png
    1721230177654.png
    47.7 KB · Views: 0
Looks OK, but completely excessive. Similar to a unmovable fab table. I would do the top and 4 legs in 2" tube, with removable legs. Then all other sections in 1". You don't need to box the ground sections, especially if your doing gussets for strength on the legs.

The way it's currently designed I can't imagine it moving from anywhere other then the garage it was built
 
It's also very similar in design to cubicle type desks I've seen in offices but with less work surface area. Not to mention, a great deal more weight and cost. Sure it will be much more sturdy, but why? Do you need that much strength out of a desk? A workshop bench is one thing but a computer desk is another.
 
Looks OK, but completely excessive. Similar to a unmovable fab table. I would do the top and 4 legs in 2" tube, with removable legs. Then all other sections in 1". You don't need to box the ground sections, especially if your doing gussets for strength on the legs.

The way it's currently designed I can't imagine it moving from anywhere other then the garage it was built
I thought about having normal legs but not sure how to seal it up without that. On the design where I've incorporated the sign, I need something there to support it too. The sign weighs 30lbs probably.
 
I thought about having normal legs but not sure how to seal it up without that. On the design where I've incorporated the sign, I need something there to support it too. The sign weighs 30lbs probably.
perhaps have the left-side as a detachable half computer rack that the desk sits on, and the right side as detachable legs.

I build a computer desk about 2 years ago and have been enjoying it lots, way nicer then a table.

478353_1.jpg478352_2.jpg

some things I liked/disliked:
It would have been completely impractical if I couldn't disconnect the legs to move it.
It has a built in electronics test bench/psu that was extremely useful. Your current design already resembles a electronics test bench.
The ghetto watercooling loop was fun but ultimately failed (3d printed reservoir), im in progress of rebuilding it.
vesa monitor mounts are a great idea, I was going to buy some for the 2 main monitors I currently run.
superstrut like what I used for the table base is very strong, weldable, and could replace 2" tubing
the desk thickness pushes wrist position abit higher then ergonomically ideal. Perhaps have a trey under the desk that slides out and contains a keyboard/ mouse.
 
I'll have to give some more thought on lightening it. Some bar stools I made out of solid 1" diameter bar stock and plate steel under the wood. My mother in law and small children can only drag them around. I do love overbuilt things but it has seemed over the top to me as well.

1721239990748.png
1721240347439.png
 
Well I can certainly give you an A for effort, however, it still looks a lot like some cubical workspaces in most open-plan offices, which are boring AF and not conducive to high morale amongst the workers....

However, should you decide to move forward, I suggest you consider the following:

A) Instead of cheapo countertop or pressboard, use a 1.5-2" Butcherblock finished with Marine-grade SparUrethane as the main top surface (the stuff used on basketball courts)...the combo is practically indestructible and will last A LONG, LONG, LONG time with minimal maintenance other than an occasional wipe down with a damp cloth...PLYWOOD of any variety is also a BIG no-no, as it will eventually split, crack, flake & peel off little pieces of wood all over the floor...

B) Switch the main leg/frame material from steel to SQUARE (not round) Carbon fiber (or possible rigid Aluminum), which will be way more $$, but will be way, way lighter & easier to move if need be, and will also never rust, corrode or degrade, and can be painted/colored if desired. Save the steel for use as corner connectors and reinforcements where other stuff will be attached to it

C) If intended for a carpeted area, install 2" lockable caster wheels on each leg, which will make it easier to move but also stay in place once the location is settled on.. not quite as necessary when on a hard surface, but still nice to have...

Good Luck & please post back with a progress report & pics :D
 
Another design I like but not sure if it's stable. I'd probably use 2" round well pipe/cattle guard for all legs. It's heavier than 2" square tubing, but it's free. Some 1" square tube to tie them together. Pretend the monitor mount is an actual vesa monitor arm. It's just a table with no provisions to silence/store a computer

1721245686471.png


1721245844425.png
 
Went with a basic table design using 14 gauge 2" steel tube. Used a Hobart 210 MVP and .030 flux core. This is lightest steel I've ever welded on and struggled with blowing through. One weld would be good and the next terrible.
Frame is 36x72.

1722197218562.png


1722197311429.png


PXL_20240728_165004665.jpg

$228 for materials so far but this should be about all of it.
I had some plywood on hand I plan to use for the top. 3/4" oak plywood and some crappy 1/2" I plan to glue together. 38"x74" top. Take a flap disk to the edges to round them over.

First coat of primer is on and haven't started the top yet. Probably have 8-9 hours into it. I don't have a welding table so getting things square is allot of eyeballing and squares. Not a great welder either.
My wife wants me to make her one now but we'll see how it turns out.

1722198472788.png

$77 for steel cut to length. $44 if I wanted 2x20' chunks to cut them myself.
$12 - 30 pre-drilled weld on tabs to attach frame to top with screws.
$10 2inch rubber leg caps
$15 ebony stain
$15 primer
$26 Goodfilla ebony wood filler
$15 Black paint
$26 Spar Urethane
$12 wood glue
$10 rollers and trays
$3 sandpaper
$7 #12 x 1 inch wood screws.

Edit: Updated costs and parts
 

Attachments

  • 1722197375795.png
    1722197375795.png
    2 MB · Views: 0
Last edited:
Got the top glued together and the first coat of paint sanded last night. My primer is thick and you can clearly see the brush lines. I should have sanded down the primer. 220 sandpaper doesn't seem to do anything but rough up the paint. Hoping it will improve if I keep sanding and painting. Have a quart of paint I'm not afraid to use. Will finish the frame with a clear coat. Top getting an ebony stain and spar urethane finish. Several days of finishing left to go.
 
I'll have to give some more thought on lightening it. Some bar stools I made out of solid 1" diameter bar stock and plate steel under the wood. My mother in law and small children can only drag them around. I do love overbuilt things but it has seemed over the top to me as well.

View attachment 666173View attachment 666176
Shit man, do you work for acme anchors Corp?

Looks pretty, but solid bar is not meant for stool legs.
 
Shit man, do you work for acme anchors Corp?

Looks pretty, but solid bar is not meant for stool legs.
My family has many large humans. It's fun to have furniture with zero risk of ever breaking. I can guarantee no human has ever existed large enough to break them. Most people can't appreciate it but if you're big enough to have demolished many chairs and couches, you get it.
 
  • Like
Reactions: travm
like this
My family has many large humans. It's fun to have furniture with zero risk of ever breaking. I can guarantee no human has ever existed large enough to break them. Most people can't appreciate it but if you're big enough to have demolished many chairs and couches, you get it.
This is an extremely reasonable answer. I'm still gonna say tube is stronger than bar per given weight, but 3"Dia bar stool legs would look funny. Keep on keeping on. And I appreciate the pictures
 
Got the top trimmed, routed the edges, used ebony wood filler around the entire edge. Never tried wood filler but I want to hide the plywood edges. Going to stain the edges first and if that doesn't work I might sand/prime/paint them. 1-2 more coats of paint on frame + clear coat. 2 rounds of stain, three rounds of spar urethane on the top. It's hot and humid as hell in my garage the last two nights.

1722430781898.png

1722430821873.png
 
Got the top trimmed, routed the edges, used ebony wood filler around the entire edge. Never tried wood filler but I want to hide the plywood edges. Going to stain the edges first and if that doesn't work I might sand/prime/paint them. 1-2 more coats of paint on frame + clear coat. 2 rounds of stain, three rounds of spar urethane on the top. It's hot and humid as hell in my garage the last two nights.

View attachment 669493
View attachment 669494
It's too late obviously, but My recommendation for hiding edges is to tongue and groove a small piece of solid wood onto the edge, mitre corners and glue the shit out of it. It is more work but looks kinda sweet. Hides the plywood.
 
It's too late obviously, but My recommendation for hiding edges is to tongue and groove a small piece of solid wood onto the edge, mitre corners and glue the shit out of it. It is more work but looks kinda sweet. Hides the plywood.
My sister in law had some edge banding she suggested too. I guess I had the idea of wood filler from the internets and wanted to try it. I did not have enough clamps to glue the top together and that left some gaps/separation. My 1/2" ply had some delamination and edge splintering after trimming too. The wood filler did a good job of filling everything in. I touched it this morning and that filler seems pretty hard.
 
  • Like
Reactions: travm
like this
Stained the top and sides tonight with Varathane ebony. Painted the bottom black just to have something to seal it up. The top is beautiful. I might have some splotchy areas when it dries but it looks really good to me.
2nd coat of paint on the frame. One to go and a clear coat. Maybe one more round of stain tomorrow or start on the three coats of finish. I've never done it but thinking of trying to thin the urethane out with mineral spirits and rub it on with a rag.

bottom_painted.jpg

top_stained.jpg
top_stained2.jpg
 
Nice! cant go wrong with a traditional table design, especially a sturdy one.
 
I like a good black stain, especially on wood with grain that shows through well. Check the instructions on your urethane, it might recommend something other than mineral spirits.
 
Beautiful. I'm a huge fan of actual plywood furniture. its not quite the same as "solid wood", but it is still really solid wood, and way more dimensionally stable/easier to work with. Looks great if you get the edges sorted out.

Love it.

when this dries up i want decent close up pics of the edges.... finishing plywood edges is somewhat of a personal vendetta of mine, never considered this wood filler idea. Seems much easier if it looks just as good.
 
Got it done and have some help coming tonight to help move it inside. I like how it turned out even if finish work is not my forte. The wood filler edges look old and weathered like something that was used for years in a workshop. Planning for 1-2 monitor arms after I use it for a bit. Once I have the monitor arms can figure out the dimensions for a matching desk riser to hide audio equipment and cables. Have enough steel and wood left over I think.

1722863330589.png

1722863370268.png

1722863402919.png

1722863761874.png
 
Got it done and have some help coming tonight to help move it inside. I like how it turned out even if finish work is not my forte. The wood filler edges look old and weathered like something that was used for years in a workshop. Planning for 1-2 monitor arms after I use it for a bit. Once I have the monitor arms can figure out the dimensions for a matching desk riser to hide audio equipment and cables. Have enough steel and wood left over I think.

View attachment 670588
View attachment 670589
View attachment 670590
View attachment 670597
Looks nice. With your desk being that deep you could probably put a lot of things underneath and keep it cleaner up top.

My desk is about the same size and I have my receiver underneath. I originally had a riser thing for my desk but ended up ditching it.
 
Looks nice. With your desk being that deep you could probably put a lot of things underneath and keep it cleaner up top.

My desk is about the same size and I have my receiver underneath. I originally had a riser thing for my desk but ended up ditching it.
It's a good idea. I have a 8" and 12" subwoofer that sit behind the desk now that I hope will fit underneath with the computer. Also have an under desk cable management tray ordered big enough to hide the power strip in. Been debating building a computer stand to raise the computer up to make cables easier to hide.
 
Looks nice. With your desk being that deep you could probably put a lot of things underneath and keep it cleaner up top.

My desk is about the same size and I have my receiver underneath. I originally had a riser thing for my desk but ended up ditching it.
Done for now. I should have built this a long time ago. Two subwoofers, DAC, and computer fit nicely underneath with room to spare. Need various longer cables and the under desk cable trays to get everything just right. A slightly recessed 12" wide shelf mounted underneath, above tower, would probably hide the speaker and headphone amps nicely.
Brother asked if I'd build him a dining room table like it. Wife wants a desk. $250 in materials and 8 days of free labor, hell of a deal for them. It was a fun project but not sure it would be fun doing it for others.

desk_office.jpg

desk_office2.jpg

desk_under.jpg
 
Looks good.

Actual wood on top? I would get at least a partial glass top. Easy to clean and will prevent wear and tear. I didnt cover mine soon enough and was wearing through the poly sealant.

I would add on, at a minimum, a computer shelf (bonus points for having it slide out). Get the computer off the floor and it will suck up much less dirt and it makes it easier to clean the floor without disturbing the PC.
Thanks. I use a 36"x15" mouse pad that covers most of what I touch day to day. Doesn't look as nice for pictures :)
The top is two sheets of plywood glued together, 3/4 with a nice veneer and 1/2 construction grade. If I had to buy them I'd do 3/4 for both but they were essentially free, had them for many years in the garage.
 
1726492498349.png

I have a small underdesk shelf to mount yet to move audio equipment underneath. Hid almost all cables under the desk with these. I mounted them far enough inside that you can't see them.
 
As an Amazon Associate, HardForum may earn from qualifying purchases.
  • Like
Reactions: Nobu
like this
Back
Top