Water Cooled Bulldozer Build

visionviper

[H]ard|Gawd
Joined
Jul 24, 2007
Messages
1,222
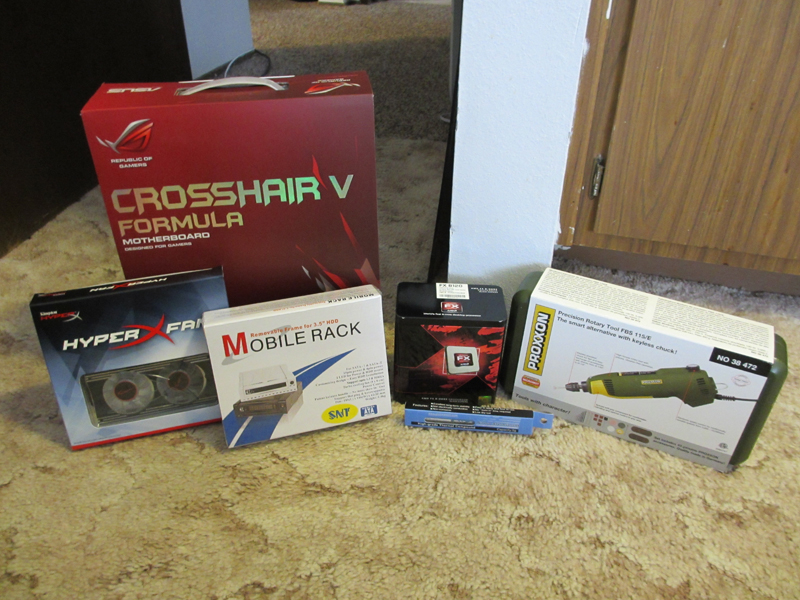
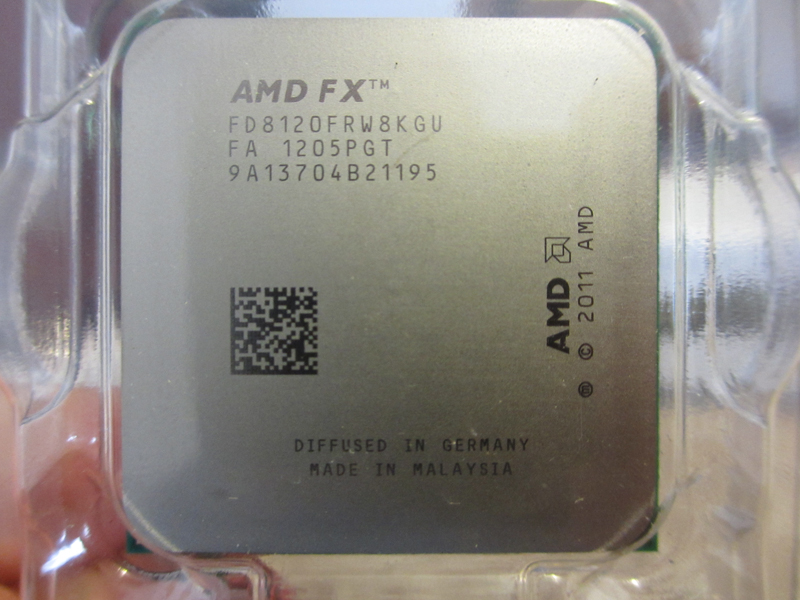
I'm still living in the Core 2 generation and I decided it was time to do a big upgrade this time around. My signature shows the parts I am putting together for this build. Since I don't have my cooling components listed in my signature I'll list it here:
Swiftech MCP350
EK DDC X-RES Top 140
Magicool Extreme MC-RADI180X2
Silverstone AP181
EK Supreme HF
Tygon R-3400 (black Tygon tubing)
KillCoil, various fittings, etc.

I considered going for some nice compression fittings, but paying close to $100 for something like that when I don't even have a window didn't make any sense. I'll stick with cheap steel hose clamps instead. I also picked up some ModRight ModMesh to serve as a radiator grill at the top of my case.

I'm waiting on a number of packages to arrive and all my orders are going to be trickling in this week. I got my rotary tool today and will probably be receiving packages every day this week.
 
I kinda feel like a jerk for asking, but why spend around $190 for a FX 8120 when a 2500K is faster in most cases for about the same cash? Just trying things with the other camp, or will the 8 core setup actually be beneficial for what you use the machine for primarily?
 
I kinda feel like a jerk for asking, but why spend around $190 for a FX 8120 when a 2500K is faster in most cases for about the same cash? Just trying things with the other camp, or will the 8 core setup actually be beneficial for what you use the machine for primarily?

I thought a lot about this and I was debating between an Ivy Bridge build and this Bulldozer build. Here are the reasons that won me over-
1: Ivy Bridge is the last generation of processors Intel is releasing for the LGA155 socket so if I want to upgrade to anything beyond that it means a new motherboard.
2: The price of the AMD setup was also lower than what I considered the equivalent Intel setup to be. (combine with #1 and for me it makes a strong reason)
3: The Bulldozer architecture looks to be stronger than Intel's offerings in the same price range when it comes to various virtualization tasks (machine and run time) and I do software development so that will be useful to me.

Other than that it's nice to have faster x264 encoding for when I occasionally need it since I don't entirely like GPU encoding yet.

Hopefully that answers any questions.

EDIT: Just in case anyone is wondering I am not Intel-adverse or anything. My server, the mini-itx build I did for my girlfriend and my laptop all run on Intel processors.
 
Last edited:
Got some more stuff today! It's killing me having to wait until Friday for my big box from FrozenCPU.

moboandmore.jpg


I was taken by surprise with the tin box for the processor. I guess I didn't remember any reviews talking about it or really seeing the packaging. Either way, it's a nice departure from standard paper boxes. There's some PK-1 in there too replacing my syringe of TIM Consultants stuff.

cpu.jpg


I'm hoping this thing will prove to be an overclocking beast for me. We'll see though!
 
Nice...that new setup should really help with video encoding. BD also is strong with virtualization. Not a big fan of increased power usage with the big OC's and BD but that rig should serve you well. Keep up with the pics!
 
Everything came! Of course it ended up all arriving right after I left to go see the doctor for a second time (they think I have the flu now) but that's not important.

img1889w.jpg


img1890pf.jpg


The first thing I wanted to do when I got my package was get the water block on. Not sure why, but that's what I wanted to do.

img1882v.jpg

Pins on a CPU? What is this, 2005? :p

img1886g.jpg


img1891no.jpg

The block was really easy to install. Absolutely painless. I just hope the jet plate didn't move when I was putting the block back together after switching the LGA plate for the AMD plate.

img1894k.jpg

Just another view.

Now to break out the rotary tool and get to cuttin!
img1896m.jpg

Rivets?! What the crap? Well, nothing a little drilling can't fix.

The adventure continues tomorrow!
 
Well this is a bummer. I got started working on the mod yesterday and I had just finished drilling the holes for the radiator and I was starting the cutouts for my cable management and the motor gave out on me. I had just put on a new cutting disk and was about half way through the first cutout and it just stopped on me. I wasn't applying a much pressure or anything so at first I thought it was just a thermal cut-off or something so I let it sit. When I came back from a quick hardware store run and I tried to turn it on it just sparked and that was that. So now it's time for me to try and figure out a replacement.
 
Amazon is overnighting a replacement to me. Just another reason why they are awesome.
 
Well now that I have my replacement in from Amazon... time to build!

I had to cut into the rails to be able to mount the radiator where I wanted to.
img1898h.jpg


Drilled holes for the radiator and pump.
img1899pi.jpg


Installed the motherboard.
img1901z.jpg


I put the fans on the radiator and mounted it after flushing it.
img1902o.jpg


It's a pretty tight fit.
img1904h.jpg


I hooked up the water cooling loop.
img1909bs.jpg


Getting the system going and getting all of the air out.
img1911l.jpg


Everything mounted/installed.
img1914yn.jpg
 
Nice build!

I also am in love with my AMD setup. Granted I am using a Phenom II 965BE as the FX Series are not performing for gamers as well as the Phenom IIs are. I am using the same board that you are and it is amazing!

Question though, why did you go with the 3/8 ID tube? It looks so tiny in that giant case!
 
Question though, why did you go with the 3/8 ID tube? It looks so tiny in that giant case!

The performance difference between the 2 is almost 0 and from comments I have seen people feel like 3/8 tubing doesn't kink as easily as 1/2 tubing.

I've got some more pictures coming soon. I cut out the top panel and now I just need to attach it to the case and figure out how I am going to get the side panel on since there's less space than I thought there would be behind the motherboard tray. More on that in my next update.
 
I get some pretty crazy bends with my 1/2ID 3/4OD tube... the people who typically say that 1/2 bends too easy, have too thin of a tube wall. Either way, nice build! Cant wait to see more.
 
I have finally set in on a stable overclock for my system. This week is the week before finals so I should have some time soon to wrap up everything.

I'm set up with the following
300MHz FSB
4.5GHz CPU @ 1.43125v (shows 1.44v under load in CPUz)
DDR3-2400 11-11-11-30-41-1T @ 1.625v
2.7GHz HT/NB

I am going to start tweaking voltages now to get them down to the lowest while keeping stability. That's going to be a long process as there are a lot of voltages I have to fiddle with to get this thing stable. I've looked at going higher than 4.5GHz but the voltage required to do it just makes it not worth it. My load temps are the low 40s. The highest I have seen was 44c.

Overall I am very happy with the way things have turned out.
 
Back
Top