
The UD3 marks Gigabytes entry level Socket 2011 motherboard. It is positioned as their lowest priced offering and is priced competitively with other manufacturers entry level boards.
What we really need to remember is that socket 2011 is Intels high end desktop platform, and so entry level here does not mean the same thing as it does on socket 1155.
The 2011 brings with it 40 PCI-Express 3.0 lanes as well as Quad Channel DDR3 support at speeds up to 2133Mhz. This improves greatly on the socket 1155 with its dual channel and only 16 PCI-Express lanes.
What it means in the case of the UD3 is that you get a well equipped motherboard that is capable of running up to 4 way CrossfireX or 4 way SLI, right out of the box without any add-on chips. Gigabyte claims full PCI-E Gen 3 support.
Board Layout and Features
Looking at the board, Gigabyte is continuing their trend of satin black PCBs for the performance oriented boards, and I must admit I do like this trend. The grey heat sink offsets the black nicely, and gives he board a more expensive look.

There are 12 SATA ports in total on the X79-UD3:
6 supplied by the Intel X79 Chipset, 2 of which are SATA 3 specification.
4 SATA 3 connected to Marvell 88SE9172 chips.
2 ESATA 3 ports also fed by a Marvell 88SE9172.

The SATA ports are color coded. White is for the Intel supplied SATA 3 ports. Black is for the Intel supplied SATA 2 ports and grey indicate ports supplied by the add on Marvell chips.
There are 8 USB 2.0 ports (red)on the back panel as well as an additional 2 USB 3.0 ports (blue) in the middle connected via a Fresco FL1009 chip for a total of 10 USB ports on the rear panel. Along with Optical and Coaxial Audio Outputs and 6 minijack plug for analogue audi connections. There are no Firewire ports on this board.

The ESATA ports mentioned earlier are along the lower edge, also blue in color.
There are additional headers on the board for 6 more USB 2.0 ports, COM port as well as HD Audio.

An additional header for 2 more USB 3.0 ports. If your case supports the new USB 3.0 connector you will be able to take advantage of this. However the motherboard did not come with an additional USB 3.0 bracket.

This should be enough storage and connectivity for most users.
The expansion slots on the board are configured as follows:
2 x PCI Express x16 slots, running at x16 (PCIEX16_1, PCIEX16_2)
* For optimum performance, if only one PCI Express graphics card is to be installed, be sure to install it in the PCIEX16 slot.
2 x PCI Express x16 slots, running at x8 (PCIEX8_1, PCIEX8_2)
* The PCIEX8_2 slot shares bandwidth with the PCIEX16_2 slot. When the PCIEX8_2 slot is populated, the PCIEX16_2 slot will operate at up to x8 mode.
(All PCI Express x16 slots conform to PCI Express 3.0 standard.)
2 x PCI Express x1 slots
(All PCI Express x1 slots conform to PCI Express 2.0 standard.)
1 x PCI slot

So if you were running 4 way SLI or Crossfire, the cards would run @ 16x, 8x, 8x, 8x.
There is plenty of space between the two PCI-E 16 slots so your video cards will have lots of room to breath if you are running a two card setup. This is well thought out. Gigabyte even provides you the longer crossfire bridge to ensure you have one that can reach over two slots. After that things tighten up and, like any board that supports more than two cards, the breathing room will be somewhat restricted. You will want excellent case ventilation in that situation. In any case, Gigabyte provides the necessary SLI bridges as well, including 3way and 4 way bridges.
Suprisingly there are no additional power connectors on the board to feed the additional PCI-E slots. All other Gigabyte board I have used in the past included at least one additional power connector when more than two way multi card setups are possible.
The heat sink mount spacing shares the same footprint as socket 1366, however, the mounting is different and you may require adaptors in order to use older heat sinks. Be sure that the heat sink you purchase is specifically designed for socket 2011. Otherwise you may end up with an overheating CPU. Notice that teh holes do not go through the board. The holes are threaded to accept the proper fasteners for a socket 2011 mount.

For my testing I started off with a Coolermaster Hyper 212 EVO but switched over to myXSPC RASA kit for the duration of the testing. This worked out well as I was able to use some of the mounting hardware from the Coolermaster in order to mount my water block.
The area around the CPU socket is filled with four ram slots. Two on either side of the socket. The UD3 only allows a single stick of ram per channel. For up to 32Gb of ram.
There is also a heat sink on the MOSFETS above the socket. Be cautious of tall ram sinks with large heatpipe coolers. This is common now and RAM manufacturers are coming out with low profile versions of DDR3 to help with clearance issues.

The X79 PCH is covered by a large flat, well finned heat sink. It did get a bit warm during testing, but never very hot as long as there was even the slightest airflow over it.

There are 5 fan headers on the board for all your cooling needs. 3 of which are speed controlled through the BIOS smart fan settings. This should be more than adequate for most users.
BIOS
Speaking of BIOS settings, the X79 series from Gigabyte are the first to incorporate their new UEFI 3D BIOS. Here is what Gigabyte has to say about this feature:
At the heart of this exciting 3D BIOS technology is a pair of 8MB physical BIOS ROMs containing GIGABYTE's exclusive in-house designed UEFI BIOS technology. With a superior graphical interface capable of 32-bit color imaging and fluid user-friendly mouse navigation, UEFI DualBIOS makes BIOS configuration a new and exciting experience for novice and experienced users alike. UEFI BIOS also brings native support for large hard drives on 64-bit operating systems.
Basically it is a new fully graphical BIOS interface that has two different modes. One is a more basic mode that uses a visual representation of the motherboard. When you hover the mouse over various areas they are highlighted. Highlighted areas are mouse clickable and open basic menus for changing some of the more common items related to the area highlighted.
More information and a video demonstartion can be found here:
http://www.gigabyte.com/microsite/304/images/3d-bios.html
There is also a more advanced mode that gives a bit more of a traditional layout and separates the various groups of settings much like a more traditional BIOS. This includes separating the tweaking and tuning section under the traditional Gigabyte M.I.T. heading.
The overall BIOS interface is far different from Gigabytes old traditional setup. And Gigabyte has taken a bit of flak in the past for being slow to adopt the graphical interface now used by so many others.
Now that they have, they have taken a slightly different approach and gone an extra step to provide a user interface that combines the best of both worlds as well as taking it a step forward.
I will admit that the mouse action within the BIOS can be a bit clunky and it sometimes takes me several clicks to actually get into the menu I am trying to open. But this is a relatively minor issue and one that is easily adjusted to. The keyboard can also be used to navigate the BIOS.
Gigabyte also continues with their TouchBIOS utility, which allows the changing of bios settings from within windows. No more pounding the delete key trying to get into the BIOS settings. You can simply make the changes you want and then just reboot for the settings to take effect.
Overclocking
I was originally waiting for the i7 3820 to be launched, and 3930ks seemed impossible to find. Luckily about 3 days after I received the UD3, my local computer shop had a 3930K in stock.
I scooped it up as it was the only one they had.
Overclocking was pretty straight forward. As this is a K series chip, the multiplier is fully unlocked so, much like a Sandy Bride chip, you can just play with multipliers and voltage until you find that sweet spot between performance and power/heat.
Make no mistake, if you have any intention of overclocking a socket 2011 chip, you better have good cooling. These chips have a 130W TDP and when pushed hard with voltage the heat ramps up quickly. With this particular chip 4.5 GHz was as easy as a slight voltage bump to 1.38V and a change in the multi to 45.
Temperatures remained pretty manageable at this setting as well. Under My XSPC Rasa RS240 water cooling kit, temperatures rarely exceeded 60C even during prolonged benchmarking sessions.
Further experimentation pushed the clocks up as high as 5.040Ghz, but voltages and temperatures were well above what I would feel comfortable with on a day to day basis, and I do not recommend Vcore voltages over 1.4V unless you have excellent cooling.
Here is the validation link to my highest possible overclock.
http://valid.canardpc.com/show_oc.php?id=2241365
Notice the fact that it is at 126Mhz bus speed? That is because X79 allows you to make changes to the bus speed and multiplier, unlike socket 1055 which really only allows you to move a few mhz away from teh standard 100mhz.
X79 has straps which allow base settings of 100, 125 and 166mhz. This should help you to find the sweet spot with ram speeds as well as improving overclocking with multiplier locked CPUs.
My chip is definitely not a Golden chip. I had to push way too much voltage through it in order to get much past 4.6Ghz. I think the sweet spot for this particular setup would be 4.5Ghz as I was able to achieve that easily and my core temperatures were well under control.
For the performance comparisons I will use 4.5Ghz for the overclocked numbers compared to the stock clocks.
Test Setup:
Gigabyte X79-UD3
Intel i7 3930K
Corsair Force 3 60Gb SSD x2 for RAID0
AMD Diamond HD7970
4 X 2 GB DDR3 1600 Gskill RipjawsX
XSPC RASA RS240 Watercooling kit

All testing was completed on an open bench with some strategically located fans to keep airflow over the heat sinks and RAM.
2D Tests
All tests were completed with the 7970 at stock speed.
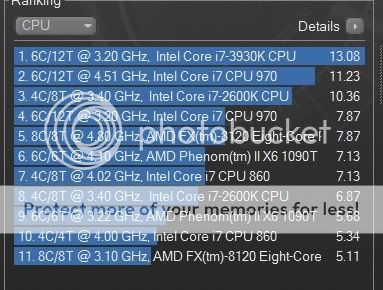
Cinebench 11.5
Here is a screen shot of Cinebench 11.5 showing a chart that has a few other CPUs for comparison. Cinebench does not properly detect the CPU speeds on Sandy Bridge or Sandy Bridge-E CPUs. The Overclocked speed in the chart is 4.5Ghz. As you can see, even compared to an i7 970, this platform shows a substantial increase in performance at the same clock speeds.
X264 Bench 4.0
Stock:
Pass 1
------
encoded 1442 frames, 167.46 fps, 3913.50 kb/s
encoded 1442 frames, 166.07 fps, 3913.50 kb/s
encoded 1442 frames, 165.54 fps, 3913.50 kb/s
encoded 1442 frames, 170.55 fps, 3913.50 kb/s
Pass 2
------
encoded 1442 frames, 53.31 fps, 3956.04 kb/s
encoded 1442 frames, 52.78 fps, 3955.37 kb/s
encoded 1442 frames, 53.25 fps, 3955.83 kb/s
encoded 1442 frames, 53.31 fps, 3956.98 kb/s
Overclocked (4.5Ghz):
Pass 1
------
encoded 1442 frames, 211.53 fps, 3913.50 kb/s
encoded 1442 frames, 214.97 fps, 3913.50 kb/s
encoded 1442 frames, 212.50 fps, 3913.50 kb/s
encoded 1442 frames, 212.50 fps, 3913.50 kb/s
Pass 2
------
encoded 1442 frames, 66.75 fps, 3956.93 kb/s
encoded 1442 frames, 67.03 fps, 3957.96 kb/s
encoded 1442 frames, 67.92 fps, 3956.82 kb/s
encoded 1442 frames, 67.92 fps, 3955.39 kb/s
The CPU seems to scale very well. This is the CPU to have if you are into video encoding. 12 threads burn through video like a hot knife through butter.
PCmark05
Stock: 27063marks http://3dmark.com/pcm05/3142811
Overclocked (4.5Ghz): 34105 http://3dmark.com/pcm05/3142825
3D Tests
All tests were completed with the 7970 at stock speed.
3Dmark Vantage
Stock: 32420 http://3dmark.com/3dmv/3932476
Overclocked (4.5Ghz): 36127 http://3dmark.com/3dmv/3932576
3Dmark11
Stock: 8996 http://3dmark.com/3dm11/2875075
Overclocked (4.5Ghz): 9250 http://3dmark.com/3dm11/2875350
Storage Tests.
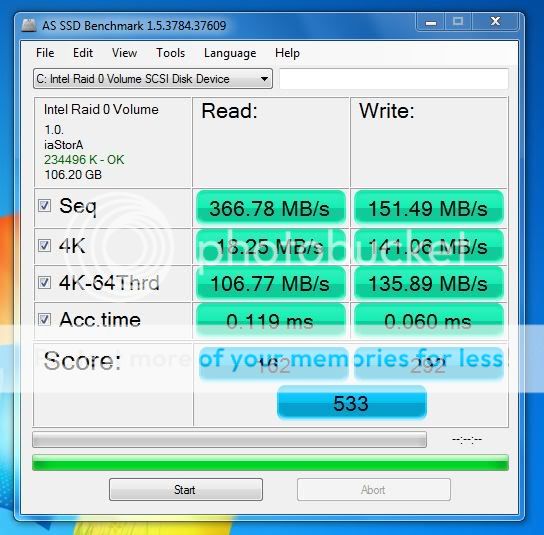
Tests were completed with 2 60Gb Corsair Force 3 SSDs in Raid0 with a stripe size of 64K.
AS SSD
Write Caching on
Write Caching OFF

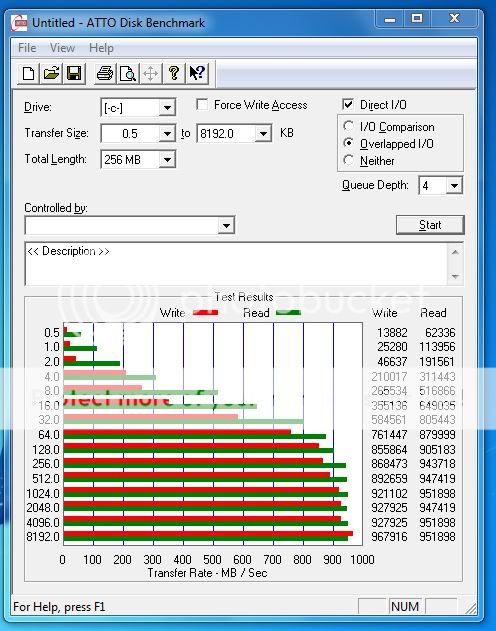
ATTO
Write Caching on

Write Caching Off
Conclusion
As you can see by the benchmarks, this setup is no slouch. The combination of Intel i7 3930K, HD 7970 and Gigabyte X79-UD3 is a powerful machine even at stock settings.
The UD3 has a very good list of features, especially at its price point. The addition of extra SATA ports and USB3 ensures that the value for the money remains excellent.
The UD3, while being among the less expensive boards for Socket 2011, delivers solid performance as well as an excellent base for overclocking. The board was extremely stable throughout my testing and recovered well from any settings it couldnt handle. I only had to clear CMOS a few times when pushing the CPU beyond what its capabilities were.
If you are in the market for a new socket 2011 system, and dont want to break the bank on a motherboard, I highly recommend you take a look at the Gigabyte X79-UD3.
Now that Intel has released the i7 3820 Quad core for this platform, you can get quad channel DDR3, as well as full 16X PCI-E for two way Crossfire/SLI as well as the ability to run up to 4 Way Crossfire or SLI, all for only a few dollars more than an equivalent socket 1155 setup.
This should bring a lot of the enthusiast market around to Socket 2011, as Intel intended this platform for that market specifically.
Gigabyte has another winner here and I am sure that sales of this particular board will only increase now that there is an affordable CPU available to compliment this less expensive X79 based motherboard.
And in case you were wondering about this boards potential for overclocking Hicookie set the world record on one of these boards!
http://gigabytedaily.blogspot.com/2011/12/hicookie-smashes-core-i7-3930x-world.html
I think that should answer the question!