![[H]ard|Forum](/styles/hardforum/xenforo/logo_dark.png)
Well I figured since I plan on buying a whole new loop for my system soon it's time to get my hands back in practice of working with water cooling gear. The last water cooled rig I had was back in the days of my Pentium 4 extreme. Oddly enough, this cooler was meant to cool that socket, not the one it will be put on.
I was browsing craigslist last week when I found a water cooled computer for $80. The guy was parting it out and wanted $10 for the water cooling loop. Not knowing what it was (and frankly not caring at all) I told him I wanted it. So after he got back in town I arranged to pick it up. I jumped in my car today after work and drove a couple of minutes to pick it up. Now.. this is where things take a turn.
When I found this ad there were no pictures of the computer, all I had was a part number off the pump. A part number used for both the 80mm and 120mm version of this loop. Like the giddy idiot I was I assumed it was the 120mm. No shock to me (mainly because it's just my luck) I showed up and it was the 80mm version. What ever, ten dollars is ten dollars, you've got to start some where.
So I throw it in the seat and spend the rest of my trip home looking at it laying lifeless in my passenger seat thinking of all the things I may be able to do with it. It's ugly horribly applied TIM, only being stopped from hitting my nice leather by a towel I luckily had in the trunk. I knew first thing was first, it needed cleaning but only slight (so I foolishly thought), and a nice lapping. Then my mind wondered to fans, and then I thought about a res mod. Looking over I noticed the hoses were held on with spring clamps and new immediately it was coming apart.
I bought some computer components off of some one who apparently is (was?) and OCN member near me from craigslist. Among the box of stuff she gave me when i bought a few parts from her was a XSPC res, and a Thermaltake V1 Heatsink of which I found out later the original owner is still an active member. Remembering the res I knew I had to use it, as it wouldn't be suiting for OCN if it wasn't done cheaply while using some hand me down parts. :thumb:
So I get home and I decided I'll start cleaning it. This is what she looked like when I got her on the bench.

She looked dusty, but I didn't think much as it didn't seem to be that bad, and went ahead with the tear down.
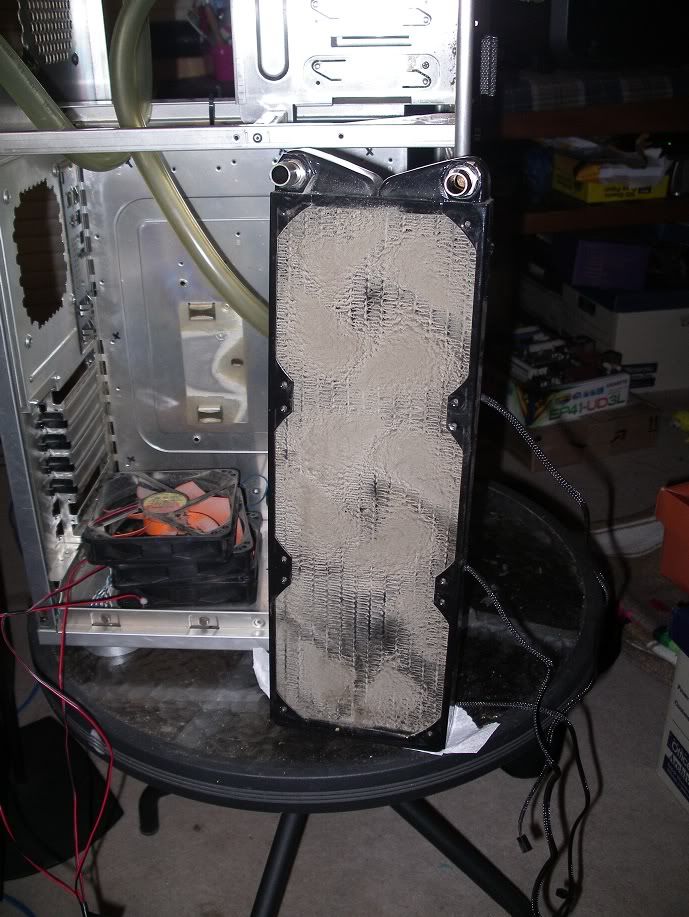
And then I hit this...


I figured it may have been from a smoker home, but the dust blew out easily and didn't carry an odor. My guess is it was never serviced and the rig always sat on the floor clear up until the day it was parted out.
So I made a trip to ace hardware to get some stuff (mainly canned air).
What I've gotten accomplished tonight. The build will commence tomorrow.
So I cleaned up the radiator. Thinking about polishing it, any thoughts?

I cleaned the pump up as well.

Pulled the res out of my case:

Mounted the barbs in it:

And then I started working on lapping the block/pump combo.
After twenty minutes of dry sanding with 2000 Grit:

After Sanding with 2500 Grit and polishing:


The goal is that tomorrow night I'll have the loop all laid out, the fans mounted to the rad, all the wiring and tubing done, and have leak testing underway.
So I'm actually going to repolish that block tomorrow, I'm not happy with it. If you look near the center in the photos there's a nib from the machining process. I'll DA this flat and then step through it and polish it.
Also, I have to make a bracket for this as the bracket I have is for intel. Things are going to get interesting....
I was browsing craigslist last week when I found a water cooled computer for $80. The guy was parting it out and wanted $10 for the water cooling loop. Not knowing what it was (and frankly not caring at all) I told him I wanted it. So after he got back in town I arranged to pick it up. I jumped in my car today after work and drove a couple of minutes to pick it up. Now.. this is where things take a turn.
When I found this ad there were no pictures of the computer, all I had was a part number off the pump. A part number used for both the 80mm and 120mm version of this loop. Like the giddy idiot I was I assumed it was the 120mm. No shock to me (mainly because it's just my luck) I showed up and it was the 80mm version. What ever, ten dollars is ten dollars, you've got to start some where.
So I throw it in the seat and spend the rest of my trip home looking at it laying lifeless in my passenger seat thinking of all the things I may be able to do with it. It's ugly horribly applied TIM, only being stopped from hitting my nice leather by a towel I luckily had in the trunk. I knew first thing was first, it needed cleaning but only slight (so I foolishly thought), and a nice lapping. Then my mind wondered to fans, and then I thought about a res mod. Looking over I noticed the hoses were held on with spring clamps and new immediately it was coming apart.
I bought some computer components off of some one who apparently is (was?) and OCN member near me from craigslist. Among the box of stuff she gave me when i bought a few parts from her was a XSPC res, and a Thermaltake V1 Heatsink of which I found out later the original owner is still an active member. Remembering the res I knew I had to use it, as it wouldn't be suiting for OCN if it wasn't done cheaply while using some hand me down parts. :thumb:
So I get home and I decided I'll start cleaning it. This is what she looked like when I got her on the bench.
She looked dusty, but I didn't think much as it didn't seem to be that bad, and went ahead with the tear down.
And then I hit this...
I figured it may have been from a smoker home, but the dust blew out easily and didn't carry an odor. My guess is it was never serviced and the rig always sat on the floor clear up until the day it was parted out.
So I made a trip to ace hardware to get some stuff (mainly canned air).
What I've gotten accomplished tonight. The build will commence tomorrow.
So I cleaned up the radiator. Thinking about polishing it, any thoughts?
I cleaned the pump up as well.
Pulled the res out of my case:
Mounted the barbs in it:
And then I started working on lapping the block/pump combo.
After twenty minutes of dry sanding with 2000 Grit:
After Sanding with 2500 Grit and polishing:
The goal is that tomorrow night I'll have the loop all laid out, the fans mounted to the rad, all the wiring and tubing done, and have leak testing underway.
So I'm actually going to repolish that block tomorrow, I'm not happy with it. If you look near the center in the photos there's a nib from the machining process. I'll DA this flat and then step through it and polish it.
Also, I have to make a bracket for this as the bracket I have is for intel. Things are going to get interesting....
 .
.