• Some users have recently had their accounts hijacked. It seems that the now defunct EVGA forums might have compromised your password there and seems many are using the same PW here. We would suggest you UPDATE YOUR PASSWORD and TURN ON 2FA for your account here to further secure it. None of the compromised accounts had 2FA turned on.
    Once you have enabled 2FA, your account will be updated soon to show a badge, letting other members know that you use 2FA to protect your account. This should be beneficial for everyone that uses FSFT.

Project Scorpius

lkramer

n00b
Joined
Nov 12, 2008
Messages
33
[size=+2]Introduction[/size]

I have built numerous computers over the years for my family and friends but never completely built one for myself. My goal for this computer is to use the best quality components that I can find for a low price, and build a reliable computer. In addition, to that goal, I will be using components from AMD (as I work there) regardless of the price. Since this is a new build, I have a couple of objectives in mind. First, this computer will be used for software development and as a gaming machine. Second, I want to keep the physical size of the system to at most a mid-tower. Third, I want the ability to dual boot Windows and Linux.

[size=+2]Log[/size]

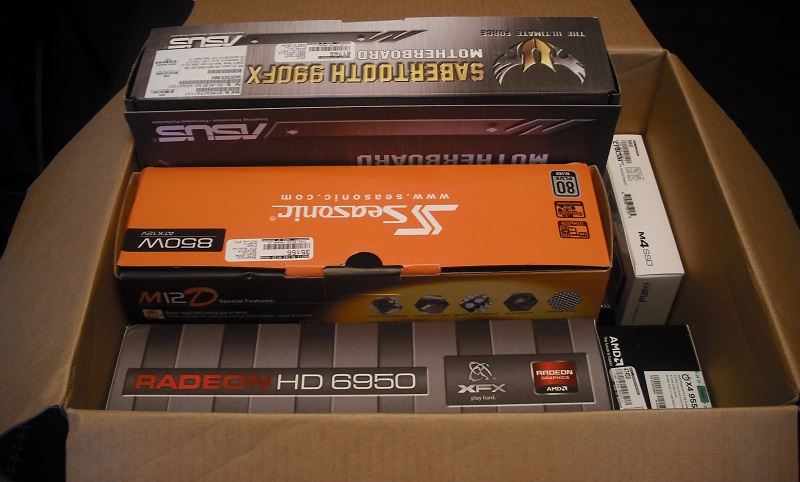
06 June 2011: Ordered CPU, Motherboard, SSD, Video Card, Power Supply and Optical Drive.
08 June 2011: Picked up parts.
13 June 2011: Putting it together.
14 June 2011: Ordered additional fasteners.
22 June 2011: Received the additional fasteners.
 
Last edited:
Case
I have been a fan of the Silverstone TJ09 case for some time; however, while that full-tower looks great. I could not find a mid-tower case from Silverstone I liked. After looking at a number of cases, I decided on the Cooler Master CM 690 II Advanced. I have seen various development and test systems at work that use that case and it is easy to work in, looks good and supports an all-in-one dual radiator watercooling unit. In addition, the case looks good. I will be replacing the Cooler Master supplied case fans with Scythe Gentle Typhoon D1225C12B3AP-13 (1,150rpm) fans.

Power Supply
This is an easy one; I exclusively use power supplies from one manufacturer, Seasonic. I selected the Seasonic M12D 850W power supply unit.

CPU
As I work for AMD, this was an easy choice. I selected one of their Phenom II CPUs. After carefully weighting all of the factors such as price vs. performance, my impatience for wanting to build an AMD-based system and the release date of the FX series. I chose the Phenom II X4 955 BE.

When the FX-8130P processor is available to purchase at retail stores, I will be buying one to replace the Phenom II X4. If I get the FX-8130P before or on June 21st, I will be returning the Phenom II X4 for a full refund; otherwise, I will be selling the Phenom II X4 used.

Motherboard
This was a tough choice as I have not built an AMD-based system since the Athlon FX days. The features I want on a motherboard are excellent reliability, moderate overclocking ability, and the ability to monitor temperatures around the board for more effective cooling and better fan placement (for a quieter computer overall). In addition, I want a long warranty period and an RMA facility in Canada so I don't have pay the stupid UPS or FedEx brokerage fees, duty or high shipping charges.

I selected the ASUS Sabertooth 990FX as it offers all of these features but the only drawback to this motherboard is the colour scheme as I am not a fan of military colour schemes.

Heatsink
For the heatsink, I decided to try a prebuilt all-in-one dual radiator watercooler for this build. I selected the Coolit Systems ECO C240, as it is the only dual radiator watercooling unit on sale. For the radiator fans, I choose two Delta AFC1212D PWM fans as they are capable of pushing 3.2 m^3/min (113.1 CFM) each with a static pressure of 107.1 Pa at 46 dB when running at 100%. However, at 0% the fan does not spin, so it doesn’t make any noise.

RAM
I was looking for an 8GB (4x2GB) kit with the timings as low as possible but also inexpensive, so I selected two 4GB Crucial DDR3-1333 kits. The two 4GB kits are cheaper than one 8GB kit but are harder to overclock. As I do not plan, overclocking the RAM is fine with me.

Graphics
I have an allegiance to the graphics product group of AMD (I develop the Linux-based drivers), I decided to go with a 6950 1GB based on the performance review at Hardware Canucks using my monitor’s resolution, 1920x1080. I chose the 6950 1GB from XFX for their double lifetime warranty.

Optical Drive
Believe it or not I actually had to buy one of these. Here’s how much time I spent shopping for it though --- I went to the local computer store, selected the top rated DVD writer that was on sale. It is a LG 22X DVD writer.

Hard Drive
This was a tough decision, too. I really wanted to get a sold state drive. So, I splurged a bit on the drive and get a Crucial M4 128GB. In addition to the solid sate drive, I will be using a 1TB Western Digital Black hard drive and my 640 GB RAID-1 NAS drive for data storage.

Operating System
Not much of a surprise here. I am going with Windows 7 Pro 64-bit. Why the Pro version and not Home Premium? Remote Desktop. Home Premium does not support it and I really want this feature so I could easily access this computer remotely.
 
Last edited:
I made a slight alteration to the parts I got, swapping the 8GB of Crucial DDR3 1333MHz RAM for 4GB of Kingston DDR3 2133MHz, for better memory performance on the current processor and my future upgrade to the FX-8130P processor. I just have the picture of the parts: AMD Phenom II X4 955; ASUS Sabertooth 990FX; Kingston HyperX KHX2133C9AD3X2K2/4GX RAM; XFX 6950 1GB XXX; Crucial M4 128GB SSD and Seasonic M12D 850W in their boxes:

DSCF0055.JPG
 
Last edited:
After my last build, I wanted to pay a little more attention to the details, to reduce the risk of scratching parts or potentially having static electricity damage parts.

I started opening the boxes for everything a second time. I actually opened the boxes the night I received them to ensure all of the components were visual okay and nothing was missing. In addition, I read the manual for the motherboard.

First, I gutted the Cooler Master CM 690 II Advanced case.

After that, I started assembling the components attached to the motherboard (CPU and RAM). I tried to attach the Eco C240 to the motherboard but it was too hard to get the motherboard and the Eco C240 radiator positioned correctly inside the case without damaging the radiator or motherboard. Therefore, I am going to attach the Eco C240 after I place and secure the motherboard in the case.

DSCF0065.jpg


Like the grounding scheme? My wrist strap is connected to an ESD grounding strap. The ESD grounding strap is connected to one of the screws on an electrical outlet. In addition, the ground strap is connected to the ESD mat via a metal snap button.

Next, I started putting the components that I had into the case until two issues come up. The first issue was I don’t know how to apply the Shin-Etsu X23-7783D thermal compound, so does anyone know to the application method for the Shin-Etsu X23-7783D thermal compound? The second issue is how much amperage can the CPU_OPT fan header handle. I have emailed ASUS technical support about the CPU_OPT fan amperage and, hopefully, I will receive a response soon.
 
Last edited:
Like the grounding scheme? My wrist strap is connected to an ESD grounding strap. The ESD grounding strap is connected to one of the screws on an electrical outlet. In addition, the ground strap is connected to the ESD mat via a metal snap button.

Next, I started putting the components that I had into the case until two issues come up. The first issue was I don’t know how to apply the Shin-Etsu X23-7783D thermal compound, so does anyone know to the application method for the Shin-Etsu X23-7783D thermal compound? The second issue is how much amperage can the CPU_OPT fan header handle. I have emailed ASUS technical support about the CPU_OPT fan amperage and, hopefully, I will receive a response soon.


I do like your grounding method. I want to give that a try next time I do a build.

After a quick google search I found this thread that should be helpful for the paste. It seems like there are a few methods.

http://www.overclock.net/other-cool...5-application-method-shin-etsu-x23-7783d.html
 
I replaced the indicator LED in the LG DVD drive after successfully changing the indicator LED in a DVD drive for another project and liking the results. I changed the indicator LED to a red LED to better match the red hard drive activity LED.

The LG DVD Drive disassembled.
DSCF0081.JPG


LG DVD Drive tray ejection motor, button and indicator board with the LED changed.
DSCF0108.JPG
 
Back
Top