friedchicken
Gawd
- Joined
- Oct 30, 2001
- Messages
- 711
Project: Lubic's Cube
Reference: http://www.aerocool.us/aerocool-files-v3/lubic/kit.htm
Pictures: Coming in a couple weeks once I break this thing apart again.
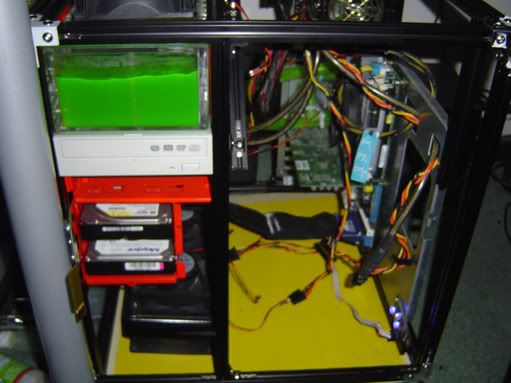
I'm building a custom case out of a Lubic kit as my first case-mod project. The design is based on a cube shaped case and has the mainboard mounted flat on the top half, and everything else in the bottom half.
The panels are lexan and the rear of the case is open (save some mesh) and designed to allow the mainboard to slide out the back. The DVD writer also ejects out the rear since I don't use it much and to clean up the front.
I first made a basic frame for the motherboard to get the minimum frame width and then expanded the front out to make it a perfect square. I then used that square frame to arrange the 2 HDD, DVD and PSU.
I found it easier to tackle the bottom section of the case and get the mounting positions set. The only way I could mount two HDD was to stand them upright side-by-side in a cradle insulated with solf rubber to reduce noise.
Lower Arrangement:
____________
| DVD | PSU |
|ROM | _____|
|_____| Wire |
|==== | store |
|==== |_____|
--------------------
^
HDD
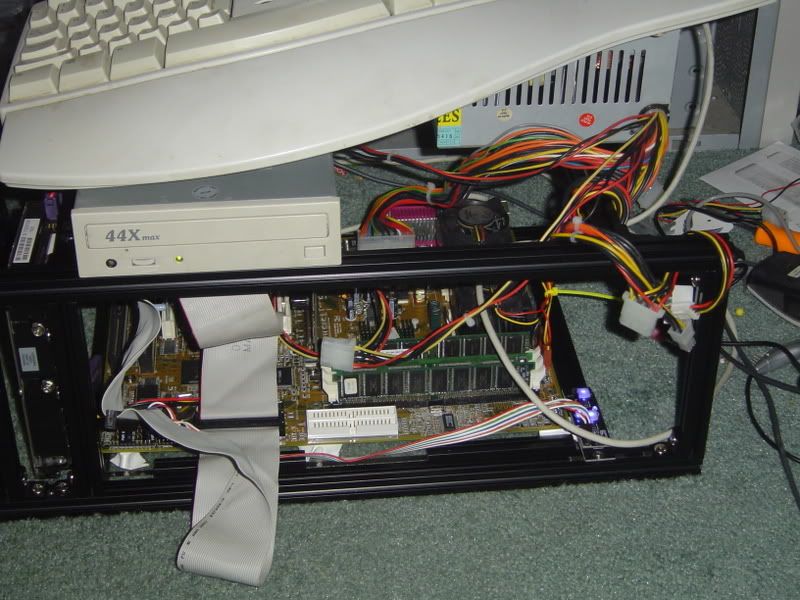
Once that was completed, it was easy to measure the height required for the bottom half and then cut the verticle peices and mount the motherboard tray assembally. I had to keep in mind that the corner verticle peices could not block my sliding motherboard tray. So the rear risers had to be done in 2 sections (up to the MB frame from the bottom, and from the MB frame to the top of the case.)
The peripheral mounting points were easier than I thought. With the Lubic peices framing the motherboard tray, I could put my video card on the board, and the backing plate peice that extends below the motherboard tray actually fits perfectly into the slotted Lubic peices. Then a crossbrace was cut to fit under the retaining tabs for support and provided a screw-down point.
My issues with this is, with the top of the case secured, how would I unscrew the peripheral card retaining screws, to allow me to slide out the motherboard? There is 2 ways to go about this. The first way is to allow the top to slide out similar to the motherboard by making the top panel crossbrace in the rear to be removable.
The other way is to make the motherboard and the peripheral crossbrace a one-peice and slide out the whole enchelada.
I opted for the the former version so that I could easily access the lower tray with the HDDs, with the top and the motherboard removed.
Once everything was fitted together, each section was broken apart again to measure and cut the plexi. It was important to do this as a last step so that all the proper crossbraces could be re-adjusted as the project moved on. There was alot of adjustments that had to be made by the end. Also, you want to cut out the holes for your fans, power switch, USB/Audio bus connections...
Note: When I was designing the case dimensions, I had to be conscience of air flow and cable management. The cables from the mainboard are all on the outside edge, so it was no problem hiding the wiring, and being able to reach the PSU below.
I needed to blow outside air directly at the 8800GTX vid card cooling fan, and on the otherside, over the dominator ram modules. The air blowing over the ram should provide enough air flow to push air across the southbridge and towards the northbridge cooler and then out the back. The CPU cooler is a Zalman which can be oriented in any direction, and it would appear that rear-ward is still the best position. The mounting of the fans in this fashion meant that I could only slide the motherboard our towards the rear, or the fans on the side of the case would come into contact with the capacitors and CPU fan.
The bottom half didn't need too much in the way of cooling, but a single 120mm scythe fan blowing towards the HDDs should be plenty. The PSU is inverted so that the intake fan is pulling warm air from above and venting it out the rear.
I am currently at the point where everything is completed, but I am not satisfied with the mess of cables behind the power supply. I could make a "box" to hide them in, or I could just try to use zip ties and make them neater. I also don't have any "bling, bling". The old lady wants me to add some, but it would have to be subtle and not expose more wires. I may look at fiber optic strands which I can hide in the lubic peices and illuminate it with an LED array (change colours, show multiple colours, oscillate.. etc).
I can't wait to get the pictures loaded up and I would welcome any feedback, specially from those who have used this kit.
Reference: http://www.aerocool.us/aerocool-files-v3/lubic/kit.htm
Pictures: Coming in a couple weeks once I break this thing apart again.
I'm building a custom case out of a Lubic kit as my first case-mod project. The design is based on a cube shaped case and has the mainboard mounted flat on the top half, and everything else in the bottom half.
The panels are lexan and the rear of the case is open (save some mesh) and designed to allow the mainboard to slide out the back. The DVD writer also ejects out the rear since I don't use it much and to clean up the front.
I first made a basic frame for the motherboard to get the minimum frame width and then expanded the front out to make it a perfect square. I then used that square frame to arrange the 2 HDD, DVD and PSU.
I found it easier to tackle the bottom section of the case and get the mounting positions set. The only way I could mount two HDD was to stand them upright side-by-side in a cradle insulated with solf rubber to reduce noise.
Lower Arrangement:
____________
| DVD | PSU |
|ROM | _____|
|_____| Wire |
|==== | store |
|==== |_____|
--------------------
^
HDD
Once that was completed, it was easy to measure the height required for the bottom half and then cut the verticle peices and mount the motherboard tray assembally. I had to keep in mind that the corner verticle peices could not block my sliding motherboard tray. So the rear risers had to be done in 2 sections (up to the MB frame from the bottom, and from the MB frame to the top of the case.)
The peripheral mounting points were easier than I thought. With the Lubic peices framing the motherboard tray, I could put my video card on the board, and the backing plate peice that extends below the motherboard tray actually fits perfectly into the slotted Lubic peices. Then a crossbrace was cut to fit under the retaining tabs for support and provided a screw-down point.
My issues with this is, with the top of the case secured, how would I unscrew the peripheral card retaining screws, to allow me to slide out the motherboard? There is 2 ways to go about this. The first way is to allow the top to slide out similar to the motherboard by making the top panel crossbrace in the rear to be removable.
The other way is to make the motherboard and the peripheral crossbrace a one-peice and slide out the whole enchelada.
I opted for the the former version so that I could easily access the lower tray with the HDDs, with the top and the motherboard removed.
Once everything was fitted together, each section was broken apart again to measure and cut the plexi. It was important to do this as a last step so that all the proper crossbraces could be re-adjusted as the project moved on. There was alot of adjustments that had to be made by the end. Also, you want to cut out the holes for your fans, power switch, USB/Audio bus connections...
Note: When I was designing the case dimensions, I had to be conscience of air flow and cable management. The cables from the mainboard are all on the outside edge, so it was no problem hiding the wiring, and being able to reach the PSU below.
I needed to blow outside air directly at the 8800GTX vid card cooling fan, and on the otherside, over the dominator ram modules. The air blowing over the ram should provide enough air flow to push air across the southbridge and towards the northbridge cooler and then out the back. The CPU cooler is a Zalman which can be oriented in any direction, and it would appear that rear-ward is still the best position. The mounting of the fans in this fashion meant that I could only slide the motherboard our towards the rear, or the fans on the side of the case would come into contact with the capacitors and CPU fan.
The bottom half didn't need too much in the way of cooling, but a single 120mm scythe fan blowing towards the HDDs should be plenty. The PSU is inverted so that the intake fan is pulling warm air from above and venting it out the rear.
I am currently at the point where everything is completed, but I am not satisfied with the mess of cables behind the power supply. I could make a "box" to hide them in, or I could just try to use zip ties and make them neater. I also don't have any "bling, bling". The old lady wants me to add some, but it would have to be subtle and not expose more wires. I may look at fiber optic strands which I can hide in the lubic peices and illuminate it with an LED array (change colours, show multiple colours, oscillate.. etc).
I can't wait to get the pictures loaded up and I would welcome any feedback, specially from those who have used this kit.