Navigation
Install the app
How to install the app on iOS
Follow along with the video below to see how to install our site as a web app on your home screen.
Note: This feature may not be available in some browsers.
More options
You are using an out of date browser. It may not display this or other websites correctly.
You should upgrade or use an alternative browser.
You should upgrade or use an alternative browser.
Project:Laocoön - First NCase Build
- Thread starter The_Cheese
- Start date
The_Cheese
Weaksauce
- Joined
- Oct 9, 2013
- Messages
- 81
It's so weird to see 120mm fans in this case, they look like 200mm ones. I will probably wish I had 12 year old's fingers just to install everything as my manly sausage fingers will most likely get in the way even more than any other SFF build.
If you like this kind of stuff, I recommend you try to get a hold of a PowerMac G5 or Mac Pro case for some modding project. I did one and I was amazed how a 10 year old case like the PowerMac G5 has such an incredible amount of engineering genius put into it. The newest Mac Pro (the polished black aluminium tube SFF piece of art) is even more amazing:
http://www.youtube.com/watch?v=IbWOQWw1wkM
Even if you don't like Apple, it's hard to argue their computers aren't inspiringly well engineered.
I have sizable meathooks and it hasn't been any more of a handicap for me on this build than on a regular ATX case build.
Way back before the turn of the century, I was a Mac guy.
Even before the PowerMac G5 and Mac Pros, Apple was turning out some really innovative case designs, like the G3 desktop that opened up like a book, the G3 tower that was almost as cool, or even the modular Macintosh cases in the II series.
My personal favorite was the IIcx / IIci that eventually was rehashed as the PowerMac 7100. All the components snapped together with plastic clips or brackets, the power supply plugged directly into the logic board... it was all very ahead of its time.
The_Cheese
Weaksauce
- Joined
- Oct 9, 2013
- Messages
- 81
Can you please take some pics of the drive cages.
Thanks for the work log!
Sure...
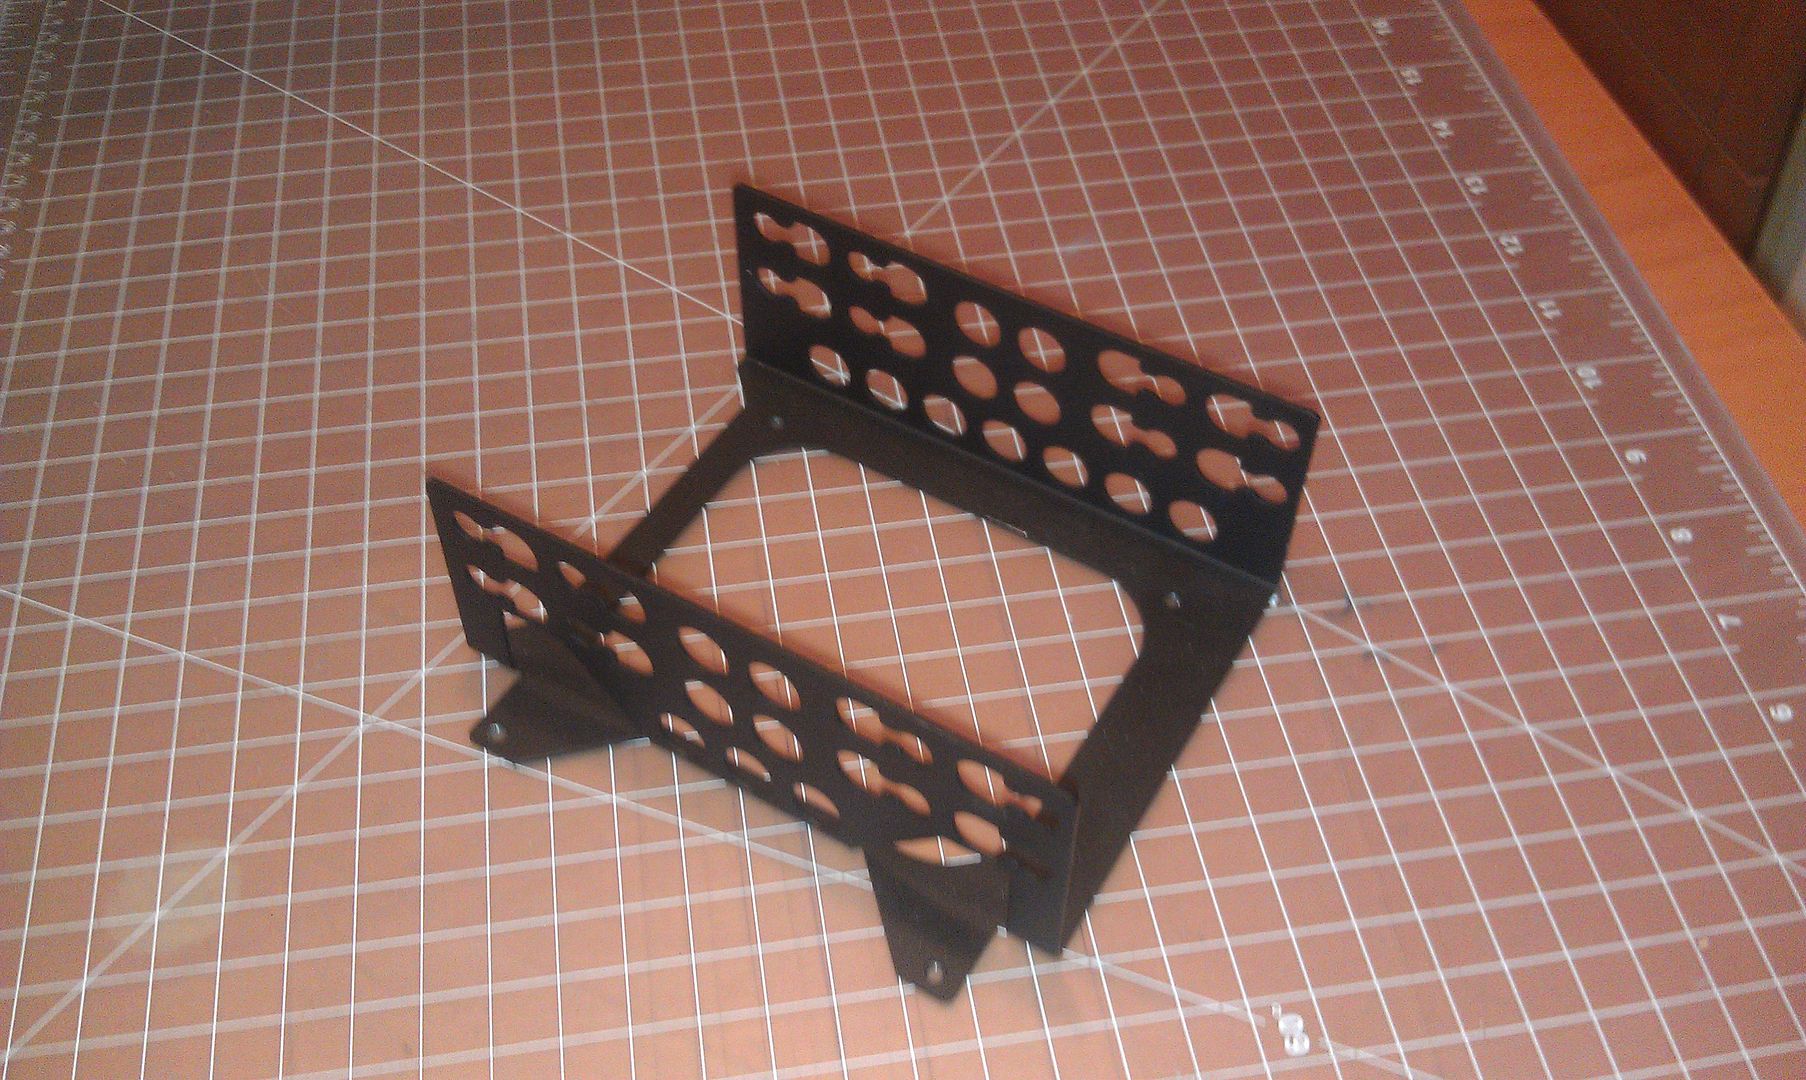
How's that?
The_Cheese
Weaksauce
- Joined
- Oct 9, 2013
- Messages
- 81
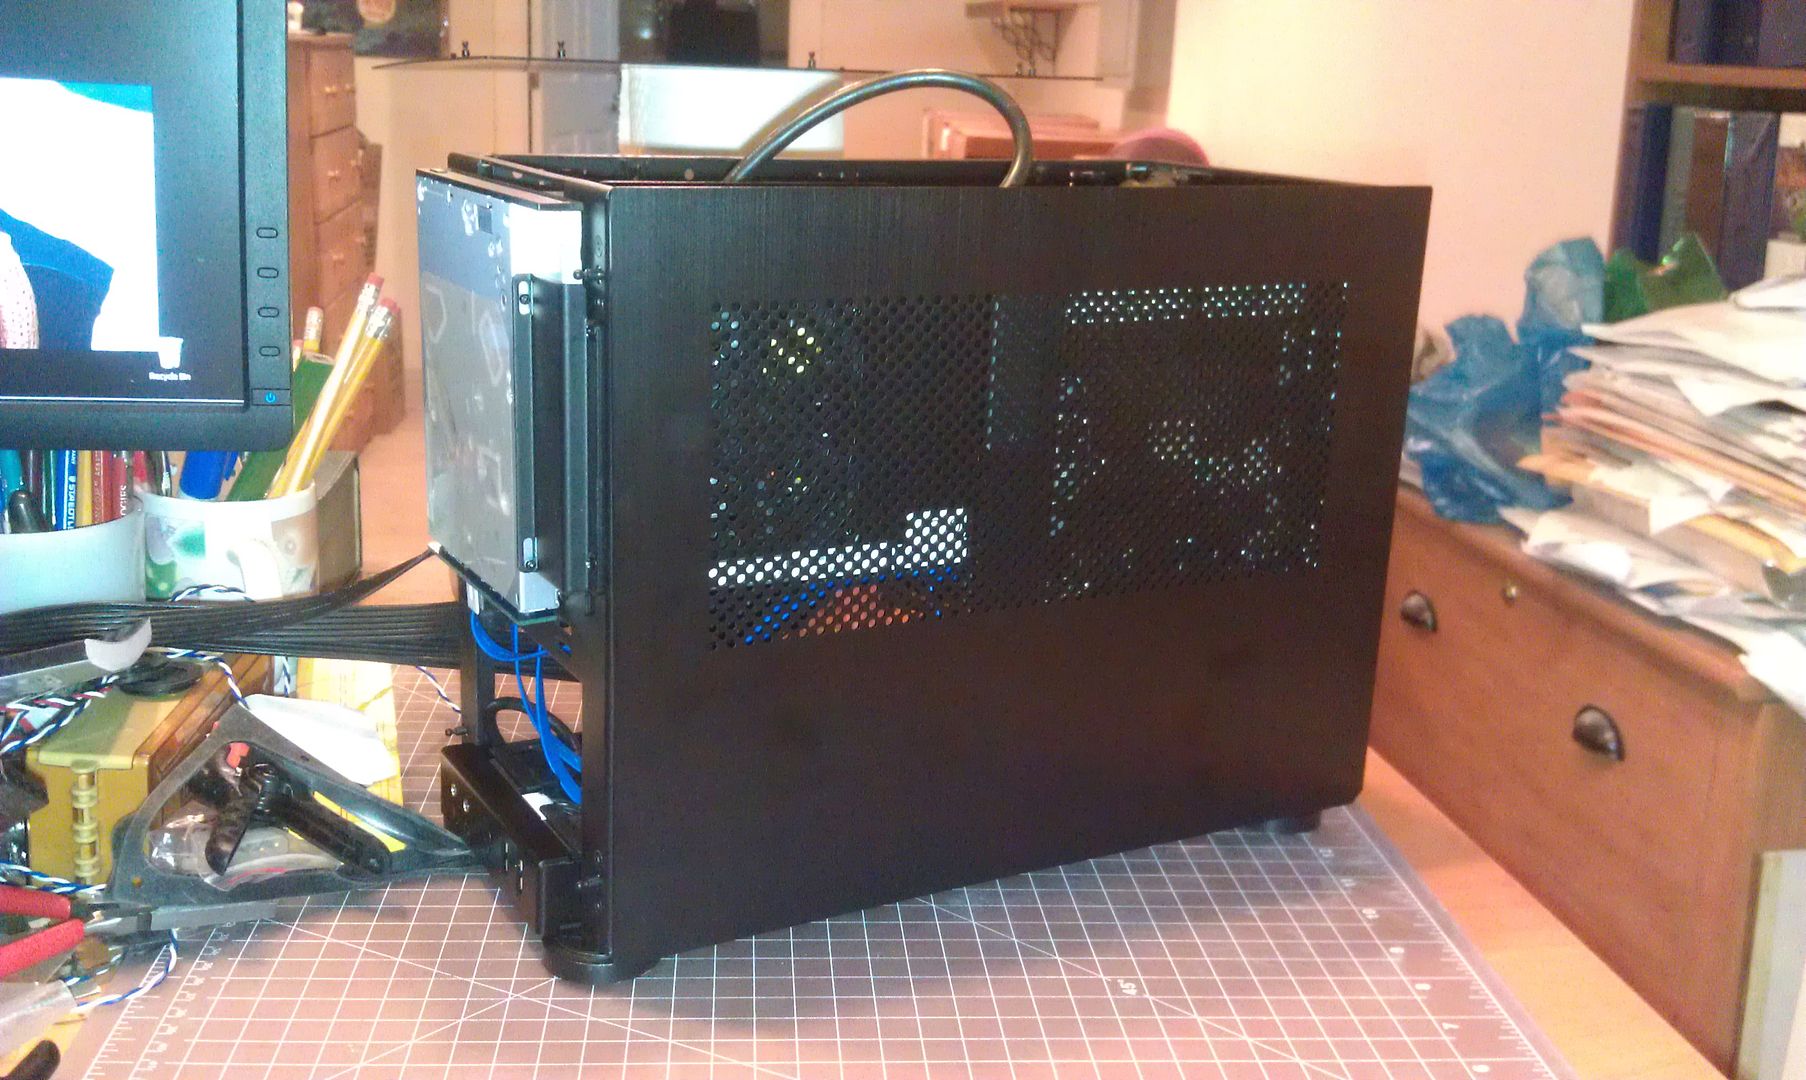
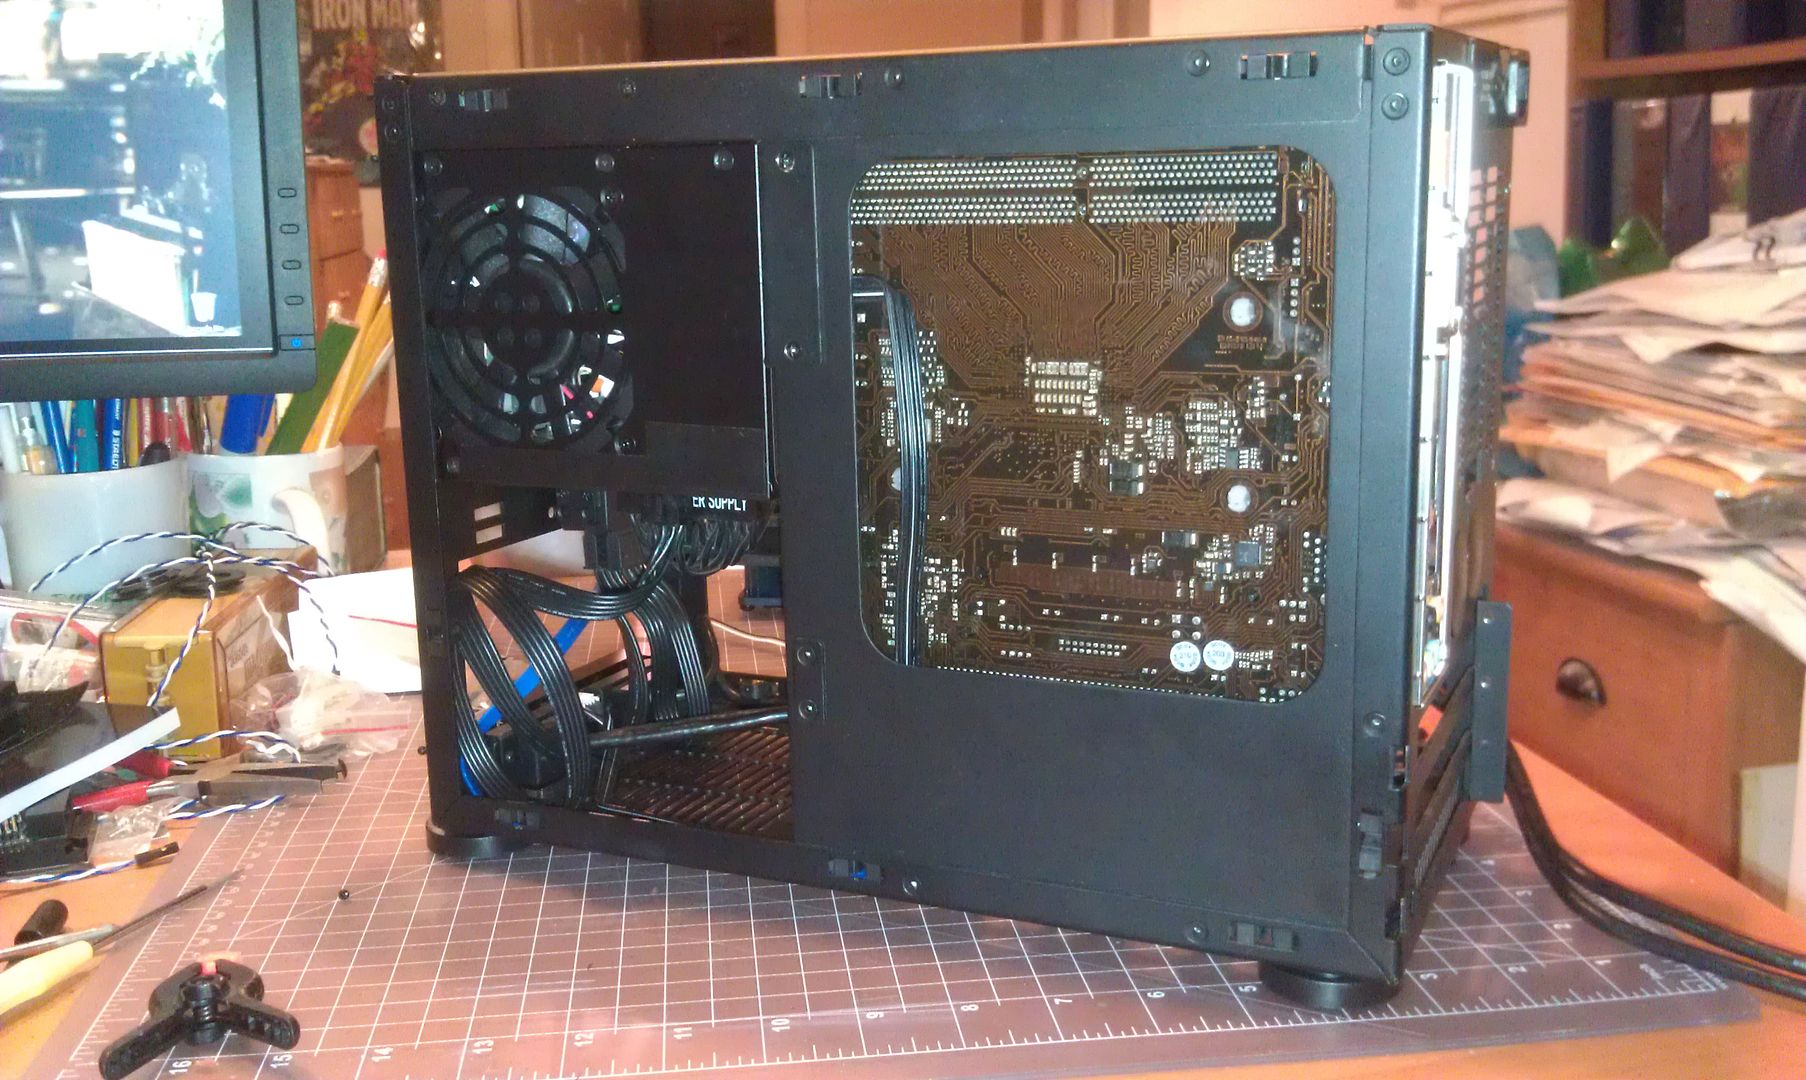
Solidly into season 5 of Corner Gas, I am making slow progress on the build.
Some evidence:
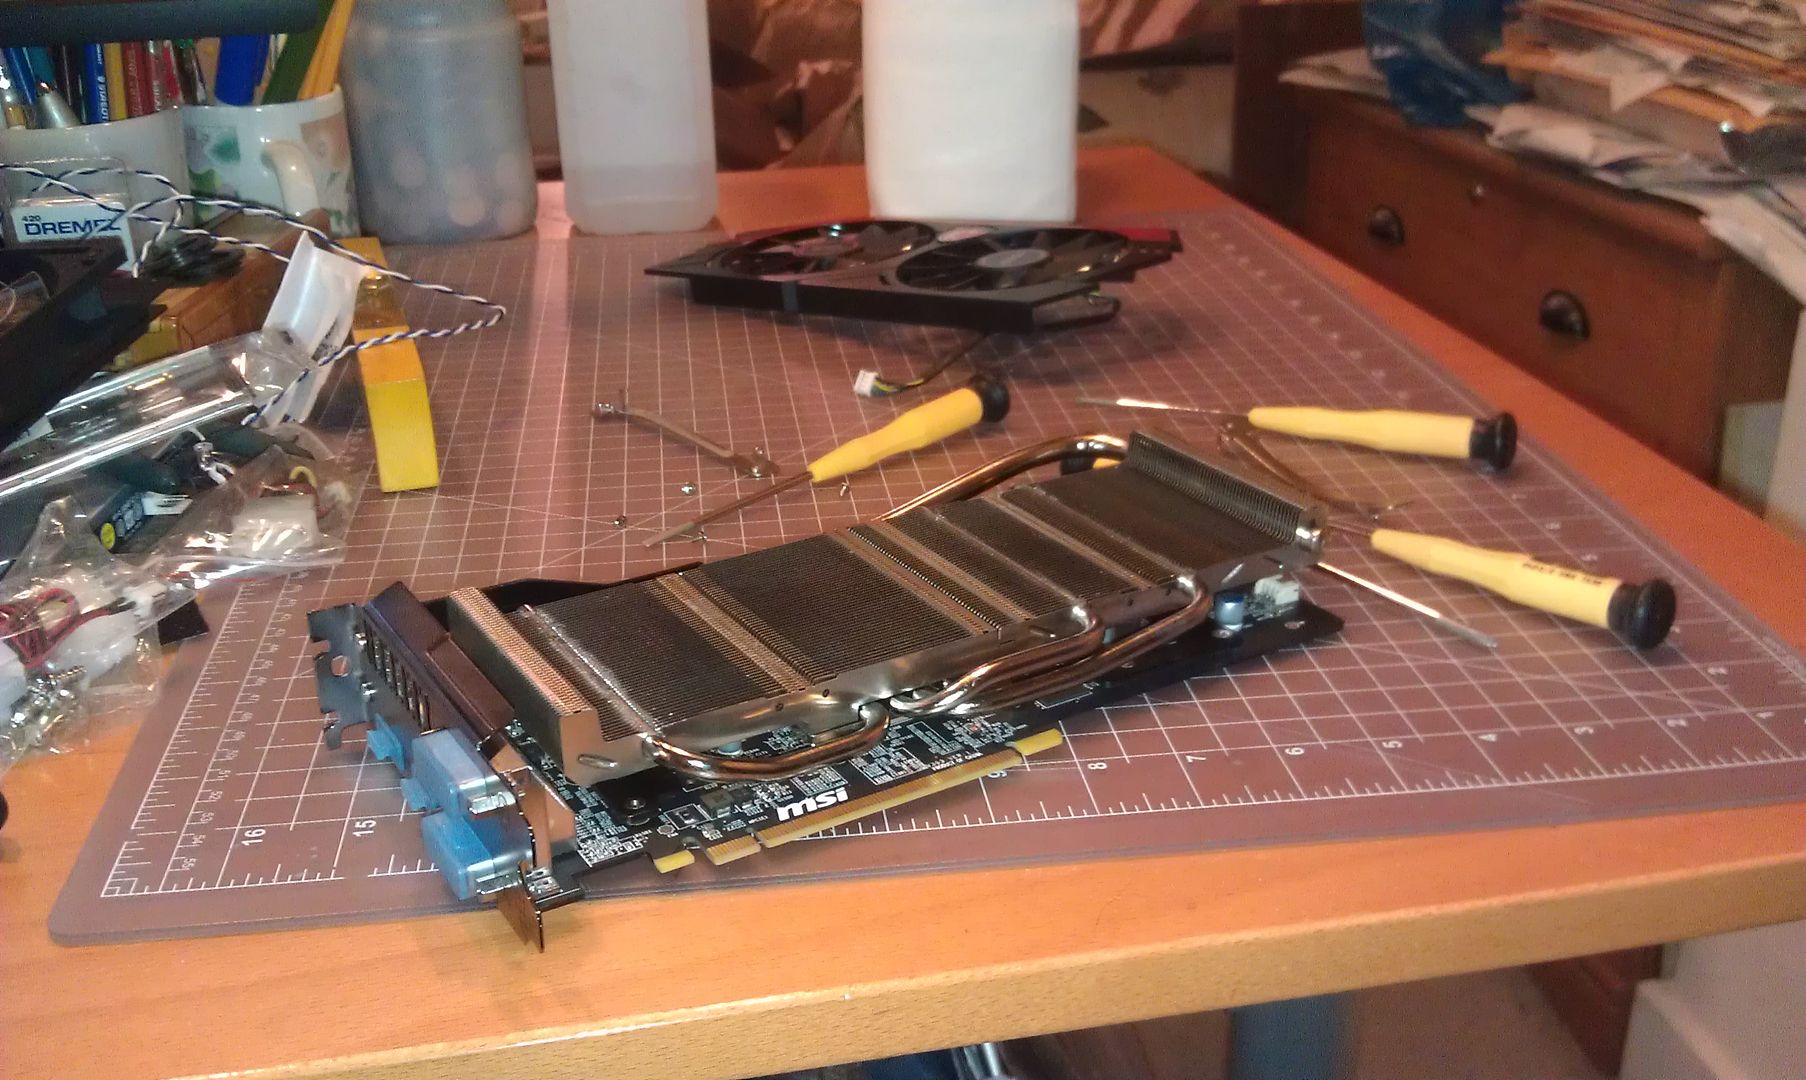
Removed the fan assembly from the R9 270x. Oddly, the hardest part was maneuvering the power lead out from under the heat exchanger.
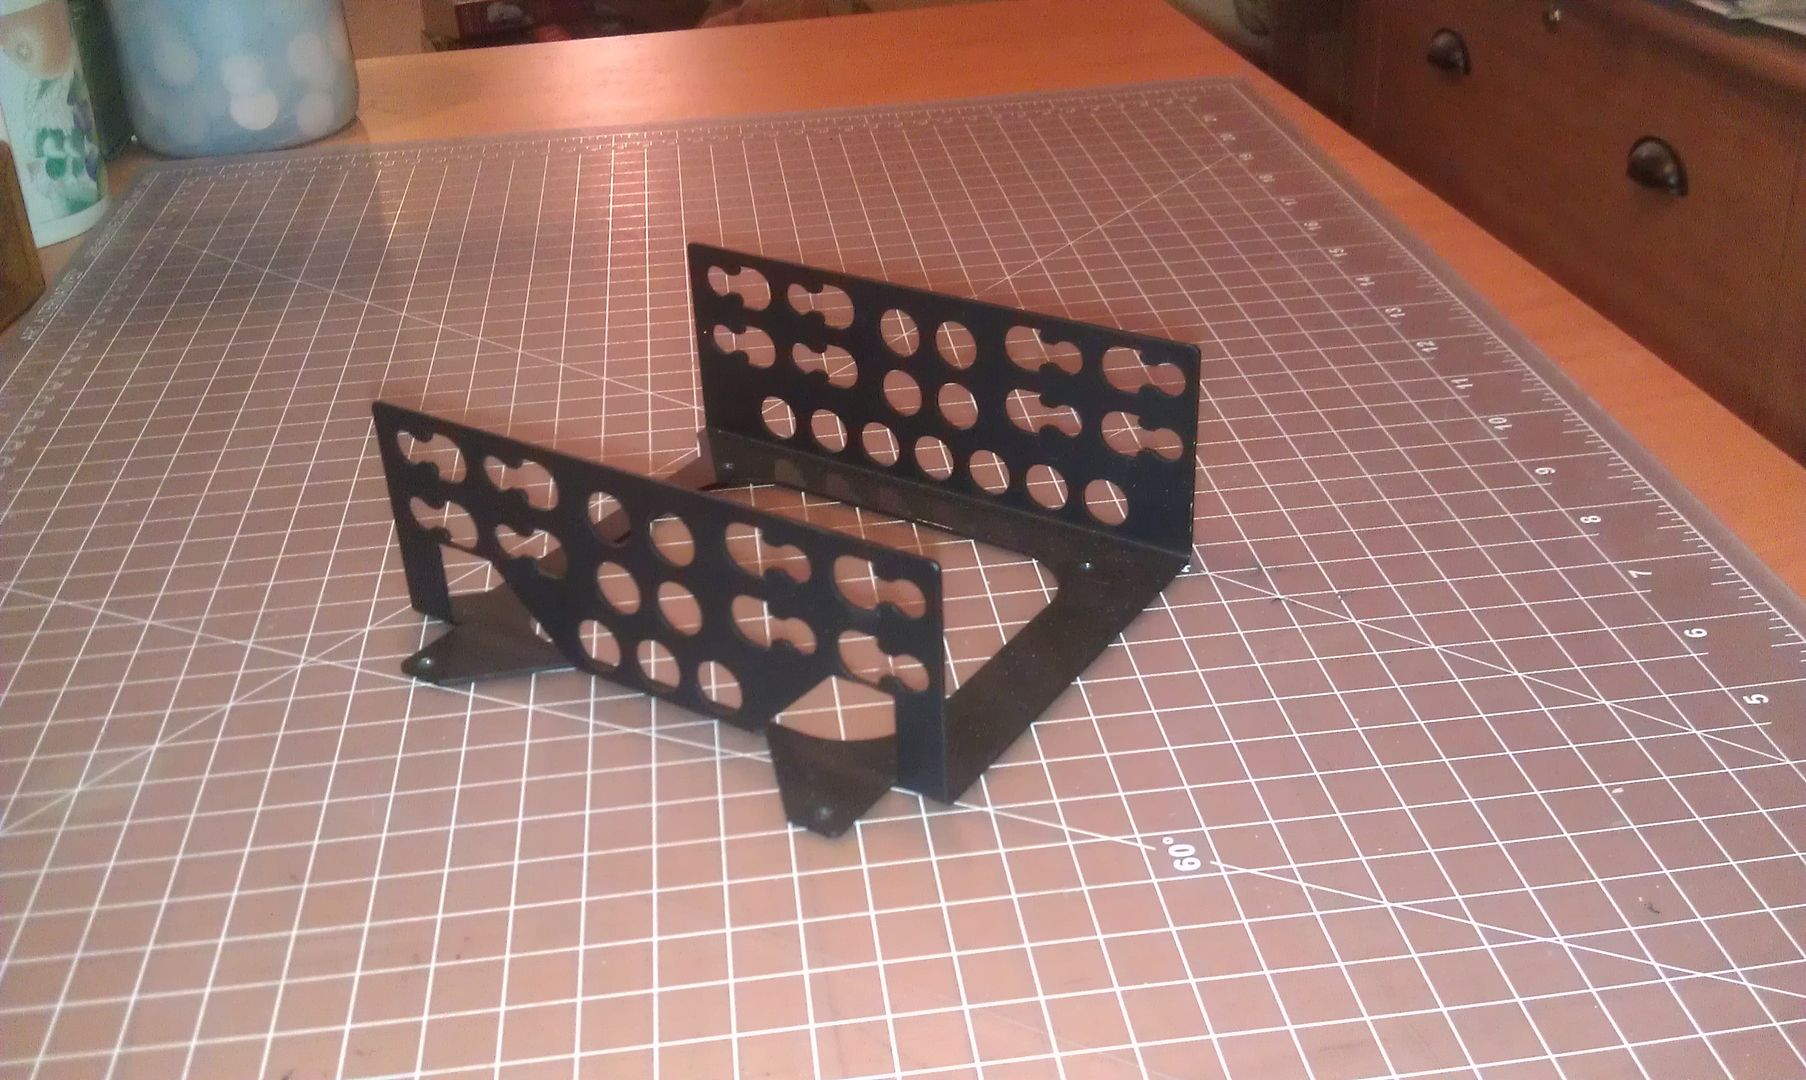
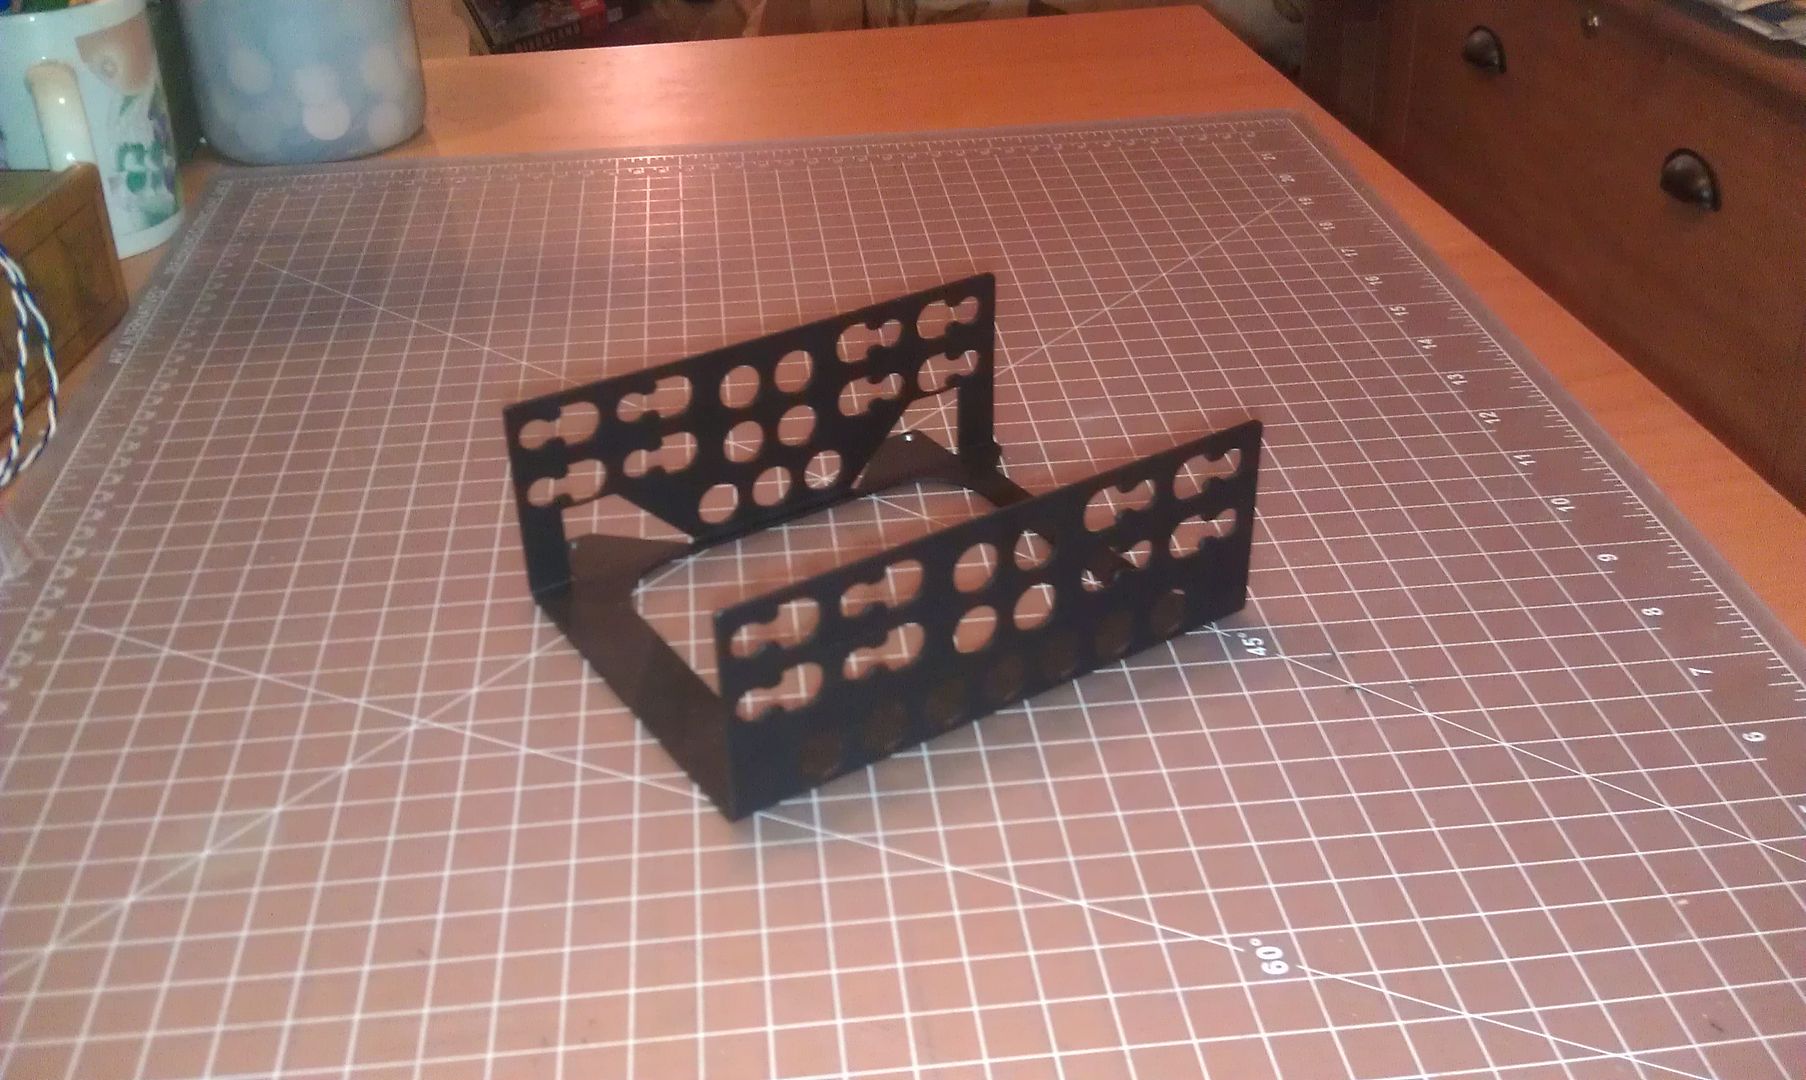
Here's some beauty shots of the side bracket, fitted out with matching 120mm fans:
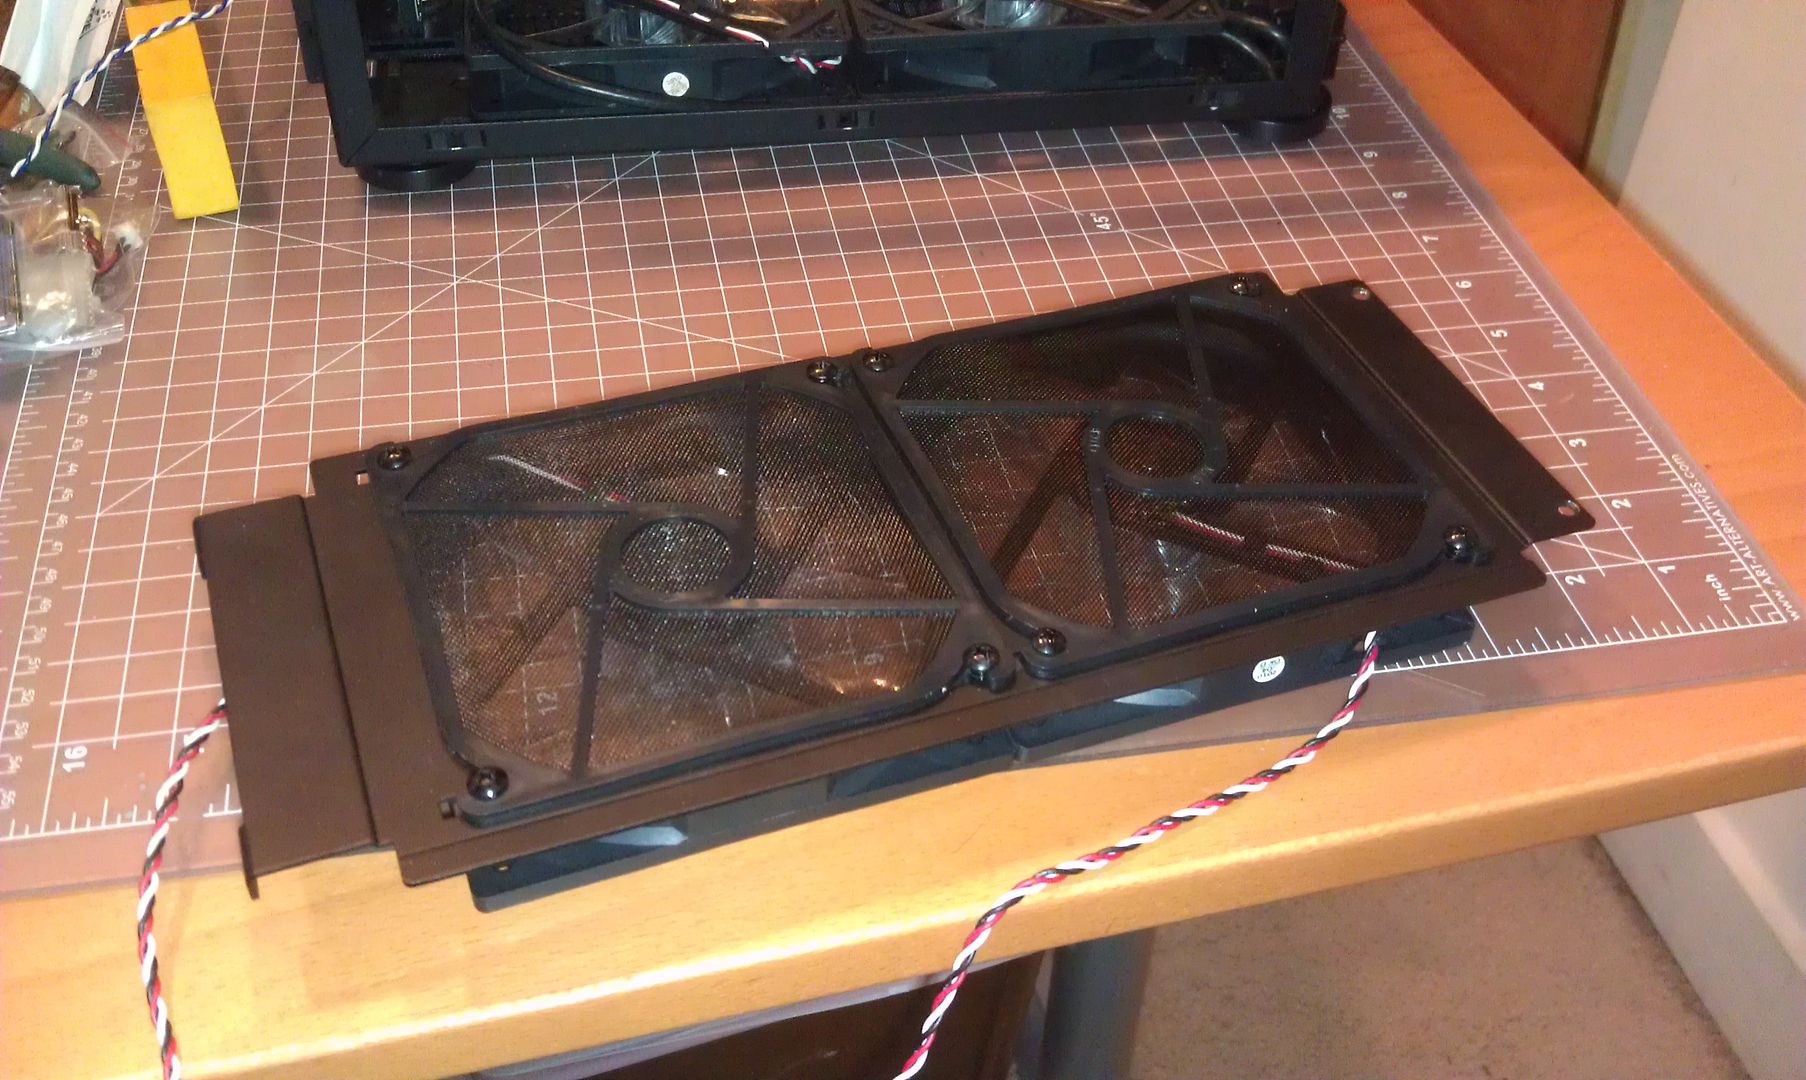
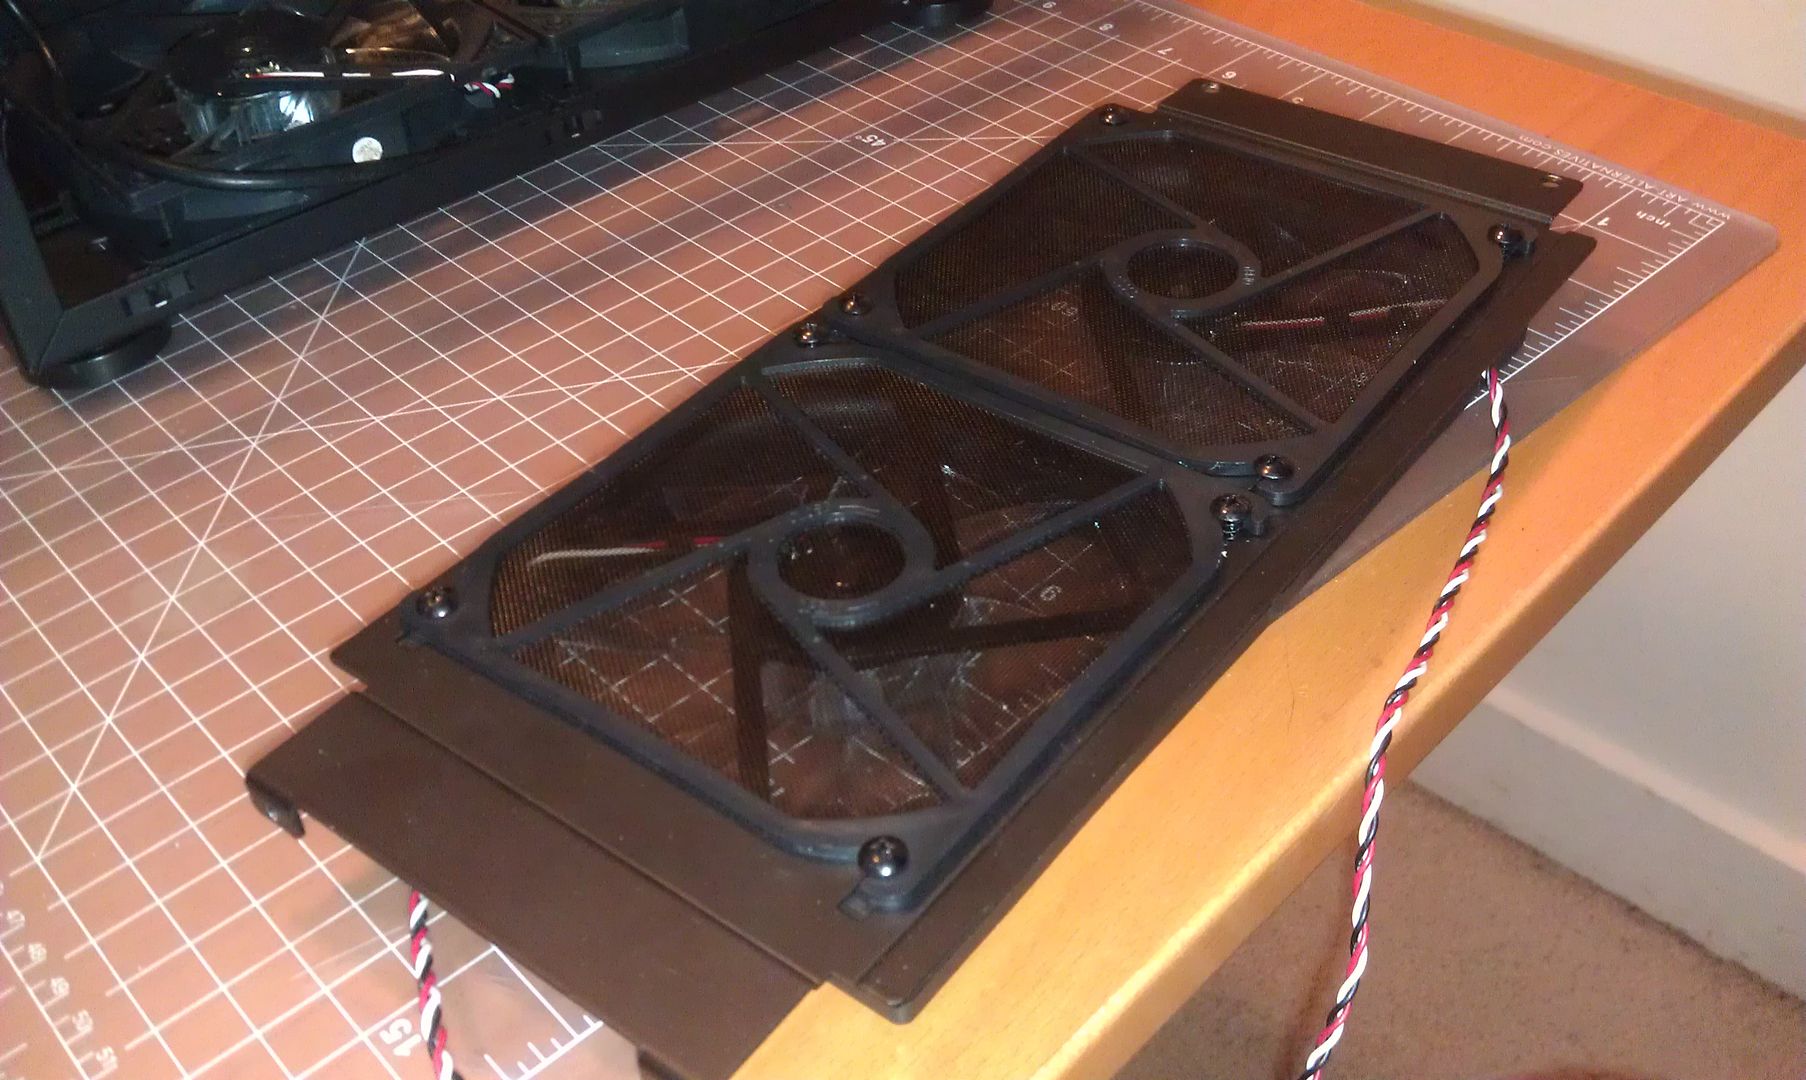
This was shortly before I took them apart to remove the filters (these fans exhaust, so no filters) and to re-orient the fans so I don't need any extension cords.
More to come!
Some evidence:
Removed the fan assembly from the R9 270x. Oddly, the hardest part was maneuvering the power lead out from under the heat exchanger.
Here's some beauty shots of the side bracket, fitted out with matching 120mm fans:
This was shortly before I took them apart to remove the filters (these fans exhaust, so no filters) and to re-orient the fans so I don't need any extension cords.
More to come!
Something I should mention: those LL filters are a bit too thick to fit on the outside of the bracket, as you show them, so they'll need to be on the inside if used. It was one of those things where I tried to make it work, but this was already the third revision of the bracket, so it was ultimately something that needed to be let go. I didn't want to make changes without testing them, and ordering another sample would've added weeks to the timeline. There are always things that could be improved, but at some point you just have to make the call to stop development and finalize for production. It'd be nice to have unlimited time and money to iron out every tiny detail, but that's life.
The Demciflex filters I designed for the case will still fit on the outside of the bracket, though, so if for some reason you need filters and can't spare the 3mm on the inside there's still an option available.
The Demciflex filters I designed for the case will still fit on the outside of the bracket, though, so if for some reason you need filters and can't spare the 3mm on the inside there's still an option available.
D
Deleted member 222586
Guest
Even though this build is coming off rougher than an old band-aid on a hairy arm, I am having a good time with it. The case is such a dream to work with; all the parts fit together sensibly and logically, the fit and finish are top notch, and it just seems like a high-quality piece.
Its my research skills that aren't up to par. I keep getting parts that don't or won't go together, and if I'd gone more slowly and done my research ahead of time I would've figured that out without dropping a pile of cash on a CPU cooler on whose manufacturer's website it clearly states that said CPU cooler will not work with the motherboard I have chosen.
To pick a random example, which may or may not be true.
More to come!
To be fair, there isn't really that much research... since you are the #1 user with an NCASE M1. Sure, with a caliper you might have been able to work with it better... but there are manythings that are hard to realise until you try that damn piece that won't fit and you don't understand why... when it should

Keep it up!
Awesome seeing your build come together! Absolutely loving the pictures, appreciate the effort that goes into doing so.
So the fan filter limitation is the lack of space between the fan mount and the side panel.
The demci would still work because it does't add to the thickness under the screws? Does this therefore mean that its raised screws that are the concern? (modding required, but if we found a lower profile way to mount the included fan filters, that should work fine? Thinking countersunk screw heads with appropriately prepared countersinking.
The_Cheese
Weaksauce
- Joined
- Oct 9, 2013
- Messages
- 81
Awesome seeing your build come together! Absolutely loving the pictures, appreciate the effort that goes into doing so.
So the fan filter limitation is the lack of space between the fan mount and the side panel.
The demci would still work because it doesn't add to the thickness under the screws? Does this therefore mean that its raised screws that are the concern? (modding required, but if we found a lower profile way to mount the included fan filters, that should work fine? Thinking countersunk screw heads with appropriately prepared countersinking.
In my experience, the supplied Lian Li filters will almost fit under the side panels, the difference being about 1.75mm. However, the supplied fasteners have domed heads that stick up an additional 2mm on top of that, which REALLY doesn't fit.
I tried some small-head, countersink-type fan screws (I am certain that everyone has some of the same screws; like AC power cables, they multiply in dark storage boxes and drawers), which worked pretty well but the filters still sit proud of the frame.
So, as Necere said, the supplied LL filters don't quite fit.
The_Cheese
Weaksauce
- Joined
- Oct 9, 2013
- Messages
- 81
A fast update; I am trying to keep my momentum up.
Progress:
More to come!
Progress:
More to come!
A fast update; I am trying to keep my momentum up.
Progress:
More to come!
Isn't the PSU fan / air flow blocked when the gold version is mounted that way?
In my experience, the supplied Lian Li filters will almost fit under the side panels, the difference being about 1.75mm. However, the supplied fasteners have domed heads that stick up an additional 2mm on top of that, which REALLY doesn't fit.
I tried some small-head, countersink-type fan screws (I am certain that everyone has some of the same screws; like AC power cables, they multiply in dark storage boxes and drawers), which worked pretty well but the filters still sit proud of the frame.
So, as Necere said, the supplied LL filters don't quite fit.
So the clearance of the side panel is not sufficient for the thickness of the filters alone, let alone the screws. Is the fan panel steel or alum? Demci filters are magnetic, but onto aluminium we will be needing the magnet strips too. By the sounds of it (and by your photos), there is only 1-2mm of thickness available...
The vents on that side extend to about 60-70% of the width of the intake fan on the ST45SF-G, plus there's 2-3mm between the PSU and the side panel.Isn't the PSU fan / air flow blocked when the gold version is mounted that way?
It's all aluminum. I actually physically checked on this exact case whether the Demciflex filters w/non-ferrous backing would fit between the bracket and side panel, and they do.So the clearance of the side panel is not sufficient for the thickness of the filters alone, let alone the screws. Is the fan panel steel or alum? Demci filters are magnetic, but onto aluminium we will be needing the magnet strips too. By the sounds of it (and by your photos), there is only 1-2mm of thickness available...
The_Cheese
Weaksauce
- Joined
- Oct 9, 2013
- Messages
- 81
Isn't the PSU fan / air flow blocked when the gold version is mounted that way?
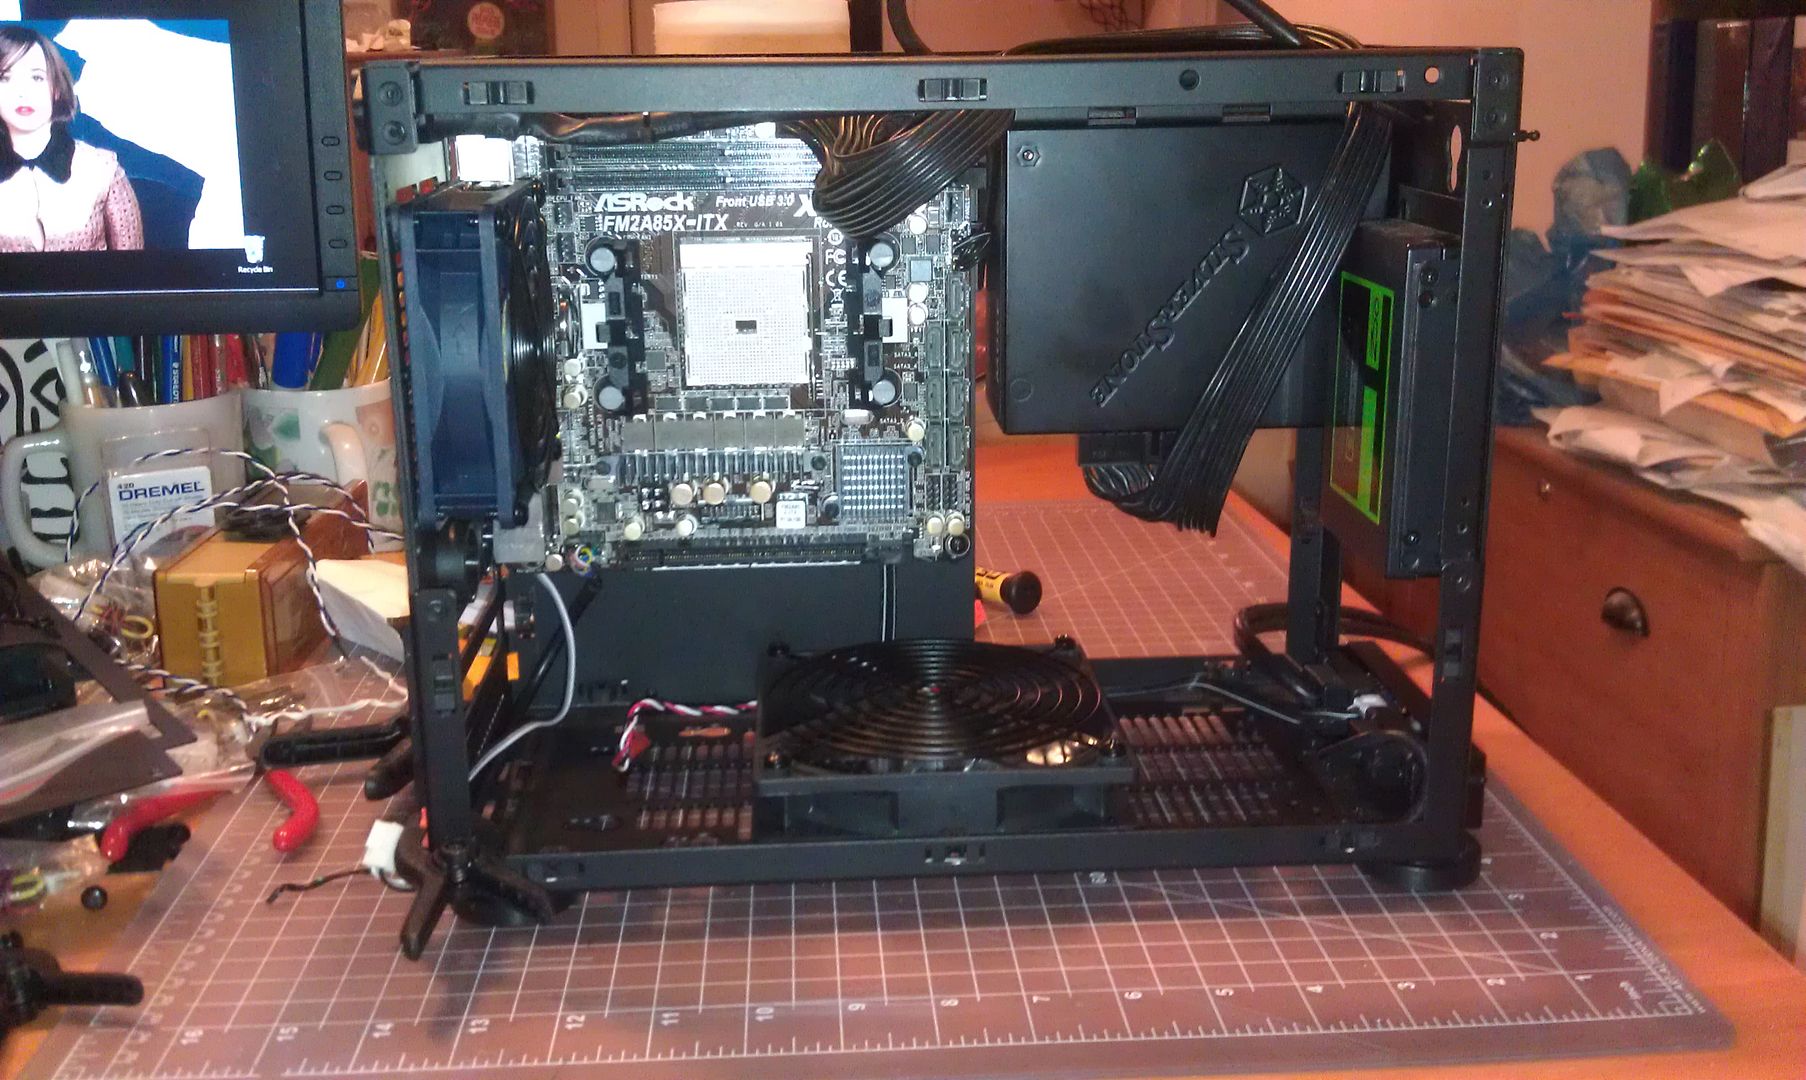
Due to the excellent layout of the case, the fan will draw air in through the holes in the side panel, and will exhaust upwards through the top panel.
If only there was some way for me to show what I mean...
Here you can see the fan ready to suck air through the back of the case... happy as a clam.
Here's one with the case side on:
One can see that the fan will have about 10% obstruction along the side, which to me is acceptable since it will be drawing in cool air from outside the case.
More to come!
The_Cheese
Weaksauce
- Joined
- Oct 9, 2013
- Messages
- 81
Nice worklog! I just discovered it from google spreadsheet.
I´m very curious about GPU and your solution with 2 big fans.
I'm going to try it with just one 12cm fan at first; hopefully, that will provide sufficient airflow across the heat exchanger to keep the GPU temp low.
I mounted the single fan in the center fan location (which I suspect might not actually be intended for a fan, but for support hardware for bottom-mounted radiators... Nevertheless, the mounting holes are placed such that a 12cm fan fits perfectly, right in the center of the bottom panel) so that the fan's airflow is not-quite directly onto the heat-producing GPU.
The result should be a nice convection current that pushes warmed air out the back of the case and up and out the top and draws in more cool air from the bottom.
I am really interested in your GPU cooling solution also - very cool (no pun intended
)Are you going to run the fan using PWM off of the GPU fan controller? or just connect to 12v and set it to be always ON at a constant speed?
How about GPU power connector? Is there enough space for the wire to make the curve to PSU?
By the way, I´ve heard Silverstone SFX is a bit noise. They suppose make it better on v2.0. Do you have idea how can I tell if the version is 1.1 or 2.0 when buying online?
By the way, I´ve heard Silverstone SFX is a bit noise. They suppose make it better on v2.0. Do you have idea how can I tell if the version is 1.1 or 2.0 when buying online?
The_Cheese
Weaksauce
- Joined
- Oct 9, 2013
- Messages
- 81
How about GPU power connector? Is there enough space for the wire to make the curve to PSU?
By the way, I´ve heard Silverstone SFX is a bit noise. They suppose make it better on v2.0. Do you have idea how can I tell if the version is 1.1 or 2.0 when buying online?
See my earlier posts about the PCIe connectors, and the mods I made to them to promote better fitment.
Realistically, I think that there is more than adequate clearance (at least with the GPU I chose) to not require special modification of the PCIe connectors at all.
I don't know how to tell online when ordering, other than to see if the vendor specifies which version they are selling.
Mine has a big ol' sticker on the sides of both the box and PSU that say "Ver 2.0" on them, so I presume mine is 2.0. Other than these stickers, the UPC codes on the box are printed so there is no way to tell if they are the same as the version 1.1 units, as I do not have a v1.1 unit to compare with.
The_Cheese
Weaksauce
- Joined
- Oct 9, 2013
- Messages
- 81
And so, I finished Season 6 of Corner Gas and didn't finish the build yet.
So, then... on to Season 19 of Top Gear, and some progress:
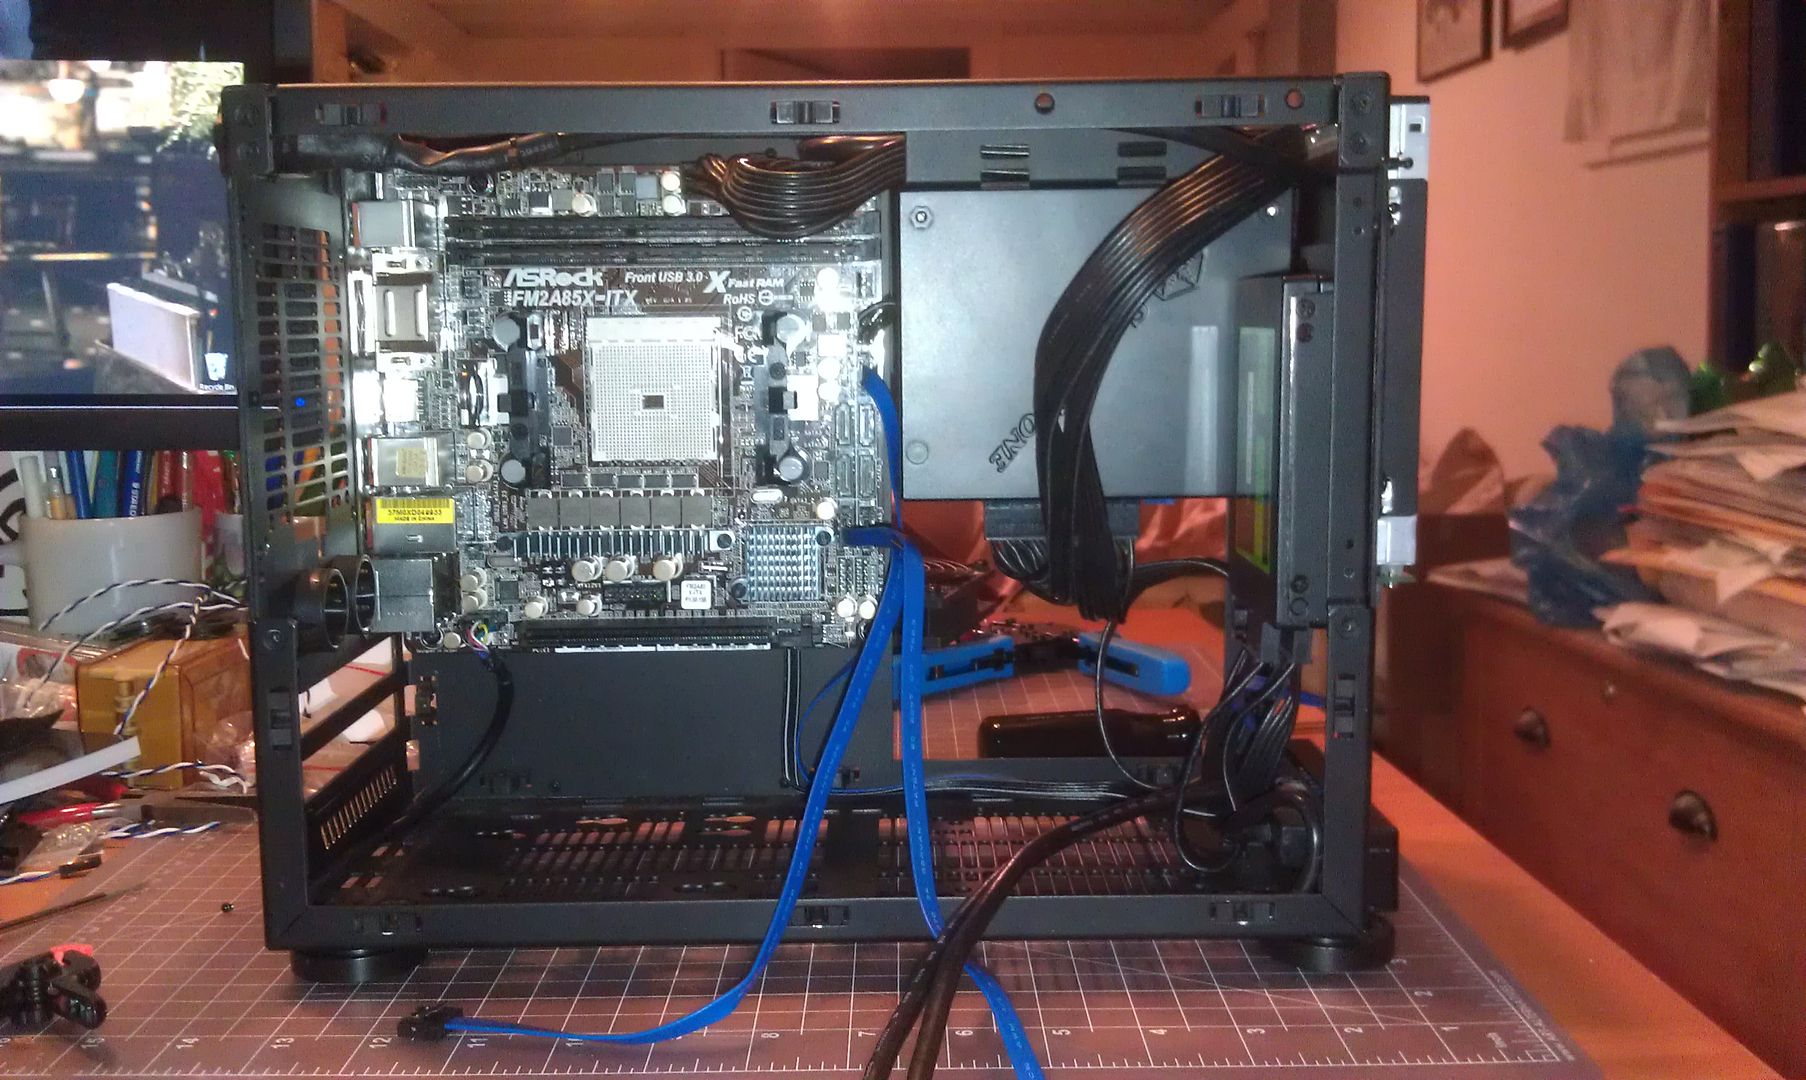
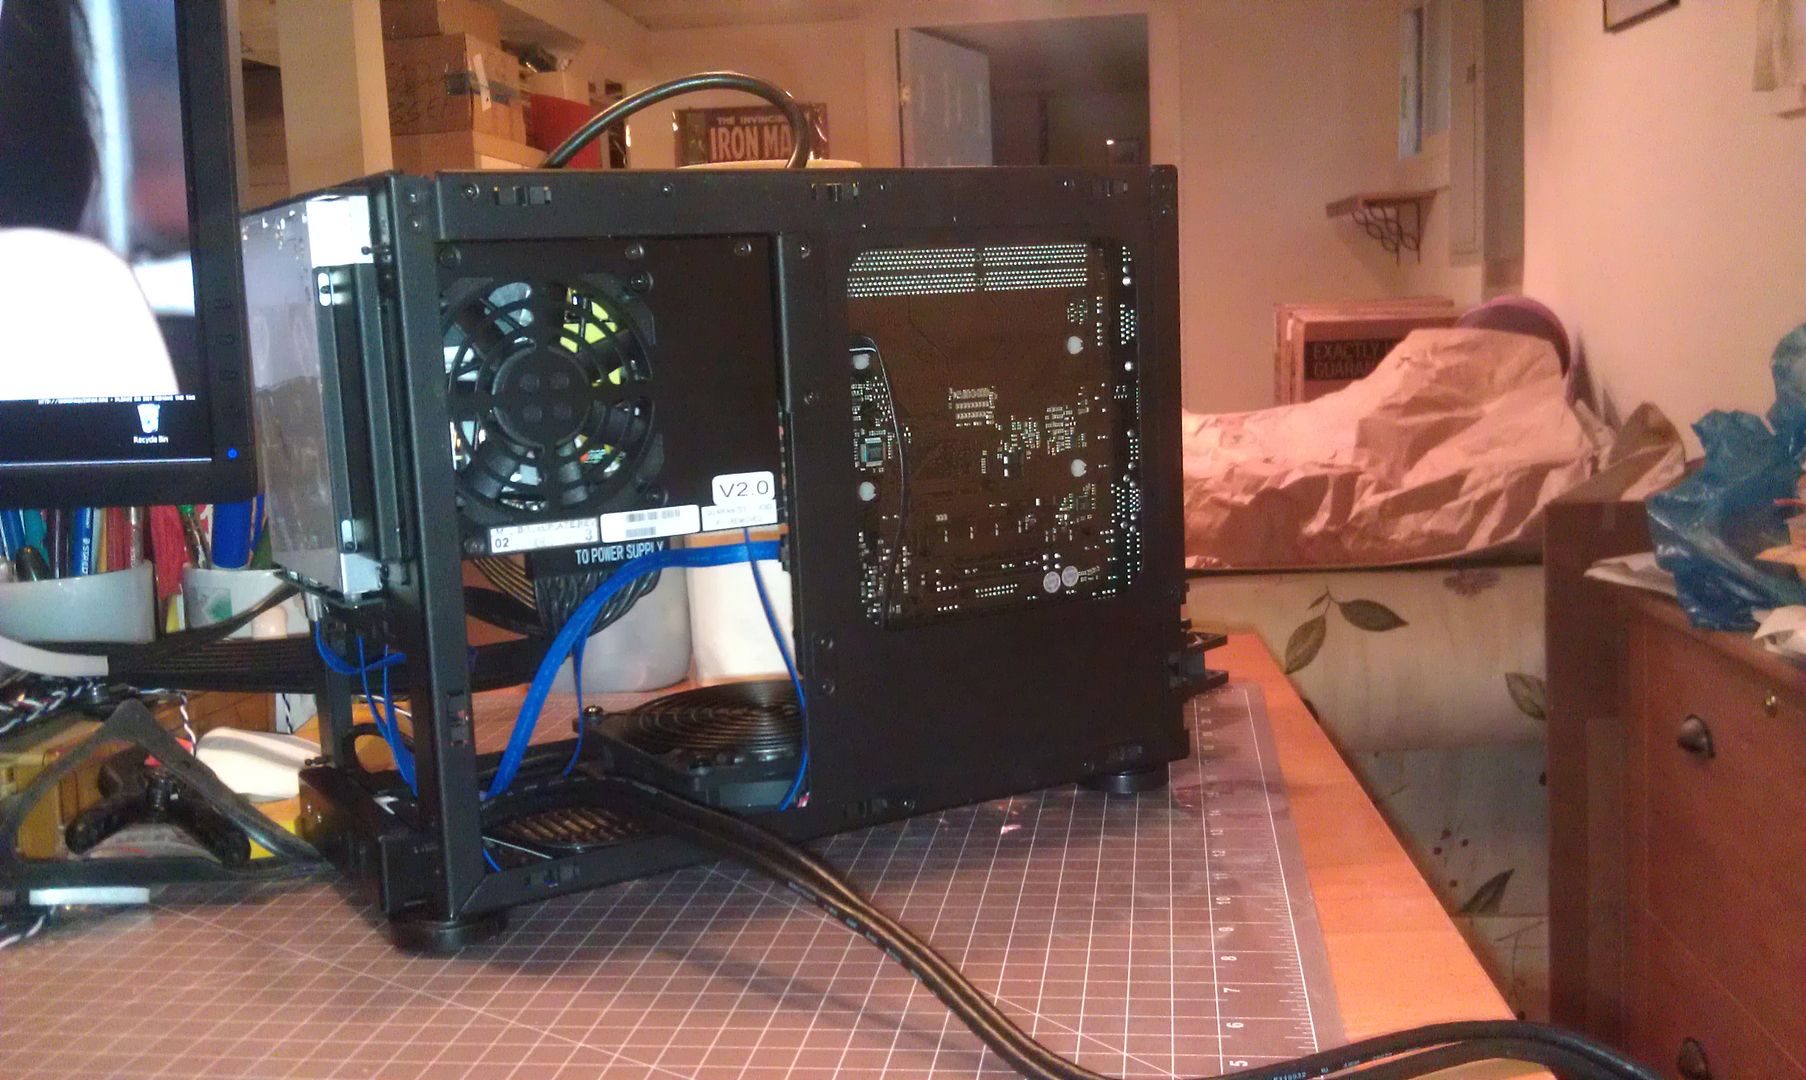
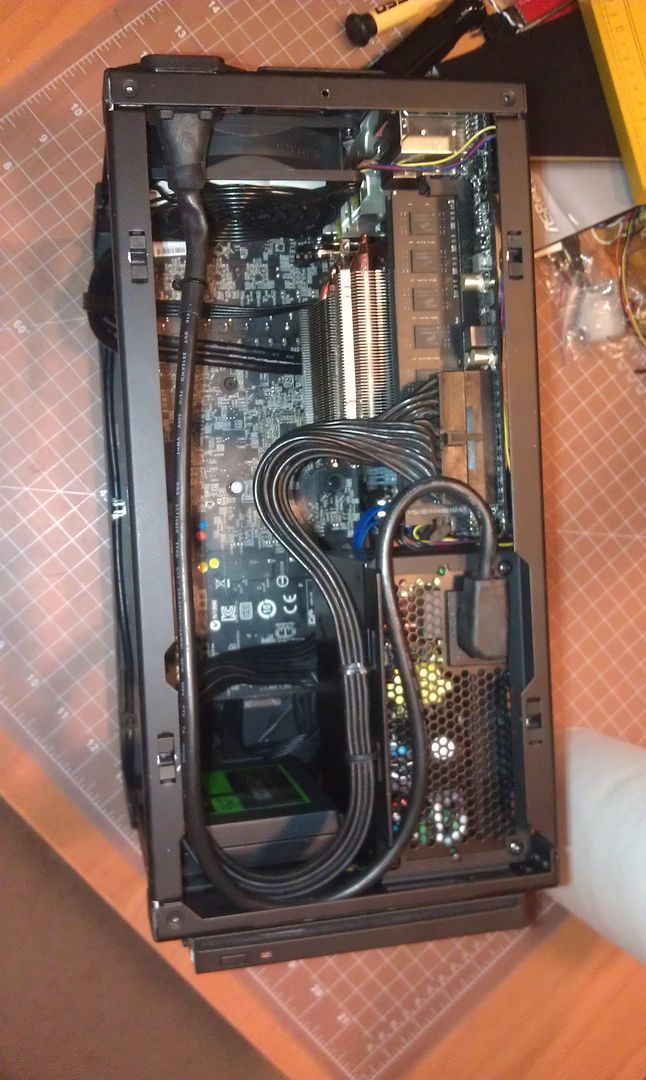
RAM in place and cable goodness:
From the back:
And cleaned up the other side:
You may have noticed that the fans are missing... yes, well...
GBH2 asked if I was using PWM fans; well, no that didn't occur to me when I was ordering fans, of course. That would've made a TON of sense, though... using PWM to speed up or slow the fans as needed.
So... I ordered some new fans. *sigh*
I'm waiting on parts -again- though I hope this is the last time.
That, and I'm having a rough patch in crimping the connectors on my cables... I am crap at it.
More to come!
So, then... on to Season 19 of Top Gear, and some progress:
RAM in place and cable goodness:
From the back:
And cleaned up the other side:
You may have noticed that the fans are missing... yes, well...
GBH2 asked if I was using PWM fans; well, no that didn't occur to me when I was ordering fans, of course. That would've made a TON of sense, though... using PWM to speed up or slow the fans as needed.
So... I ordered some new fans. *sigh*
I'm waiting on parts -again- though I hope this is the last time.
That, and I'm having a rough patch in crimping the connectors on my cables... I am crap at it.
More to come!
The_Cheese
Weaksauce
- Joined
- Oct 9, 2013
- Messages
- 81
Any update about your GPU with big fan on the floor?
I am sourcing a connector to replace the stock PWN plug on my big fan with the one on the card, so that the card can control the fan speed.
Mostly, I need to make some time to get to the electronics supply shop on the other side of town.
The_Cheese
Weaksauce
- Joined
- Oct 9, 2013
- Messages
- 81
What sort of part did you use for those WC hole caps? I would like to hunt some down for my build.
Those are custom-ordered, specially-cast one-off caps made from myrrh by the finest Chirobistan craftspeople.
I kid, I kid... they are 1 inch / 2.5cm nylon caps from the hardware store.
My local (Westmoreland TrueValue) had them in black or white nylon and a couple other materials.
Any reasonably well-stocked DIY shop or home center should have a selection of plugs/caps for a range of sizes, if you don't have a hardware store handy.
If you can't find what you are looking for, just ask the friendly staff; they live for helping you find this kind of thing in their store.
I am sourcing a connector to replace the stock PWN plug on my big fan with the one on the card, so that the card can control the fan speed.
Mostly, I need to make some time to get to the electronics supply shop on the other side of town.
After I figure out that Asus 280x won´t fit on ncase (luckly before buy it) I´m just waiting your solution/tests to see if it solves noise problems
The_Cheese
Weaksauce
- Joined
- Oct 9, 2013
- Messages
- 81
O callou callay! I met the mail carrier at the door, and he handed me the solution to all my problems.
Well... Okay, it was a box with a heat exchanger in it, not the Philosopher's Stone.
But it does solve my biggest problem to date. To wit:
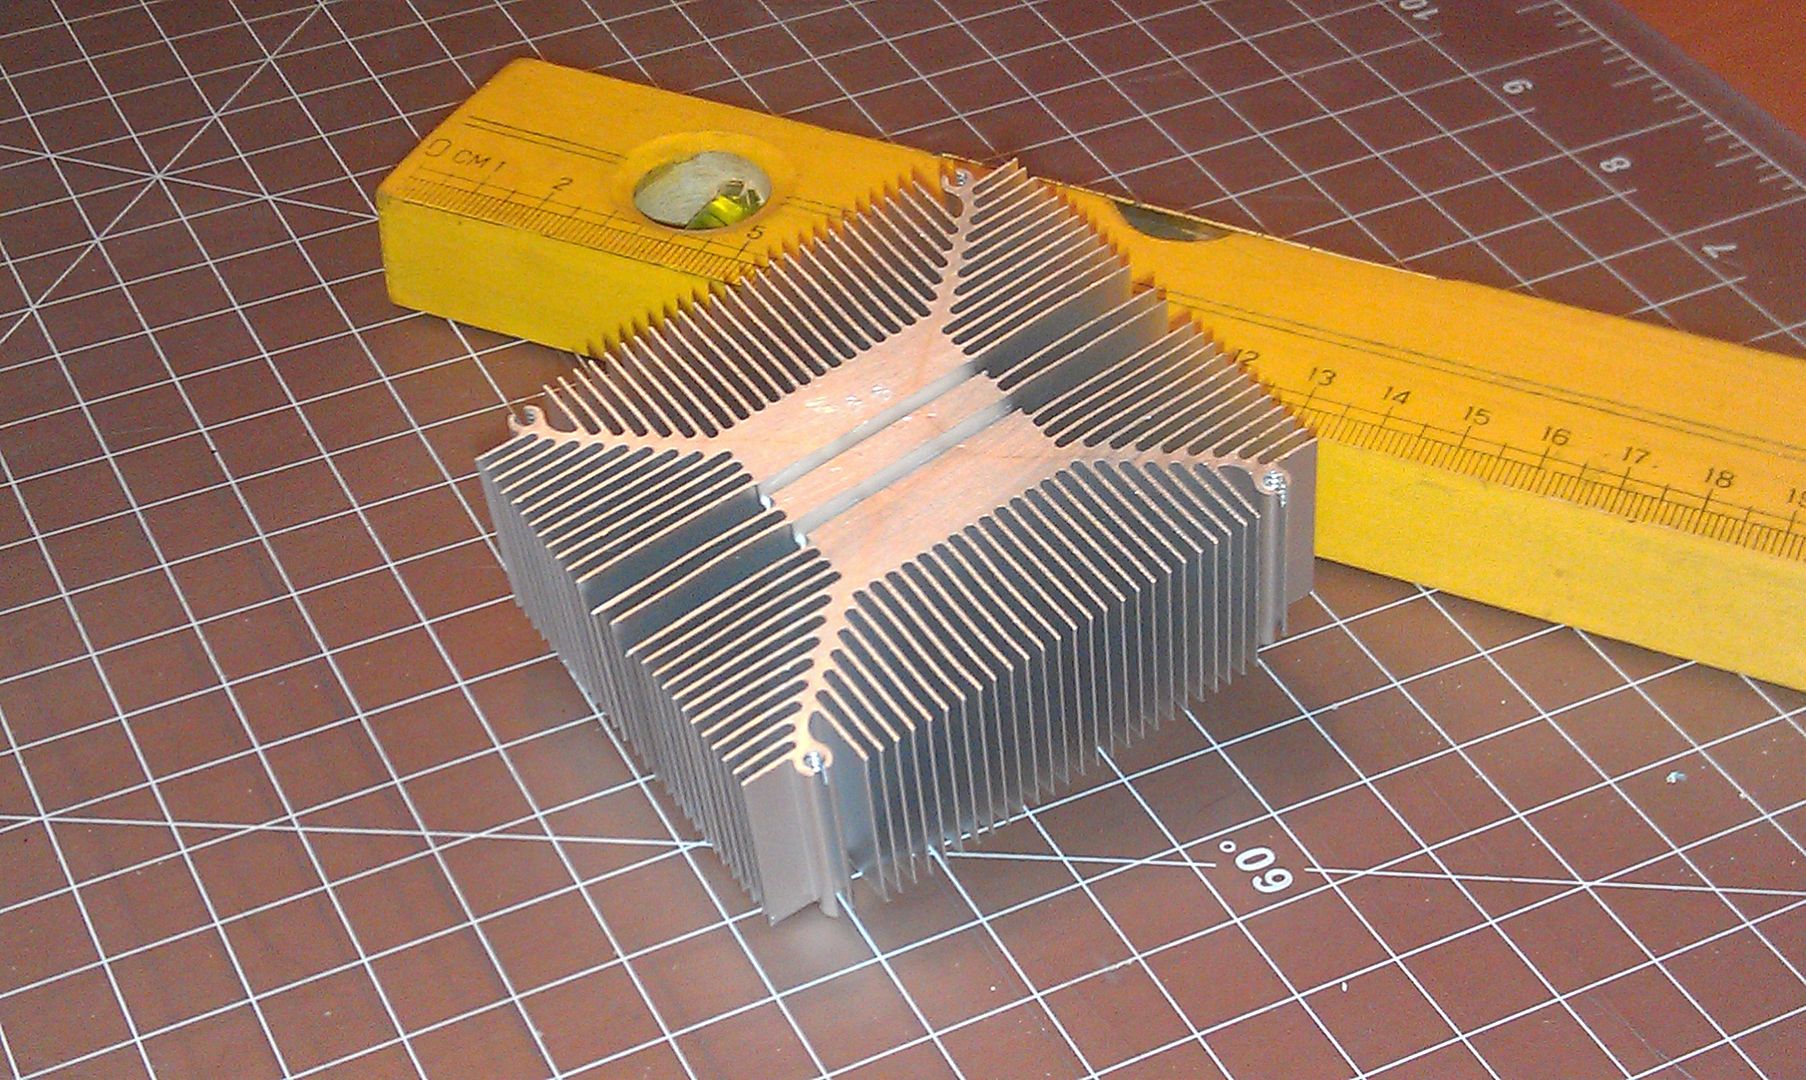
Gaaah! The horror!
That is one ugly stock heatsink.
Simple aluminum extrusion, only expected to dissipate up to 100w as heat, with the help of a superlatively noisy 70mm fan (not pictured.)
I had been stuck over what to do about an HSF since what sumludus so graciously referred to as The_Cheese's Folly.
Then in a flash of cola-induced brilliance, I remembered that AMD's engineers are lazy, and all the current AMD socket designs use the same retention clip mechanism.
So, $20 on eBay and a week later, I have this:
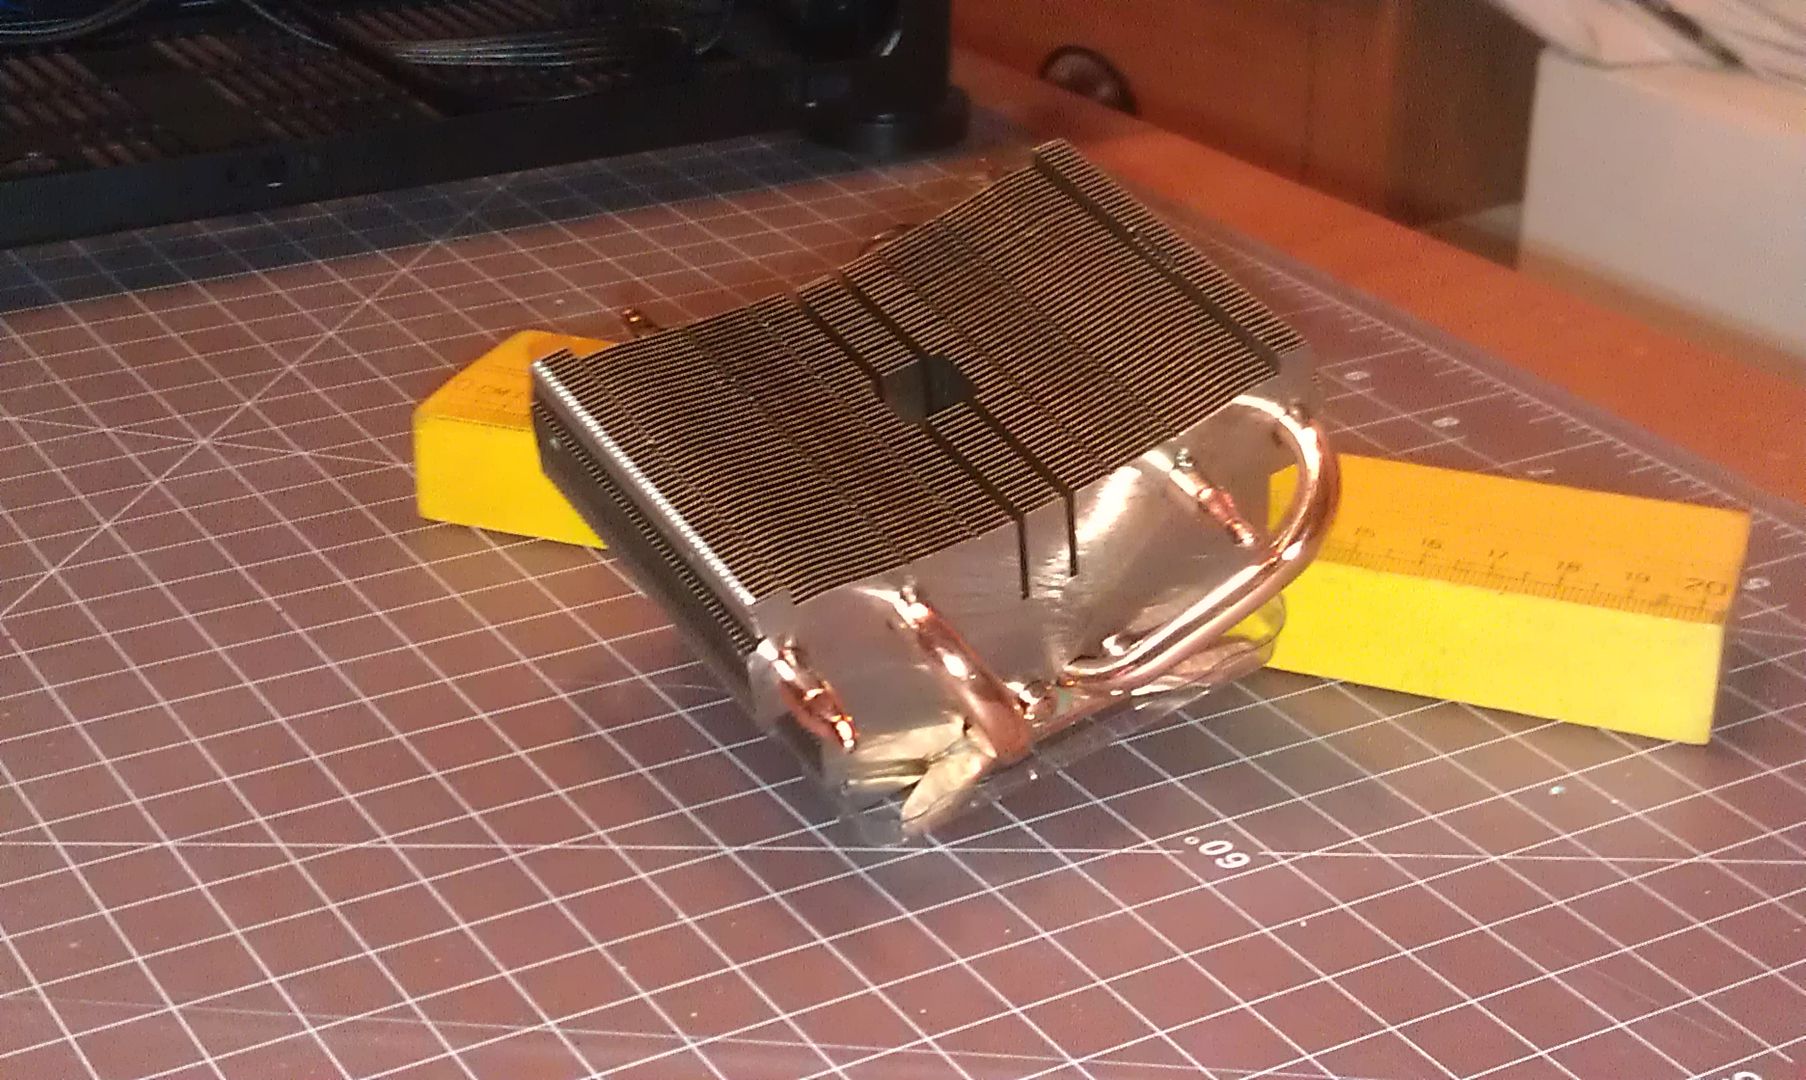
Why, yes... that is a stock AMD 8-core/125w heat exchanger, minus the fan and its retainer.
More to come!
Well... Okay, it was a box with a heat exchanger in it, not the Philosopher's Stone.
But it does solve my biggest problem to date. To wit:
Gaaah! The horror!
That is one ugly stock heatsink.
Simple aluminum extrusion, only expected to dissipate up to 100w as heat, with the help of a superlatively noisy 70mm fan (not pictured.)
I had been stuck over what to do about an HSF since what sumludus so graciously referred to as The_Cheese's Folly.
Then in a flash of cola-induced brilliance, I remembered that AMD's engineers are lazy, and all the current AMD socket designs use the same retention clip mechanism.
So, $20 on eBay and a week later, I have this:
Why, yes... that is a stock AMD 8-core/125w heat exchanger, minus the fan and its retainer.
More to come!
The_Cheese
Weaksauce
- Joined
- Oct 9, 2013
- Messages
- 81
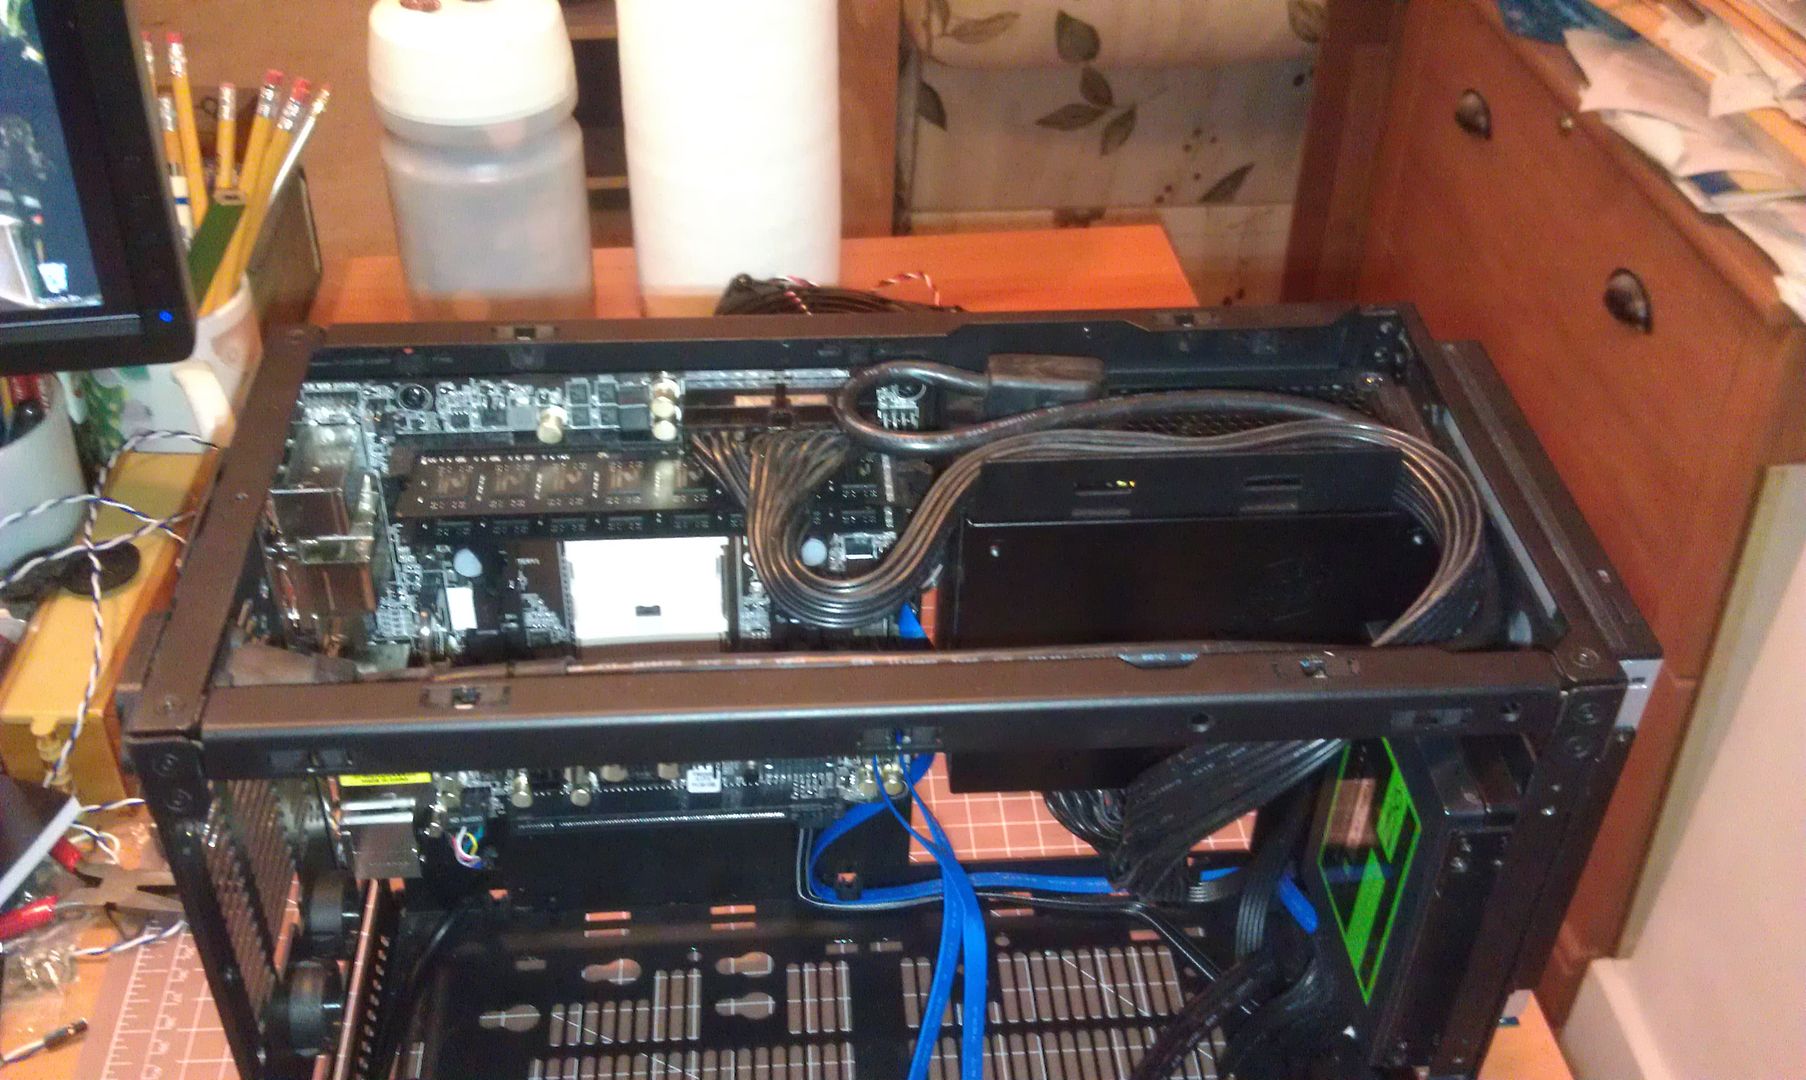
Check this out:
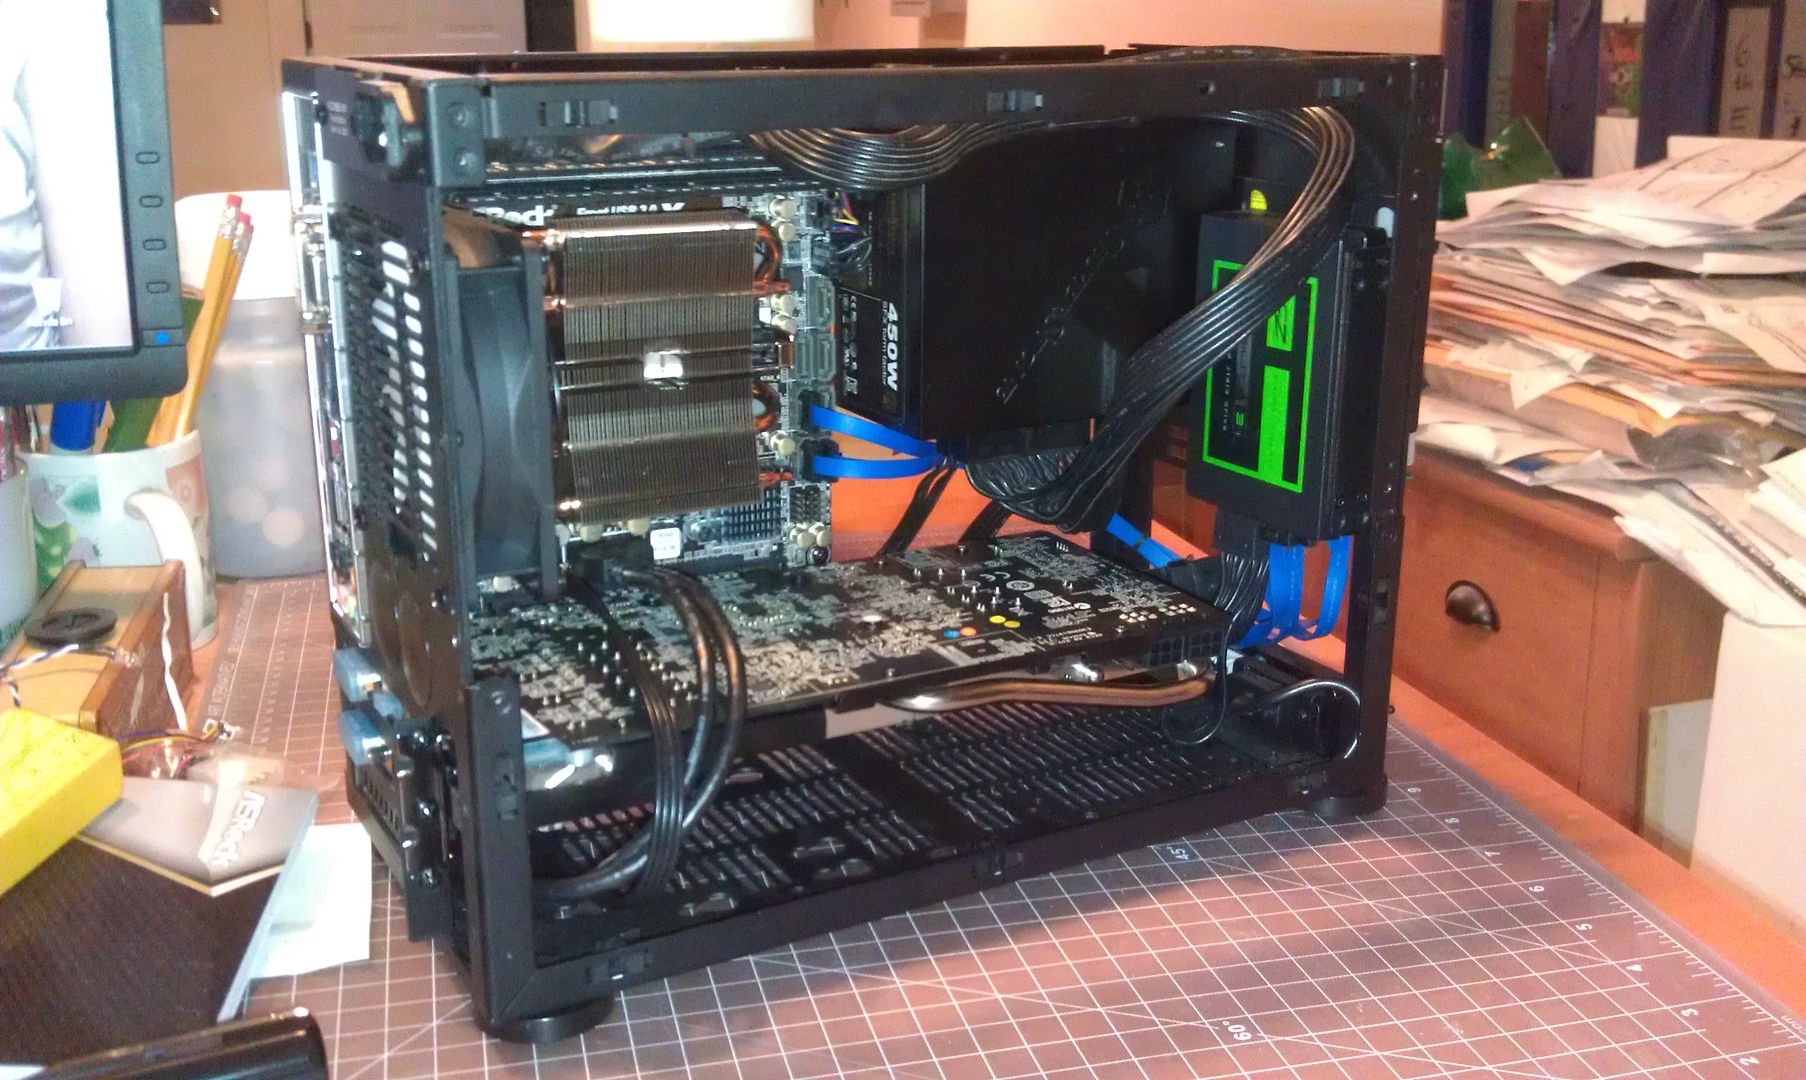
I am 90% finished with the build. As I said in previous updates, I still need to run to the specialty electronics store across town and get the pins and connector I need to connect the bottom fan (not pictured today) to the GPU's fan header.
Also:
More to come!
I am 90% finished with the build. As I said in previous updates, I still need to run to the specialty electronics store across town and get the pins and connector I need to connect the bottom fan (not pictured today) to the GPU's fan header.
Also:
More to come!
The_Cheese
Weaksauce
- Joined
- Oct 9, 2013
- Messages
- 81
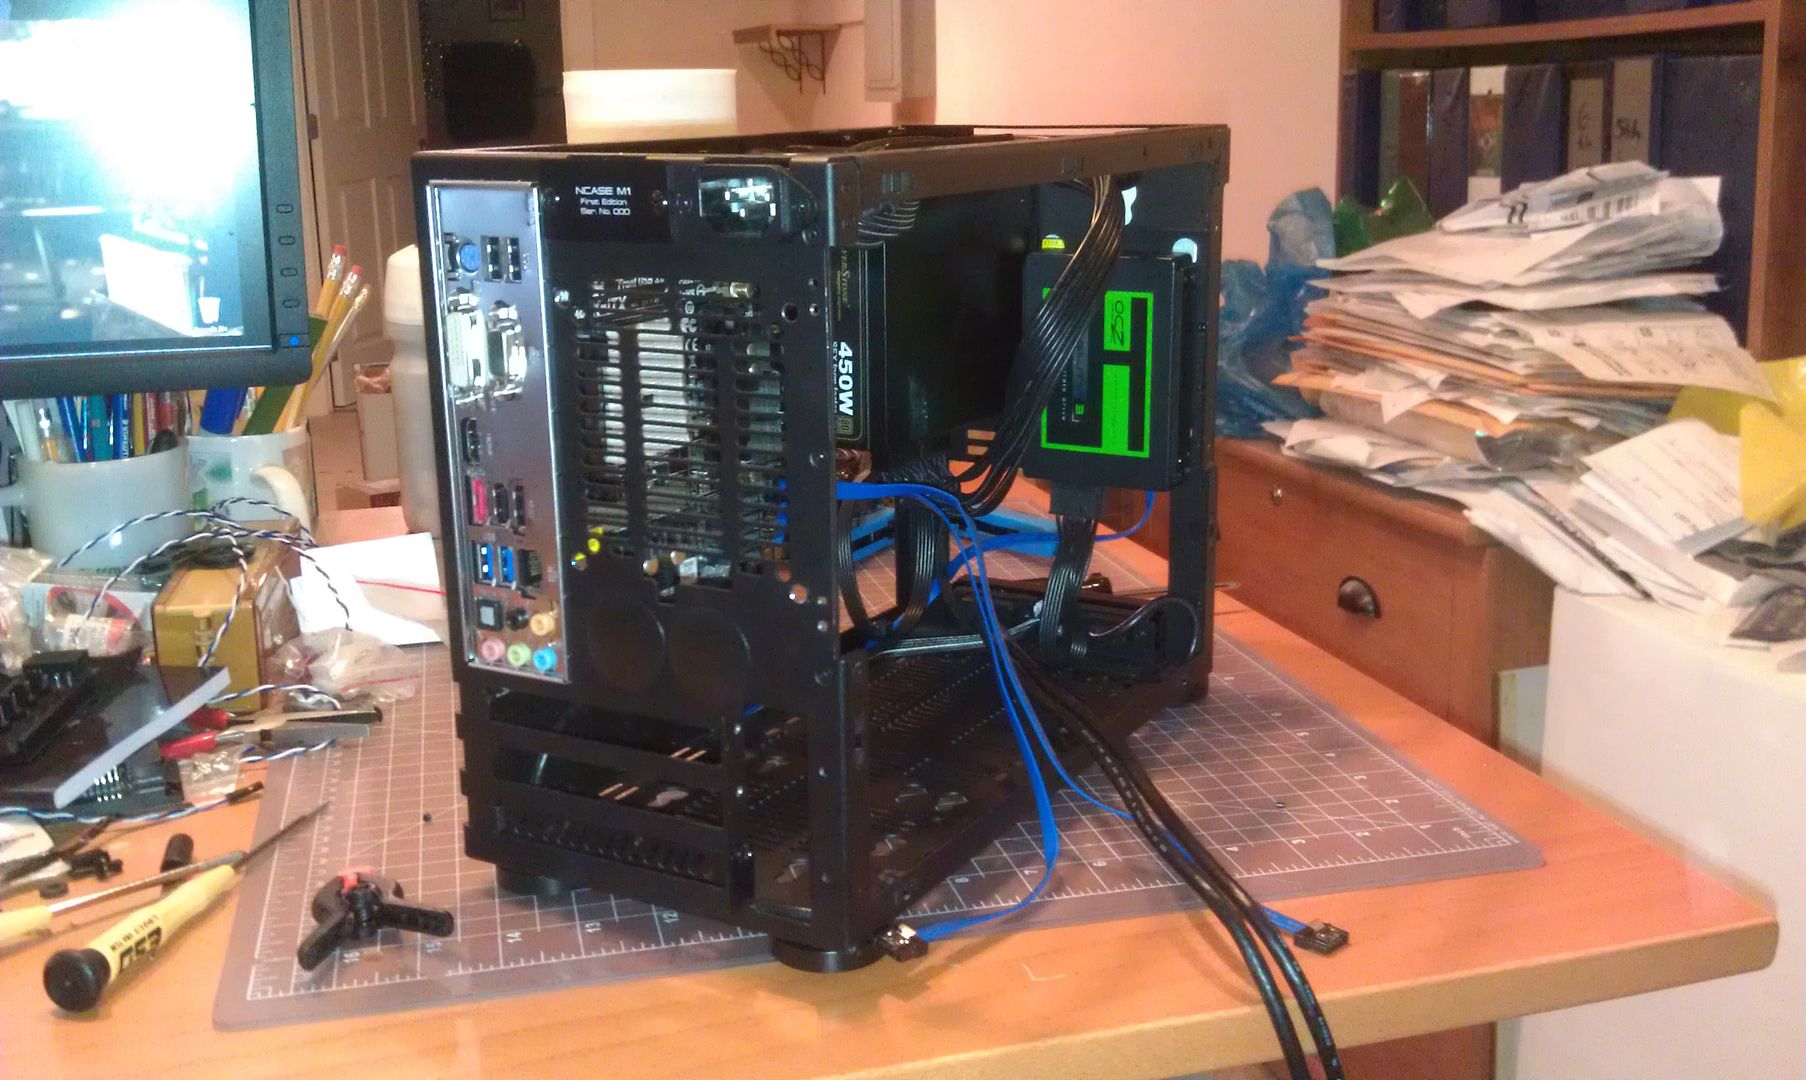
I ended up ordering the pins and connector I need from an online vendor, as the "electronics supply" place across town does not stock the parts I need.
So... yet again, I am waiting on parts.
I must confess at this point that I -still- have not made the 8-pin to two 6-pin PCIe cable I need.
First I dragged my feet on it until it was the only thing left in the build, then I hosed enough pins making the other cables that I didn't have enough to build the 8-to-6-and-6 PCIe.
So, I ordered a roll of pins. No more excuses for how crap I am at crimping, I will have enough.
Or I'd better have enough!
The_Cheese
Weaksauce
- Joined
- Oct 9, 2013
- Messages
- 81
Yes, sorry... Thanksgiving has absorbed a lot of my time since last week, so I have not made much progress.
My connectors are in, and I am getting a LOT better at crimping those tiny buggers.
I haven't taken any pictures, just imagine yourself swearing at a crimper, some pins and a spaghetti-tangle of wiring, instead.
My connectors are in, and I am getting a LOT better at crimping those tiny buggers.
I haven't taken any pictures, just imagine yourself swearing at a crimper, some pins and a spaghetti-tangle of wiring, instead.
Those are custom-ordered, specially-cast one-off caps made from myrrh by the finest Chirobistan craftspeople.
I kid, I kid... they are 1 inch / 2.5cm nylon caps from the hardware store.
My local (Westmoreland TrueValue) had them in black or white nylon and a couple other materials.
Any reasonably well-stocked DIY shop or home center should have a selection of plugs/caps for a range of sizes, if you don't have a hardware store handy.
If you can't find what you are looking for, just ask the friendly staff; they live for helping you find this kind of thing in their store.
Plumbing section? Got my case and figured I can hunt these down over xmas break.
Yes, sorry... Thanksgiving has absorbed a lot of my time since last week, so I have not made much progress.
My connectors are in, and I am getting a LOT better at crimping those tiny buggers.
I haven't taken any pictures, just imagine yourself swearing at a crimper, some pins and a spaghetti-tangle of wiring, instead.
Unfortunately my gpu without stock fan and 2 custom fans on bottom didn't work so well. I had to attach again. Did it work well for you?