• Some users have recently had their accounts hijacked. It seems that the now defunct EVGA forums might have compromised your password there and seems many are using the same PW here. We would suggest you UPDATE YOUR PASSWORD and TURN ON 2FA for your account here to further secure it. None of the compromised accounts had 2FA turned on.
    Once you have enabled 2FA, your account will be updated soon to show a badge, letting other members know that you use 2FA to protect your account. This should be beneficial for everyone that uses FSFT.

Project Headrush: 5th August

headala

Limp Gawd
Joined
Jul 26, 2005
Messages
432
Hello, folks, got a new project here.

It all started out with me being annoyed that with my case, a Thermaltake Tsunami Dream; the window is on the left but the door opens on the right. Shouldn't the door open on the same side? I decided to remedy the situation.

First idea was to flip the door and change the side it hinges on. Waaaay to complicated and too much new fabrication. Hinges, etc. would get messy. I don't mind doing something from scratch, but it seemed like a lot of 麻烦 (needless trouble) so I scratched that.

New idea: flip the rear panel and motherboard tray (non-removable) so that the window will be on the right side of the case. Kindof a design similar to the Lian Li Vx000's that all the cool kids have these days. While I'm at it, I want to do a few other things:

Put my 120.2 radiator inside the case, making a custom top cover
Create new HDD rack
Redo watercooling
Mod the PSU
Maybe a new front panel

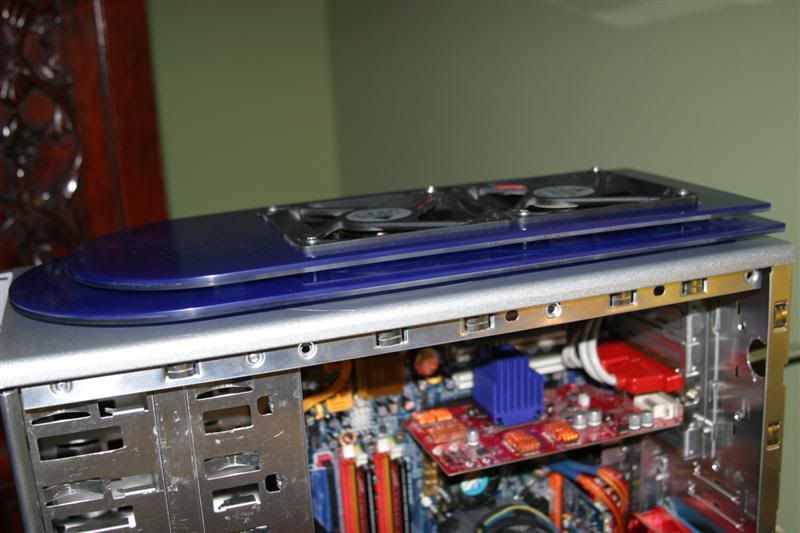
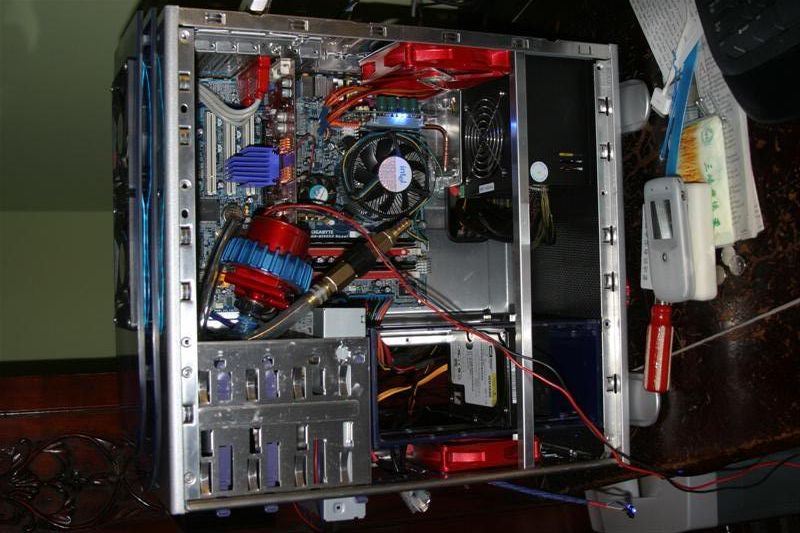
First off, some pics of current rig:
IMG_7396Small.jpg

See, the case opens on one side and door opens from the other.
IMG_7395Small.jpg

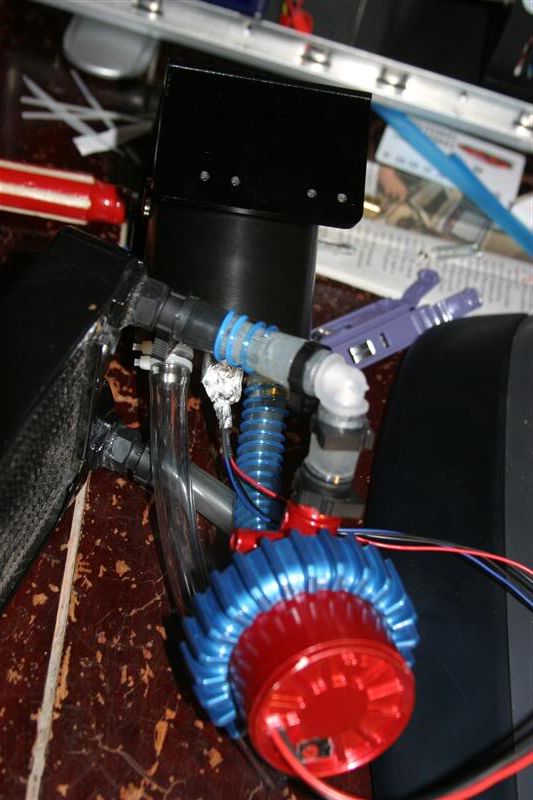
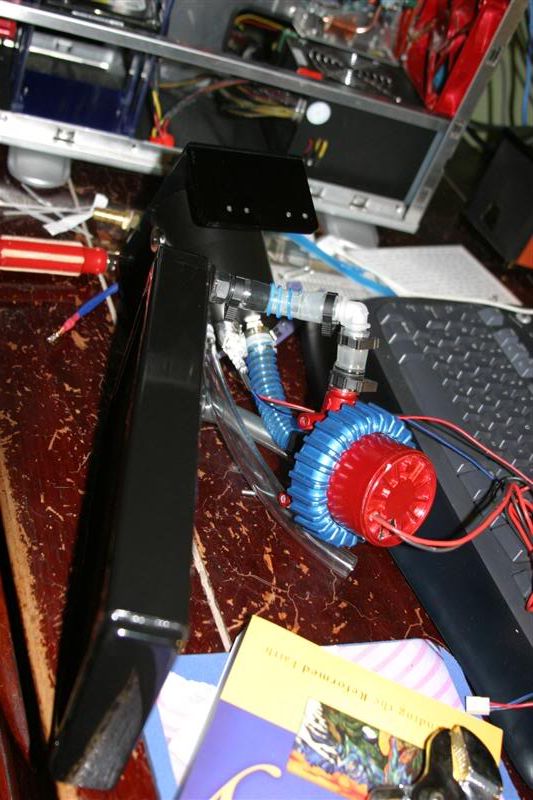
This is my old loop, complete with extreme kinkiness :D.
CRW_7000.jpg
 
So, with the flip-conversion thing, this is basically what I hope to accomplish (imagine back of mobo try is actually not there and the mobo and all the watercooling gear is visible there);
IMG_7391Small.jpg


Alrighty, let's get down to business...
Strip the case of everything:
IMG_7400Small.jpg


And tape off the pretty paint on the top and bottom:
IMG_7401Small.jpg


And drill out the rivets holding the mobo tray and back to the top and bottom:
IMG_7398Small.jpg


IMG_7397Small.jpg


IMG_7402Small.jpg


And this support, which I buggered up the end:
IMG_7404Small.jpg


And finally, FREEDOM!
IMG_7403Small.jpg


So, now the case is finally apart and ready to work on fitting it back together with back and mobo tray flipped around.

Please please post comments, as this is my first major mod and will probably forget/screw up some things! :(
 
Okay, so let's test fit the two parts back together the way they *should* have been from the beginning:

Front:
IMG_7405Small.jpg

Rear:
IMG_7406Small.jpg

Some difficulties, starting with this little support:
IMG_7409Small.jpg

And this:
IMG_7411Small.jpg

See, one side of the mobo tray has a deeper cut in the corner, this keeps it from hitting the top support when it is installed on the right, so I'll have to enlarge the other one:
IMG_7412Small.jpg


However, the back fits well:
IMG_7407Small.jpg


Next time, I'll cover some of the other 'todos' that will need to be taken care of for this to work.
 
Okay, I'll be simultaneously getting the case to fit back together reversed and getting my swiftech 120.2 radiator to fit in the top :eek: . This is a really small case to do this in.

First of all, some progress shots:
This is with the side panel on, and the notches cut so the case fits together perfectly now...at least the outside of it does:
IMG_7415Medium.jpg


But, now that I've switched the side the window is on guess who's upside down now:
IMG_7417Medium.jpg

The cheezy thermaltake propaganda! I've been looking for an excuse to do a new window anyway
:cool:

Now that the mobo will be at the top, it's REALLY close to the drive cages:
IMG_7418Medium.jpg


As well as the HDD rack, since it was offset to one side originally, now it will be WAY too close:
IMG_7420Medium.jpg


I'll hold the case together temporarily with these M3's (not the car stupid):
IMG_7423Medium.jpg


A test fit with my dvd burner in:
IMG_7435Medium.jpg

Really close, but it seems to fit!

And the top, where the radiator will go:
IMG_7437Medium.jpg


Seems awefully close with the radiator in, especially with the front panel and extra USB and Firewire ports:
IMG_7438Medium.jpg


IMG_7439Medium.jpg


So I'm thinking about using an old floppy cable and cut it up:
IMG_7444Medium.jpg


It fits much lower, but do you think it will work?
IMG_7442Medium.jpg


Please tell me what you guys think; I need your help!


So now, the list is:
new hdd rack
new side window
2 blowholes and a way to mount the rad
 
My 120mm reservoir bent all the pins on my Asrock board. I was able to use a floppy cable extension (except I broke off the top part to shave off another 3~ mm). and reroute all the connections to the main jumper brick. Works well! Posting from that computer now :).
 
looks cool i've always wanted to do this :)

should leave lots of room at the bottom to put your pump and res :D
 
looks good, but couldn't you just undo the window with those rivits it comes with, rotate it, and not have to cut more plexi? That would rule.
 
Thank you so much for the comments and suggestions; ya'll are a vital part of this build. I value your opinions!

@Arcygenical- Now I'm contemplating just trying to modify the stock connectors, since there's firewire involved which has a moderate amount of current compared to USB. What do you think? Is it too much current for those little wires?

@paradoxblue- I'm still trying to figure out where to put all the WC gear to give it the cleanest look...the delres will go in the top 2 bays, and I may try to just hang the pump between it and the radiator barbs. Will definitely be a tight fit if I can swing it!!! If it works out, what should I do with all that space in the bottom?

@Bbq- Thanks for the suggestion, but I don't think it will work because either the logo will be backwards or the two big black latches will screw it up.

I've done a couple of other things; gotta disconnect my mobo and test fit it and give ya'll a look-see!
 
why couldnt you just flip the front door instead? i didnt quite catch that. otherwise it looks real solid, dont know abt that floppy thing tho, and everything seems to be awfully snug in there
 
I dont really have any suggestions, but I really appreciate you taking the time to do this project and everything. Great idea!

Maybe as time goes on I will think of ideas.. /Subscribed.
 
Howdy folks, been busy since last time...done some modding, been to Hong Kong, now I'm back.

Thanks so much for the comments...about the door, miskari, it's tough to explain but basically the door rests by gravity on little horizontal plates with holes in them. They are totally non-reversible, along with the locking mechanism. So, I would have to rebuild those two rather non-interesting things that work just fine now.

@dchrsf: Thanks for the kind words and encouragement! I hope I won't disappoint all of you!

Remember how I wanted to put the rad in the top? Well, it won't work without holes. So, I bought some ghetto doo-hicky from B&Q that has an adjustable boom with cutters on it that let you make various size holes with a drill. The first hole went well; actually, it was perfect. I should have re-tightened all the screws on the thing between the holes, since it is such a piece of dung, but I didn't. So, on the second hole, one cutter came a little loose and etched a 1/3" wide band and then the center boom came loose and slung it all the way to one end, gouging a huge cut across the top of the case and missing my hand by about 1/4". It only got about a half a turn, but that was enough to damage the top of the case. See for yourself:

IMG_7491Small.jpg


So, I got mad, and then remembered that I had thought about making a new cover for the top of the case. I guess that was God's way of confirming it :D

So, I went to a sign shop and ordered some plexi to be made. It was way below my expectations, since (to be fair) they usually need for something to look good only from 10 feet away, not up close. They had run the plexi through their milling machine with the paper off, ran the machine waaaay to fast with a dull bit. But, after about 2 nights of sanding and sanding and sanding, I came up with this:

IMG_7451Small.jpg


IMG_7450Small.jpg


Now, I'm still debating about how to attach the top shroud. I needs to be about 1.5 cm from the tops of the fans, but I need the screws to go through the fans to hold the rad in from the other side. So, PLEASE give me some ideas as to how to do it? Try to get some threaded rod? Glue spacers onto the bottom pieces and tap it with bolts and spacers going in from the top? Levitation? Here are some profile shots to give you an idea:

IMG_7454Small.jpg


IMG_7453Small.jpg


IMG_7452Small.jpg


So, ya'll let me know what you think, 'ya hear?
 
as i have the same case i totaly dig this mod looks sweet.

cant wait to see what you do with the new top
 
Anybody got any ideas on how to attach the top plate? The bottom two just fit with friction around the fans, but the top one has to be raised up and attached yet removable. Any ideas?

lozaning & Xyphox, thanks for the kind words. Do you have any suggestions?
 
Sanchez, do you mean add another piece of plexi or expose the fans? Two of the pieces serve no purpose than to hide the fans, and I think if I move them together then they would be more visible. Is that what you meant?


Anyhoo, I guess I'll figure the top shroud/hood thing out later; I've got to get this project closer to finished or it will drag out waaaaay too long.

So, I need some help with the airflow and water setup.

IMG_7469aMedium.jpg


Air first, since it's easier: the red fans are Nexus silent fans (read: very quiet but pretty low cfm's), and the blue fans are deltas (not quiet and high cfm's). The PSU has a 'globe' brand 92mm intake and 80mm exhaust. So, my question is this: will the intakes be enough to feed the two deltas going out and the psu exhaust? If they're not, what can I do?

Now with the water:

IMG_7469wMedium.jpg


As you can see, I have a barrel res in the top two bays, the rad in the top with the barbs close to the res, a Swiftech Storm, and two AC twinplexes. The pump is a Liang D5. Help me design my loop! At first, I had planned on putting the pump directly out of the res and straight up into the radiator, but it's too tight. Would work fine if my stuff had no barbs! So, where to put the pump, and how to route the tubing?

I had the output of the storm going through a Y splitter and to each twinplex once before, and I liked that idea then. I had to scrap it because of kinking issues. Should I try it again?

Thank you all for your help and encouragement!
 
Hey, ya'll, I really need some help with this before I can continue. Please post suggestions/questions/comments below...

Thanks!
 
i meant leave 2-4 mm in space between each layer of plexi.
that seems like it wouldnt be too low or too high.
 
Right now I have 5mm in between the pieces, and I think it looks pretty good. Thanks for the help!

Does anyone have any ideas on how to set up my loop?
 
I don't know a thing about watercooling, but I say the more room the better between the top pieces, to facilitate air flow. I don't know what you have in mind, but here's some ideas. Of course, I am a basic modder and may not be seen as knowing my ass from a hat, but here goes.

Modder's Mesh from MNPC tech would allow you to cover the fan tops with a free flowing grill material and then be able to space out the plexi a little more for evenness and air flow. Plus it just looks cool, even in silver paint! Using rod and spacers painted black should do the trick, or glue some inserts to the top plexi and screw it together bottom up or something.

A 90 degree elbow might just get the res to the radiator from the look of your drawing. To save space, look into a slot load DVD burner from Newegg for laptops. Some people here should know where to get the interface boards to make it ATA compatible for you; I can't remember where they are. This will allow you to move your pump down into the third and fourth bay and stealth the DVD in the lower half of the bottom one. I hope that makes sense. Basically doing that would gain you an inch or more of badly needed space, but only if you are prepared for the cost of the drive:

Pioneer Example

That would be a biggie if you could swing it. They are only a half inch tall, if that, I think. I hope that makes sense. then just cut a slit in the front of a blank face plate and do a drive stealthing. Viola! Lots of space!

As far as airflow goes, you can get some pretty decent fans that move quite a bit of air and don't cause a racket for what you need. As it sits, your fan placement looks ideal (heat rises), and similar to the chimney effect I would like to try with my future water cooling attempts. I like having a little more air out than in, but others disagree. To each his own. I'm seeing 90 degree elbow from res to radiator, out from rad to CPU block, then to GPU block if possible, then NB, out to pump, into res. OR with more planning res to pump, to rad, to CPU, GPU, NB, back to res is probably ideal. Again, I am a water noobtard, so YMMV. Anyone else?
 
Thanks! I have some modder's mesh to try out on the top fans...but I also don't want to ruin the overall look of the case :-/ We'll see how it goes.

I think that, for now, I'm going to try to do it with my current DVD-R drive. I looked around the 'computer city' and they didn't seem to have any new laptop hdd's, only old ones scavenged from dead laptops. Maybe I'll order a slot-loading model fromt the US or something.

As for the loop setup itself, I working on it, and it may work to have the pump up there afterall. I'll have to use an elbow, like you suggested, but it just might work! :cool:

Thanks again for the suggestions!
 
First of all, I went ahead and mounted the top fans in the two pieces of plexi. They fit almost flush and look good I think. I’ll mount the third piece of plexi on the very top, with spacers attached via Velcro to the tops of the fans. I may use some modders mesh to create a very open grill for the fans since a finger in there would be VERY bad.

Here that is:
IMG_7548Medium.jpg


Next, I’ve managed to mount the res, rad, and pump all in the top area of the case. It was NOT easy since I had to hold them in the case, measure tubing, pull them all out, assemble it all, put it all in as one piece, test the fit, remove it again, apply clamps/ties/coolsleeves, and put it back into the rig. I slid it through the front bays using my mother and wife as extra hands.

Assembly in progress:
IMG_7546Medium.jpg


IMG_7545Medium.jpg


Now pic of the build in its current state:
IMG_7550Medium.jpg


So, as you can see, the rad, res, and pump are all in the top ¼ of the case, with the flow sensor pointing down. As far as the WC’ing goes, I just have to put on the cpu, gpu, and nb blocks and run that tubing (should be a cakewalk, but you know how it goes…). Of course, after that is leak testing and putting in the final fluid (Koolance fluid).

So, that just leaves the air cooling…I have a LOT of options but not all of them are mutually exclusive:
a) mount small (80mm)? quiet fan (probably vantec stealth) on the back of the case, blowing in through the unused expansion slots, thus giving some fresh air to the rad and adding to the positive pressure in the case

b) modding the psu so that the fan on the top goes on the front so as to not suck out so much of the fresh air that will be put in by the side window fan (will be over socket area)- possible to still have a cowling to prevent a tunnel from the front fan to the psu

c) keep the rear 120mm fan as intake, or switch to exhaust (as numerous people have suggested)

d) put some small vents in the top of the window to allow fresh air in to the rad

e) put a system of shrouds or cowlings to guide the air around the case

All of these have their pros and cons; which ones are feasible or would help?
 
Personally I think making the rear fan an exhaust and making vents near the top of the window is an great idea. If done right i think it would look the most professional and be the most functional without adding the whirring sound of an 80mm fan at the back.

Make the front intake a low powered fan (1400 rpm maybe) and the exhaust fan a low powered fan aswell. That way (by taking the deltas out of the equation) 1 intake and 2 exhaust would naturally create negative air pressure and would force air through those vents at the top of the plexi. Then add the deltas into the equation and you've got the deltas sucking complete fresh air from those vents.

This way your system will be relatively quiet (minus those Deltas) but then you could always fan control them when they are not needed, yet still be pullin fresh air from the vents...

Just my thoughts, hope it helps :D

Geo
 
Back
Top