Welcome to the worklog for Project: Flow

I actually started this project January 2006. The mods were pretty much finished up at that point, but it didn't attain the results I was really after - as if a compromise had been made. I spent the last three months of 2006 planning the next round of mods, and I promise this is it - the end of the mods for this case. I finally have the case I feel is optimal for my needs after all these years. Without futher ado, here's my "worklog" that's a bit late, but better than never...
This is what I started with, a now 5+ year old Lian Li PC-6000, which was the first in a line of "cheap" versions of the original PC-6 chassis.

These workstation class machines served as inspiration:


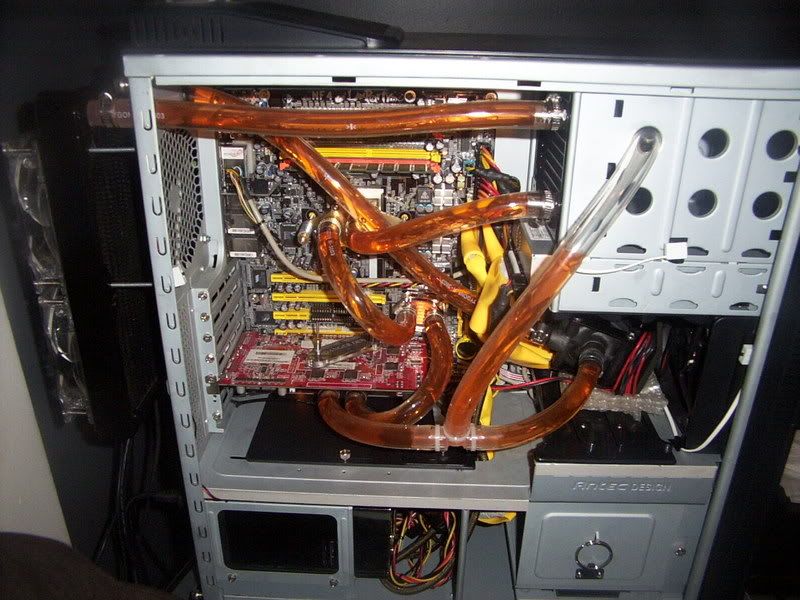
This was what the first round of mods delivered:


List of modifications performed in phase 1 (January 2006):
- Opened factory 80mm exhaust grill to 120mm
- Relocated factory drive cage rearward 1" for intake fan/radiator clearance
- Used factory 3.5" drive cage to suspend HDD horizontally on large o-rings
- Modified original bezel to support airflow into radiator, installed round hole modder's mesh in opening
- Modified main chassis to allow mounting of radiator support plate to the front of the chassis
- Fabbed radiator mounting plate out of plexiglass/acrylic/perspex, covered in Avery carbon fiber film (simulated)
- Installed Bulgin illuminated switch in bezel
List of modifications performed in phase 2 (December 2006):
- Removed additional material from front of chassis to allow clearance for a dual 120mm radiator
- Clearanced 5.25" area in chassis to allow for depth of radiator and fans
- Fabbed new plexi panel to support dual 120mm radiator
- Removed factory drive cage/bracket, installed suspension bracket vertically
- Relocated pump (Laing D5) to floor to improve tube routing
- Replaced original bezel with PC-6075/PC-6077 bezel
- Mounted 22mm Bulgin switch on bezel
Also replaced all 120mm fans with Scythe S-Flex (Sony FDB bearings = quiet!)
To do:
- Install hex modder's mesh in bezel
- Add silicone mount for pump
- Replace plexi window, possibly add lighting
Current components:
- Intel D975XBX2
- Intel Core2 Duo (E6600 @ 3.6GHz)
- Patriot PC2-6400
- WD 74GB Raptor
- HP DVD writer
- Corsair HX520
- 3x Scythe S-Flex 120mm fans
- Coolingworks Coolrad 22T
- Laing D5 pump
- Swiftech Storm
- DangerDen Koosah
- Currently running a 7800GT, upgrading to 8800GTS (on hand), waiting for new block to arrive
Fans are run at 7v for intake, which nets approx 800RPM/38CFM each. Exhaust fan is run at 5v via Zalman fanmate dialed down.
Pics coming in next post...
I actually started this project January 2006. The mods were pretty much finished up at that point, but it didn't attain the results I was really after - as if a compromise had been made. I spent the last three months of 2006 planning the next round of mods, and I promise this is it - the end of the mods for this case. I finally have the case I feel is optimal for my needs after all these years. Without futher ado, here's my "worklog" that's a bit late, but better than never...
This is what I started with, a now 5+ year old Lian Li PC-6000, which was the first in a line of "cheap" versions of the original PC-6 chassis.
These workstation class machines served as inspiration:
This was what the first round of mods delivered:
List of modifications performed in phase 1 (January 2006):
- Opened factory 80mm exhaust grill to 120mm
- Relocated factory drive cage rearward 1" for intake fan/radiator clearance
- Used factory 3.5" drive cage to suspend HDD horizontally on large o-rings
- Modified original bezel to support airflow into radiator, installed round hole modder's mesh in opening
- Modified main chassis to allow mounting of radiator support plate to the front of the chassis
- Fabbed radiator mounting plate out of plexiglass/acrylic/perspex, covered in Avery carbon fiber film (simulated)
- Installed Bulgin illuminated switch in bezel
List of modifications performed in phase 2 (December 2006):
- Removed additional material from front of chassis to allow clearance for a dual 120mm radiator
- Clearanced 5.25" area in chassis to allow for depth of radiator and fans
- Fabbed new plexi panel to support dual 120mm radiator
- Removed factory drive cage/bracket, installed suspension bracket vertically
- Relocated pump (Laing D5) to floor to improve tube routing
- Replaced original bezel with PC-6075/PC-6077 bezel
- Mounted 22mm Bulgin switch on bezel
Also replaced all 120mm fans with Scythe S-Flex (Sony FDB bearings = quiet!)
To do:
- Install hex modder's mesh in bezel
- Add silicone mount for pump
- Replace plexi window, possibly add lighting
Current components:
- Intel D975XBX2
- Intel Core2 Duo (E6600 @ 3.6GHz)
- Patriot PC2-6400
- WD 74GB Raptor
- HP DVD writer
- Corsair HX520
- 3x Scythe S-Flex 120mm fans
- Coolingworks Coolrad 22T
- Laing D5 pump
- Swiftech Storm
- DangerDen Koosah
- Currently running a 7800GT, upgrading to 8800GTS (on hand), waiting for new block to arrive
Fans are run at 7v for intake, which nets approx 800RPM/38CFM each. Exhaust fan is run at 5v via Zalman fanmate dialed down.
Pics coming in next post...


")