Project Bright Panel: 800D, Liquid Cooled, Illuminated Mid Panel

As mentioned, looks like a fantastic build.

You ordered Aqua Computer and EK gear, but also went with the EVGA Hydro. Any particular reason for doing that instead of getting a separate block from either of those manufacturers?

The EVGA HydroCopper 2 was released at the same time as the other 580 editions. I didn't want to wait for EK to design a block for the 580, so I sprung with the EVGA one with the block pre-installed. Plus I really like the look of the full PCB covering Water Block. EK makes some great stuff, but at the time the HydroCopper was just more appealing.

I have never used anything from AquaComputer before, so this will be my first foray with their products. Reviews state that the Aquaeros 5 is a great fan controller, and the idea of having my pumps more quiet when performance is not needed is very appealing to me.
 
I am TOTALLY stealing this idea (although I may try it with red LEDs to match the color scheme of my rig)! Nice work!

Sure thing. The nice thing about using the white acrylic layer on top is that you can substitute any color LED strip you want and it will still give off a good bright glow. Looking forward to seeing it in Red. Good luck.
 
SATA Cable Sleeving

I worked on sleeving my SATA Data cables tonight, but ran into a bit of a hiccup. Two of my 5 cables have both right angle ends. It is near impossible to get the shrink tube over those ends, so I was only able to sleeve the SATA cablest that had a least one straight connection.

7083066183_8fc9f6e7ae_c.jpg


I ordered some new cables from Newegg that can be sleeved property. Ended up getting some round SATA cables for easier cable management. Should have them in a few days. Some of my other components should also be arriving at that time allowing to to finish up the rest of the sleeving.

And just a word of advise to anyone that wanting to sleeve their SATA cables... I had to stretch out my shrink tubing (a lot) for it to go over the connection heads. Otherwise it is VERY difficult to get them over. Maybe it is just the brand of cables I am using, but it seemed much more difficult than it should have been.

You could check monoprice.com in the future. They have a lot of different connector and length options in a fairly intuitively organized interface, and their prices are better than Newegg by a good bit. I've never liked buying cables at Newegg very much. They even have some all black SATA cables that you might not even have to sleeve.
 
Last edited:
You could check monoprice.com in the future. They have a lot of different connector and length options in a fairly intuitively organized interface, and their prices are better than Newegg by a good bit. I've never liked buying cables at Newegg very much. They even have some all black SATA cables that you might not even have to sleeve.

I checked Monoprice first as they are my preferred cable retailer, along with all things related to wiring my home theater room :D
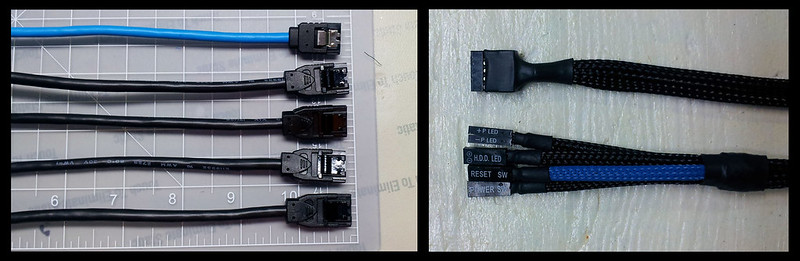
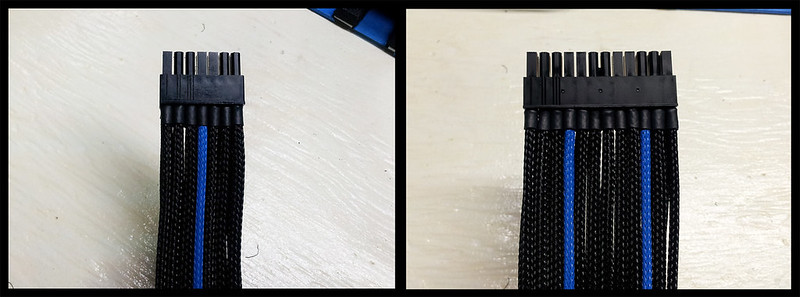
. They didn't have the smaller 10in cables in black, or with the combination of connectors I needed.

I was originally using some of the SATA cables I had around from previous builds, but the new ones I just ordered are round, and should be a bit easier to bend/maneuver for cable management.
 
I have had to stretch the shrink with a needle nosed pliers to get it to slide over the square end of the SATA cables.

I found it a little easier if you put scotch tape over the end before you start. It's just a little slick and helps the shrink slide on.....same with the sleeving.:D
 
You can easily stretch heatshrink with a pair of needle nose pliers. It shrinks right back up again as if nothing happened.
 
I have had to stretch the shrink with a needle nosed pliers to get it to slide over the square end of the SATA cables.
I found it a little easier if you put scotch tape over the end before you start. It's just a little slick and helps the shrink slide on.....same with the sleeving.:D

I will give the scotch tape trick a shot. Thanks.

You can easily stretch heatshrink with a pair of needle nose pliers. It shrinks right back up again as if nothing happened.

I did end up using a pair of pliers to stretch out the shrink before sliding them over the connectors, otherwise it was too difficult to get over. But even after stretching, I couldn't get the shrink over the right angle connectors, so I am abandoning those cables in favor of some round SATA cables that have at least one straight end.
 
This build is taking me a lot longer than anticipated, but will be worth the wait. Doesn't help that I am also doing a bunch of new landscaping and yard work at my house this week. I do a bit every night when I get home from work, and by the time I am done, there is no desire left to work on my PC :( not to mention my hands are usually too tired to even attempt sleeving my new round SATA cables.

Slow and steady wins the race... Right?
 
Last edited:
This build is taking me a lot longer than anticipated, but will be worth the wait. Doesn't help that I am also doing a bunch of new landscaping and yard work at my house this week. I do a bit every night when I get home from work, and by the time I am done, there is no desire left to work on my PC:(: not to mention my hands are usually too tired to even attempt sleeving my new round SATA cables.

Slow and steady wins the race... Right?

When I put together my latest, corsair 800D build, it took me 6 months. Then another 6 weeks waiting on the HD7970 Heatkiller waterblocks and backplates. I find it really hard to work on these things in the spring/summer, I'd rather be outside.:cool:

I just took a little bite at a time and if I didn't like it I simply started over.

Yup, slow is good.:D
 
SATA Cable Sleeving Continued...

Finally got around to sleeving my new Round SATA Cables. The look great and are a bit easier to bend. Also went ahead and sleeved the motherboard header pins along with the USB header from the front panel.

7111963031_bcc16fff20_c.jpg


I ran into a bit of a problem when trying to plug the cables into the mobo with the heat-shring tubing installed. They were a bit more stiff than normal, making them difficult to bend, and adding a bit too much stress for my liking in the SATA port. So I ended up using my heat gun again on the areas that had the shrink tube making it nice and hot. While still pliable, I inserted the SATA Cables into the Motherboard, and allowed them to cool with the exact bend angles that I wanted. Now they fit perfectly without any undue stress on the ports.

7111963083_1ba836b2c5_c.jpg


Still waiting on one more major component to arrive before I can finish sleeving. Not a whole lot I can do until then, but I might do some leak tests in the mean time.
 
Good idea with the heat gun.

I agree. The MDPC-X stuff, although excellent, does add a stiffness to things that can be difficult to control.:p
 
New Hardware Sponsor – Corsair

I am very pleased (and grateful) to announce that Corsair has decided to help me out this with build by supplying me with an AX1200 PSU, Sleeved Black Cables, and a Corsair Link Temp Control & Lighting Kit. I was surprised when I got the news of a sponsorship from Corsair, but will gladly use their great products in this build. Thanks Corsair!

6980259340_8be1607b49_c.jpg
 
New Components

Here are some beauty shots of the AX1200 that just arrived. I was previously rocking a 1000w Silverstone PSU, but was getting close to the top end of its range (hitting 970-980w) when benchmarking with everything OC’d. The extra 200w will come in very handy, especially if I ever go Tri-SLI. The pouch the PSU came in was a soft suede material. The overall packaging was of high quality, and of course the PSU itself looks great in the 800D.

7126345645_3c7baffc64_c.jpg


Here is the full Corsair Link Kit that includes the Temp Monitor / Fan Control, and the LED lighting component. I’m not sure if I will be able to use the LED strip this go around, as I have already installed one in this build. But I like the fact that is so customizable using the Corsair Software, and since its an RGB LED strip, the colors can change based on usage (gaming mode), or vary based on system temps. I am going to run the Link and the Aquero 5 to see which one better suites my needs with this specific build.

7126345805_f058912219_c.jpg

Larger Image

On the right is a Set of Black Sleeved cables for the AX1200 from Corsair. I had already decided to sleeve my own cables this go around, but will be using the “guts” from these for my custom cut lengths.
 
So far loving this build, the panel is a little flashy for my tastes, but that doesn't mean it doesn't look great. So far awesome.
 
Awefully nice of Corsair to sponsor your deal there.

That Link Kit looks interesting if one really has a thing for bling.:D

Anxious to see how your project turns out.
 
Hey just a heads up, if you want the light box to be a little brighter use dimpled mylar (automotive wind screen reflectors). I made a cathode light box and found that mirrored surfaces didn't reflect nearly as well as dimpled surfaces.

Great work though man, I might be stealing your idea :-p
 
Hi and thanks for the awesome build log. Just a quick question about your fan setup as I'm about to embark on a similar project and was concerned about the apparent lack of 'in' fans. From what I can see you have a 360 out on top, 240 out on bottom and a single 120/140 'in' on the back. I know theres another 120/140 up front in the drive bays at the bottom, but as it looks like its pulling directly with a cover on one side, I was questioning whether or not there's enough fresh air for cooling the interior of the case and its other components.

Can you also explain how the single water loop is configured with the pumps in serial. Am I right that this is a function of the res/pump unit you purchased or have you had to 'be creative' to get it to work. Also, is it very loud as I was really wanting a bay/res pump but others have put me off the idea due to the fact you can't isolate the pump which introduces vibrate/noise.

Keep up the great work :) More piccies !! :)

The way I have configured the case allows for 2 fans on the bottom to draw air in through the 120.2 radiator. The other fan towards the bottom of the case blows across the hot-swap hard drive bays. The 3 fans at the top of the case along with the rear are all exhaust fans. I not aware of any cooling issues when using air, but I'm probably not the best to judge being that just about anything that can be liquid cooled, is liquid cooled in my build.

This is how I have my loop set up:
Res > Pump > RAM > CPU > Motherboard > 120.3 Rad > Res > Pump > GPU > 120.2 Rad > Res

The XSPC Res that I am using is made to house the pumps and makes running this type of loop very easy. I previously used it with two separate loops, and it worked fine with that setup as well.
 
Corsair Sleeved Cables Mini-Review, and More Sleeving…

I have to admit, these sleeved cable packages made by Corsair for their PSUs are a great value proposition. If someone just wants one specific color of sleeved cables, these are a great deal, especially when you factor in the cost of sleeving materials, and the time involved to sleeve and entire set of cables yourself. The connectors are also of high quality (although different layout than standard PSU connectors, more on that later), and the sleeving material is a tad thinner than the MDPC variants, possibly making things a bit easier when trying to manage your cable clutter. Overall for may individuals, these cable kits are a great buy.

But… not everyone will want these types of kits. I can see three main reasons why these would not be for everyone.

  1. Perfectionists will notice that the heat shrink tubing is not even lengths across the connectors. For those going for looks / beauty, that could be a turn off.
  2. Custom Cable Lengths can make cable management a lot easier. I for one have decided to go that route for this build, but in all fairness I did still use these cables, simply cutting them to my preferred length, re-crimping one side of the cables, and resleeving with MDPC sleeve.
  3. Custom Color selections. Right now these kits seem only to be available in solid colors. Many sleevers like to use multiple colors in their strands. I am using 2 colors in this build (black & blue), hence the need for me to resleeve these cables once I had cut them down as stated above.

So for some, these sleeved kits by Corsair are great time savers and can fit a specific need (single color) very well. For others of a more DYI nature (or OCD / Perfectionists), they will be better off making their own sleeved cables. To the left below is a close-up of a few of the connections from the kit.

7126345917_17246af325_c.jpg

Larger Image

Above right is a picture comparing the connector for an 8-pin CPU Power connection. This is the side that plugs directly into the PSU. This was not a problem, but something I just found to be interesting. The AX1200 has a different connector layout compared to a standard 8-pin CPU connection, as can be seen in the above diagram comparing the two. I had already completed an 8-pin sleeved set before the PSU arrived, only to find out it wouldn’t plug in. Luckily with the MDPC Pin remover, I was able to switch out to the one that comes with the AX1200 in just a few minutes. All is well.

6980262874_ac26e120aa_c.jpg

Larger Image

And here is my completed 24pin Cable/Connector. The AX1200 has the 24pin cable split into two connectors where it plugs into the PSU. The pic on the left is one of those two connectors. Not perfect compared to sets from the “Pros” that I have seen, but it is getting easier each time, and my results are improving bit by bit. Even with it getting easier (and faster)… I have found that sleeving still takes a LONG time if done correctly.
 
Last edited:
You did a great job on the cable sleeving, I can't imagine how long that took..
 
I like your discussion about the Corsair cables. The other thing I don't like about the pre-made cables is the lettering on the heat shrink.....I think that's worse than the shrink being uneven.

I noticed the odd connector pin-out and arrangement as well when I sleeved my 1200 AX.

I really appreciate your cabling job. Nice work! I took two months offf/on to cable my 24 pin, 8 pin, and two sets of PCI-e cables (8 and 6 pin) when I did my last build.
Proper cabling is tedious at best, it's fun but I thought I was going to go blind before I finished. The OCD comes in handy when cabling things.:eek:

Great build-log so far!
 
Sweet build so far man!

Looking forward to more :)

You did a great job on the cable sleeving, I can't imagine how long that took..

I like your discussion about the Corsair cables. The other thing I don't like about the pre-made cables is the lettering on the heat shrink.....I think that's worse than the shrink being uneven.

I noticed the odd connector pin-out and arrangement as well when I sleeved my 1200 AX.

I really appreciate your cabling job. Nice work! I took two months offf/on to cable my 24 pin, 8 pin, and two sets of PCI-e cables (8 and 6 pin) when I did my last build.
Proper cabling is tedious at best, it's fun but I thought I was going to go blind before I finished. The OCD comes in handy when cabling things.:eek:

Great build-log so far!

very nice update

congrats on getting sponsor

Thanks Everyone. Sleeving is tedious, but I really like how it has turned out. Would have been done a while ago, but have been busy with "Honey Do" lists at my house. Have to take advantage of spring time to get my yard in really good shape.
 
Sleeving... COMPLETED!

MNPCTECH finally has their MOD Ruler / Gauge back in stock, and mine came in this week. Pretty sweet little modding tool, but I won't have a chance to use it this time around since I am wrapping up the build. But since I can't seem to go more than 6 months without modding / upgrading something, it will get plenty of future use.

7003264186_d900c289ee_c.jpg

Larger Image

All major sleeving is now complete. All I have left on the build is to connect all my fans an pumps to the AquaComputer / Corsair Link, and finish my tubing runs.

I know for sure that I will be using a two (2) AquaComputer USB PowerAdjusts to control my pumps, since they operate independently from other monitoring component. I will be testing the Aquero 5 and Corsair Link separately to see which will end up in my system long term to control my fans.

I still have to secure some of the cable runs to the back of the case with my cable clamps from MDPC, but here is a basic shot of all the major cables connected. Also in the pic is the SATA Power cable that I connected to the Hot Swap plate. It was very easy to sleeve, but a pain to get the actual wire to go in the connector. Ended up using a hammer to "tap" the two parts of the connector together.

7149355999_dbe8148067_c.jpg

Larger Image

Almost done... :D
 
I agree.

Those SATA connectors are just a pain. I made one and the second the cable did any bending at the insertion, it severed the wires.....:eek:

took me a couple hours to figure it out. I think there need to be a special connector just for a end position and one for the "middle".
 
Sleeving... COMPLETED!

MNPCTECH finally has their MOD Ruler / Gauge back in stock, and mine came in this week. Pretty sweet little modding tool, but I won't have a chance to use it this time around since I am wrapping up the build. But since I can't seem to go more than 6 months without modding / upgrading something, it will get plenty of future use.

7003264186_d900c289ee_c.jpg

Larger Image

All major sleeving is now complete. All I have left on the build is to connect all my fans an pumps to the AquaComputer / Corsair Link, and finish my tubing runs.

I know for sure that I will be using a two (2) AquaComputer USB PowerAdjusts to control my pumps, since they operate independently from other monitoring component. I will be testing the Aquero 5 and Corsair Link separately to see which will end up in my system long term to control my fans.

I still have to secure some of the cable runs to the back of the case with my cable clamps from MDPC, but here is a basic shot of all the major cables connected. Also in the pic is the SATA Power cable that I connected to the Hot Swap plate. It was very easy to sleeve, but a pain to get the actual wire to go in the connector. Ended up using a hammer to "tap" the two parts of the connector together.

7149355999_dbe8148067_c.jpg

Larger Image

Almost done... :D

Glad you like it! ...Each ruler takes 45 minutes for us to make in the cnc mill. Since they always go out of stock fast, we're always making them...lol

Keep up the great work!
 
I pretty much have everything set up now to start playing with both the AquaComputer Aquero5 and the Corsair Link. Just finished making my cables for, and sleeving the Poweradjust USB 2 pump controllers. I will be using them independently from the other control/monitoring units. From what I have seen from other users online, both the Aquaero5 and Link have a lot of capabilities. It just going to come down to which fits my needs the best.

Along with the Poweradjust USB 2, here is a shot of the 5mm Blue LEDs I just wired and sleeved, and a preview of how they will look inside the res. No liquid yet.

7178918868_65ea0bf855_c.jpg

Larger Image

Once I decide on which control unit to stick with, I can finish the cable management up no the back of the case. Even with using MDPC sleeving on all of my cables, there are still A LOT of cables to deal with. I don't know if it will look as clean & tidy as I originally envisioned it, but already it is a huge improvement over the spaghetti wire mess that used to abide back there.
 
Love the lighting effect... I am looking for a way to accomplish this in a build I am doing (the Azuremight v3 build), but with a bent surface... should be interesting, but your post was informative! Like the work so far, subbed!
 
Sorry for the lack of updates guys. Things have been really busy lately with work, adding new landscaping to my home, along with helping my brother out with his home remodel. Since these things happen after I get home from work, or weekends, it hasn't left much time for me to work on the build.

I also had another project that took me away from my PC. I am taking a Venturing Crew (17-18yr old Boy Scouts) into the Pike National Forest for 5 days, where we will be teaching them wilderness survival. Part of the outing will be devoted to primitive weapon construction, and I promised to have my homemade Longbow completed before we leave. Happy to say it is complete, and shoots very well.

Longbow+%25289%2529+.jpg

I made it from scratch using Red Oak for the belly and Hickory for the backing.

Longbow+%252811%2529+.jpg

Maple Red stain for the belly and Ebony for the backing, followed up with two coats of polyurethane to seal and protect the bow.

Longbow+%252810%2529+.jpg

If anyone wants to see a detailed construction log, head over to my blog for more details and close up pictures.

Mr. Armageddon's Project Logs

Since I will be gone with the Scouts for almost a week, there will not be any updates on the PC build. But as soon as I get back, my priority is to get it finished ASAP.
 
Back safe and sound from my outing in the Colorado Mountains. My longbow performed perfectly. Ready to get working on my build again!

Nice!

Also, man your wife is a stunner!

Ha ha... thanks! She will love to hear that. At first I was confused as to how you managed to see a picture of my wife, but then realized my family blog was linked to my Project blog via my Google account.
 
Last edited:
Man, I remember those Boy Scout days... got to do some of the most amazing things. Managed to get my Eagle Scout as well as Vigil in Order of the Arrow... if there were any days I wish I could rewind and relive, it would be those days...

Awesome build.
 
New Corsiar "Air Series" Fans

Been a while since my last update due to a very busy summer. My most gracious hardware sponsor Corsair, sent me the final components to finish up my build. This week I received a bundle-o-fans. These are their new line of "Air Series" fans, and they look great. There area verity of types, but they gave me the AF Quite Editions for case fans, and the SP series for my radiators. Here is the list of what came in:

Radiator Fans (120mm) - SP120s (High Performance Edition) x7
Rear Exhaust (120mm) - AF120 (Quiet Edition) x1
HDD Bay (140mm) - AF140 (Quiet Edition) x1

7433490610_fd3e999fce_c.jpg

Larger Image

I really dig the changeable color rings on the fans. It should look good with my black/blue theme. Each fan also comes with an adapter that will step down the voltage and manually slow down the RPMs. Nice that its included, but I will be counting on the Link or AquaComputer for that duty. The blades on the two types of fans are also different. The high pressure fans "SP Series" have blades specifically made to push more air through a radiator. The few reviews I have seen speak highly of them, so I am excited to get them installed.

7433490308_c35753bd3b_c.jpg

Larger Image

I was planning on getting all of these fans sleeved and installed this weekend, but "life" had other plans for me. Posting this update from the hospital, waiting to hear news on my 6 month old daughter. Looks like RSV & pneumonia... Again. Hopefully we will be back home soon.
 
Last edited:
Back
Top