• Some users have recently had their accounts hijacked. It seems that the now defunct EVGA forums might have compromised your password there and seems many are using the same PW here. We would suggest you UPDATE YOUR PASSWORD and TURN ON 2FA for your account here to further secure it. None of the compromised accounts had 2FA turned on.
    Once you have enabled 2FA, your account will be updated soon to show a badge, letting other members know that you use 2FA to protect your account. This should be beneficial for everyone that uses FSFT.

Mountain Mods Plateau Case

officermartinez

[H]ard|Gawd
Joined
Jan 21, 2006
Messages
2,012
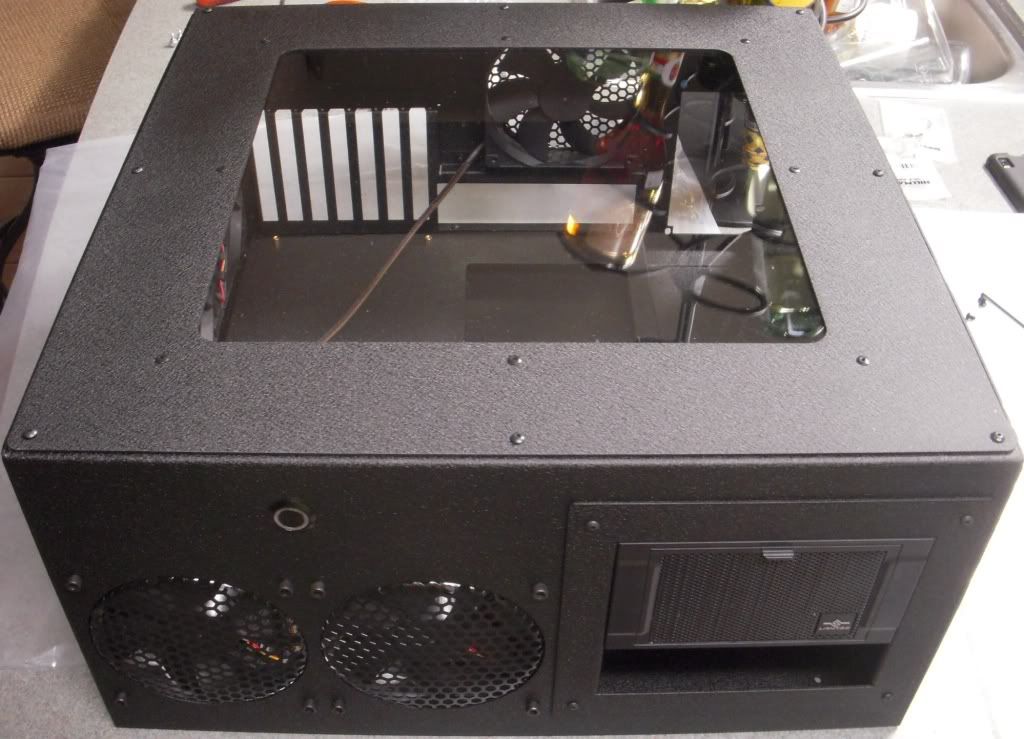
There sure are plenty of Mountain Mods cases out there in cyber-land. 99% of them are pretty huge! However, the Mountain Mods Plateau case seems to be one case that doesn't get a lot of press. It's smaller as I plan on using it as HTPC / Gaming Rig. I'm starting this thread in hopes that other MM's Plateau owners / admirers can chime in with their two cents. Although the Plateau is "hyper modular" like the rest of the MM's line, it's a little different from the rest. I just received my order today from MM's and after unboxing it, I was glad to see it was not damaged during shipment. I was particularly impressed with the fit and finish of the black wrinkle powder coat. I purchased several hex mesh fan grills from coolerguys.com and I've already started installing them. I also purchased some new 120mm fans, which I received a few days ago. During the down time, I took the liberty of sleeving the fan wires. Also, I drove down to my local home improvement store (Lowes) and purchased several tiny packages of black 10-24 x 1/2" socket head cap screws. They will be the screws that I use to mount my 120mm fans.

My entertainment unit in my bedroom is black (as well as all of my peripherals), so this case will fit right in. I'm using my current setup that's in my Antec Nine Hundred Two case with a few exceptions. Now that I have my Plateau case in, I am changing out ALL of my case fans. I purchased 8 different ones (Coolermaster, Antec, Xigmatec *currently installed in my Antec case*, Scythe, Thermaltake, Enermax, Aero Cool and Silverstone). Since I had to purchase a total of (8) fans for my Plateau case, unfortunately, cost played a role in my decision. But, alas, I was happy with the decision. Rated at 19 dB's, the most cost effective, price to performance to audible fan I liked was actually the one I thought I would hate the most.. COOLER MASTER. Seriously? What tha.. bleep! It's not the best fan I've ever owned, it's not the quietest fan I've ever owned nor is it the prettiest fan I've ever owned (but definitely not the cheapest fan I've ever owned.. haha). It just seemed to fit all of my current needs.. Cheap enough, quiet enough, powerful enough.. It even had 5 out of 5 eggs on Newegg. Anyway, let's more on..

I guess I can start with my setup. Like I said, I am already up and running in my Nine Hundred Two case. So, I'm just basically migrating everything over to the Plateau case (with a few exceptions).

Intel Core i7 2600k (overclocked at the moment @ 4.8ghz)
Asus P8P67 Deluxe motherboard
Promilatech Megahalems CPU Cooler (with a dual 120mm push / pull fan setup)
(2) Western Digital Black SATA 6.0 GB/s 1TB drives (RAID 0)
Gskill Ripjaws X DDR3 1600 4x4GB's (just installed it today)
Sparkle GTX 580 video card (just purchased another Sparkle GTX 580 from a [H] member and it should arrive in the next few days. Will obviously be running SLI)
Enermax Galaxy 1000w PSU (old faithful.. still kickin after 4 years of service)

I picked up a Vantec hard drive cooler and I intend on using my LG bluray internal optical drive. While I was at it, I bought an internal USB 3.0 PCI bracket / internal header to give me a couple of extra USB 3.0 slots. I intend to connect many of my fans to a MOLEX to multiple 3 pin fan output connector. I picked a few of those up from performance-pcs.com. I've taken a few pictures here and there and will post them up in the near future.
 
I just finished building this case. It was pretty straight forward but the motherboard mount / design, where it physically mounts to the bottom floor of the case, needs to be redesigned. What a major pain. Plus, a set of ONE SIZE FITS ALL instructions on MM's website is a total waste of time for Plateau owners. Now, with all of that said, I am extremely impressed (motherboard mounts aside) with the final product. It was wrapped from the factory EXTREMELY well. Each piece was powder coated nicely. The included screws were a nice touch but I new I did NOT want a bunch of chrome screws holding the case fans in place.

DSCN0556.jpg


DSCN0557.jpg


DSCN0559.jpg


DSCN0560.jpg
 
I fit the panels together but DID NOT TIGHTEN the bolts down. That was done at the end of the build, to ensure all pieces fit nice and snug together.. Here is what I am talking about. These clear acrylic sheets are somehow supposed to help mount the motherboard tray to the bottom of the Plateau case. I never could get it mounted up. I see the bolt pattern but alas, it did NOT fit properly. I was forced to come up with a better mounting solution (and being a modder, I surely did).

DSCN0563.jpg


I had some black plastic spacers that fit perfectly snug around the motherboard gold mounting bolts.. With the motherboard tray perfectly spaced, I quickly realized the secondary benefit..

DSCN0565.jpg


DSCN0567.jpg


DSCN0569.jpg
 
Last edited:
The secondary benefit is I am able to run my wires directly under my motherboard tray. This helps a bunch and keeps everything nice and tidy..

DSCN0573.jpg


As you can see, the case is coming together really quickly..

DSCN0570.jpg


DSCN0574.jpg


DSCN0576.jpg


DSCN0577.jpg
 
Here are some parting shots of the case, now that it is assembled. I will begin migrating my components into the MM's case tomorrow. Shouldn't take long at all..

DSCN0581.jpg


DSCN0583.jpg


DSCN0585.jpg
 
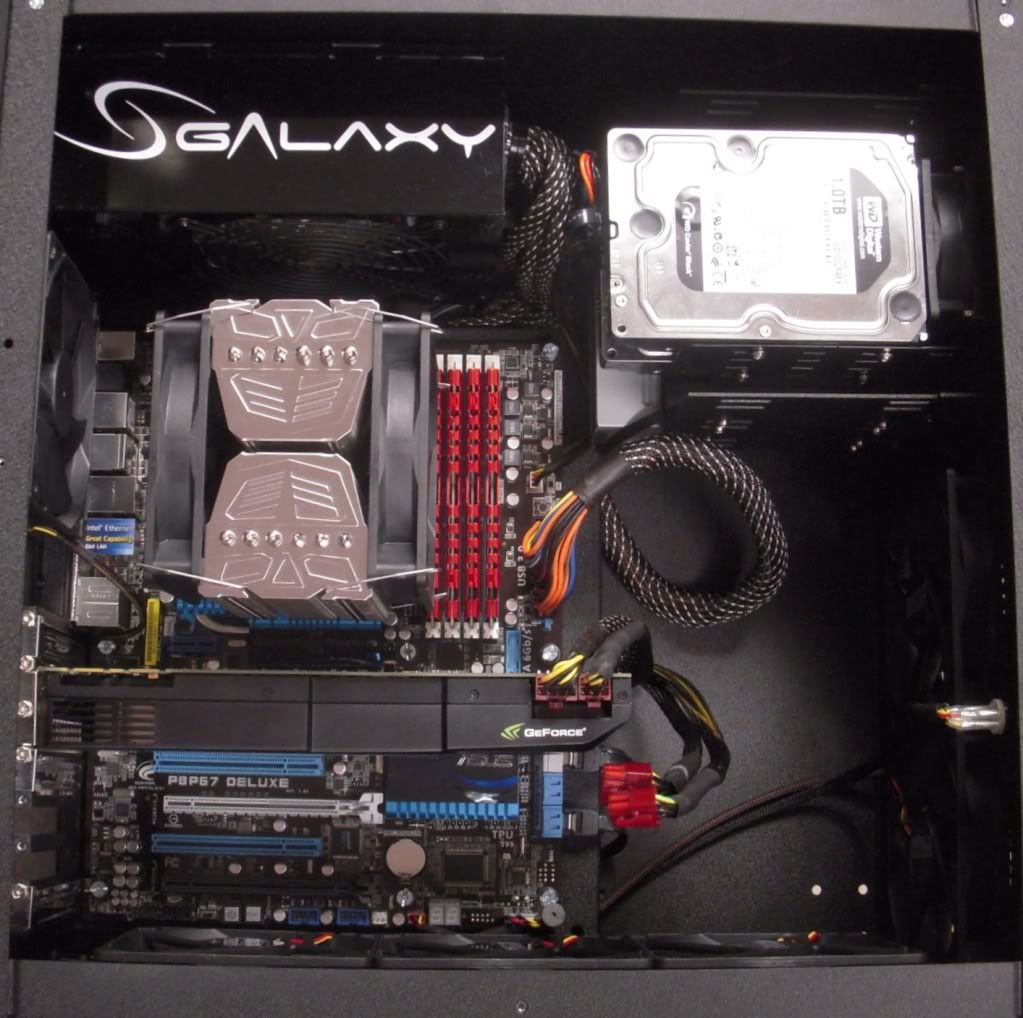
I've finished migrating over to the Plateau case (minus another GTX 580.. it should be here in a few days). Not too shabby. I was able to decently tuck away most of the wires. For those of you have have MM cases, how did you hide your wires?


DSCN0586.jpg


DSCN0593.jpg


DSCN0594.jpg


I have PLENTY of room on my Prolimatech Megahalems CPU Cooler, between the top of the actual cooler itself vs the top of the case (acrylic case window). However, my Ripjaws X BARELY fit. As you can see, the 120mm fan is touch the top part of my heat spreaders.. talk about zero clearance.

DSCN0596.jpg
 
Damn thats sexy, I just bought a ascention its in the mail. THis just makes me want it all the more.
 
That actually looks very good. Is that the black wrinkle-coat finish? I was looking at some of their parts for a custom build I'm dreaming up , wasn't sure how that would look but that definitely looks sweet.
 
I saw the Ascention.. nice choice! ..I ran into my first issue. The Delrin Vandal Switch is a (6) pin switch. The pins on the switch are labeled 1, 3, +, -, 4, 2 ...Here is how the included wiring diagram looks:


1 ................. 3

+ ................. -

4 ................. 2


Looking at the instructions, the first diagram is labeled "COMMON"

The diagram legend shows a SOLID black line connecting 1 and 2. That = ON
The diagram legend shows a DOTTED black line connecting 3 and 4.


Looking at the instructions, the second diagram is labeled "PUSH DOWN"

The diagram legend shows a DOTTED black line connecting 1 and 2. That = OFF
The diagram legend shows a SOLID black line connecting 3 and 4.


The + PIN on the vandal switch was hooked up to my PLED (Power LED) + motherboard header pin.

The - PIN on the vandal switch was hooked up to my PLED (Power LED) - motherboard header pin.


Whenever I tried to boot the computer, it powered on briefly and started running through the internal system checks. The LED on the vandal switch lit up the LED Ring on the switch (in my case, lit up green). After roughly 4 seconds, the computer powered down. So, I tried booting it again, and again, it did the exact same thing. I repeated this process 5 - 6 times before I decided to start "troubleshooting". First thing I did was remove all 4 wires from the vandal switch. Using a spare power button from an old Thermaltake case that I have laying around, I simply connected it to my motherboard. Viola. Booted right up.

So, that's where I am at. The included switch diagram from www.lamptron.com is very generic. There are NO instructions per say, on how to hook up the wires. Obviously, I either have a defective switch or the diagram needs to be explained better in detail on what wire goes to what header pin on the motherboard.

:rolleyes:
 
That actually looks very good. Is that the black wrinkle-coat finish? I was looking at some of their parts for a custom build I'm dreaming up , wasn't sure how that would look but that definitely looks sweet.

Yeah, I've seen some pictures that appeared a little misleading. It just depends on the camera / lighting / angle / etc.. The texture is NOT as harsh as some pictures may seem. It is VERY subtle. I've seen some pics that make it look like RHINO-LINING for a pickup truck.. haha. It is FAR from that.. It is NOT course but it is not super glass smooth like a car paint job. I am way happy with the black wrinkle powder coat finish!
 
UPDATE - I got the Lamptron 6 PIN Delrin Vandal Switch working.

I purchased the "pre-wired" harness from Mountain Mods but wasn't too happy about the sleeving (too much exposed bare wire). So, I threw on some extra sleeving and re-shrink wrapped it. Much better. The wiring harness has a BLACK WIRE, RED WIRE and TWO YELLOW WIRES (4 wires total). Here's how it all worked:

YELLOW WIRE (doesn't matter which yellow wire you use)
- Hooked up one yellow wire to the PWR SWITCH (also known as a PWR BUTTON) to the + (positive) motherboard header pin
- Hooked up the other yellow wire to the PWR SWITCH (also known as a PWR BUTTON) to the - (negative) motherboard header pin

RED WIRE
- Hooked up to the PLED + (positive) motherboard header pin

BLACK WIRE
- Hooked up to the PLED - (negative) motherboard header pin

It works like a champ. On my particular vandal switch, here's the order of the wires:
- PIN POSITION labeled 3 (YELLOW WIRE)
- PIN POSITION labeled 4 (YELLOW WIRE)
- PIN POSITION labeled + (RED WIRE)
- PIN POSITION labeled - (BLACK WIRE)

Vandal switch PIN POSITION's NOT USED: 1 and 2. Hopefully this post will come in handy if anyone is actively searching the net for the 6 pin Delrin Vandal Switch.
 
Last edited:
That is a pretty awesome case... Does it have 3 or 4 5¼" drive bays?

About your switch, is it a dual-led switch? I thought that the 6-pin Vandal switches could be connected to the PWR LED connection along with either a Sleep/SMI LED or a HDD LED connection. Maybe you can try using pins 1 and 2 that way.
 
That is a pretty awesome case... Does it have 3 or 4 5¼" drive bays?

About your switch, is it a dual-led switch? I thought that the 6-pin Vandal switches could be connected to the PWR LED connection along with either a Sleep/SMI LED or a HDD LED connection. Maybe you can try using pins 1 and 2 that way.

Thanks JMccovery.. I appreciate the words of encouragement. It has the (3) 5 ¼" drive bays. Perfect size for (2) HDD's and (1) optical drive. As for the PWR LED, my PWR LED (or PLED) connection is connected to these pins. Some motherboards are labeled POWER LED, some are labeled PWR LED and some are labeled PLED. It's the same connection as far as I know. When my computer is in the OFF position, my vandal switch is NOT illuminated. When I turn the power on to the computer, the switch illuminates perfectly. I was thining of drilling a small hole for the hard drive activity LED light but decided against it. For my particular application, I do not need the HDD LED light nor do I need a RESET button. The vandal switch does a good job powering the computer ON and OFF as well as the LED ring illuminating when it's powered ON.

I'm sure PIN positions 1 and 2 are good for something but I don't need them. I haven't put my computer in sleep mode, so I can't comment on that yet. As a matter of fact, let me do just that.. I'll see what the vandal switch does.. I'll report back in just a bit.
 
Last edited:
The computer sleeps just fine. A press of the vandal switch gets me back up and going. Works perfectly fine. While it is in sleep mode, the LED ring on the vandal switch blinks in roughly one second intervals. However, if I try to wake up my computer from the keyboard or mouse, the computer appears to turn on but my screen stays blank and my keyboard / mouse are not lit up. I checked my settings (allow this device to wake the system up.. keyboard, mouse, usb are all checked) but I could not get the system to wake up. I am thinking I need to change something in my bios?
 
Last edited:
You'll have to find a setting similar to 'Wake/Resume from USB' in your bios under the power management settings.
 
Thanks for the compliment Vivatalia. JMccovery - I didn't get a chance to mess around with the computer today (spent all day putting together my sons computer). But I am off tomorrow and I will definitely mess around with the settings.. LOL
 
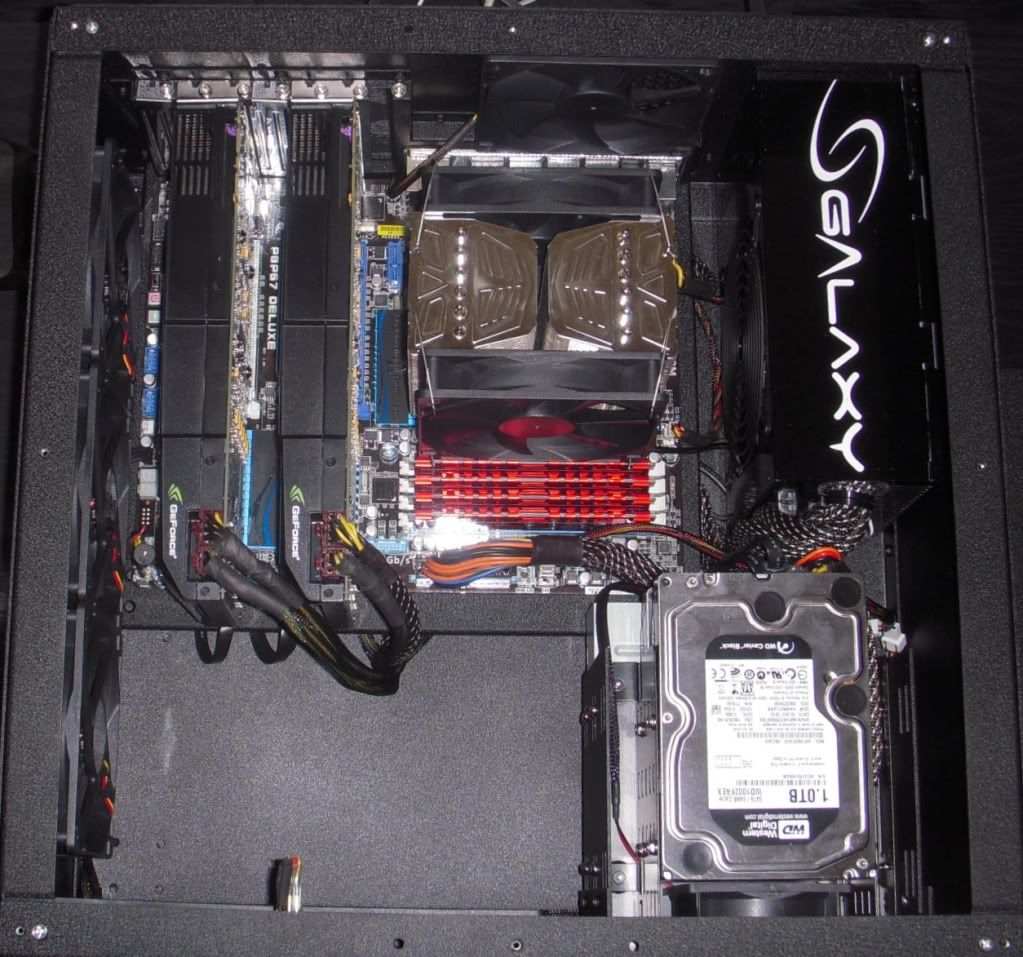
I just got the second GTX 580 in and hooked it up.. I tied up a few wires and realized, not too shabby for a quasi home theater pc. It is WAY overkill obviously for the HTPC part, even though that's what I use it for 50% of the time. However, I do game on it as well and those GTX 580's enjoy stretching their legs every now and then! (..oh, and don't worry.. my sli bridge was not shown in the pictures but rest assured, it's connected!)


DSCN0618.jpg


DSCN0617.jpg


DSCN0612.jpg


DSCN0609.jpg


DSCN0607.jpg
 
Last edited:
I also ran a little BEFORE and AFTER on the Heaven 2.5 engine.. Nothing is overclocked (no need to overclock my setup). Nice little "boost" ...lol.


ONE GTX 580

00003.jpg


TWO GTX 580's

00004.jpg
 
This is ugliest desktop case on the market :)

..Just kidding, MM is a class of its own, either you love or hate that rough look of these cases.
 
This is ugliest desktop case on the market :)

..Just kidding, MM is a class of its own, either you love or hate that rough look of these cases.

Yes, I agree. Love em or hate em. Some of these cases, in my opinion, are not very tasteful in appearance.. but that's not a direct fault of MM's. They will will ship you a case to your preference.. I've seen several MM setups and I was left wondering, WTF? That is fugly! ..haha! But hey, to each their own.. One mans trash is another mans treasure! ..and my case / setup is MY treasure. Love it or hate it.. I definitely LOVE IT! The powder coat job is what I realllllllllllllllly dig. Very nicely done.
 
Seriously that is one sexy block of tech right there, your makin me want to buy another MM case and I havent even recieved my first one yet!
 
Seriously that is one sexy block of tech right there, your makin me want to buy another MM case and I havent even recieved my first one yet!

Well thank you dieseldog49! I'm looking forward to your build. As for this setup, I am not really much of a 3dmark kind of guy but I was curious about a one time bench to see where I stand. I know nothing about 3dmark 11 but this is where I stand (not sure if my score sucks but here it is)..


3dmark11-1.jpg


3dmark11.jpg
 
..another curve here. After putting this case together, I found myself very distracted by the beautiful tiny black wrinkle powder coat job vs. (1) the flat black hex mesh 120mm fan grill covers, (2) the chrome pci bracket covers and (3) the semi-gloss finish on the Vantec hard drive cooler mesh grill. I made a quick phone call to my local powder coater and he said bring down a "sample" piece of the powder coating to see if he had anything in stock that could match it. Holy cow, how lucky am I? I got down there and he had JUST finished coating something for a client with the EXACT color tiny black wrinkle powder coat that is on my MM's case. I left all of the items that needed to be wrinkle coated and it should be ready for pick up sometime next week. Wow, I'm pretty happy.. haha.
 
You got very lucky on that one...congrads.
What is the clearance between that CPU cooler and your 1st GPU?
 
nice.
always had a weakness for MM & the newer CaseLabs cases (tho this case obviously falls a outside their usual massive double-wide variety).
now if you could chuck in a couple of radiators and a customer water loop... have a very compact and tidy WC rig.
won't deduct too many points for choice of air cooling, still a very nice setup. ;)
 
You got very lucky on that one...congrads.
What is the clearance between that CPU cooler and your 1st GPU?

I got very lucky! As for the clearance, I just measured it and between my Prolimatech cooler to the back side of my GTX 580 is exactly 1 1/4 inches. By contrast, the top of the Prolimatech cooler vs the top portion of MM's case is 1 1/2 inches. This case looks rather large when it is all assembled but that room disappears quickly when the parts start going in.

nice.
always had a weakness for MM & the newer CaseLabs cases (tho this case obviously falls a outside their usual massive double-wide variety).
now if you could chuck in a couple of radiators and a customer water loop... have a very compact and tidy WC rig.
won't deduct too many points for choice of air cooling, still a very nice setup. ;)

I almost pulled the trigger on a water cooling setup but decided against it. Back in the day, I water cooled my sli 8800gtx's, north and south bridge and my CPU. I dumped tons of money into it and it was marginally better than air cooling by 6-7 degrees or so.. Not to mention, I ended up developing a leak on one of my EK waterblocks. I know much has changed but sadly, I'm not as [H]ard as I used to be.. LOL!

officermartinez = getting old
 
...I almost pulled the trigger on a water cooling setup but decided against it. Back in the day, I water cooled my sli 8800gtx's, north and south bridge and my CPU. I dumped tons of money into it and it was marginally better than air cooling by 6-7 degrees or so.. Not to mention, I ended up developing a leak on one of my EK waterblocks. I know much has changed but sadly, I'm not as [H]ard as I used to be.. LOL!

officermartinez = getting old

yeah agreed (on the performance front), tho i don't think anyone does it just for the cooling bonus alone. those that do it (myself included) do it for how the final products look and more importantly (for me at least), the thrill of actually building the thing.

i get the 'i'm too old for this shit' sentiment too, i recon i won't be building too many more WC rigs in the future either. the cost does get a bit stupid after a while. the off the shelf units are getting pretty decent now a days tho there is still a little bit of the purest left in me which turns its nose up at such weak arsed cooling solutions. that type of hardware snobbery is slowly dying tho.
 
The image for video 2 really reminds me of a custom boombox I built about 15 years ago. Just swap the 120mm fans for woofers and your bass case will throb!
 
yeah agreed (on the performance front), tho i don't think anyone does it just for the cooling bonus alone. those that do it (myself included) do it for how the final products look and more importantly (for me at least), the thrill of actually building the thing.

i get the 'i'm too old for this shit' sentiment too, i recon i won't be building too many more WC rigs in the future either. the cost does get a bit stupid after a while. the off the shelf units are getting pretty decent now a days tho there is still a little bit of the purest left in me which turns its nose up at such weak arsed cooling solutions. that type of hardware snobbery is slowly dying tho.

Yeah.. Those days are quickly disappearing. These days, it seems to be much easier to buy a sealed loop and just go that route. Back in the early days of the Q6600, I bought a single stage vapochill LS unit and had it modded. OMG, I was hitting 4.4ghz on my Q6600 (that's a 2ghz OVERCLOCK over stock)!

The image for video 2 really reminds me of a custom boombox I built about 15 years ago. Just swap the 120mm fans for woofers and your bass case will throb!

Holy crap, you're right. In person, you don't really get that reaction. So when I read your response I was like.. WHAT? No it doesn't.. OMG, YES IT DOES! ..haha!
 
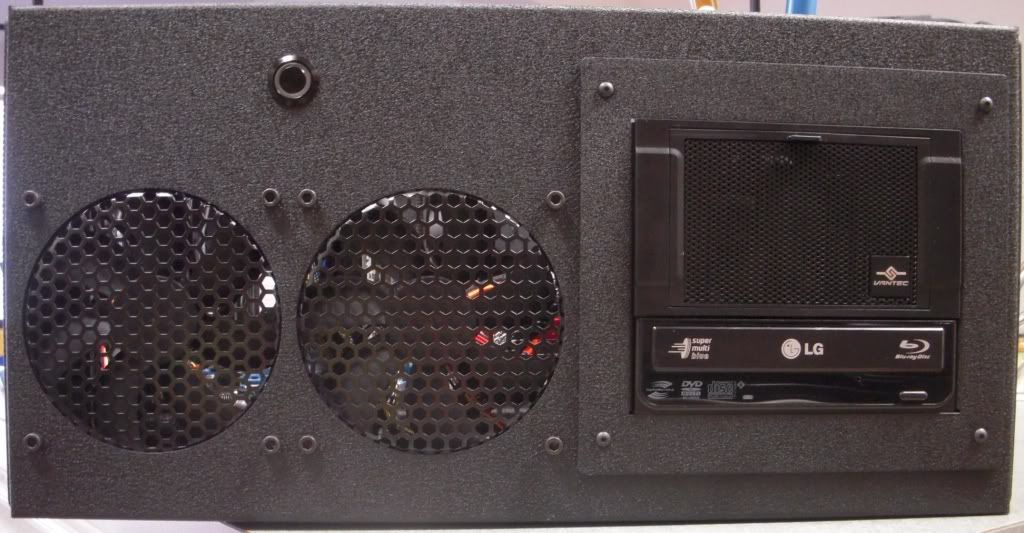
OK.. I couldn't stand it. The PCI brackets from MM's are chrome.. the 120mm fan grills were sort of flat black and the Vantec HDD cooler metal mesh was a semi gloss back with Vantec's logo just staring right at you.. So, I removed the all of those parts from my MM's case. I removed the Vantec logo off of the HDD Cooler, hammered out the indented part of the Vantec mesh where the logo USED to be and took all of the metal parts to my local powder coater. We matched up the black wrinkle powder coating that comes from MM's powder coater. I finally got the powder coating back yesterday and installed the newly powder coated parts. Now, it looks / blends / ties in with the rest of the case MUCH better. Everything matches and doesn't look "pieced together".. I guess it was my O.C.D. kickin' in.. haha.

- PCI brackets, 120mm fan grills and Vantec HDD cooler mesh matches now.. LOL!

(I tried to take some pictures with the flash ON and with the flash OFF)..


DSCN0643.jpg


DSCN0639.jpg


DSCN0635.jpg


DSCN0633.jpg


DSCN0632.jpg


DSCN0629.jpg


DSCN0631.jpg
 
Very nice job with that. Looks nice. I love MTN cases...may get the h2go for my wife's pc next.
I have the u2ufo and its a monster, cant imagine how huge the others actually are.
 
Very nice job with that. Looks nice. I love MTN cases...may get the h2go for my wife's pc next.
I have the u2ufo and its a monster, cant imagine how huge the others actually are.

Thanks.. I never really considered MM's as a case that I would be interested in. However, when I began to seriously look at my HTPC / Gaming PC case options, the MM's case was a clear choice for me. I can only imagine how huge some of their cases actually are! As for the H2GO cases, I was looking at them this morning.. I like em! I am VERY pleased with the way my MM's case turned out. I've gotten tons of positive feedback from it. A friend of mine simply likes the powder coat finish on it and is going to have his computer case powder coated like mine. When I took my parts up to my powder coater to have them matched to my MM's case, he said the black wrinkle coating is the EXACT same powder coat that Harley Davidson uses on some of their motorcycles. As a matter of fact, my powder coater shot my parts at the exact same time while he was shooting a whole bunch of parts for Harley Davidson (they sub-contract with him to coat their motorcycle parts / frames). Pretty darn cool! ...I learned something new :)
 
I appreciate the compliment. I am wondering if I shouldn't just go ALL out.. I could remove my power supply and have that powder coated to match.. But then that would leave me my Prolimatech CPU cooler. Of course, it would not be wise to powder coat that.. Maybe I should leave the internals alone. With that said, I am wondering if it would be feasable for me to make some kind of back plate that would mount at a 45 degree angle with a mirror mounted on it that would show case / show off my internals.. Hmmmmmm...
 
Back
Top