Background Info About the Heatsink
Well, I just had my first experience with lapping a heatsink and I have to tell you all about it") . Sadly I didn't take any before or after pictures of the work but the results speak for themselves.
. Sadly I didn't take any before or after pictures of the work but the results speak for themselves.
The heatsink that I lapped is the Zaward Vapor 120. This is a fairly capable heatsink, but I had a feeling that it was being held back by the crude finish on its base. Here is a picture of what the base looks like. The photo does not do justice to the scratches on the base, they are much deeper than they look.
Source: www.overclockersclub.com
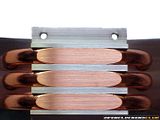
I also learned through FrostyTech's review of this heatsink that the base has a surface roughness of 32 microinches, which is considered good by FrostyTech. For comparison, a high quality mirror finish like the one found on the Thermaltake Frio Extreme (review here) has a surface roughness of 8 microinches, which is considered excellent. Clearly, this heatsink had room to improve. This was one of the main factors that led me to lap this heatsink. One of the most important variables in lapping is the initial quality of the heatsink base. A high quality base with a mirror finish will not be improved by lapping.
Lapping Materials
I lapped the heatsink using a mix of sandpaper and lapping compounds. Lapping compounds are supposed to create an exquisite finish, better than what sandpaper can do alone. I read somewhere on the Internet that these compounds are comparable to 20,000 grit sandpaper, an incredibly fine finish. After shopping around and doing some research, I settled on this kit from PCViper because of its low price and the inclusion of three different lapping compounds, something I couldn't find with any other kit. I also read this old review from 3DVelocity and the final picture at the end was very convincing. Personally, I wasn't able to get rid of all the scratches, but the scratches are now very small. If the scratches on the heatsink were the size of coarse hairs before (like armpit or public hairs), they are now very fine, like the hair on your head. It may not sound like much, but the difference is dramatic if you see it in person. But don't take my word for it, look at the results!
Test Setup and Results
Maximum Temperature BEFORE Lapping*** 54 - 55 - 55 - 54 (Celsius)
Maximum Temperature AFTER Lapping***** 51 - 51 - 52 - 50 (Celsius)
All four cores show an improvement of either 3* or 4* C. This is a 6.5% decrease in temperature, a noticeable improvement. I'm happy.
Source: www.3dvelocity.com
Well, I just had my first experience with lapping a heatsink and I have to tell you all about it
. Sadly I didn't take any before or after pictures of the work but the results speak for themselves.The heatsink that I lapped is the Zaward Vapor 120. This is a fairly capable heatsink, but I had a feeling that it was being held back by the crude finish on its base. Here is a picture of what the base looks like. The photo does not do justice to the scratches on the base, they are much deeper than they look.
Source: www.overclockersclub.com

I also learned through FrostyTech's review of this heatsink that the base has a surface roughness of 32 microinches, which is considered good by FrostyTech. For comparison, a high quality mirror finish like the one found on the Thermaltake Frio Extreme (review here) has a surface roughness of 8 microinches, which is considered excellent. Clearly, this heatsink had room to improve. This was one of the main factors that led me to lap this heatsink. One of the most important variables in lapping is the initial quality of the heatsink base. A high quality base with a mirror finish will not be improved by lapping.
Lapping Materials
I lapped the heatsink using a mix of sandpaper and lapping compounds. Lapping compounds are supposed to create an exquisite finish, better than what sandpaper can do alone. I read somewhere on the Internet that these compounds are comparable to 20,000 grit sandpaper, an incredibly fine finish. After shopping around and doing some research, I settled on this kit from PCViper because of its low price and the inclusion of three different lapping compounds, something I couldn't find with any other kit. I also read this old review from 3DVelocity and the final picture at the end was very convincing. Personally, I wasn't able to get rid of all the scratches, but the scratches are now very small. If the scratches on the heatsink were the size of coarse hairs before (like armpit or public hairs
), they are now very fine, like the hair on your head. It may not sound like much, but the difference is dramatic if you see it in person. But don't take my word for it, look at the results!Test Setup and Results
- Intel Core i5-750 (3.2 GHz, stock voltage 1.20 V, LLC On)
- Gigabyte P55M-UD2 motherboard
- 2 x 2GB DDR3 1600
- Radeon HD 5450
- NZXT Lexa S (side panel OFF, all fans at 100%)
- Stock Zaward "Golf" fan at 2000 RPM
- 10 minutes of OCCT CPU stress test
Maximum Temperature BEFORE Lapping*** 54 - 55 - 55 - 54 (Celsius)
Maximum Temperature AFTER Lapping***** 51 - 51 - 52 - 50 (Celsius)
All four cores show an improvement of either 3* or 4* C. This is a 6.5% decrease in temperature, a noticeable improvement. I'm happy.
Source: www.3dvelocity.com
Last edited: