Hello,
one week ago i find out how to modify my monitor driver for a custom FreeSync range. It begann with my Samsung U24E850R and i checked whats the different between "FreeSync Standard-Mode" and "FreeSync Ultimate-Mode" available by the OSD-Menue. After a comparison of the EDID-Data i find out, it's yust a single byte whats control the FreeSync refresh rate range. And yes it's possible to change this byte to get a lower FreeSync minimum refresh rate. I running this monitor with a range new range of 32hz - 60hz instead of the official 40hz-60hz.") I am not alone, some other users have successfully modify his monitors.:
I am not alone, some other users have successfully modify his monitors.:
ASUS MG279Q (default 35hz-90hz) down to 31hz, #1
LG 27MU67-B (default 40hz-60hz) down to 33hz, #1, #2
LG 29UM67-P (default 48hz-75hz) down to 32hz, #1
LG 34UM67-P (default 48hz-75hz) down to 40hz?, #1
Samsung U24E850R (default 40hz-60hz) down to 32hz, #1
Beware, if the minimum range to low your got massive flickery screen artifacts. On my Samsung 32hz works perfect, one hz lower (31hz) results instantly in screen artifacts.
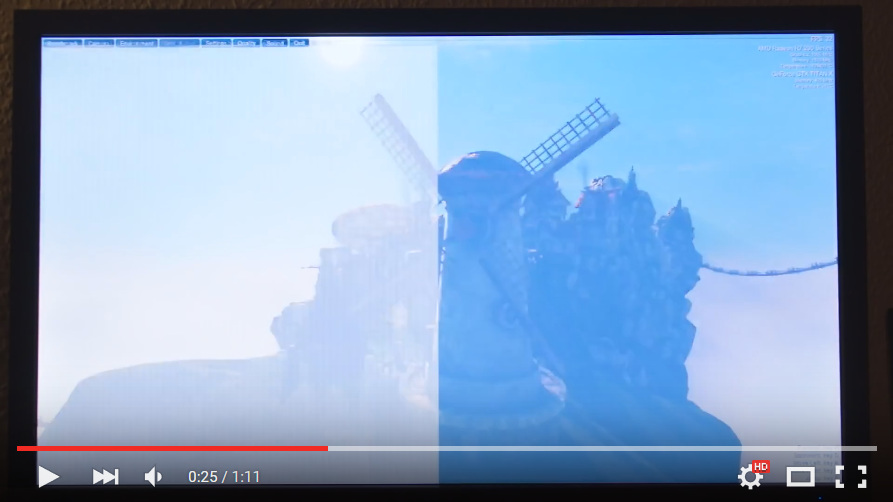
Watch this Video: https://www.youtube.com/watch?v=txKkDfOzVHE
Now here is a small tutorial for creating a custom monitor driver that change the FreeSync minimum range:
Download Links for
*Phoenix EDID Designer
*EnTech Monitor Asset Manager
*EnTech softMCCS
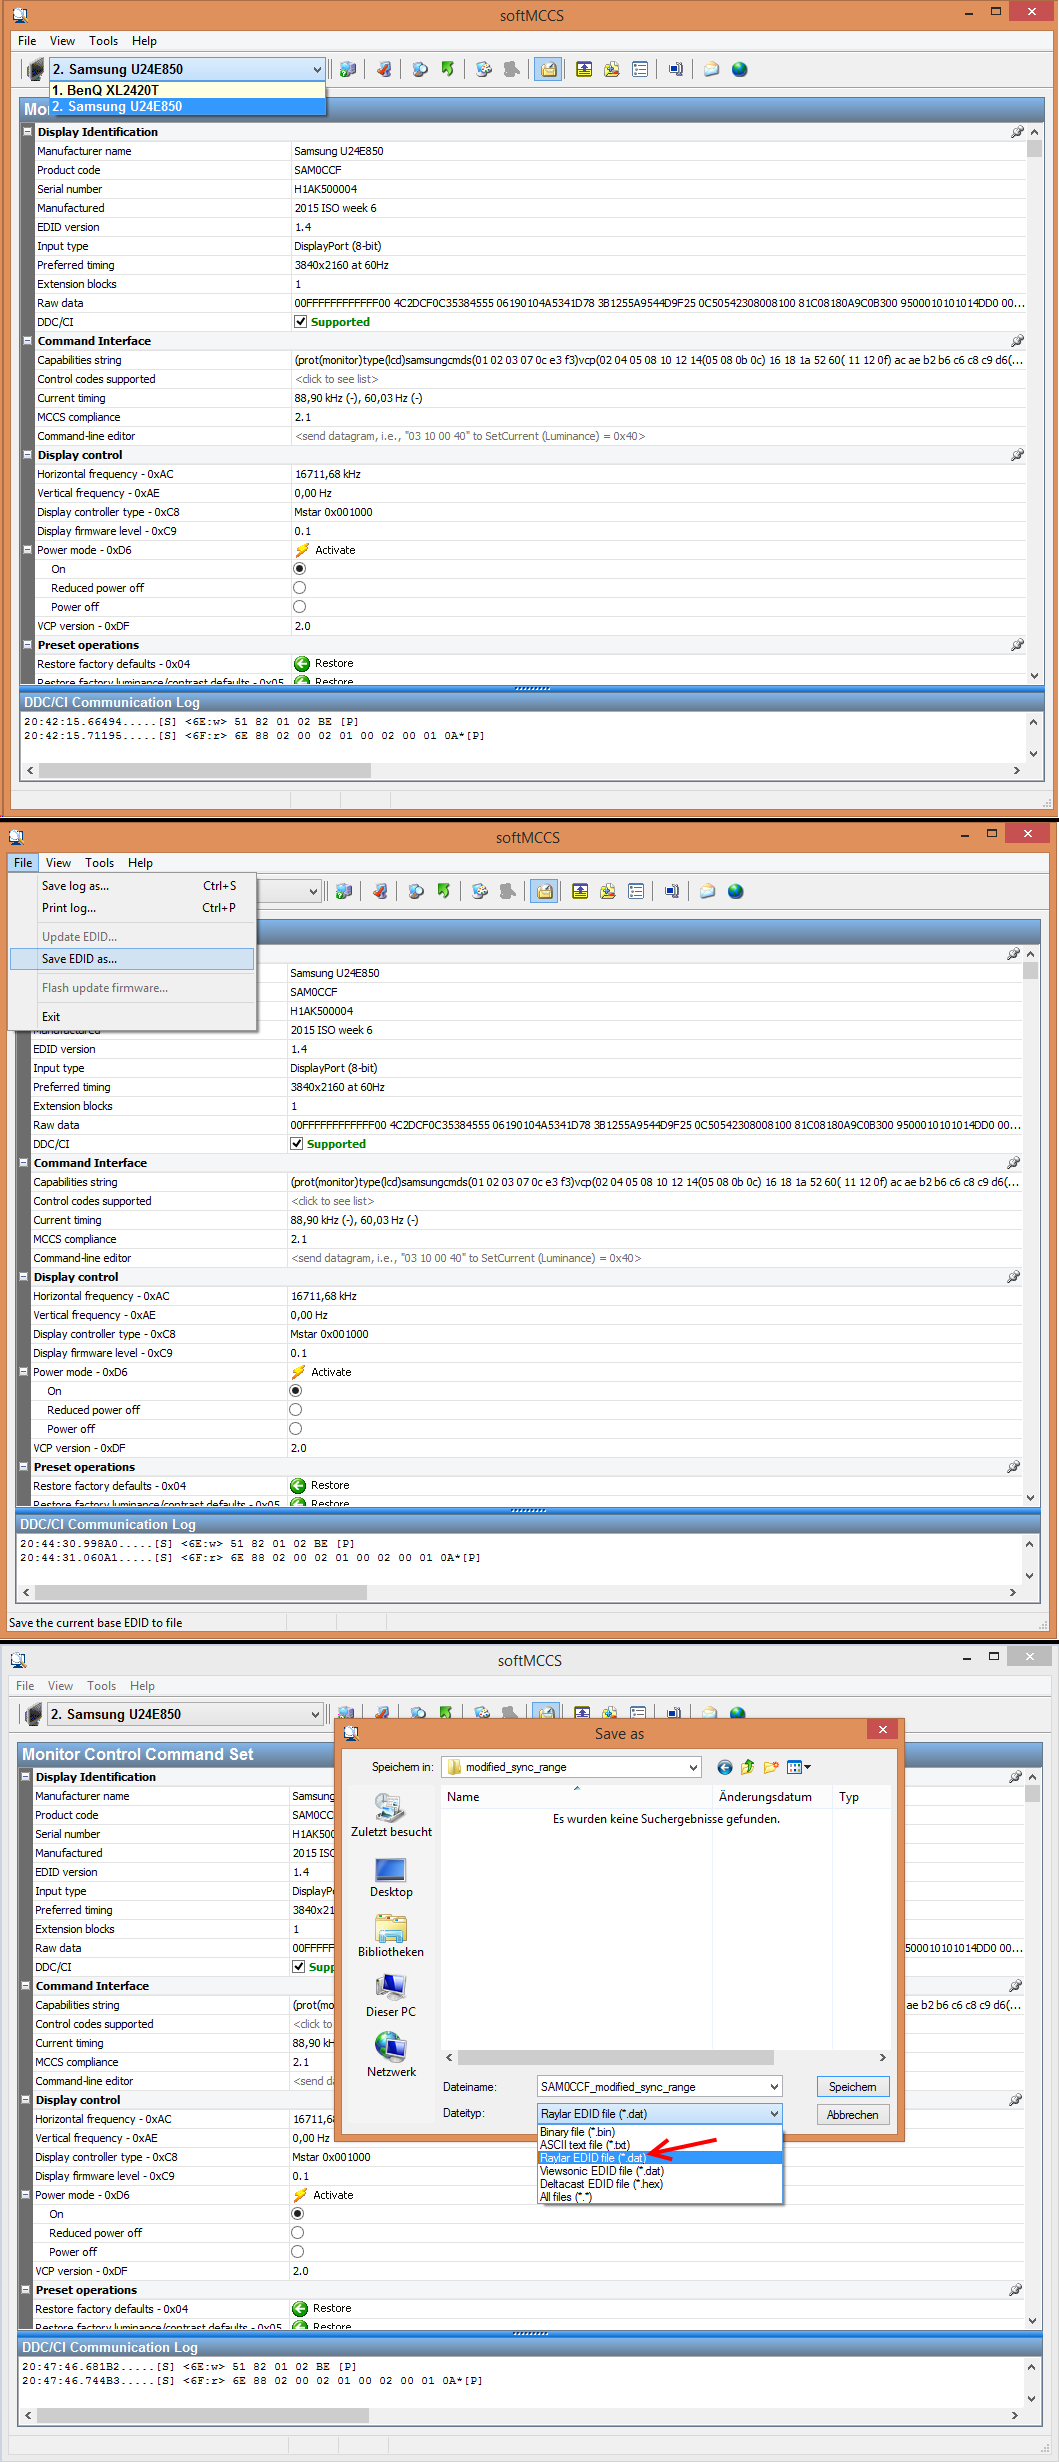
1. extract EDID
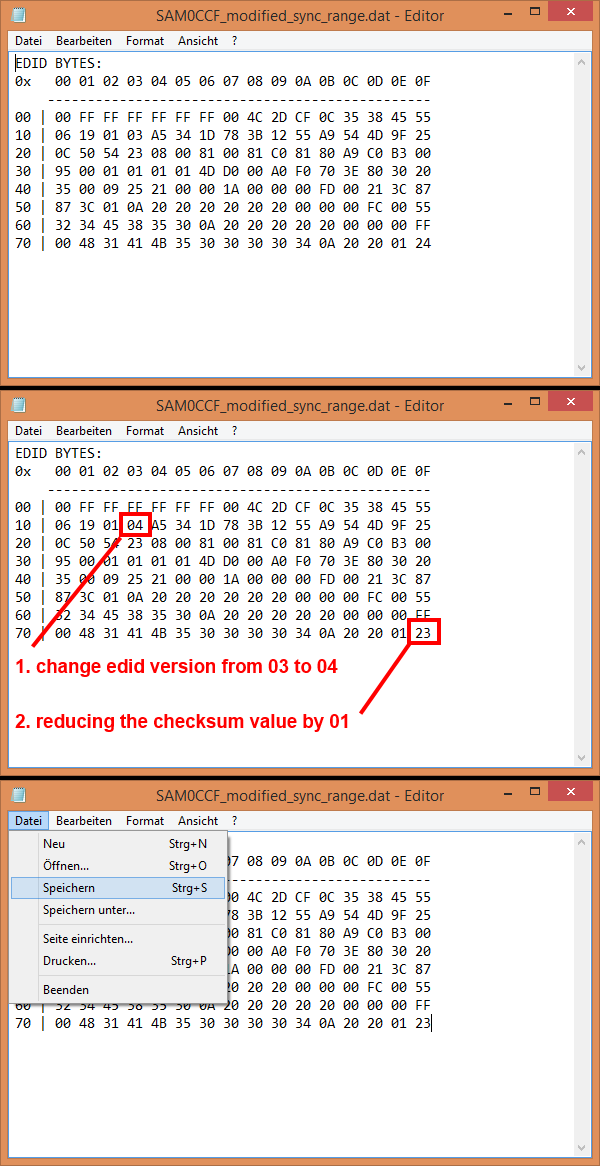
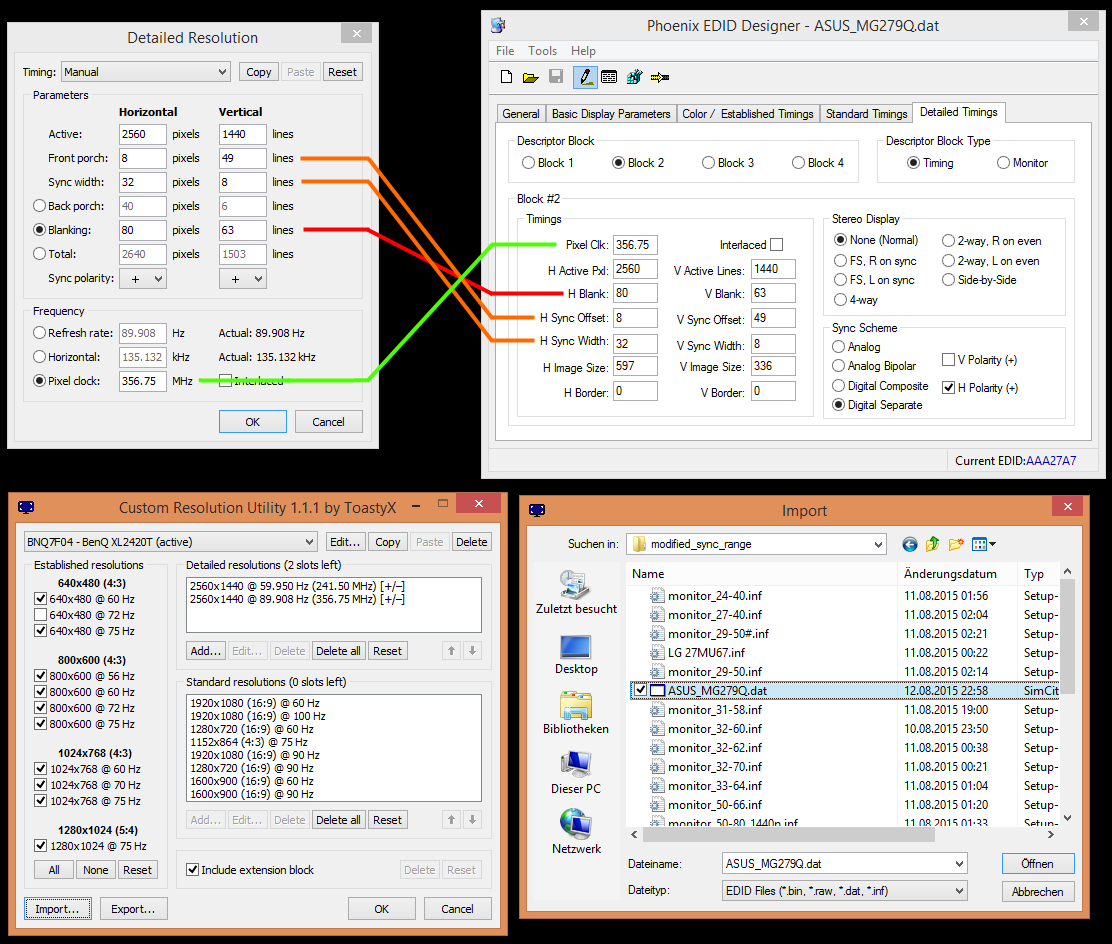
2. modify EDID (part1)

3. modify EDID (part2)
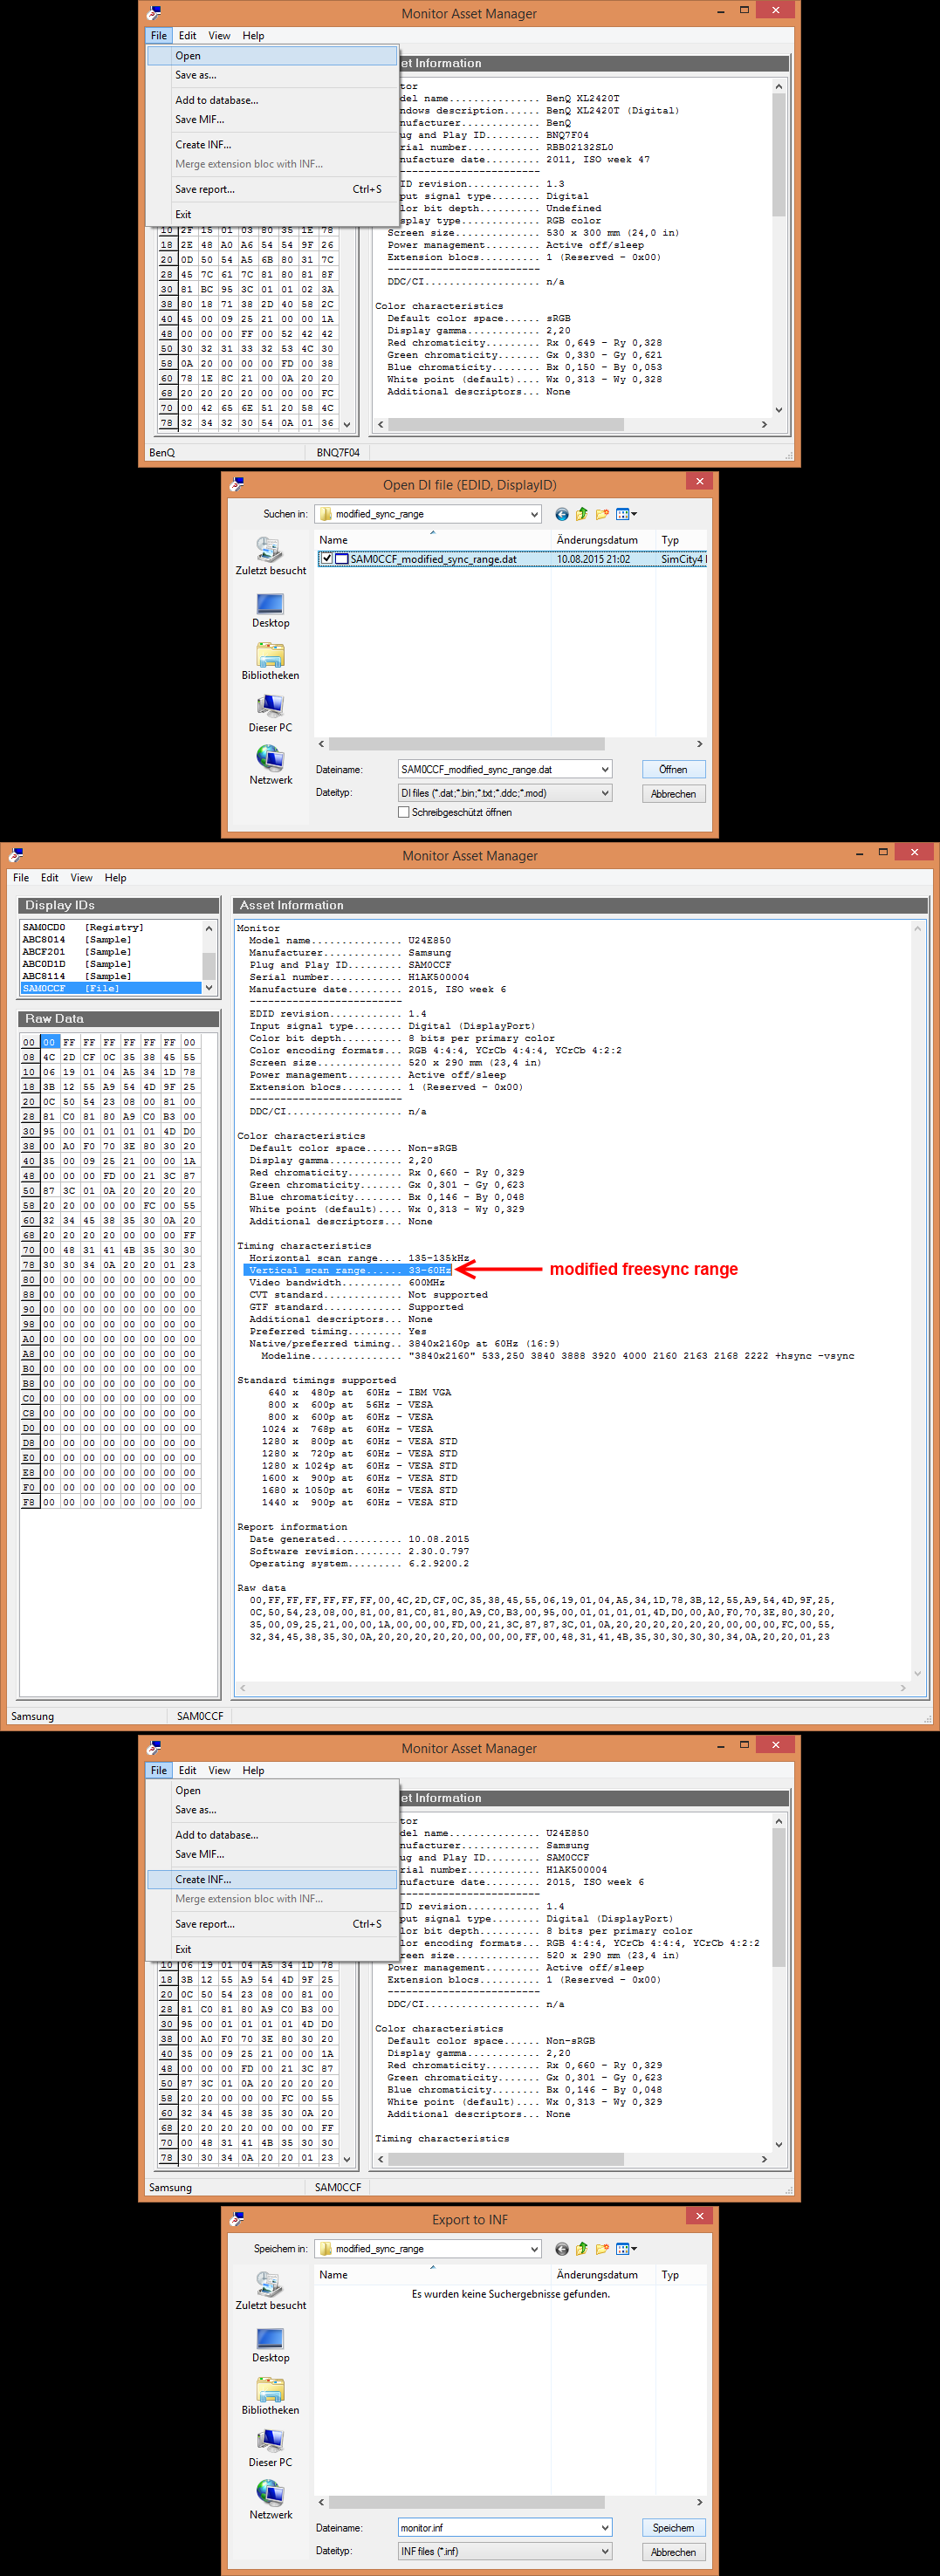
4. create monitor driver
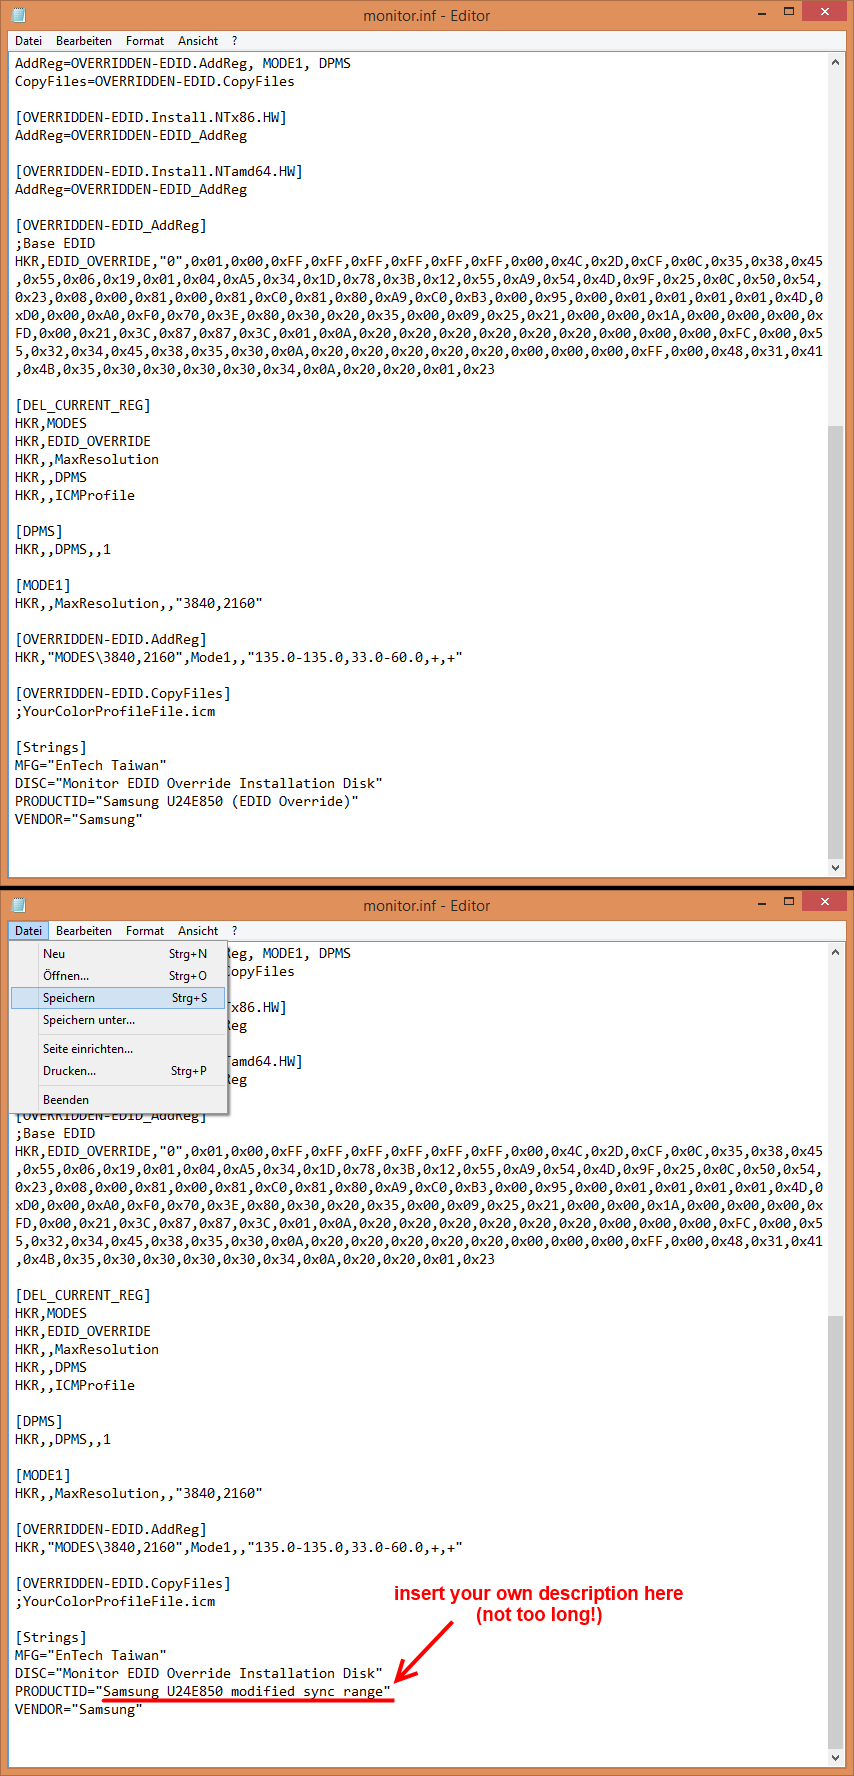
5. add description to driver
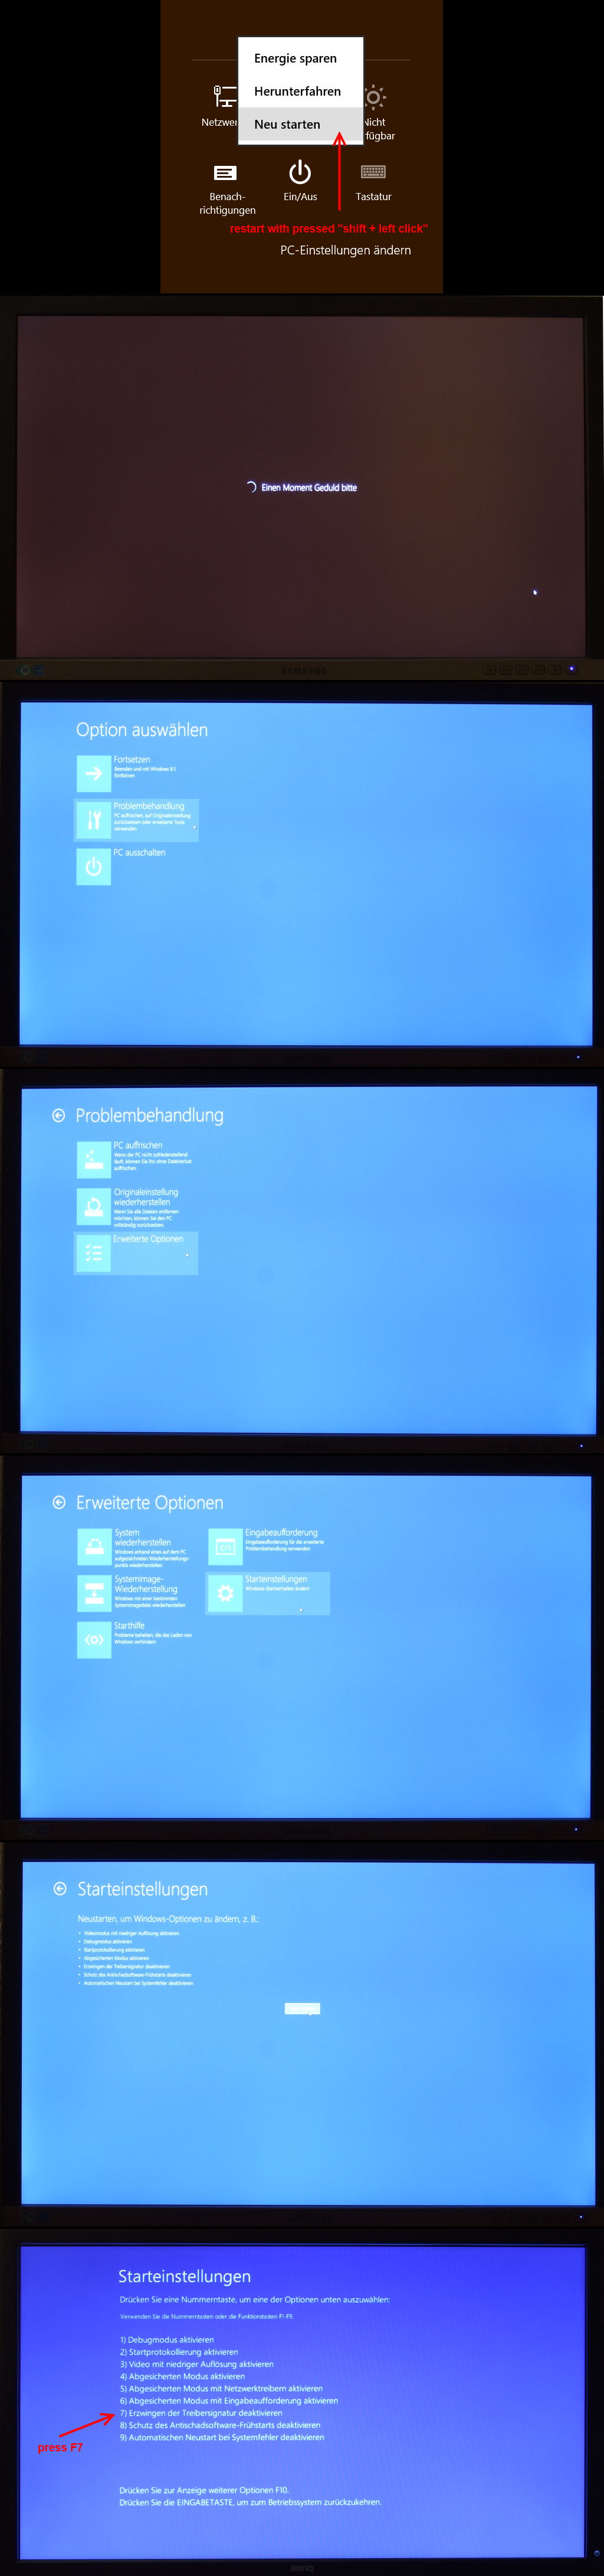
6. deactivate Windows 8.1 driver signatur
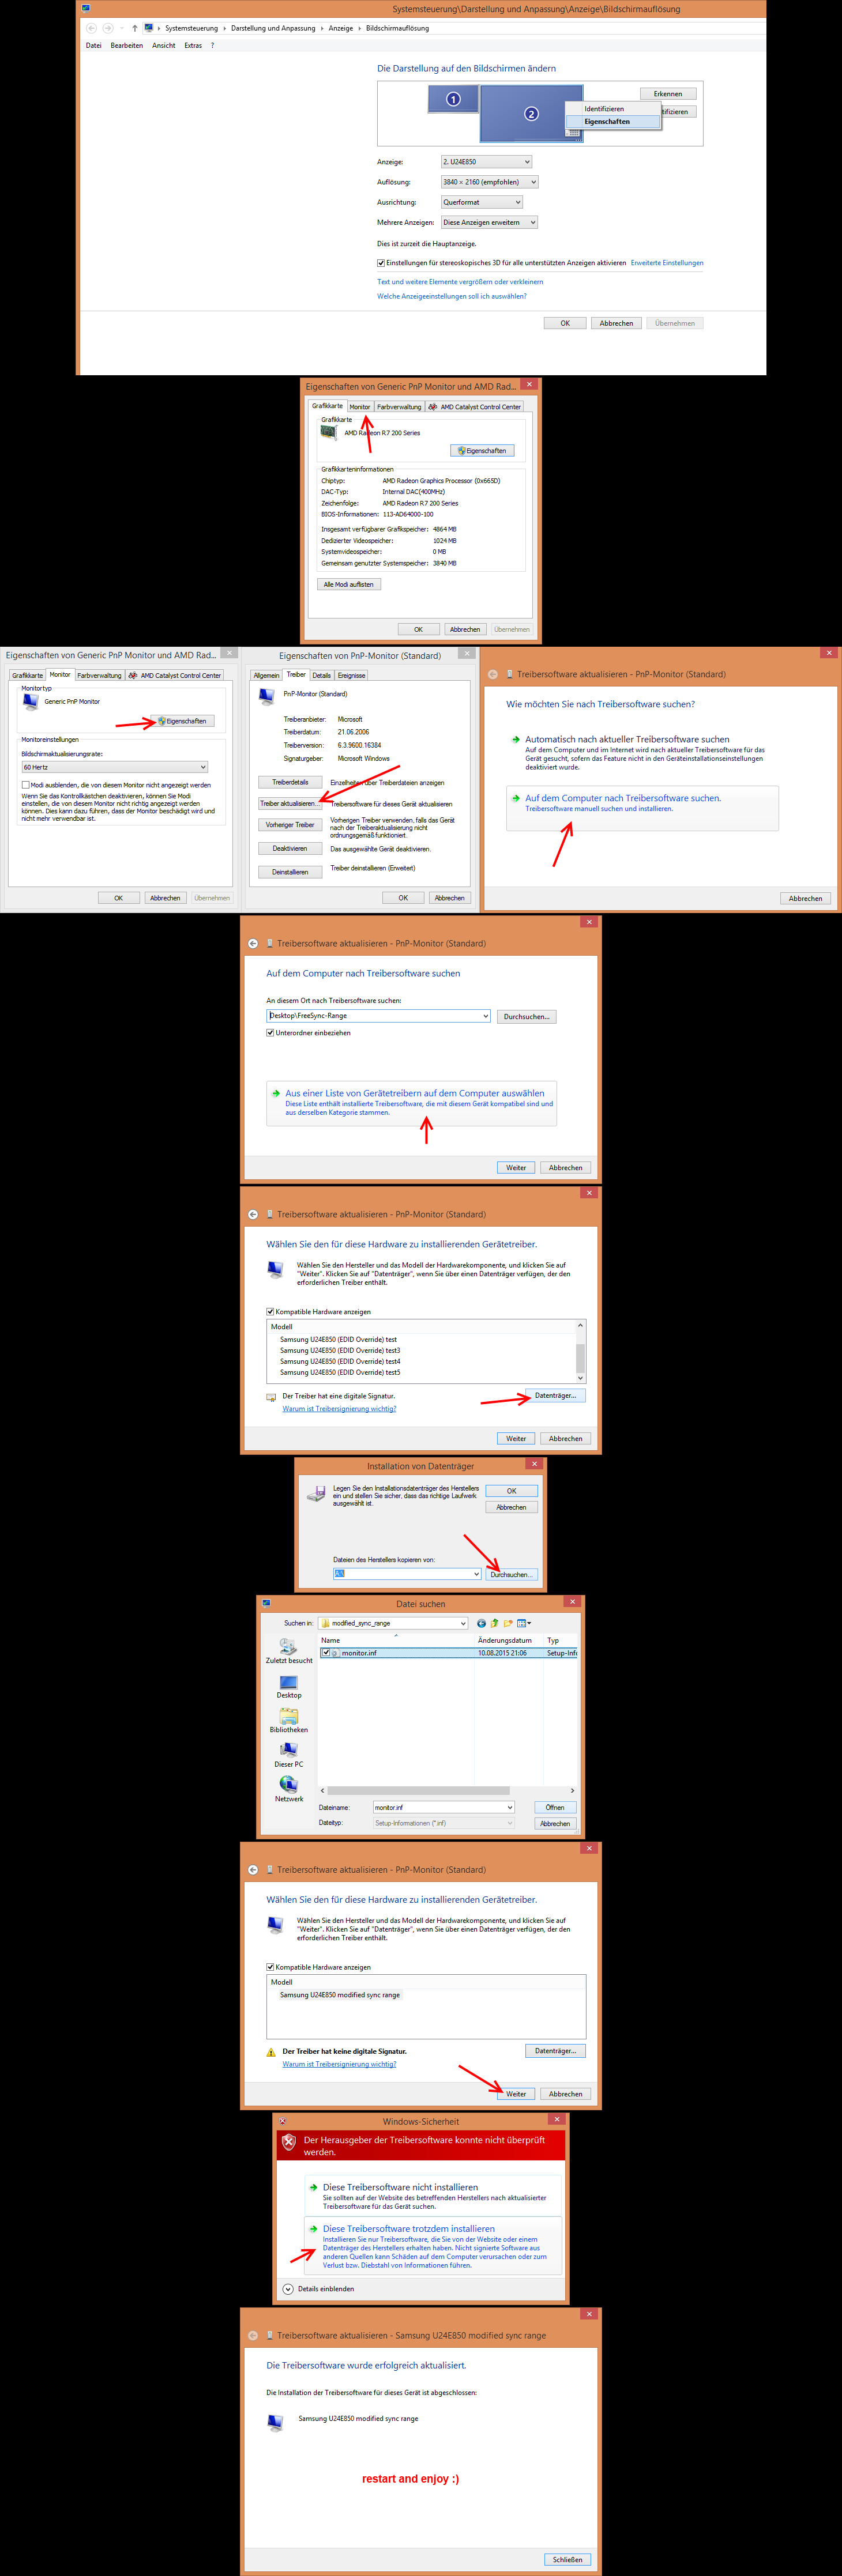
7. install monitor driver
You can see the pictures are taken on a german windows, nevertheless the step by step order is the same.
Thats not all, its also possilbe to increase your maximum FreeSync, but this way of direction is more complicated. First, you need create a new custom edid resolution with higher refreshrate. Second, if you increase your FreeSync maximum range, you lose the new FreeSync minimum range. A higher maximum range results also in a higher minimum range. Custom EDID resolutions can calculated by CRU (custom resolution utility)
Feel free to share and modify this tutorial, good luck
one week ago i find out how to modify my monitor driver for a custom FreeSync range. It begann with my Samsung U24E850R and i checked whats the different between "FreeSync Standard-Mode" and "FreeSync Ultimate-Mode" available by the OSD-Menue. After a comparison of the EDID-Data i find out, it's yust a single byte whats control the FreeSync refresh rate range. And yes it's possible to change this byte to get a lower FreeSync minimum refresh rate. I running this monitor with a range new range of 32hz - 60hz instead of the official 40hz-60hz.
I am not alone, some other users have successfully modify his monitors.:ASUS MG279Q (default 35hz-90hz) down to 31hz, #1
LG 27MU67-B (default 40hz-60hz) down to 33hz, #1, #2
LG 29UM67-P (default 48hz-75hz) down to 32hz, #1
LG 34UM67-P (default 48hz-75hz) down to 40hz?, #1
Samsung U24E850R (default 40hz-60hz) down to 32hz, #1
Beware, if the minimum range to low your got massive flickery screen artifacts. On my Samsung 32hz works perfect, one hz lower (31hz) results instantly in screen artifacts.
Watch this Video: https://www.youtube.com/watch?v=txKkDfOzVHE
Now here is a small tutorial for creating a custom monitor driver that change the FreeSync minimum range:
Download Links for
*Phoenix EDID Designer
*EnTech Monitor Asset Manager
*EnTech softMCCS
1. extract EDID
2. modify EDID (part1)
3. modify EDID (part2)
4. create monitor driver
5. add description to driver
6. deactivate Windows 8.1 driver signatur
7. install monitor driver
You can see the pictures are taken on a german windows, nevertheless the step by step order is the same.
Thats not all, its also possilbe to increase your maximum FreeSync, but this way of direction is more complicated. First, you need create a new custom edid resolution with higher refreshrate. Second, if you increase your FreeSync maximum range, you lose the new FreeSync minimum range. A higher maximum range results also in a higher minimum range. Custom EDID resolutions can calculated by CRU (custom resolution utility)
Feel free to share and modify this tutorial, good luck
Last edited: