• Some users have recently had their accounts hijacked. It seems that the now defunct EVGA forums might have compromised your password there and seems many are using the same PW here. We would suggest you UPDATE YOUR PASSWORD and TURN ON 2FA for your account here to further secure it. None of the compromised accounts had 2FA turned on.
    Once you have enabled 2FA, your account will be updated soon to show a badge, letting other members know that you use 2FA to protect your account. This should be beneficial for everyone that uses FSFT.

BluHaz reDux v2.0 "Worklog"

jedihobbit

Gawd
Joined
Nov 3, 2005
Messages
963
02/19/02

With Celtic Spirit again being placed on indefinite hold, wanting to put together a small sever (Yoda’s SMN), and bring DreamCatcher into the realm of AM2, it looks like BluHaz reDux will now be a v2.0.

What changed (Bold - Italic) and what didn’t (see sig) are listed below, with other minor tweaks and mods covered later.

CASE: akasa Blue Acrylic mATX
PSU: Enermax Liberty ELT400AWT 400W
MOBO: Biostar Tforce 6100-939
CPU: AMD Opteron 170, CCBBE0615DPMW
HSF: Zalman CNPS7000B-CU LED
NB Cooler: Noctua NC-U6
GPU: On Board 6100 (3850 / 3870 Future?)
MEMORY: 2GB G. Skill F1-4000USU2-2GBHZ (2 x 1024)
HDD: Raptor 74 GB, SATA II w/ Cooler (Raptor X Future?)
Optical Drive: Plextor PX-716A DVD+RW
FDD: standard 1.44

For reference these are the main pieces (case & mobo assy.) and a close-up of the mobo stuff.

TheStuff-BHrDxv2-1SM.jpg
DHtoBHrDxv2MoboAssySM.jpg


BH rDx v2.0’s function really shouldn’t change > backup, LAN, & folder. The primary changes have been cause by bringing over DC’s “x” mobo assembly. However there are currently several other considerations that I would like you comments on.

1. HDD… currently I’m running the 74GB version of WD’s Raptor series. Left over from CS’s demise is a 150GB Raptor X (windowed version). My choices are to sell the unit or use it for v2.0. Considering the ‘puter’s usage – would this be a “useful upgrade” or more under the heading of “bling (window) and bragging rights”?
2. GPU… in keeping a 8800GT for DC, thought as money allows it would be kinda neat to make this an “AMD family affair” and use a 3850 / 3870 as this is supposed to be a backup/LAN gaming machine. ‘Course that brings a potential problem therefore number 3 here.
3. PSU… while it has been brought to my attention the ELT400AWT does have two 20A rails – this may not be enough for the gpu and the rest of the stuff. Besides what is listed above there are 2 x 80mm LED fans, 1 x 60mm LED fan, illuminated temp gauge, a “running” LED memory mod, and the twin 40mm fan hdd cooler that I can think of.

The Plextor is another “leftover” from CS and being a wee bit shorter than the “original” LG seemed like a good idea as the area of the case associated with the PSU is tight. Started painting it yesterday in between wind gusts as we had a usually warm day and hope to get the clear coat on in the next day or two.

What will be of interest also is wither I can shoehorn the 7000 hsf into the same area as the Sandy’s Opty 175 hsf/Tt SmartFan 2. The top fan is very close to the CPU area of these Biostar mobos.

The Opty 170 and the G. Skill PC-4000 (again from CS!) were changes to DC while on several OC’ing binges.

As usual I’ll bore you with pictures as this gets rolling in the next few days, but for now got to get on with “other things”.

02/22/08

With things going a little slow here, it was a good thing I decided to re-read the instructions on the Metalcast paint can. I Wanted to hit the Plextor parts with a clear coat to slow chipping and scratching. Thought I only had to wait 24 hours before painting; however the instructions stated “7 days” for curing. Boy would I have been p****d with the crinkles!! This picture shows the size difference between the LG and the Plextor units mentioned earlier

BHrDxv2OpticalDrCompareSM.jpg


Got around to seeing if the Zalman hsf would fit and the following pictures answer that question!


BHrDxv2HSF2.jpg
BHrDxv2HSF1.jpg
BHrDxv2HSF3.jpg
BHrDxv2HSF4.jpg


Now some tough engineering questions have to be addressed. Sadly the “bling factor” is a major consideration with this. It seems I have two options:

1. The cheapest but, biggest impact on “bling” is to keep the 7000 and sit the exhaust fan on top. To even marginally look “finished” I think I would have to some how enclose it with blue acrylic pieces (sources?).
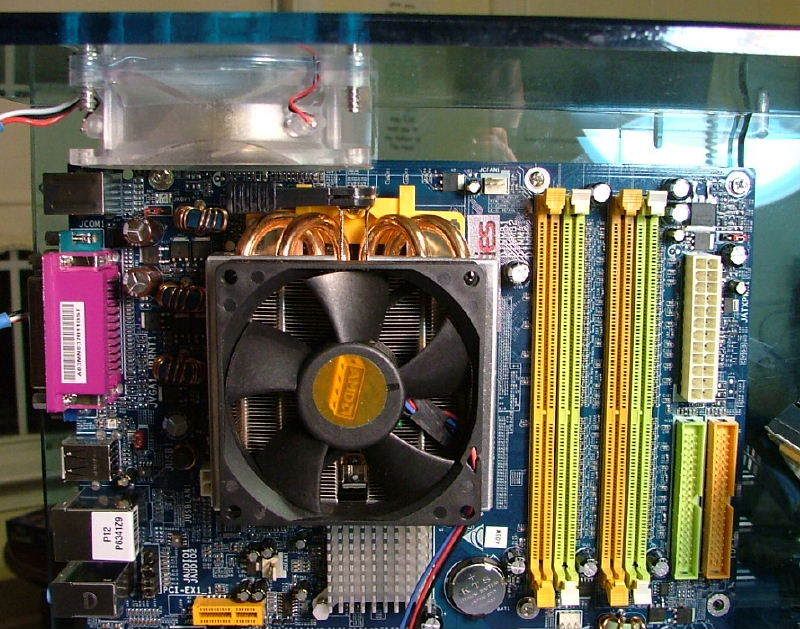
2. Of course option two is to change the hsf. Here is where I wonder if the Opty 175 stock cooler with a Tt SmartFan2 would be enough??? I know that fits as that was what was on the Sandy before. The heat pipe design moves the fan down just enough to fit.

This shows any early test fit before the Tt fan was mounted
HSFClearence1SM.jpg


Another “engineering” issue that is left over from the original reDux version is the orientation of the PSU. When akasa located the PSU at the bottom they just “dropped it straight down” leaving the exhaust fan of my Liberty about an inch off the bottom. I have been toying with the idea of “flipping” the unit over so it might assist in removing hot air, especially from the GPU area. It is realized at a minimum the mounting holes would need to be re-drilled. An earlier “test fit” also reviled that the power switch will hit the edge of the cutout. Another thing noted was that would then be the lower left mounting screw could not be used.

The first pic shows the stock layout while the second is just a 180 of the first to show the mounting holes.

BHrDxv2PSURework1.jpg


I would thing that since there is a standoff pad for the PSU on the bottom panel and it being one of the bottom mounting screws, three shouldn’t be a problem. My only concern, again a “bling” only issue, is how nasty my “hammer, grind, or file to suite” would look. But then again who looks at the back, right?!?

And since we’re discussing the PSU, any input on my earlier question concerning the 400W Liberty being enough with a 3850/70 (HIS IceQ3 STD or Turbo) added later?

Now considering the earlier question concerning going from the 74GB Raptor to the Raptor X……… and after “thinking about it”, my thoughts are this (showing my laziness!). If I transfer the Raptor X from DreamCatcher I would not have to reload/format the OS as I would be using the same hdd / mobo assy. – correct? Then I could use my “new” Raptor X in DreamCatcher and format that with XP Pro left meant from Celtic Spirit. Make sense?

Well that is for now, so I wait for y’alls’ comments and suggestions! :D
 
Okay I deleted the useless picture of the PSU rotated 180. Below in the crudest of forms is a Paint markup showing the approximate locations of the new mounting holes, switch, and power plug (RED) and some idea of what would have to be cut out (YELLOW). Think I need to invest in “easy” CAD program!

BHrDxv2PSURework2.jpg


I’ve had mixed luck with when working with this acrylic and am open to suggestions. My cutting has been done with a coping saw, grinding, and then sanding. On drilling should I start with a pilot hole and then the clearance hole size or go for it all at the same time? Also high or low speed?
 
It has been a busy few day for BH rDx and the biggest thing is…………..

IT WILL NOW BE THE SERVER!!!

Fickle aren’t I!! So we’re back to what we had and the new stuff in Bold/Italics

CASE: akasa Blue Acrylic mATX
PSU: Enermax Liberty ELT400AWT 400W
MOBO: Biostar Tforce 6100-939
CPU: AMD A64 3700+ San Diego CCBWE 0549 WPMW
HSF: AMD Stock Opteron Cooler w/ Tt 80mm Smart Fan
GPU: On Board 6100
MEMORY: G.Skill F1-3200PHU2-1GBZX (2 x 512)
HDDs: Primary > WD740GB-00FLC0 Raptor
Secondary 1 > WD5000KS-00MNB0 400GB
Secondary 2 > WD5000KS-00MNB0 400GB


After blowing up the 8800GT and killing the mobo for DreamCatcher v2.0 did some hemming and hawing about what to do and how to get at least on ‘puter up and running as I’m working on 3 and have none…..except the wife’s lappy and she getting a bit pissed about that.

Before I continue there is something I need to clarify about BluHaz reDux, it is a “bling” case first and hardware second. Meaning if hardware has to be “compromised” to keep the aesthetics I’m after so be it.

As you can see I’ve really torn into it for trying to make things fit and look good.

BHrDxv20Start1SM.jpg
BHrDxv20Start2SM.jpg


First on the list was the PSU issue that I was working on earlier. Did all the taping and marking and fretting in preparing for the drill and cutting. Must of spent several hours laying everything out and was getting a little bit confused as to what was happening to the mounting hole location. Well DORH!! Had it taped on the inside but laying it out as if it were the outside. So off came the tape and I put it aside to think about it. Part of the issue is I really needed to see the PSU thru the acrylic, so………..

Laid the back plate on the PSU to position the holes and mark the cutout needed for the power switch and plug. It was good I decided to do it this way as I actually had to move the supply up a fraction to miss a tapped insert and allow for enough material between an old mounting hole and the new one. Turns out I lost one of the mounting holes on the bottom (figured that), but the case provides a standoff / rest that carries most of the weight.

So at 01:30 Saturday Morning I started the easy re-work…..

Didn’t bother with pictures as I was cutting, filing and drilling. Basically after I made the cutout I position the back and PSU to locate one hole. After that they were bolted together and “eyeballed” the other two hole locations. For the “wiggle room” factor I used the next largest drill bit over the original clearance holes. This part was actually fairly easy and came off without a hitch. For drilling I used a cordless that was low torque and it seemed to have no grab issues with the plastic. The first time I drilled some holes I used a standard electric drill, which grabbed and broke off a piece of acrylic where I was working. Luckily it was not in a “strategic” area!

Here is what it looks like “finished”

Before…….

BHrDxv2PSURework1.jpg


After……..

BHrDxPSUFlipSM.jpg


If you look closely you’ll be able to see the cutout for the plug and switch…….

BHrDxv20PSUSWDetailSM.jpg


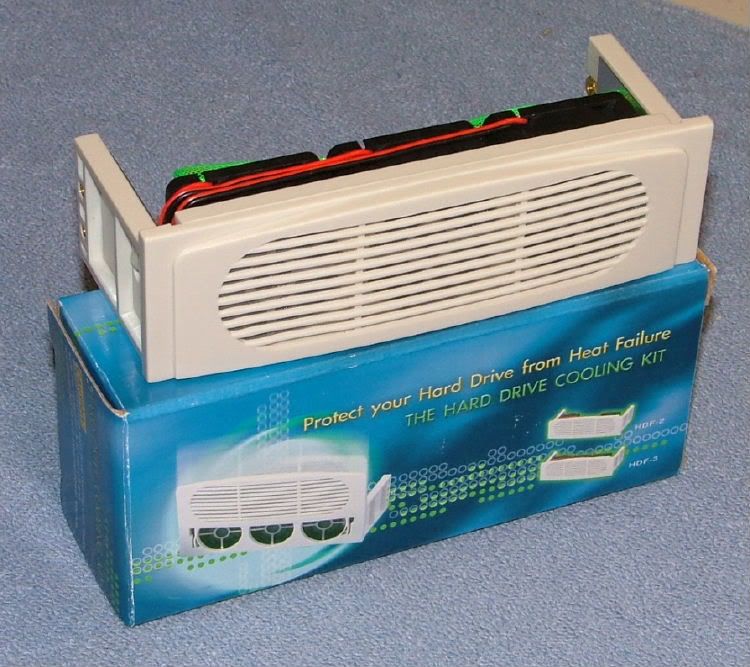
Now that this will be my “server” had to figure out where to put the other two HDDs as I’m leaving the 74GB Raptor “in place”. First and foremost the FDD had to go as one drive was to occupy that spot. I raise the Raptor’s location an inch so I wouldn't loose the fan controller as it moved up one slot. This required me to drill a couple of new mounting holes, which was no big deal. All the parts seemed to go into place without a hitch with the exception of a 5.25 bay 3 x fan / HDD cooler. This was left over from the aborted upgrade of the wife's original build called OZ1, and had decided to use it last week.

Original5-25Fan.jpg


Course being a “bling” machine I couldn’t leave it as “out of the box”…….

BHrDxv20HDDCoolerw-oGrillSM.jpg
BHrDxv20HDDCoolerRearSM.jpg
BHrDxv20HDDCoolerwithGrillSM.jpg


The brackets that come with it was/is to be used to mount one of the HDD, but as I started mounting the HDD and fan bracket it became obvious it was meant for a deeper cage. However I think it's workable. So everything was in place, the two new HDDs, and repositioned fan controller and Raptor, then…………

Along about 04:00 it occurred to me to mount the side plate that holds the mobo to see if there would be any minor interference.

Then it was down hill……… with the hardware layout that took 3 hours to get in place, there was an issue. I had a choice of covering up one of two minor items on the mobo – my only two SATA ports or the CMOS jumper. Should have gone back and looked at the original worklog for BluHaz & remember why the first HDD and then the Raptor were canted. I think it was in the back of my mind that the Biostar layout was different enough from the Chaintech 7NIL-1 so it would wouldn’t matter. Well I missed the IDE & FDD connectors unlike the 7NIL-1 but covered the other stuff. Also in flipping the PSU, the mobo power cables won't tuck away as nicely and may even get in the way of the other cable management. So much for engineering on the fly, you'd think I'd learn.

Lets see what was the reason to switch the builds again……… oh so I wouldn’t have to move the top fan and it would be an easy build I could finish in a day, that’s right.

By 05:30 think I may have re-engineered everything to fit, but it is all compromises (what’s new). Primary concern now is I will have two HDDs mounted at 45 degrees.

Eyes were heavy, too tired to think on it any more, and paint some HDD standoffs so off to bed for a short nap.
 
Late Afternoon 03/15/08 – Early Morning 03/16/08

Finally got the HDDs in place and started working on mounting the other hardware, etc. Here you can see the Raptor (Primary) at the top, a WD5000KS just below that, the fan controller, and under that is the second WD5000KS with the HDD 3 x fan cooler in front, and finally at the bottom is the Plextor 716A. The second picture shows where the first attempt to remount the Raptor occurred (empty hole) and then its final location.

BHrDxv20HDDsInPlaceSM.jpg
BHrDxv20RaptorMtgHolesSM.jpg


One of my major concerns with the new HDDs was supporting the bottom one as I was only able to use the front holes in the mounting bracket. Then I tripped across two 3.5 acrylic bay covers I had, so……..

BHrDxv20HDDSupport2SM.jpg
BHrDxv20HDDSupport1SM.jpg


Had a delay in getting the Plextor optical drive mounted (slowed everything down for fitting). When I painted the drive I had to wait a week to put on the clear coat, and during that week the cover screws disappeared. It seems they are proprietary as nothing I had would fit. Eventually they “showed up” and was able to get it mounted. After getting the HDDs and drive bay stuff in place it was time to start getting BH rDx “put together”. With the added HDDs, a running led memory mod, and the new HDD cooler wiring layout became a major nightmare. The PSU cables are long and laid out kinda sorta wasted. When the Liberty series came out they were great as SATA drives were just starting to come out. So Enermax laid the cables out PSU plug > Molex > SATA > Molex > SATA, all in about 18”. Try hiding the extra crap in a SFF case! Anyway after much shoving and cramming everything seemed to be in place.

BHrDxv20Together1SM.jpg
BHrDxv20Together2SM.jpg


It is all there except for the e-SATA bracket and cable and the PCI SATA 2 port expansion card for the 2 WD 400GBs. Here is what it now looks like from the front and a closer look at the bays units.

BHrDxv20FrtView2SM.jpg
BHrDxv20DriveBaysSM.jpg


Midmorning 03/16/08

So time to hook it up to power to see what might have come loose during the packing…….

Hooked everything up, checked connections, mobo power leds lit, and pushed the power button…….and pushed the power button…..AND PUSHED THE POWER BUTTON….. nothing. Spent 20 minutes looking and pushing to make sure everything necessary is plugged in. Then I happen to look closely at the front and………

BHrDxv20PwrWiringBroke1SM.jpg
BHrDxv20PwrWiringBroke2SM.jpg


The method of assembly for this case will require me to do a 50 – 70% disassembly to get to the part that needs repair. Oh well, kinda sorta wanted to revamp how the front cables ran anyway!
 
i am not 100% sure, but i think i remember seeing somewhere that having your hdd at an angle is bad! either horizontal or vertical is the preferred orientation, not diagonal! something about the heads skipping or shortening the lifespan of the drive.

something to consider...anybody else agree/disagree?
 
Sadly I've heard the same thing from the beginning, when I was using the Chaintech 7NIL1 and a 2800+ Barton. We'll have to see, but I think someone told me that goes back to the days when you also had to "park" a drive before moving a system.

Thanks for the concern. :D
 
While I’m waiting on the repairs etc., thought I should again start thinking about how to set this unit up software wise. Yep back to me being “software challenged”.

As a reminder, this is what I plan on using the unit for….. a home unit for only 2 adults and 2 other desktops and 1 laptop. Along with the usual shared text files there would be ripped music, photos, and occasional video editing. Added to this unit’s duties would be to share two printers and a scanner with the other ‘puters.

Originally had planned on going RAID for redundancy and for the novelty, however if I use M$ Home Server that is out the window. Also it seems the general consensus is it would be a waste. Speaking of Home Server, at close to $200 its appeal is sinking fast. However it is my understanding that the latest version is what a NOOB like me should use. XP Home doesn’t have anything in it that would work? How hard is Linux? I believe someone also suggested FreeNAS.

Again, let me remind you I need something SIMPLE as I’m VERY software challenged. :eek: The other primary reason for this build was to justify building a third computer to the wife. :D
 
Getting ready to "power up" BH rDx v2.0 as the reassembly after the busted power cable is almost finished. The 2 WD5000KSs should be "necked" and haven't supposedly been partitioned, formatted or anything. Also I haven’t finalized which OS I plan to use and XP Home is currently on the Primary (Raptor 74GB).

So can I power everything (including the new 400GBs) with out issue? Would like to see if the PSU distribution is okay, so need everything to power up. Should I format the new drives, also as they are for storage I don’t see a reason to partition – correct?
 
Late last night I finished up most of the assembly work with the idea of testing BHrDx this morning. The first mechanical issue I came across was the wiring for the speaker. Now that is one of the main things I don’t like about this case, speaker location. It is on the bottom with the back exposed to everything and needless to say with my heavy hands it is easily damaged. As a matter of fact I had to re-solder the red lead as it had be pulled off during the assembly when the power harness was damaged. Then as I was relaying out the cables last night for the final assembly I noticed the black lead had now been pulled off. So that had to be soldered before getting the rest of the stuff crammed in.

BHrDxv20SpkrIssue1SM.jpg
BHrDxv20SprWireIssue2SM.jpg


As you can see it is defiantly a tight fit and not the best in cable management!

BHrDx20CableMessSM.jpg


Well I’ve had an interesting morning to evening with BHrDx v2.0!!! Thought all I was going to do was put it back together and start it up. Man I should know better by now!!

Got set up for an ambush early as the initial start up went like nothing else. Even managed to get the SATA expansion card software loaded as well as a Window update. After the reboot for the updates everything started sliding down hill. Any way here you have it “running” in the beginning.

BHrDxv20PowerOnSM.jpg


The rear 60mm fan was not running but that didn’t affect anything so I just kept on trucking with the initial startup. After everything was running I investigated that and found out that I had a bad 3-pin extension cable, which was quickly replace after shutting down the system. However when I turned it back on I was greeted with

BHrDxv20IDECAbleIssueBootSM.jpg


Actually I had been greeted by that earlier and had swapped out the DVD-R from IDE 0 to 1 to see if there was a header issue. And yes there would be a “Floppy Disk Fail” as there isn’t a floppy. Ended up having to go into bios and delete the A: drive. However never could get rid of the ref to the 80-pin cable.

Then at start up it would request a systems disk to boot from the optical drive, so go into bios and set the hdd as first boot. Nothing it would just hang. So set the optical back as first boot and tried with my OS cd in hopes to repair. No go as it went into a loop of “load OS” reboot “load OS” reboot……. Then I noticed at boot up I didn’t show the Raptor! As it turns out the SATA cable was knocked loose from the mobo header when I swapped out the 3-pin fan cable. Then it really went down hill.

Could not get the OS to do a repair so tried for a total re-load. Must have done that 5 times complete with reformatting and partitioning. Finally said screw it shut everything down and decided to take a shower, chill, and then try again. While I’m not the greatest troubleshooter, finally figured it out as everything is up and running. Took the two WD5000KSs and the SATA expansion card out of the loop before doing the formatting and load. Not sure why but with them “missing” everything loaded up. It is just that whatever was on the HDD is now gone and forgotten. Hooked the 2 drives and card back up and reloaded the controller software and haven’t had any issues.

Did end up with two other hardware failures though, one I will eventually have to fix and the other is a “hell with it”. It seems the sensor for the front mounted temp gage broke, and will need replacement when I can find another and have the desire. Until then case temp will show “Lo C”. I installed what I call a running led memory mod which looks pretty cool under the “bling” area. However it seems on of the pushbuttons that changes pattern either is broken or the wiring is messed up. This leaves me with only one pattern, big deal.

And in closing for now I’ll leave with what that mod looks like and the variety with one of the units that still lets me.


Now just to figure what I want to do OS wise and how I want to partition & format the two 400GB HDDs.
 
While I’m still trying to figure out what to do software wise I did play a little with oc’ing before dropping everything to stock for the server thing. That can be found over at BluHaz reDux v2.0’s Last Hoo-Rah!

Mechanically going to call it 90% finished as I have two or threes issues to be addressed, depending on what one what’s to call “necessary”
1. One running led memory mod switches is not letting me select the different patterns. Forget it, as it looks fine the way it is and it would require taking the case apart.
2. It appears the sensor has broken for the front mounted temp gage. Will have to check and see if I can find a new sensor and make sure the soldering for repair will not interfere with the resistance for the reading.
3. The front USB ports are not working. Hopefully that is an easy fix and will only require me to change board headers.

And on a closing note here are three “shots in the dark”………

BHrDxv20LftSideDarkSM.jpg
BHrDxv20FrtDarkSM.jpg
BHrDxv20LT3-4DarkSM.jpg
 
Okay managed to get the front USB ports to work…..it helps when all the pins on the board header are covered by the plug! Jury still out about soldering on a new sensor for the temp gage, however here it sits in what will be its final home.

BHrDxv2inPlace1.jpg
BHrDxv2inPlaceClose.jpg


Now I need to seriously look into what OS I want/need to use for the server part. Also think this might be a good time to learn how to set up a dual boot system incase I go with MS & Linux.
 
Back
Top