• Some users have recently had their accounts hijacked. It seems that the now defunct EVGA forums might have compromised your password there and seems many are using the same PW here. We would suggest you UPDATE YOUR PASSWORD and TURN ON 2FA for your account here to further secure it. None of the compromised accounts had 2FA turned on.
    Once you have enabled 2FA, your account will be updated soon to show a badge, letting other members know that you use 2FA to protect your account. This should be beneficial for everyone that uses FSFT.

Asus VE278Q [Debezel + Custom Fix] Guide

Sargar

n00b
Joined
Jul 3, 2012
Messages
11
I decied to remove the plastic cover from my 3 ASUS VE278Q to have the smallest bezel possible for my triple monitors stand. Here the explanation to give you some ideas for your custom home made fixation maybe! (Sorry for my poor english)

1 Step: Remove the cover:

For this, I used a bricklayer tool which was very handy. I think it is the best way to do the less damage to the plastic because you need to apply a bit strength to separate the cover.

Begin with the bottom, near the buttons, it is easier:
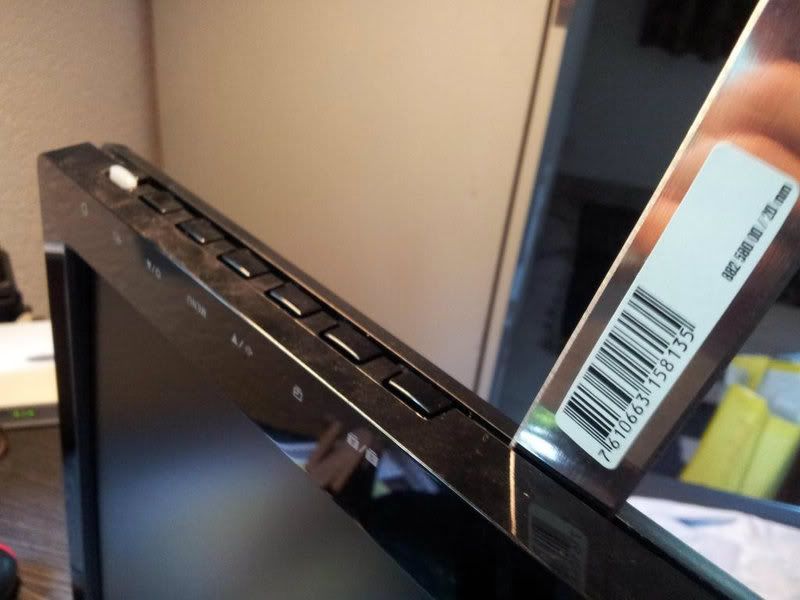
11.jpg


Then slide every 5-6 cm, it is the space between the grips:
21.jpg


31.jpg


Half done:
4.jpg


Remove the cable for the buttons and the light sensor:
6.jpg


Finished:
5.jpg


The problem now is that the panel is only maintain at the bottom and for my triple monitor stand it isn't enough stable so I decide to make my own fix (coming soon). Here the pictures:

Before and after removing the original fixation system:
7.jpg


8.jpg


Updating soon!
 
Looking at the bezel with the plastic off, it doesn't look like removing the plastic really reduced the size all that much. Is that true, or is the picture not doing the difference justice?
 
Hi,

without the plastic you reduce it by 0.7mm. it's true, it isn't a big difference but for me it is ;)
 
Ok here the next steps:

2 Step: Remove the aluminum back plate

First unscrew the top electronic circuit:
10.jpg


Then unclip the panel frame:
11.jpg


Panel frame away:
12.jpg


Frame ready for painting:
13.jpg


Back plate away:
15.jpg


3 Step: Custom fix:

The custom fix (angle bracket) will be screw on the back plate i just removed. The gap in the plastic frame allows the use of screws to fix the angle bracket to the back plate:
16.jpg


17.jpg


Now cutting the aluminum angle bracket and the pieces for the vesa hold:
18.jpg


Drilling the hole:
21.jpg


Screw the angle bracket to drill precisely the other holes:
24.jpg


25.jpg


Now rivet the angle bracket with a bigger one to have 2xright angles:
26.jpg


27.jpg


Drill a small hole in the angle bracket so it is possible the screw the back plate again once it's finished:
29.jpg


Now the panel to join the angle bracket (I will also screw behind this panel all the electronic from the ordinal fixation (see step 1)):
30.jpg


31.jpg


I also screwed a piece of wood to the panel and sticked it with double sided tape to the back plate for better stability (I stick it only at the end):
341.jpg


Sawing tube to have 25mm space between the electronic and to fix it to the panel without touching it the back plate:
351.jpg


361.jpg


Ok, I screwed all the electronic. Now before screwing the vesa pieces I check that it is aligned with another:
371.jpg


And here the 3 displays mounted! Now just have to do some more things (insulations, ...), cable management and configure it so that I can switch between landscape and portrait orientation quickly:
39.jpg


40-1.jpg
 
Also painting the frames black is supposed to be bad because the silver acts like a mirror and reflects/bleeds the surrounding color and helps the human eye disappate the borders even more.

Are the frames pure steel/aluminum? Do you think it would have been easy to buff them to a mirror like finish?
 
Hi,

I confirm that the Asus VE278Q is a "floating box" design. I didn't know it before i went for debezelling it. Thats why it took me more time and job to transform it.

Floating box:
the floating box contains all the electronic parts and a rail at the bottom in which you "slide" the panel in and then screw the 2 parts together (you can see it on the fifth picture, the monitor is up side down on this picture). As a consequence, if you leave it that way and use the vesa fix, I think the whole fixation is very fragile, breakable. That's the reason for the custom fix.

Frame:
Once you remove the plastic cover, the frame can be removed quite easy. You can then chose to paint it the way you want to have it (black, glossy, etc). I painted it in black because between the frame and the displayed picture you have a small black gap like you can see it on this picture (picture from the link you posted):
IMG_1331.JPG


So if the frame is black, I feel it more uniform: you have only 2 different colors: the color of the displayed picture and the color of the gap + the frame. Note that you can even more reduce the distance by putting the center monitor a bit in front and the other 2 monitors behind so that the frame of the center cover the frame of the 2 others. While playing, your eyes won't notice the small depth difference.

If you need more info, feel free to ask. I can take a picture of the floating box and post it if you want.
 
Wow, thank you so much for responding! Yes, any more pictures you could provide of the floating box would be great! Also, if you have an Amazon link for the tool you used, that would be nice as well! Can't seem to find a good sharp putty knife or anything that will separate the plastic cleanly.

I have no where near the skill that you have to fabricate something myself. I don't think I could replicate your custom fix in a thousand years!

What I was thinking was I'd get a bunch of that HVAC Metal/Foil repair tape and some Loctite Professional Super Glue, which I hear is awesome for metal to metal bonding, and going to town on the floating box. First by hitting it with the super glue then taping it completely down with the metal repair tape.

I figure if the Mythbusters can pick up a car with a few drops of superglue, no problem for a monitor. Though I might need to use actual epoxy if I want it to be long term. I hear superglue and the constant heat of the monitor panel might compromise the bond after awhile.

Once again, thank you so very very much for posting this thread. It was the only one I could find of someone opening up the VE278Q to remove the bezel. I'd been looking at this monitor for a few months now, but never saw anyone debezel it till now. You just helped me pull the trigger and get a stand and 3 VE278Q's. :cool:
 
As an Amazon Associate, HardForum may earn from qualifying purchases.
Now that I think about it, I also agree with you about painting the frame black. But as a test I'm going to try something with the frame.

I bought 3M 32044 Imperial Wetordry 9" x 11" 2000 Grit Sheet, Meguiar's Hi-Tech Sanding Backing Pad, and Mothers 05101 Mag & Aluminum Polish. I'm going to see if I can get a really nice reflective surface and see if I can detect that "bleed" effect folks talk about and then cover it with some matte black tape and see which one I prefer.

If it's alright with you, I can post pictures of my build here once I get everything!
 
As an Amazon Associate, HardForum may earn from qualifying purchases.
Wich VESA, or tripple monitor stand is this? I'm searching the same one but DUAL monitor, for 2 27" 16:9 lcd's, but don't know the exact name for purchase in europe.
 
I know.. kind of old thread and the question was already asked but.. I just wanted to bump and ask if anyone knows the monitor mount being used by Sargar?
 
Back
Top