• Some users have recently had their accounts hijacked. It seems that the now defunct EVGA forums might have compromised your password there and seems many are using the same PW here. We would suggest you UPDATE YOUR PASSWORD and TURN ON 2FA for your account here to further secure it. None of the compromised accounts had 2FA turned on.
    Once you have enabled 2FA, your account will be updated soon to show a badge, letting other members know that you use 2FA to protect your account. This should be beneficial for everyone that uses FSFT.

Arcygenical03 Folding System

Update 6


Alright, so I've got a semi large update for everyone this round... I'm about... Oh, halfway to completion for this project right now, which is very exciting for me! The system is ALMOST operational as it stands, but I'm not entirely sure if I want to wait to build it completely, or boot it up now to start folding. Either way, let's start with the pictures :)

First up, the first of 2 PerformancePC's orders... You can see that I got a few fittings, some sleeving, some cable ties, and a Maze 5 low profile GPU waterblock... I accidently ordered the wrong tubing though, so plumbing this loop will have to wait a bit!
26PPCsorder1.jpg


Now let's mount that last waterblock. I'm pissed to realize that the low profile block actually would have fit on an XFX card... Which means I'll have to buy yet ANOTHER 8800GS eventually :p. I still need to cut the rest of the ramsinks out... But I won't need them until I get the CORRECT tubing. :rolleyes:
27fourgpus.jpg


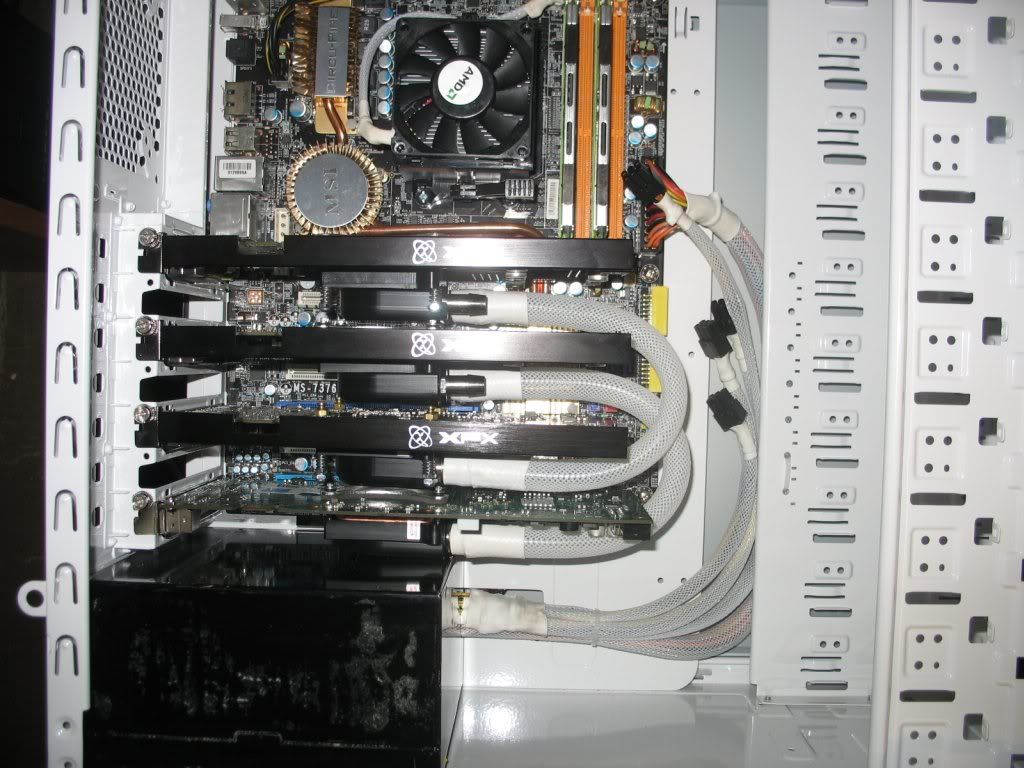
Here's all the 4 GPU's installed with the tubes running between 2 of them. I'm putting cards 1 and 3 in parallel with cards 2 and 4. The cards will intersect with 2 Koolance F fittings (I'll show these later). The tubing between cards is 7/16" ID, and the tubing to/from the F fittings is 3/8" ID. The smaller diameter will help reduce "tube" clutter.
28fourgpusinstalled.jpg


Lets wire up the radiator fans! And sleeve them while we're at it.
29radfans.jpg


Just a single piece of sleeving with some "stealth" wire addition.
30radwiringexit.jpg


Here are my fans in their new home... And you can see my new fish in the background :D
31myfans.jpg


Here's what people will see looking through the front mesh... And my fish again!
32coverreplaced.jpg


While we're at it, my betta fish fighting his mirror image...
33newfriend1.jpg


And his really rare orange colouration (very Rare for a betta, most "orange" people see is just the red of a sick pet-store betta). On an unrelated note, I'm still torn on a name for this little guy... I bought him because of both the rare colouration and the fact that orange+blue is our school colour scheme!
34newfriend2.jpg


Back to the mod, I installed the fans on the radiator...
35radfans.jpg


Second order came in from PPC's and Ebay. In this one I got some more sleeving... The world's SMALLEST Ethernet cord (in white to complete the whole theme!) and a bitspower Male to Male fitting to connect a Koolance F fitting to the pump. Oh, PPC's sent me the WRONG TUBING... First I ordered the wrong kind, then they sent the wrong kind! Gah! PUSHED BACK ANOTHER WEEK.
36ppcsorder2.jpg


Here we have the pump, complete with F fitting and the Bitspower Male to Male (sounds dirty) adapter...
37bitspowermalemale.jpg


Let's sleeve that biatch!
39sleevedpump.jpg


Now... Here's an image complete with a few new elements. First up you can see the pump in it's new location... I've decided to attach the pump to the radiator directly with the help of a male to male fitting. Second, I've decided to include a picture of the cardboard version of my acrylic PSU shroud... I've hit a bit of a design snag though... My 900w heat gun pops like, every circuit breaker I've tried in this entire building! I have no idea what I should do! I might have to hold off on this part until I go home over Thanksgiving... Sigh...
40cardboardcutout.jpg


Here I've got a quick shot from the front of the case showing some more of the internal cabling... That cardboard cutout will probably be a full 3D shroud and cover up the wires you can see from this view (Worst explanation ever! Sorry, you'll see what I mean later...)
41pumpwiring1.jpg


And finally tonight we can see where the radiator's going to be installed, in the front, and how the pump is going to be installed... I'd really love to have the pump totally hidden, so I'm going to use a male-male homoerotic fitting toscrew it directly into the radiator... The top part of this fitting will be my T line entrance. Note these are the wrong tubes...
42Ffitting1.jpg
 
Cool fish :D

Cool mod too ;) Very inspiring to see someone try such an 'extreme' mod which actually is more efficient than using a stack of PCs to fold as well :)

*waits for more updates*
 
Hey two things you should get a turtle as well they are pretty cool to have around, and i have been folding for maximumpc, sorry i didnt know the[H] had a folding team but what in the world is the display showing?:D
 
Another 8800GS? What for? Doesn't the board only have 4 slots?
 
Eh, I've lost camera access for the last week or so...

But, the system is definitely up and running ;)


More pics! Oh, and folding stats for this monster :D
 
I was confused for a second before I went back and looked at the pics and saw that the bottom of the case has an air intake for the PSU - nice looking setup!

Also, off topic but is there a minimum length for a network cable? I don't think so, right?
 
Also, off topic but is there a minimum length for a network cable? I don't think so, right?

There is no minimum length for an ethernet cable, though you may want to have a few cm of cable at least so that you can at least bend it a bit ;)
 
More pics! Oh, and folding stats for this monster :D

Hehe, alright, I got a few more pics coming up... Not that many considering I hit a snag, but pics none the less :).

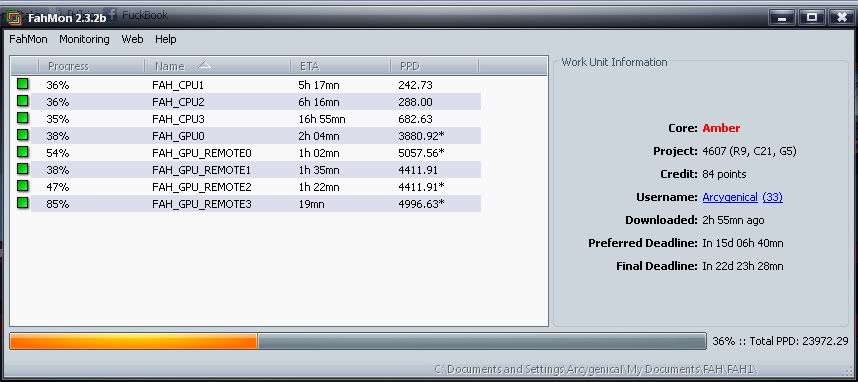
The GPU_REMOTEs here are the FAHmon PPD stats so far :)
ABS.jpg


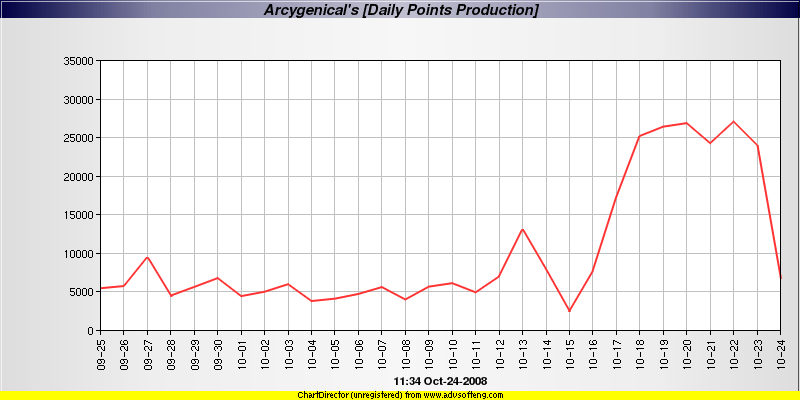
And the PPD ramp from my old folding power :p
ppdramp.png


[H]utch;1033219338 said:
That colour scheme looks amazing. Great job so far!

Thankyou!

I was confused for a second before I went back and looked at the pics and saw that the bottom of the case has an air intake for the PSU - nice looking setup!

Also, off topic but is there a minimum length for a network cable? I don't think so, right?

Nope, network cables can be as short, and as long (within reason of course) as you want em to be.

Thanks for the comment!

There is no minimum length for an ethernet cable, though you may want to have a few cm of cable at least so that you can at least bend it a bit ;)

Bah, wiggle room is for pansies... But, uhm... I lost the 1" cable (I dunno where I put it damnit!)
 
Update 7

Woo! It's been awhile since my last update, some trivial things (like, y'know, real life) cropped up and prevented me from working on the system... The good news is that it's fully operational and working almost 24/7 for the [H]orde!

I finally got all the WC parts in... Mainly the thinner tubing that I required to finish the mod... Here's the supply lines from the pump:
51watersetup1.jpg


And here's the return lines from the GPU...
52watersetup2.jpg


Yeah, the case is really cramped now, I realize that... Unfortunately, with 4 PCIe power ports, and dual GPU loops, there's really not much you can do to stave off all the cabling and tubing...

I figured that now would be a better time than any to show you how the pump is connected... Since these CPX-1 pumps use, literally, the shittiest mounts available of any pump currently on the market today, I decided "To hell with it!" And mounted it directly to the radiator.
50pumpsetup.jpg


I've mounted the Radiator/pump assembly in the case now using 2 L brackets (that, are very ugly in the following pictures but have since been re-painted).
46RadiatorInstalled.jpg


Here's a confusingly sideways view of the Tline and the pump area... I got some clamps on these fittings because, in all honesty, the Dtek stubby fittings really don't grab onto thin walled tubing very well. You can also see the return lines coalesce into the larger line to the radiator...
53Tlinesetup.jpg


I started getting the light wiring all finished up... There's 24 wires to supply 8 bicolor LED's with power. :eek:.
49lightwiring.jpg


Here's the other set of lighting (My choices will be white, red and Purple. Red will always be on, white and purple will be controlled by switches in the front panel). It's a 6" long white LED strip that, for all intents and purposes, is way, way too bright :D.
43whiteLEDs.jpg


You can see how snugly they fit beside the radiator...
47lightsrad.jpg


I'll be mounting the red/blue bicolor LED's in the corners of the top intake fans like so...
45Fanslighting.jpg


Speaking of LED's why the hell do cheap eBay sellers give you 1/4w resistors for use with 12v sources? The resistors sink well into the 0.2w range and, yes they do work, but they also reach temperatures close to the surface of the sun :mad:

Now, I'll be controlling the white and blue LED's via small pushbutton latching switches... But, I wanted to mount them somewhere without requiring too much modification... So... I'm going to drill out the front headphone ports, and mount them there. Snag #1: I don't have a drillbit large enough for this, so this step will have to wait until November when I can go to my workshop at home...

So, to mount them there, I needed to remove the audio connectors from the front IO ports...
48cannibalizedIO.jpg


I've recently received the switches and the LED's, however the LED's need better resistors, so they have to wait before I can put them in.

Also, there isn't a power plug in the entire dorm that can accomodate the 1250w heat gun I have, so I'll need to fabricate the acrylic shield (to replace the ugly cardboard one!) at home over the US thanksgiving...

I think that's the last update until the 30th of November or so, yeah, a long way away, but at least the machine is up and working right now :D
 
Wow, it just doesn't matter!!!! Any case's resistance to your ability to make it beautiful is futile!!!!!!!

I'm currently in the midst of building a similar rig, but I'll be using a MSI P6N Diamond with 4 evga 8800GS cards that will be volt-modded & capable of pushing a tad over 6k ppd each :) ... Since you have yours under water, you might even be able to get more out of them... Here's a guide by the guy that's doing mine for me.

When you get out of school, I hope you don't give up this hobby!
 
Hi I just read your thread! Awesome job.

Like you i'm taking advantage of the FREE dorm power. I just completed dual quad core opteron system with dual 9800 GX2's. Though I didn't water cool it like you. How much did this end up costing you total?

I also had a question on your folding. Are you only running a dual core processor supporting 4 gpu's? I though it was 1 cpu per 1 gpu but I could very well be wrong. My box is pushing 13k right now until my other GX2 gets here. Maybe I'll go for three...hmm.

Also are you running FAHMON through a network share? ie is it reading the fah log's over the network?

It's very weird we're college students and it seems we both had the same idea at almost the same time. Hahah and we're the same age.

Go folding!
 
I also had a question on your folding. Are you only running a dual core processor supporting 4 gpu's? I though it was 1 cpu per 1 gpu but I could very well be wrong. My box is pushing 13k right now until my other GX2 gets here. Maybe I'll go for three...hmm.

On XP, the GPU client seems to eat a bunch of the cycles, but on Vista it's barely noticeable. So to answer your question, it depends on your OS. Secondly, 13k out of 2 GX2s seems incredibly low to me. I would highly suggest getting RivaTuner & bump up the Shaders. When you do that, increase the fan speed as well from within RivaTuner to account for the increased temps.

I am running a dual GPU rig with 2 9800GTX+ cards that put out close to 7000ppd each. I bumped the shader up until I started getting errors within the folding app, then decreased the settings little by little until they stabilized. I have my fans running at about 85% & temps are around 45C.

Also are you running FAHMON through a network share? ie is it reading the fah log's over the network?

Very simple to do. It's simply a matter of sharing the work folder, then on the machine that will have FahMon monitoring the rest, browse the network for that shared folder. There's tons of guides around the net if you get stuck.
 
Hi indiginity,

Not to thread jack but the 9800 GTX+ runs at a higher clock speed by default ( 600mhz vs 738mhz) so of course you'll get a higher ppd. Currently I'm average around 6000ppd at 710mhz core speed per core, which is within the acceptable and reproducible ppd.
 
Back
Top