• Some users have recently had their accounts hijacked. It seems that the now defunct EVGA forums might have compromised your password there and seems many are using the same PW here. We would suggest you UPDATE YOUR PASSWORD and TURN ON 2FA for your account here to further secure it. None of the compromised accounts had 2FA turned on.
    Once you have enabled 2FA, your account will be updated soon to show a badge, letting other members know that you use 2FA to protect your account. This should be beneficial for everyone that uses FSFT.

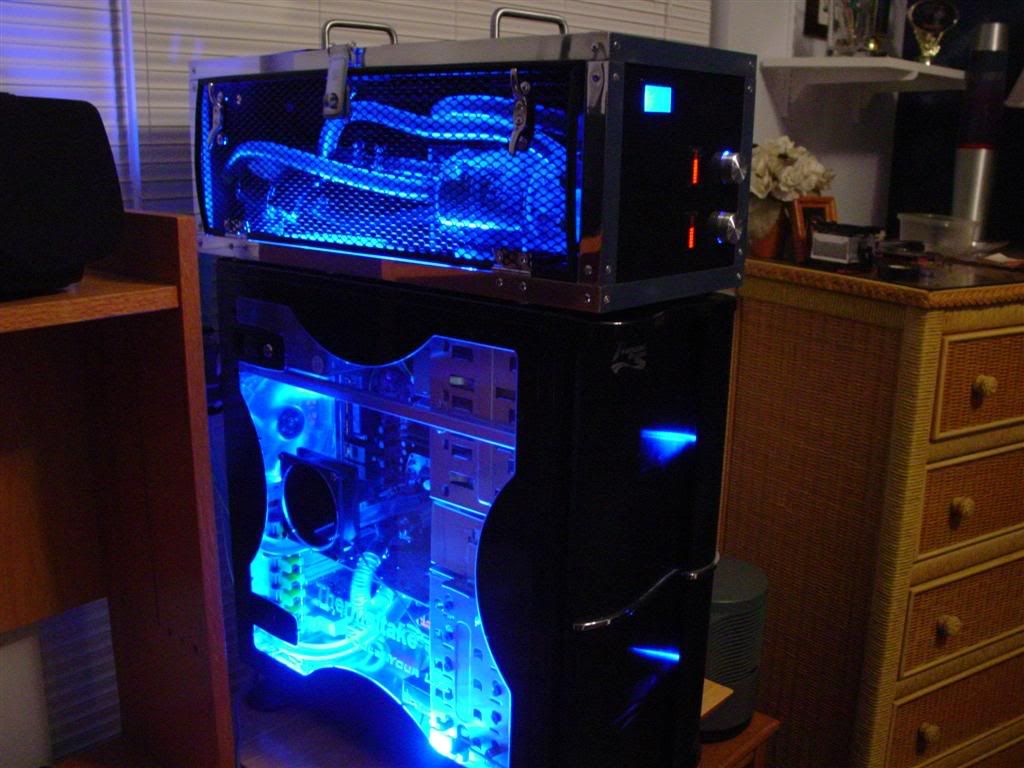
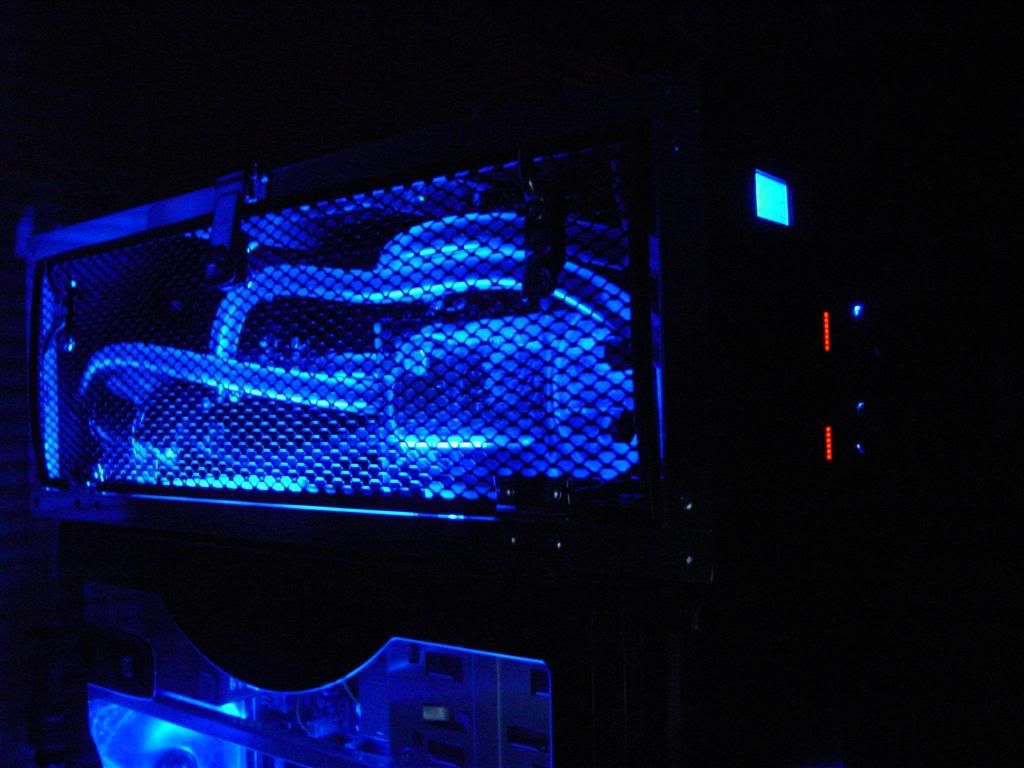
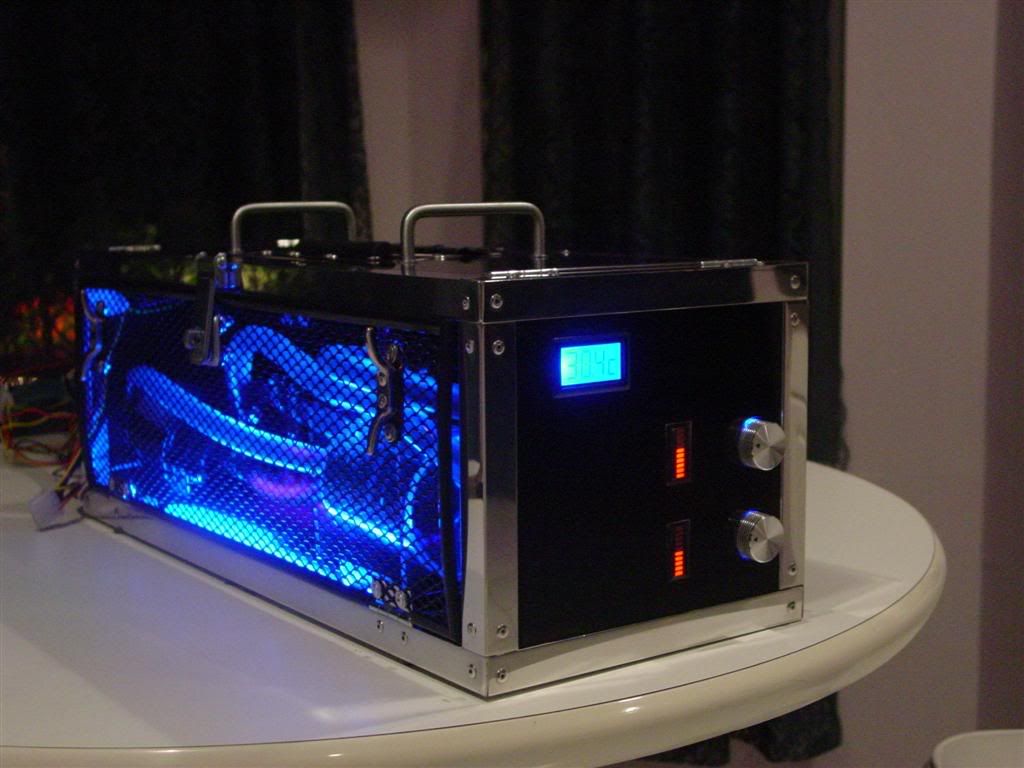
External watercooling box project

Mr. Muffin said:

Thanks for the link, although i've checked around everywherre for the criticool reservoir.

Erasmus354 said:
I believe the resevoir you are looking for is the Criticool "Waterplant" resevoir. http://www.criticool.com/

You might also be able to find it at a distributor.

Yeah, the criticool reservoir is very well built and looks good to boot, imho. Unfortunately, www.criticool.com has been "upgrading their inventory" or whatever for quite some time. I doubt they are still in business.

I've googled and froogled to no tomorrow to find a US distributor for this reservoir, but haven't had any luck.

I do have some good news, though. The reservoir, while having some cracks, doesn't seem to be leaking. I flipped it around so the cracks face the heater core, and they aren't too visible. Unless the cracks spead or it starts leaking, I'm going to stick with the current one I have.
 
wow...awesome work. I'm actually planning something similar. I was initially going to build a box for my case to sit on that would house my WC gear, but now i'm leaning towards a case-top box similar to yours. I'm planning on my audio controls built into the front of my box, and possibly an LCD screen.

Man, yours looks great. well done.
 
seniorpaul said:
wow...awesome work. I'm actually planning something similar. I was initially going to build a box for my case to sit on that would house my WC gear, but now i'm leaning towards a case-top box similar to yours. I'm planning on my audio controls built into the front of my box, and possibly an LCD screen.

Man, yours looks great. well done.

Yeah, I was originally going to go with a LCD character screen on the front. I don't know anything about them though, and it would have taken forever to rig it up correctly to report temperatues without having it hooked directly up to the PC (I didn't want another cord going out and around to the inside).

By the time the $13 ps1 LCD's came out, I had already made the cuts and painted the front. Maybe you should check those out in the hotdeals forum if they are still on sale :p.
 
If you ever need that reservoir shoot me a PM. I have one I never used. I`ll have to dig it up though.
 
Fanatik said:
If you ever need that reservoir shoot me a PM. I have one I never used. I`ll have to dig it up though.

Cool, thanks. I'm going to stick with the one I have now, as I flipped it around and the cracks aren't too visible. I also don't think the cracks go all the way through the plexi because I don't have any leaking (fortunately).

If I ever have any issues I'll be sure to shoot you a PM though. Is it in good condition?
 
I believe so but its been in a box in closet for a long time. Its never been used in a watercooling loop. Only the barbs were attached.
 
Well, it has been around a month since my last update. I was simply too bogged down with classes to worry about this project.

Now that I am on break, however, I have lots of time to work!

I am confident that I have the electronics working error free now. I ended up rebuilding a LM3914 circuit.

Here is everything (minus the temperature LCD) mounted to the back. I didn't want anything permanent so I used electrical tape and velcro.
DSC02294.jpg


The front all polished up! There is a bit of polish around the 10 element LED's I'll eventually get this out.
DSC02298.jpg


With the front mounted but everything off
DSC02308.jpg

DSC02309.jpg


Powered up :p. The camera doesn't take a good picture of the temperature numbers, but oh well.
DSC02312.jpg

DSC02313.jpg

DSC02314.jpg

DSC02315.jpg


Kitchen lights off. I know the blue CC is bright, but you won't directly see it once the side mesh door is on.
DSC02316.jpg


As you can see, I didn't rivet a lot of it in yet. I want to be absolutely sure everything works fine before doing so.

Here is the side mesh door I have been working on:
DSC02320.jpg


Shiny handles :D
DSC02321.jpg


I found this at home depot and liked it.
DSC02322.jpg


The next step is to do a bit of drilling and riveting after some lengthy testing. I don't want to find out something is b0rked later on.

Once that is all set, I can gut my PC and drill the entry holes, grommet them, and begin to install my w/c grear.

I should have the box pumping water into my system by Jan.
 
I tell you what. Every one on this site could learn a thing or two from you. Project is just mind blowing, everythings perfect.
 
altec said:
I tell you what. Every one on this site could learn a thing or two from you. Project is just mind blowing, everythings perfect.

Heh, thanks, but it surely isn't perfect...there are small imperfections all over the place.

Anyway, I noticed the strangest thing tonight when testing. When I touch anywhere on the frame, the temperature on the LCD display instantly drops about 5 degrees. When I touch a painted panel it it also instantly drops, but only by .5-1C.

When I remove my finger, it instantly jumps back up. This leads me to believe that either the sensor isn't electrically isolated.

I took a voltmeter and measured the voltage between me and the edge of the frame, and I got a very very small amount, on the same order as I would get between my arms while standing on tile floor. The temperature did not budge when I did this.

Hopefully there isn't something seriosuly wrong with my electronics or sensor. I never noticed this before as it usually sits on metal case (although it too is painted). Right now it is on the kitchen table, connected to a grounded PSU (jumped using the pin trick).

Does anyone have any insight? I don't exactly know what forum I should post this in, but I definetly want to fix it, especially if it is a health or safety hazard.

EDIT: Yep, I am pretty confident that the temperature sensor is infact electrically part of the system. I turned eveyrthing off except the temperature sensor and the same thing happened.

When I touched the grounded body of the PSU to the aluminum frame, the LCD lights turned off (but the backlight was on). This has happened before on numerous occasions and I had no idea why. After I cut the power and turned it back on, the LCD worked fine.

I guess I need to drain the system and add some more epoxy or glue where the sensor is. A bit of a pain in the butt, but it is worth it.

If I am wrong here, feel free to chime in. It'll save me a lot of time and effort.
 
It occurred to me that I didn't quite turn everything off...I left the pump and cold cathode on.

Turns out it was the cold cathode, and not the temperature sensor. I switched it off, and my temperatures went back to normal right away. Touching the frame to the frame of the PSU didn't disrupt the display either.

This makes my job a lot easier!
 
It looks like the box itself is almost finished. I completed a lot today. Here is a list:

-Redrilled a few holes (I flipped a panel around 180 degrees a LONG time ago and never redrilled)
-Riveted all remaining things together
-Put the side mesh door on
-Re-polished everything
-Cleaned out as much polish residue on the front near the LEDs as I could.

Here are some pics of the results. Note that I still am using a testing power supply so when things are done I won't have cables coming out the side. I also removed the cold cathode inverter from the case for now.

With kitchen lights on:
768fcc29.jpg

a736ee8d.jpg


And off :D:
444da32b.jpg

99b10411.jpg


I still haven't quite figured out one thing though. Even when the cold cathode isn't directly connected to the molex that the temperature sensor is on, when it is switched on, the temperature instantly jumps up 5C. When it is switched off, it drops the same amount.

Does this sound like an electrical problem or something else? Maybe the cold cathode operation interferes with the temperature sensor? I don't think the sensor is electrically connected to the water and everything else because only the cathode affects it.

I'll try taking out the cathode and moving it really far away from the temperature sensor and report the results. This is really bugging me, lol (especially if it could cause long-term harm).
 
Maybe its EMI? Not to sure though.

I like your watercooling case, I hope it yields godlike temperatures for you. You have put a lot of effort into this, its obvious you deserve to be congratulated for your efforts! Keep it up and I hope you find your problems!
 
TehRoflcopter said:
Maybe its EMI? Not to sure though.

I like your watercooling case, I hope it yields godlike temperatures for you. You have put a lot of effort into this, its obvious you deserve to be congratulated for your efforts! Keep it up and I hope you find your problems!

So far the temperatures seem great. Even though the only heat load is the pump, water temperatures are often within 1-2C of room temperature. I'll definetly post temperatures when it is all set up.

I plan on unlidding my opteron to get better temperatures too. Right now, even though it is a stock cooler, I get horrible temperatures at 2650 mhz, 1.5 vcore, and room temperature around 24C. I idle around 48C and load at 60+. I remounted several times and applied AS5 per directions. It has to be the IHS.
 
Hey, i just joined this forum so I could ask some questions concerning you mirror finish paint job. First of all, congrats on the box looking great.

I am about to paint my entire case, and hopefully a mirror finish. Can you send me a detailed method of how to paint with a mirror finish (i was going to paint it red if that matters)

Thankyou in advanced
 
emerald_AURA said:
Hey, i just joined this forum so I could ask some questions concerning you mirror finish paint job. First of all, congrats on the box looking great.

I am about to paint my entire case, and hopefully a mirror finish. Can you send me a detailed method of how to paint with a mirror finish (i was going to paint it red if that matters)

Thankyou in advanced

Sure, no problem. I pretty much followed this guide http://case-mods.linear1.org/case-mod-101-how-to-paint-your-computer-case-part-1/

I didn't do the clearcoat at the end. I tested it and couldn't get a nice finish. If you are brave, try it, but practice on some scrap metal first.

Also, many guides stress very thin coats. I agree that the very first coat of primer or color should be thin, but the 2nd and 3rd coats should be fairly thick. I kept running into problems of cutting through the color coat and hitting primer (a bad thing!) or cutting through primer and hit bare metal.

If at any time you cut through, you want to repaint with another coat, preferably thick (but not running, of course).

Also, when you paint, I find that the following method works best:
-Start at the top right corner about 1.5 feet from what you are painting. Move closer if necessary, but try to keep some distance.
-Sweep back and forth going down vertically slowly on the surface you are painting. Almost all paint cans have a nice diagram of this...basically you do a snake.
-After a light coat sweep, rotate 45 degrees and repeat. Going at this diagonal angle will help disperse the paint and get an even coat.
-Repeat the above until you have gone all around. When you are done you will have a finish that looks wet, but not dripping of course. You don't want to do it or hammer it on, but like I said, you want ample paint because you are sanding it flat. There will inevitably be low areas and such, and if you don't have enough paint, you WILL cut through. I learned this the hard way.

When sanding, make sure the paint is 100% flat. You don't want any lowspots or divets (these will inevitably happen) when you are done. Otherwise, they will look like crap when you are done and show up as lightly colored lowspots. A few of these may be inevitable, but you want to try and limit them.

When it comes to polishing, take your time and work in small areas. If you want a nice finish, you will spend a lot of time polishing over and over. The results pay off though. Get a good polish, such as the scratch and swirl remover stuff by 3M.

Be prepared to take a lot of time and effort. It took months until I was done because I kept messing up and cutting through, but then painting was completely new to me.

Good luck, and let me know if you have any questions.
 
Another update!

Well, I didn't do a whole lot today, but I decided to relap my blocks, and to do it properly this time. I used a permanent marker to draw lines on the block to indicate lowspots. It worked out pretty well.

Note that there are a couple dings on the bottom of the whitewater - it came like this as I bought it used a long time ago (I wish I would have known about them beforehand...grr). Anyway, I'd end up sanding half the base off, if not cut through the thin base itself to the channels getting these out. I don't care about the dings as they don't come into contact with the core, fortunately

The results compared to graph paper - it is flat :D:
0a148995.jpg

1ba30905.jpg


Lettering for another comparison on the gpu block:
56e3cc8e.jpg


I need to dig around and find some molex connectors on something I can cut off to make my removable power cord. I thought radioshack carried them so I didn't bother bringing down old PC stuff to cut up, and I want to avoid ordering cables online due to the wait in time and shipping cost.

As far as I know, no place offers molex connectors locally. Heck, a couple 4 pin splitters would do fine, as I have the 18 AWG wires I'll use...I just need the connectors. I guess I'll check out BB and CompUSA.
 
Holy crap man, I just setup my water cooling about 2 days ago, and I'm loving it (same pump as you ;)). But damn, this is probably one of the nicest case mods I've ever seen. I wish I had the time/ability/tools to do that, becuase damn, I so would.

I noticed you cut off the end of the plug from the Eheim but never mentioned what you were going to do with it. Just put a shorter power plug on? I'm looking into possibly self-containing my system and I was wondering how you were doing it there.

Keep at it, you're at the home stretch now.

Full Folding Ahead!

 
Thanks for the positive replies everyone :).

Tsuehpsyde, originally I was going to use the eheim1250, but I found a good deal on an AquaXtreme50z. I wanted a more powerful pump, so I jumped on it.

Originally the eheim was connected to a Criticool PCI Relay. I bought it like this used. I unattached it from the PCI card and resoldered it to an extension cord so I could plug it straight into the wall again. I then ended up selling it.

This is why I will have an empty grommeted hole on the back...it was for the AC out power cord. The other one is for DC to my computer's PSU. I still need to make this cord, though, and I have been using a spare PSU for the time being to power my box for testing purposes.

Did that answer your question?
 
Well, I finally decided to gut my case. Wow, there sure were some dust bunnies that I'd never seen before. I'll definetly need to clean it all up after I drill into it.
DSC02351.jpg


Last night I modified my motherboard so I can run my TwinMOS SP (new BH-5) at 3.3V if I wish, since my board is only capable of 2.85V. My memory can't break 220 mhz stable at 2.85.

So, following a guide on xtremesystems, I ran a wire from my 3.3V bus to the + end of the capacitor nearest my memory. I decided to put in a switch so I can toggle between normal and +3.3V.

DSC02353.jpg


It works fine so far, but I'm not going to mess around testing for stability yet. I want to get a dedicated ram cooling fan first.

So I don't go through withdrawal, I set my computer up on a table for the time being without my case!
DSC02350.jpg


I hate doing this, but hey, what are ya gonna do? I'm always afraid I'm going to short something and fry something in my PC.

Anyway, I'll hopefully get to drilling the entry holes for my tubes today.
 
I have it all up and running!

Leak testing:
DSC02362.jpg


My homemade adapter for my d-tek VGA cooler. You don't see anyone using this block anymore, heh. It works fairly well, though.
DSC02369.jpg


Powered up, lights on:
DSC02371.jpg

DSC02372.jpg


Side door and top panels open:
DSC02376.jpg


Lights off:
DSC02373.jpg

DSC02374.jpg


A look inside at the d-tek WW and GPU cooler:
DSC02378.jpg


Flash on to see inside:
DSC02383.jpg


Here is a breakdown of my temperatures so far at stock settings:

CPU Idle: 36-40C (can't quite tell yet)
CPU Load: 45C
GPU Idle: 48C
GPU Load: 52C
Inline water temperature sensor range: 26.6-27.4C

I am confident that once I remove my CPU's IHS I will get better cpu temperatures. My water temperature is excellent, so this make ssense. I had HORRIBLE temperatures on air (load at 60C, idle at 52C). So yeah, my IHS and core probably have bad contact. My only worry is that I'll need to modify the cam on my cpu socket to get a good mount of waterblock on my cpu.

I could probably tweak the mount on my gpu wb too, as my homemade adapter isn't the best solution.

But hey, at least I don't have any leaks or anything. I got gutsy and powered it up after an hour or so of leak testing. I'll just be sure to keep a good eye on everything in the next day or two.

It's also nice to have everything up and running, finally.
 
Thats odd... I would have honestly guessed your temperatures to be quite a bit better on that CPU... Weird... When did the AMD's start putting out a lot of heat again?
 
TehRoflcopter said:
Thats odd... I would have honestly guessed your temperatures to be quite a bit better on that CPU... Weird... When did the AMD's start putting out a lot of heat again?

Well, opteron processors tend to run fairly hot from what I have seen. Not Prescott hot, but still, not cool either.

The problem with a lot of athlon 64's that I have seen is there is often a bad interface between the CPU core and the Integrated Heat Spreader (IHS). If there is a bad contact there, then no matter how good your cooling system is, you are limited by the crappy contact.

I'm going to remove my IHS soon and see how low my temperatures get. I've seen drops as high as 10-15C when removing the IHS.

I just need to be careful not to crack the core when tightening the waterblock down. It shouldn't be much of an issue though, since I watercooled Athlon XP's before, and they were more fragile and IHS-less.
 
I saw a guy make a shim out of some fabric type material for his Pentium M when he put it on his motherboard... It didn't go directly on his core, but rather around the perimeter of his chip.

I'm considering removing the shim on my Northwood, but i'm not sure if its epoxied or not, so I don't know if I am even going to bother.
 
Yeah, a protective shim is a good idea. I've thought about cutting some squares or strips of the "weatherstrip" foam and place it around the cpu packaging after I remove the IHS to protect the core from cracking.

The main thing I need to be careful of is tightening down the block too much before I find out whether or not the socket "cam" is higher than the cpu core on my motherboard (the heights vary). If it is indeed higher, this will put undue stress on one edge/corner of the cpu die, and could very well chip it. This has happened several times over on the xs forums.

I'm out of town now so I won't get to it in a few days, but when I get to it I'll definetly post the results. I really think I'll drop my temps by 8-10C, minimum. If not, I'll do some looking into how much flow I am getting and see how I can improve that without spending tons of money on a 2nd pump (which really shouldn't be necessary).

If push comes to shove, I'll replace my cpu/gpu blocks with some newer ones.
 
Merry Christmas everyone!

I've been out of town, but some gear I ordered came in a few days ago:
DSC02396.jpg


I ordered a sleeving kit since it has a lot of different flexo-pet sleeving and heatshink. I don't intend on sleeving my PSU, since I'll probably upgrade it within the year (seems stupid to go through all of that work) but I want the materials to sleeve other wires. I also ordered some extra sleeving, heatshink, molex connectors, molex pins, y-splitters, and AS5.

I'll build the power cord soon that will run from my PC's PSU to the external box.

I am even more convinced that my IHS is to blame for my lackluster temps. I let the system run for a few days and came home.

Here is a breakdown of my temp data:
Vcore:1.55
Clock: 2730 mhz
Idle: 45C
Load: 54C
Water: 28C
Room: 25-26C

I pushed my settings down to stock:
Vcore: 1.34
Clock: 2000 mhz
Idle: 44C
Load: 50C
Water: 28C
Room: 25-26C

Ok, this is messed up. I looked at the base of my stock HSF and I can tell where the edges of the IHS mated with the HSF...it is slightly marked and scratched. This means the IHS is concave. This would explain a lot.

I'm going to take off the IHS today after I do a bit of extra reading. I don't want to cut the packaging, bend pins, or cut off a capacitor. I already know to put the pins in some foam (like the cpu is packaged with) and to use a blade and mark off where 3mm is on the blade (so I don't go too deep). I just want to be extra careful :).
 
I don't think its your IHS to blame, are you sure you mounted the block right on ur cpu? And for your GPU, you might want to get some ramsinks for the ram, don't just leave them like that.
 
Hexus0 said:
I don't think its your IHS to blame, are you sure you mounted the block right on ur cpu? And for your GPU, you might want to get some ramsinks for the ram, don't just leave them like that.

I tried several mountings, and got the same results within 1C. I am fairly sure I mounted the block correctly.

Thanks for your concern about the ram on my 6800 GT, but contrary to popular belief, ramsinks aren't required on this card. Actually, I am getting higher clocks and have better stability now than when I had the stock cooler, which cooled the ram (yeah, it probably heated them up because it got so hot, but oh well).

I guess ramsinks would allow me to overclock a tad bit more, but I don't think they are necessary. They are only warm to the touch. If I get artifacts, then I'll definetly invest in some, though.

Well, I removed my IHS, and my temperatures decreased quite a bit.

Here is a breakdown:

Vcore: 1.34
Clock: 2000 mhz
Idle: 33-35C
Load: 42C
Water: 26-27C
Room: 24-25C

Vcore: 1.55
Clock: 2731 mhz
Idle: 36-40C
Load: 45C
Water: 26-27C
Room: 24-25C

So yeah, major improvement. I think I can still improve my contact, however. I tried to slip a piece of paper between the socket cam and the waterblock and I can't. This means that the waterblock isn't making flat contact and is putting more pressure on one edge of the core.

I'm going to sand down that edge of the cam so contact isn't an issue. Maybe i'll see 1-2 more degrees improvement after that.

Hey, at least I didn't kill my cpu after I removed my IHS. I freaked for a second when the system didn't initially POST. I took a 5 minute break and got a drink. I then looked into my system...I forgot to put the memory back in! I removed it so I would have more room to play with my waterblock and do the paper test.

I was very relieved after my system POST'ed.
 
Well, I sanded down the cam block, and it looks like it has improved my temperatures by 1-2C overall. It is sorta hard to tell though since my water temperatures are slightly lower because it is cooler in the house.

I now idle at 33C and load at 40C at stock vcore. Not too shabby :).

I'll post more data in the morning after I let the system run for a while. The water is still heating and it needs to stabilize.

I will say one thing though...the 2 bolt system for mounting a waterblock on an athlon 64 sucks. It is very difficult to get proper contact. I had to go through like 3 different mountings to get decent temperatures.

I miss the old 4 bolt system of the K7 motherboards :(.
 
I finished the external cable for the power so I can run the external box off the PC's PSU instead of the jumped external one :). No pics now, but I'll update later.

Unfortunately when I hooked it all up and turned the PC on my 12V rail measured only 11.3V or so with my multimeter. I can't even run my 120mm fans on the external unit at full blast. When I turn them down, along with other misc things such as lights, the 12V rail voltage increases to roughly 11.7V.

I obviously need more power. I'm going to get a new PSU for my system, but I want to get one that is fairly futureproof, preferably sleeved and modular with black molex connectors, and a decent price tag at or under $130. Oh yeah, I want it quiet too :).

I'm looking into this http://www.newegg.com/Product/Product.asp?Item=N82E16817103932. Dual 12V rails with 19A on each. I currently have a 12V rail with 20A, so I'll have roughly twice the power when it comes to that rail (which is what really matters nowadays).

Any suggestions?
 
Back
Top