486 Repair (or, my Ni/MH is leaking!)

Nobu

[H]F Junkie
Joined
Jun 7, 2007
Messages
10,059
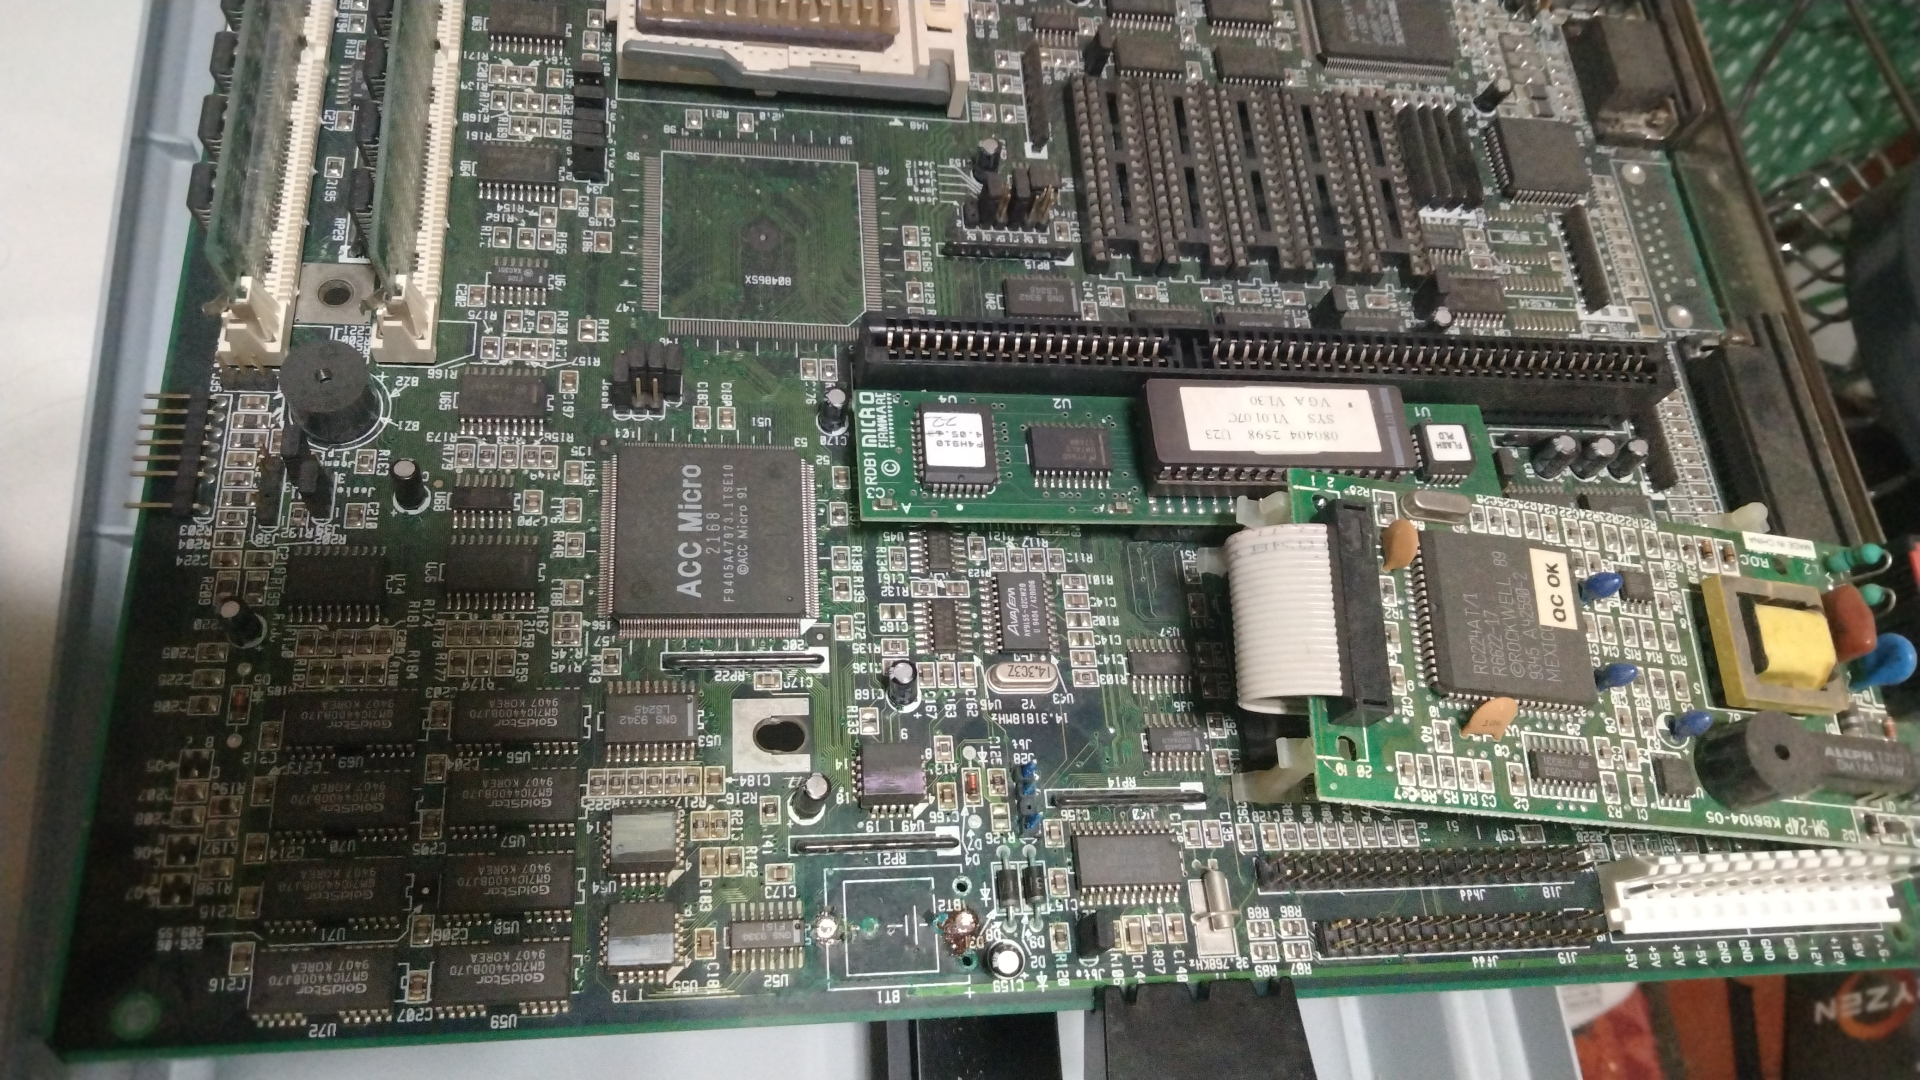
So I recently found again the Packard Bell my dad let me play with as a kid, and he let me have it. Concerned with the condition of the board (as it had already been losing the BIOS date/time and config when I was a kid), I opened it up, only to find this:

img_20220320_145921-webp.455677

img_20220320_145851-webp.455679


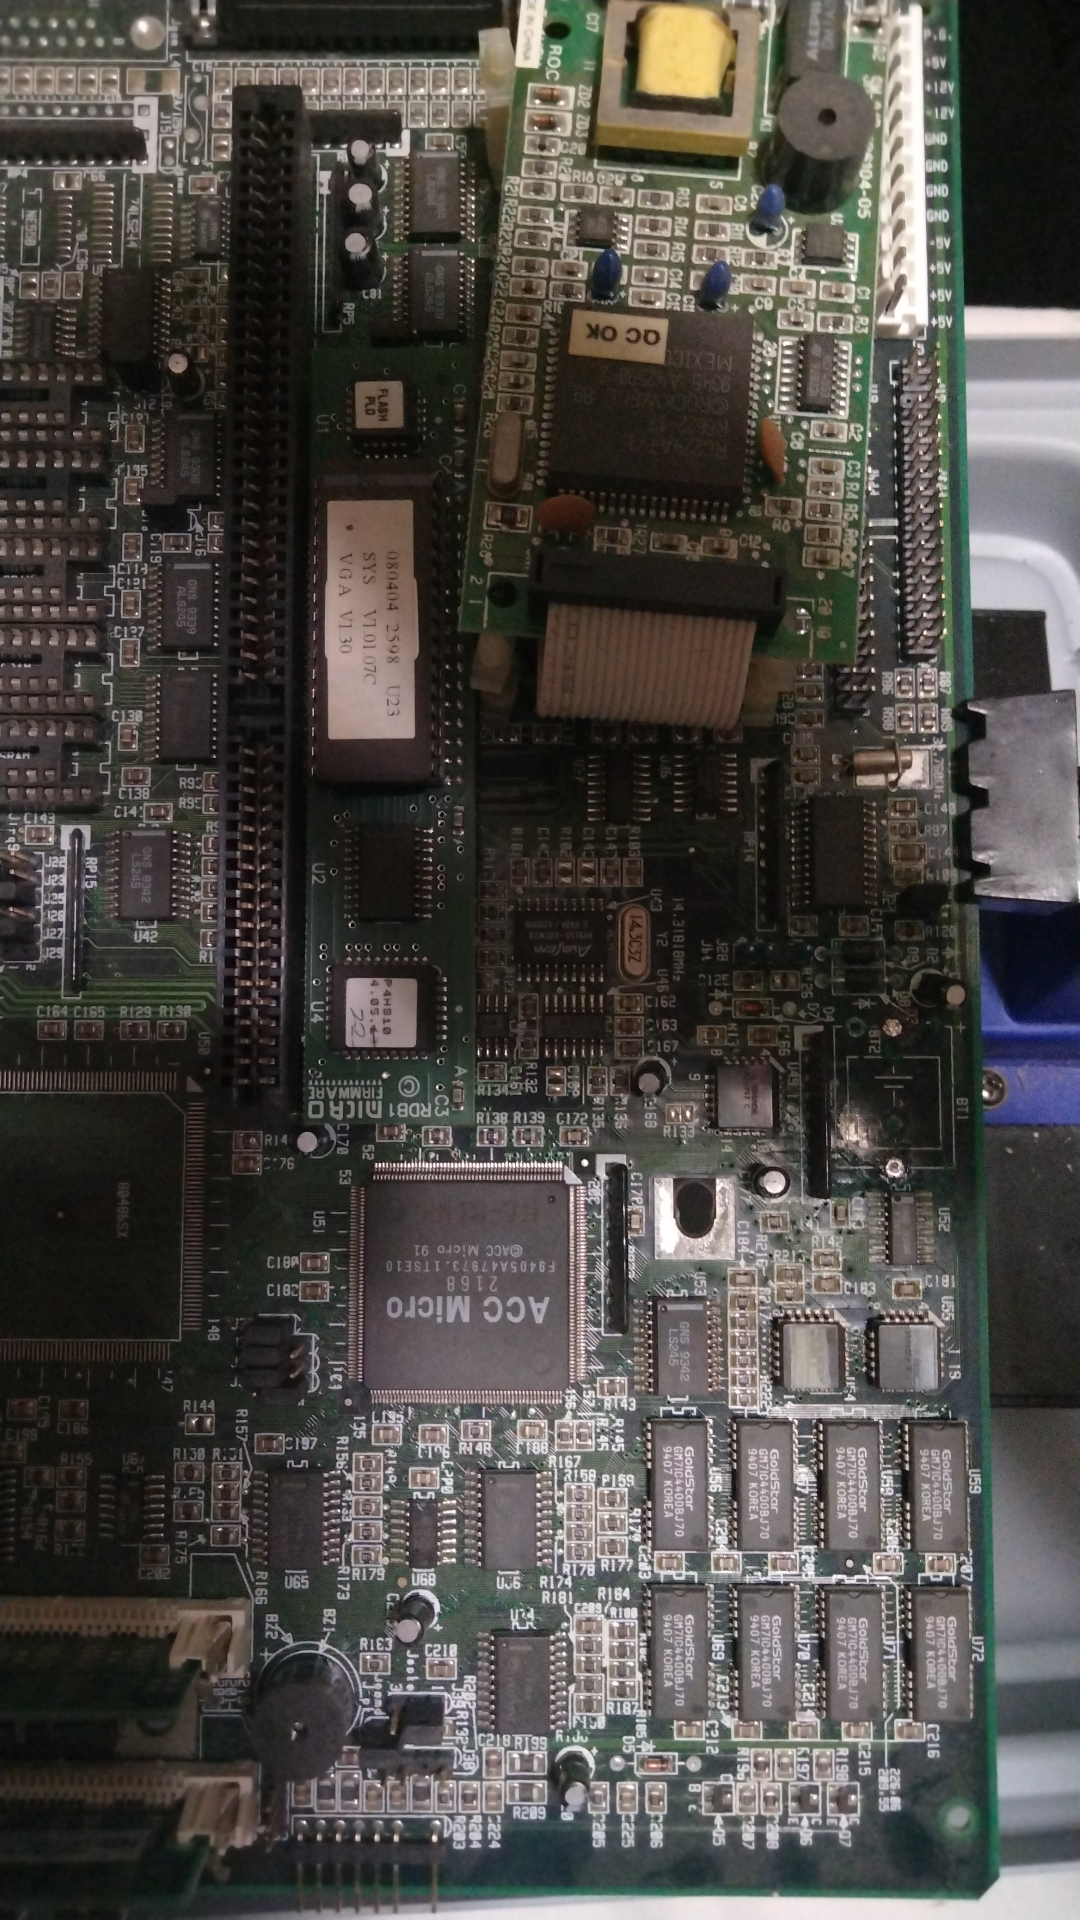
Well, that and a lot of dust, a really old HDD, FDD, a yuge soundblaster card with a pata connector on it, and some other random stuff.

Anyway, looks like the only major corrosion is on the tiny leads immediately around the batt, the exposed leads on the diodes and j28 north of it, and in the component through-holes immediately below the batt (because of their location and being unoccupied, I suppose). I think the battery juice spread farther than that, but it's hard to tell -- the traces are greener in some areas, but I think that's just from thicker areas of PCB/overlay.

Anyway, I blew off as much dust as I could, and cleaned top and bottom with 5% vinegar and flux cleaner (because I had it on hand). After, I scraped as much of the crud off the unused through-holes as I could with my fingernail...sorta gently. Should I do anything else, or will it be more or less stable now? I already painted a layer of conformal coating on the back, because it was mostly clean and undamaged)
 

Attachments

  • IMG_20220320_145921.webp
    2 MB · Views: 0
  • IMG_20220320_145851.webp
    1.8 MB · Views: 0
Oh, the brown stuff around the outside two holes where the battery goes came off clean, and those two holes appeard to be undamaged. Was from soldering without cleaning the gunk first, I suppose.

Upon closer inspection, there appears to be a lot of brown shit around the smd Caps...and resistors on the board. I'm thinking dust and/or tobacco tar, but feel free to correct.
 
Last edited:
Hard to tell because of bad lighting, but it looks like there are several traces being eaten away near the battery. You'll need to use an X-Acto knife or something to scrape the solder masking off and clean off any battery goo and neutralize it. Anywhere where you see the solder mask bubbling up or deformed needs to be scraped off and cleaned.

I don't recommend vinegar because if you don't get it all off, it will cause long term damage. I'd recommend something like Krud Kutter, which is dilute phosphoric acid: https://www.amazon.com/dp/B001AH7AY6/ It does a really good job at cleaning up traces that have been damaged, getting the copper back to a sheen without eating it away too much. I usually apply it with a cuetip and rub the affected area gently until the copper sheen comes back, but if you suspect a large area of damage, you can put a pool of it on and spread it around to find tiny remnants of battery goo and neutralize it.

Whenever I do trace repair, I usually just tin the entire trace with solder if it's still intact and leave it exposed. The solder will protect it from further oxidation.

The "brown shit" around the SMD capacitors is leaked electrolyte. Late 80s and 90s SMD capacitors had problems with the seals that caused them to fail and leak. Anything from that era using SMD caps is almost guaranteed to have leaked by now, you'll need to replace them. What you don't see is the leaked electrolyte wicked under the base of the capacitor corroding the board. Those caps need to come off ASAP. But while you're doing that, you may as well recap the entire board.

I don't know why there'd be brown stuff around the resistors, unless it was electrolyte that leaked from nearby capacitors or leftover flux from manufacturing.
 
As an Amazon Associate, HardForum may earn from qualifying purchases.
I revived a very similar Packard Bell Legend 486 system that I ended up selling a few years ago. It didn't have any problematic SMD caps (and I don't see any in your pics either). I repaired the battery damage with a few small jumper wires, and installed an external battery. All I did on that one was remove the motherboard, clean with lots of 90% Isopropyl Alcohol and a fine cosmetic brush, and then washed board carefully in my kitchen sink using dishsoap and the same cosmetic brush. I then carefully blew off board with 30-40PSI compressed air (especially drying underneath all components) and let board sit a few days before I reassembled.....as far as I know machine is still working great.

GiGaBiTe's advice is sound though, I don't use vinegar anymore as it is too hard to insure it's all removed. Krud Kutter works great for cleaning up barrel battery damage though, so use it all around where you suspect the battery leaked. Put some good tape over the piezo-electric speaker before washing the board to keep water out of it.

I like the aftermarket MicroFirmware BIOS your board appears to have, huge improvement over the stock BIOS. It probably supports IDE HDDs up to 8GB or so too so very nice. Looks like you could use some L2 cache though, searching around https://www.vogons.org/viewforum.php?f=60 may help you determine what SRAM cache chips you would need. That board uses an odd 2168 ACC Micro single chip 486 controller for 33MHz bus, and you seem to have the modem add-on too (which can simply be unplugged and set aside - its a 20 pin cable plugged into motherboard). As I recall the system probably has either a Headland or Cirrus Logic VLB video controller onboard too - you may need to identify that for sure to find drivers if you are going to use Windows. Also this may help http://pbplanet.info/wiki/index.php/Main_Page https://pb.retropc.se/430.html

Also make sure you plug your AT power connectors back in correctly, if not sure google that. They can be connected incorrectly which will most likely smoke the motherboard.

I have a whole closet full of 486 and early Pentium systems, they are fun to mess with and definitely can make one appreciate how easy we have it with modern hardware as far as ease of setup.
 
Last edited:
  • Like
Reactions: Nobu
like this
I revived a very similar Packard Bell Legend 486 system that I ended up selling a few years ago. It didn't have any problematic SMD caps (and I don't see any in your pics either). I repaired the battery damage with a few small jumper wires, and installed an external battery. All I did on that one was remove the motherboard, clean with lots of 90% Isopropyl Alcohol and a fine cosmetic brush, and then washed board carefully in my kitchen sink using dishsoap and the same cosmetic brush. I then carefully blew off board with 30-40PSI compressed air (especially drying underneath all components) and let board sit a few days before I reassembled.....as far as I know machine is still working great.

GiGaBiTe's advice is sound though, I don't use vinegar anymore as it is too hard to insure it's all removed. Krud Kutter works great for cleaning up barrel battery damage though, so use it all around where you suspect the battery leaked. Put some good tape over the piezo-electric speaker before washing the board to keep water out of it.

I like the aftermarket MicroFirmware BIOS your board appears to have, huge improvement over the stock BIOS. It probably supports IDE HDDs up to 8GB or so too so very nice. Looks like you could use some L2 cache though, searching around https://www.vogons.org/viewforum.php?f=60 may help you determine what SRAM cache chips you would need. That board uses an odd 2168 ACC Micro single chip 486 controller for 33MHz bus, and you seem to have the modem add-on too (which can simply be unplugged and set aside - its a 20 pin cable plugged into motherboard). As I recall the system probably has either a Headland or Cirrus Logic VLB video controller onboard too - you may need to identify that for sure to find drivers if you are going to use Windows. Also this may help http://pbplanet.info/wiki/index.php/Main_Page https://pb.retropc.se/430.html

Also make sure you plug your AT power connectors back in correctly, if not sure google that. They can be connected incorrectly which will most likely smoke the motherboard.

I have a whole closet full of 486 and early Pentium systems, they are fun to mess with and definitely can make one appreciate how easy we have it with modern hardware as far as ease of setup.
The wires on the AT connectors are color coded conspicuously and marked clearly on the board, so should be no problem there. I'll grab some Krud Kutter (or similar) and make another pass.

Yeah, there were some small traces near the battery that had obvious corrosion, which I was able to scrape off with my fingernail --most of it, anyway. I'm about 90% sure the brown shit on darn near all the components is just dust/tar. The board was very dusty and it just wipes off, except for a little that is embedded in the solder joints -- not sticky or anything. I'll take some better pics later.

The back of the board looks beautiful after just a bit of cleaning. Unfortunately there's a lot more to work around on the front.
 
Seconding for better lighting, and maybe a closer shot of the battery area in focus. I can hardly see anything!
 
The wires on the AT connectors are color coded conspicuously and marked clearly on the board, so should be no problem there.

Just remember black to black on the P8/P9 connectors. The ground wires should be sandwiched in the middle, not on the outsides.

The back of the board looks beautiful after just a bit of cleaning. Unfortunately there's a lot more to work around on the front.

If there's lots of flux left, might consider going down to the home despot and getting some Lectra Motive electric parts degreaser. https://www.homedepot.com/p/CRC-19-oz-Lectra-Clean-Heavy-Duty-Degreaser-02018-6/100111937

I use that stuff to clean off flux and capacitor electrolyte, works way better than isopropyl alcohol that just smears it around.
 
  • Like
Reactions: Nobu
like this
Here's a few more, slightly better pics. At least, you can see a few components per pic now, maybe. My wash attempt the other day didn't do a whole lot, def need the pro stuff. Otoh, I'm not entirely sure it needs it. Gonna do it anyway.

20220322093616.JPG

20220322093700.JPG
20220322093712.JPG
20220322093724.JPG
20220322093740.JPG
20220322093902.JPG
20220322093913.JPG


Edit: In the pic with all the SRAM sockets, you can see (maybe) that even the unpopulated solder pads have the brown stuff on them, with no caps nearby, if you look at the pads by the unused fuse and rear connector positions.

Actually, if someone wants to clean and repair this for me, I don't mind paying. I really don't think it needs much work, although the damage near the battery looks like it could be much worse that I initially thought. The 12v rail near the board edge looks like it could be damaged under the mask, and if it got that far then there's probably a lot more in the area.
 
Last edited:
The first pic is showing quite significant damage to that part of the board. I can see lots of corroded solder joints (they look like a dull sandy grey) and some pretty significant trace damage towards the edge of the board. One of the components near the capacitor looks like it has capacitor electrolyte between the legs, so it's likely that many of those caps have leaked. A really easy way to know is to heat up the legs with a soldering iron and see if it smells like fish. If it does, it's cap goo.

Those PAL/GAL ICs and the support logic around them is probably going to have to be removed from the board and inspected under them, as well as cleaned. The traces look like they're mostly still there, but they're so thin that continuity and resistance measurements would have to be checked to see if the trace hasn't gone high impedance.

I can tell you from working on such boards in the past, that board is not an easy fix. It's going to require at least 5-6 hours of bench time to properly clean and resolder all of those damaged parts near the battery, and more to do the trace repair. But that's still not a guaranteed fix, if any of that battery or cap goo leaked into the inner layers of the board from penetrating VIAs, then it's a lost cause without schematics.

If you want to try and fix the board yourself, I can recommend a few places to go for help, and I can offer you some advice. If you wanted someone else to try and fix it, it'd easily run into the hundreds of dollars territory. I'd offer to look at it myself, but I'm backed up for months and don't have any room with all of the stuff I have in for repair.
 
Well let me know if you get some time and feel like taking it on. I'll probably just hang it up on a wall, maybe put it in a shadow box or something. Really don't feel like this is in my skill level, even if I had a proper solder station (I don't, really).
 
Well let me know if you get some time and feel like taking it on. I'll probably just hang it up on a wall, maybe put it in a shadow box or something.

You can ping me in a month or so if you still want it worked on, things should be better then work queue wise.

Really don't feel like this is in my skill level, even if I had a proper solder station (I don't, really).

We all start there. If you don't mind the logic board potentially being destroyed worse, it would be a good starter course in learning how to repair on the board level. Even if you fail, you're still learning the techniques to remove and replace components, as well as repair board damage. You have a ton more resources today to learn, unlike when I started back in the 90s. There's hour long HD video on Youtube for free showing board level repair, I didn't have any of that, just trial and error. I destroyed a lot of electronics before I was proficient enough to repair stuff.
 
  • Like
Reactions: Nobu
like this
Back
Top