• Some users have recently had their accounts hijacked. It seems that the now defunct EVGA forums might have compromised your password there and seems many are using the same PW here. We would suggest you UPDATE YOUR PASSWORD and TURN ON 2FA for your account here to further secure it. None of the compromised accounts had 2FA turned on.
    Once you have enabled 2FA, your account will be updated soon to show a badge, letting other members know that you use 2FA to protect your account. This should be beneficial for everyone that uses FSFT.

Easy Water Cooling V2

Justintoxicated

[H]F Junkie
Joined
Apr 10, 2002
Messages
14,522
Decided to make some updates, I have skipped out on a few mods so I will post them and include them as V2.0.
origional Worklog

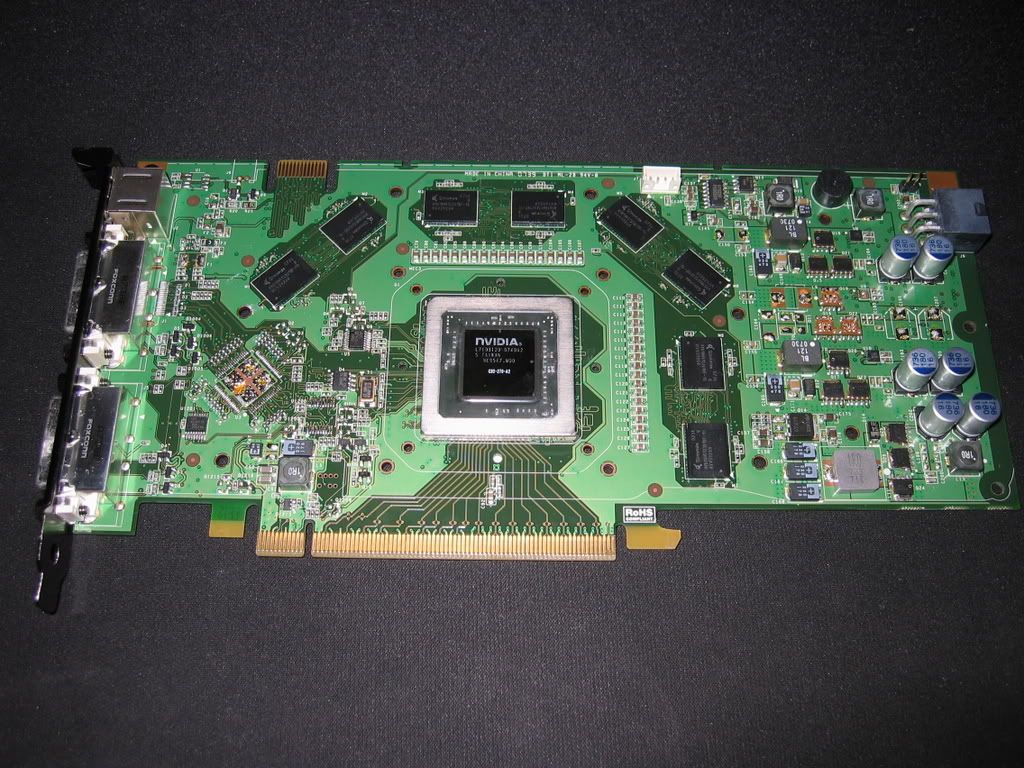
I'm going to be using the same hardware from my first time rookie build other than the 7800GT card which has been replaced with a 8800GT. This hardware has been lasting me a long time and the Processor is still running strong. However I think if I move to SLI I will need to upgrade the CPU,MB and Memory to get the most out of the setup.

I had since cut a custom window and wired up 2 LED's for lighting (I hate CCFL's because they take up alot of space and are soo over done these days.) here is a pic before I started.

bansheeDesktop3.jpg

The window was cut out of the stackers factory side panel. I copied their design but made the window smaller so as not to show the ugly drive bay or Power Supply and only display the good stuff, as well as get rid of the ugly rivots. A Jigsaw and a few blocks of wood to lift it up. I cut this on my driveway! Unfortunately the piece of Lexan cost me as much as the aftermarket window would have! Lowes $$$$$ Lexan oh well..

First I pulled out the Thermochilla PA 120.2 and had my buddy help me cut out some 61-60 1/8th inch aluminum. Decided to cut circles because we thought it would look cool and he wanted to try using the fly cutter with his drillpress.

IMG_2021.jpg

IMG_2018.jpg


Looks good, it would have only taken a little while to polish this piece but it was getting late and honestly I don't really care since it's on the bottom of the case.
 
Heres the 8800GT with the Heatsinks layed out. (I'll probably get around to epoxying them into place tonight).

IMG_2022.jpg

Nice and Clean...
IMG_2024.jpg

The Layout

I cut the black heatsink with some extra heat Sink I had laying around. Since I don't have a vice it was a little bit of a PITA but I managed to cut through it by just holding it in my hand, no big deal. This location on the card is a problem spot for me since my DFI Expert's NB will now be water cooled as well. The posts for the NB block rub the the stock cooler just slightly. Using this low profile heatsink I can clear the posts for the NB. (I will take some pics of this later).
 
Now for the part I can't decide on and could use some suggestions.

IMG_2015.jpg

Thats where the radiator will lie.

I cant decide:
1) If the fans should go on the top or bottom of the radiator. (I think it would look cooler with them on top. I'm going to use the same L1A's and the new L1BX's since I could not find anymore L1A's.

2) Should I blow air in or out of the case?

3 120's on the radiator blowing out and reversing the exhaust fan to make it an intake is very tempting. This however would still create a negative case pressure which is tpyicaly bad for dust. However most of the air would likely come in through the front of the stacker with the drive bays foam dust shields so this might be the best way to go.
(Fans would best be placed on top of the radiator.)

On the other hand blowing air in from the bottom would create a positive case pressure and blow air towards the video card. But air would not flow past a dust filter.
(Fans would be placed under radiator)

3) Finaly I need to come up with some kind of gasket for either the bottom of the radiator or the fans (depending on which is on the bottom). I could simply purchase another gasket like the one that comes with the thermochill, but I also have some foam at the parents house so I could make something as sceen in the origional worklog that will cover the entire floor of the case. Any suggestions?

I will get some more pics of the board mounted for test fitting.
However I'm at a waiting point int his project. I am waiting on some new O-rings for all my water blocks, Fans from SVC, and Barbs for my Thermochill (Ordered from NCIX Canada) as that was the closet place to the US that sells the barbs. I have some plastic ones but I did notice a few drops of coolant had leaked from my old thermochill over the past 3 years right at the barbs (I pressure tsted the system and leak tested it for 24 hours these are very very very slow leaks that did not show up in either test). The plastic barbs Danger Den provid for the thermochills are either NPT or BSPT, but the CORRECT barbs for the thermochill are BSPP G3/8. All US distributers are out of stock for the past 6 months or not currently selling the barbs...
 
I would blow down out of the case, a bit of dust is preferable to blowing hot air right onto your graphics card. Looks sweet!
 
You'll get better temps with the fans pulling fresh air into the case from underneath. Your GPU will be on water so it's not like it's temps will be high.

Good work so far, keep it up.
 
I think the air comming through the radiator would still help to cool the memory on the card more than if it had no air blowing against it. But its hard to say without testing I suppose.
 
Well right now it appears my best bet is going to be to blow air out of the case. By leaving the fans on top of the radiator will save me a drive bay due to the location where I think I want to place the pump.

Kind of defeats the purpose in the circles (Vs cutting out a huge square) in the bottom but that is ok.

Unfortunately the O-rings DD sent me are the wrong size. They have changed their product line to different size holes and smaller O-rings. They said I did not mention anything about having Old blocks that are 9/16th, but then again I didn't know they had changed anything! New O-rings are on the way again so I must try to be patient and survive the weekend with no computer. I think im starting to have withdrawals!

IMG_2027.jpg

It kind of sucks for me that they have changed to new diameter barbs etc. This means if I want to re-use my block base and just purchase new tops I will also now need to purchase new barbs for all 3 blocks...I am planning on a quad core setup in Q1 2008 and if I have to replace all the barbs and tops, I may as well just buy all new blocks for build 2.5 :(
Luckily my dad will likely inherit this setup anyways, actualy he will give me some money for it so not all is lost and the new blocks will be up to date :) Not sure if I will go back with DD or not but there customer service has impressed me thus far.

IMG_2028.jpg

Replacement Fill port plug does not fit either. The old one developed some rust and corrosion (it is immersed so I think the water vapors killed it since the coolant does not really evaporate with the water). No traces of corrosion were found elsewhere.

IMG_2030.jpg

pretty much what the loop will look like. Not my favorite preference as far as order of components but shorter runs of tubing with less sharp bends should make more difference than the order of the components.

IMG_2032.jpg

Pump will be attached to the underside of the HD bay. Yes, I have it flipped upside down as I wanted the holes on the bottom to help the bottom HD vent. I might flip this later hold the pump better since I will simply be using industrial strength Velcro to hold it in place (other side of HD bay is solid with no holes). It does not need to be permanently mounted. Permanent mounting would make it harder to remove the HD bay and the Velcro will also help with any vibrations.

IMG_2033.jpg

As it sits now, and will likely be until I get the new parts for some time. As you can see the video card is all set to go.

Waiting on:
New O-rings and fill port plug.
Metal Barbs for the Thermochill (shipping from NCIX)
New Fans from SVC L1BX's (one for radiator and one for the exhaust fan to replace that awesome looking AOC aluminum fan. (Functionality over looks will prevail)
 
If you are impatient re: the mailing of O Rings, go to a hardware store's plumbing section. Even the big box home improvement stores have a good supply. Just take a plug or barb with you to match up the correct diameter and thickness.
 
If you are impatient re: the mailing of O Rings, go to a hardware store's plumbing section. Even the big box home improvement stores have a good supply. Just take a plug or barb with you to match up the correct diameter and thickness.

Yea, I thought about that I'll probably do that tomarrow so I can at least get the system up and running for the weekend. I also waiting on those barbs, as well but perhaps teflon tape will work for the time being.
 
Still waiting on the barbs and I may have to order my fans from someplace else.

However, I decided to go ahead and use the plastic barbs. I will just have to swap barbs later.


Sat Morning I still did not have my O-rings from DD. I did not expect to. I took a shopping trip to harbor freight to see what they had. I found some nice expensive viton O-rings and purchased those.

IMG_2084.jpg

I figured even if I'm getting regular replacements they would probably not hold up to the heat and conditions as well since many of my old ones had cracked. Now I don't have to worry about this happening again. As you can see these should hold up to chemicals and extreme temperatures much better. However as I returned from the store I received the mail and of course the DD fillport and O-rings were here. Went ahead and used the viton o-rings though, in fact I went and replaced them all with vitons.

So here is where we are at.
IMG_2043.jpg

The radiator is attached with zipties for now untill I can find some nice screws. It is mounted to the aluminum plate through a gasket I made out of weather stripping foam

I ran into problems when I needed to jump the PSU. I could not get the PSU to jump at all. I know for sure that I was doing it correctly as I had this exact PSU before and it blew up. THis replacement has problems turning on even when plugged into the MB...What a POS it's an Enermax 620 Liberty.

LeakTestingBattery.jpg

So I used a 12v battery...And relaxed for a minute


Lights.jpg

IMG_2065.jpg

LED Lighting, RoyalBlue, makes neon stuff glow like a blacklight, but not all UV sensitive stuff since these LEDs don't put out any UV. probably brighter than CCFL's but I have them hooked to a circuit that is hooked to a fan controller so I can turn them way down.


Sorry the pics suck my camera is a bit dated...
 
What ginormous mouse pad is that ?

It is a ginormous Core Pad :)

Got my metal thermochill barbs from NCIX Canada, but they are not 1/2 inch like they are supposed to be..barbs are now still the only thing holding me back from finishing this project how retarded is that? Guess i will have to order some from the UK.
 
got my NCIX Barbs, they look a little restrictive, but I'm going to use them anyways...Petras is now stocking the EK G3/8 barbs I wish I would have waited instead of spending $25 on 4 of these
IMG_2095.jpg

IMG_2092.jpg


Here they are with the VITON O-rings
IMG_20961.jpg
 
Thanks for the pointer on the o-ring kit - that is goign to save my current radiator. :)
 
Whoa - double bastard? And I thought arrogant bastard was an experience in a bottle..I can only imagine w/ a double. The Chimay is really good too.

You have good taste in beer.
 
The double bastard was pretty good for the price, but not as good as trader Joes Ale by Unibrow, or even better Unibrow aniversary ale. All have high alcahol content though so drink responsibly :)

I no longer plan to use the GT card in this build. It has been replaced with a GTS 512 (Got in on the BFG deal). I'm dying to turn my computer on for the last month but I have run into some serious hold ups.

1) Waiting on ramsinks from Iandh who posted his nice ram and mosfet sink solution on Xtreme Systems. I don't want to epoxy the mosfets again as I learned they break off extreamly easy compared to memory chips.

2)All my blocks with lucite tops have cracks in them (other than GPU). I got one (Maze4) from a member here and told him it seemed ok, ran it without problems however upon closer inspection I noticed cracks in the Lucite tops on the Maze4 Chipset block. So now I need a new top. My TDX block also has cracks in the Lucite so that will need to be replaced as well :(

IMG_2126.jpg

IMG_2127.jpg


DD says that this is not common but typicaly happens only with their older blocks with tapered threads, their new blocks use G1/4 threads and mine are 7/16th (which is probably better for flow but i don't want to be breaking blocks)

I sorta wish I had not purchased the Maze4 now since their new MPC blocks look better, just as I wish I had not purchased more swiftech copper heatsinks (I will have 2 packs that I will never use now)
Luckily, after replacing the top it will be a couple bucks cheaper than the new block with lucite top so all in all I guess I still win :) Besides Ill probably buy all new blcoks when I do the rebuild (peryn V2.5)

As much as I hate to throw money at blocks I will no longer be using in a few months, I'd rather be safe than sorry. Besides my dad may get this system (with the old PA120.2) in the near future anyways, then again he might not!. Not sure exaclty when I will upgrade as this PC still seems faster and snappier than many newer systems with C2D's and DDR2/3 for whatever reason (not overclocked ones but honestly DDR with it's faster timigns does not seem to be very much slower since 1/2 the systems don't fully utilize DDR2/3 anyways)...
 
sorry to go off topic, but is that a handheld VHF radio in your first picture?
 
sorry to go off topic, but is that a handheld VHF radio in your first picture?

it is a Yaesu VX-170 ham radio. It has been getting neglected. I have plans for it though, going to wire it into my helmit for communications in the sand dunes.

You guys crack me up all the comments are about beer or other objects in the pictures.

Just got my brass tops and the blocks should be damn solid now, although they are a bit old to be upgrading they still get the job done fine. The barbs were boy 7/16th but they were G1/4th, so I don't know why the tops spidered, perhaps I made the barbs overlight, but whatever, all brass now! More pics to come...
 
Back
Top