Work Log - Canticle of the Apocalypse

Bad Fenny

n00b
Joined
Jun 22, 2013
Messages
38
Hello

I am new to the forum and very new to the computer modding game. I wanted to take an opportunity to share my first ever mod and get some feedback (good or bad) from the community.

Bear in mind, when I started this mod, I had an idea of what I wanted to do, but knew nothing about where to start tor how to do it . . . Google and YouTube are a wonderful thing.

My mod was completed with basic (very basic) tools – jig saw, drill, exacto knife and spray paint. So please do don’t expect a truly professional polish as this in an amateur attempt. To date, I have completed the case only (exterior and interior). Now that I have my build components, I have begun working on the interior – cable sleeving, component mods etc. (will update as I go along). Components going into the computer will be:

MOBO: ASUS Sabertooth X79

CPU: Intel i7 3820

GPU: Zotac 660Ti

PSU: Corsair AX850

RAM: Corsair Vengeance (Olive Green) 16GB

Cooling: Corsair H80i

SSD: Adata 512GB

HD: WD 1TB

DVD: ASUS

Fans: BitFenix Spectre LED (red) x 4 (in addition to the 2 existing Corsair white LED)

Fan Controller: BitFenix Hydra Pro

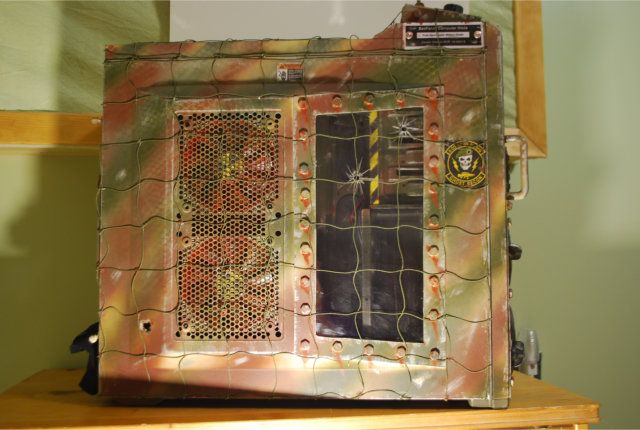
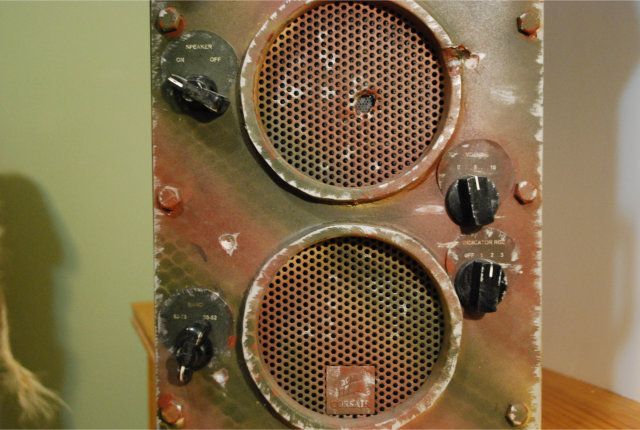
While new and shiny mods are very spectacular to the eye, I wanted something a bit more worn and used looking. Being a fan of all things zombie and a gamer of apocalyptic and military themed games, I wanted a computer that matched my interest. So I went about designing a mod that looked like a military radio which had seen service in a global war, survived and had been repurposed in a post-apocalyptic world.

So I figured that since everyone tends to name their computer mods . . as this is my first one, I decided to give it a name.

After much deliberation I struck on "Canticle of the Apocalypse". Canticle comes from the latin "canticulum" meaning hymn or song of praise. As this was themed on a piece of communication equipment which had survived a world apocalypse I felt the word was reflective. In addition, this is a nod to the post-apocalyptic novel by Walter Miller "A Canticle for Lebowitz" which describes a world where technology is outlawed and that which survives (including those who use it) are eliminated. Surviving technology is collected and protected by an order of monks until humans are again ready for such technology again.

I know, a lot of work for a name but I figured if I was going to invest so much effort in building the rig, I should invest equal effort in a name

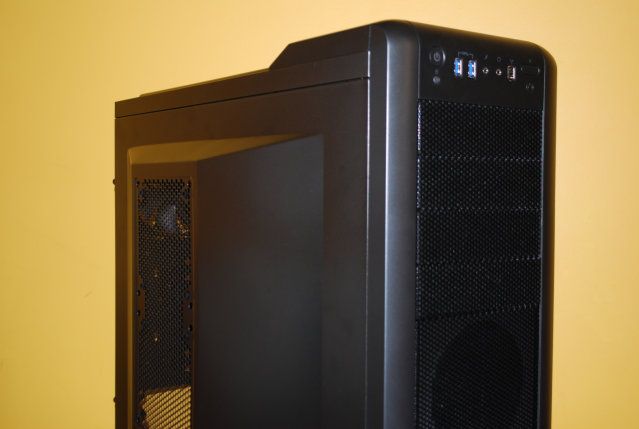
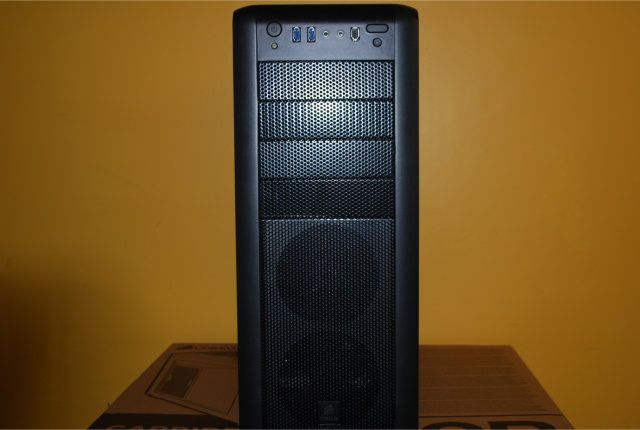
I decided to go with the Corsair Carbide 400R as the start point.


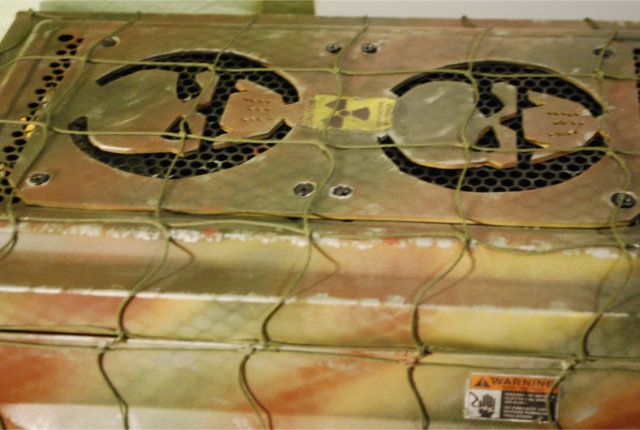
Using my limited knowledge, I added a window (gave it an armoured look – heavy bolts), altered the bezel to look like communication equipment with speaker openings disguising the two existing fans. I added a top control box to give it an appearance of having been re-purposed later on in its life. I also added a cover plate for the top grill (plexi-glass – skulls cut out using a jig saw – going to mount two red led fans below). The whole thing was painted and aged (aluminum brushing for wear, rubbing with ash to darken and age – everything sealed with a clear finish). The camouflage netting was individually glued to each side and top – decals were applied to give it a used look.


I thought I would provide some background to the first pictures I posted to show how the case got to its new state before I move forward with the interior build log.

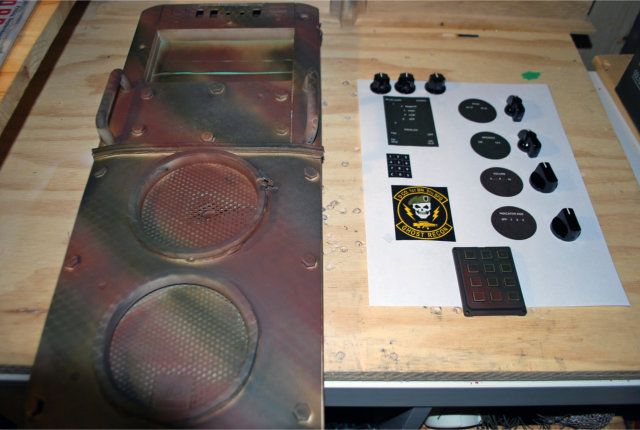
Firstly the paint and tools used:


The work done to transform the case:
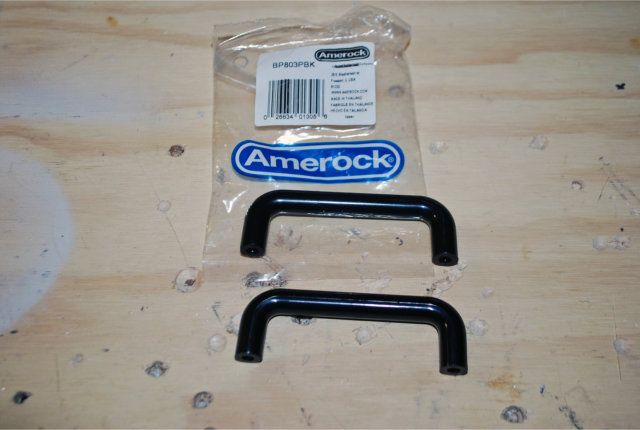
Dial Plate

I wanted to have a place to mount some communication dials while some might say why give up two bays, my thoughts were I only need two (DVD and Fan Controller). The dials were salvage from an electric guitar, the dial pad an old phone and the handles I had lying around.
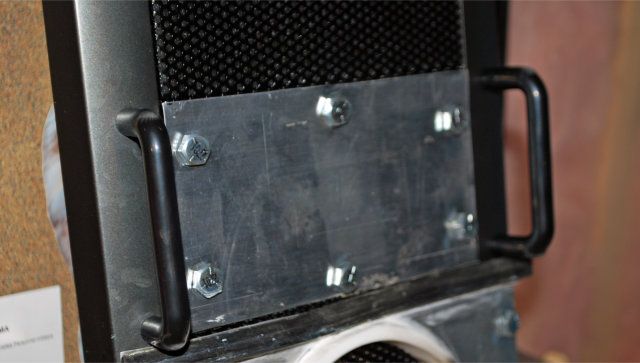
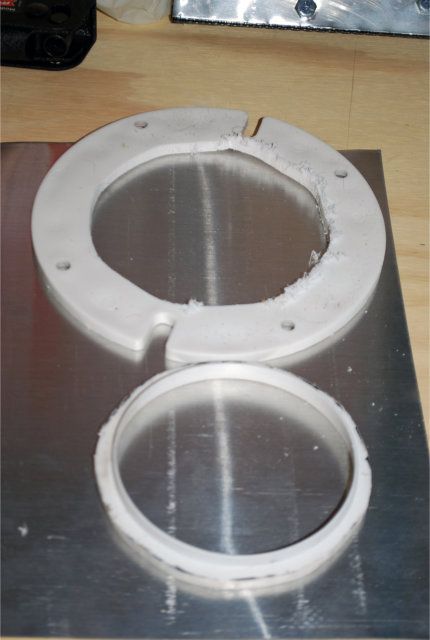
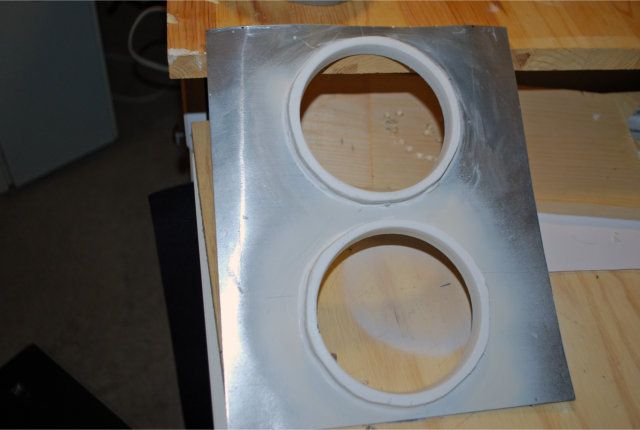
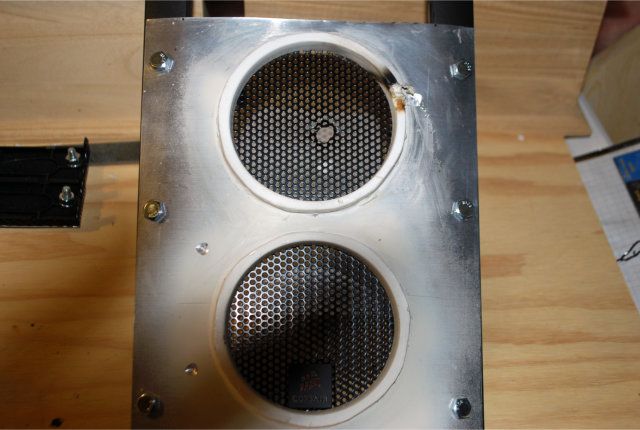


Speakers

Every radio needs speakers so I thought the two existing fan openings on the case would do for this purpose. In making the openings, I wanted them to stand out so I cut down two toilet installation brackets (yes toilet installation brackets - anything can be repurposed :D ), to form the framing of the speaker ports. They were glued in place and then I used caulking to seal and smooth them to the front sheeting. The bolts were used to give the front a rugged armoured look and dials were added for effect.
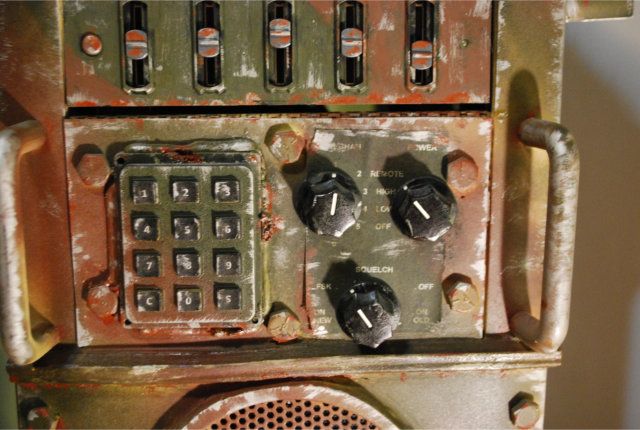
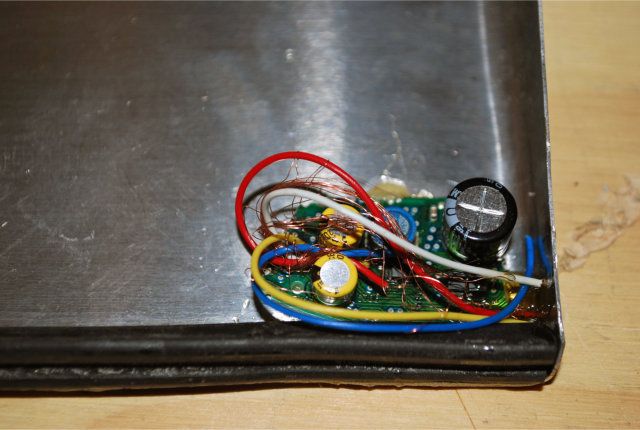
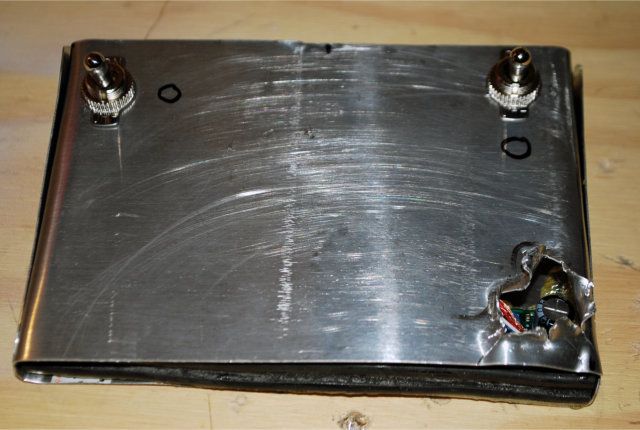
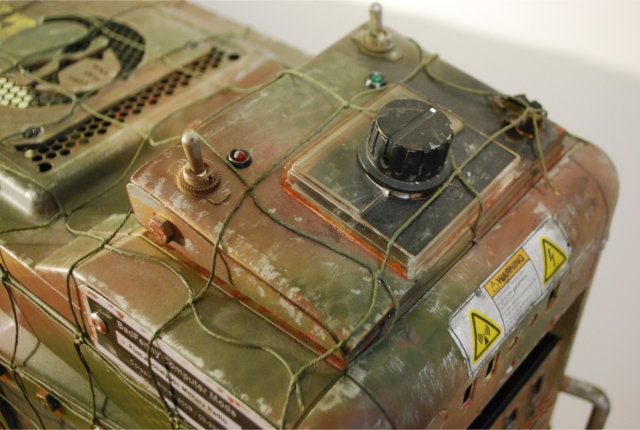


Control Box

I wanted to add a control box which would look like a retro-fit. This was done using aluminum sheeting, toggle switches, LEDs and cannibalizing an old dial I had lying around. I also wanted to give it a damaged an repaired look, so added some exposed wiring for effect:


Window Mod

The 400R does not have an existing window and I wanted to be able to see my interior. I cut out a window opening and used plexi to create a frame. Bolts were added to give it a rugged armoured look - I know not exactly something a radio would have but I needed something to go with the theme:
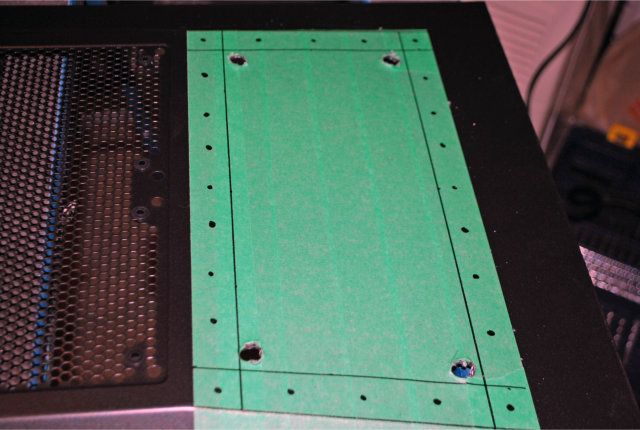
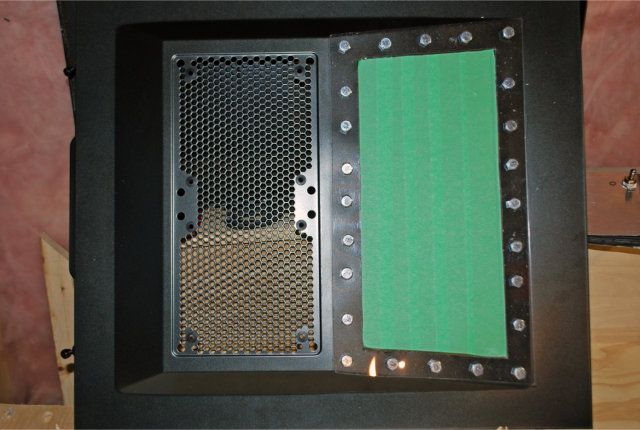
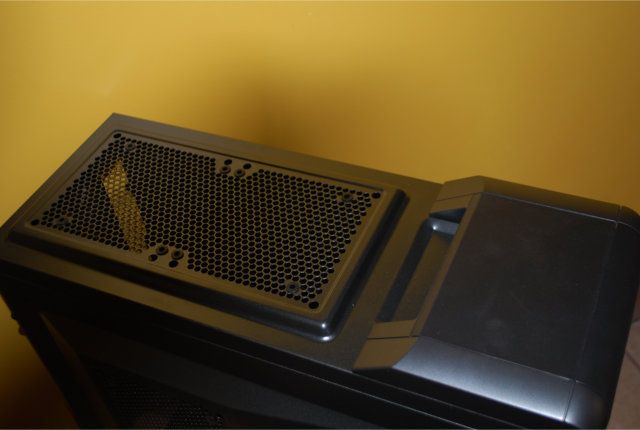
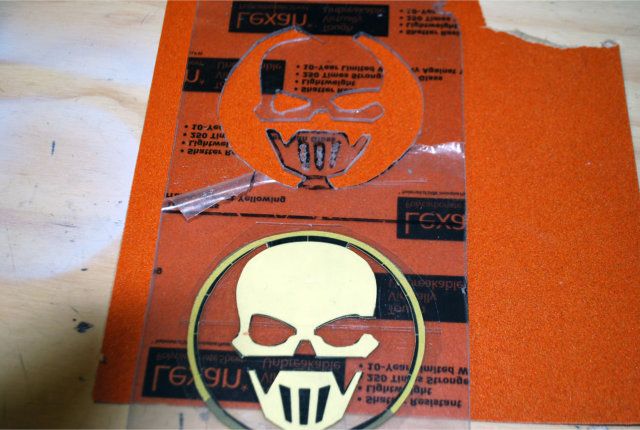


Top Fan Grill Plate

Originally I wasn't going to do this. I had seen lots of top grill plates on other mods and thought that would be cool However, I did not have the equipment to mill a metal plate or even a good saw to cut one out of metal sheeting. Then it dawned on me, why not plexi? So I drew the templates for cutting and gave it try with a jig saw. Worse case it would look horrible and I would scrap the idea. I didn't think it turned out too badly - so I kept it. I will be mounting two red LED Spectre Pros below the plate.


That's about it leading up to the outside of the case. I will update soon.

Cheers

Fen
 
You sure you're not a professional? :D

Awesome work so far. The outside of the case looks really good. You done a killer job on aging the finish.
 
You sure you're not a professional? :D

Awesome work so far. The outside of the case looks really good. You done a killer job on aging the finish.

Nope . . . first time trying anything like this. Although I did do some military dioramas when I was younger so that gave me some practice at painting.

Thanks very much for the feedback. I will be posting some more pics hopefully today which will shed some light on the interior work . . . almost ready to put some hardware into the case :D

Cheers

Fen
 
WORK LOG - PART 2 :)

PSU, Fans and the art of hiding plain sight

I decided on a Corsair 850AX for the PSU. I wanted it to fit into the theme so I painted/aged it. I added a few Mylar decals to cover the Corsair labels (checked with Corsair, so long as I don't destroy the labels when I remove the Mylar, my warranty is still good


I am using 4 BitFenix Red LED fans. The two which will go on the side panel have been painted/aged to match the theme. In addition, I sleeved the cables coming from the fan. Tested out the fans as this was my first sleeving and I wanted to make sure I wired it correctly. Hooked it up to my fan controller and everything works


For the Fan Controller I wanted something simple to stick with the theme of the build (just sliders - no flashy display), so I went with the BitFenix Hydra Pro Fan Controller. Naturally, after a quick paint job it fit right in to the build:


Hooked up the fans and fan controller to the PSU for a test and everything worked fine :


Once I had all my cables run, I was soon left with the dilemma of what to do with all the cables. I could have run them through the back and weaved them through to the fan controller but I didn't want weaved wires/cables crisscrossing inside the case. So I thought about potential solutions and settled on using electrical conduit sheathing to hide the wires and route them direct to the fan controller. This way they would be "hidden in plain sight" but still fit in nicely with the build theme.


Okay . . . not a major mod but one of the little details I used to correct something that bugged me. After I ran the fan cables through the electrical conduit, no matter how much strapping I used, I could still see the fan wires through the slots on the side of the front expansion bay cage. So I decided to cover the slots. I used aluminum sheeting to make the covers, painted them and added warning decals for effect - la voila . . . I could not see the wires any more and my functional obsessive needs were met again.


So, I went through the hassle of finding a way to hide my incoming fan cables to the controller and then hiding the side openings of the expansion bay cage so the wiring could not be seen. The next thing I turned my attention to was the HD/SSD cage. I realized that once mounted my HD with it's shinny silver cover would be raining all over my matt/aged finished goodness as the cage is open to view with the side panel off . . . not mention you would see the cables running through the back to the HD and SSD


I considered painting the HD to match the theme but that presented a host of potential risks (I have venting holes on my HD) and as this was a brand new 1TB HD, I really did not want to risk it. Besides, the cables would still be seen. So I hit on the idea of a adding an access door to the opening. This way I could work it into the theme as a service panel for the communication array. To achieve this I used aluminum sheeting I had lying about and a set of hinges I bought. The door was painted and aged to match the theme. Warning and panel labels were added for effect . . . Oh yeah, the bolt heads are just window dressing to give it more of an access panel look.


Hope you enjoyed.

Cheers

Fen
 
WORK LOG - PART 3 :)

Optical Drive - Its all about making it match

Okay, so I have the standard black and grey optical drive, and while painting/aging the front is a given so it matches the theme, I quickly realized that while it might be nestled quite high in the expansion bay cage, the bottom and back grey would be visible at certain angles. So once again my functional obsessive compulsive need for detail kicked in and I decided to paint the whole optical drive to match the theme.


Hope you enjoy

Cheers

Fen
 
WORK LOG - PART 4

Sleeving and Cable Management: The surest way to insanity for a noob

Right, so one day I hit on the brain storm idea of trying my hand at sleeving. I went online watched the YouTube vids, Googled myself silly and found out as much as I could . . . I mean how hard could this be . . . right? I soon found out that not all wardrobes lead to Narnia and some come out just this side of h#%$

I had bought the tools and decided on various subdued military colours (para cord) and it all seemed so simple. That was until I pulled apart my first connector and discovered the wonderful world of Corsair PSU proprietary rights and double wires . :eek:

Luckily I didn't run in all ham fisted and take every wire out, and decided on only one wire at a time. So, when I was finally able to breath again, I started the long process of finding out what to do . . . it was my PCI-E cable. In the end it turned out. Although, I have to admit it took every ounce of control not to throw it across the room and run out screaming.

I next tackled the molex and SATA . . . and I thought double wires were bad. In the end they all turned out relatively well and colours match the build nicely. The head shrink could be better but even my functional obsessive compulsive idiosyncrasies were no match for the h@%$ that is heat shrink . . . So I admitted my weaknesses and moved on.

I will admit that I chickened out on the 24 pin connect as I noted multiple double wires crisscrossing back and forth. In the end, I decided to give the Corsair cheap OEM sleeving a quick blast of spray paint (very light) in various camo colours . . . not the best way but I needed to recoup some of my sanity at that point.

I turned my attention on the front panel connectors which were sleeved in paracord. However, I found there was nothing I could do with the USB 3 cable as it was a sealed casing. So I paid a visit to my favorite modding store - Home Depot - and walked around until I found something to hide this ugly cable which would have to go straight through the case to the USB 3 slot on the mobo :mad:. I found plastic cable sheathing which resembled the metal electrical conduit I used earlier. Not an exact match but close . . . so with a little work and of course paint, I was able to make it fit in and in the end give this ugly cable a new look and exercise some cable management.


I tested out the other sleeving projects in my case to measure for fit so the photos below are just temp cable management. My intent was to keep only the sleeved wires visible.


That 24 pin connector still pains me to look at though :(


So with the above experiment in all things insane . . . I now ready to move on to the wonderful world of hardware and what not. Unfortunately, work will take me away for a week, so I will have to wait until next weekend :(

Hope you enjoyed

Cheers

Fen
 
WORKLOG - PART 5

Corsair H80i Cooling - The art of rusting

Hello all:

I am beginning to work on some of the internal hardware mods in an effort to make them match the theme (old an worn). I have been experimenting with rust effects and after a bit of trial and error, I have come up with a method which I think provided good results . . . Let me know what you think.

I started with the Corsair H80i Cooler.


As this was going to be mounted toward the front back of the build I wanted to show some real rust damage (think eaten away). My normal mode has always been to paint and age via rust colour model paint and brushed aluminum. This would require a different approach. I started with a base coat of "ruddy brown" primer (light coats so as not to clog up the fins)


The next step was a very light coat of colour (olive drab). I did not want to overpower the base coat so it was spray sparingly to give it the appearance of having been worn away over time and use.


In order to create the illusion of metal which had been corroded by rust I used liquid adhesive which I sprayed in various locations on the pieces ( I did not spray the adhesive into the fins . . . :D). Once the adhesive began to set, I took ground fire place ash and rubbed it into the adhesive to create a rough surface. Once the adhesive set, I brushed off the loose charcoal and then lightly sprayed the pieces with the base coat primer and olive drab to seal the rough surface.


To provide a final rust appearance, I used acrylic paint mixed to various orange textures which I applied on the pieces. Initial painting was smudged in using my finger and a latex glove. I continued this process to create varying shades of orange to provide depth. The final light orange coats were applied lightly on the rough surfaces without smudging.


All I have left to do is to sleeve the fan cables and it is ready for mounting into the unit.

Hope you enjoy :)

Fen
 
I'm not a modder myself, tbh, so I'm not sure what this is worth, but -- well done so far! *claps enthusiastically*

It really does look awesome. I'll be watching this ;)
 
I'm not a modder myself, tbh, so I'm not sure what this is worth, but -- well done so far! *claps enthusiastically*

It really does look awesome. I'll be watching this ;)

Thanks very much for the feedback. :)

I am glad you enjoyed the pics/build to date. Still have a few things to do but will be finishing and putting hardware in soon.

Cheers

Fen
 
Work Log: Part 5a

I hate black wires running across my theme

Okay now before you read this update on the Corsair H80i for those of you who are "sleeving purists" you may want to skip this post as I have thrown caution to the wind. If you continue . . . you were warned . . . so please don't think poorly of me :)

In part 5 of this work log, I aged the H80i to match the theme. As you are probably aware of by now and my Log title gives it away . . . I had black plastic wires running across my theme. So, I try to sleeve anything that is offending to me (black plastic for starters). Now the H80i comes with an attached SATA connector and attached pump LED attachment in that wonderful black plastic. In addition, the unit fans must connect through the pump via another black plastic attachment:


While I could easily sleeve the small LED connector the tried and true method, the SATA cable was a bit of a problem as it was sealed and I do not have the technical skill to open the pump, disconnect and re-solder. :confused: So I had to find a way to sleeve this with paracord. I had the same issue with the fan connector as I had no idea how to get the connector off to sleeve :confused:

WARNING - SLEEVING PURISTS MAY BE OFFENDED BY THE FOLLOWING IMAGES

So if I could not remove the end connectors on these cables, then I would have to cut the paracord open and fit it around the cable . . . Did he say "CUT" :eek: :eek: :eek: Yup . . . cut.

I get this is not the best/cleanest method to do this but these cables are only going a short distance and will only be seen from a specific side/angle . . . so lets get started. I am illustrating with the fan connector although I did the same thing for the SATA cable:

Starting cable:


The fileting of a paracord shell:


Ironed flat and sides melted:


Tacked in place with adhesive:


Fold/tuck/melt - I know very Frankensteinish


However the exposed side looks pristine (IMHO)


Final product of all cables


Most of these cables will be fit within the case an barely visible, however that which is seen will at least be (or appeared to be) sleeved . . . Did I mention I hate black plastic wires running across my theme 0

Cheers :)

Fen
 
WORK LOG - PART 6

What to do about the GPU?

First off Happy Canada Day to all my fellow Canadians :D

Hello, I thought I would share this latest instalment of my theme build.

The GPU became a bone of contention because the PCB side would be facing up with all its electronic goodness screaming "Ignore the theme and look at my newness :mad:” One idea was to add a back plate to the GPU and paint it to match the theme. The only problem was . . . I did not know what a back plate was or how to go about making one. I did some online research and while the concept seemed simple enough, I did not have the skill sets (or screws) to build one and then mount it to the GPU . . . I suppose I could have gone out and had one made but when a problem presents itself . . . why not make it a challenge.

Okay . . . the mounted back plate was off the table. So I stared at the computer case for about 30 minutes and then thought . . . If I can't mount one directly to the GPU why not create a back plate which could be mounted to the expansion slot above where the GPU would mount . . . in essence a free floating back plate sitting about 1/8th of an inch above the GPU. Sounded reasonable . . . so first thing I would need is a GPU mock-up model. That I created out of wood and mounted it to the expansion slot it would be sitting in (the model does not extend the full width - I only need the top half anyway).

Wooden GPU model - measurements for back plate


Wooden model mounted in expansion slot - cardboard back plate template


Okay, I won't lie . . . this took a lot of trial and error to get the measurements correct as well as some careful handling/measuring of the actual GPU. But in the end, I had a workable temple. I now needed to decide on material.

I had some aluminum sheeting lying around . . . metal and electronics (especially PCB) . . . I know, bad idea :eek:. So I decided on adhering plexi-glass to the bottom of the back plate to guard against metal and circuitry accidently connection.

Cutting the metal sheeting


High tech metal bending gadget


Finished prototype ( I did go through several iterations before I got the final one you see later)


To mount the back plate I decided that pop rivets and an existing bracket would work best. This took a bit of trial and error to get it right. In the end the bracket and back plate were solid and could be fit into any expansion bay. The key was to ensure there was space between the GPU and the back plate. After a few iterations and few moments of the "what the :mad:" this was achieved


Now the part I like best . . . aging the back plate (of course I had to add some bolts to make it look rugged and military :) I started with a base coat of ruddy brown primer, followed by a camo (snakeskin) effect in OD green. Next, I added texture for metal corrosion (this time I used coffee grinds and adhesive spray). A final spay of ruddy brown then various shades of orange to create the rusted look. As a final touch, I could not resist adding a warning sticker ;)


After the aging process, I trialed the back plate on my wooden model to see if it achieved the purpose. I think the bracketed back plate does the trick as the GPU PCB will be covered, the back plate does not contact the PCB and now it melts into the theme


Of course this is my "noob" take on it as I have never done anything like this . . . just a concept. Should anyone out there see a major (or even minor) flaw in this idea, please let me know. Feedback is always welcome when you are new.

Cheers :)

Fen
 
Fen, it looks awesome! I love these distressed mods. You execute very nicely. You're like no modding "noob" I've ever seen. Hell, you're better than a lot of people who have been modding for awhile now! Myself included!
 
Very very nice work and some awesome one off ideas here.
Really like how you have taken some older ideas and freshened them up to fit your build/needs (GPU Backplate) for one!
Definatly subscribed and really hope this is just the start....Thumbs Up!
 
Fen, it looks awesome! I love these distressed mods. You execute very nicely. You're like no modding "noob" I've ever seen. Hell, you're better than a lot of people who have been modding for awhile now! Myself included!

Hello . . . thanks much for the feedback and the compliment. I've wanted to do a distressed mod ever since I saw the Fallout mod by Luciel some time ago. Then when I saw the MNPCTECH Firefly Mod with the Corsair 400R . . . it was the final push to give it a try myself.

Cheers and thanks again :)

Fen
 
Very very nice work and some awesome one off ideas here.
Really like how you have taken some older ideas and freshened them up to fit your build/needs (GPU Backplate) for one!
Definatly subscribed and really hope this is just the start....Thumbs Up!

Thanks much, I am glad you are enjoying the build and thanks for subscribing. I think enjoy coming up with ways to hide things the most . . . must be the military in me :D. Going to start working on the sleeving now. Have decided to redo it heat shrinkless. The black heat shrink is throwing my eye and I have decided to bite the bullet and do the 24 pin connector as well.

Thanks again and cheers :)

Fen
 
This is just awesome. I'm not normally into the apocalyptic mods because I think they're always a little over done. But this thing rocks! Keep it up, can't wait to see it finished.
 
Wow, love the look! Hope you have a big LAN in your near future so you can show that badboy off!
 
WORK LOG: PART 7

24 Pin Points of Insanity

Hello,

For those of you have been following my log to date, you know that when it came to sleeving, I chickened out on the 24 pin point connector :(

I thought that painting the already existent OEM sleeving a nice camo green that it would just blend in. Unfortunately, when I put the sleeved cables next to it . . . it looked dismal.


So after some soul searching and feedback from others, I decided to bite the bullet and sleeve that beast . . . I mean how bad could it be . . . right :confused:

So I ordered some new paracord and finally took that cable . . . which I admit I had hidden away like a bad family secret . . . looked at it one last time with its Corsair proprietary rights PSU connector looking at me as if to say . . . Man you have no idea what I am hiding beneath this peaceful OEM.


I grabbed my trusty Exacto Knife, took a very big breath (and an even bigger gulp of single malt scotch) and dissected the heat shrink and tie wraps . . . so far so good :)


So in for a penny in for a pound . . . I grabbed my scissors and started on the OEM . . . No turning back now.


I made short work of the OEM and I have to admit for a few short moments (exactly 2.5 seconds by my reckoning) it felt quite good . . . this cable was not beating me :D. But like all things which seem too good to be true, my Narnia existence soon turned into a Bizzaro world where things like connection to connection cables don't exist . . . I mean . . . seriously what were they thinking :confused:

The mess I found


This was surely one of those great "what the :mad: " moments in life as I stared at double wires criss-crossing every where and what is up with the demented twisted swivel thing

Okay, one thing I have learned in my current job is to shoot, scan and breath . . . emphasis on the breathing. So I decided to be smart about this and not yank all the wires out and do one wire at a time. My paracord had arrived a few days earlier and I was planning to try heat shrinkless to see what it looked like.


The paracord sleeving tool from Lutro Customs saved a lot of snagging headaches :)


Took a few attempts but I finally got the proper combination of location and melt


Two down 22 to go . . . the heat shrinkless looks so much better . . . what do you think?


Well that is it for now, I will post once I get the 24 pin point done . . . unless I mess it up . . . then I think I will drink some more scotch and try to forget before calling Corsair and saying . . . Hey funny thing happened when I was sleeving your cable . . .

Cheers

Fen
 
Wow, military-esque themes usually aren't my thing, but this is awesome! Subscriping for further updates!
 
WORK LOG: PART 7A

24 Points of Insanity - Sanity Recoup

This had to be one of the most agonizing experiences of my life when it came to patience and just pure deliberation :eek: . Not only did I have to contend with the snake nest of twisty tie wires/double wires, the shear angst of getting those :mad: wires out would try the patience of a saint. I ran into several (10 to be exact) wires which would not release their hold on the connector no matter how many times I repositioned the removal tool, wiggled, pulled up, pulled down. So after a quick consult a few people recommended using flattened staples in lieu of the tool for these difficult ones. So, after tearing apart the house for staples (never one around when you need it ), I found some and gave it a go.

After 15 minutes of repositioning . . . pop out came the first one :). Now I would like to say that each one followed in turn as quickly but that would be a lie . While I did manage to get them out, it took over 5 hours . . . hey what else are you going to do on a Friday night? Did that sound as sad as I think it did? :confused:

So while it did take more time than I thought it would, the end product turned out okay (IMHO). I have seen far better, but I was just glad I didn't manage to break any of the wires. :)

So below is the final product. The two paracord horizontal wraps across the wire were a last minute impulse addition. I thought what the heck after that agonizing experience, I deserve to add a personal character touch to the project :D

PSU End Connectors


MOBO End Connector


I decided to dry fit the cable to see what it would look like and the best way to cable management. In the end I decided that the MOBO end will exit from the grommet, wrap around the faux cable conduit (hides the USB 3.0 MOBO cable) and then plug into the MOBO.


The only problem now is that while I like the new look of the 24 pin connector, I absolutely detest the very poor heat shrink job on did on the other cables, not mention I realized the coyote brown of the old wires does not match the coyote brown of the new paracord :(.


So, I guess there is only one resolution . . . grab my staples, removal tool, paracord throw caution to the wind and most likely my sanity and redo . . . Oh well, what else is there to do on a weekend ( I know . . .very sad ;) )

Cheers

Fen
 
WORKLOG PART 8

Cables sleeves and the art of aging

Hello all,

Haven't been able to do much on the build . . . funny how work gets in the way of fun :D

I have finished sleeving my cables and thought I would share the final products with you . . . I will say, this is probably the single worst nightmare I encountered on this build :eek:. If you have been following this work log you will know my angst with the 24 pin connector . . . that only continued with the rest of the cables. But with some patience, several staples and half a bottle of scotch they all got finished.

24 Pin Connector


PCI-E


Molex


SATA


The Art of Aging

Of course to keep the job in line with the case theme, I cannot have pristine sleeved cables running across the build. So with the help of some fireplace charcoal and paint, all the cables were aged to give them that used look. Below is a sample using the PCI-E . . . Remember . . .

. . . BEFORE


. . . AFTER


Hope you enjoyed

Cheers :)

Fen
 
WORK LOG: PART 9

GPU and Plate: Refining the illusion

Hello all:

For those of you who have been following this work log, you may recall I decided on a free floating back plate to hide the PCB of my GPU vice a mounted plate. I did this because I want maximum room between the PCB and the plate. This was the end product:


The original intent was to have the GPU mount directly below the back plate but when I trialed it, there was still some contact between the plate the PCB. So I decided to mount the plate two brackets above the GPU. While it still provided top coverage of the PCB, it could still be seen from the side. So I had to add a piece to the plate to provide more coverage of the side. Lexan plastic sheeting was used:


The other think I did discover was that the side of the GPU shroud looked too pristine to match against the back plate. So, I had no choice but the remove the shroud and get to work aging it to match:

Shiny Shroud


Shroud Removal


Base Paint Job


The final step was to age and rust the extension plate and the shroud. Surface corrosion was achieved by using adhesive spray and charcoal dust. This was then painted with various rust colours to achieve the final product.

Giving it some surface corrosion


Rusting Effect


The Final Products


Hope you enjoyed the pics and update

Cheers :)

Fen
 
FINISHED!!!!!! - At last :)

Well my first build has come to an end and I have to admit I have mixed feelings. On one hand I am glad it is finished :) and on the other I am sad that it is finished:(.

Not sure what I will do now but I do have a bunch of spare military ammo cans and all the spare parts from my old computer which this one has replaced . . . HMMM . . . wonder what I can do with them ;)

Anyway, here are some of the finished pics for the exterior and interior. Hope you enjoyed reading my work log as I had bringing it to you.

EXTERIOR SHOTS

Yup . . . I realize there are two different colours of led (red and white). Was trying something out . . . wanted to make the speakers stand out from the side and top. Can't say I like it too much (have since turned the white leds off - may replace the fans with red leds . . . what do you guys think . . . like or not?)


Okay, could not resist one scary glowing skull shot :)


Had to have a place to hang my head set as I got tired of picking it up off the floor


Just so you don't think I forgot about the back of the case during the aging process


Okay . . . not the best cable management but it does still fit in well with the theme, aged worn and frayed :D


INTERIOR SHOTS

I think the interior turned out quite nice with an aged and worn appearance . . . the MOBO was the hardest and most nervewracking experience when I was aging it. :eek:


Hope you all enjoyed. I had a blast building and will definitely be back with something new . . . once I figure out how to disect and ammo box ;)

Cheers

Fen
 
BRAVO!

Nicely done.

+1 . Yes, well done indeed!

Thanks very much guys . . . This is my first build and I really enjoyed it and very glad it went well. Using the computer now as I speak and it runs great . . . even passed the Intel Burn Test on Super High. Needless to say after all my mods, I was a bit worried it wouldn't start or just burn out.

Cheers

Fen
 
Wow, that is a pretty detailed case mod! I tip my hat to you, sir. I certainly do not have the patience to individually sleeve wires - at least for now....hehehehe....Great Mod!!!:D
 
Nice, this thing looks like its been to war. I mean that in the best way, lol. Very nice attention to detail.
 
Back
Top