Gigabyte Z77X-UP7

Some Legends are born out of a desire to do what no one has done before. Some are born out of necessity, when someone or something exceeds expectations by a large enough margin to be nearly disbelieved. Some legends are the product of lineage, where a family's DNA seems to be superior granting legend status to the sons at birth.
Gigabyte's Z77X-UP7 draws from all of these as the Flagship motherboard for socket 1155. The now familiar orange and black color scheme indicating it's lineage from a family of extreme overclocking boards that started with the X58-OC.
Will it live up to the legend status? Read on .....

Introduction
The Gigabyte Z77X-UP7 is one of Gigabytes new series of Ultra Durable 5 Z77 chipset based motherboard for the socket 1155 CPU’s from Intel. The Z77 chipset launched in support of Intel's new Ivy Bridge series of processors.
This board is aimed at the enthusiast overclocker, someone who wants a full featured and cutting edge motherboard. They don't want to sacrifice any performance, as a matter of fact, they want to squeeze every last ounce of performance from the board, the processor, the memory, as well as up to 4 GPUs in CrossfireX or SLI. No holds barred, knock em' down and out performance. No excuses. No compromises.
The Z77X-UP7 fills in this role in Gigabytes lineup, and provides full access to all the features of the Z77 chipset.
The product webpage for the Gigabyte Z77X-UP78can be found here:
http://ca.gigabyte.com/products/product-page.aspx?pid=4334#ov
The Z77X-UP7 microsite is located here:
http://ca.gigabyte.com/fileupload/microsite/316/z77x-up7.html
Board Layout
The Z77 series of Ultra Durable 5 boards continue with the glass fabric weave that is designed to be more resistant to humidity. This was first introduced on the Ultra Durable 4 line.
The big news however is the new IR3550 PowIRstage® ICs which promise to provide superior power output as well as lower overall temperatures. These are considered the pinnacle of current power circuit technology, and offer higher overall efficiency and fewer overall components on the board due to their single package design. This board goes well beyond the bounds of sanity with a 32 phase power system for the CPU. In theory this would allow the board to supply over 2000watts just to the CPU socket!! Insanity!


Gigabyte has gone once again to black PCBs and orange highlights on the black heatsinks for its flagship overclocking performance board and, I have to say, its striking. The heatsinks use a new thin fin design for maximum heat dissipation. I really like this color scheme and the overall quality of these heatpipe type heatsinks gives the board a very expensive look and feel. I like the orange on black as a signature color. It reminds me of a Porsche GT3. All in your face color scheme and the performance to back it up as well.
The board is SLI and CrossfireX compatible up to 4-way.

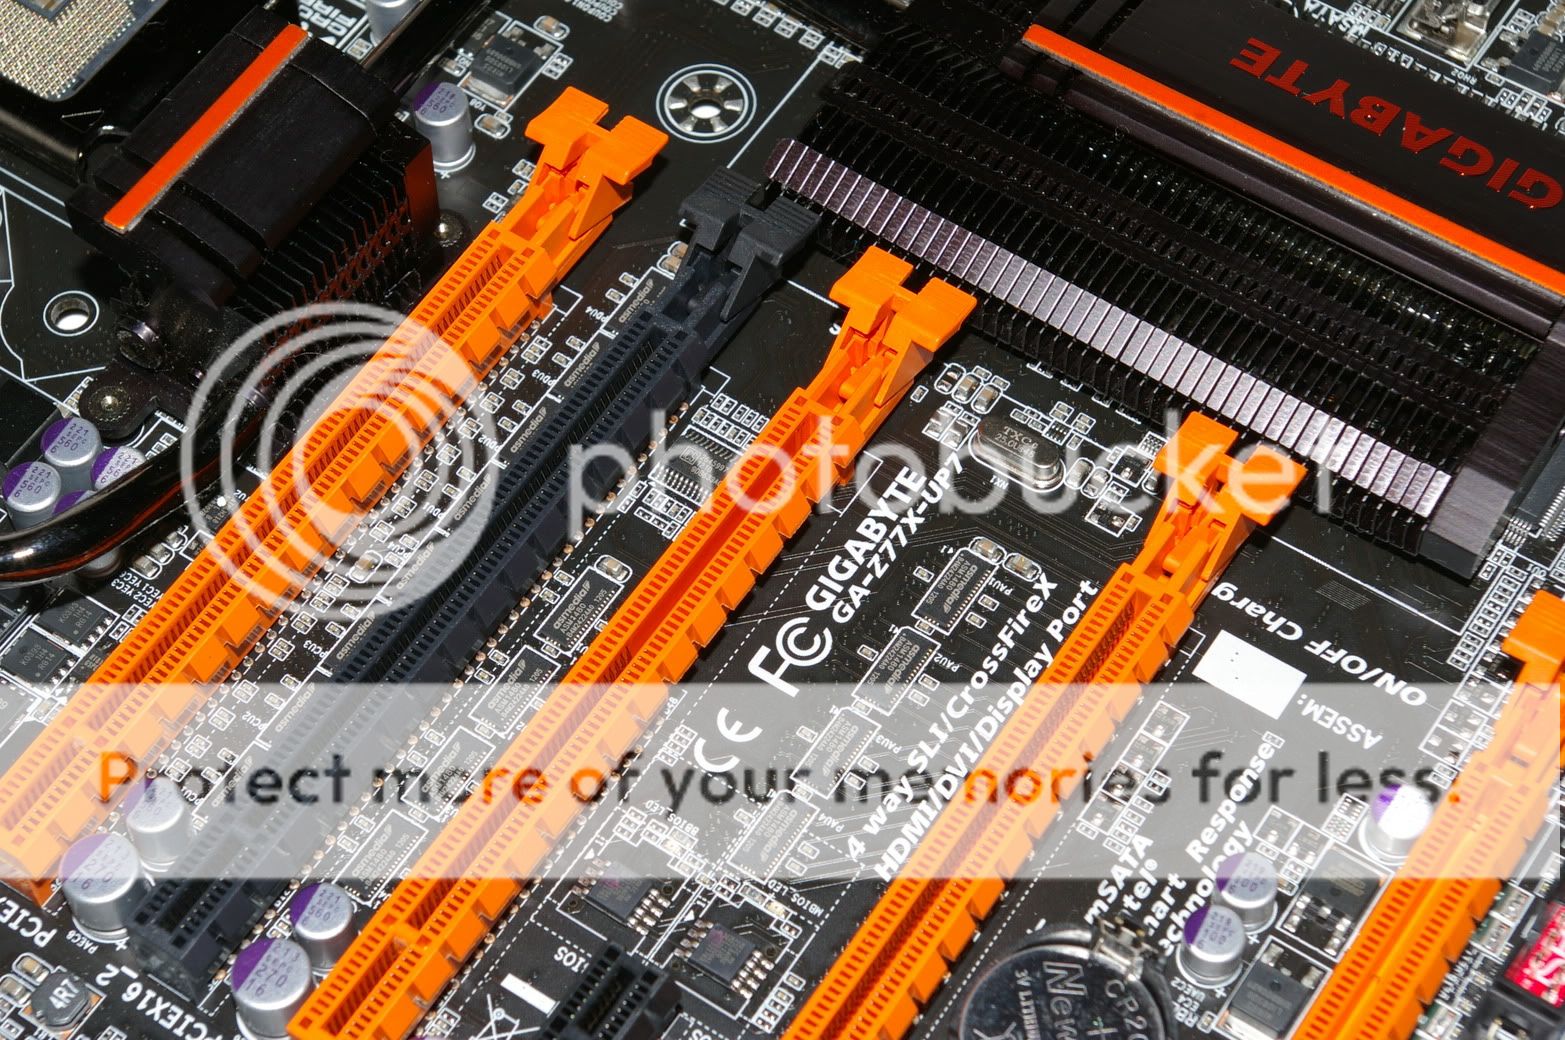
Expansion port layout is as follows:
3 x PCI Express x16 slots, running at x16 (PCIEX16_1~3)
* For optimum performance, if only one expansion card is to be installed, be sure to install it in the PCIEX16_2 slot.
2 x PCI Express x16 slots, running at x8 (PCIEX8_1~2)* The PCIEX8_1 slot shares bandwidth with the PCIEX16_1 slot and the PCIEX8_2 slot with PCIEX16_3. The PCIEX16_1/PCIEX16_3 slot will operate at up to x8 mode when the PCIEX8_1/PCIEX8_2 is populated.
(The PCIEX16 and PCIEX8 slots conform to PCI Express 3.0 standard.)
* Whether PCI Express 3.0 is supported depends on CPU and graphics card compatibility.
* The PCIEX16_2 slot will become unavailable when an expansion card is installed in the orange PCI Express x16 slot.
2 x PCI Express x1 slots
(All PCI Express x1 slots conform to PCI Express 2.0 standard.)
When using a single GPU, place the card in the black colored PCIEX16_2 slot. This bypasses the PLX chip and reduces latency slightly.
There is an additional SATA power connector on the edge of the board to help provide additional power to the PCI-E slots when running SLI or CrossfireX.

There are 2 internal headers for additional USB 3.0 front ports. One just between the DIMM slots and ATX power connector. The other one is located at the bottom right of the board.


There are also headers along the bottom of the board for an additional 4 USB 2.0 ports. There is no shortage of USB connectivity here.
There are also COM (serial) and front audio headers located at the bottom left of the board.
There is a large diagnostic LED panel between the USB3.0 connector and BIOS switches at the bottom right of the board. This can point you in the right direction in the event of a boot failure.
The BIOS (MB) switch allows manual switching between the main and backup bios. This is handy for several reasons. You may want to have separate settings in each bios for specific tasks or setups. Or if you are having issues while using one bios, you can easily switch to the other. The SB switch can enable/disable the dual Bios function.

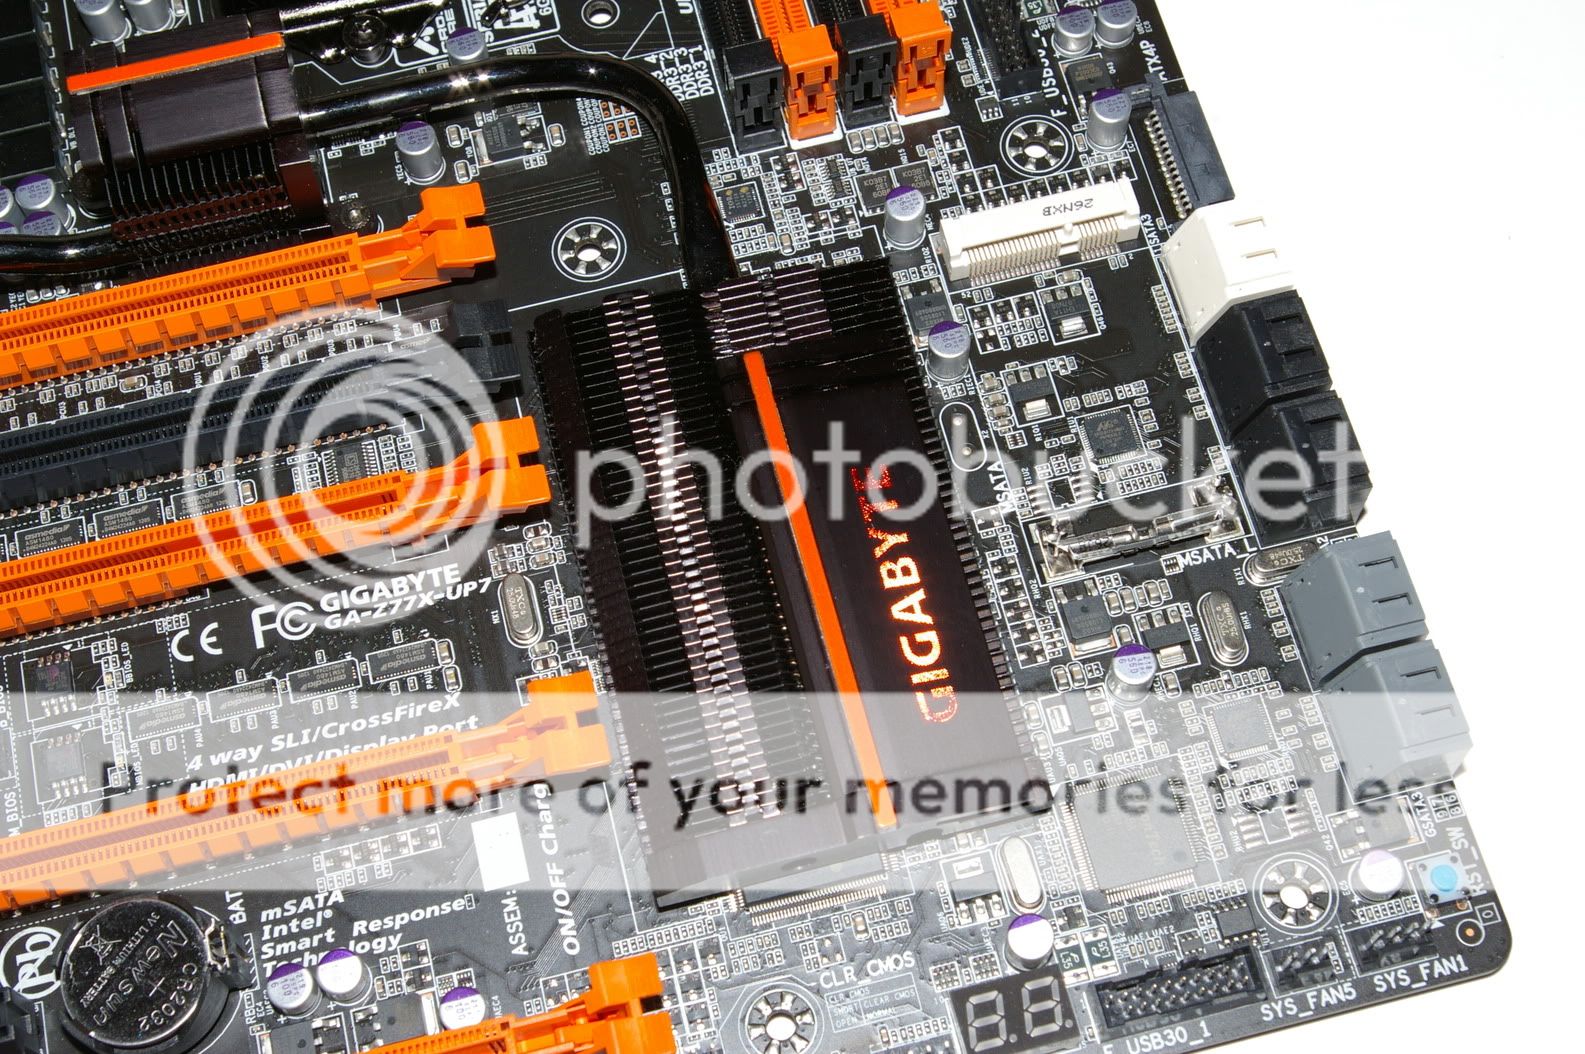
There are 10 SATA ports on the board, grouped together along the right edge. The white (SATA 3)and black (SATA2) headers are the native Intel SATA connections.
There is an mSATA port directly beside the Intel native SATA ports. Keep in mind that port 5 will be disabled if the mSATA port is occupied.
The other 4 connectors (grey) are provided by a pair of Marvell 88SE9172 chips.

The socket area is typical for a socket 1155 board with plenty of space for even very large CPU coolers. You will notice an additional heatsink directly below the socket. This is there to cool the PLX chip. The PLX chip is what allows the UP7 to support 4-way GPU options. Typical Z77 boards only allow 2-way or sometimes 3-way GPU setups. The heatsinks surrounding the socket cool the power circuitry and are connected to the PCH and the PLX chip with heatpipes. These heatsinks are also a thin fin design for increased surface area and thus better heat dissipation.

On the upper right hand side of the board we find Power and Clear CMOS buttons. This is the standard for a board in this price range. In addition we see the OC-Touch buttons. These allow for instantaneous changing of either multiplier or base clock. The Gear switch changes the base clock buttons between 1 mhz and .1 mhz adjustments. Gigabyte has again chosen to include easily accessible voltage monitoring points on the board as well. In fact they gave provided connectors and pigtails to allow you to easily monitor voltages without having to hold the tester probes. You can connect them and set the tester down. This is a very welcome addition for the serious overclocker.

There are 7 fan headers on the board for all your cooling needs.
Rear Panel
There are 4 different options for video out... D-SUB, DVI-D, HDMI and Displayport all on board.
There are 6 USB 3.0 ports on the back panel as well as Dual LAN ports and an optical digital audio port.
Filling out the back panel is an old school PS2 connector and the typical 6 analogue audio jacks.

Also included in the package are a wireless module that has both Dual Band 300mbps wireless N and Bluetooth 4.0 capability and dual antennas. There is also a front 3.5" USB 3.0 front panel to take advantage of all those headers on the motherboard.
There is a single SLI bridge connector as well as a 3-way and a 4-way SLI connector, 6 SATA cables, the usual manuals, driver disk and I/O shield.
To handle eSATA duties, Gigabyte have included a rear bracket and esata cables and power connections.
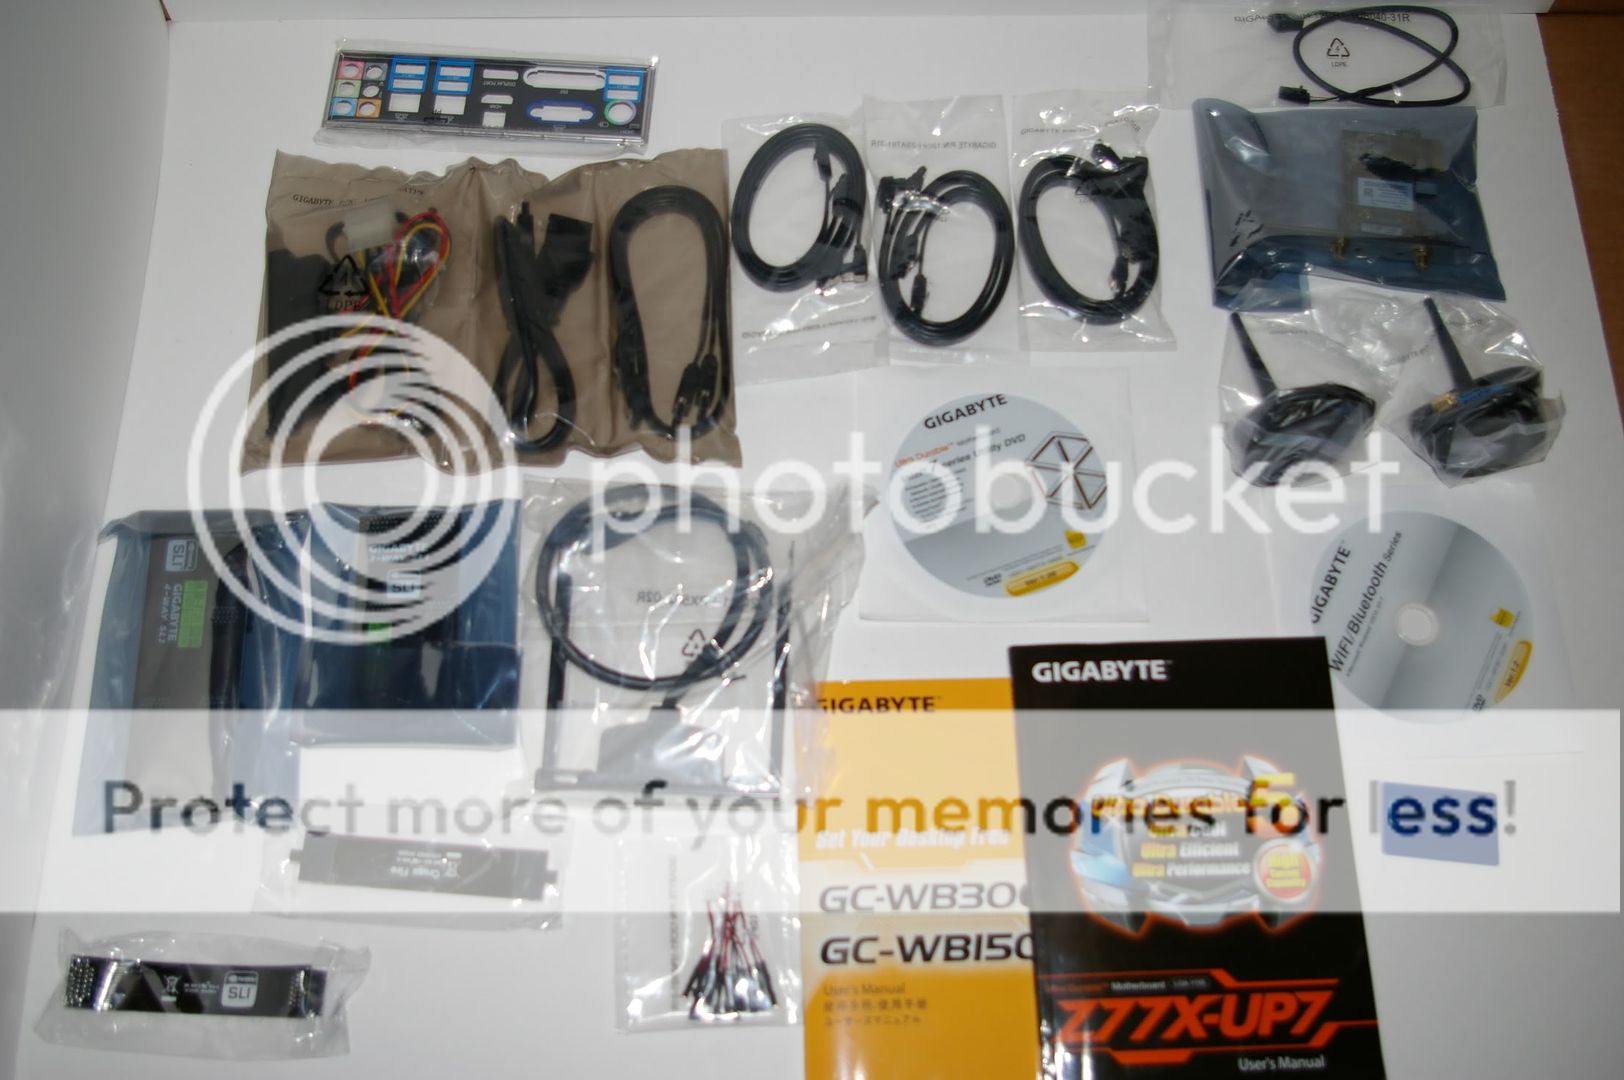
This really does give everything the power user is likely to use, all in one package.
Gigabyte has also chosen the Z77 series of boards to fully launch their 3D BIOS for socket 1155. This gives them full UEFI compliance and allows the BIOS to be navigated with a mouse as well as a keyboard. The 3D section shows a visual representation of the motherboard and various areas can be highlighted and clicked to access BIOS settings for that feature. There are also more traditional menus for those who are more comfortable or familiar with that environment.
You can check out a short video of the Z77 3D BIOS here:
http://www.youtube.com/watch?v=OxzJiwM1Sz8
Test System Setup:
Case: Open Bench
Power Supply: OCZ ZT750W
Motherboard : Gigabyte Z77X-UP7
CPU: Intel i7 3770k
CPU Cooling: XSPC RASA 750 water cooling
Memory: 8 GB (2x4GB) Gskill Ares DDR3 2133
Video Card: XFX AMD HD7870 2Gb
System Hard Drive: Corsair Force F115
Optical Drive: LG BH10 Blu ray writer
Operating System: Windows 7 Home Premium 64 bit
The Z77 Chipset Features
We have covered this many times in the past, but here is a brief overview of the Z77 chipset.
The Z77 chipset is the successor to the Z68 chipset. It offers all those same features of the Z68 but expands upon them.
Intel Smart Response
This allows a user to add an inexpensive, small capacity SSD drive to an already installed OS on a standard platter drive (the controller must be in RAID mode in Bios). The Smart Response technology allows the SSD to be used as a large cache while the larger capacity standard hard drive gives a greater capacity. This is an economical way to get most of the performance of an SSD at capacities that would easily break the bank if purchasing just a single large capacity SSD.
I have covered this technology in several of my previous reviews and so will not be benchmarking it again here. The technology works as advertised and is an easy and quick way to increase desktop performance and do it cheaply. I would love to see more mSATA drives on the marked at affordable prices as this makes the process quick and easy.
Intel Quick Sync
This allows the onboard IGP to be used for video encoding. This can greatly reduce the CPU load while encoding, making your system still responsive and reduce power consumption. There have been improvements made and the new Ivy Bridge CPUs see a pretty substantial boost in encoding speed compared to Sandy Bridge. In order to take advantage of this feature, the board must have a video out connection. I won't rehash this technology in this review as it has been well covered in several of my past reviews. Suffice it to say it offers a real and measurable speed improvement for some video encoding tasks.
Lucid Virtu MVP
This allows real time switching between the onboard IGP and your discrete GPU so that you can either use Quick Sync or just run your basic system with IGP to reduce system power usage. Then switch to your discrete card for some gaming power. This also improves on the feature set of the original Lucid Virtue available on Z68. It allows the onboard Intel GPU to be used to help boost performance and responsiveness in 3D games. For a more details description of this feature click on this link to take you to Lucid Logix website:
http://www.lucidlogix.com/product-virtu-mvp.shtml
We have looked at this in my previous review of the Gigabyte Z77X-UD3H, where we discovered that while it offered a huge gain in many benchmarks, it did not offer a noticeable gain in BF3, the one title I was able to test it in.
Overclocking
Why we are looking at this board in the first place!
Being a flagship product, I figured I needed to use a flagship CPU. So i have upgraded my 3570K to a 3770K for this review.
Maximum Clock
My best CPU-Z validation was 5402.05 @ 1.524V.
LINK: http://valid.canardpc.com/show_oc.php?id=2580698
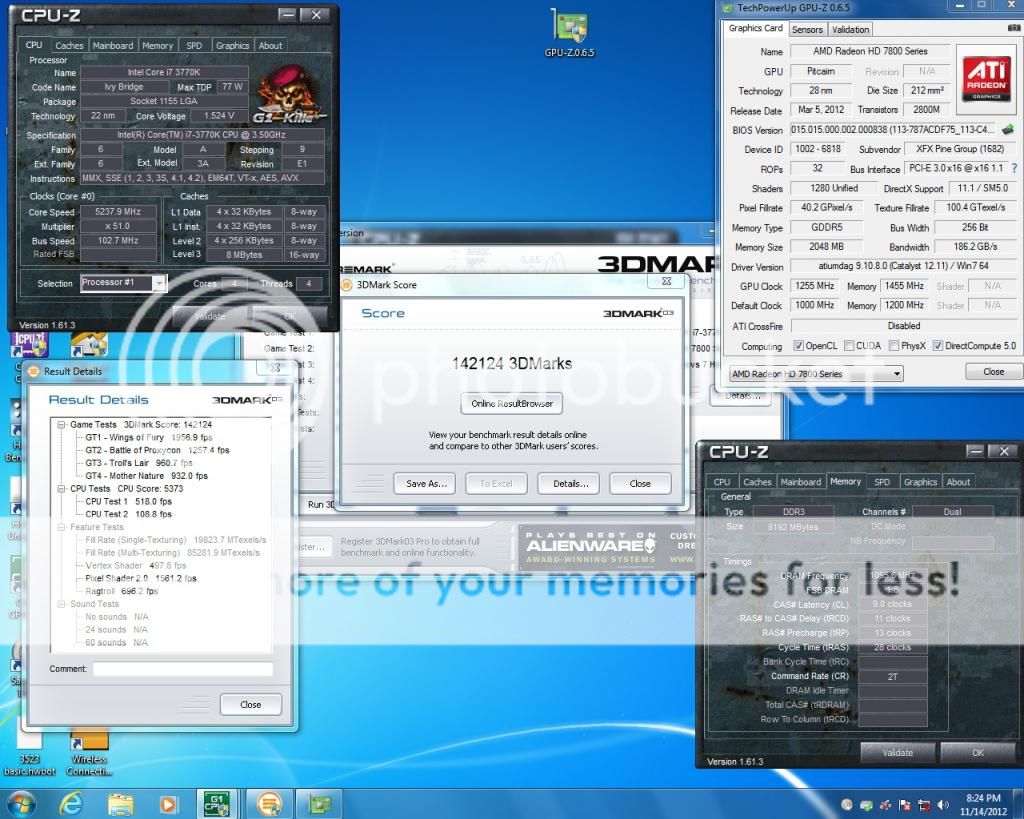
This was only stable long enough for the validation. But for most of my benchmarking, I ran the 3770K between 5200Mhz and 5300Mhz.
Here is a sample of what I was able to achieve with this motherboard:
3Dmark03: 142124
3Dmark 05: 49249
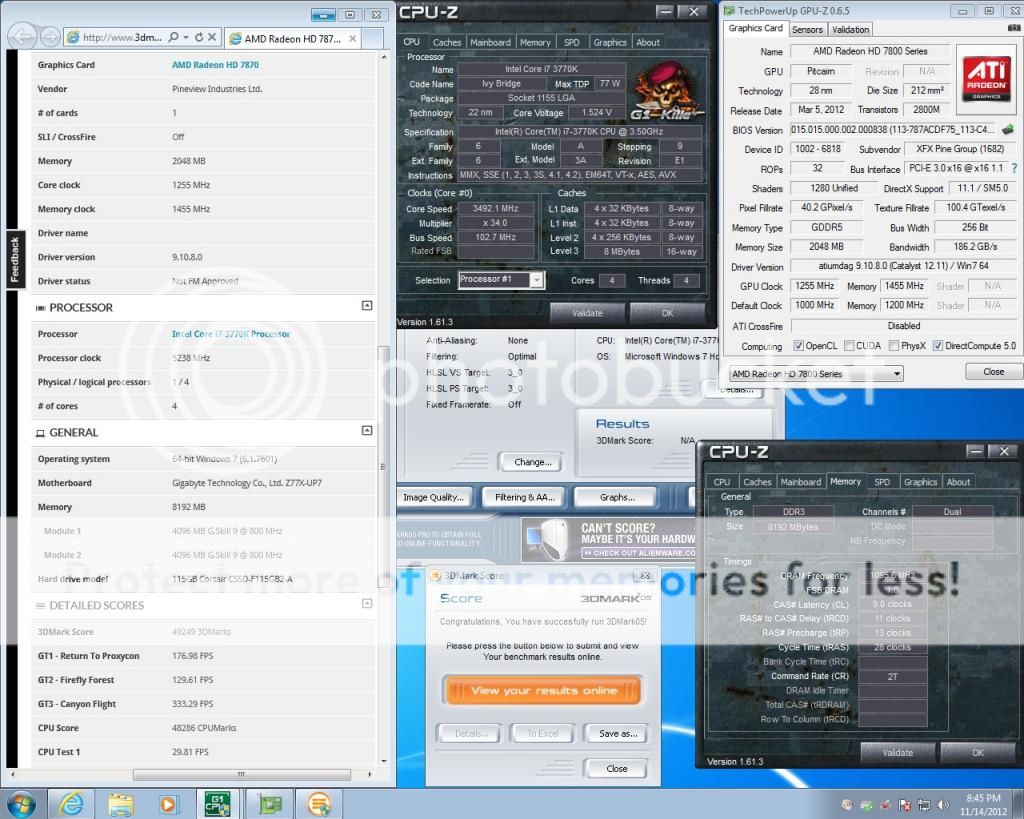
Superpi 1M:
http://hwbot.org/submission/2328257_kirbster_superpi_core_i7_3770k_6sec_906ms
Superpi 32m:
http://hwbot.org/submission/2321907_kirbster_superpi_32m_core_i7_3770k_6min_22sec_516ms
Wprime 32m:
http://hwbot.org/submission/2328254_kirbster_wprime_32m_core_i7_3770k_4sec_452ms
Wprime 1024m:
http://hwbot.org/submission/2328256_kirbster_wprime_1024m_core_i7_3770k_141sec_671ms
Overclocking on this board is very similar to any of the other Gigabyte Z77 boards I have tested. The BIOS contains a myriad assortment of tweakable settings to help any level overclocker to reach their targets. Where on previous boards I seemed to be able to find my limits fairly quickly, this board kept drawing me back to try again and again. I kept trying to write this review, but the board kept whispering in my ear.. "come and play some more!" and I couldn't resist! So here I am about a week beyond my normal time threshold for testing and I am still running benchmarks while I am writing.
In the end, isn't that an important quality in a new piece of kit? That immeasurable enjoyment factor that isn't necessarily seen in the results, but encouraging us to keep pushing further?
Thankfully the numbers do back up this boards DNA heritage. I was able to post some of the fastest benchmarks for a water cooled 3770K on HWbot.org.
This board was extremely cool during all my overclocking sessions. The heat sinks on the PCH and on the power ICs barely got above room temperature. Even the slightest airflow across them and they were cool to the touch.
This is a very cool running motherboard. This validates Gigabytes claims regarding the new power circuitry and the efficiency of the IR3550 PowIRstage® ICs. They really do run a lot cooler.
The board remained absolutely rock solid and never had an issues recovering when the overclock was pushed too far. I was always met with a message letting me know the overclock had failed and giving me the option to enter the BIOS or load default settings. I was then allowed to re-enter the BIOS to tweak the settings further looking for that sweet spot between performance and stability.
Conclusion
What more can I say about this motherboard? It proved itself rock solid throughout my testing, it never failed to recover from a reboot. It is gorgeous, and screams performance with it's flashy and bold color scheme. And it lived completely up to the expectations of this reviewer and it's heritage as a pure performance board like its predecessors the X58-OC and X79-UD7.
Do I sound excited? That's because I am! I know I will continue to tweak and push this system into the coming weeks ahead, continually striving for more performance.
After all, isn't that what the hard core overclocker does? Isn't that why we want a board like this?
[I


http://s912.photobucket.com/albums/ac327/kirbster1966/z77X-UP7/
Some Legends are born out of a desire to do what no one has done before. Some are born out of necessity, when someone or something exceeds expectations by a large enough margin to be nearly disbelieved. Some legends are the product of lineage, where a family's DNA seems to be superior granting legend status to the sons at birth.
Gigabyte's Z77X-UP7 draws from all of these as the Flagship motherboard for socket 1155. The now familiar orange and black color scheme indicating it's lineage from a family of extreme overclocking boards that started with the X58-OC.
Will it live up to the legend status? Read on .....
Introduction
The Gigabyte Z77X-UP7 is one of Gigabytes new series of Ultra Durable 5 Z77 chipset based motherboard for the socket 1155 CPU’s from Intel. The Z77 chipset launched in support of Intel's new Ivy Bridge series of processors.
This board is aimed at the enthusiast overclocker, someone who wants a full featured and cutting edge motherboard. They don't want to sacrifice any performance, as a matter of fact, they want to squeeze every last ounce of performance from the board, the processor, the memory, as well as up to 4 GPUs in CrossfireX or SLI. No holds barred, knock em' down and out performance. No excuses. No compromises.
The Z77X-UP7 fills in this role in Gigabytes lineup, and provides full access to all the features of the Z77 chipset.
The product webpage for the Gigabyte Z77X-UP78can be found here:
http://ca.gigabyte.com/products/product-page.aspx?pid=4334#ov
The Z77X-UP7 microsite is located here:
http://ca.gigabyte.com/fileupload/microsite/316/z77x-up7.html
Board Layout
The Z77 series of Ultra Durable 5 boards continue with the glass fabric weave that is designed to be more resistant to humidity. This was first introduced on the Ultra Durable 4 line.
The big news however is the new IR3550 PowIRstage® ICs which promise to provide superior power output as well as lower overall temperatures. These are considered the pinnacle of current power circuit technology, and offer higher overall efficiency and fewer overall components on the board due to their single package design. This board goes well beyond the bounds of sanity with a 32 phase power system for the CPU. In theory this would allow the board to supply over 2000watts just to the CPU socket!! Insanity!
Gigabyte has gone once again to black PCBs and orange highlights on the black heatsinks for its flagship overclocking performance board and, I have to say, its striking. The heatsinks use a new thin fin design for maximum heat dissipation. I really like this color scheme and the overall quality of these heatpipe type heatsinks gives the board a very expensive look and feel. I like the orange on black as a signature color. It reminds me of a Porsche GT3. All in your face color scheme and the performance to back it up as well.
The board is SLI and CrossfireX compatible up to 4-way.
Expansion port layout is as follows:
3 x PCI Express x16 slots, running at x16 (PCIEX16_1~3)
* For optimum performance, if only one expansion card is to be installed, be sure to install it in the PCIEX16_2 slot.
2 x PCI Express x16 slots, running at x8 (PCIEX8_1~2)* The PCIEX8_1 slot shares bandwidth with the PCIEX16_1 slot and the PCIEX8_2 slot with PCIEX16_3. The PCIEX16_1/PCIEX16_3 slot will operate at up to x8 mode when the PCIEX8_1/PCIEX8_2 is populated.
(The PCIEX16 and PCIEX8 slots conform to PCI Express 3.0 standard.)
* Whether PCI Express 3.0 is supported depends on CPU and graphics card compatibility.
* The PCIEX16_2 slot will become unavailable when an expansion card is installed in the orange PCI Express x16 slot.
2 x PCI Express x1 slots
(All PCI Express x1 slots conform to PCI Express 2.0 standard.)
When using a single GPU, place the card in the black colored PCIEX16_2 slot. This bypasses the PLX chip and reduces latency slightly.
There is an additional SATA power connector on the edge of the board to help provide additional power to the PCI-E slots when running SLI or CrossfireX.
There are 2 internal headers for additional USB 3.0 front ports. One just between the DIMM slots and ATX power connector. The other one is located at the bottom right of the board.
There are also headers along the bottom of the board for an additional 4 USB 2.0 ports. There is no shortage of USB connectivity here.
There are also COM (serial) and front audio headers located at the bottom left of the board.
There is a large diagnostic LED panel between the USB3.0 connector and BIOS switches at the bottom right of the board. This can point you in the right direction in the event of a boot failure.
The BIOS (MB) switch allows manual switching between the main and backup bios. This is handy for several reasons. You may want to have separate settings in each bios for specific tasks or setups. Or if you are having issues while using one bios, you can easily switch to the other. The SB switch can enable/disable the dual Bios function.
There are 10 SATA ports on the board, grouped together along the right edge. The white (SATA 3)and black (SATA2) headers are the native Intel SATA connections.
There is an mSATA port directly beside the Intel native SATA ports. Keep in mind that port 5 will be disabled if the mSATA port is occupied.
The other 4 connectors (grey) are provided by a pair of Marvell 88SE9172 chips.
The socket area is typical for a socket 1155 board with plenty of space for even very large CPU coolers. You will notice an additional heatsink directly below the socket. This is there to cool the PLX chip. The PLX chip is what allows the UP7 to support 4-way GPU options. Typical Z77 boards only allow 2-way or sometimes 3-way GPU setups. The heatsinks surrounding the socket cool the power circuitry and are connected to the PCH and the PLX chip with heatpipes. These heatsinks are also a thin fin design for increased surface area and thus better heat dissipation.
On the upper right hand side of the board we find Power and Clear CMOS buttons. This is the standard for a board in this price range. In addition we see the OC-Touch buttons. These allow for instantaneous changing of either multiplier or base clock. The Gear switch changes the base clock buttons between 1 mhz and .1 mhz adjustments. Gigabyte has again chosen to include easily accessible voltage monitoring points on the board as well. In fact they gave provided connectors and pigtails to allow you to easily monitor voltages without having to hold the tester probes. You can connect them and set the tester down. This is a very welcome addition for the serious overclocker.
There are 7 fan headers on the board for all your cooling needs.
Rear Panel
There are 4 different options for video out... D-SUB, DVI-D, HDMI and Displayport all on board.
There are 6 USB 3.0 ports on the back panel as well as Dual LAN ports and an optical digital audio port.
Filling out the back panel is an old school PS2 connector and the typical 6 analogue audio jacks.
Also included in the package are a wireless module that has both Dual Band 300mbps wireless N and Bluetooth 4.0 capability and dual antennas. There is also a front 3.5" USB 3.0 front panel to take advantage of all those headers on the motherboard.
There is a single SLI bridge connector as well as a 3-way and a 4-way SLI connector, 6 SATA cables, the usual manuals, driver disk and I/O shield.
To handle eSATA duties, Gigabyte have included a rear bracket and esata cables and power connections.
This really does give everything the power user is likely to use, all in one package.
Gigabyte has also chosen the Z77 series of boards to fully launch their 3D BIOS for socket 1155. This gives them full UEFI compliance and allows the BIOS to be navigated with a mouse as well as a keyboard. The 3D section shows a visual representation of the motherboard and various areas can be highlighted and clicked to access BIOS settings for that feature. There are also more traditional menus for those who are more comfortable or familiar with that environment.
You can check out a short video of the Z77 3D BIOS here:
http://www.youtube.com/watch?v=OxzJiwM1Sz8
Test System Setup:
Case: Open Bench
Power Supply: OCZ ZT750W
Motherboard : Gigabyte Z77X-UP7
CPU: Intel i7 3770k
CPU Cooling: XSPC RASA 750 water cooling
Memory: 8 GB (2x4GB) Gskill Ares DDR3 2133
Video Card: XFX AMD HD7870 2Gb
System Hard Drive: Corsair Force F115
Optical Drive: LG BH10 Blu ray writer
Operating System: Windows 7 Home Premium 64 bit
The Z77 Chipset Features
We have covered this many times in the past, but here is a brief overview of the Z77 chipset.
The Z77 chipset is the successor to the Z68 chipset. It offers all those same features of the Z68 but expands upon them.
Intel Smart Response
This allows a user to add an inexpensive, small capacity SSD drive to an already installed OS on a standard platter drive (the controller must be in RAID mode in Bios). The Smart Response technology allows the SSD to be used as a large cache while the larger capacity standard hard drive gives a greater capacity. This is an economical way to get most of the performance of an SSD at capacities that would easily break the bank if purchasing just a single large capacity SSD.
I have covered this technology in several of my previous reviews and so will not be benchmarking it again here. The technology works as advertised and is an easy and quick way to increase desktop performance and do it cheaply. I would love to see more mSATA drives on the marked at affordable prices as this makes the process quick and easy.
Intel Quick Sync
This allows the onboard IGP to be used for video encoding. This can greatly reduce the CPU load while encoding, making your system still responsive and reduce power consumption. There have been improvements made and the new Ivy Bridge CPUs see a pretty substantial boost in encoding speed compared to Sandy Bridge. In order to take advantage of this feature, the board must have a video out connection. I won't rehash this technology in this review as it has been well covered in several of my past reviews. Suffice it to say it offers a real and measurable speed improvement for some video encoding tasks.
Lucid Virtu MVP
This allows real time switching between the onboard IGP and your discrete GPU so that you can either use Quick Sync or just run your basic system with IGP to reduce system power usage. Then switch to your discrete card for some gaming power. This also improves on the feature set of the original Lucid Virtue available on Z68. It allows the onboard Intel GPU to be used to help boost performance and responsiveness in 3D games. For a more details description of this feature click on this link to take you to Lucid Logix website:
http://www.lucidlogix.com/product-virtu-mvp.shtml
We have looked at this in my previous review of the Gigabyte Z77X-UD3H, where we discovered that while it offered a huge gain in many benchmarks, it did not offer a noticeable gain in BF3, the one title I was able to test it in.
Overclocking
Why we are looking at this board in the first place!
Being a flagship product, I figured I needed to use a flagship CPU. So i have upgraded my 3570K to a 3770K for this review.
Maximum Clock
My best CPU-Z validation was 5402.05 @ 1.524V.
LINK: http://valid.canardpc.com/show_oc.php?id=2580698
This was only stable long enough for the validation. But for most of my benchmarking, I ran the 3770K between 5200Mhz and 5300Mhz.
Here is a sample of what I was able to achieve with this motherboard:
3Dmark03: 142124
3Dmark 05: 49249
Superpi 1M:
http://hwbot.org/submission/2328257_kirbster_superpi_core_i7_3770k_6sec_906ms
Superpi 32m:
http://hwbot.org/submission/2321907_kirbster_superpi_32m_core_i7_3770k_6min_22sec_516ms
Wprime 32m:
http://hwbot.org/submission/2328254_kirbster_wprime_32m_core_i7_3770k_4sec_452ms
Wprime 1024m:
http://hwbot.org/submission/2328256_kirbster_wprime_1024m_core_i7_3770k_141sec_671ms
Overclocking on this board is very similar to any of the other Gigabyte Z77 boards I have tested. The BIOS contains a myriad assortment of tweakable settings to help any level overclocker to reach their targets. Where on previous boards I seemed to be able to find my limits fairly quickly, this board kept drawing me back to try again and again. I kept trying to write this review, but the board kept whispering in my ear.. "come and play some more!" and I couldn't resist! So here I am about a week beyond my normal time threshold for testing and I am still running benchmarks while I am writing.
In the end, isn't that an important quality in a new piece of kit? That immeasurable enjoyment factor that isn't necessarily seen in the results, but encouraging us to keep pushing further?
Thankfully the numbers do back up this boards DNA heritage. I was able to post some of the fastest benchmarks for a water cooled 3770K on HWbot.org.
This board was extremely cool during all my overclocking sessions. The heat sinks on the PCH and on the power ICs barely got above room temperature. Even the slightest airflow across them and they were cool to the touch.
This is a very cool running motherboard. This validates Gigabytes claims regarding the new power circuitry and the efficiency of the IR3550 PowIRstage® ICs. They really do run a lot cooler.
The board remained absolutely rock solid and never had an issues recovering when the overclock was pushed too far. I was always met with a message letting me know the overclock had failed and giving me the option to enter the BIOS or load default settings. I was then allowed to re-enter the BIOS to tweak the settings further looking for that sweet spot between performance and stability.
Conclusion
What more can I say about this motherboard? It proved itself rock solid throughout my testing, it never failed to recover from a reboot. It is gorgeous, and screams performance with it's flashy and bold color scheme. And it lived completely up to the expectations of this reviewer and it's heritage as a pure performance board like its predecessors the X58-OC and X79-UD7.
Do I sound excited? That's because I am! I know I will continue to tweak and push this system into the coming weeks ahead, continually striving for more performance.
After all, isn't that what the hard core overclocker does? Isn't that why we want a board like this?
[I
http://s912.photobucket.com/albums/ac327/kirbster1966/z77X-UP7/
") Gonna push my chip to the max with it, so excited
Gonna push my chip to the max with it, so excited