TheHobbyist
Hugs Hard Johnnies [H]ard
- Joined
- Apr 8, 2008
- Messages
- 456
Welcome everyone! Thank you for stopping by to see my work in progress.
What is the ThreeZeroProject?
Necessity is the mother of invention. About a year and a half ago, I was traveling a lot for work and spending a lot of time going through airports and staying in hotel rooms. As I sat there working on my laptop, I kept wishing I was at home, using my desktop computer. Even worse, when my work was done for the day, I couldn't even play games at a decent frame rate.
I began researching custom laptops and exploring how much power could be expected from one. As I looked at all the top models and read reviews of the mobile graphics cards, I was very disappointed in their performance and their price compared to my trusty desktop at home. I needed a portable computer that was small enough that I could take it on a flight as a carry on, but powerful enough that I wouldn't be limited by it's performance.
I couldn't find a product that could do what I wanted, so I decided to design one.
What are your goals with the ThreeZeroProject?
As mentioned before, I originally set out to design a computer that was portable, powerful, and airplane carry on compatible. Since then, I have added additional goals as it has all come together.
It must be able to:
1. Easily hook up to a High Definition Television with HDMI
2. Play Blu-rays
3. Play my media collection with hardware acceleration and custom filters
4. Play any game I throw at it at 1080p with maximum settings
5. Rapidly encode video with hardware acceleration
1. Easily hook up to a High Definition Television with HDMI
2. Play Blu-rays
3. Play my media collection with hardware acceleration and custom filters
4. Play any game I throw at it at 1080p with maximum settings
5. Rapidly encode video with hardware acceleration
Hardware
Motherboard
Enclosure Details- ASUS Maximus V GENE
- SilverStone ST45SF 450W SFX
- Intel Core i7-3770K
- 16GB DDR3 1600 Samsung 30nm MV-3V4G3D/US
ASUS GTX670-DC2T-2GD5 GeForce GTX 670 2GB(No Longer Available)- ASUS GTX680-DC2-4GD5 GeForce GTX 680 4GB
- GTX 690
- Corsair Neutron GTX 240GB SSD
- Western Digital WD10JPVT Scorpio Blue 1 TB 2.5" Hard Drive
- Panasonic UJ240 6x Blu-ray Burner
- Antec Kuhler 620
- Scythe Gentle Typhoon GT-15
- Thermal Paste (Tuniq TX-2 Extreme)
- PCI-E Bus Extender
- Front Audio and USB 3.0 Ports (Silverstone G11303260)
- Xbox 360 Wireless Controller (Black/White)
- Case Feet (Mod/Smart Low Profile Black)
- Power Button (Lamptron Black 16mm Red Ring)
(Momentary Vandal Resistant Illuminated Switch)
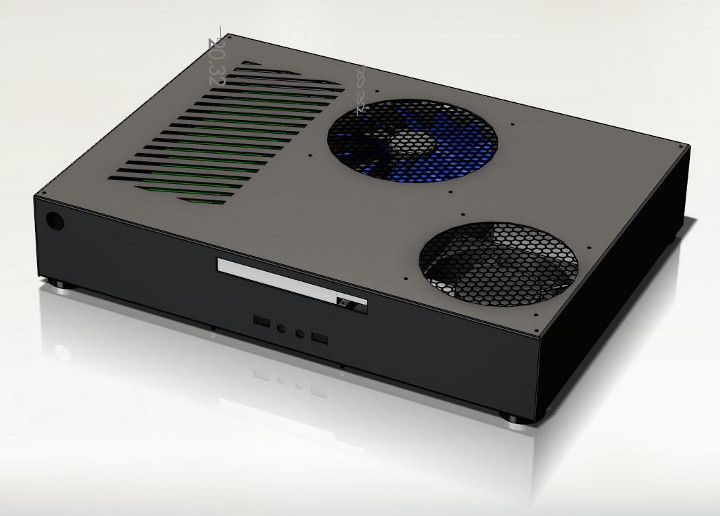
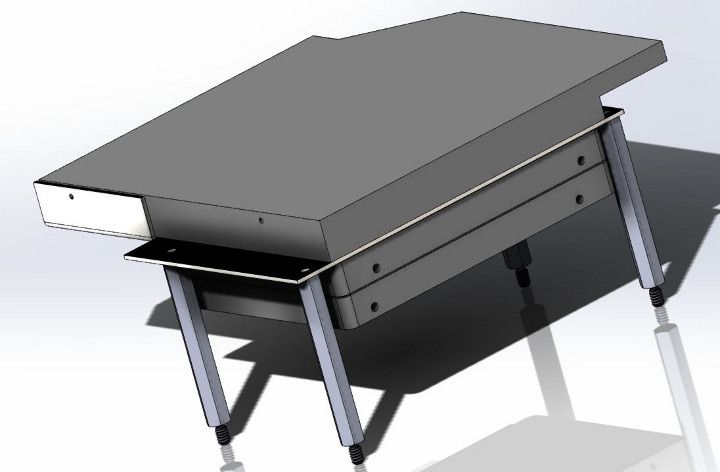
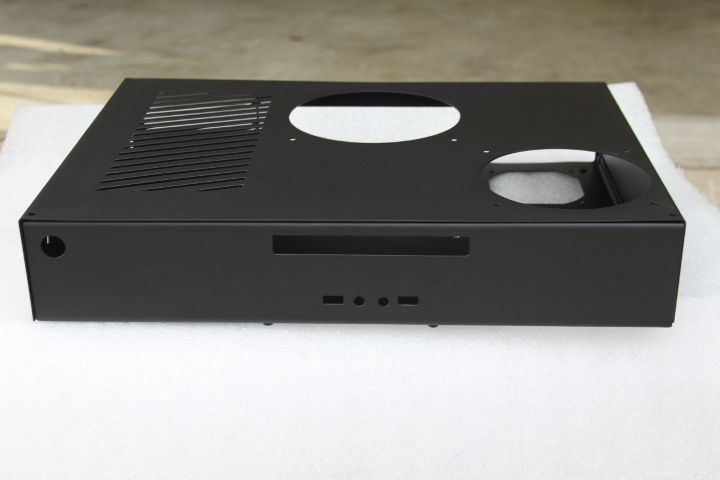
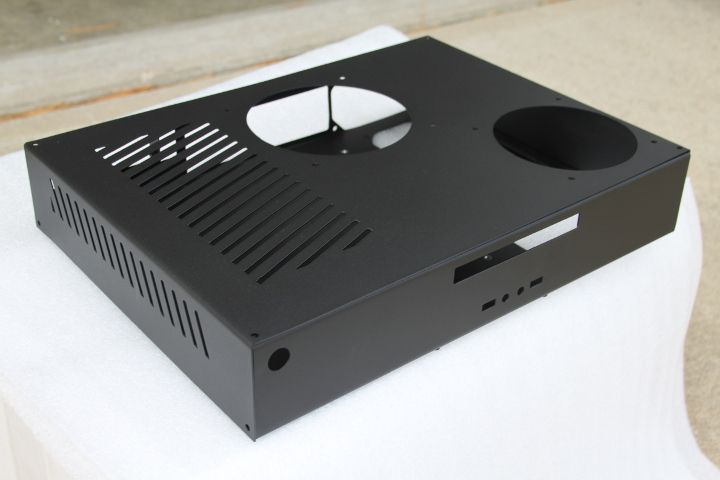
The enclosure will consist of 2 external pieces and a custom bracket for mounting the drives. It's final dimension will be 12"x17"x3" or 612 cubic inches (10 Liters for my SFF friends)
The Design
I basically spent the last year or so learning and accumulating dimensions necessary for the design of a computer case. Using SolidWorks, I modeled the hardware I wanted to use and began experimenting with their arrangement. Once I was satisfied with their arrangement, I began to design the enclosure around it. Having no prior experience with SolidWorks and no engineering education, it was an interesting ride. 
I think I can successfully say that I have packed a ferocious desktop computer into a small package and fulfilled my design goals IN THEORY. I finally reached a point where I was ready to bring my design to the real world.
I think I can successfully say that I have packed a ferocious desktop computer into a small package and fulfilled my design goals IN THEORY. I finally reached a point where I was ready to bring my design to the real world.
Sponsors
My wife
My new baby girl
My new baby girl
Progress Updates
- [anchorlink="Update 1"]Initial Post[/anchorlink]
- [anchorlink="Update 2"]10/18/2012[/anchorlink]
- [anchorlink="Update 3"]10/18/2012 2nd Update[/anchorlink]
- [anchorlink="Update 4"]10/27/2012[/anchorlink]
- [anchorlink="Update 5"]11/14/2012[/anchorlink]
+ All of the hardware has been purchased,received, and assembled.
+ I have submitted the first revision of my design to the manufacturer for production.
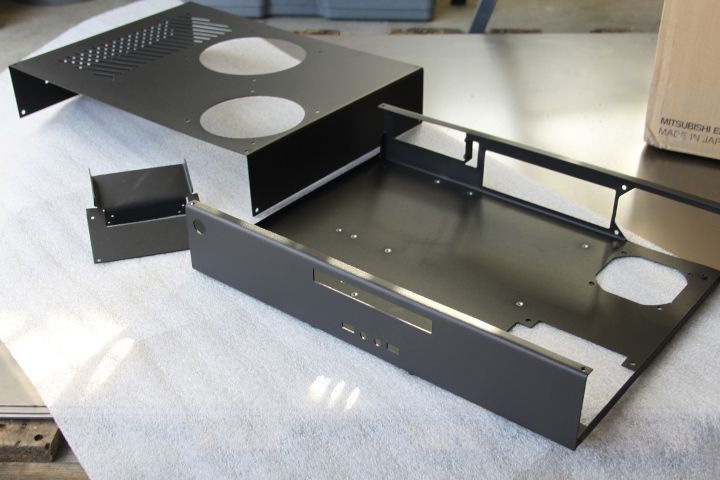
Case
Drive Cage
+ I have received the engineering drawings
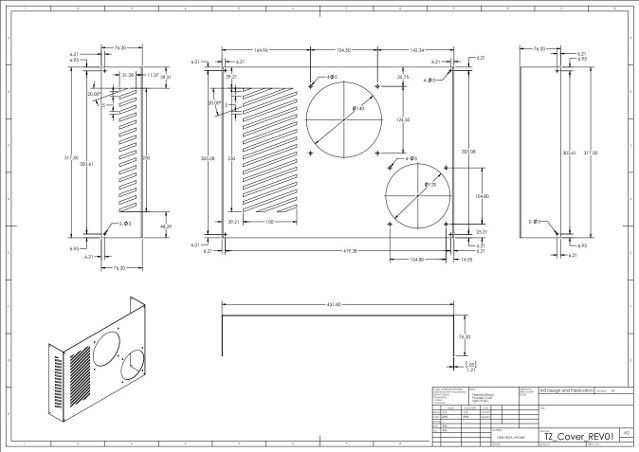

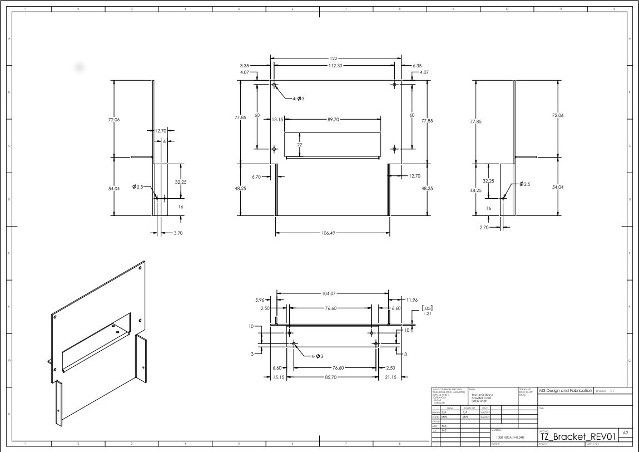
+ Production of the first unit has begun
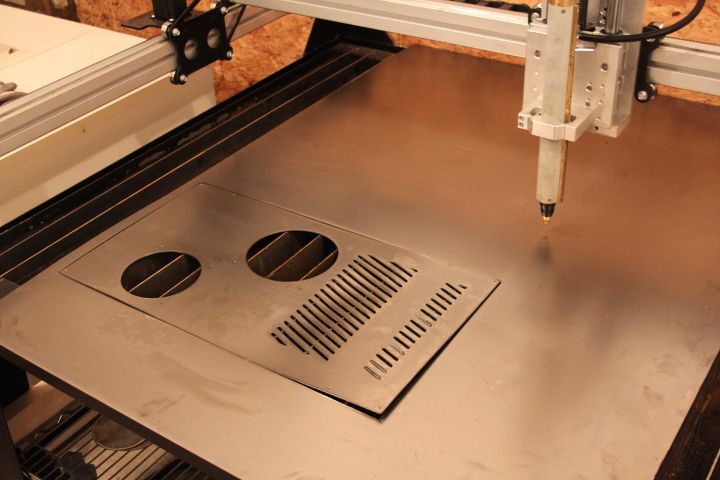
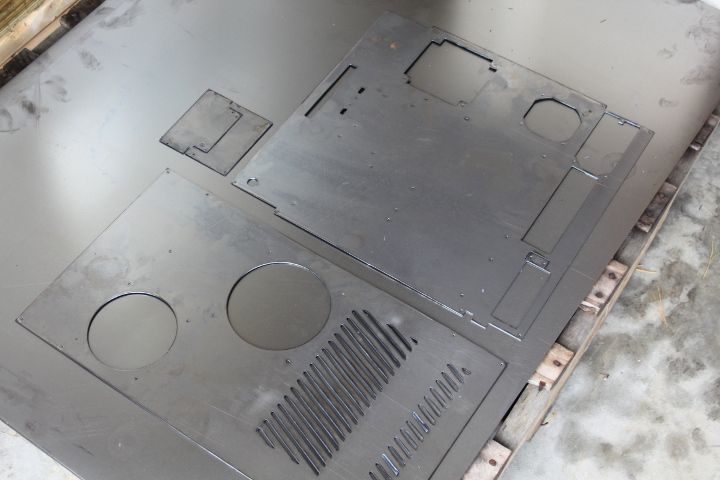
[anchor]Update 2[/anchor] 10/18/2012
+Manufacturing of the prototype is going well!
+Recently completed:
- Debur and semi-finish parts
- Drill out holes
- Press in thread inserts
- Bend
[anchor]Update 3[/anchor] 10/18/2012 2nd Update
+ Parts are powder coated and on their way!
[anchor]Update 4[/anchor] 10/27/2012
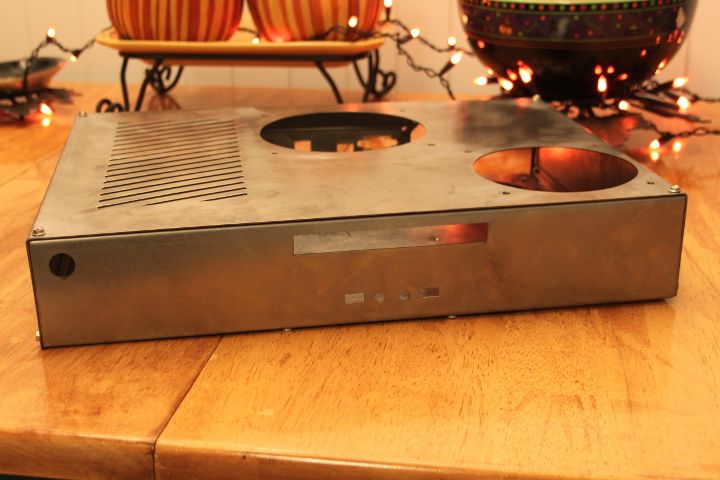
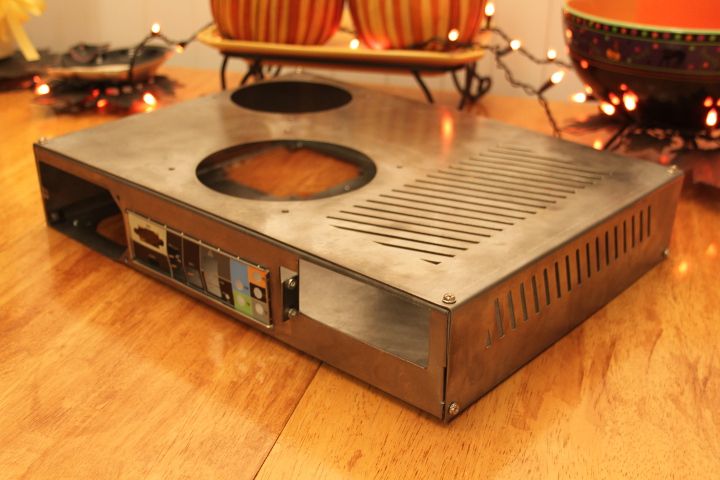
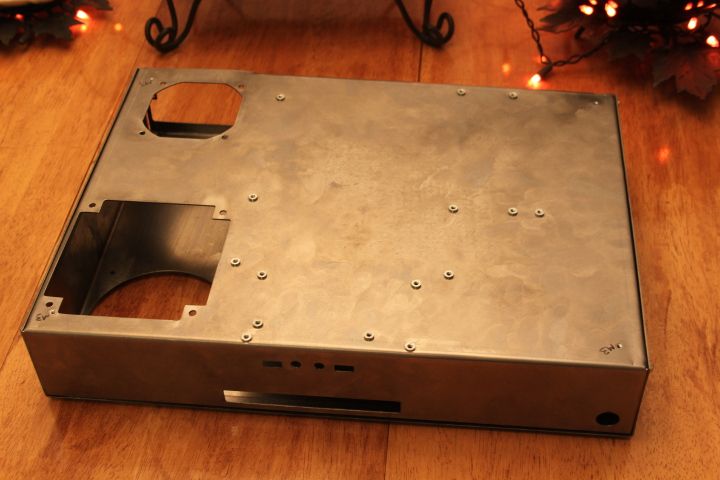
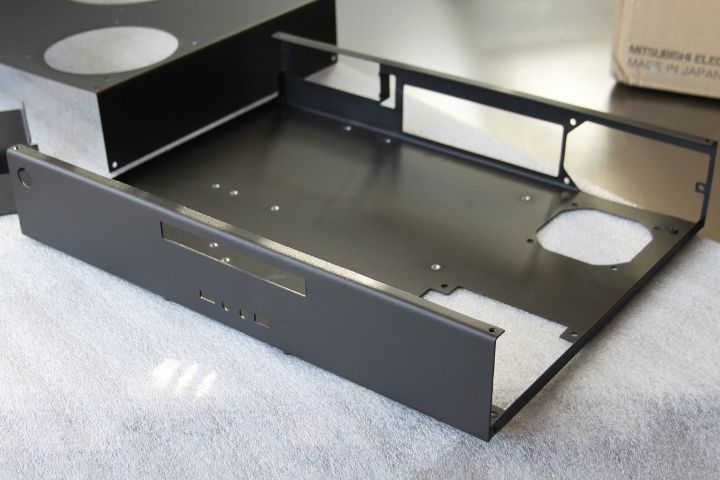
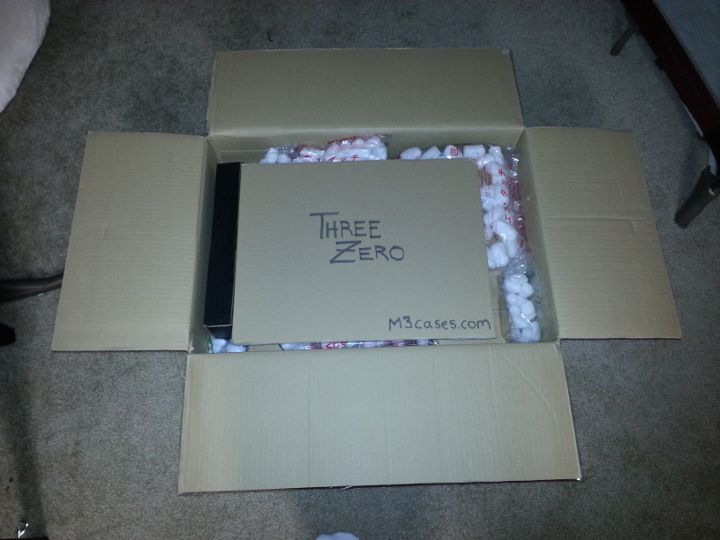
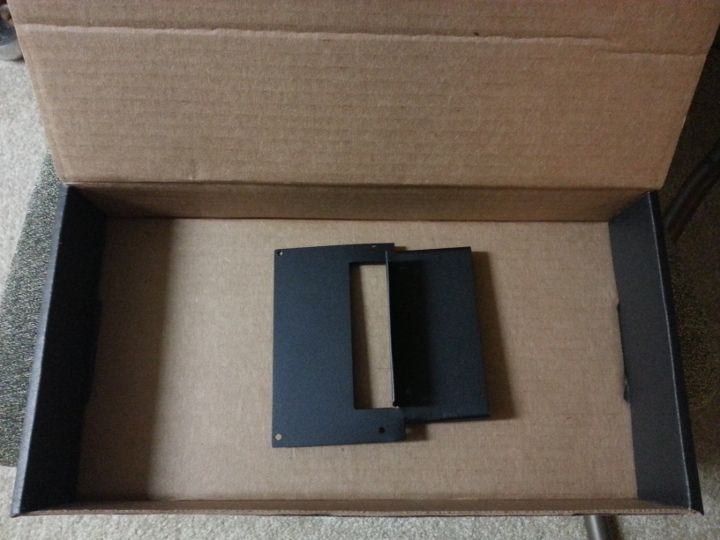
+ The case arrived!
+ Not usually one for "unboxing" but I can't resist =)
Nice touch cmadki4 =)

Ah, the custom drive bracket!
Time to fill this baby with "the goods"
AND yes, that is a baby toy, a dog toy, and a grown man's toy all in the same picture... lol
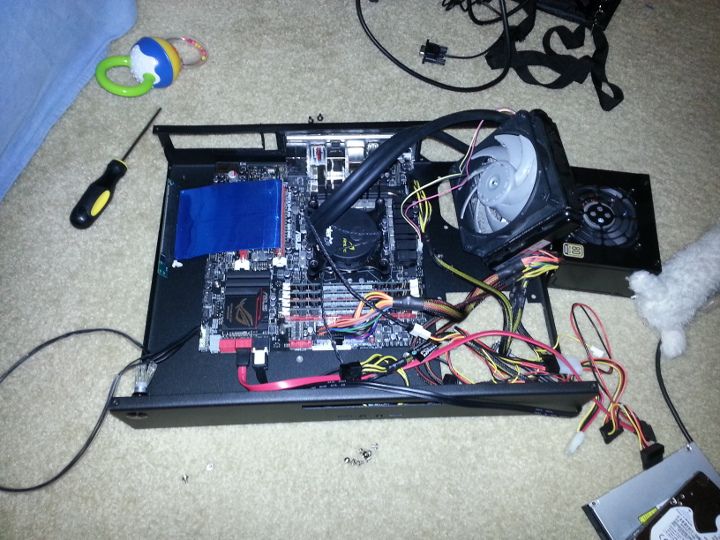
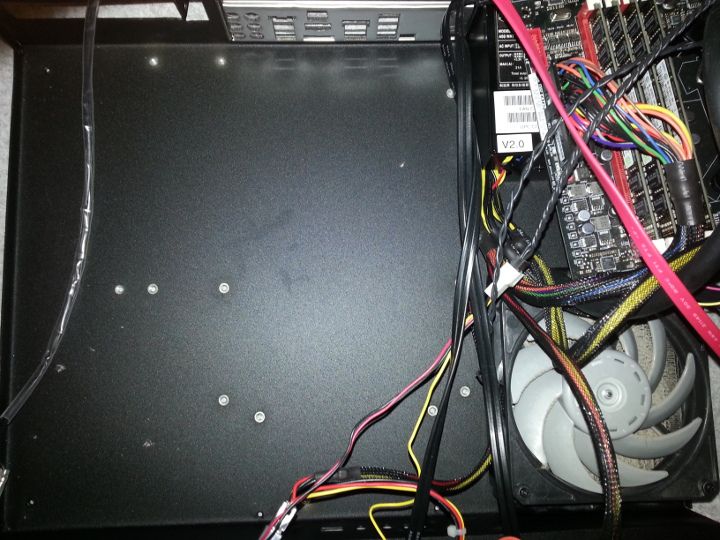
Cable management anyone?
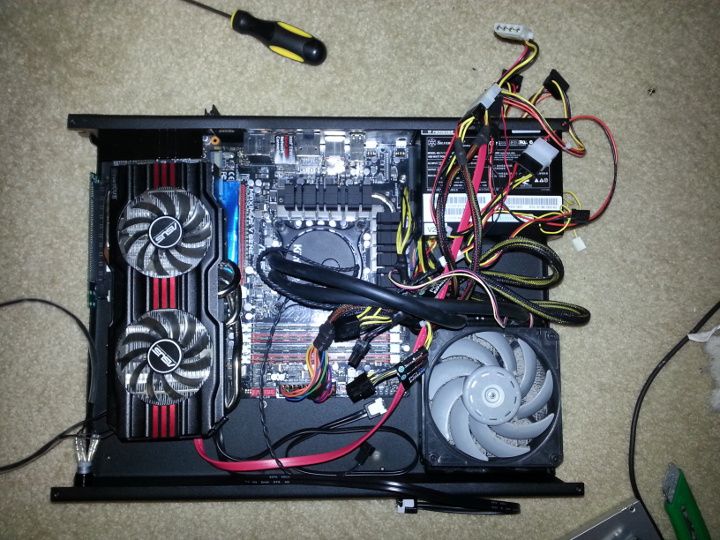
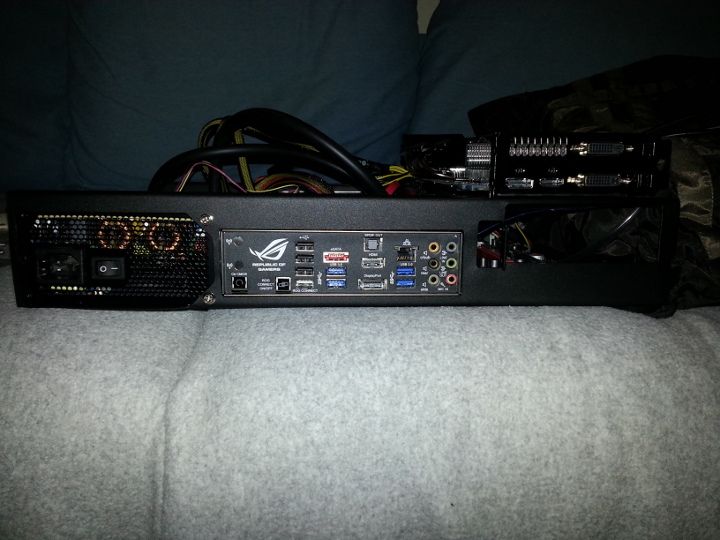
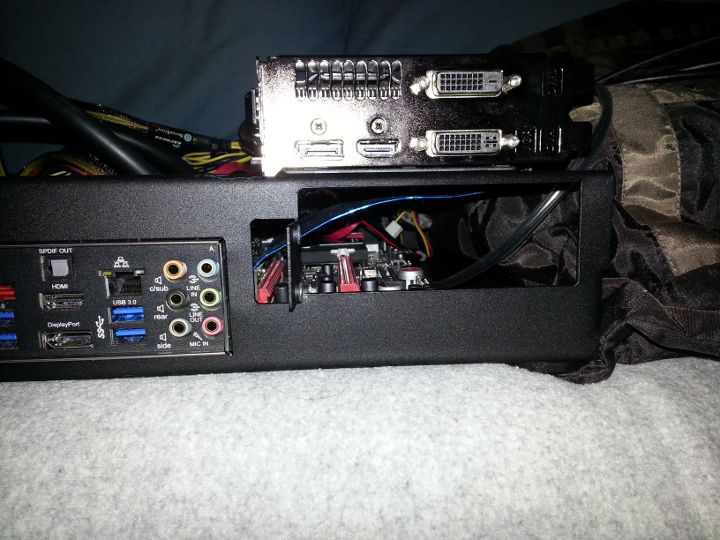
Got it up and running!
Custom drive bracket in action
+ There are a few hiccups with the case, but that's what prototypes are for, right? =) I will detail the hiccups and their resolution in a future post.
+ I'm still waiting on a few fasteners I ordered to arrive. Until then, the front ports and drive bracket will have to wait for installation.
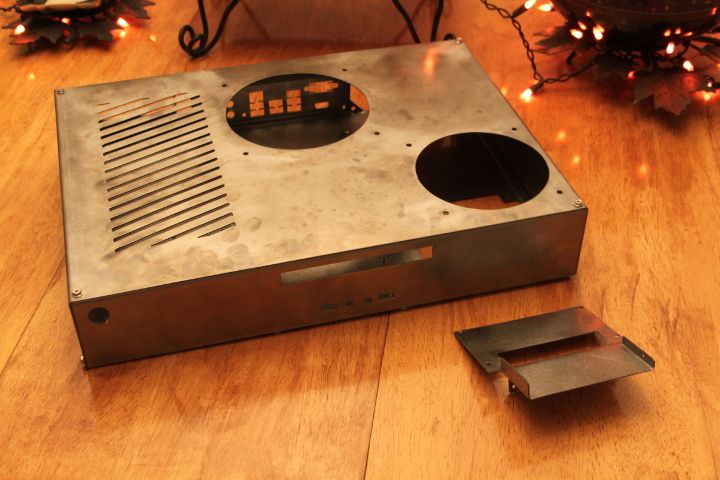
[anchor]Update 5[/anchor] 11/14/2012
+ The fasteners finally arrived!
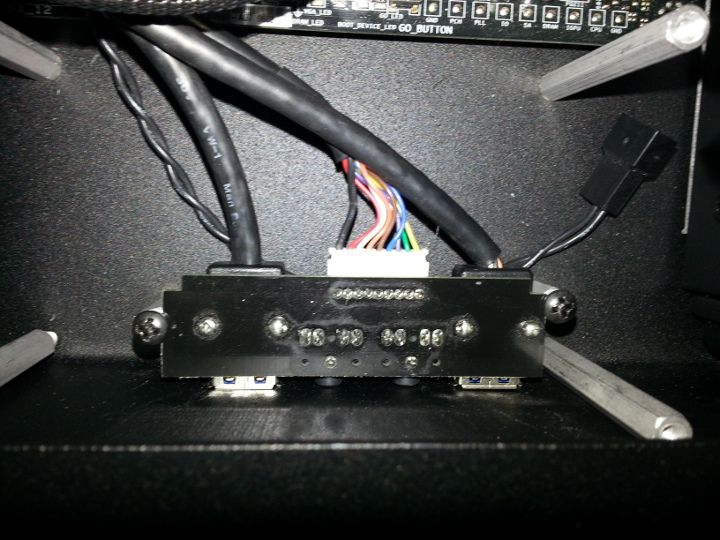
+ I got the front ports and drive bracket installed.
+ I detailed most of the errors in the prototype.
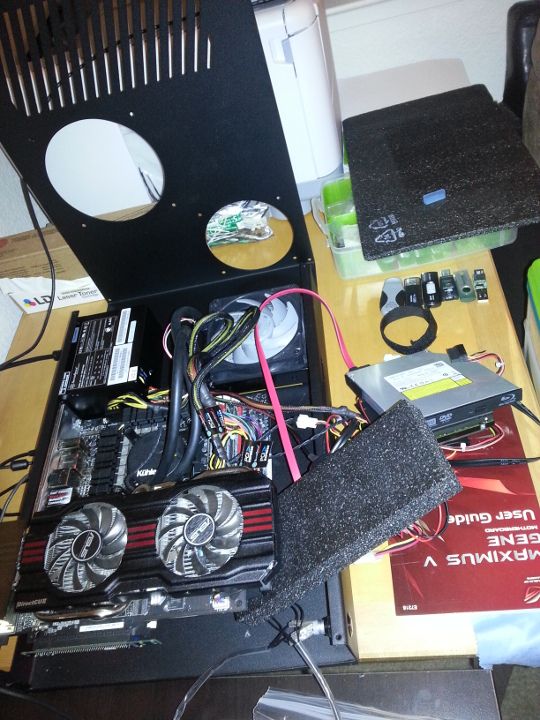
Finally! Everything I need to put this beast together!
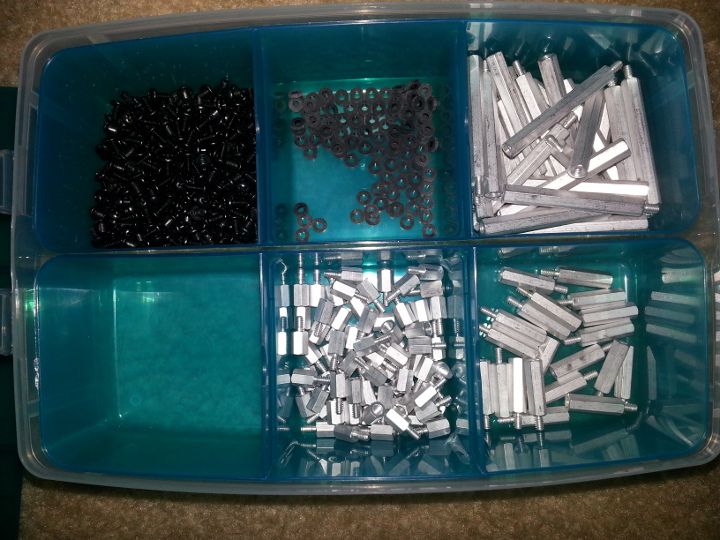
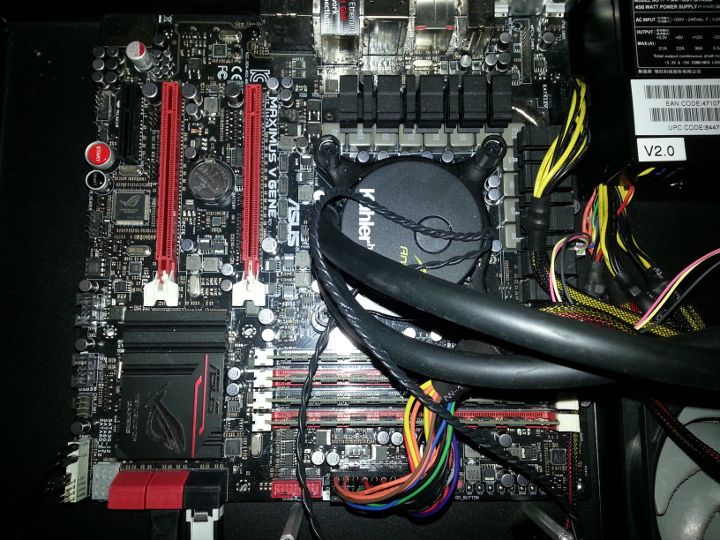
These aluminum MB standoffs look great in the case!
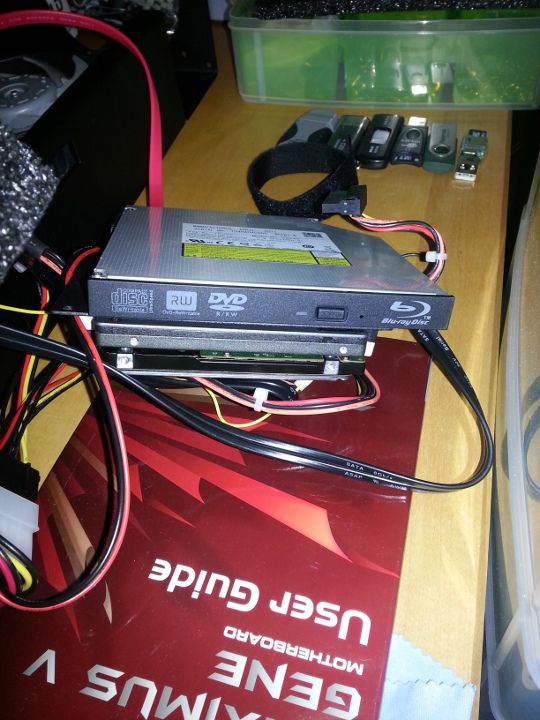
Improvised front port design is a success! =)
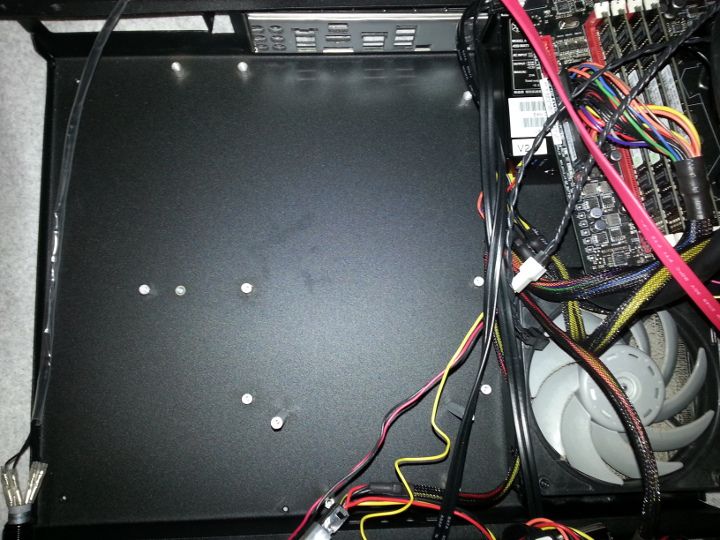
The drive bracket fully installed.
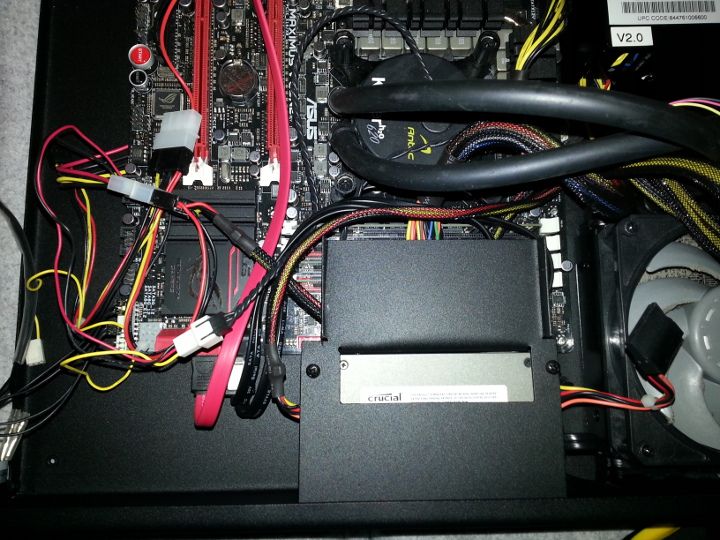
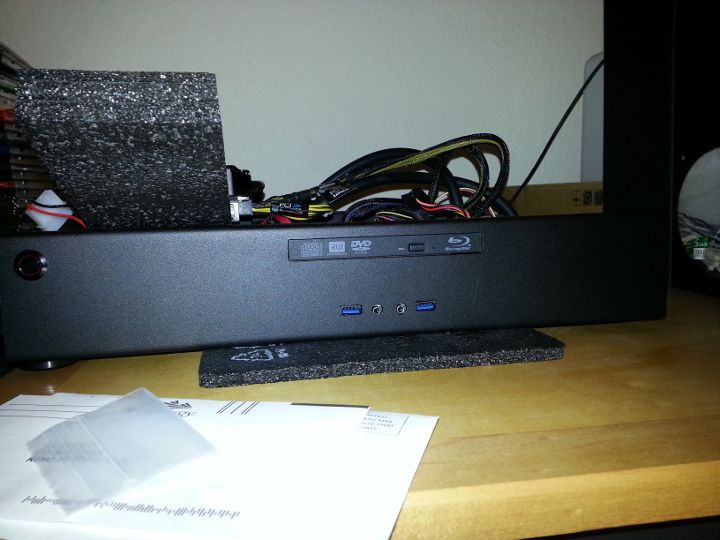
Not too shabby with the optical drive and front ports!
And now for the Goofs!
The MB mounting holes aren't quite right, they should line up with each other.
As a result, I can't mount the motherboard completely, the holes don't match up.
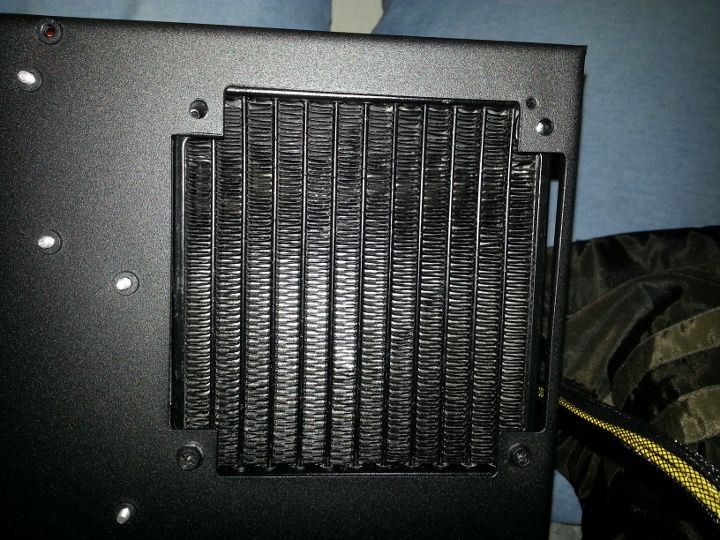
2 out of 4 radiator mount holes match up.. 1/2 isn't bad right? lol!
A last minute hardware trade lead to some PSU cutout errors:
- The left mounting hole is in the wrong spot
- The lip at the bottom of the cutout is too small to bend correctly

Oops! The tab to mount the video card is great! Too bad I didn't make enough room for the video card's bracket to come through!
Time for a nice cold brew!

+ Now I need to iron out the errors in the prototype. I'll be sure to document my progress here.
+ A special thanks goes out to one of my best buds for designing the sweet logo for me! Thanks Bro!
Work Remaining
- Sleeve the power supply
- Cable Management
- Configure the software
I look forward to your feedback, questions, and feature requests!
All designs, pictures and final product are the intellectual property of the OP, TheHobbyist.
Last edited: