Navigation
Install the app
How to install the app on iOS
Follow along with the video below to see how to install our site as a web app on your home screen.
Note: This feature may not be available in some browsers.
More options
You are using an out of date browser. It may not display this or other websites correctly.
You should upgrade or use an alternative browser.
You should upgrade or use an alternative browser.
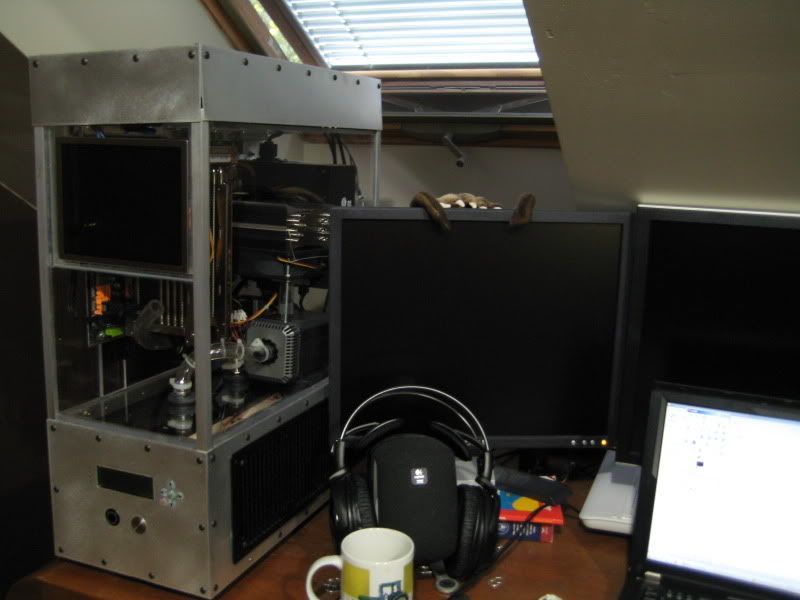
The Mineral Oil PC
- Thread starter legoman666
- Start date
Hello everyone. I wasn't able to work at all yesterday since my dad was using the shop, but I did a little work today.
That's where I stopped today. Next on the list is to mount the power supply and make a "cover" of sorts for the top of the tank. Comments?
I see where you're going with that now. Forgive my VGA/DVI question, I didn't realize how you were mounting the unit.
legoman666
Gawd
- Joined
- Dec 21, 2003
- Messages
- 638
*prepares for the party which will ensue upon the completion of the project*
There better be lots of cake.

Oh believe me, there will be.
Excellent job, I am so jealous there are people out there that can do this sort of thing. I have no where near the attention to detail needed to do something like this. Freaking awesome dude!
Thanks!
I see where you're going with that now. Forgive my VGA/DVI question, I didn't realize how you were mounting the unit.
Sa'll good!
Getting better!! Still can't wait for the completion!! hehe
Me either! Thanks.
Awesome man, it's looking really nice!!
Thanks.
Subscribed!
Awesome so far. IN terms of the cover, I would make it as rounded as possible, being as it is what you will be staring at all the time.
I would also think about integrating some kind of cable management, as unlike with a normal case, gravity will pull the cables down and together, here, it can make them fall all over the place.
The "cover" itself will be covered by the top of the case, as such it will not be visible. "cover" might not be the best word for it. I mean a piece of aluminum on top of the motherboard backpane plane that is parallel to same plane as the very top of the case.... Lol I don't know if that clarified it. As for the cables, yeah, I plan on cutting all of the cables to length and having a sort of cable routing scheme.
Looks good, I'm starting to see how it is going to look now. I too was a little confused as to how you were going to get to the rear of the motherboard connections.
Why do you have 3 holes at the bottom of the case? I would assume you would just need 1 intake and 1 output. Or maybe 2 of each (for a total of 4), but cannot figure the odd number of 3.
Why do you have 3 holes at the bottom of the case? I would assume you would just need 1 intake and 1 output. Or maybe 2 of each (for a total of 4), but cannot figure the odd number of 3.
legoman666
Gawd
- Joined
- Dec 21, 2003
- Messages
- 638
Looks good, I'm starting to see how it is going to look now. I too was a little confused as to how you were going to get to the rear of the motherboard connections.
Why do you have 3 holes at the bottom of the case? I would assume you would just need 1 intake and 1 output. Or maybe 2 of each (for a total of 4), but cannot figure the odd number of 3.
Thanks. The odd hole is for a drain
Thanks. The odd hole is for a drain
yea
... I can see where a drain would come in handy. Good planning.legoman666
Gawd
- Joined
- Dec 21, 2003
- Messages
- 638
yea
Indeed, thanks!
voklskier4452
2[H]4U
- Joined
- Nov 20, 2008
- Messages
- 2,111
any updates?
legoman666
Gawd
- Joined
- Dec 21, 2003
- Messages
- 638
Sorry for taking so long to reply, I thought I had already School has started up again so I took a break while getting back into the swing of classes and such. I'm hoping to get some work done on the case this weekend.
School has started up again so I took a break while getting back into the swing of classes and such. I'm hoping to get some work done on the case this weekend.Waterclocker
n00b
- Joined
- Apr 8, 2005
- Messages
- 62
I can't wait to see this finished. Great work so far!! Much more refined that just buying the pugent kit or store bought tank.
formula409
Limp Gawd
- Joined
- Apr 7, 2005
- Messages
- 311
Great mod...always wanted to build a custom aluminum case and got close one time.. wood and alumnium, but this new one you built is a tank. Oil cooling is pretty awesome...cant wait to see the results.
Pretiacruento
Limp Gawd
- Joined
- Mar 18, 2009
- Messages
- 490
You're a very talented modder, the mod looks really really really cool so far!! Keep up the excellent work!!
this new one you built is a tank.
pun intended? this is a great case man. i hope to do an oil cooled sometime in the distant future. dont know if i can compete with this though. ill be following your log through the rest of your project. do you have any references to tutorials or threads about making sketchup drawings like on your first page? i have no idea how to make them that detailed and that accurate and would really like to be able to do that for my upcoming first build.
ps: tell your dad he needs a wood/metal lathe. it is not an option!
Last edited:
Modder man
[H]ard|Gawd
- Joined
- May 13, 2009
- Messages
- 1,770
very nicley done i have always wanted to try this
Really impressed with the project!
I'd like to bump this question. You seem to have a really decent handle on it and would really like your opinion on the best way to learn. I've tried AutoCad and Sketchup and can't make either work well for me.
Also, I'm going to try and replicate the bottom of your tank (Radiator structure) for a project I'm working on. How would I go about making a .05" groove for sheet metal in one of the sides? My plan is to mount an mini ITX board on one side. Your expertise would be greatly appreciated, as well as anyone else who wants to throw in here. I'd draw my plan in Sketchup but...
Thanks
do you have any references to tutorials or threads about making sketchup drawings like on your first page? i have no idea how to make them that detailed and that accurate and would really like to be able to do that for my upcoming first build.
I'd like to bump this question. You seem to have a really decent handle on it and would really like your opinion on the best way to learn. I've tried AutoCad and Sketchup and can't make either work well for me.
Also, I'm going to try and replicate the bottom of your tank (Radiator structure) for a project I'm working on. How would I go about making a .05" groove for sheet metal in one of the sides? My plan is to mount an mini ITX board on one side. Your expertise would be greatly appreciated, as well as anyone else who wants to throw in here. I'd draw my plan in Sketchup but...
Thanks
legoman666
Gawd
- Joined
- Dec 21, 2003
- Messages
- 638
It's been a while! I'm beginning my final push for completion. With any luck, the case will be completed for a lan party in Louisville July 12th (or somewhere around there, I can't remember). Enough talk, to the pics!
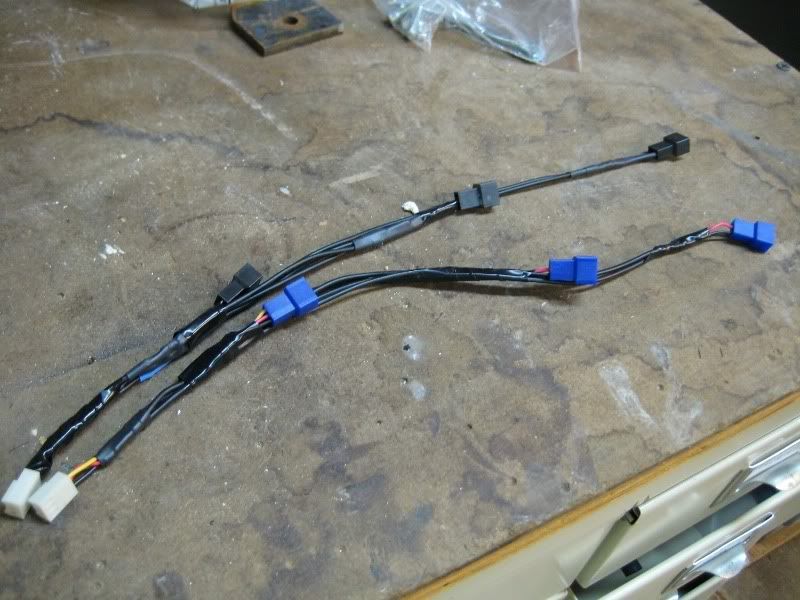
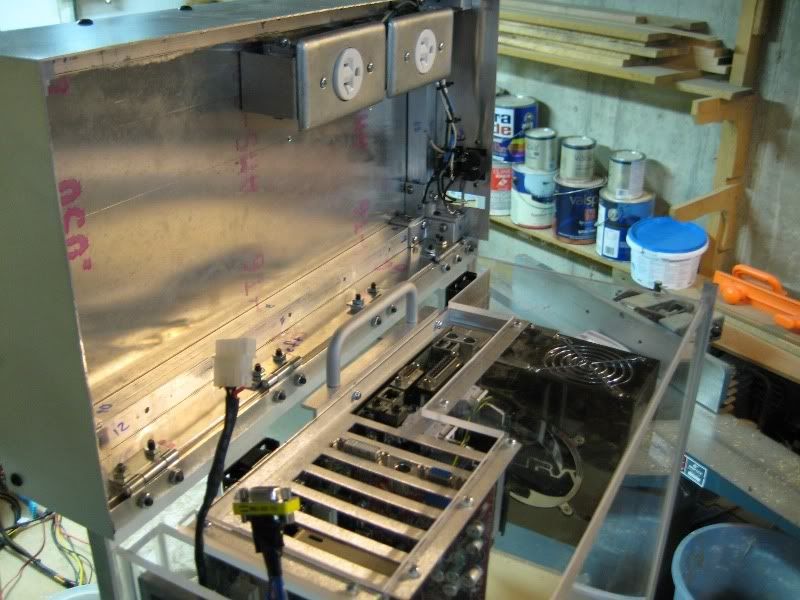
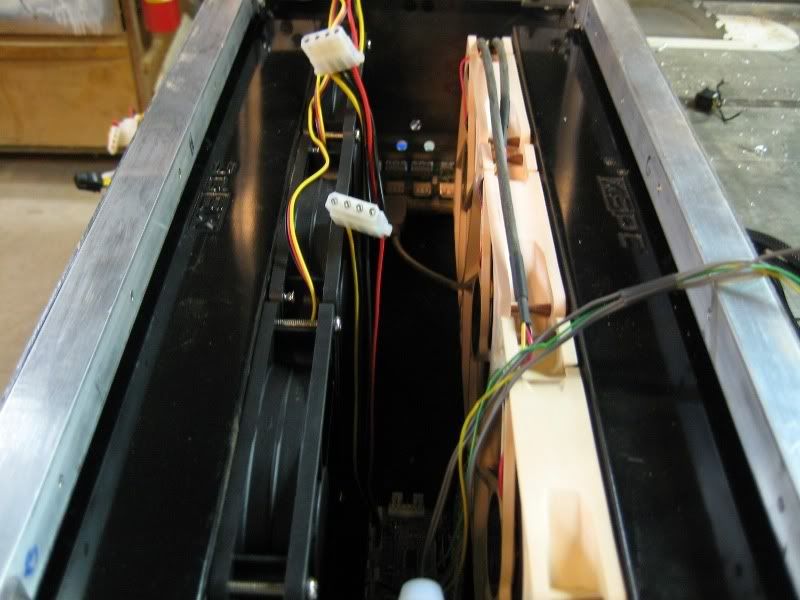
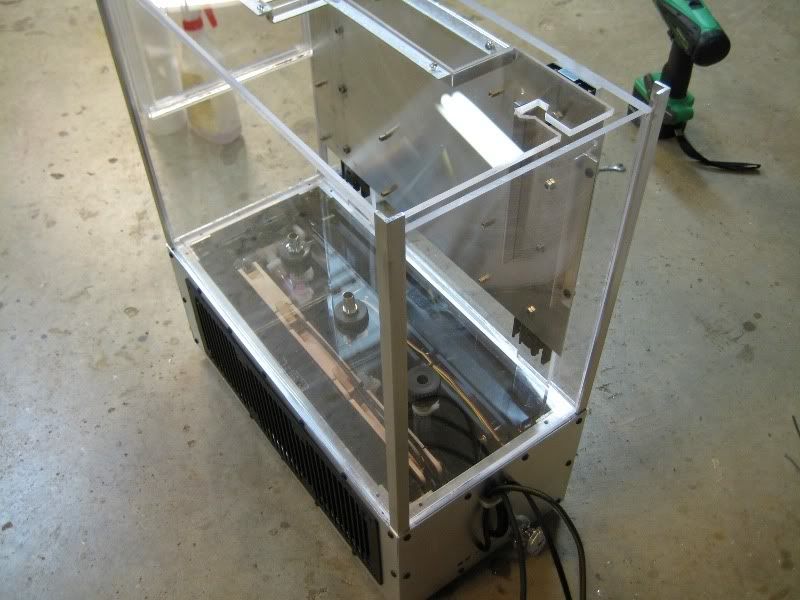
I made a second 3 to 1 fan adapter to allow me to control all 3 fans from 1 header on the SCAB unit. It still has RPM control from the fan closest to the plug.
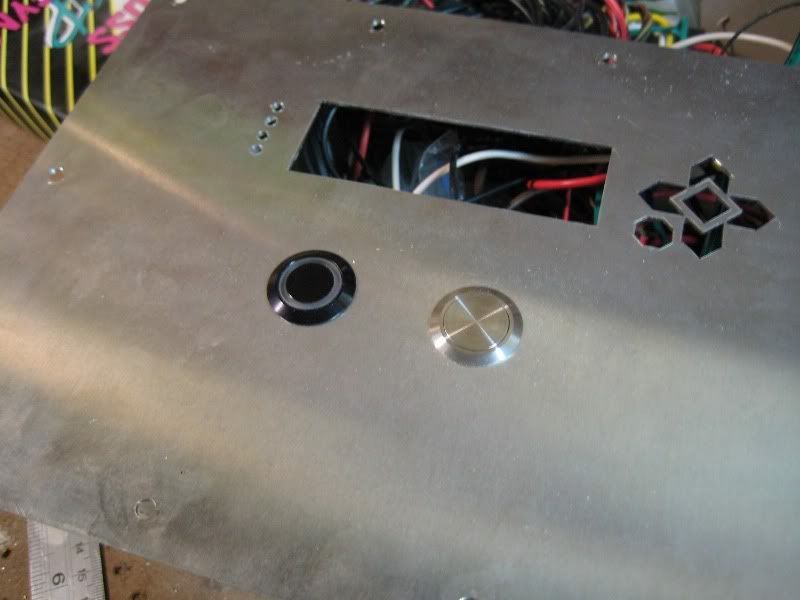
Did a bit of work on the buttons.
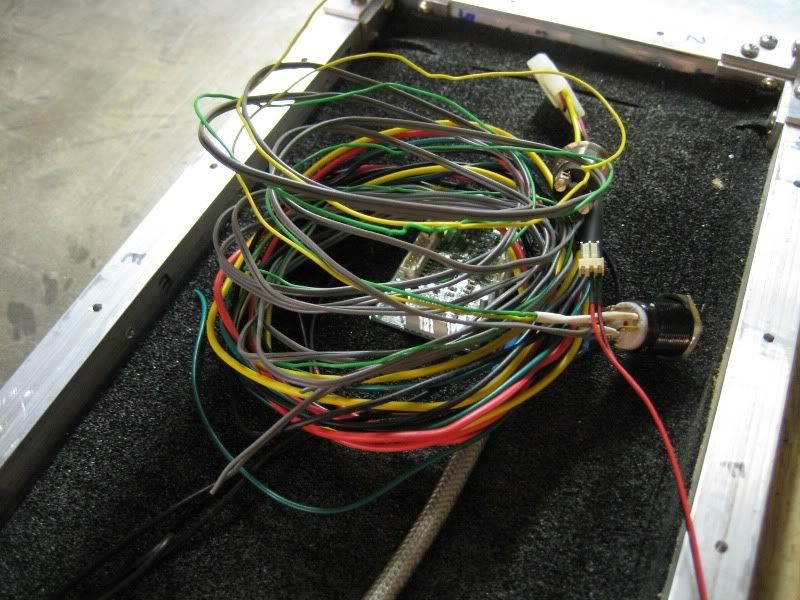
Bunch of wires that will have to run between the top compartment and bottom compartment.
The PSU was a challenge to mount. I couldn't attach it directly to the mobo tray because of the bolts that hold the tray to the drawer slides. So I attached 2 pieces of L angle.
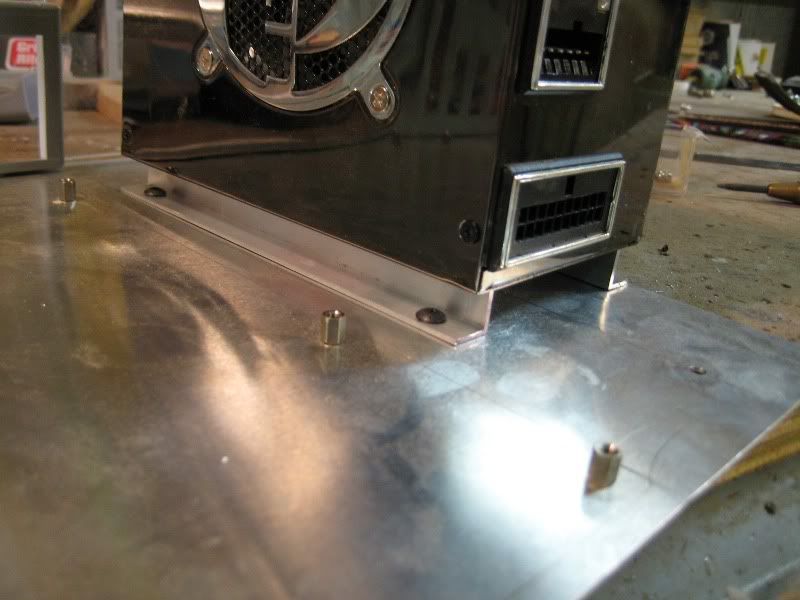
On top of which will rest the PSU.
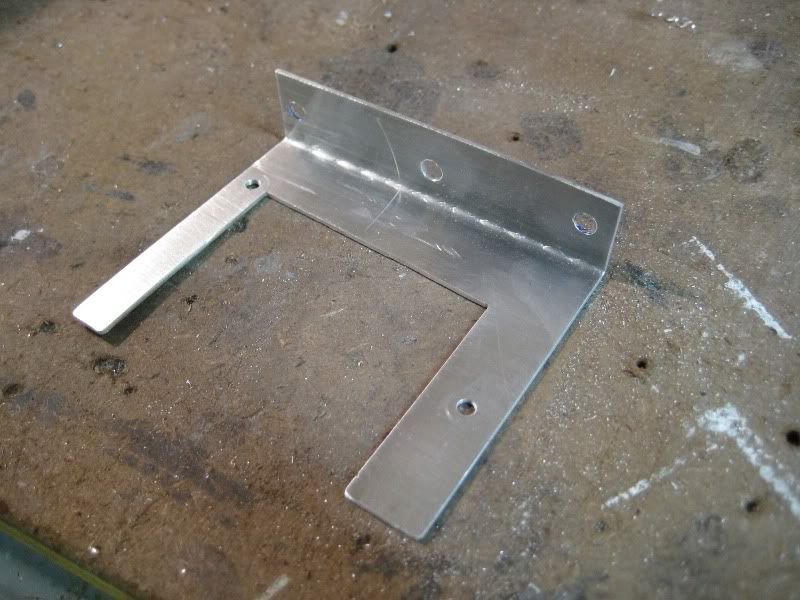
To hold the PSU to the actual tray, I made this bracket....

...which attaches thusly.
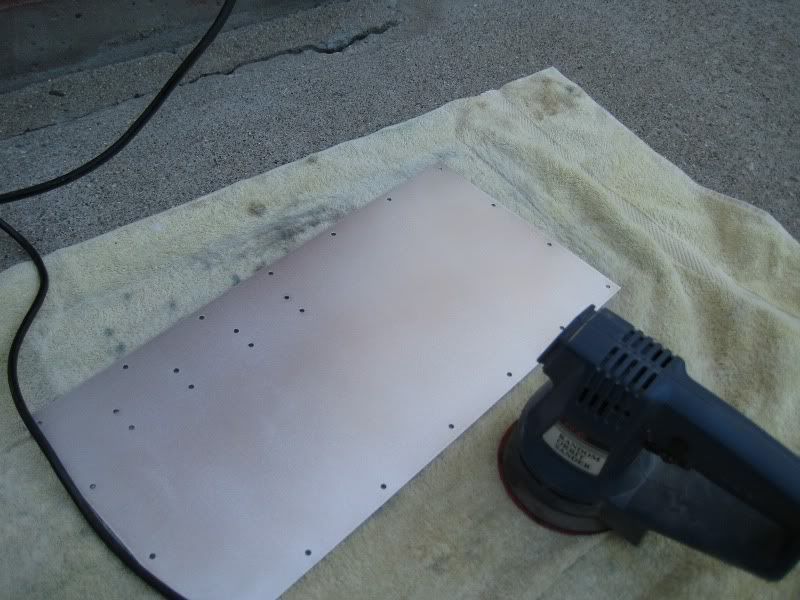
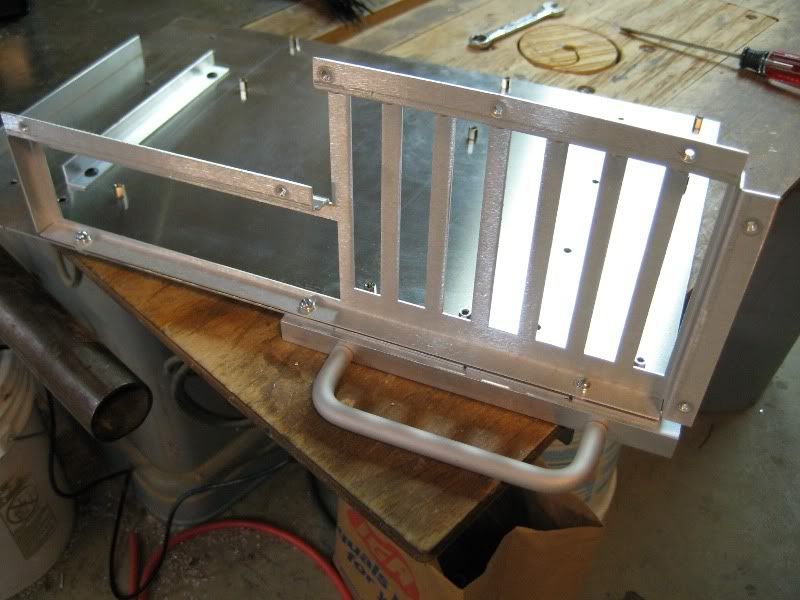
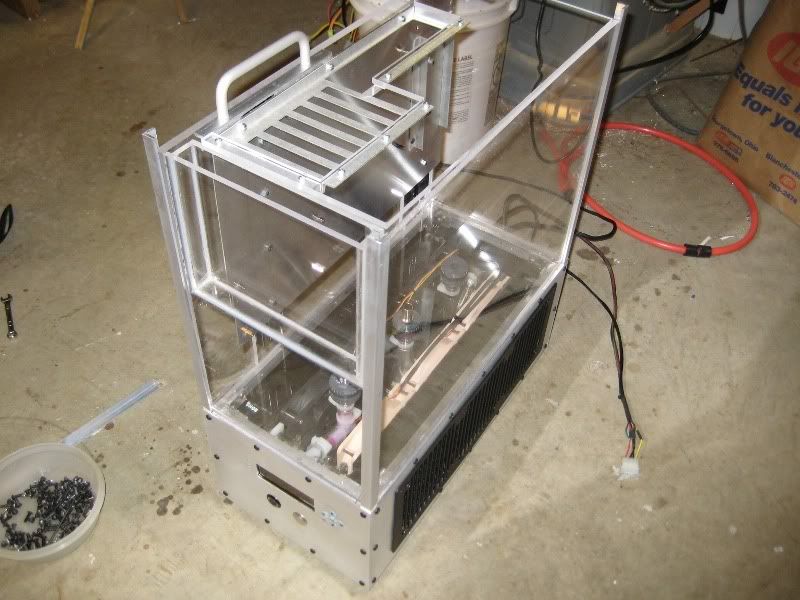
I removed all of the panels from the frame for sanding. I used 150 grit sandpaper on my small random orbit sander. The object here was not to make it smooth, merely to put a finish on the sides that will not easily show finger prints and small scratches. A mirror finish would look amazing but only for about the 5 minutes it's clean.
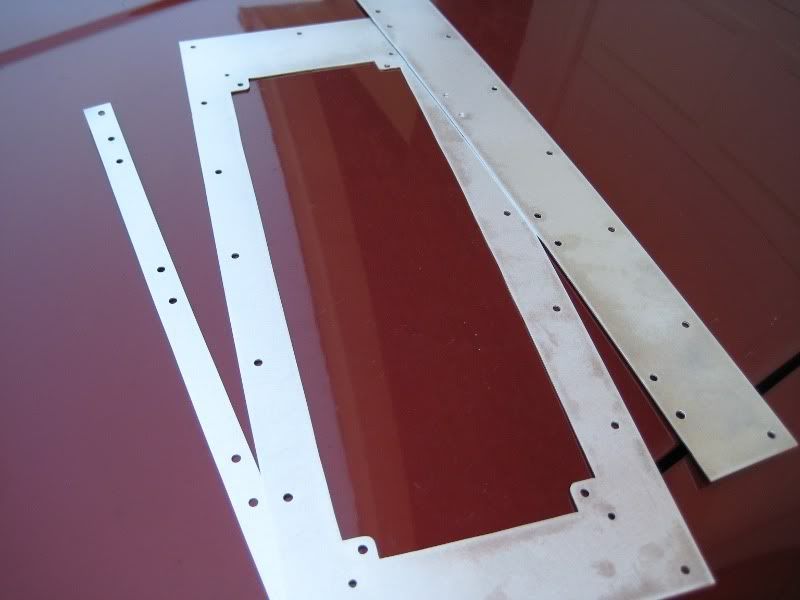
Crappy sand paper = crappy job. I had to change the sanding pad regularly; the aluminum wears down the sand quickly.
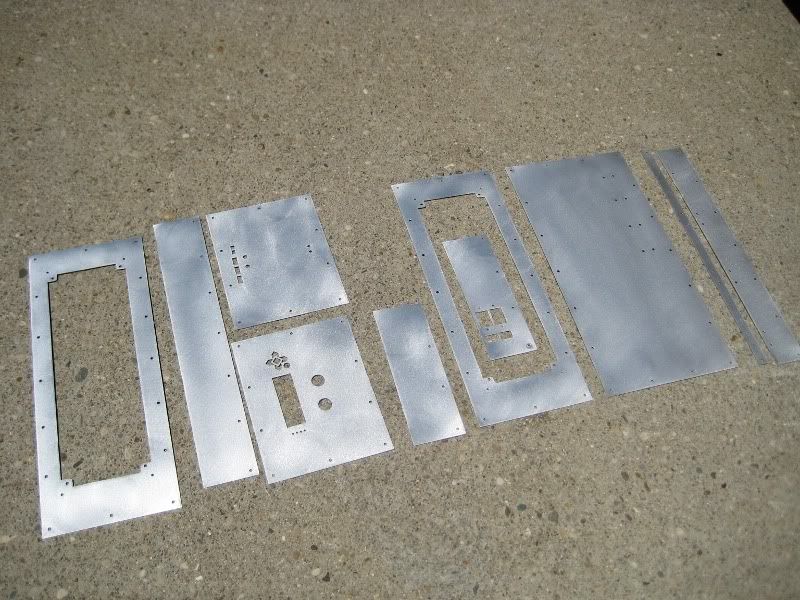
Sanding aluminum makes a mess, I did this outside. All nice and finished.
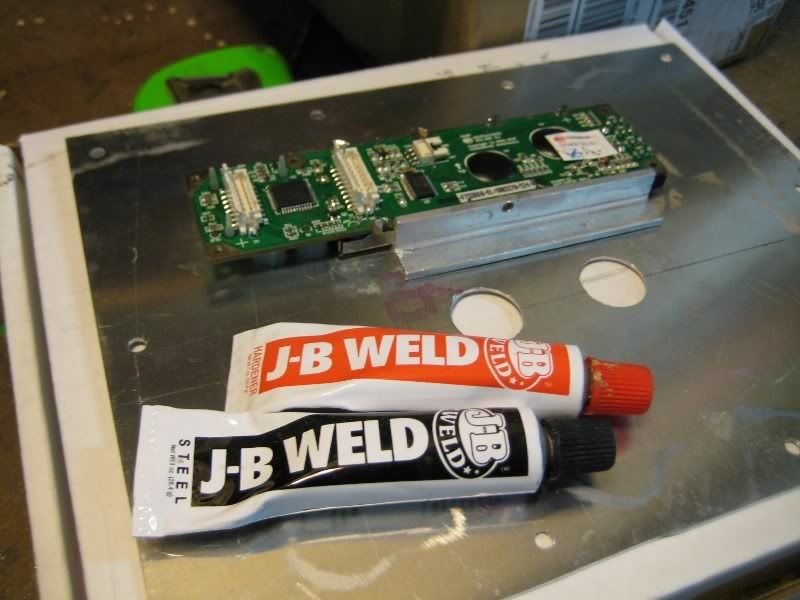
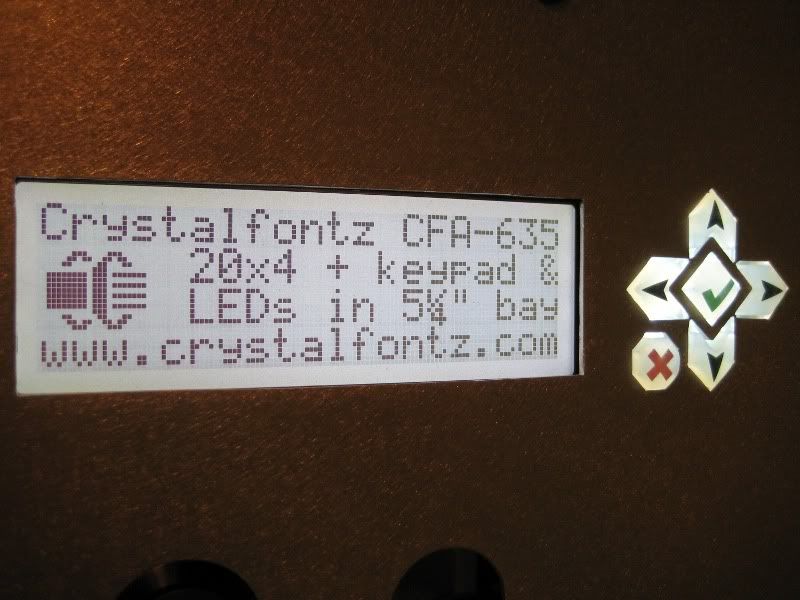
Holding the LCD in place was a challenge as well. There was no simple way to screw it to the front panel. So with the help of a little JB Weld and L angle, I made a mold to hold it in place.
I needed a little bit of masking tape on one side to make the screen perfectly level.
There are two pieces for the sides.
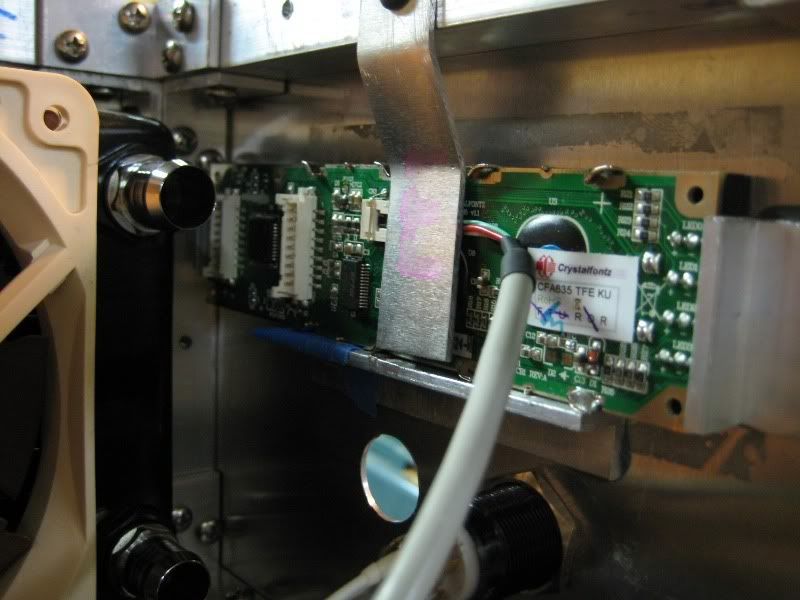
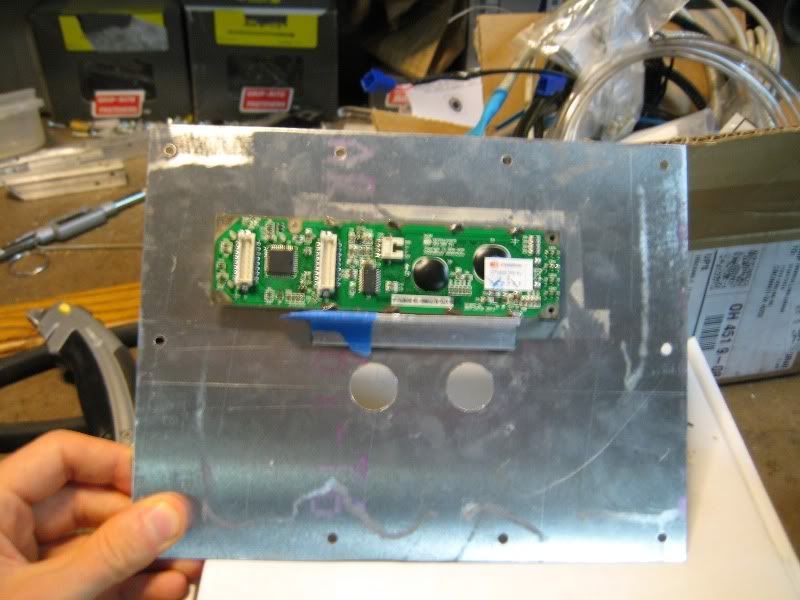
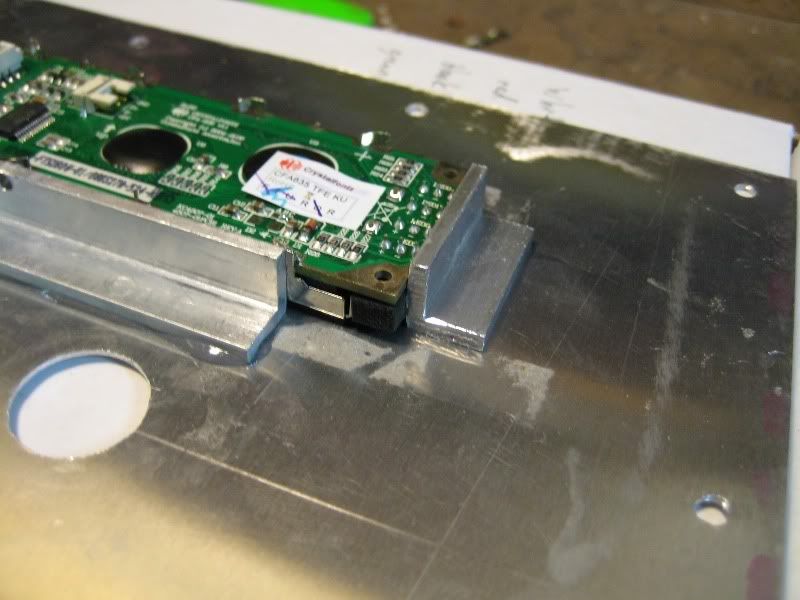
And to actually hold the screen in the mold, I made a little bracket that keeps tension on the back of the PCB. There's masking tape on the side in contact with the PCB to prevent shorts.
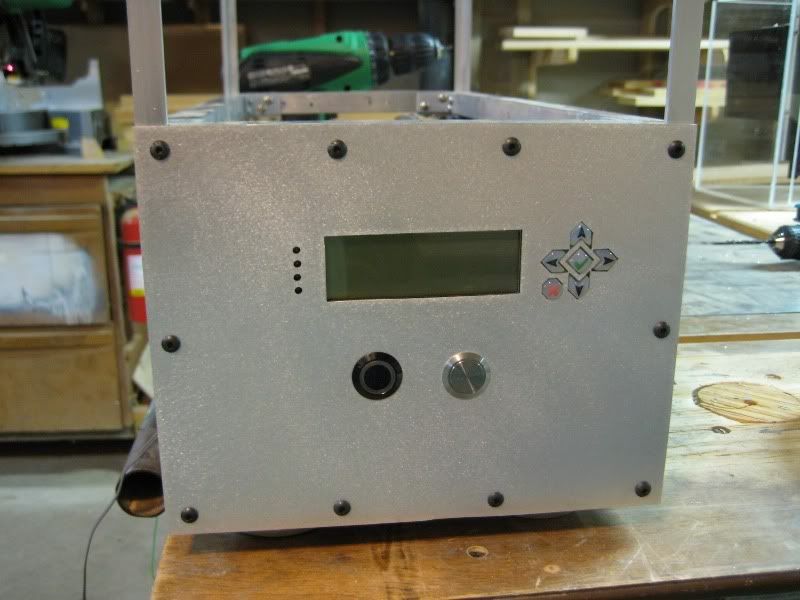
Looking pretty sharp!
I fired it up real quick to make sure I didn't kill anything. It's really quite secure in there.
And that's as far as the pictures go. I did a little more work but nothing significant. All that remains is finishing up the wiring to the bottom compartment and finding a way to mount the hard drives.
Thanks for sticking with me through the break!
Thanks! And a lot more work too!
I can speak from experience when I say that custom aluminum cases are a lot more work that wood. Wood is softer, more workable, and has character. My 4th case will definitely go back to wood. Thanks
Thanks!
Sorry for taking so long to reply, for some reason I stopped getting topic reply notifications and forgot to check the thread. To answer your question, sorry no I just fired up SketchUp one day and started fooling around. It's really easy to do simple shapes and objects. Doing highly detailed work is a pain in the ass and takes forever. Hah, we have an old wood lathe. I wouldn't stick aluminum in it though, I don't think the motor could handle it, it's quite old.
I think the fumes from my transformer oil would kill any fish! Ahaha, thanks for the reply!
Do etttttt
See reply above. For a .05" groove, I'd check to see if I had a saw blade that thin and just stick it in the table saw and run the piece over it. Failing the thin blade, I guess I'd use a dremel, but it'd be really difficult to get a straight cut.
Me too! I just want it completed at this point. Small tedious details are killing me.
I made a second 3 to 1 fan adapter to allow me to control all 3 fans from 1 header on the SCAB unit. It still has RPM control from the fan closest to the plug.
Did a bit of work on the buttons.
Bunch of wires that will have to run between the top compartment and bottom compartment.
The PSU was a challenge to mount. I couldn't attach it directly to the mobo tray because of the bolts that hold the tray to the drawer slides. So I attached 2 pieces of L angle.
On top of which will rest the PSU.
To hold the PSU to the actual tray, I made this bracket....
...which attaches thusly.
I removed all of the panels from the frame for sanding. I used 150 grit sandpaper on my small random orbit sander. The object here was not to make it smooth, merely to put a finish on the sides that will not easily show finger prints and small scratches. A mirror finish would look amazing but only for about the 5 minutes it's clean.
Crappy sand paper = crappy job. I had to change the sanding pad regularly; the aluminum wears down the sand quickly.
Sanding aluminum makes a mess, I did this outside. All nice and finished.
Holding the LCD in place was a challenge as well. There was no simple way to screw it to the front panel. So with the help of a little JB Weld and L angle, I made a mold to hold it in place.
I needed a little bit of masking tape on one side to make the screen perfectly level.
There are two pieces for the sides.
And to actually hold the screen in the mold, I made a little bracket that keeps tension on the back of the PCB. There's masking tape on the side in contact with the PCB to prevent shorts.
Looking pretty sharp!
I fired it up real quick to make sure I didn't kill anything. It's really quite secure in there.
And that's as far as the pictures go. I did a little more work but nothing significant. All that remains is finishing up the wiring to the bottom compartment and finding a way to mount the hard drives.
Thanks for sticking with me through the break!
I can't wait to see this finished. Great work so far!! Much more refined that just buying the pugent kit or store bought tank.
Thanks! And a lot more work too!
Great mod...always wanted to build a custom aluminum case and got close one time.. wood and alumnium, but this new one you built is a tank. Oil cooling is pretty awesome...cant wait to see the results.
I can speak from experience when I say that custom aluminum cases are a lot more work that wood. Wood is softer, more workable, and has character. My 4th case will definitely go back to wood. Thanks
You're a very talented modder, the mod looks really really really cool so far!! Keep up the excellent work!!
Thanks!
pun intended? this is a great case man. i hope to do an oil cooled sometime in the distant future. dont know if i can compete with this though. ill be following your log through the rest of your project. do you have any references to tutorials or threads about making sketchup drawings like on your first page? i have no idea how to make them that detailed and that accurate and would really like to be able to do that for my upcoming first build.
ps: tell your dad he needs a wood/metal lathe. it is not an option!
Sorry for taking so long to reply, for some reason I stopped getting topic reply notifications and forgot to check the thread. To answer your question, sorry no
I just fired up SketchUp one day and started fooling around. It's really easy to do simple shapes and objects. Doing highly detailed work is a pain in the ass and takes forever. Hah, we have an old wood lathe. I wouldn't stick aluminum in it though, I don't think the motor could handle it, it's quite old.This mod truly makes me want to start a new. I saw the mineral oil fish tank mod in a video several months ago but this cool!
I think the fumes from my transformer oil would kill any fish! Ahaha, thanks for the reply!
very nicley done i have always wanted to try this
Do etttttt
Really impressed with the project!
I'd like to bump this question. You seem to have a really decent handle on it and would really like your opinion on the best way to learn. I've tried AutoCad and Sketchup and can't make either work well for me.
Also, I'm going to try and replicate the bottom of your tank (Radiator structure) for a project I'm working on. How would I go about making a .05" groove for sheet metal in one of the sides? My plan is to mount an mini ITX board on one side. Your expertise would be greatly appreciated, as well as anyone else who wants to throw in here. I'd draw my plan in Sketchup but...
Thanks
See reply above. For a .05" groove, I'd check to see if I had a saw blade that thin and just stick it in the table saw and run the piece over it. Failing the thin blade, I guess I'd use a dremel, but it'd be really difficult to get a straight cut.
Can't wait to see it all finished up!
Me too! I just want it completed at this point. Small tedious details are killing me.
Last edited:
BrainEater
[H]ard|Gawd
- Joined
- Jul 21, 2004
- Messages
- 1,211
Nice work mang !
legoman666
Gawd
- Joined
- Dec 21, 2003
- Messages
- 638
lets seem some shit in some oil! THis is fucking tight!
Thanks! Hopefully it'll be done, up, and running in 2 weeks or so.
Nice work mang !
1337
Thanks
legoman666
Gawd
- Joined
- Dec 21, 2003
- Messages
- 638
Moving right along...

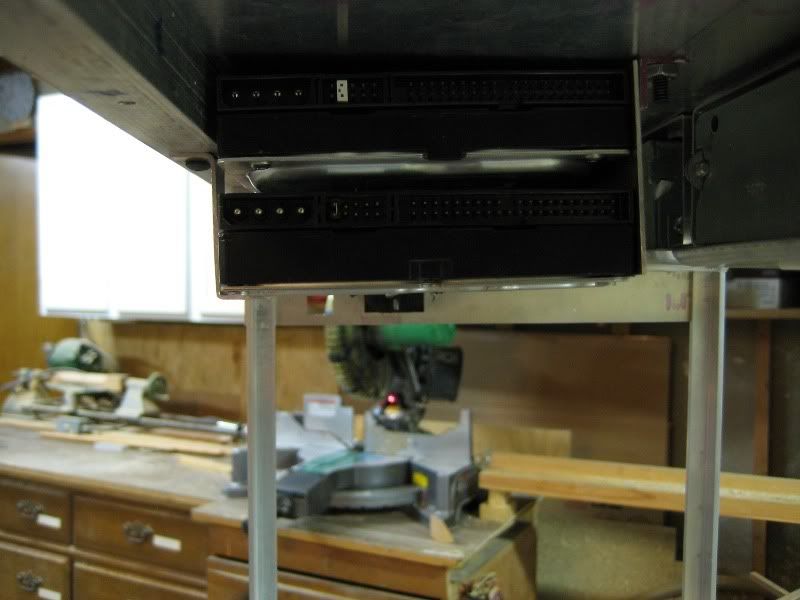
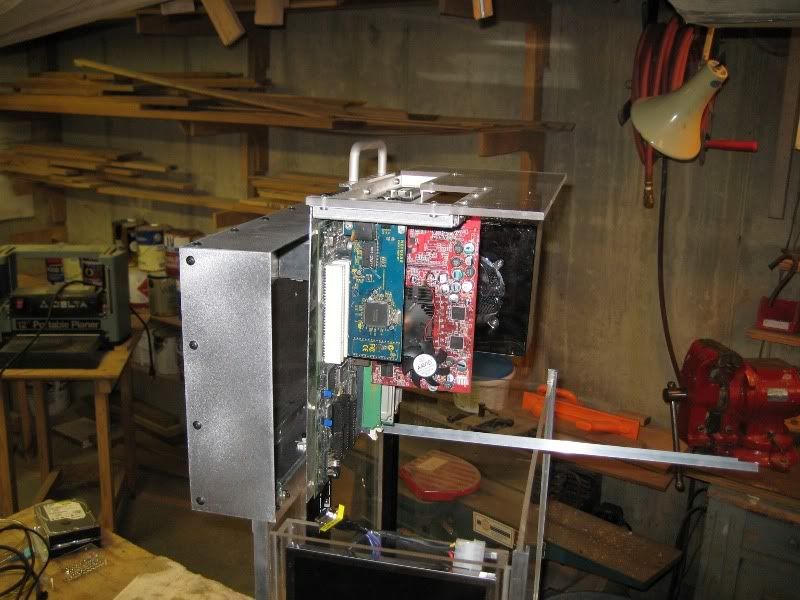
Finding a place to mount the hard drives inside the case was difficult. I attached a piece of L angle to one of my drives to find the best spot.
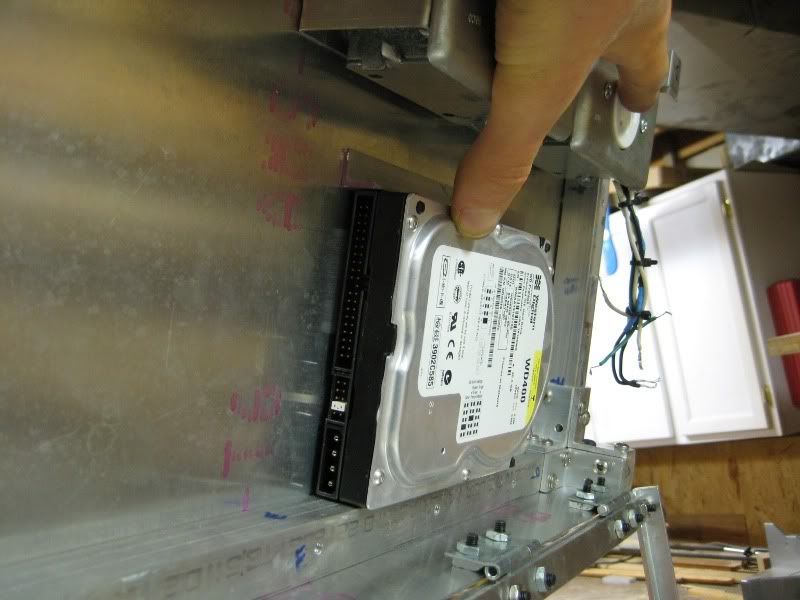
This was as good as I could do, but even here it's blocking the top most ports on the motherboard (keyboard and mouse PS2 ports). Hopefully this won't be a problem. All of my crap is USB anyway.
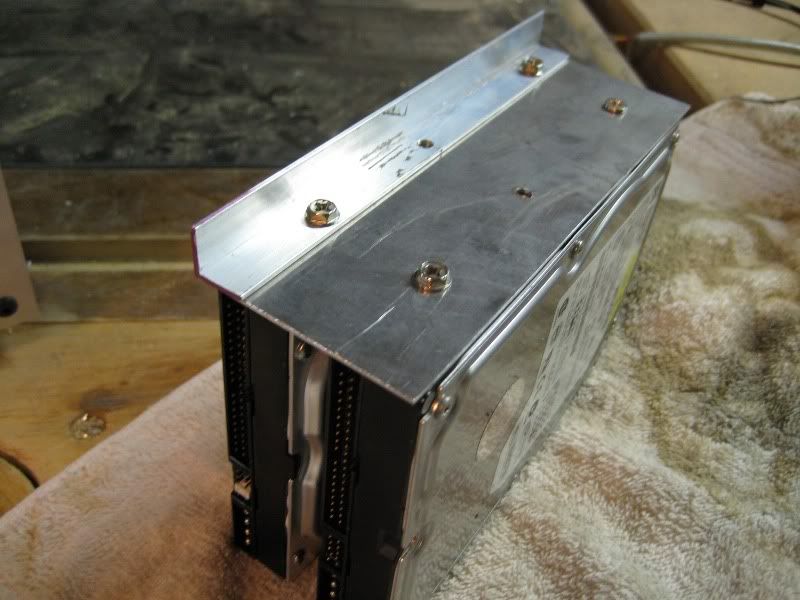
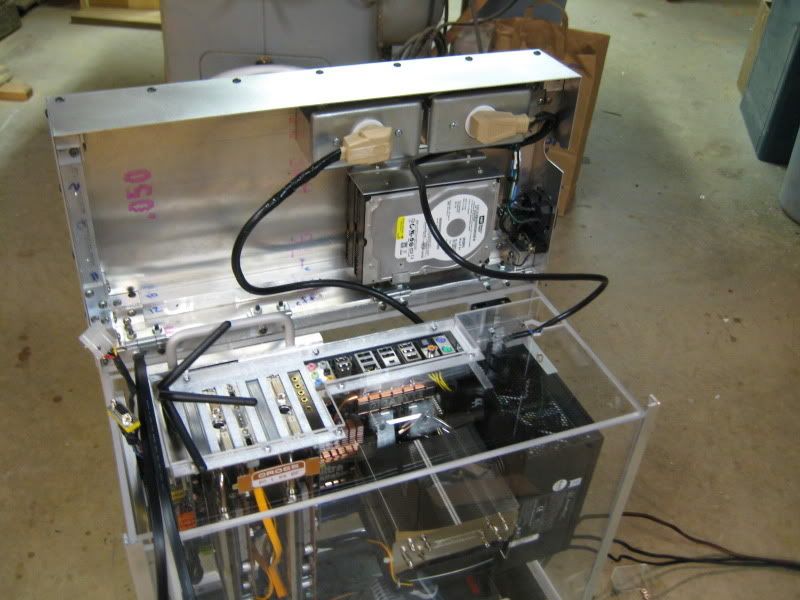
I have 6 drives I would like to put in the case, but only two are going to fit. I drilled a piece of sheet so I could attach the 2 drives.

Lookin' good.
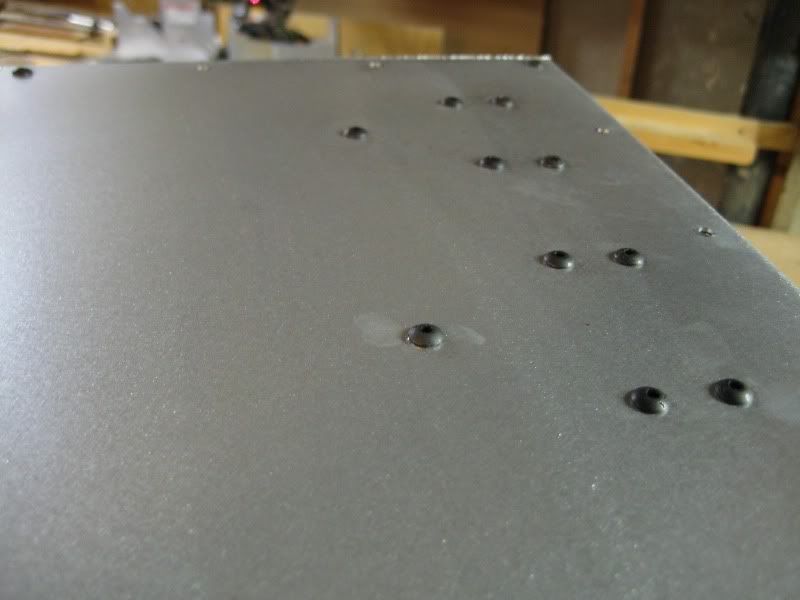
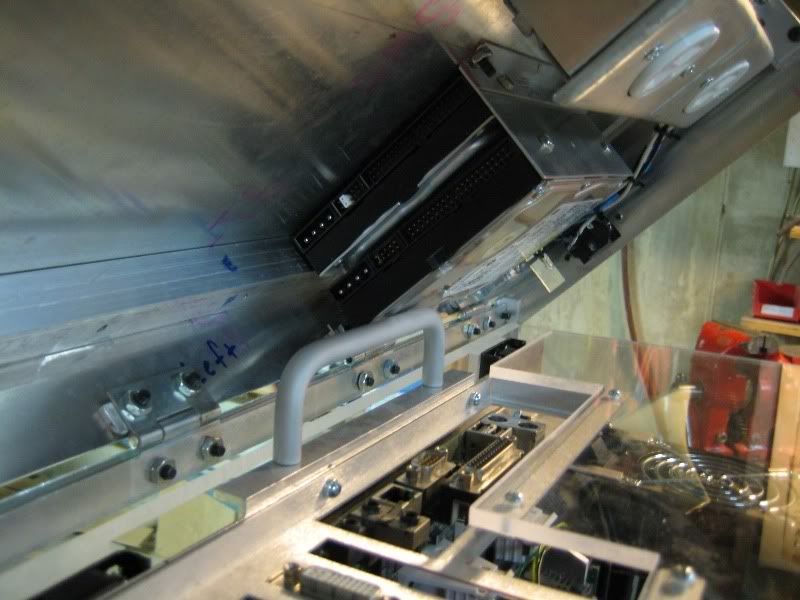
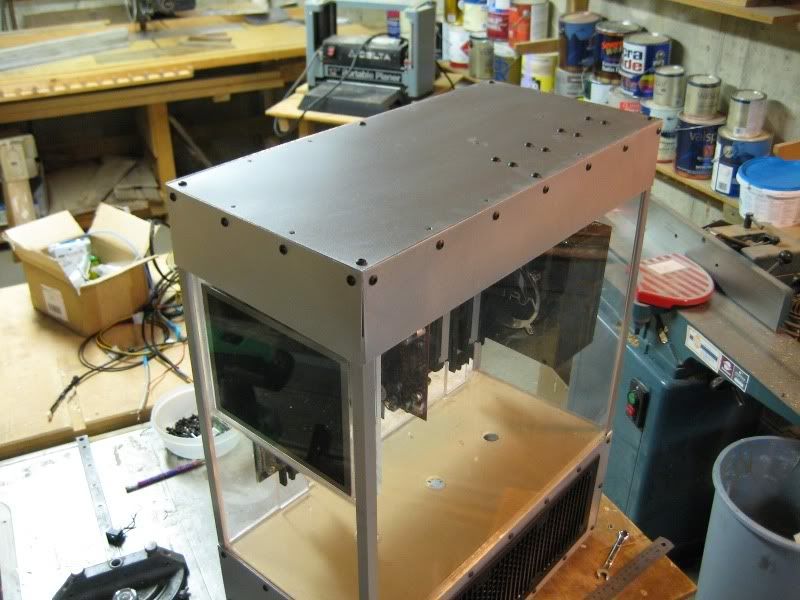
After double checking and triple checking the measurements for these screws, I drilled the holes in the top of the case.
And here they are on the inside with the lid closed. As you can see, they kind of lean one way since they're only supported on one side.
A quick little bracket on the other side fixed that.
Much better.
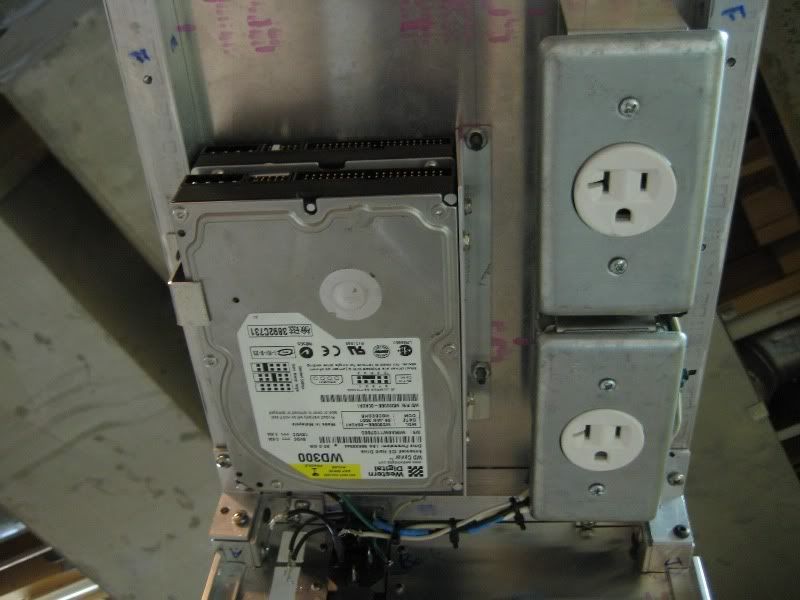
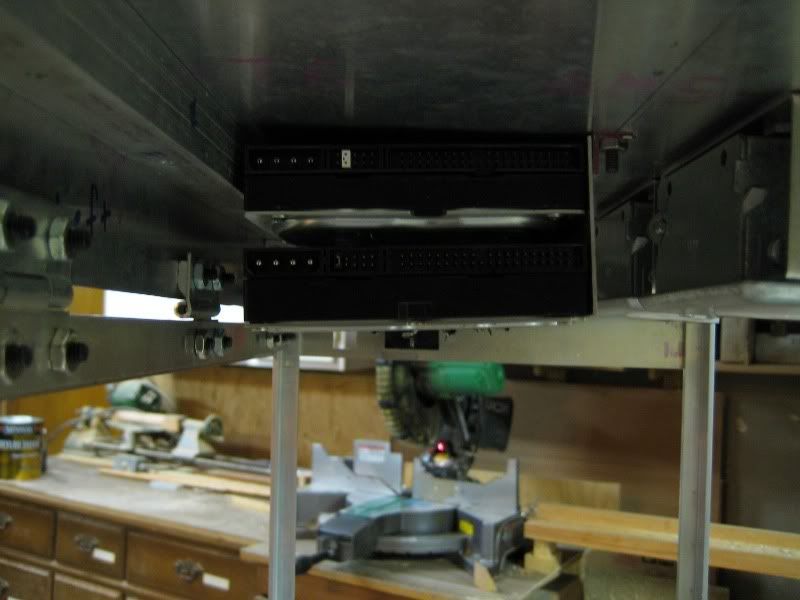
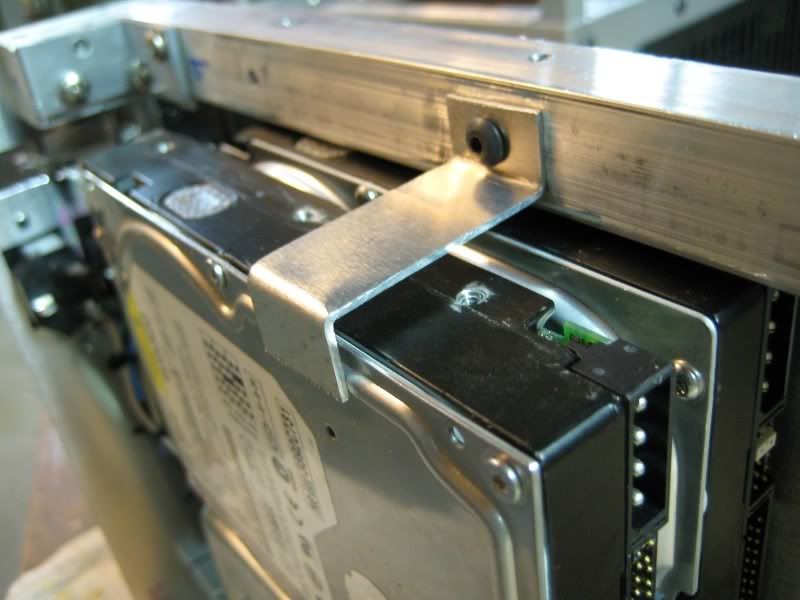
The drives on screwed to the top of the top compartment and will not be submerged in oil.
:wallbash: Who planned this thing anyway? The handle for pulling up the motherboard tray is in the way of the hard drives. Since this is the only place that the hard drives will fit, the handle will either have to be modified or removed.
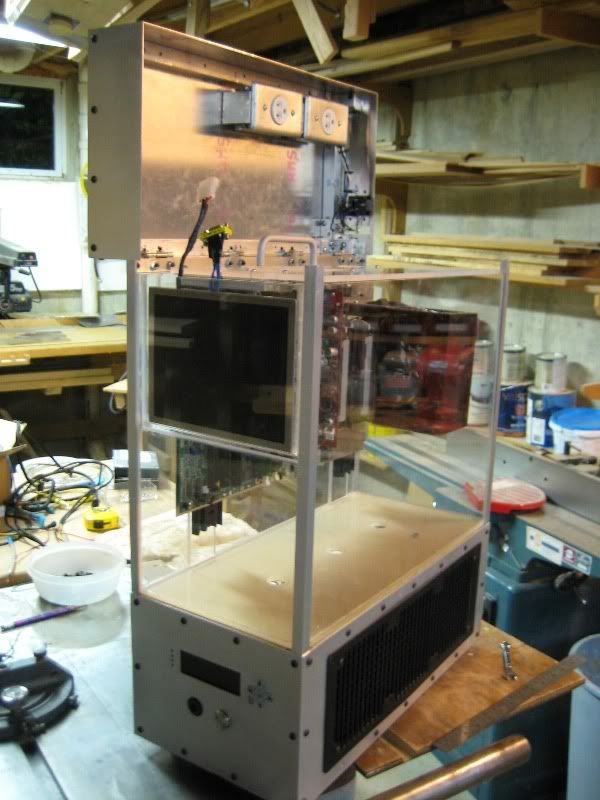
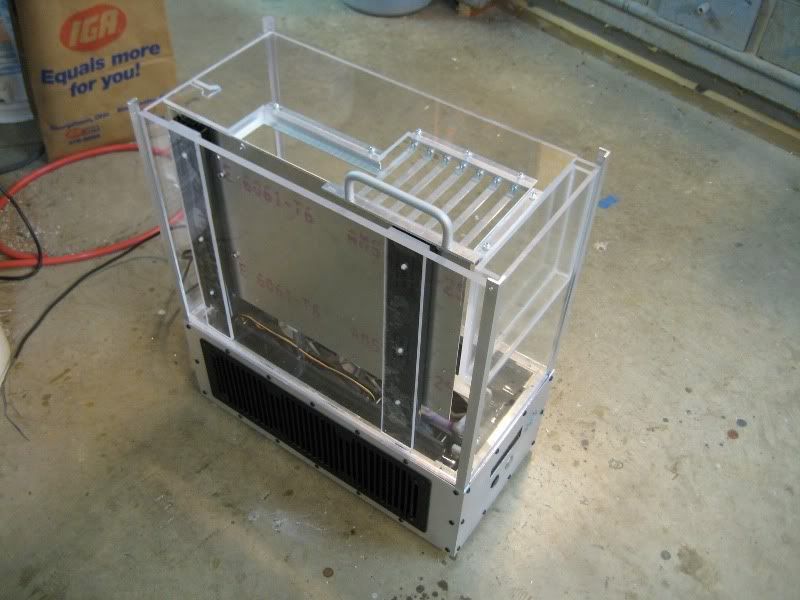
This shot and the ones following are simply money shots to show the overall progress on the case.

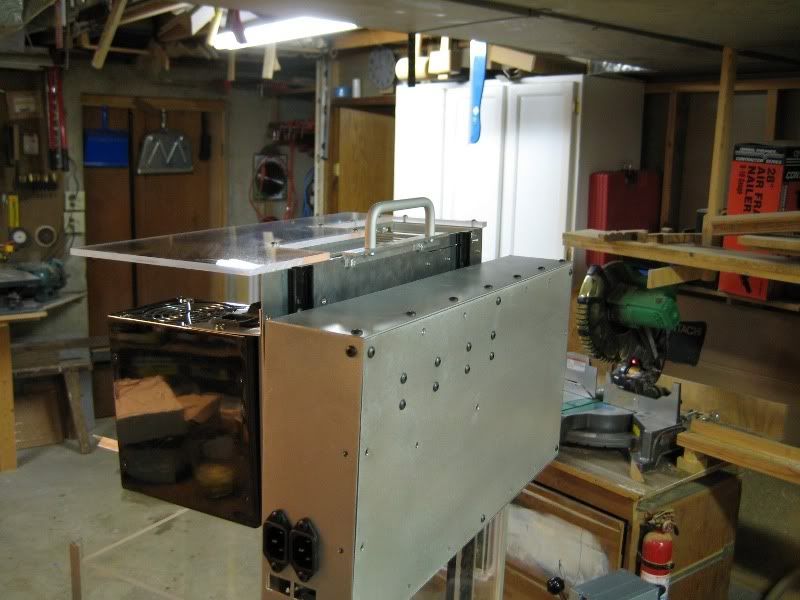
And from the back.
These are the cables that provide power for the lower compartment. The remaining slot on the spacer will hold the power, reset and power LED wires.
And that's all for today. All that remains is fixing the mobo tray handle, re wiring the plugs, installing the fans on the 2nd radiator, installing the tubing, installing the pump, and cleaning the case before I fill it with oil.
Comments?
Finding a place to mount the hard drives inside the case was difficult. I attached a piece of L angle to one of my drives to find the best spot.
This was as good as I could do, but even here it's blocking the top most ports on the motherboard (keyboard and mouse PS2 ports). Hopefully this won't be a problem. All of my crap is USB anyway.
I have 6 drives I would like to put in the case, but only two are going to fit. I drilled a piece of sheet so I could attach the 2 drives.
Lookin' good.
After double checking and triple checking the measurements for these screws, I drilled the holes in the top of the case.
And here they are on the inside with the lid closed. As you can see, they kind of lean one way since they're only supported on one side.
A quick little bracket on the other side fixed that.
Much better.
The drives on screwed to the top of the top compartment and will not be submerged in oil.
:wallbash: Who planned this thing anyway? The handle for pulling up the motherboard tray is in the way of the hard drives. Since this is the only place that the hard drives will fit, the handle will either have to be modified or removed.
This shot and the ones following are simply money shots to show the overall progress on the case.
And from the back.
These are the cables that provide power for the lower compartment. The remaining slot on the spacer will hold the power, reset and power LED wires.
And that's all for today. All that remains is fixing the mobo tray handle, re wiring the plugs, installing the fans on the 2nd radiator, installing the tubing, installing the pump, and cleaning the case before I fill it with oil.
Comments?
so if they were submerged would that impede the drives' spinning or something? or do you just not want to get them messy inside? i dont remember if there is any space in the bottom and im too lazy to search back through your HUMONGOUS worklog, but you cant put them down there either?they really dont need that much cooling, so you may even be able to lay 2 or 3 of them flat on the bottom. i know this would require running SATA wires up the side of the case, but im just offering ideas. its too bad if you have to remove that handle. it looks good and really does serve a purpose it seems.
its too bad if you have to remove that handle. it looks good and really does serve a purpose it seems.so if they were submerged would that impede the drives' spinning or something? or do you just not want to get them messy inside? i dont remember if there is any space in the bottom and im too lazy to search back through your HUMONGOUS worklog, but you cant put them down there either?they really dont need that much cooling, so you may even be able to lay 2 or 3 of them flat on the bottom. i know this would require running SATA wires up the side of the case, but im just offering ideas.
HDDs aren't sealed as many people believe. They are open to the outside air, with an air filter in place to keep out any small particles, this to equalize the pressure in and outside the casing. I can't even begin to imagine what'd happen if you were to immerse an HDD in mineral oil. Probably not much positive.
Anyway, this project is like the coolest fish tank I have seen which isn't a fish tank
Nice work!legoman666
Gawd
- Joined
- Dec 21, 2003
- Messages
- 638
HDDs aren't sealed as many people believe. They are open to the outside air, with an air filter in place to keep out any small particles, this to equalize the pressure in and outside the casing. I can't even begin to imagine what'd happen if you were to immerse an HDD in mineral oil. Probably not much positive.
Anyway, this project is like the coolest fish tank I have seen which isn't a fish tank
Indeed, there are several breathing holes that would somehow need to be sealed for operation under oil. Thanks!
so if they were submerged would that impede the drives' spinning or something? or do you just not want to get them messy inside? i dont remember if there is any space in the bottom and im too lazy to search back through your HUMONGOUS worklog, but you cant put them down there either?they really dont need that much cooling, so you may even be able to lay 2 or 3 of them flat on the bottom. i know this would require running SATA wires up the side of the case, but im just offering ideas.
The viscosity of the oil would impede the rotation of the platters and the movement of the reading arm inside the drive. Before I started construction on my case, I researched a few other mineral oil cooled PCs to see what they did with the hard drives. One person sealed all of the holes on a HDD with glue or silicone or something. Unfortuneatly, it turned out that he missed one of the holes and oil leaked in. The drive stopped functioning.
As for the handle, I think I might be able to keep it in it's current location. The hard drives themselves might be able to be moved a little more towards the center of the top compartment and thus be out of the way of the handle when the lid is closed. I'll see what I can do when I get home from work today.
Beautiful!
Thanks! Keep them comments coming.
legoman666
Gawd
- Joined
- Dec 21, 2003
- Messages
- 638
I should be able to finish the case tomorrow or the next day! All I need to do is break down my current PC, clean it, put it in the new case, and fill it with oil. Here's what I've been working on for the past 2 days.
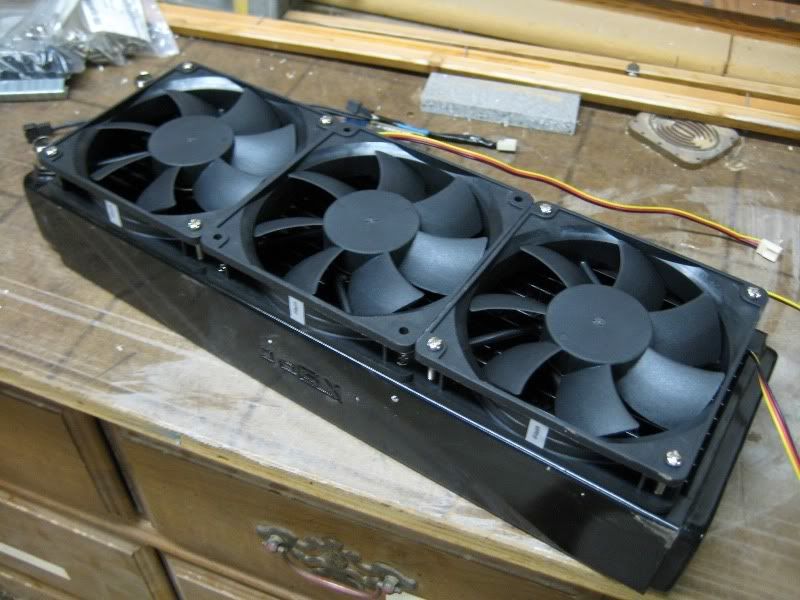
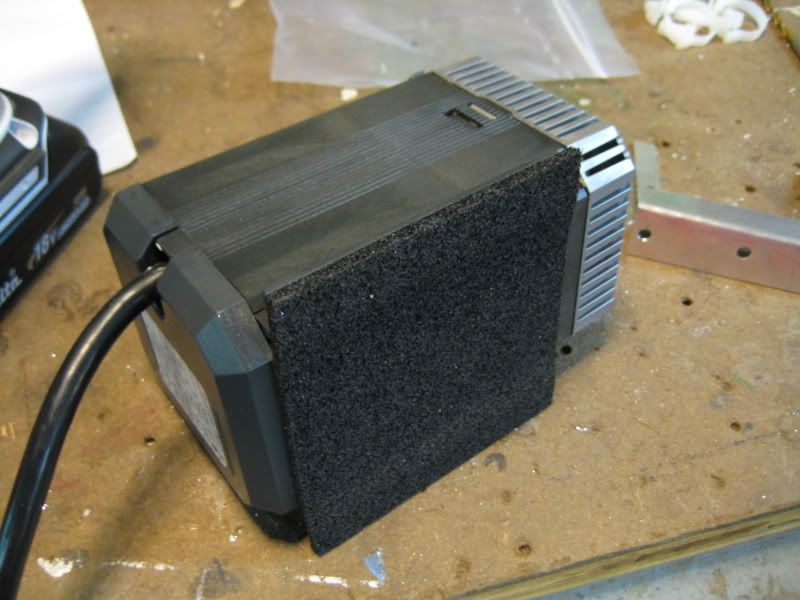
Noctuas are ridiculously expensive. I bought these instead. Great performance at half the cost. Win!
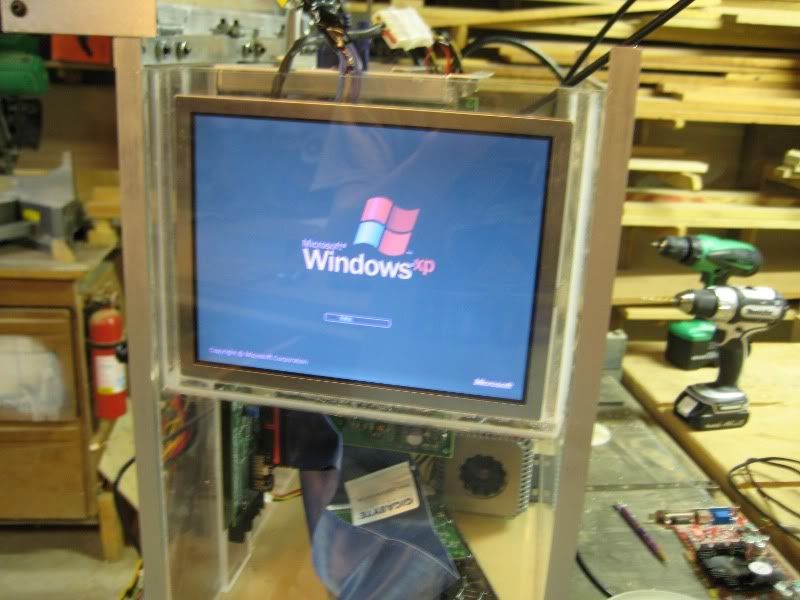
I was bored yesterday, so I stuck my retro gaming machine in the case and fired it up.
Dual P3's, Voodoo 5 5500, 512mb Rambus. Pro specs!
Enough silliness; I installed the second rad. There isn't much space between the two. And to think I had originally intended to stick two pumps down there...
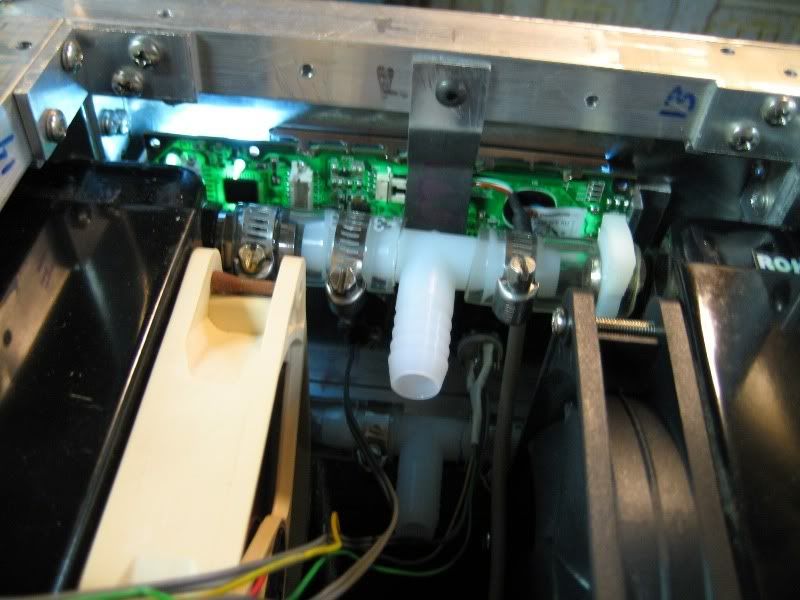
The two radiators are connected in parallel. Oil will flow in to both simultaneously and then back out. The two rads are identical so the same amount of oil should go to both.
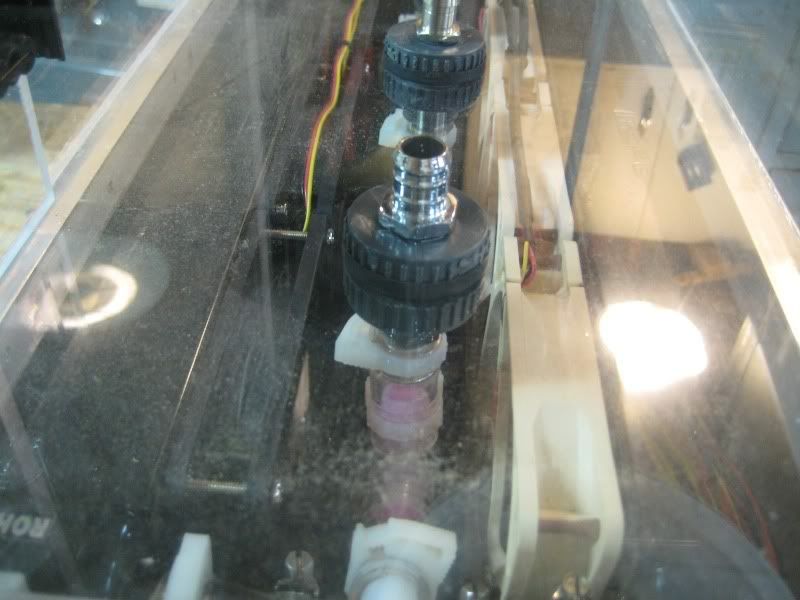
Then I attached the tubing to get the oil to the inlet and outlet on the bottom of the tank. You can see the two temperature sensors that I mounted in the sawed off T's here.
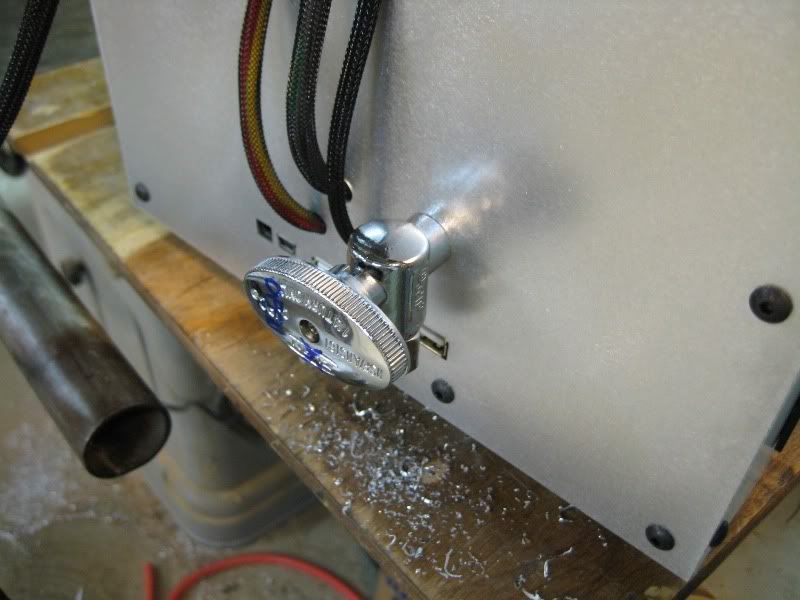
Then I installed the drain. I made sure to mark which position was what so I didn't accidentally fill the tank when the drain wasn't shut.
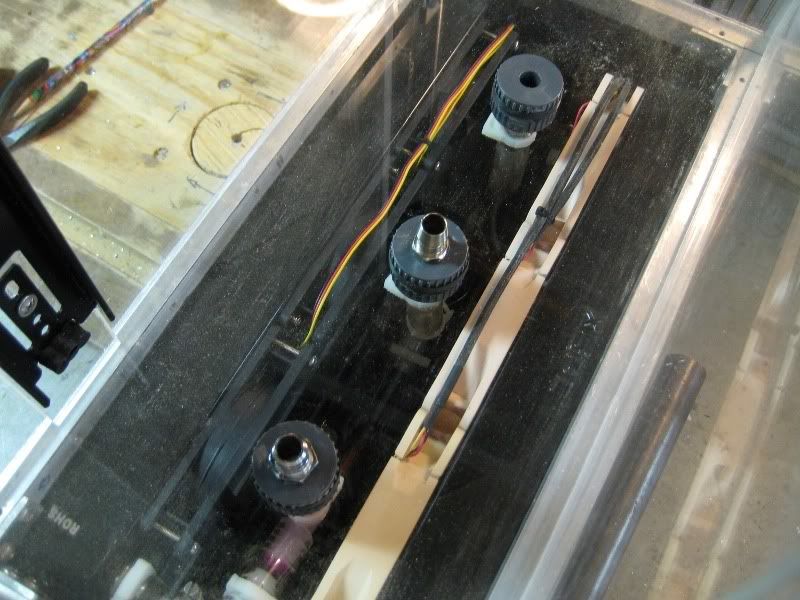
And this is the view of the bottom compartment in its final state. Fingers crossed on no leaks. I only get 1 shot at this, I can't leak test with water because I will never be able to get all of it out of the radiators.
The bottom of the tank sure is dirty....
After thinking hard about what to do with the handle so it doesn't hit the hard drives, I just simply moved it off center. It was previously attached to the left two screws that hold the backpane to the tray. Now it's attached to the right two. Brilliant eh?
I gave the tank a good cleaning with a few blasts from the compressor and some Windex. Squeeky clean!
Can't wait to get it running!
Noctuas are ridiculously expensive. I bought these instead. Great performance at half the cost. Win!
I was bored yesterday, so I stuck my retro gaming machine in the case and fired it up.
Dual P3's, Voodoo 5 5500, 512mb Rambus. Pro specs!
Enough silliness; I installed the second rad. There isn't much space between the two. And to think I had originally intended to stick two pumps down there...
The two radiators are connected in parallel. Oil will flow in to both simultaneously and then back out. The two rads are identical so the same amount of oil should go to both.
Then I attached the tubing to get the oil to the inlet and outlet on the bottom of the tank. You can see the two temperature sensors that I mounted in the sawed off T's here.
Then I installed the drain. I made sure to mark which position was what so I didn't accidentally fill the tank when the drain wasn't shut.
And this is the view of the bottom compartment in its final state. Fingers crossed on no leaks. I only get 1 shot at this, I can't leak test with water because I will never be able to get all of it out of the radiators.
The bottom of the tank sure is dirty....
After thinking hard about what to do with the handle so it doesn't hit the hard drives, I just simply moved it off center. It was previously attached to the left two screws that hold the backpane to the tray. Now it's attached to the right two. Brilliant eh?
I gave the tank a good cleaning with a few blasts from the compressor and some Windex. Squeeky clean!
Can't wait to get it running!
legoman666
Gawd
- Joined
- Dec 21, 2003
- Messages
- 638
Wow man this is looking great, This has inspired me to retake up my case I was building.
Thanks!
So close to completion... I just want to pour the oil in the tank and let it rip, but good things come to those who wait.
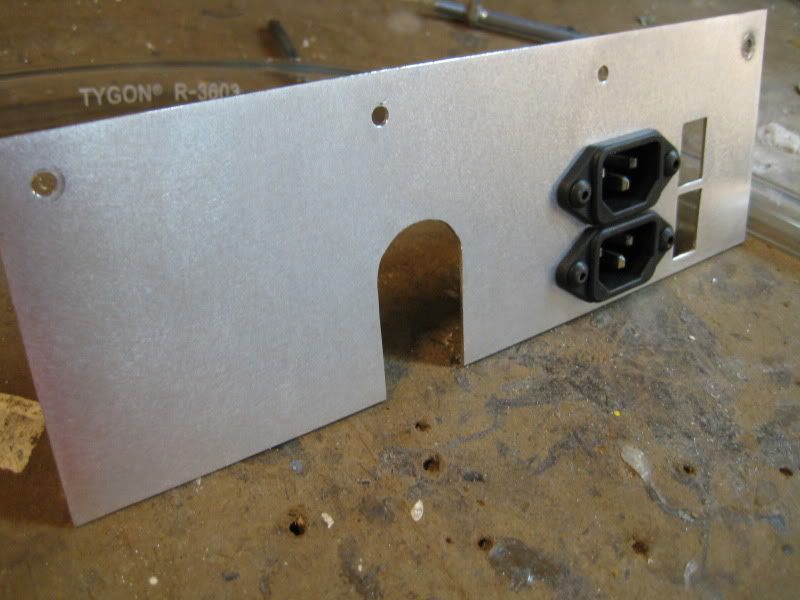
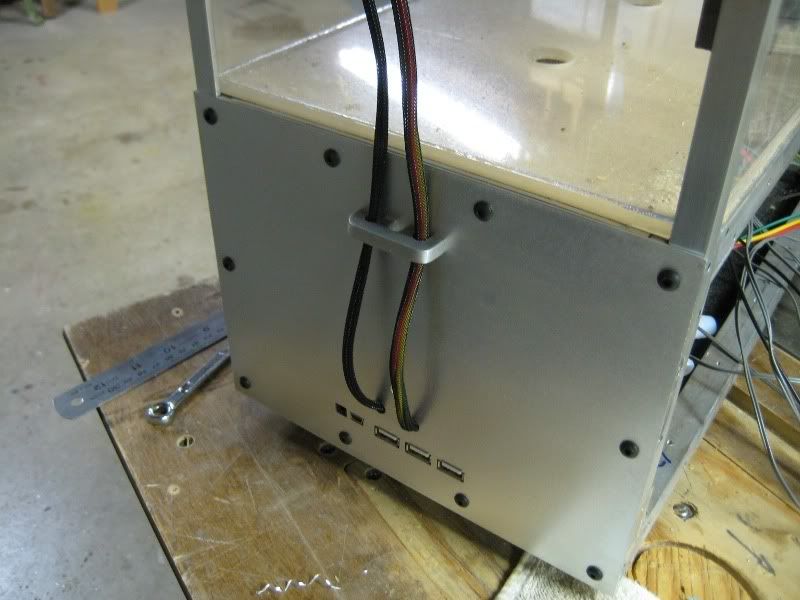
I cut out a hole in the back of the top compartment for all of the cables and such to go through. I made sure it was nice and smooth so I don't chop any of my wires in half. Would probably be a bad thing....
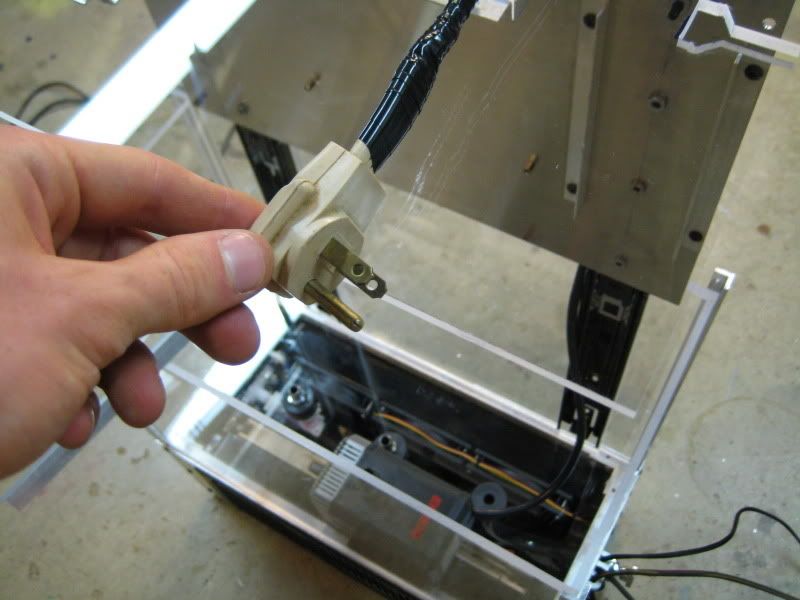
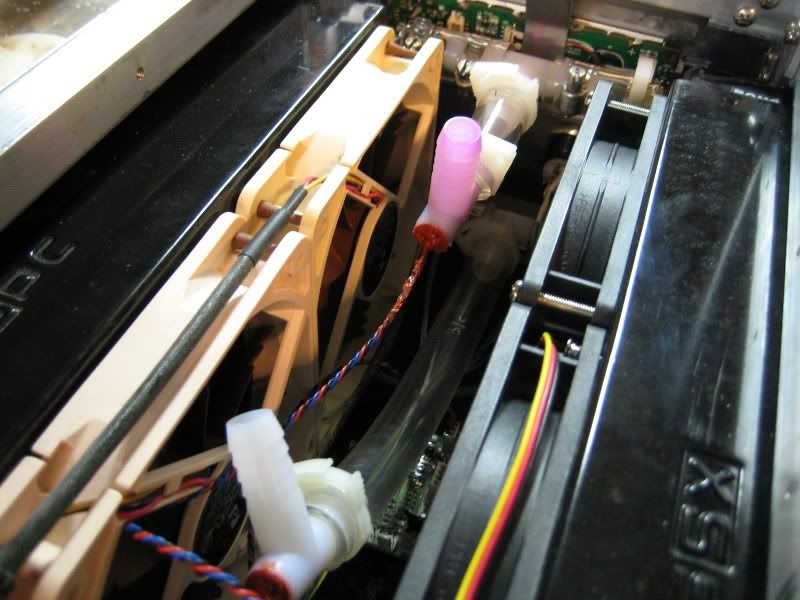
I had to scrounge around the house for 2 of these flat wall plugs. The regular kind won't fit. I cut the end off of the pump cord and attached one (which is in the bottom of the pic). The other is for the PSU. Both go to the internal electrical sockets.
I used a piece of leftover neoprene sound insulation on the bottom of the pump for vibration dampening.

Then I attached the pump to the outlet of the radiators. I had to use a few zip ties to prevent the tubing from kinking.
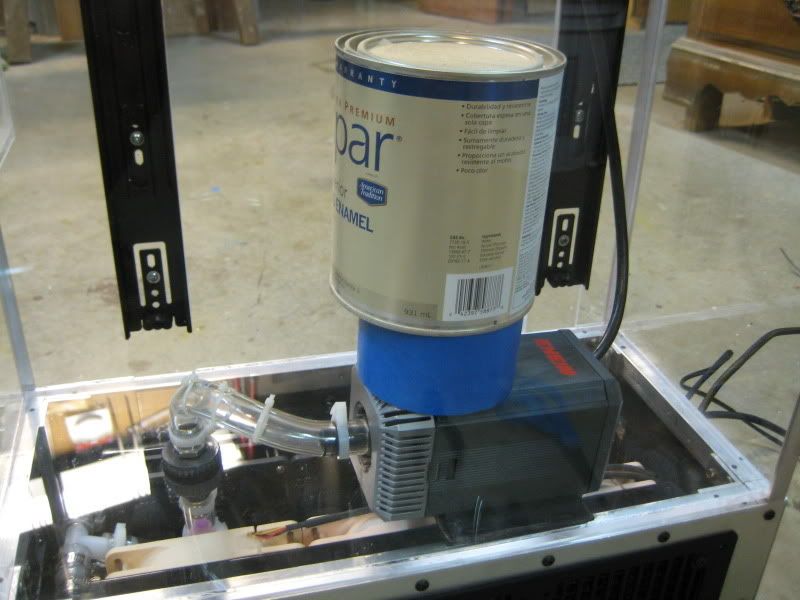
The sharp bend also has the unwanted consequence of causing one end of the pump to rise up in the air instead of sitting flat on the tank floor. I put a weight on it to help it bend. I'm hoping that over time, the bend will become permanent even without the weight.
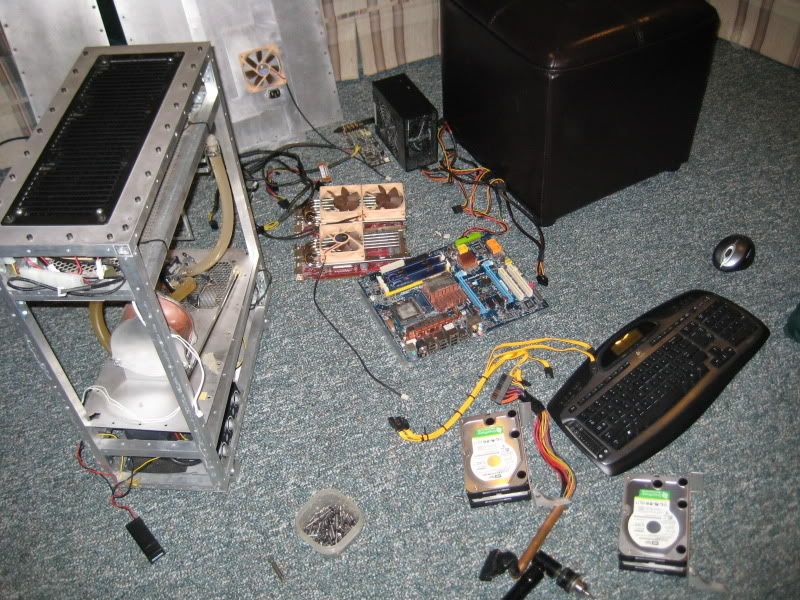
I ripped my old machine to shreds. Taking the case apart made me remember one of my reasons for wanting to build a new case; it's damn near impossible to do any work on the case without removing a million screws. The simple task of swapping a hard drive would require removing the left side panel (~44 screws), the front panel (~20 screws) and removing the mounting brackets (10 more screws). Who designed the stupid thing anyway.... [shifty]
My new case doesn't really get any new components. Theoretically, no harm should come to any of the bits when they're submersed in oil.... but better be on the safe side. I'll use my old stuff in the oil for a few months and then upgrade if all is well.
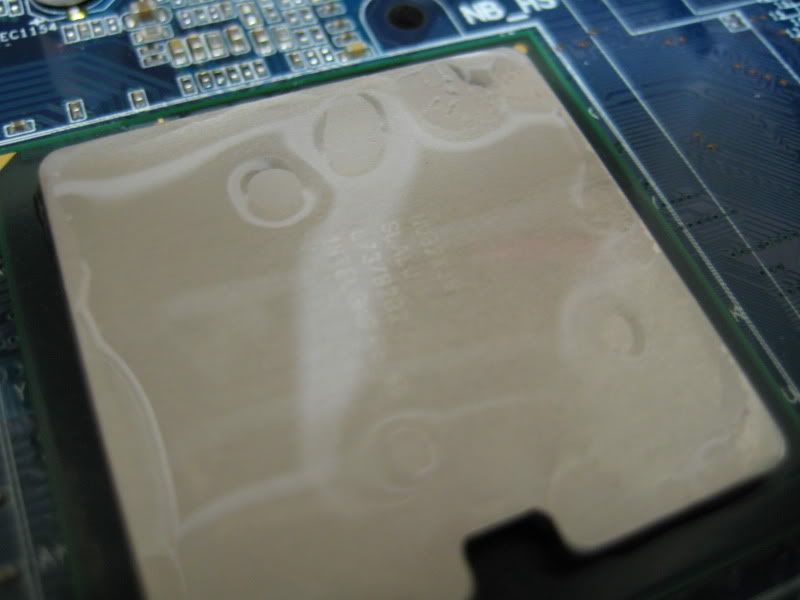
I learned this from another modder here. Mineral oil breaks down and dissolves thermal interface material. The trick to get around this is to use mineral oil itself as the TIM.
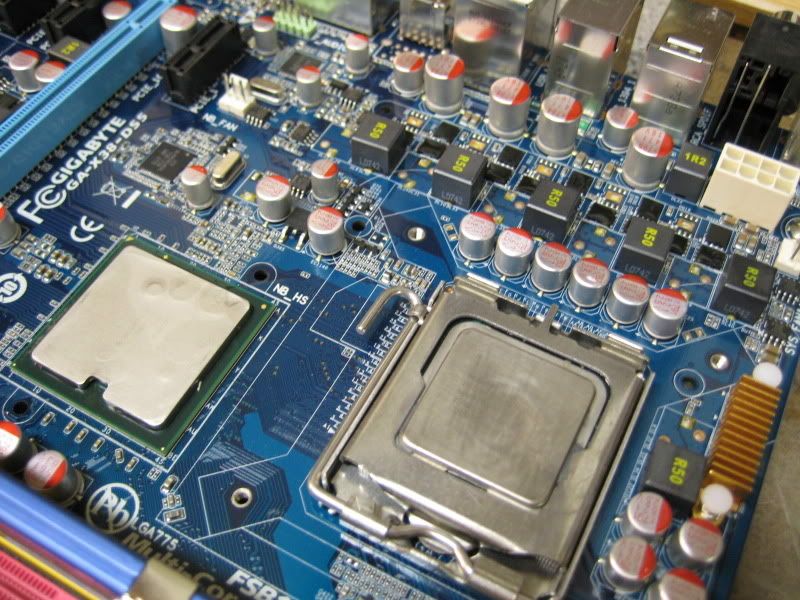
I removed all of the heatsinks from the motherboard and gave the chips and heatsink surfaces a good cleaning before reattaching them all with mineral oil in place of the original TIM.
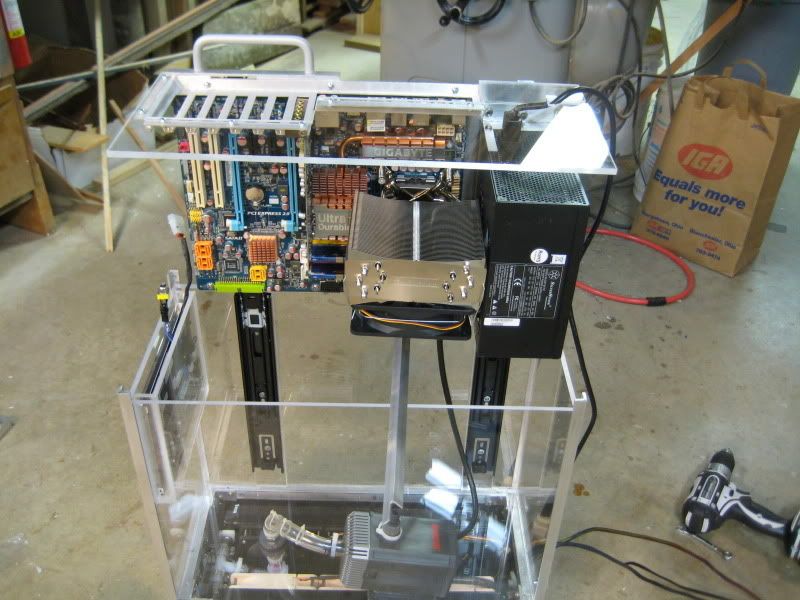
Checking the fit with the HSF on; barely fits. Another mm or two on the right side and I would've had to make some changes!
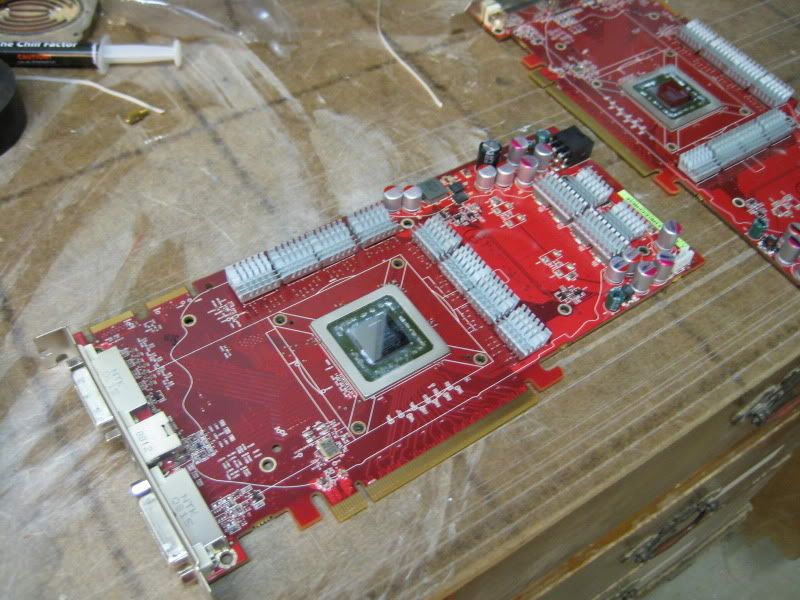
The video cards get a treatment similar to that of the motherboards heatsinks; the only difference here is that the ram sinks are superglued on. I left the thermal tape in place, but put a dab of glue on each corner on every RAM chip. Thermal tape is dodgy even at the best of times and I don't want ramsinks falling to the bottom of my tank.
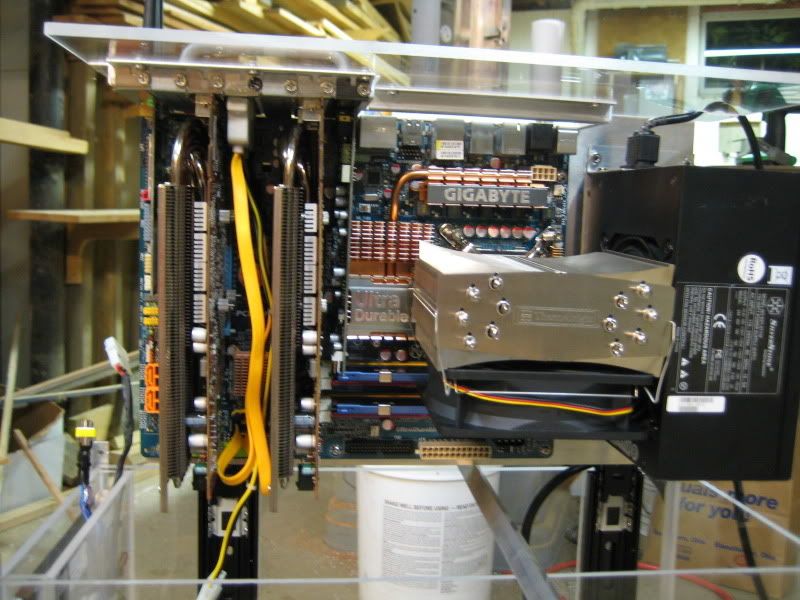
And here they are in place. Looking good!
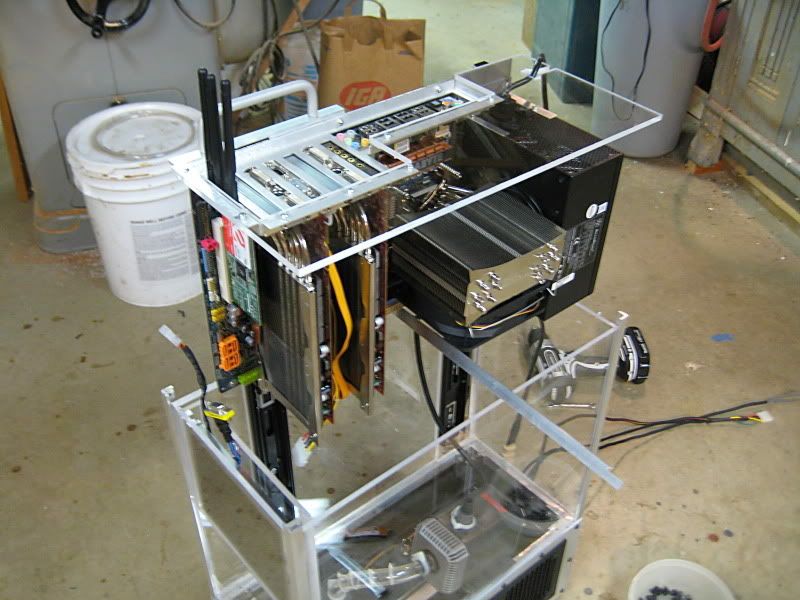
A couple of the these pics were randomly taken during the process of bringing it all together. I put the hard drives in and made sure the tray could still go up and down.
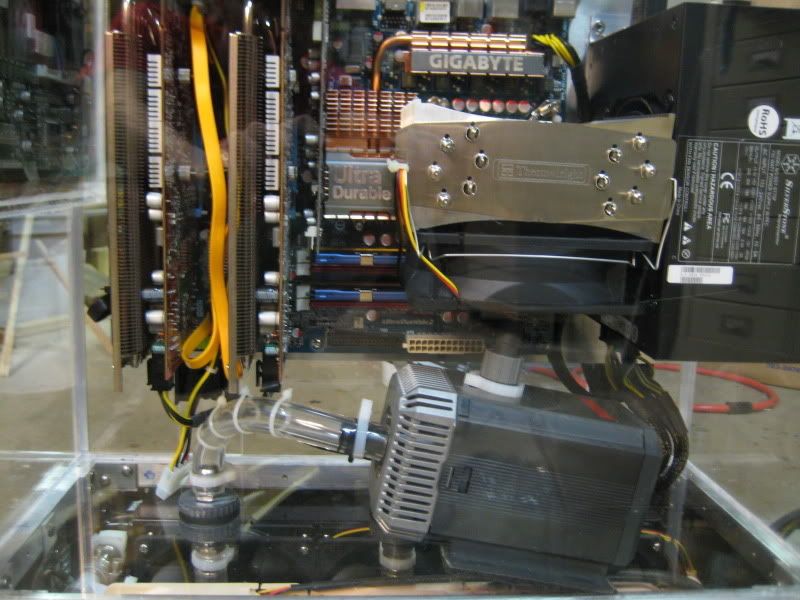
See what I mean about the pump being pushed up by the tubing? I fixed this later by attaching a bolt to the mounting hole on the fan above it and dropping it down to the pump. This accomplishes two things, 1) it takes some of the weight of the HSF off the mobo, and 2) pushes the pump down. Win win.
Edit:
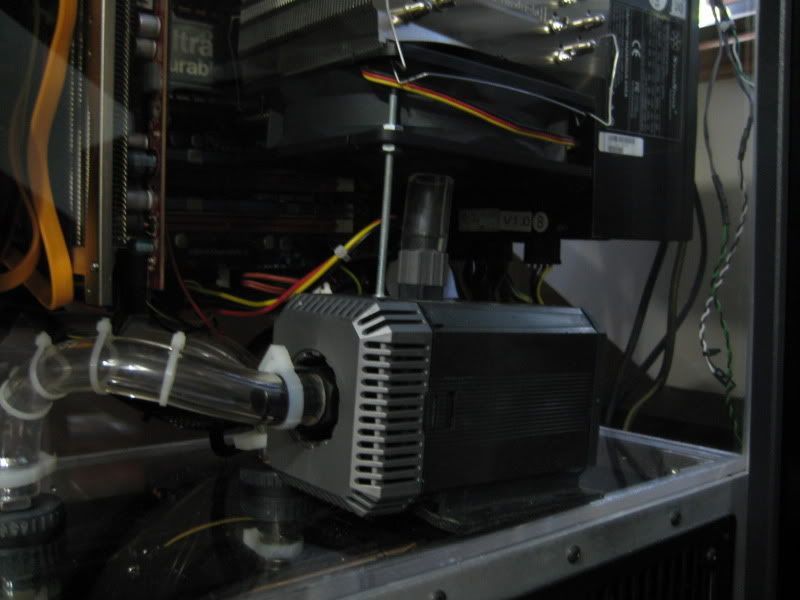
Here's a closeup of my fix.
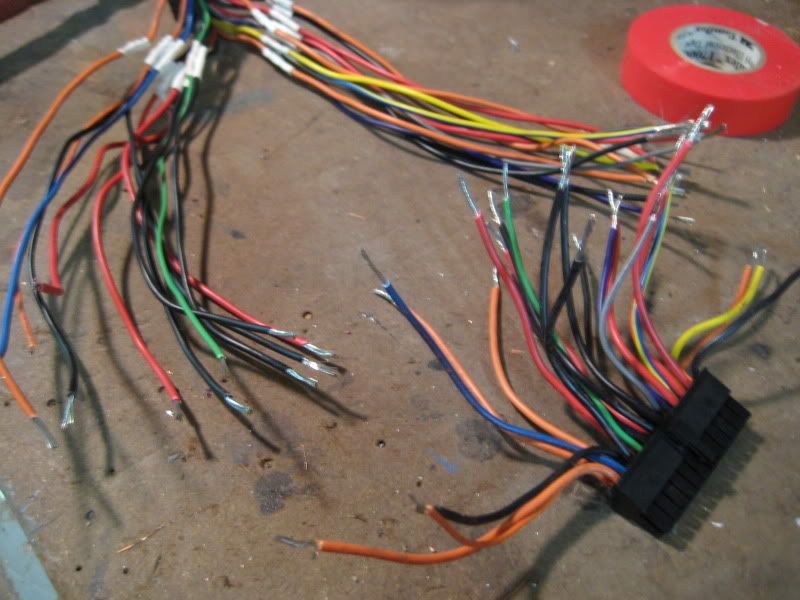
Why do I do these things to myself?:wallbash: The distance between the PSU and the ATX power header on the motherboard is really short, so I don't need a long cable. Snip!
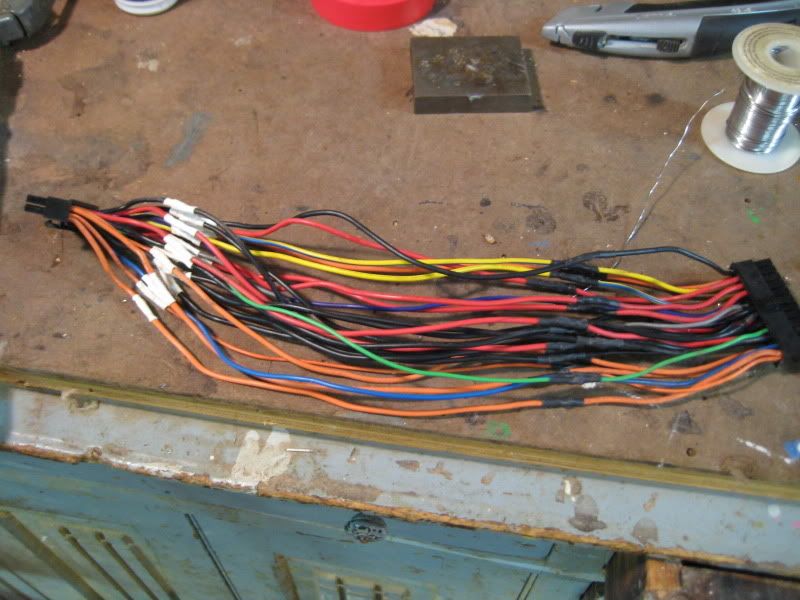
God, I wish soldering all of those wires only took as long as it took you to scroll from the image above to down here. Sigh
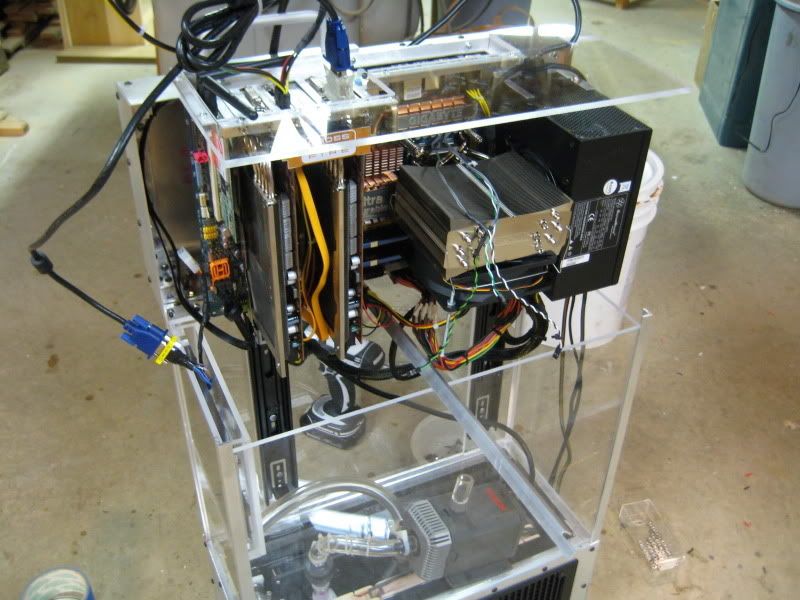
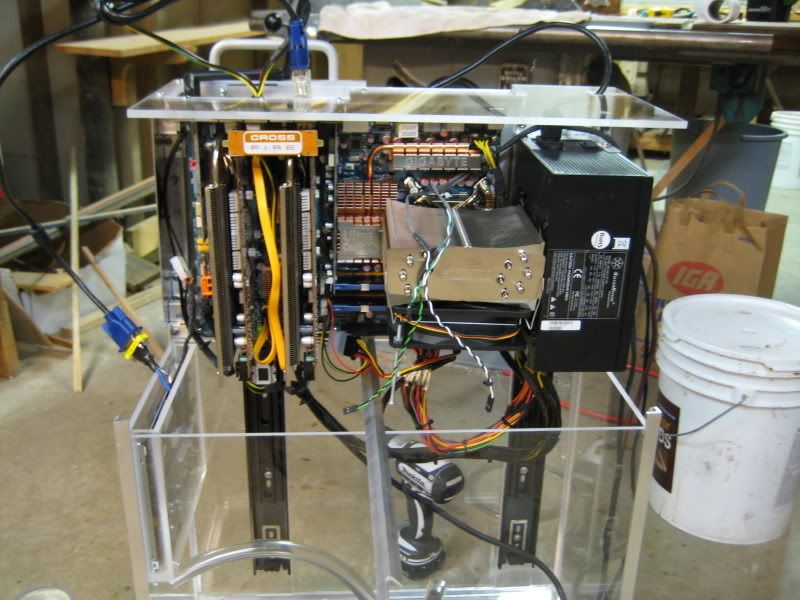
More stuff in place. Most of the power connections are run and zip tied at this point.
Firing it up! It only lasted a few minutes before over heating. As the temperature increased and thusly decreased the viscosity of the oil, the mineral oil I applied to the CPU as a TIM all probably seeped out of the small gap since the motherboard is vertical. No worries, it'll have no where to go once the tank is filled.
I carried the beast up to my room. Oh my god, is that sucker heavy. I estimate it weighs at least 80lbs empty. I was panting after carrying it up one flight of stairs. I had to rest in the kitchen before taking it the rest of the way up to my room.
And that's where it stands now. There are a few more things I have to do before filling it, but nothing major. The next update will either be my triumphant return or me crying in a puddle of mineral oil all over my bedroom floor (brand new hardwood flooring no less).
:dremel:
AthlonXP
Fully [H]
- Joined
- Oct 14, 2001
- Messages
- 20,588
Nice work so far, when is the oil going into the rig???
legoman666
Gawd
- Joined
- Dec 21, 2003
- Messages
- 638
Nice work so far, when is the oil going into the rig???
Today
I worked on the case non-stop from 6PM on the 26th until 7:30AM today (27th). I was tired, dirty and greasy. I took a break, posted the pics, took a shower, ate breakfast and I'm ready for round 2. Before I put the oil in, I need to lengthen the power switch, reset switch, and power LED leads. I appear to have made them about 6" too short. Drat, I'm out of sleeving too.Then I need to dust off the bottom of the tank. Besides that.... I think it's ready.Negative Decibel
2[H]4U
- Joined
- Dec 13, 2005
- Messages
- 3,588
This is looking really awesome! You are doing a superb job!
Reality
[H]ard|Gawd
- Joined
- Feb 16, 2003
- Messages
- 1,937
man, this is going to be a sweet conclusion, make sure you take a million pictures of all the sparks!
just kidding, good luck, take a lot of pics though
just kidding, good luck, take a lot of pics though
legoman666
Gawd
- Joined
- Dec 21, 2003
- Messages
- 638
What a cliff-hanger!
Great work.
@%#&^^%#
A leak! I was up to 4.5 gallons and I started to see oil seeping from the bottom of the case. I drained the tank as fast as I could. Upon inspection, none of my fittings leaked; they are all dry. The bottom of the case is a puddle of oil though. I went through ~15 washrags preventing the oil from getting to the floor.
If it isn't the fittings, the only other thing down there is the radiators. I guess I'll have to check those. ****.