So, I finally ordered parts for my first WC build!

Zarathustra[H]

Extremely [H]
Joined
Oct 29, 2000
Messages
38,819
So,

I've kinda wanted to build a custom loop for more than 15 years, since back in the day when people were using open loops with shower heads instead of radiators, but I never got around to it.

After exhaustive research, I ordered the parts list below.

I'll be cooling a single i7-3930k and Pascal Titan X GPU with this loop. The intent is to go overkill on the radiators in order to be able to not have to rev up the fans too much. All of it will be going into a Corsair 750D

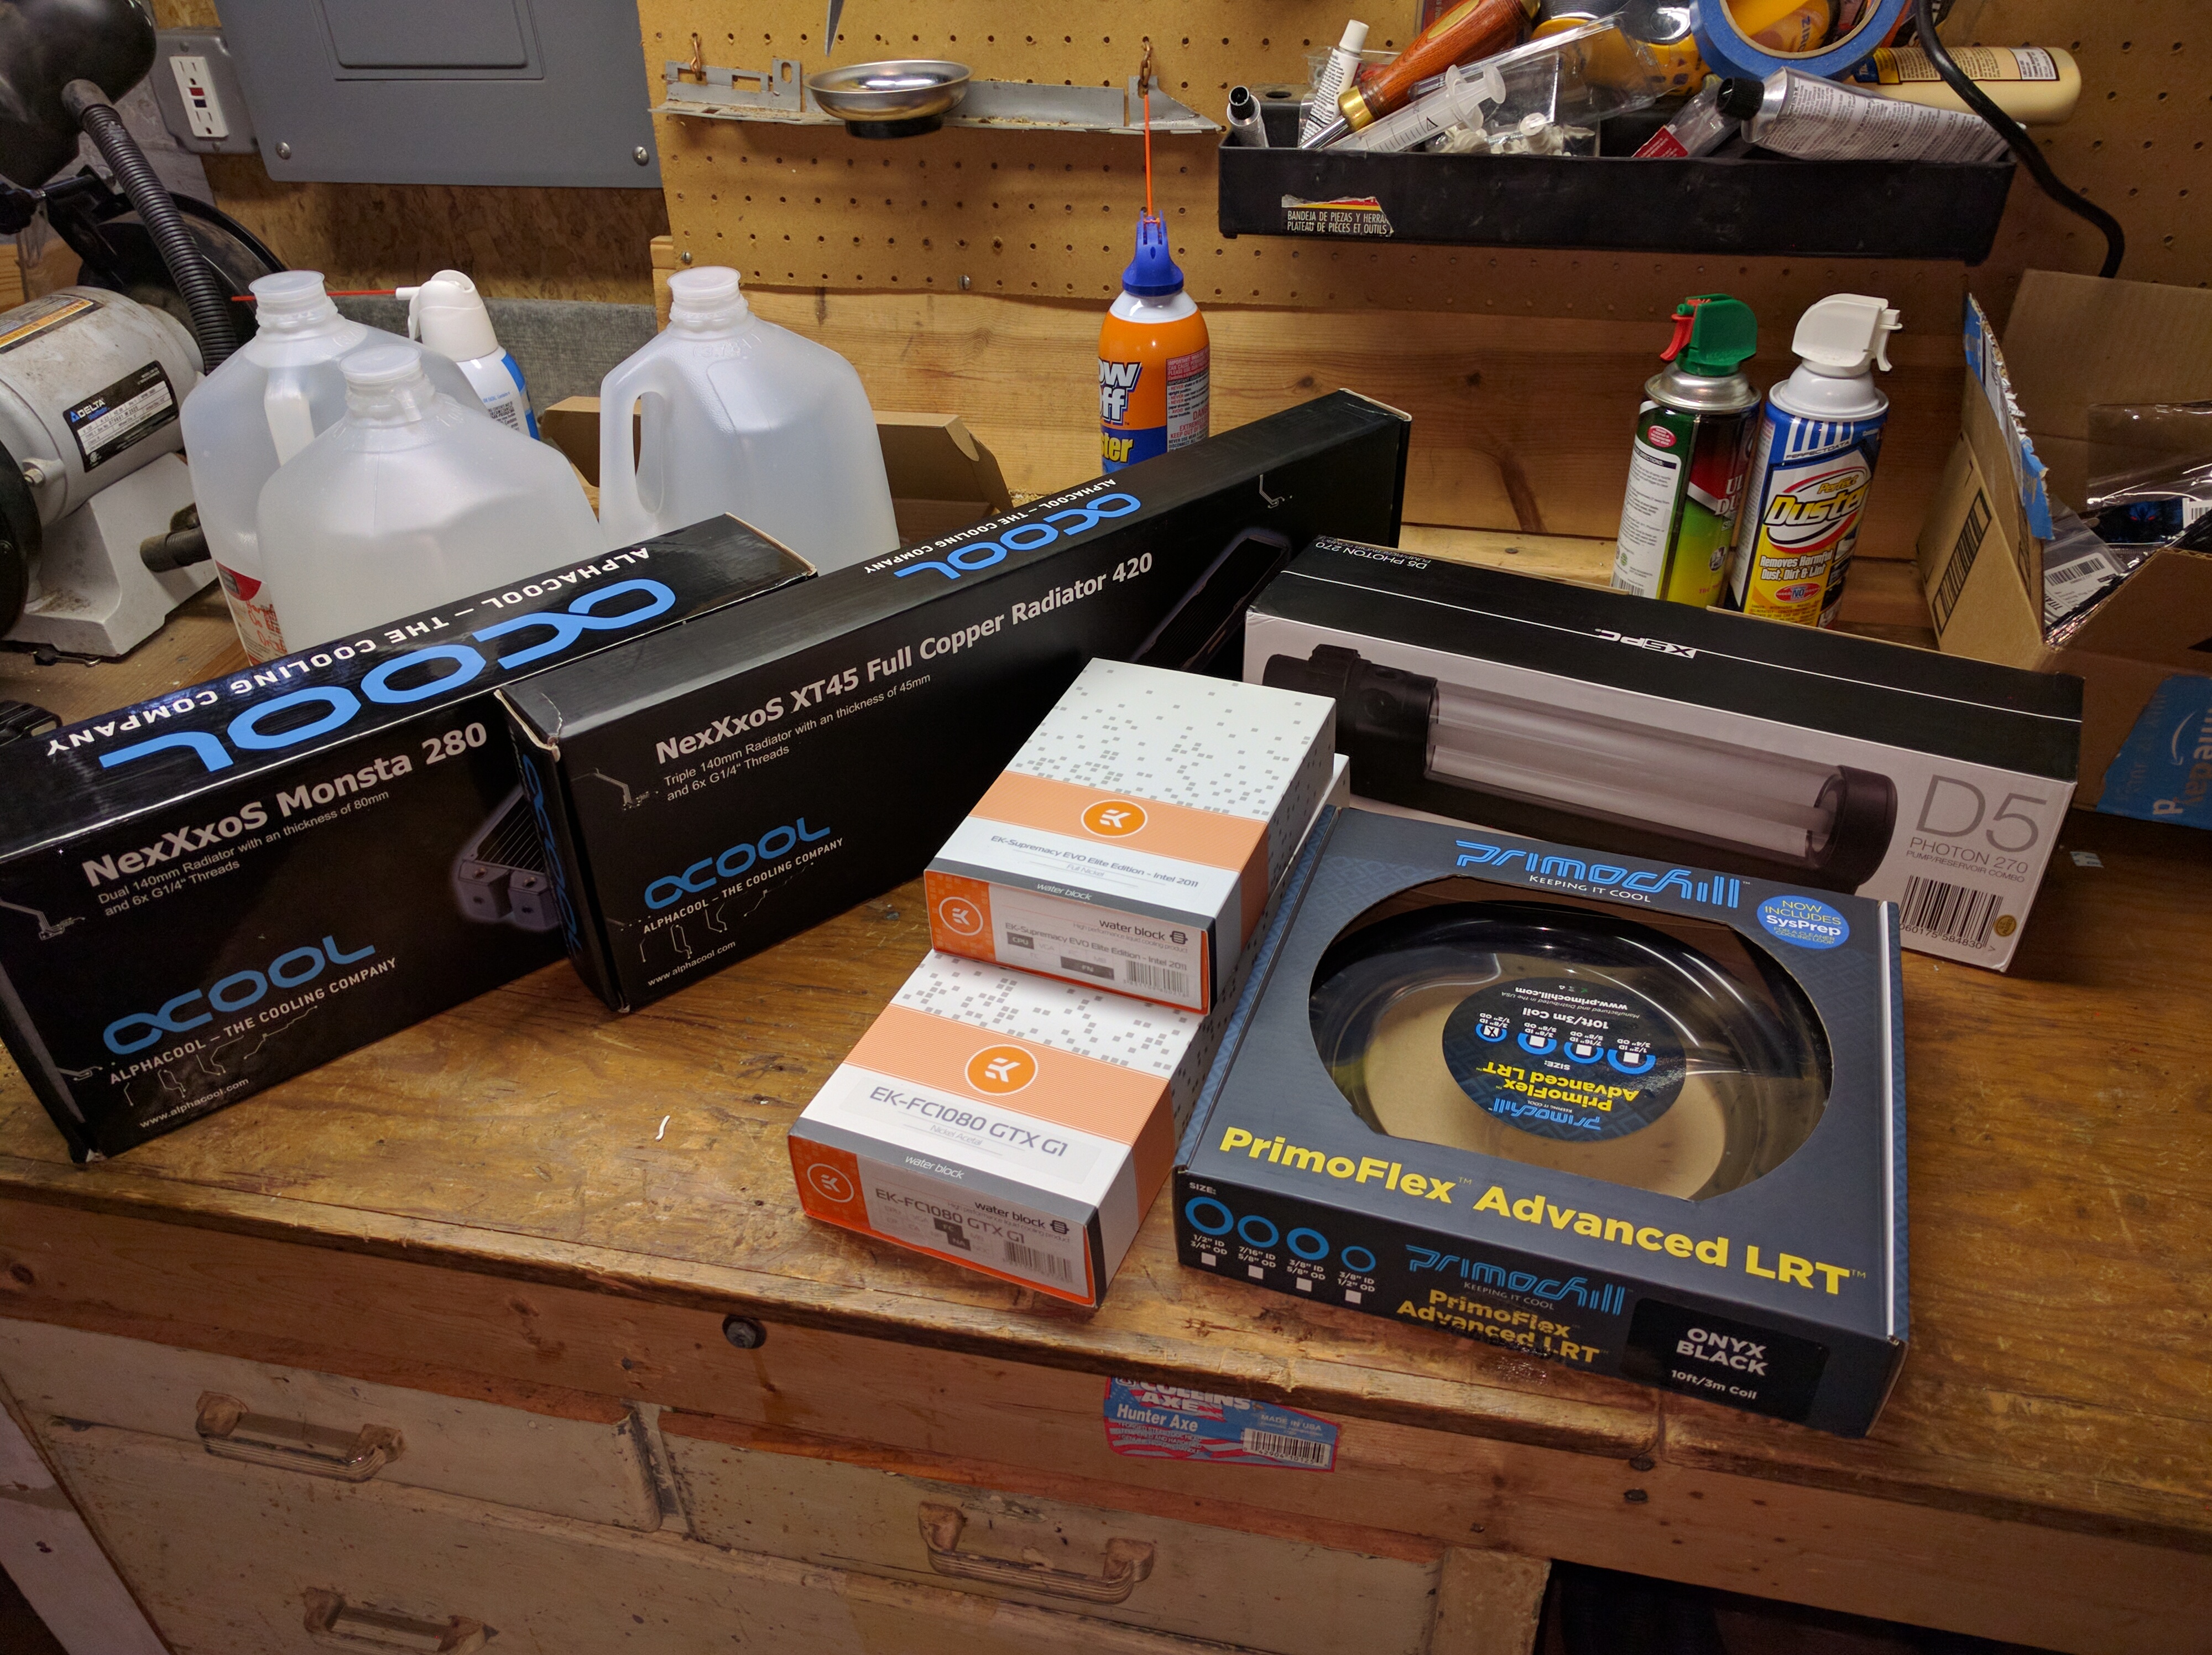
  • Top Radiator: Alphacool XT45 420mm, with three 140mm Noctua 140mm iPPC-2000 PWM fans pushing out.
  • Front Radiator: Alphacool Monsta 280, with four 140mm Noctua 140mm iPPC-2000 PWM fans in push-pull
  • GPU Block: EK Pascal Titan full cover block (was originally Gigabyte G1 Gaming block)
  • CPU Block: EK Supremacy EVO Elite LGA2011
  • Reservoir/Pump Combo: XSPC D5 Photon 270 Reservoir / Pump Combo w. Fillcap g1/4 adapter
  • Fittings:12x XSPC G1/4" to 3/8" ID, 1/2" OD Compression Fitting Black Chrome V2
  • Tubing:PrimoFlex Advanced LRT 3/8in. x 1/2in. Tubing (10ft pack) - Onyx Black
  • Sealing Plugs: 2x Enzotech Sealing Plug for 3/8" ID Tubing, Black (for filling on top and draining on bottom)
  • Temperature Probes: 2x Phobya G1/4" Inline Temperature Sensor, 50cm, Black Nickel

The plan is to hook up the temperature probes to a PWM fan controller in order to control fan speed based on loop temp.

I will be using Ekoolant, one bottle UV blue, two bottles clear. The original plan was to just use plain deionized/distilled water with no additives and a kill-coil, but I decided to play it safe with somethign that has corrosion inhibitors.

Hopefully I didn't screw up, but if you think I did, I'd like to know!

The overkill radiators will hopefully allow me to keep the fans slow and quiet, and also allow me to get the absolute most out of the GPU, as I'll only be using one of them for my 4k monitor. (I am SO done with SLI)

Thanks for reading.

edit: Updated parts list with final one
 
Last edited:
I don't think you can fit a triple 140 rad in that case. I have one. I know you can fit a 360, but not a 420.
 
I don't think you can fit a triple 140 rad in that case. I have one. I know you can fit a 360, but not a 420.

I've spent some time measuring and planning.

Corsair doesn't include triple 140's in their spec, but I think it will fit.

Worst case I'll have to remove the drive cage. Then it will be guaranteed to fit. I don't use the drive cage anyway.
 
How are you planning to include/attach the drain line? I saw no mention of any T-fittings, fillport, valves ir bulkhead fitrings in the list. Also you may need more than 12 compression fittings:
Res/pump - 3 (in, out, fill)
Rads - 4
Waterblock - 4
Sensors - 4 (in line temp fittings usually require 2 each)
Additional - ??? (3 for each T-fitting, 2 for each bulkhead or valve fitting, 1 per fillport, etc. )

Yeah, I noticed that earlier today and ordered an additional bag of 4 fittings.

My plan is to take advantage of the fact that these radiators have two plugs on each inlet and outlet (straight and angled).

My plan is to use one of the extra inlets on the top radiator for a bleed port, one of the extra outlets on the front radiator for a drain port, and a Y fitting screwed straight into the top of the reservoir for filling.
 
So I've started getting some parts, and I have some thoughts, comments and one big question (with pictures):
  • Jesus, the XSPC 270 reservoir is HUGE. Should still fit, but it is much larger than I expected. Also, if you plan on using th etop fill port adapter as an in, it doesn't come with the metal cover to cover the input on the bottom. I think I can probably just use one of the extra ones from the radiator for this, right, as they are all G1/4".
  • Very impressed with the PrimoChill Advanced LRT tubing. It was suggested to me that the 3/8" ID 1/2" OD tubing might be prone to kinking, but I have been playing around with it bending it around, and it seems damned near impossible to kink. At tight radius you might get a narrowing of the ID, but it never completely folds and kinks off.
  • The tubing came with a bottle of something called "SysPrep". The infosheet that came with it suggested prepping the loop by running a DI water + SysPrep mix for 12 hours before filling it with th efinal coolant. I've never heard of this stuff before, is it legit, or just a huge waste of time? I'm still planning on cleaning the rads with hot distilled water before use anyway.
  • So, my alphacool radiators seem to have a little rust on the fins. It is only really visible if you look at it from the bottom (non-port side) not if you look at them from the top (port side), as if the manufacturer only sprayed them with black paint from one direction.

    1.) Is this normal? I've heard talk of fins being copper and them being misidentified with rust, is this the case I am seeing here?I've never seen this on any of my sealed AIO coolers, which otherwise look mostly the same (except for being much smaller and lacking the ports)

    2.) If not, is this strictly cosmetic, or could it have some long term effect on either performance or leak potential?


Pics:

IMG_20160710_173059.jpg IMG_20160710_173030.jpg
 
Last edited:
Yeah, I noticed that earlier today and ordered an additional bag of 4 fittings.

My plan is to take advantage of the fact that these radiators have two plugs on each inlet and outlet (straight and angled).

My plan is to use one of the extra inlets on the top radiator for a bleed port, one of the extra outlets on the front radiator for a drain port, and a Y fitting screwed straight into the top of the reservoir for filling.


Turns out they actually have 7 (!) plugs each, 3 inlet, 3 outlet and one on the non-plenum side, presumably for draining/bleeding.
 
Last edited:
second pic looks like a shitty paint job on a all copper rad, no prob not rust just exposed copper. if it doesn't bother you I wouldn't worry aboot it.
 
second pic looks like a shitty paint job on a all copper rad, no prob not rust just exposed copper. if it doesn't bother you I wouldn't worry aboot it.

Thanks for your input! I have since learned that Alphacool rads are apparently notorious for looking like this, as they try to strike the balance between looks and performance!

This build is getting so close I can taste it...


(On second thought, not sure I want to taste watercooling...)
 
copper flavored water with plastic undertones. mmm mmm good!
that's gonna be a nice little setup for ya!
 
You can get normal barb fittings and save a lot of money, the compression/rotary fittings are like $7-15 a pop. I've reused the same bitspower compression fittings for like 3-4 builds though, so you buy them once, and you can reuse them forever.

I have the G1 EK block also, it's very nice. Although I almost wished I would have gotten the MSI seahawk EK version with the block preinstalled/and backplate just for the guaranteed warranty . Would have been pretty much the same price, and saved me 1+ hours as well and the stress of tearing apart a $700 video card. EK charging another $40 for a backplate is beyond me.
 
Last edited:
I didnt use the backplate when I put the EK block on. Looks like it traps heat anyways.
 
I highly recommend PPCs. I've ordered all of my WC gear from them, except a few items I picked up at the Sharronville Microcenter
 
The question is - however - are those 4 holes really necessary to keep the backplate in place, or can I do without them...

From drawings of the back of the board, there doesn't seem to be much under there they are covering... I could just use the 7 holes in the center, might not be too bad.
Unless they interfere with whatever backplate you're using, you can totally just not use them. Unless you put a thermal pad between the backplate and the PCB so that it functions like a heatsink, the backplate is an entirely cosmetic part. You really only need enough screws on it to keep it from falling off and being loose inside your case.

Edit: If your card came with a backplate, why are you even bothering with buying another one? The water blocks I've installed would totally have worked with any backplate designed for the card in question.

My Zotac 980Ti amp extreme came with a backplate. It does not work with my Bitspower block at all. However, the block did come with a new backplate.
 
Why didn't it work?

well, I can't speak to his, but I explained the compatibility issue above with mine. Sure, I could leave those 4 screws off, but that could lead to potential issues.

I feel fairly confident EK could have designed around this, especially since they were making a special block just for the G1, but that they'd rather not, so they can sell $40 (for a backplate?) more of parts, which is pretty shitty.
 
Why didn't it work?

The Zotac didn't use all mounting holes that the card had available. Also, screw size. The screws have a larger diameter for the block compared to the factory plate. Also, the factory plate wrapped around the side of the card, and that won't work with a water block, obviously.
 
well, I can't speak to his, but I explained the compatibility issue above with mine. Sure, I could leave those 4 screws off, but that could lead to potential issues.

I feel fairly confident EK could have designed around this, especially since they were making a special block just for the G1, but that they'd rather not, so they can sell $40 (for a backplate?) more of parts, which is pretty shitty.
What issues do you think you're going to have? Seven fasteners is plenty for a little piece of aluminum on a part that doesn't move.

The Zotac didn't use all mounting holes that the card had available. Also, screw size. The screws have a larger diameter for the block compared to the factory plate. Also, the factory plate wrapped around the side of the card, and that won't work with a water block, obviously.
Just two or three mounting holes ought to be enough to hold it on there. I'd have no compunction at all about just reaming out the holes in the plate to fit larger fasteners. Length of the fasteners could be an issue here, I guess, but that could be fixed by spending like $5 at Fastenal for some super cool looking stainless hex cap screws in the proper length. That's what I'd do, anyway.
 
What issues do you think you're going to have? Seven fasteners is plenty for a little piece of aluminum on a part that doesn't move.


Just two or three mounting holes ought to be enough to hold it on there. I'd have no compunction at all about just reaming out the holes in the plate to fit larger fasteners. Length of the fasteners could be an issue here, I guess, but that could be fixed by spending like $5 at Fastenal for some super cool looking stainless hex cap screws in the proper length. That's what I'd do, anyway.

I didn't want to mutilate the plate by cutting the section off that wraps around the side of the card. Not to mention, if I did that, and reemed the female standoffs that are pressed into the plate, I would have to find new standoffs.
So, it was easier to use the plate that came included with my block, than mutilate the factory plate.
 
What issues do you think you're going to have? Seven fasteners is plenty for a little piece of aluminum on a part that doesn't move.


Just two or three mounting holes ought to be enough to hold it on there. I'd have no compunction at all about just reaming out the holes in the plate to fit larger fasteners. Length of the fasteners could be an issue here, I guess, but that could be fixed by spending like $5 at Fastenal for some super cool looking stainless hex cap screws in the proper length. That's what I'd do, anyway.

I'm most concerned with vibration. Iv'e had loose backplates before (when I used included EVGA backplates with corsairs HG10 brackets) and it was annoying. That was only one screw too, this would be 4.
 
Side note:

Apparently these G1/4" threads can be sharp!

I was testing my new PWM fan controller and wanted to heat up my thermal probe a little to see if the fan would spin up, so I stuck my pinky inside it and twisted it a little to get some friction.

Now I have a nice circular cut all around my pinky :p

Lesson learned!
 
As an eBay Associate, HardForum may earn from qualifying purchases.
While I've been waiting for my last part (that slovenian worth it's weight in gold backplate) I've been doing some sketching, and I started getting concerned about tight bends and potential kinks.

I went on amazon and ordered 6x 45 degree bends and 4x 90 degree bends, which I hope will help.

So easy to blow your budget on fittings...

You add up all the big parts and think "Hey this isn't so bad, I'll do it", and then the many little parts add up :p

Well, in for a penny, in for a pound. This build is happening (starting on Tuesday)
 
I did some calculations using that TDP/Radiator Area spreadsheet that has been going around. It suggests I should see sub 5 degree delta T's at load, overclocked. I didn't think I was going that overkill on the radiators, but if true, I'll take it!
 
Damn.

I get my last part on Tuesday, and now Nvidia had to go and announce the new Titan X... I was not expecting it so soon.

Decisions, decisions.

While it feels dumb to turn around and sell parts as soon as I get them, the intent with this build was to get ht emost out of a single GPU, and with Titan X (Pascal) being released on August 2nd, I don't want to build a loop, just to tear it back down again.

I can even still eat the restock fee with Newegg for the Gigabyte G1 1080 if I have to...

The blocks will be more difficult, as I ordered them from Slovenia. I wonder if there is a market for new, unused EK Gigabyte G1 1080 block & backplate...
 
Does NewEgg do refunds for a graphics card? I thought it was replacement only from them, but you might be able to talk them into a refund.

Worst case, water-cooled PhysX 1080 ;)
 
hurry and finish old timer. i bought that sandy-e machine i talked about in that thread i started and the build is already done. dying to see how your build turns out and to show you how mine turned out. can't seem to get my 3930k over 4.5ghz. also got the evga x79 ftw board to run my 1070@pci-e 3.0. thanks for your suggestions last time.
 
I don't think you can fit a triple 140 rad in that case. I have one. I know you can fit a 360, but not a 420.

Finally getting started tonight, and I am happy to report that the 45mm thick 420 radiator fits nicely, after some slight
bending of tabs. The two top alignment tabs (right above the top 5.25" bay) needed to be bent back, and then it slid right in.


IMG_20160815_182336.jpg
IMG_20160815_182320.jpg


After that it slid right in!

IMG_20160815_184015.jpg
IMG_20160815_184031.jpg


This will be my bleed port on the back. Not my cleanest hack job, but its on the back so who cares. I will have to be careful and angle it a bit, but it should work.

IMG_20160815_185606.jpg
 
With a fan installed you could even still use the bottom two bays if you wanted to, though airflow might be restricted.

From the top of the middle bay to the bottom of the fan is less than 10mm. Probably 7-8mm if I had to guess.

IMG_20160815_195759.jpg


Side note:

Alphacools radiators, while they use M3 screws like a Corsair AIO unit, they have the alternate smaller threading like drive screws do, so I couldn't use my existing radiator fan screws.

Not a problem though, because Alpahcool included all the fan screws I need, but for some reason they are hex screws, which is kind of a pita.

well, except this one which has some sort of mangled head. Now I'm going to be a screw short... great...

IMG_20160815_200559~2.jpg
 
Second radiator in.

Ran into a snafu here. For my preferred tubing routing I was planning on sucking up the fact that it would result in a more difficult time getting air out, and having the tubes connect on the bottom, but there was no way to make it work that way. The holes didn't line up, and the way the case is designed, it wasn't straight forward to drill ones where I would have needed them.

This means tubes will connect on top, and I will have to come up with a new, probably less direct routing than I had planned :(

IMG_20160815_205424.jpg
 
Second radiator in.

Ran into a snafu here. For my preferred tubing routing I was planning on sucking up the fact that it would result in a more difficult time getting air out, and having the tubes connect on the bottom, but there was no way to make it work that way. The holes didn't line up, and the way the case is designed, it wasn't straight forward to drill ones where I would have needed them.

This means tubes will connect on top, and I will have to come up with a new, probably less direct routing than I had planned :(

View attachment 6711


Also, the radiators ship with two sets of screws, one set is 30mm long, presumably for use with 25mm thick fans only. The other set is 35mm long, presumably for when you have sheet metal + fans for case mounting.

Well, the 35mm screws were too long when bottomed out, leaving the radiator to wiggle and not be firmly attached to the case. The 30mm screws were - however - too short, requiring me to tighten the hell out of them and bend the fan "wings" slightly, which I didn't like.

I solved this by using the 35mm screws with an extra set of washers for spacing.
 
As for that problem fan screw?

Well, my friend the hacksaw and I turned it into a flat head... (well, sortof...)

IMG_20160815_211403.jpg
 
Last edited:
By the way, I'm TOTALLY expecting someone to chime in and tell me that I did something irreversibly wrong any time now :p
 
Some more fans are in, and this previously seemingly cavernous Corsair 750D is starting to feel smaller by the minute. Next I'm going to have to shoehorn my enormous reservoir in there...

IMG_20160815_212322.jpg


I left the leftmost top fan out for now, because I think it would be extremely difficult to tighten the compression fittings on my tubing with it in place.

Also, please disregard the paper stuck to the foot of my case. I live in a house built at the turn of the century. The floors are not perfectly even in my office, so I used the old, "fold up a piece of paper and stick it under one of the legs" trick, and somehow it got stuck, hehe...
 
Hmm. This new unplanned tube routing is going to require some sort of bend coming out of the front radiator in order to reach the pump, but this XSPC 45 degree fitting is too short to get around the fan...

IMG_20160815_214544.jpg
 
Back
Top