Shuttle XPC - mirage paint + intake

chrisf6969

[H]F Junkie
Joined
Oct 27, 2003
Messages
9,011
(be sure to read all the way to page 3 with the most recent pics)

This is the beginning:
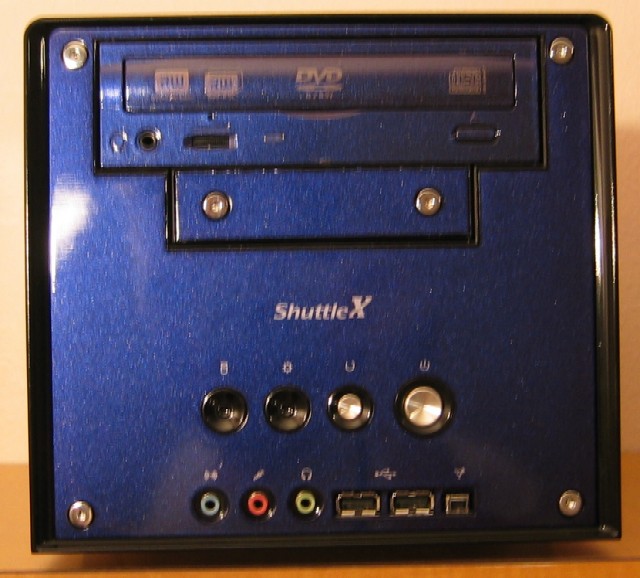
Shuttle XPC SB65G2B (865 mobo with wireless - black case)
Pentium 4 - 2.4C @ 3.2Ghz
PNY 6800nu
OCZ 2x1Gb ddr400 2-3-2-5
160GB 7200rpm HD
Edit: LiteOn 16x DVD+RW dual layer
combo card reader & floppy
Integrated Realtek LAN & Sound
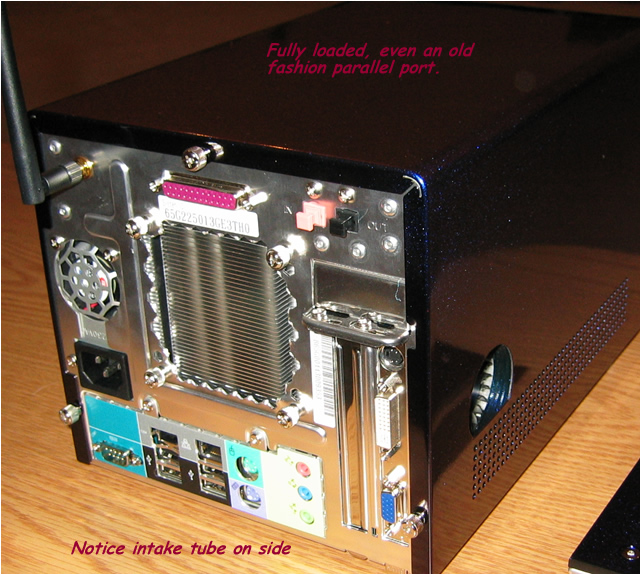
Integrated 802.11b wireless

mycomp2.jpg

Assembled...

sideshot2.jpg

temps were high on Videocard so I added an intake hole...

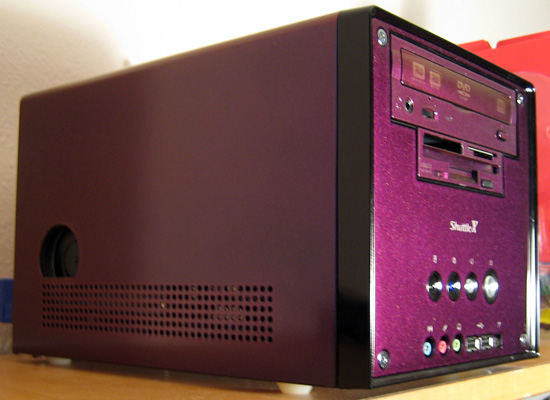
Then I decided it was boring, so I went out and bought some Mirage paint:
paint2.jpg
 
paint.jpg

I painted only the metal parts. Face plates, and outershell. I didnt paint the plastic guards that hold the faceplates on.

Secret here is not to use the 1st can of paint (black) of the 3 can process, so you can still read the text on the front panel. The case is already black so you dont have to use the 1st can of black primer.

Edit: added picture with new Lite-On 16x Dual layer DVD+RW

So here it is:
after.jpg

sideshot.jpg

backshot.jpg

And of course I cut away the back fan guard with some wire cutters... watch yo fingers! :)

Removing the rear fan guard is an ABSOLUTE MUST on Shuttle XPC's!!!
IT DROPPED MY CPU, CASE and VIDEOCARD TEMPS BY 5-10 C each.

My videocard is about 8'C cooler, CPU is about 5-6'C and case temps are 6-7'C cooler on average. HUGE IMPROVEMENT.
 
I'm trying to capture what it looks like normally. (cool bluish-purple)

Here's a picture with out the flash (before I added the 16x DVD+RW)
noflash.jpg

This is what (COLOR) IT REALLY LOOKS LIKE MOST OF THE TIME.

I'm going to try taking one more with the red look.
 
Great job!!! I used to be the proud owner of a SB75G2 and that's one of the better non-powdercoat paint jobs I've seen. :)
 
Ok got it:
redangle.jpg


The light has to be coming from an angle over 90' to show the red.

Light straight on (like a flash) shows blue.

Normal lighting which is reflected all over the place... looks kinda purple.
 
JessAlba452 said:
Oooh looks super nice! :D Shiny too! Great work!

I'm pretty hand with spray paint.

I think after the DVD drive comes in I might wetsand it with a super high grit paper to get a perfect finish. Then put a final coat of clear on.

It looks great considering I didnt sand it or anything yet. Just nice even layers of paint. It almost ran on me once.
 
Wow! That looks really nice. My only gripe is that exhaust fan hole. Some sleeving or something would clean that up nicely.
 
How much did all of the paint cost? I wouldn't mind doing that to mine. Gotta tape up the mirrored panel though. And then there is this...

logo.JPG


I've been painting that on by hand for a past few days. Still not finished and I still have to touch it up. Its brass model enamel paint. I figured I would spice it up a bit lol. Anyway, since my case is black already I don't need that first step as well I take it. I'm just worried...would that logo still show up as well or would it be covered up?

EDIT: And i noticed you painted the 5.25" drive cover. I wouldn't bother painting the new drive when you get it. Just steath it with that cover and I think it would be much nicer.
 
markt435 said:
How much did all of the paint cost? I wouldn't mind doing that to mine. Gotta tape up the mirrored panel though. And then there is this...

I've been painting that on by hand for a past few days. Still not finished and I still have to touch it up. Its brass model enamel paint. I figured I would spice it up a bit lol. Anyway, since my case is black already I don't need that first step as well I take it. I'm just worried...would that logo still show up as well or would it be covered up?

Nah, it wont cover it. Look at the fine silver text on the front of my XPC.
http://www.crowdcontrolusa.com/overclock/paint.jpg
You can read every little detail perfectly. So I know that big gold thing will be fine.

$20 at Walmart... it comes in a kit with all 3 cans of spray paint.
step 1 - black primer
step 2 - "color" coat (but it looks clear)
step 3 - clear coat

And I want to paint the drive... it will be just like the front of the computer... so you can read the text through it. (I'm not going to use the black primer)
 
Awesome. I think I'm gonna go pick that up. I might paint that G4 cube i have with this too. That way I can get some use out of that black primer lol
 
apHytHiaTe said:
Wow! That looks really nice. My only gripe is that exhaust fan hole. Some sleeving or something would clean that up nicely.

If the case had come bare, I would have dremelled it off before I installed everything.

But since mobo comes in it... and I was too anxious to get started. I didnt bother removing everything (taping stuff up, etc) so I could dremmel it off nicely.

I will be adding a DVD Weds so if I get the urge or have enough time, I might take everything apart, tape things up, etc.. and dremel those rough edges off.

I do plan on adding an 80mm wire fan guard later.
(sucks I have 3 - 92mm wire fan guards, anyone want to trade me an 80mm fan guard for a 92mm?)
 
You prolly coulda taken it out. I was able to take mine out before i did the dremel work. You'd be surprised how much you can strip down to the frame. Almost makes me wanna paint the frame.
 
no point.... unless you're going to do a window mod.... which I might add to the top.

If, I do that though, its going to be to show off a windowed CD-rom.

I'm going to practice on the old CD-rom thats in there now. To see how easy it is to window mod on a CD-rom.

If its easy, I might hack up that brand new 16x dual layer burner! then the top of the case with a round window, so you can see the DVD's spin.
 
Your paint looks awesome! How'd you keep dust and debris from settling anywhere? Did you paint this in a booth, or outside? I really like the little air intake in the side, looks purposeful. Does it make a lot of noise?
 
I painted it outside on my screen porch. It was a cool, dry day (no wind either)
I would recommend a garage, with no fan or air condition vent, etc.

There were maybe 2-3 tiny imperfections from dust. Keep a pair of tweezers handy you might be able to pull a piece of lint or hair off as soon as it lands. As I did pull one little curly piece of lint off.

I might take and wet sand it and put a final coat of clear on. Even though its nearly perfect with out ANY sanding so far.

I painted coat after coat.... while the prior coat was still sticky this makes them melt together and smooth out nicely. Being cool the paint didnt dry too fast so it settled perfectly. But not too cool where it would get cloudy or not dry.

The can recommends 8-10 inches away, but I was more like 6-8 inches away... but you have to keep the can moving in perfect passes to cover it evenly but not too much at a time. I think thats the biggest thing. Putting on nice smooth coats, too far or too little and it looks rough.... too much and you get puddles & runs..... just right = smooth as glass.
 
foofighter06 said:
:D

That would be a great combo with spray paint.

*huff huff* weee.... spray painting is fun. I feel...kinda dizzy :D Why don't i just cut another blow hole on top! BLOW HOLES EVERYWHERE! *faint*


I can just imagine the case mods that could come out of this :)
 
typhoon43 said:
Nice mod.
How much did your Vid Card temps drop?

Between the 2 mods... removal of fan grill and side intake probably 10C.

SWEET, I made front page. I just got my DVD-RW in from FedEx/Newegg. Check back tonight. I'll have the new drive in there & painted! :)
 
JasperW said:
*huff huff* weee.... spray painting is fun. I feel...kinda dizzy :D Why don't i just cut another blow hole on top! BLOW HOLES EVERYWHERE! *faint*


I can just imagine the case mods that could come out of this :)

:p

That shuttle does look pretty good though.

20 bucks isn't bad for the results.
 
Nice mod!! You gotta love a mirage Shuttle!

I painted my sn45g with the mirage Purple/green awhile back - its in the forums somewhere. I painted my mouse with red/blue and I have to say its the coolest color mirage paint. You did an awesome job without any wetsanding at all, it took me forever to get a smooth finish and I had to sand like mad.

I have a bfg 6800 gt and i as well put blowholes where the fans are and noticed a considerable drop in temps, somewhere around -10c. Thats Alot! I went the easy route though and cut a window into the side and then cut the blowholes out of the plexi - How in the world did you get that hole cut exactly where it needed to be without seeing where the card sat? That is the most amazing part to me :)

Great work!!
 
Gshady said:
How in the world did you get that hole cut exactly where it needed to be without seeing where the card sat? That is the most amazing part to me :)

Measure twice, cut once.

Basically, remove the side panel, measure it all out... Where the fan falls. Write it all down on a sheet of paper, diagram or whatever helps. Basically, note where the extremities fall of all edges of what you actually would want cut out. Use the back of the case and a flat, level desktop for the reference points for measurement.

Once you have those measurements, put the case (or) panel(s) back on the machine. Repeat the measurements working from your notes/diagram. This time, mark where all the extremities are on the case.

Cut.

That's how I'm doing it on my Biostar. There may be an easier way, dunno.
 
Gshady said:
Nice mod!! You gotta love a mirage Shuttle!

How in the world did you get that hole cut exactly where it needed to be without seeing where the card sat? That is the most amazing part to me :)

Great work!!

Thanks! I measured once, cut once... and it came out ALMOST perfect. Maybe 1/64th small on the front edge.

intake.jpg

I wanted something threaded, so I could screw on a filter if needed. I have the piece that screws in ready for a filter, but I dont want to restrict the airflow.

Now some semi-finished pics. I hurried on the DVD-rom. The problem was the DVD has an orange peel finish. So its going to take about one or 2 more coats to make it match the rest of the case. But I wanted to hurry up and put something up, since it was linked on the front page.

Red Angle
newred.jpg


Blue Angle
newblue.jpg
 
Wow, the DVD drive bezel looks great, especially around the switches and buttons. Did you re-apply the logos? If so, where'd you get the transfers? I'm not sure if this case would have allowed it (interior space being at a premium), but I would have loved to see you stealth that drive with it's original cover plate. Now all you need is a multi-card reader or mini display in the FDD slot. Great subtle mod.
 
There's room for the stealth mod, but I like to see the text on the DVD.

The front of the case, and the DVD drive were both black, so you can skip the 1st process of the 3 cans... (black primer - which would have covered the letters)
The 2nd step is the colored flakes... but they're actually like a clear prism flake of some sort. So when you spray it on and the final 3rd step (clear coat) you can still read all of the text that was on the face of the Shuttle and the DVD. You can still see the light on the DVD, everything.

newpurple.jpg
 
after.jpg
- last shot
.
.
.
.
.

The End..... .
.
.
.
.
.
.
.
for a while.. until I get bored with it. :)
 
So how did you paint the bezel without painting over the dvd logo and the other logos. Did you paint and then print out stickers and put them on?

JEEVES
 
JEEVES/whohasmyname? said:
So how did you paint the bezel without painting over the dvd logo and the other logos. Did you paint and then print out stickers and put them on?

JEEVES

He said (a couple of times, I think) that he didn't prime the case (because it was already black) and that the paint allows the original white lettering show right through.
 
JEEVES/whohasmyname? said:
So how did you paint the bezel without painting over the dvd logo and the other logos. Did you paint and then print out stickers and put them on?

JEEVES
Timmee said:
He said (a couple of times, I think) that he didn't prime the case (because it was already black) and that the paint allows the original white lettering show right through.

Yes, thank you.... I think I said it like 3 times... even in BOLD... "The secret..."

read the WORDS too, they actually have some good things in there... besides the pretty pictures!! :)
 
Wow....very nice....*impressed*....might have to try that paint sometime...wow.... :eek:
 
Excellent work, and I have a Shuttle question, too. What exactly do those four hex bolts on the front screw into? I'd like to put my Shuttle back together one of these days when my own mods are done, but the bolt threads have nothing to grab! Did I lose a piece prior to re-assembly? Everytime I look at the collection of parts I go a teenier bit insane, I think.
 
what was the stuff called you got at walmart, is it on their site perhaps? lol

I might go pick up some of this...looks good.

edit: I see it clearly now...dupli color mirage? :)
 
Wanamingo said:
Excellent work, and I have a Shuttle question, too. What exactly do those four hex bolts on the front screw into? I'd like to put my Shuttle back together one of these days when my own mods are done, but the bolt threads have nothing to grab! Did I lose a piece prior to re-assembly? Everytime I look at the collection of parts I go a teenier bit insane, I think.


They hold the faceplate on.

Novensu
 
Back
Top